Q: Do you guys have any tips for photographing your rooms? I’m actually listing my house for sale and thinking of snapping some photos (for memories and also to help with the flier) but I want them to look great. Any and all tricks, tips and suggestions are appreciated! – Leslie
A: We totally feel your pain. When we started our blog and were suddenly tasked with sharing photos we had no idea how to make rooms look their best (hence all the fugly pictures way back in our archives). But we did learn our fair share of simple tricks (mostly through trial and error) along the way- and we’re happy to share the goods. First of all, we’re definitely not professional photographers and we don’t have a fancy expensive camera. We snap every picture that you see on our blog (including all the “after” pictures on our House Tour page) with a Canon PowerShot SD1100-IS Digital Elph. It’s a small 8 megapixel camera that has great little features like a macro setting, an image stabilizer, and a manual setting (which we use 100% of the time so we can turn the flash off- pictures look so much better without it!).
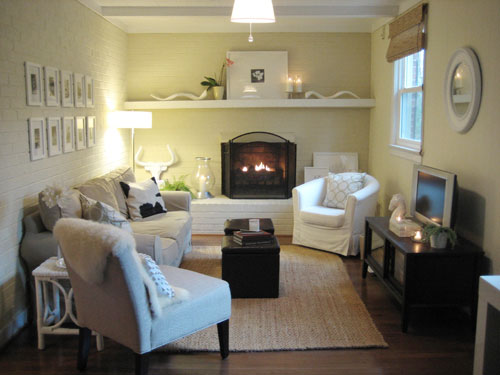
So that’s tip #1: turn on all the lights and take your photos during the day without the flash. Opening up the blinds to let in the light stream in and turning on all the lamps during the day will create a soft glowing ambiance instead of blowing things out in the foreground while leaving everything dark in the background (which often happens when you use the flash). Sunny days are great for room photos so aim for those but try not to take pictures when the sun is shining directly into the room onto the rug or the furniture and casting harsh shadows (you might want to wait a few hours for it to shift slightly).
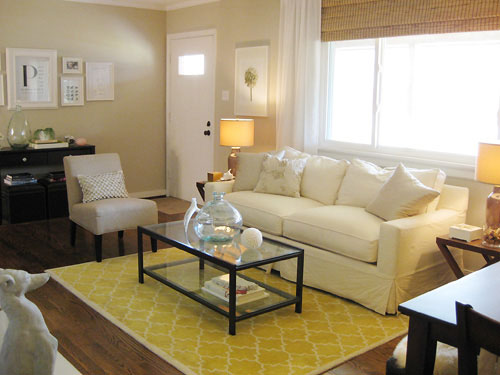
Now for tip #2: tweak the room first. Really look around the space and see what you can do to enhance the look of the room before picking up the camera and snapping away. Some seemingly obvious (but often forgotten) ideas would be lighting any and all candles, fluffing pillows, picking up dog or kid toys on the floor, and even making a fire in the fireplace (or lighting some large pillar candles in lieu of logs). Little flickering touches of light around the room are like jewelry- they’ll add a nice warm sparkle and a certain je ne sais quois that the same space wouldn’t have when they’re not lit. At the same token, small toys on the floor and flat mashed couch pillows take a little bit away from the polished image that you might be trying to capture. And it definitely saves you time to make these small changes before you take all of your photos and upload them only to notice a bunch of little things that you wish you had changed.
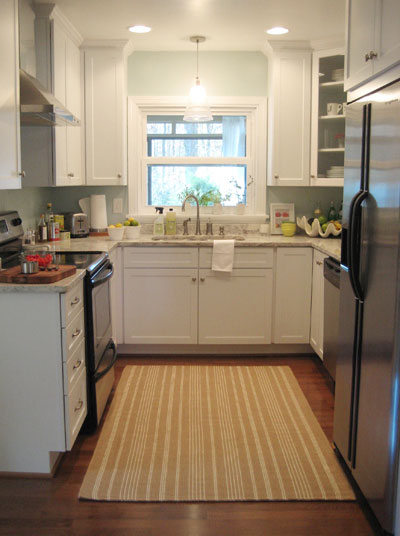
And now for tip #3: take a test shot. It just takes one picture to really “see” a room in a way that you can’t see it in person. By grabbing one shot in the beginning and looking at it critically, you might notice other details in a room that you’d like to change (instead of spotting them after snapping away for an hour). We’ve identified everything from wonky curtains (which were easily shifted on the rod to look more balanced) to the fact that we needed a shot of color in a bland corner (easily accomplished by switching out a throw pillow). This little test shot is a great “last look” before you really give your fingers a workout and snap your final room photos (and it really can make all the difference in your after pics). For example, after shooting a test shot of the kitchen below, we added the dishcloth draped over the sink and the cutting board with tomatoes on it for more interest (and to balance out the splash of red in the art to the right of the sink). Oh and on a side note, bowls of fresh fruit- we love real lemons and limes- make great (and cheap!) centerpieces in a dining room, eat-in kitchen, and even on a living room coffee table. Especially if you’re staging your house to sell.
This brings us to tip #4: work those angles. We take a lot of pictures just to get one that we love. And when I say a lot, I mean anywhere from 25-75 or more (especially when it comes to capturing “after” photos for a big reveal). Try standing on a chair to get an alternate angle or squatting down a bit to make the ceilings feel higher. Shooting from each corner of the room and the center of each wall will also help you evaluate which points of view look best. You can even put the camera on a tripod if your hands aren’t very steady (especially when you have the flash off, you’ll need to keep the camera still to get crisp delicious photos).
And now for tip #5: don’t forget to go tall instead of long. You’ll find a fair amount of vertical after photos on our House Tour page, which might seems strange since you can get a wider shot with more furniture by turning the camera and grabbing a horizontal pic. The key here is again to take a plethora of pictures, both horizontal and vertical. Sometimes the furniture layout just looks better (and the ceilings look higher) in the vertical photos. And sometimes the wide shots will win out for their overarching views. We’re consistently surprised how often we’re drawn to certain vertical shots though, so they’re definitely worth taking (they might just be your favs in the end).
Then there’s tip #6: think about zones and function. Sometimes your instinct will be to cram as much of the room into the shot as possible, but if you’re shooting a small office area that’s within a larger den, you might not want to capture half of the TV and the seating area when the focus should be on the desk. Try taking a few steps forward to spotlight that specific zone instead of capturing half of another area that could look disjointed and busy if it’s wedged into frame.
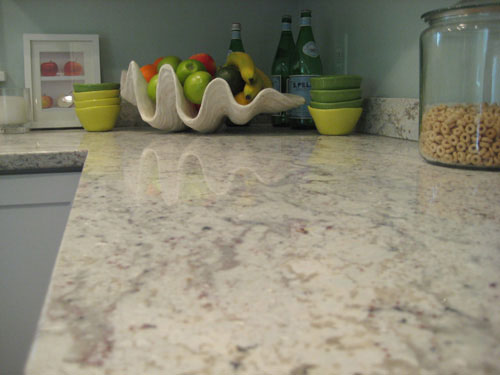
Oh and we can’t forget tip #7: it’s all in the details. We love using the “macro” setting on our camera if we’re doing a close up detail shot (like trying to capture the weave in our jute rug or the soft veining in our granite counters). This built-in camera setting makes things look extremely clear and crisp when they’re up close without any photographic skill required on your part (except for keeping the camera nice and still of course). While this might not be as applicable for snapping wide room pictures for listing your house, it’ll definitely come in handy if you’re taking any shots for memories (and have a particular detail or arrangement that you want to remember long after you move).
And now for tip #8: practice makes perfect. We’re still learning different angles and approaches to picture taking as we go. Don’t wait until you’re under pressure to snap a gorgeous picture (to sell your house or document your baby’s first birthday). Just pick up the camera and start clicking away so by the time something imperative pops up you’ll have more experience and more confidence with your cam. If you go back into our archives it’s obvious that we were terrrrrrrrible photographers when we started blogging back in 2007. But thankfully over the course of a few months we definitely started to hit our stride (heck, we’re still hoping to get better after more than two years of regularly clicking away).
So that’s our non-professional-learn-on-the-job approach to photography. Now we wanna hear what you guys do to get the shot. Any additional pointers for Leslie (and us). Do tell.
Psst- The link to our camera included above is an Amazon Affiliate link.

Yevette says
What great tips! Thanks for posting. Are you considering a new camera, especially for when the baby arrives? Not that you need one (with the great-looking pictures on the blog), but just wondering… Hopefully you’ll post “photo-taking” tips when the baby arrives, too.
YoungHouseLove says
Yup, we’re definitely dreaming of a great DSLR camera for when the beanette arrives! Can’t wait to check them out.
xo,
s
Jo says
I have a Canon PowerShot 10.0 pixel, and I love it so much!!! KC bought it for me Christmas 2008 and it looks new and takes pictures like a champ still! SO, I AGREE SHERRY! I pretty much do everything you explained! Thanks
Jessica @ How Sweet says
What awesome tips! Thanks so much for posting. Gosh knows I NEED these.
Claire says
Great question Leslie. We are also about to put our house up on the market and photographing each room is super important since so many buyers look online these days to get their first impression. Glad for all the helpful hints!
Meg Lyttle says
One more tip from me…who is a regular house seller. :) If you are using an agent, ask if they have a wide angle lens for their camera. If not, see if you can borrow one. It gives the illusion of space and really gives that WOW factor, especially if you are marketing your home online. (which is really the way to go)
Good luck! We are also listing our house today…we buy and fix up houses, so this one is finally done and ready to go!
Navya says
wow, great tips guys. You really made me think about my picture taking a little differently – You have to work with the enviornment your photographing (sunlight, day time etc), cant just expect a perfect picture whenever you want. I’ll be keeping this in mind for my own blog-pictures!
As far as my own tips…My proffesional photographer freind told me that if I *must* use flash – when taking a picture of something reflective you can put a small peice of paper over your flash on your camera and it will help diffuse the light and help reduce that awful shiny reflective spot on whatever your photographing!
Eric at My First Garage says
Great great tips! I’d also like to add one thing: Tell a story – Are you trying to simply document the room, or do you want to create a feel. In my day job (I’m a pro wedding photographer), I often find that it’s better to show just a part of something, and leave a little more to the imagination.
For example, take your office, you can stand in the doorway and snap the whole room, or try sitting on your chair, and shoot just your workspace. Then swivel around and grab the view out your window (incorporating the frame). You might need to zoom out, or even take a few steps back to get the view you love.
And remember, it IS digital, so snap away!
YoungHouseLove says
Thanks for adding those tips guys! Keep them coming!
xo,
s
Amy @ Renovation Innovation says
Great tips guys! The only thing I would add is not to be afraid of tweaking your photos after you’ve downloaded them to your computer. You dont have to have expensive programs, such as Photoshop, to do it – there are a bunch of free online tools that are great way to snazzy up photos; Google Picasa and Fotoflexer are ones I’ve used in the past.
Jen @ Life By An Inch says
Wow, awesome post! I spent hours the other day researching this very question. I had no idea how tough it was to photograph a house until I tried it myself… it definitely takes some smart preparation and lots of practice. Can’t wait to try out the “go long” tip and see what that does for our place. Thanks!
Amanda says
Thank you so much for this! It’s so good to hear that you don’t even have a fancy camera and your pictures look great. I have a “point-n-shoot” and most of my photos lack pizazz (could also have something to do with the subject matter- heh heh). I think I could do a lot more with my simple camera and these tips are great.
As a side note, there’s nothing like snapping a photo to remind you of those annoying unfinished details that you’ve been living with and become immune to!
Tracie@Gurtler+Home says
Wow! These tips are great! I’m like you said a beginner blogger and I am still trying to figure out how to let the camera show how great the projects come out. I’m always looking for tips so thanks.
Stancie @ Fig+Sage says
Love this post! Great tips! I just picked up BH&G’s 100 Decorating Ideas for Big Style For Small Rooms and was happy to spot your living room on page 19 :) Congrats!
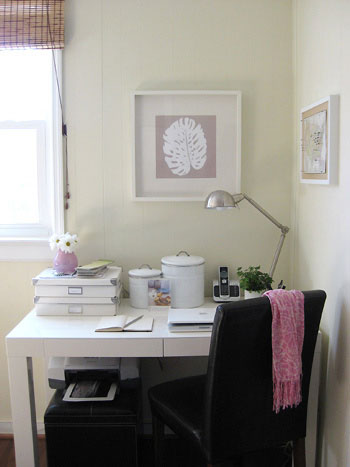
I have a random question, but have to ask…do you remember where you bought the brushed silver/nickel lamp that’s on your desk (in the picture in this post)? I’ve been seeing the same one on many different blogs and in magazines, but haven’t been able to find it online or in a store. I’m preparing to makeover my home office soon and would like to buy one for my “new” space. Thanks for any input!
Keep up the great work – love your blog and your home :)
xo,
S
p.s. I’m using your “Gentle Tide” paint for my office, with lots of white accessories, shelves, etc. – thanks for the inspiration!
YoungHouseLove says
Hey Stancie,
We got that lamp from Linens N Things for around $15. Such a steal! Sadly they’re no longer in business but maybe you can try eBay or a local lighting outlet (check your phone book to hunt one down). Hope it helps!
xo,
s
Keeley says
I love your tips. I use an Elph, too and I love that it was affordable and takes great pics. A DSLR just isn’t in my budget, so I appreciate that you guys gave real tips for people who don’t have the resources to purchase a professional camera. (Especially in these “tough economic times”… you two are really realistic about money and resources.)
I like editing my photos with Picnik (www.picnik.com). It’s web-based (so no downloading necessary), there’s a free version and it has almost no learning curve.
KOS! (Keep On S'myelin!) says
Thanks for the photo tips! I was hoping you would make a post about this :)
HHenderson says
Another great tip I learned from a realtor (for those w/ photoshop or other editing program) – take a photo with all of the lights on. Then take one without which lets you capture the view outside the window. Then superimpose the window from the photo w/ no lights onto the photo w/ all the lights. Then you’ve got a well lit room with the view of outside. This is how you see it naturally with the naked eye and makes the room look spectacular (which it is, right?)
Meredith says
Thanks for the tips!!! I am still learning how to take pictures myself!!
Handy Man, Crafty Woman says
Great tips. I’ve been figuring some of this out through trial and error on our blog; I figured out the flash thing right away. Room photos just look better with no flash. I’m sure some of my early photos look amateur-ish (well probably some still do, as I’m fairly new at this!) but I’m getting better. I love looking at photos of people’s homes/rooms. I’ve even been known to look through real estate listings, just too look at interior photos. It’s like a sickness! :-D
Jenny @ DIY Newlyweds says
I recently got a tripod and it has really helped me take better photos. It keeps the camera straight and steady, which is really important especially when photographing in low-light situations.
Do you guys touch up your photos using Photoshop? I use Picasa which is free and great, but I’d love to learn how to use the many features of Photoshop.
YoungHouseLove says
Hey Jenny,
We do use Photoshop from time to time, just to crop things or lighten the room by dragging the levels up a bit if it’s looking dark. We definitely don’t do any major superimposing or anything, just because we like to keep it real.
xo,
s
Lisa in Seattle says
As a fairly recent home-buyer who looked at a zillion pics of prospective homes, here were some real turn-offs: Obvious wide-angle lens shots (you’re not fooling anybody that your modest rambler has square footage like the Hearst Mansion), overly Photoshopped pics (I shouldn’t be able to read by the green glow given off by your “enhanced” lawn), and rooms filled with your personal belongings (clothes and toys all over the place – I feel like I wouldn’t be able to shift you and your stuff out of there with dynamite). You do not want to end up on http://www.lovelylisting.com. Turn-ons: Pretty much everything the Youngsters have said here: Tidy rooms with lots of light and a few attractive, contemporary accents. Good luck with your house sale!
Carly says
I recently got an SLR, maybe when you get one you can teach me about it! I got a Cannon Rebel XSi. It’s middle of the line but I have a Cannon Powershot so a lot of the symbols and actions are the same which is helpful.
On another note. I have white cabinets and they get so dirty. What do you clean your cabinets on the outside with? What would be a good “heavy” cleaner to do occassionally?
YoungHouseLove says
I just use a wet rag or sponge most of the time and every once in a while I give them a once over with some watered down Mrs Meyer’s soap on a rag. It really cuts the grease and does the trick. We’re not into heavy cleaners in general since I just tidy things up as I go and try to use the non-toxic stuff whenever I can, but thankfully our cabinets look nice and white two years after installation so it seems to really work! Hope it helps.
xo,
s
Barbara says
It’s darned near impossible to take pictures of my house. It’s only 910 square feet and most pictures have to be taken from the doorway…it’s frustrating. I’ve been redecorating my bathroom, and I can’t get any decent shots of it. Trust me, I’ve stood on the toilet!! Thanks Tiny House!!
I really miss your blog on the weekends!!
___
Barbara
http://ifididnthaveasenseofhumor.blogspot.com
Jenn says
I was so surprised to hear that you are using a point and shoot camera. It has inspired me to learn a bit more about mine:) Your photos are always great.
Stancie @ Fig+Sage says
Thanks Sherry! I’ll check it out :)
Heather says
We have the same camera! I’ve had it for years, and I’ve only just begun to play with the features (isn’t that terrible!) I think it was the fattie user manual that terrified me. I can’t wait to play around with it when I get home now :)
Carole says
I took the photos when we listed our house last March, because the pictures from our realtor’s listings were awful! Part of the reason was that his pics were all crooked.
On my pictures, I use my photo editing software (iPhoto) to “straighten” the pictures. Sometimes, I didn’t have the camera perfectly level, but I was able to rotate the pictures so that everything was perfectly horizontal. We took the pictures on a really sunny day with no flash, and they turned out great. We had two offers in 10 days!
Good luck, Leslie!
for a chuckle, check out some awful pictures from real estate listings:
http://lovelylisting.com/
amylouwho says
I think you guys must live near my friends down in Richmond – your floorplan is VERY similar. And your house is really beautiful!
Martha says
YHL is right about shooting when there’s plenty (but not too much) natural light coming in the windows. Living in an apartment with a northern exposure, I would add that it takes practice to learn when this magic time occurs during the day. Try shooting from the same angle at different hours and comparing how the images look on the computer screen after the fact; keep in mind this time may change by the season. You’ll be surprised what a difference waiting for just the right moment can make.
Sara says
a photo related question- how do you store your photos- both digital and older printed olds?
and do you have any favorite/suggestions for attractive albums and storage boxes? I cringe at the floral patterned ones I see in some stores.
Thanks!
YoungHouseLove says
We print our favorite photos out (at places like Target or CVS) and store them in simple brown or black faux leather albums from Target. As for the rest of our digital ones, we just have folders on our computer (sorted by month) for easy access and we pare them down at the end of each year so we keep only the best ones around. Hope it helps!
xo,
s
Dana @ House*Tweaking says
I really enjoyed this post! All the photo-taking tips are helpful for selling a house. We sold our first home by-owner. I would recommend Leslie store all things (in an attic, basement, garage, storage unit, etc) not necessary for daily living. We did this when selling our first home and held open houses every Sat/Sun…it sold in 4 weeks! And most of the stuff we had stored away during that time ended up getting donated because we realized we could live without it. Plus, that meant less items to move to our new home and a clean slate! Moving time is a great time to purge.
JLP says
SHERRY!
i am soo sorry this has nothing to do with the post – but rather a personal question:
do you feel better?? i am in my first trimester, and feel sick ALL day long. i was just wondering when and if your sickness went away.
your pictures look great. thanks for the tips! i am still learning how to take good pictures of our house.
YoungHouseLove says
Hey JLP,
So sorry to hear that you’re feeling so sick! I was lucky enough to have only about an hour or two of morning sickness each am and then it passed (so I felt much better the rest of the day) but that actually lasted until I hit the 16 week mark, so I was definitely ready to feel better by then! Now I feel amazing (I always joke that I wouldn’t even know I was pregnant if it weren’t for my giant belly and the cute little kicks I get). So there’s certainly a light at the end of the tunnel. Hang in there! One thing that I found worked well for me when I was feeling nauseous was some wheat toast with cream cheese. Something about the dry bread and the creamy topping soothed my tummy. Oh and definitely avoid acidic things like bananas, apples, orange juice etc (at least for me, they made everything worse). Hope it helps!
xo,
s
Gord says
Another tip: Sometimes it’s much more attractive to use the rule of 1/3’s. Rather than center the feature in the middle of the photo – put it off to the side – divide the photo into 1/3’s in your head and have the feature cover 1/3 or 2/3’s of the photo. It makes for a photo with interest rather than a simple photo. Try it – it really does look professional and interesting.
Krys72599 says
Tip #1:
Tip #8 comes after Tip #7.
(Hint: check your blog!)
LOVE all your posts – thanks for the photo tips!
Amanda in Boston says
Thanks for the great tips, we’re putting our condo on the market this week!
I am sure you know of the sites like clarkcolor or snap fish, but I have saved a bundle on printing photos by using them. I use clarkcolor all the time and prints are as low as 6 cents each. They come in a few days and are great quality. Just a thought on ways to save a few pennies here and there.
Mark Samu says
Hi guys. Nice post. I am an architectural photographer for 20+ years shooting houses all over the country. The best and first advice I give any who asks (and there are plenty) what will help I tell them to get a tripod. It helps keep things straight and you don’t have to worry about poor lighting quite so much I never leave home without it! I’m looking forward to perusing your blog. My wife and I just finished the renovation of a 206 year old farmhouse on the Hudson River.
http://www.marksamu.com/River_BA/
Mark Samu
YoungHouseLove says
Thanks again for all the tips everyone! And Mark, that link to your house reno is amazing! Thanks so much for sharing it.
xo,
s
Samantha @ i heart mini. says
I happen to use a DSLR camera, but I used a P&S for years before. I loved my old Exilim camera because it had different settings for every lighting sitatuion possible, beach, sun behind you, mountains, sports, even fireworks! A lot of my photos I took of scenery turned out great with my P&S. Just keep the flash OFF at all times!
On my Canon Rebel XTi I use now, I have an external flash with a diffuser anytime I am in a space that’s really really low lighting, point it straight up to the ceiling and snap away. It bounces the light off the ceiling, and acts as a ceiling light that shines the perfect glow on your subject.
Someone mentioned they have a 900 sf house and have to stand in the doorways to take pictures, I do that too! A lot of times I’ll stand in the doorway, take a wide shot in the highest MP possible, then throw it in photoshop and crop it around whatever I want to focus on. Since I’m under 5 foot, I find that my height is perfect for shooting full room shots. It’s not too high that you’re looking down on everything, and not too low that you’re looking straight on furniture as if you’re a child. I have an example on my latest post on my blog.
I highly HIGHLY recommend going DSLR. I’m not rich, I just saved my money for several months in order to get one (instead of only saving for one month and getting a $150 camera). I also bought it refurbished in excellent condition, so that knocked about $250-300 off the price. I do use photoshop on the majority of my photos, but it’s only to match the photos to the true color of the room. Sometimes my photos turn out orangey without flash. I also kick up the lightness in my pictures by changing the manual settings to letting in ample light, almost too much light, then I “auto levels” it in PS and bam, instant professional photo! It defines the edges and darkens it back up.
Jill says
Thank you so much for that! I do have a very nice SLR so I have no excuses except that I don’t have a large amount of light in most rooms. Great tips.
Liz says
Yes, thank you for this post! I moved into my apartment a little over 9 months ago and wanted to take some pictures for my friends and relatives back home. We didn’t paint so all the walls are still an off-white. Doesn’t look bad in person but in the pictures everything looked stark and bare! I will definitely try again using these tips! Thanks,
Liz
Sara says
Thanks for the tips! I want to take more pictures, but am often frustrated by my lack of photographical skill. Since I’m not interested in learning all the functions of an expensive camera (nor can I afford one), it’s good to have tips on how to make simple cameras take good pictures!
Ashley M. [at] (never home)maker says
Your pics are great even without a DSLR. And good tips. I think the most important one is the lighting (which is likely why you guys put it first). Lighting is everything. Flash is awful.
And if you’re looking for ideas about DSLRs, I highly recommend the Nikon D40 or D60. Not super expensive, but gets the job done . . . gorgeous shots!
<3
Stephanie says
Well I love all the advise but I do have a bit of my own…not as a photographer but as someone who has spent hours looking at homes online:
Please remember to take pictures that show a clear layout of the room. Sometimes there will be a beautiful picture of a well made bed in a bedroom but we have no clue how the room is laid out. Obviously somethings you can’t fully appreciate until you are in the home, but if you’re shopping from afar, it helps to get a real feel of the layout of a home. And I second the wide angle photos turn off– I just wanna see what the house looks like for real people!
Maggie says
Great tips! I also took photos to help sell our house, and I would add: 1. De-clutter like crazy. I took 1 shot and then realized there was a pile of clutter on a shelf, retook it, and it made a huge difference. 2. Make sure there are no pets in the pics! 3. Watch out how you hold the camera so that there isn’t too much of the ceiling showing. I had to re-take a few shots to reduce the amount of ceiling that showed. Sometimes this meant crouching down a bit to get the right scale of the room. 4. Sometimes I would stand on a chair in the extreme corner of the room and hold the camera over my head to get the best over-all shot.
Jenn says
Great post! One of my goals this year is to learn how to take better pics. Thanks for all the tips! I can’t wait to start trying them out. Now, if only the sun would appear to help ;)
Amy says
great advice! i do have a random question, not so much a/b taking pictures. what type of countertops do you have in the kitchen (color/stone)? i noticed a close-up of the counters in one of the kitchen pictures and really liked the look. we are looking to paint our cabinets and change the countertop. thanks!
YoungHouseLove says
Hey Amy,
They’re called Pashmina granite and we got them through the Home Depot. We’ve heard that they have since been discontinued through HD but any local stone yard should have them (just not by that name). So you can visit one and just describe them as white and gray granite that looks like marble and has obvious gray veins and flecks of garnet. They should know what you’re talking about and show you our exact stone. Hope it helps!
xo,
s
MicheleLouise says
One tip I haven’t seen yet, think about your audience when you are taking the picture. If you are taking the picture to put on your decorating blog your image will focus on the furniture, decor, wall color, window coverings etc, and a little bit on the architecture of the house. If however you are taking pictures to help sell your house, focus less on the furniture or decor (since that will be going with you) and more on the space, architectural features (french doors, arched doorways, windows, fireplaces, hardwood floors etc).
Amanda says
Regarding the Linens and Things comment. Even though they are (sadly) closed they do have an online store: http://www.lnt.com/. I’m not sure where they ship to or what products they have but it’s still worth a shot to take a look for those Linens and Things lovers.
YoungHouseLove says
Wow! We NEVER knew that. Thanks so much for the tip!
xo,
s
Gillian says
Great post!
Magchunk says
These are great tips. This is definitely something I struggle with too, so Leslie, you are not alone! I think getting a little tripod set-up would be helpful for me. A chair works sometimes but not when I want to be up a little higher.
Heather says
what a great post! thanks for sharing this. :)
jennfier says
EXCELLENT advice. I’ve recently begun taking ALL my pictures without a flash. I either place it on the “kids and pets” or “athletics” function for a faster shutter speed, or I adjust the tuning later with Picasa (or photoshop, depending on how much work I want to put into it).
Thanks for mentioning portrait instead of landscape. I never knew that, and I appreciate the advice!
Keep up the tremednously good work!
icj,
~j
Lauren says
This is random, but where did you get that giant shell in your kitchen? (I believe you have fruit in it) I have been looking for one! Thanks!
YoungHouseLove says
Hey Lauren,
It’s actually from http://www.zgallerie.com and we believe they still sell it. Just search “clam shell” (happily, it’s faux). Hope it helps!
xo,
s