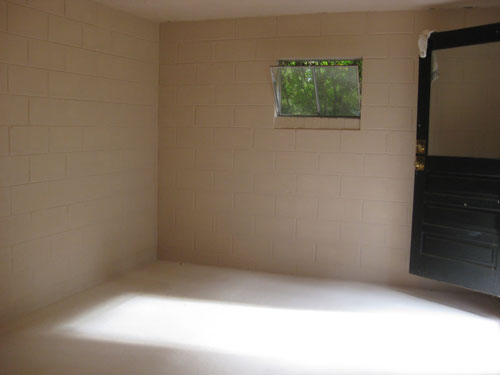
Ok, we’re back on speaking terms with the basement. After it gave us quite a hard time when we began our Dryloking-interrupted-by-oh-no-is-that-mildew adventure (read all about that right here), we’re feeling victorious after conquering the first step towards turning our cinder block insect shelter into clean and functional storage space.
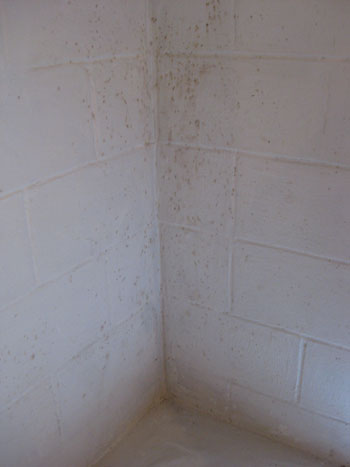
If you recall, we had already faced the grueling disappointment of mildew spots making their way through our first coat of white latex-based Drylok (which is like painting with Elmer’s glue, btw)…
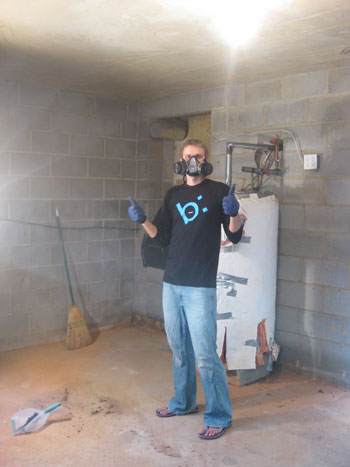
So with our second round of bleach-treatment having tamed the mildew a bit more, we crossed our fingers as we broke out the powerhouse oil-based Drylok (as recommended by the experts at True Value for being even more protective and durable).Talk about stinky. Sheesh. Thank goodness for our professional grade gas masks (we’ve read about people passing out without them when it comes to the oil-based formula). When it came to the consistency, it was like we had traded Elmer’s glue for natural peanut butter (you know, the kind that you have to stir to mix the oil in?). But we furiously trudged ahead as quickly as possible while October graced us with a convenient little “heat wave” last week (Drylok has to be applied at 50+ degrees so last week’s highs in the 70’s were a blessing to our otherwise unheated basement).
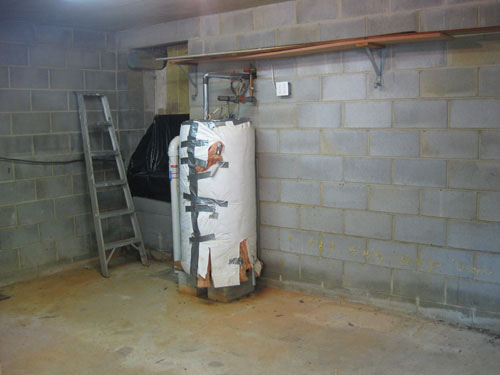
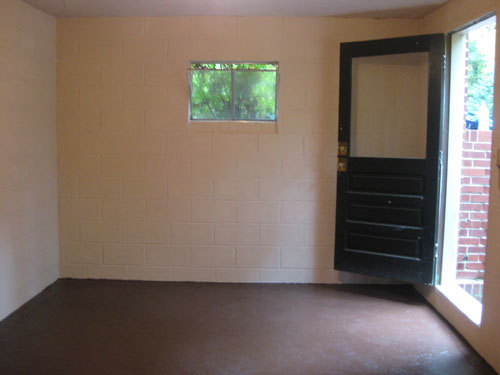
After two 5-hour days and eight additional gallons of Drylok (yes, eight!) we finally finished slathering a second coat on the walls and floor plus two complete coats on the ceiling. And with that we officially sealed our beige box of a basement (yup, that’s 13 gallons all together, totaling 325 beans- thank goodness for our True Value gift card!). And a few hundred bucks is still a small price to pay for a weatherproofed basement that can now serve as usable storage forevermore (in fact after the first coat we had about a week of rain and nary a drop of moisture seeped through, so the second coat convinced us even further that our basement was completely waterproofed for the long haul). And despite the premixed tan Drylok color being a little fleshy for our tastes (they offer it in white, tan, gray and blue- we went with tan to make it feel a bit less stark down there), it actually looks pretty good- especially compared to the raw cinder block “before.”
But the best part by far is no mildew (!!!) – even now, a week and at least two rainstorms later. Zero. Zilch. Nada. I guess the guys at True Value were right… that oil-based stuff is way better than the latex version.*
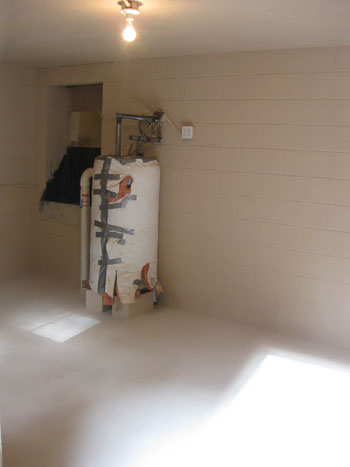
So with our Drylok finally packed away, this weekend we took care of the last bit of painting prep: the floor. See, we opted to use tan Drylok everywhere instead of painting with tan latex paint over white Drylok because painted Drylok can’t be re-Dryloked, which is recommended every 15+ years or so. But we wanted to bring some color to the floors to break up the big beige box of a basement (all of our moisture problems stemmed from the porous cinder block walls, not the concrete floor, so we’re confident in painting over it without worry that we’ll need to re-Drylok the floor in a decade or two).
And in the spirit of being cheap using what we have, we broke out some leftover chocolate brown porch and floor paint from our sunroom floor-painting project (Valspar’s Oil-Based Porch & Floor Paint in “Brownstone” in case you’re wondering), slapped on one thick coat, and called it a day. We love that the dark color will hide dirt and outdoor footprints (since it’s a separate entry basement that’s always a plus because we’ll always be trudging in from outside) and we also appreciate that the rich tone works with the rest of our home’s mocha flooring to make it feel like a part of our casa, even if it is a bit disconnected.

But of course this is all still just the beginning of the big basement overhaul. Once that floor paint has a few days to dry, we’ll be back in there planning how to minimize eyesores like the big water heater in the middle of the room, brainstorming some storage solutions, tidying up a few more areas – including the access to our crawl space – and hopefully finishing this basement makeover before the whole lack-of-heating-down-there thing really makes this project uncomfortable.
Oh and while we’re on the subject, tell us what you guys use your basements for. Are they storage only? Completely abandoned? Livable square footage with extra bedrooms and bathrooms? Man caves? Rooms where monsters live like in Home Alone? Spill it.
*I also mentioned our basement project to my very-expert-in-construction friend last weekend (at his wedding – I know, great “you just got married, but let’s talk about Drylok” conversation skills on my part). First question he asked was “you used oil-based, right?” I quickly responded “of course,” too embarrassed to admit our first coat mistake. Lesson learned.

Katy Campbell @ A Starter House says
We don’t actually have a basement, but we do have a walk-in crawl space. We’ve been thinking about “finishing” it off sometime in the near future – at least sealing off the floor so it is more than just exposed dirt, and maybe adding some storage space so that we don’t have to come up with creative ways of storing things like our wet vac, air compressor and other large items (right now our guest closet is home repair central… nice thing for our guests to see when they open the closet to hang something up!) I also like the idea of sealing it off because, well, I hate little critters like the spiders that are so rampant in South Carolina and I would love to have an area that I could keep on top of webs and stuff a little easier. Anyways, love what you are doing with your basement, it is looking fantastic!
Katie says
What a difference! It looks great already, especially with the beautiful floor color.
We don’t have a proper basement, but the ground-level floor of our house is the garage. There’s a storage area at the back (I don’t know the exact dimensions, but I’m guessing 8 feet wide by however long a 2-car garage is). We moved in six weeks ago, so currently it’s just filled with Christmas decorations and bikes, etc., but we have plans to finish it out and maybe turn it into a very skinny exercise room with some weights, an elliptical, and a TV.
Christa says
it looks freaking awesome!!!! way better than i anticipated. i hope you both are happy with it.
Jenny @ Words On Wendhurst says
Looks really good and the color scheme is very YHL. :-) Hope you guys don’t run into any other problems as you progress with your basement project!
Kasey at Thrfity Little Blog says
A basement? I wish! I would love a few hundred extra square feet added on to my house. We don’t have those where I live (Texas).
maddie says
that is by far one of the most amazing transformations I’ve seen yet on your blog! way to go!
CarMaj says
It looks amazing already! I am a bit jealous becasue I wish we had a basement… we have a crawl-space and it seems to work ok for now with storage… You are doing a great job!!
Sandra says
Our basement is essentially our den. We’ve got our computers down here, the TV, couches, and exercise equipment in the “main room.” Guests are hardly down here, so I don’t feel as pressured to keep it in pristine condition and instead we get to focus on comfort. No knick-knacks to dust or impress guests with!
We have room for a bathroom down here, which we hope to build soon. Our laundry room and workshop are also down here, behind doors.
I think I’d like to have a finished basement in all my future homes.
cyber terrapin says
I am with Sandra. As long as the basement is reasonably dry (minimal water encroachment with a dehumidifier), it is the perfect place to do day to day living. This includes office, hobby, man cave, and dressing room. All of that living that can get messy and it is inconvenient to abandon what you are doing and tidy up because the world calls. The drawback is that it can be difficult to heat in the winter, but cooling is not necessary unless you get a long heat wave.
Many people have entered my basement and said, “You really should finish this!” Well, IT IS A BASEMENT! When I am down there, I am so focused on what I am doing I don’t notice the cinderblock and floor joists. Plus, leaving it unfinished allows you to keep an eye on the plumbing and services while allowing you to spread out as you need to, like tax time and season changes.
Rebekah says
How’d you take last photo if your floor still needs a few days to dry? :)
It’s looking better already!
YoungHouseLove says
Rebekah- You caught us. John actually wrote the post a few days ago and yesterday I snuck in and took pics since the floor was finally fully dry. It feels like a totally different room already!
LauraC- Yup that weird little wooden trap door in the wall next to that terrible water heater is the entrance to our crawl space which runs under the rest of the house. It’s a pretty big design challenge (especially with that old taped up water heater) but we’ve got a few ideas that just might work. Stay tuned…
xo,
s
Liz says
I can’t believe how much better it looks with that Drylok and paint on the floors! What a difference it made.
Can’t wait to see what you do with the water heater.
Carmen says
Our basement was finished by the previous owners in a very rustic style. Pine plank ceilings and doors with wrought iron hinges and latches. I personally think it’s what sold my husband on the house. He has his “lovely room of death” (Ace Ventura)full of stuffed and mounted wild life down there along with our home theater system and playroom. My only gripe is that there was no bathroom put down there. So we have the toilet stump thingy (that’s the technical term) sticking up out of the floor between our computer desk and filing cabinet. Putting a bathroom down there now would require a lot of tearing up and expense and we don’t plan to be there more than another five years anyway, so we just trudge back upstairs whenever nature calls.
Ellen says
Looks great! I really like the addition of the chocolate brown – makes it look like living space.
Our basement is 2/3 finished, with a 3-piece bathroom, open living area, and a nook (finished with closet) that just needs to be closed off to make a fourth bedroom.
The unfinished-ish 1/3 houses a very functional and not too unattractive laundry room, as well as a storage/workout room.
We love the functionality of the basement and are slowly making adjustments to up its use and attractiveness. Basements are wonderful things!
Joelle says
Wow! Such a dramatic change already! Can’t wait to see the rest :)
Emily H says
We don’t have a basement – hence the need for creative, OPEN storage ideas (we don’t even have an extra closet – just two tiny bedroom closets). We are thinking of turning our detached garage into some kind of organized storage area instead of having it hold our cars. We’ll see. I am excited to see what you come up with for your basement – maybe we can “borrow” a couple of your ideas! :)
Oh, and our dogs would definitely want to be friends with Burger – especially Rufus – I think they might be related…we should introduce them if you’re ever in the K.C. area…..maybe they are third cousins or something! :)
LauraC says
WOW!! Looks fantastic now, esp with the mocha floors! The duck tape covered water heater made me smile though. With the rest of the room so nice it does stand out a bit more than it did. :=) Is that your crawl space beside it?
As far as basements go though, ours is a mix of unfinished workshop, storage, laundry and mostly-finished family room. There is one door that opens up to the outside, and the last two weeks we’ve battled a flooded porch area which lets water flow under the door and on into the basement. Not fun. We think we’ve jerry-rigged a temporary solution (painted plywood “roof” over the porch + steps), but we might have a big project for this next summer if drainage really is the problem. But I still love our house!
Lindsay says
Loving the paint! Glad the Dryloc finally worked for you!
We have a basement that’s 1/2 garage (and my husbands workshop) and 1/2 finished staircase and large room. We had basement leaking in the finished room due to the Georgia floods. We have a family friend who does basement waterproofing and gave us a discount. We didn’t trust anything else since we were going to be re-finishing the space so we opted for the more expensive, non-DIY option. Next we are having to replace flooring and drywall… at least we wanted to replace the ulgy blue carpet that was there before :-)
Aliya says
Nice work! This is definitely the next big project on the to-do list for our house, but since our first baby’s slated to arrive in December I’m guessing our basement overhaul will have to wait until the spring.
Our basement is split roughly in half by the stairwell. One side is non-perishable/misc. storage (under the steps), plus a not-so-gorgeous laundry area w/utility sink. The other side is bright, well-lit and painted white — all it needs is a remnant carpet and it’d make a great den/office/playroom. We also have two “bonus” storage rooms in back w/doors.
Question: what’s the strategy for keeping your basement bug-free? We have an older (1940’s) home and that seems to be our biggest fight. We did have a bit of water in there two summers ago but have remedied some issues with our gutters and that’s done the trick since. But I CANNOT get beyond the bugs. Thoughts?
YoungHouseLove says
Aliya- Sealing things up has really helped so far. You know, caulking any small holes where critters could come in through the crawl space, around the windows, etc. Also eliminating the moisture issues and bringing in a dehumidifyer or taking some other precautions will help make it less attractive to bugs. Hope it helps!
Amyks- We don’t think you can use Drylok in wood since it’s meant to seal off porous stone like cement and cinder block. They do have various waterproofing products for wood though (many of which are a heckova lot easier to apply) so just hit up your local home improvement store and see what they recommend. Good luck!
xo,
s
micah says
It looks SO good! Can’t wait to see what else you do.
We are in our basement a lot – there’s where our only TV lives.
Lauren says
One of the reasons we bought our townhouse in June of 2008, was because of the finished basement. Berber carpet throughout, a 4th bedroom/office with a full cedar lined closet (one of my favorite, but rarely used perks), functioning (but needs to be updated) half bathroom, family room with wet bar and wood burning fireplace, and a finished storage closet under the stairs. But there are a few unfinished parts. The “half bath” down there is technically designed to be a full, but the owners never installed a bath or shower for the all ready to go plumbing. And the laundry room is still unfinished – although, how greedy can I get? The space is really just for that – laundry, water heater, furnace, and extra storage shelves for paint and my own (and my boyfriend’s) continuous power tool collection (I work for a well known power tool company…). Maybe one day we’ll finish the walls off and incorporate built in shelving.
Erika says
Wow – looks so much better already! It’s amazing how just a good, thorough cleaning and a different color can make a huge difference.
amyks says
Your basement looks fabulous so far! can’t wait to see the end results…btw can you use drylok on wood, as in a wood garage door?
Jen Z. says
Great job! Love the colors. Can’t wait to see how you will hide the water heater. We are going to hide our furnace and water heater in our laundry room by using vented bi-fold doors. We hope it works out well when we start the project. ;-)
We don’t have a basement. :( We have a Hi-Ranch. Lots of luck with your basement. Can’t wait to see the end result.
Jessie (Vegan-minded) says
It already looks amazing! I can’t wait to see what else you guys come up with down there :)
Sara @ Queen of the House says
It looks AMAZING!!! What a HUGE difference!
Are you sure you just want to use that space for storage??! It looks too good for storage!
Sarah says
It looks so cozy!! I can’t wait to see what you do with the rest of it!!
susan says
Sadly, I have no basement :O( Such is apartment life. Maybe someday :O)
You guys did such an awesome job!!! It looks fantastic! Not that I expected anything less.
Randifity says
We are currently in the process of finishing our 1600sq.ft basement now. We’ve just completed the electrical and framing and about to get a contractor started on hanging drywall.
We’ll use the main space as a den and there’s a gym, bedroom/study, and full bath. We’re contemplating turning the area into an apartment for DH’s mother. If we do, we’ll add a kitchenette onto the den.
Our biggest issues we’re working through right now is flooring. We want to go inexpensive as we’ll have to spend money on rugs no matter what flooring we get (we’re refusing to install carpet in a basement). I’m not sure about just painting the floor.
I’ll send before and after pictures if you’re interested. We hope to have this all done before the end of the year.
Della @ Della Grace's Life says
It looks very nice…of course, I’m partial to basements. I live in one. :)
Lauren says
Wow! A huge improvement already!
We have a half crawl space, half basement. We considered digging out the crawl space to gain more square footage, but underpinning a foundation was not necessarily a skill set that we wanted to have!
Instead, we opted to pour a concrete slab over the dirt and use the space for storage. We also added interlocking foam mats over the concrete so we don’t bang up our hands and knees while we’re down there. Even though it’s a “short basement” there’s tons of space for storage and we were also able to put our new furnace and most of the duct work in there, saving precious space on the full basement side (which will eventually become finished space).
Here’s a link to our basement saga (which is still very much a work in progress – we too need to seal our perimeter foundation walls): http://www.chezerbey.com/basement
Shannon says
Wow! It looks 100% better already! I can’t wait to see what you have planned!
Our basement is finished. It was a faux wood panel nightmare when we moved in. We painted the wood paneling a light tan which really brightened things up! We’re building a wine cellar in one corner and will be replacing the carpet in a few weeks. We also had a spider problem. We cleaned away the spiderwebs and got a dehumidifier which really seemed to help.
Lauryn Galloway says
looks great already! I cant wait to see the rest!
Kristi W. says
What a great improvement! Nice work. What do you plan on using your basement for? (Or haven’t you decided yet?) Our basement right now is just a laundry room and a little storage. When we finish remodeling it (and who knows when that will happen), we’ll have a living room area, a tool bench and storage area, and a new and improved laundry area (plus a bunch of built-in storage).
YoungHouseLove says
Hey Kristi W,
We’re going to turn it into a massive room of storage for holiday accessories, bikes, and a bunch of other stuff that we’re sick of seeing covered in cobwebs in the garage. We plan to bring in some shelving and other polished-looking storage systems for a more built-in look (we’re trying to avoid that industrial feeling) so it’ll hopefully feel like a cozy and inviting room and not like a scary bug-infested basement. Here’s hoping!
xo,
s
Shannon says
I seriously cannot believe the difference that the tan Drylock made! Your basement looks totally non-creepy now! Oh and John, I think every dude would rather discuss Drylok at his wedding versus where the centerpieces came from.
Our basement is strictly storage with a washer and dryer thrown in. I would KILL for a 2nd floor laundry room but such is life. Maybe if I tackle making the basement a little less spider-webby and a little more Youngster-fied, I might actually get over it…maybe…someday… love it?
misty says
i used to have an unsightly basement in my old house and that is where the ‘laundry room’ was. And also all of the pipes, heater, hot water heater, etc. To spruce it up i bought a couple of fun clearance shower curtains and hooks. I hung the hooks from the pipes and put the shower curtains up to block all the unsightly piping and the water heater. cheap and easy solution while still having access to them when i needed them.
oh, i and i drylocked down there too. it works really well as long as there isnt a place that water pools around your foundation outside. gutters help that problem.
Angie says
Wow, it looks AMAZING so far!!!! Do you think Drylock would work on uneven stone, or just the flat cinder walls like you have? Our house is 100 years old, and the cellar/basement is rock–very uneven. Keep up the good work–can’t wait to see what’s next!!!
YoungHouseLove says
Hey Angie,
We’ve heard great things about Drylok sealing rough stone and other uneven rocky surfaces so we say go for it. Good luck!
xo,
s
Amy E. says
my husband and i recently bought our house in florida, but all through the house search i was complaining about the lack of basements!!! see, i come from minnesota, where every house MUST have a foundation that goes below the frost layer (sometimes as deep as 4 feet) so a basement is kind of a “gimme” up there. down here in florida, go down not even 2 feet and you’ll probably be standing in a brand new pond or lake! most people end up using their garages as makeshift basements for storage. personally, i think garages are for cars, tools, and outdoor toys, not junk that doesn’t fit (or you’re too lazy to put) in the attic!
can you tell how much i miss good ol’ minnesota?!
Caitlin says
I love the transformation! You can hardly tell it’s the same room at all!
Our basement is fully finished, except the laundry room and storage room (intended to be an additional bathroom in the house plans, but we decided we needed storage space more than a 4th toilet!) which don’t have drywall. We still have to actually put up shelves and the like in the storage room, though, right now it’s just piles of boxes!
The basement is our computer/lounge area, which is really great in the summer as it’s cooler underground. In the winter, it’s the coolest place in the house, but that’s what blankets are for. ;)
Laura@JourneyChic says
Wow, that is such an improvement! I wish we had a basement. In the northeast, it’s very rare to not have a basement, but our townhome’s builder was cheap, cheap, cheap, and went with a big ole slab of concrete instead. On the plus side, there’s no danger of mice!
Kathy says
WOW! What a total transformation! I like the tan drylock with those wonderful chocolate floors! (I fell in love with your floors when I saw what you did to the sun room!) I cannot wait to see your storage solutions!
carrie says
our basement looked very similar to your “before” photo, except that our cieling had exposed beams and insulation. Luckily, we didn’t have much of a mildew problem though. Like yours, it is the biggest room in our house, so we couldn’t leave it completely unfinished, but we also couldn’t afford to drywall ect. We ended up painting the cinder block walls, covering the floor in remnant carpet, and upholstering the cieling with yards and yards of white muslin. now we are able to use the room for laundry, gym equiptment, storage, and a lounge area all for about $300!
Jackie says
Your basement space already looks awesome!
We have full basement, mostly unfinished when we bought the house (well, still 80% unfinished… lots more work to do).
In out basement, we have laundry room, 1 bedroom, shop, storage room and family-room-to-be. Added one full bathroom recently.
One thing we did, which I really love, is to use a small corner to make a library nook. We just put a 4 x 6 rug right on the concrete floor (in case of flooding, we can still easily pull it out and dry it outside). Brought in 3 white bookshelves, one chest and a chair. Basement usually has lower ceiling, but that even makes this nook cozier in this case. We managed to store our books and wines! – we made X-shape wine shelves which fits right in to IKEA EXPEDIT bookcase. Works great! and chilled basement is perfect place for them!
Britni Buss says
You guys are doing a great job! You are so motivating! I want to go home right now and finish all of our little projects, we are to be honest too lazy to finish.
Keep up the great work!!
KOS! (Keep On S'myelin!) says
Looks great! Give the room some life!
We had to hide our water tank too when we finished our basement last year. We did it by putting up a wall and creating a storage room. I love the room because we can hide all the hard to store stuff and then shut the door like it’s not even there!
Now if we could only save the money to decorate!
Here are the floor plans of our basement…
BEFORE: the low head room to the left turned into a huge closet to store all the kids toys. The dots are posts. Instead of leaving them as posts we incorporated them into the design by adding closets and walls. There’s even room under the stairs for storage. We were able to add a full size door to the space under the stairs by using one of the posts to extend the wall in that area…
[IMG]http://i580.photobucket.com/albums/ss245/keeponsmyelin/House/basementlayout.jpg[/IMG]
AFTER:
[IMG]http://i580.photobucket.com/albums/ss245/keeponsmyelin/House/scan0002edit4-1.jpg[/IMG]
Jason says
OMG – looks awesome Youngsters! I’m envious of your smooth block that now looks so great with paint.
My Reno – Ranch has a 4′ plus block crawlspace, you can kind of hunch over and walk around, and I’m 6’2″ with puddle and streams all about when it rains and for a while after it just doesn’t make it into the sump pump. I can tell previous owners have tried to stop the issue with concrete, drylock, etc. and now it’s my turn, grading, new patio, drains, etc. The crawlspace is tall, but mostly under ground as the house sits low?
Do you guys have a sump pump anywhere and is your crawlspace dry? Also, I notice water likes to creep through the brick on the front of the house have you noticed that with your all brick rancher? (love that) I’m being told I need some sort of silicone based sealer on my brick areas??
Delaware – J
YoungHouseLove says
Hey Jason,
We don’t have a sump pump but we’re lucky enough that the people who built our basement as part of an addition in the 80s used gutters and other drainage methods to keep water from flowing towards the foundation (it’s all piped away so we just had some mild seepage, nothing too major). We haven’t noticed that any water creeps through the brick in any other areas in our house though, but the silicone sealer sounds like it could do the trick. Good luck!
xo,
s
Sam says
Slowly but surely…I remember having to tackle my basement. Actually I have redone it quite a few times.
When we first moved in the previous owner had a “mother-in-law” suite thing going on, which was not functional for us at all so I completely tore down everything down to the studs and redid the floor plan- it was (more on that in a bit) a man cave/rec room, separate home office, huge closet and wall storage, full bath, and laundry room. I also enclosed the area housing the water heater and furnace with sliding wood doors. Well after two kids, the man cave had to go for a play room fit for two lil’ princesses. Everything else stayed the same…..until next spring
I have plans to once again redo the whole floor plan. Haven’t really used the home office as much as I thought I would so I am going to open up that space and re-purpose it to be part of the rec room area.
Like you guys I bought and moved into my house with nothing but plans and ZERO experience. So far I have redone the kitchen, put in hard wood flooring on the entire main level, do all sorts of decorative molding (crown, chair rail, base boards) re-did all the closets, and redid one of the bathrooms….once you start its addicting and hard to stop.
I also did some “decorative” painting in my daughters’ rooms – got a bit stripe crazy (http://the-vazquez-family.blogspot.com/2009/05/girls-rooms.html)
Oh in case you are wondering- I do IT security for a living! The DIY-er in me was all “learn on the job”
foggogs says
I would love to do this in my basement- we actually have two little leaks that we get puddle from in my basement. However It sounds like my kids would need to be banished to the ends of the earth while it was happening. not to mention I have another 7 months before the weather warms up enough to keep the doors open again. Your basement looks awesome! I love the dark floor too.
Sugar Cookie says
It looks great! Can’t wait to see what else you are able to do with the space!!
Jenny says
What a difference a little (or I guess a lot)of paint makes!
Our basement is finished which I love and will love it more when we complete remodeling the main levels and make our way down there. It also has an unfinished section for storage which is great as well. We currently use the bedroom down there for an exercise room and the bathroom as my paint brush cleaning station as the sink is pretty ugly and I don’t care if I mess it up.
We dream about revamping it soon to make the large area more our taste (something about a hunting theme on the lightswitch covers does not do it for me). Also we want it to function as man space for my husband as well as a place to keep all the toys that future kids will bring.
Can’t wait to see what you come up with!
Elizabeth says
I have a question – it is possible (VERY possible) that I misunderstood your post, but did you say you cannot re-Drylock over paint?
So by Drylock-ing the floor, then painting it, when/if it needs Drylock again (in 15 years?), what are your options?
Sorry if I misunderstood. This interests me – I am hoping to buy a new house next year and all the ones I am looking at have wet basements and are of the same era as your house – filing ideas away for my future purchase. Thanks!!
YoungHouseLove says
Hey Elizabeth,
Yup you heard us correctly, you can’t re-Drylok over any painted surfaces with as much success. But as we explained in the post, the water seepage was coming from the porous cinder block walls (not the concrete floor) so we were confident that painting over just that part of the room wouldn’t compromise our ability to re-Drylok the cinder walls whenever we feel the need. Hope it helps!
xo,
s
Diane says
If you ever get some extra cash (I know, ha, ha, ha) you might think about investing in tankless water heater. They are small (about the size of a suitcase), can hang on the wall of the house (indoors or outdoors), and save money on energy bills because they heat the water as it’s needed, not all the time like a hot water heater.
YoungHouseLove says
Hey Diane,
Tankless water heaters are the stuff dreams are made of. We definitely hope to be the proud owners of one. Someday…
xo,
s