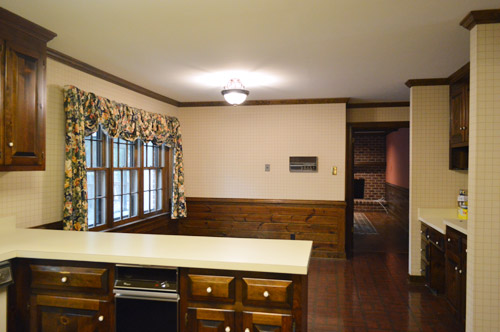
Remember when the kitchen looked like this back when we first laid eyes on our house?
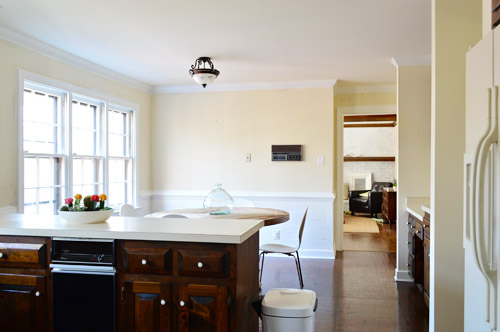
Whelp, now it looks like this…
It’s crazy how different certain angles look in person.
It’s like walking into the room and wondering who added five extra lights. It’s just so much brighter.
Yes, we dove headfirst into priming and painting the kitchen baseboards, crown molding, and window trim (52. freaking. panes.) and ended up just going all out and tackling the paneling and the doors to the pantry and the garage while we were at it. We have nothing against dark paneling, we just prefer the painted look for our house, especially after drooling over a few awesomely classic spaces that inspired us (like this one, this one, and this one).
I’m not going to lie – it was not an easy process. But it was SO WORTH IT. The room feels so much brighter and less heavy and we find ourselves actually looking out the windows now (when that trim was dark it stopped your eye, but now that it’s white, suddenly the outside world is the thing that’s emphasized, like a pretty little forest focal point).
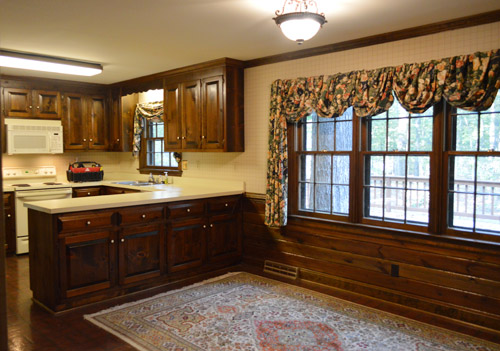
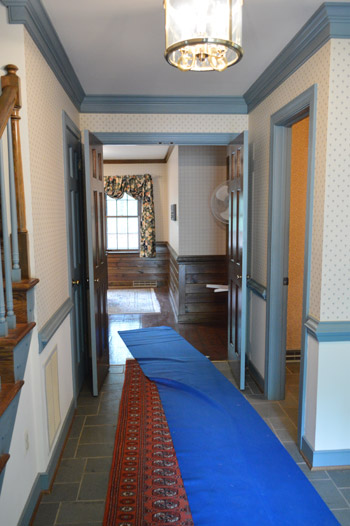
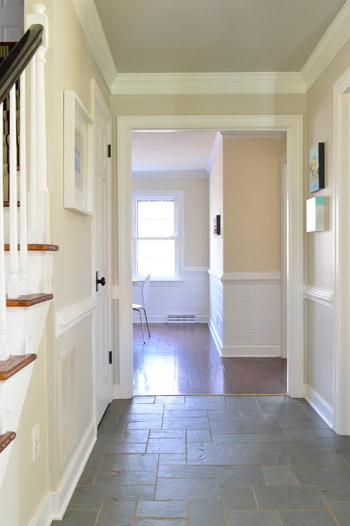
One of my favorite new views is from the front door. Here’s a shot we took during inspection (don’t mind the chaos, there were a few old furniture items being moved out by a crew at the same time).
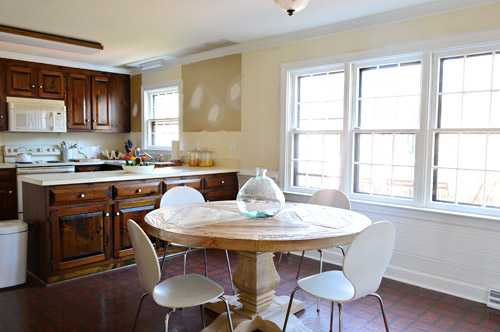
And here’s a shot we took yesterday afternoon. Ignore all the beige… we’re planning for some airy color on the kitchen walls to break things up (more details in this post). And the lower cabinets will end up nice and dark for contrast too. Eventually we also think we’ll end up with big dark (heated) tiles on the floor too, so that should help to balance/ground things. White paneling + softly colored walls + dark floors + a rustic wood table sounds like a nice mix.
All told, it took two coats of primer followed by two coats of paint applied by hand. We decided only to use the sprayer to paint things we could remove and take outside (like cabinet doors/drawers when we get to that stage) since we’ve used it once inside (to paint all of the baseboards/trim/doors upstairs while the carpeting was ripped up) and we noticed a pretty decent amount of overspray.
Based on that experience (and using it outside for things like painting the sunroom ceiling planks) we just think our type of sprayer is better for outdoor use unless we’re working in truly gutted indoor spaces. We’ve seen other folks tape off the entire room and spray every last inch of woodwork, but this room has four different doorways to other spaces that we’d need to fully block off (any paint seepage onto the wood floors in the dining room or living room scared us greatly) and we worried it wouldn’t save much time if it took us 10 hours to tape everything off anyway.
So John and I just chipped away at it over the past five days (Burger refused to lend a paw – that diva). Thankfully we found an awesome stainblocking primer that has no-VOCs but actually works so I could join in on the fun (some others gave us wood-bleed like you wouldn’t believe, but this one was awesome). It’s called Kilz Premium – just make sure you get the one with the label that says “no VOCs” and “stainblocking” since they have a bunch of different types. As for the paint, we’re still using Simply White (in semi-gloss) which has been our choice for all the trim and doors upstairs and in other rooms that we’ve tackled downstairs (like the foyer and the half bathroom). But we’ve got a round-up of other popular white paint colors you could choose from.
Gif time, baybay:

Two coats of the Kilz stuff followed by two coats of paint took us about 12 hours. The first coat is always the hardest (for some reason it just takes longer to get into all of those nooks and crannies and around all of those edges the first time, but your brush or roller seems to glide over them more easily as you go). So it was probably around 4 hours for the first coat and then 3 for the second coat and then 2.5 for the following two coats.
As for the application method, a regular old 2″ angled brush was what we both used to tag-team the trim as well as those window frames, and then we used a roller along with a brush on the paneling (a brush got into those crevices and then a roller could be passed over the fronts of each board to smooth them out). Here’s an example of what I did with a brush, and then John rolled the flat parts so it all blended in. Update: If your trim or paneling is super shiny and lacquered we always recommend sanding and using a liquid deglosser before the priming step. In our case it was chalky and dry wood without a thick layer of sealer, so we went right to primer and paint, which held nicely.

Now I’m like Jasmine rolling in there singing A whole neeeeeew world.*
*And then I see the intercom and turn into Ariel belting out You want thingamabobs? I’ve got twenty.
This corner. Huuuge difference.
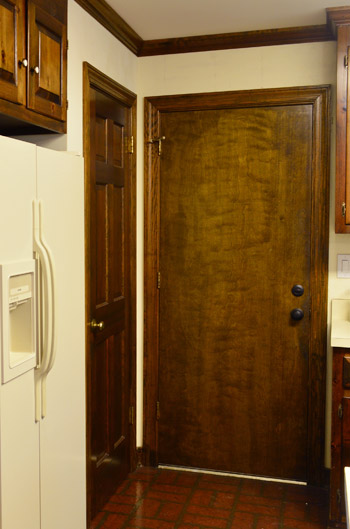
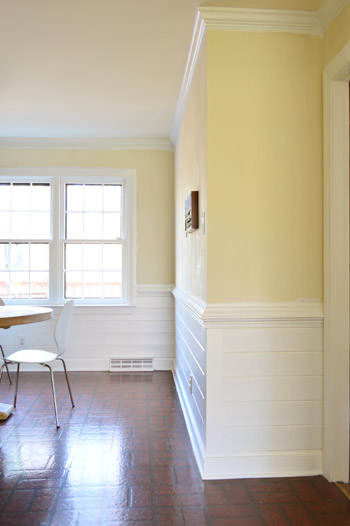
The door straight ahead leads out to the garage, and the one on the left is the pantry. Someday it would be awesome to have a paneled door that leads to the garage, but it’s wider than the other doors in our house (and needs to be fire-safe) so we might have to order one or miraculously find it at the ReStore or something. For now the white paint is a welcome upgrade.
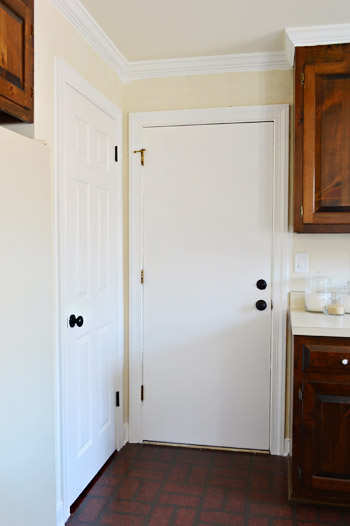
We didn’t have to paint the pantry door since we had one upstairs in our storage room that we sprayed white back when we sprayed the other doors up there but had never rehung (it was the between our bathroom and sink nook, but it blocked things off so we’re happier without it). As for the garage door, we could have removed it and sprayed it outside, but that would have meant an exterior door being off the hinges for a few days (drafty + not secure) so we just painted that one in place. Still need to replace those brass hinges though…
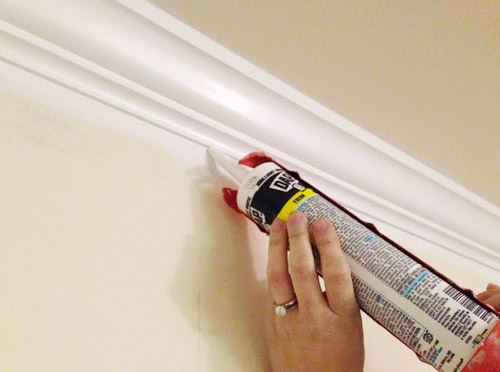
Oh and a quick tip for anyone tackling wood trim, paneling, or crown: it’s not unusual to see all sorts of dark cracks that need to be caulked after you get some primer and paint going on. Something about dark wood tones hides those cracks and shadows, but then when it’s painted they stand out. So our advice is to look for those after one or two coats of primer (you won’t be able to see them before you apply anything, since they only pop out at you as the wood gets lighter) and then fill ’em with paintable caulk (we like paintable Dap window & door caulk in white). As long as you get ‘er done before your final coat of paint, it should go over them for a nice seamless finish.
So now our to-do list in here looks a little something like this:
Remove wallpaperMove fridge cabinet forwardRemove upper cabinets on window wall to prep for open shelves
Reinstall crown molding(you can read about how we did those first four things here)
Prime & paint the pantry and the door to the garage
Prime & paint the trim, crown molding, & baseboardsPrime & paint the paneling- Patch and paint the ceiling
- Replace the florescent light in the cooking area and the pendant over the sink
- Replace and center the light over the dining table
- Paint the walls (you can read about the color we’re leaning towards here)
- Hang floating shelves on the window wall
- Possibly craigslist the existing microwave and get a countertop one (the we can put in the pantry?) and add a cheap range hood (we’ve seen some like this for $20 on craigslist) to lighten up that wall?
- Paint the cabinets (you can see the colors we’re leaning towards here)
- Update the old cabinet hinges and knobs
- Get a rug for eat-in area? Possibly install peel and stick tiles everywhere?
- Curtains for windows?
Psst – To read why we’ve chosen these steps for Phase 1 (for example, why we’re painting the cabinets, why we’re not going to attempt to paint the linoleum, and what’s on the agenda for Phase 2) there’s lots of background info in this post for ya.
There are still a lot of uncrossed items, but we’re so excited about how far this room has come already! What were you guys up to this weekend?

Lisa says
I agree with Heidi…a tutorial on painting the windows, please!! I have a house full of the beautiful old darlings and they’re in such great shape it makes no sense to replace them, but they are UGLY. I’ve been blog-stalking the 4.5 of you for quite some time. Your ideas are wonderful and I’ve learned so much. Much to my hubby’s chagrin, it has resulted in repainting nearly the entire upstairs and basement, tearing down wallpaper & retexturing walls, gutting a bathroom, and painting countless yards of bead board. Kitchen cabinets are now in the cue to be tackled. Poor hubby is so tired of hearing things like, “You know, babe, I’ve been thinking (I think that phrase nearly frightens him to death). We should keep the paneling in the laundry room. It lends a cool texture and John & Sherry (as though you are my close, bosom friends) showed me how to do it.” No offense, John & Sherry, but my husband has confessed to a deep shiver of fear that follows the mention of your names because it always results in work. LOL
YoungHouseLove says
Haha! That’s too funny!
xo
s
B says
We have put new windows in our house and I am wondering if you like the look of your windows with the jams still bright white but the trim painted an off white color. We need to decide if we are going to paint our jams the trim color or not. Any suggestions based on your new look?
YoungHouseLove says
We prefer everything a crisp white if possible! That’s what we’re working towards here :)
xo
s
Kristin Holmes says
We just bought a home that has oak trim EVERYWHERE! So, because you all are so inspiring, we are going to attempt to paint it all white. I see what you use for your primer but did not see the brand you use for your Simply White in semi-gloss. Here’s hoping we won’t have to call in the professionals!
YoungHouseLove says
That’s by Ben Moore. Good luck Kristin!
xo
s