It’s Wednesday the 27th… so it’s time to share this season’s (completely unofficial) Pinterest Challenge project (not sponsored by Pinterest or anyone else, just dreamed up by Katie to make us stop pinning and start doing). Huzzah!

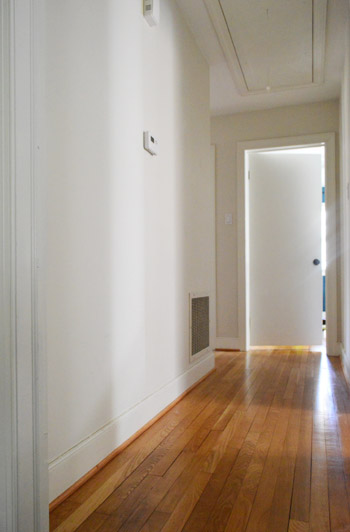
And this season’s challenge was the biggest one we’ve tackled by far. We tried our hand at adding some character with some easy board & batten in our formerly bare hallway.
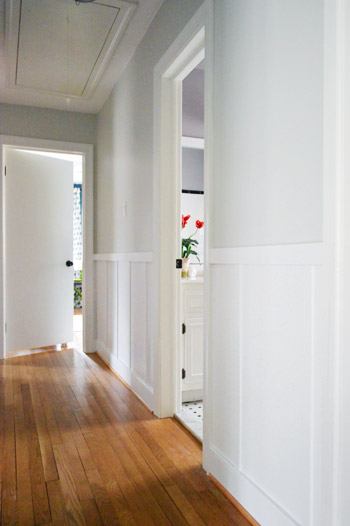
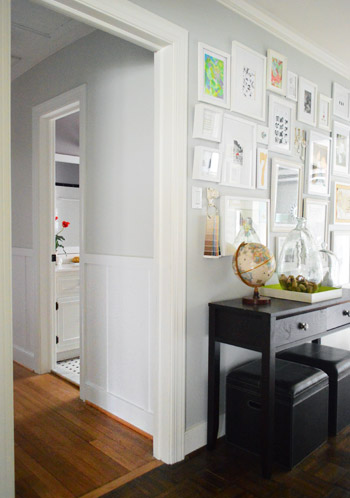
Which now, a week later, is looking like this. Woot!

Is it weird that I’ve been sitting on the floor just staring at it?
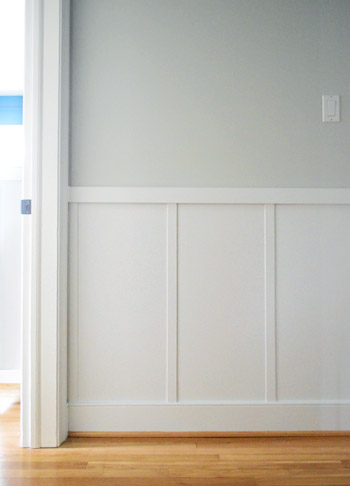
A few folks who had already installed board & batten or wainscoting commented last week to say that pictures don’t do it justice and they’re right. Photos are flat. But in person it’s just so dimensional. It really adds a ton of polish and interest to a formerly drab little hallway that we walk through dozens of times a day.
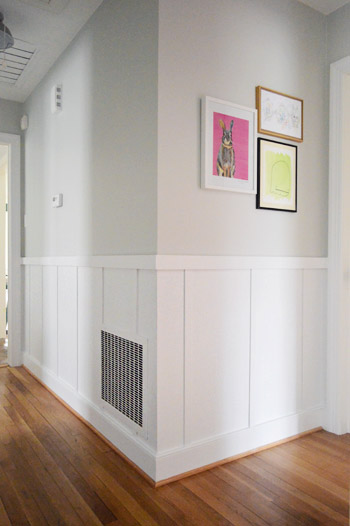
And when it came to how we got ‘er done, there’s thankfully no shortage of tutorials on the subject. So as per the challenge rules, I took inspiration (or Pintspiration, har-har) from a few awesome board-&-batten-tackling bloggers out there, and then we did own spin. Still have some more art to hang of course…
Here’s a rundown of the tutorials that we read before we took a crack at it:
- This one from Ana at Ana-White
- This one from Sara at Thrifty Decor Chick
- This one from Kate at Centsational Girl
- This one from Emily at Decor Chick
We’ll be back tomorrow with a full tutorial (including a video of each and every step!). We just have to get that all together (we were rushing just to take the photos for this post by today, so we didn’t have time to edit the video and write out the full step by step tutorial). The good news is that although the project took us nearly the full week that we allotted for the challenge, none of the steps were too hard by themselves, so it’s one of those projects that anyone can tackle as long as you take it one step at a time. And although we’ll be back with more details tomorrow (and a video of our entire process) our general order of the steps was this:
- measure & gather materials
- mark, level, and attach the top rails
- nail and glue the battens
- fill the wood holes and caulk the cracks
- sand the holes we filled and prime all of the wood
- paint the wood and the walls below the rail white
- paint the walls above the rail your color of choice (doing this beforehand is even easier)
As for what color we went with on the walls, we thought the same soft platinum gray color (Moonshine by Benjamin Moore) that’s in our adjoined frame hallway would make for a nice cohesive and open feeling (we worried that anything too dark on the walls would close in the small hallway too much). We really love how it accents the white board & batten effect on the bottom without being too high-contrast. It’s a soft tone-on-tone look for sure, and the dimension in the board & batten adds so much interest. Note: you can see in this pic that we still have to paint the trim in the frame hallway so it’s pure white like the board & batten.
We’ll have a full budget breakdown for you tomorrow too (still have to go through those receipts!). Seriously, the paint was still drying when we grabbed these after pics for you, so we can’t wait to sit down and write up all the hows and the whys. But anyone can do this! It took a fair amount of time, but nothing was too complicated. Thank goodness or it would have been the first Pinterest challenge that we didn’t actually finish. Haha!
Don’t forget to check in on Katie, Megan, and Michelle to see what awesomesauce projects they’ve whipped up (they’ll all be sharing theirs sometime today as well)!

And now here’s the part where we tip our homemade hats to you guys and invite you to share all of the fun Pinterest Challenge projects that you’ve tackled in the last week (right along with us, well at least virtually with us). If you’ve already blogged about it, just:
- click on the blue “Add Your Link” button with the odd cartoon head at the bottom of this post (you might have to do some scrolling, depending how many projects are added)
- add a link to your specific blog post about your project in the url field (not your home page)
- where it says “name” write a descriptive name for your project (ex: “Homemade Leaf Wreath”) as opposed to your actual name
- we’d also love if you could quickly link back over to our project posts within your own (here’s Katie’s, Megan’s and Michelle’s) – it’s also nice to link to your inspiration project on Pinterest as well as to directly link to the original project/site, just so they get some love too.
And if you’d rather just link over to your project in the comment section, feel free to do that – or even add a link to a free photo sharing site like Flickr with your pics if you don’t have a blog (remember to set the gallery to public so we can all see it). I’m waay too excited to see what you guys have been up to! Seriously, Petersik. Calm down.

Amanda C says
OMG, I love it….it looks great! I jumped on the B & B bandwagon last year and did it in my entrance and am now gearing up to do it in my upstairs hallway. I actually have to restrain myself from going overboard with it because if left to my own devices, I’d probably have it everywhere….LOL!
BurbHappy says
I like your Pinterest Challenges so much that I joined Pinterest. Now if only the people participating in the Pinterest Challenge would make their projects pinnable!
Melissa Ricci says
Hey guys!
LOVE what you did! It looks amaze. Do you have any tips at all for moving? I’m sure you did a post but I can’t find it. I have to pack our house in two weeks (by myself) to move into our new home!
Any tips would be awesome!
Thanks!
xo Melissa
YoungHouseLove says
We actually have a category about moving/selling/buying – so here’s a link with all of our posts about it (just scroll through them to see ’em all). Hope it helps!
xo
s
Yumi Matsuo says
I’m normally not a huge fan of wainscoting, but that just works! It looks so clean and really brightens up the hallway. I can only fear the precision that went into making sure everything lined up. That’s something we’re working on – getting stuff level!
One question though, how come you guys apply the nofollow attribute to all of your outbound links for these contests? It’d be great to give all of the folks who are giving you inbound links and content with some outbound link juice for the search engines from time to time!
YoungHouseLove says
That’s actually just the setting on the link manager we use for these thing (inLinkz). It’s the easiest tool we’ve found and sadly I’ve yet to discover the place where I can change that setting.
-John
Amanda says
It looks fantastic! I’ve been dreaming of doing board and batten in our hallway and in our powder room for quite some time – I love how yours turned out! Makes the hallway look so much more airy and bright!
Vanessa says
Love it! Turned out so great! Can’t wait for the full play-by-play – trying to convince the boy to do this now ;)
Katherine says
Love it!
Kristi -SIMPLEPRETTYTHINGS says
Hey guys, I decided to blog my daughter’s closet makeover afterall: http://www.idlepress.com/simpleprettythings/?p=303
YoungHouseLove says
Adorable! Thanks to everyone who shared their makeovers today! We had so much fun!
xo
s
Caz says
Looks brilliant. Out of curiosity, are there any practical benefits of board and battern? I’m mainly thinking of how dinged up some of our walls get (kids!) and whether it’s harder wearing or an easier fix up job.
YoungHouseLove says
I think if you actually install the board part (aka: the flat panels between the vertical battens) then you could certainly choose a material like MDF or plywood that is tougher than drywall. Ours is just painted drywall so there’s not much practical benefit to it. Although some people will make theirs taller so it can act as a picture ledge or even a coat hook.
-John
carmel says
Looks awesome! I feel like such a slacker because I didn’t finish my project in time. It will happen- someday – hopefully soon ;)
Chana says
Hey Sherry and John! It looks great, but I can’t see the “share your link” button, or any shared links. Is anyone else having this issue?
YoungHouseLove says
Hmmm, sorry you’re having trouble Chana. We can see it right at the end of the post and I know lots of other have been able to see it without problem. Maybe try a different browser?
-John
Carly says
Oh that is beeeeautiful! You guys are so talented!
You guys always make me hustle and get my projects done so I can get my post in on time! Ha! Love Pinterest Challenge
Jen says
Don’t sell yourself short on the photos. The after look SO GOOD. I’ve always loved the look of B & B, but I had no idea how much of a change it would make.
mara says
that is totally not related, but I just had to share :)
that nail-color-tutorial totally reminds me of sue the napkin:
http://thebeautydepartment.com/2013/02/nailed-it-13/
mara says
oh no, two “totally”s in one comment! I’m embarrassingly overexited :)
YoungHouseLove says
Totally does! :)
-John
Eileen Catherine says
Holy Pinterest Challenge!! 537 links to others pin projects!! That’s incredible :o)))
Kim says
What is the paint color of the new board and batten? Thanks!
YoungHouseLove says
We painted it Decorator’s White by Benjamin Moore.
-John
farrah says
Wow! I am in sensory overload. I am humbled by all this creativity. Thanks for bringing us all together
Meredith says
Yay! I love board & batten, it looks great. Can’t wait to see the tutorial and how you guys did it. I have been interested in doing this in a loft space on our second floor to help brighten it up (it doesn’t get much light at all). When I mention it to my husband he isn’t so enthusiastic (he’s not big on doing big house projects). But maybe I can tackle this myself! I may start out by doing some on the backside of our bar in the kitchen which faces the family room/den and extend along a small portion of the adjoining wall to the doorway of our foyer as a little practice. We’ll see, I’m very inspired right now! I also need to make frames for our bathroom mirrors!
Kate says
I had no idea what you were talking about when you said board and batten! Looks great! I’m so glad you chose the gray, I love how it looks with all the white
Knitmaker says
I have been wanting to do a DIY Faux Roman Shade for FOREVER. My Pinsperation: http://inmyownstyle.com/2012/08/one-yard-window-treatment3-ways.html, http://evolutionofstyleblog.blogspot.com/2011/08/no-sew-all-faux-roman-shade.html, http://365days2simplicity.blogspot.com/2011/04/easy-no-sew-roman-shades.html, and your very own https://www.younghouselove.com/2012/11/shady-business/
After reading (and re-reading) all of the tutorials that went along with these shades, I decided that Sherry’s with the fabric-covered wood thing at the top was more trouble than it was worth, and settled on replicating the one from “In My Own Style.” But I did it in my own style, of course, as is the nature of the Pinterest Challenge! I love, love, love my finished product!
See my finished shades here: http://www.flickr.com/photos/65678582@N05/
Sarah @ Thrifty Decor Chick says
Hey guys, thanks for the link! The b and b looks awesome in the hallway! Watch out, you’ll want to add it everywhere now. :)
YoungHouseLove says
Haha it’s so addicting!
xo,
s
Erin says
It looks great! Can’t beat $57!
Rachel says
Great job, as always! I thought I’d make a suggestion for a future Pinterest Challenge (taken from http://andthenwesaved.com/things-to-do-instead-of-spending-money/): “tackle a project that you can do with supplies you already own.” It might be a fun twist on the Challenge, and who doesn’t have a drawer/closet/whatever full of stuff they could use?
YoungHouseLove says
Ooh that’s fun!
xo
s