It’s Wednesday the 27th… so it’s time to share this season’s (completely unofficial) Pinterest Challenge project (not sponsored by Pinterest or anyone else, just dreamed up by Katie to make us stop pinning and start doing). Huzzah!

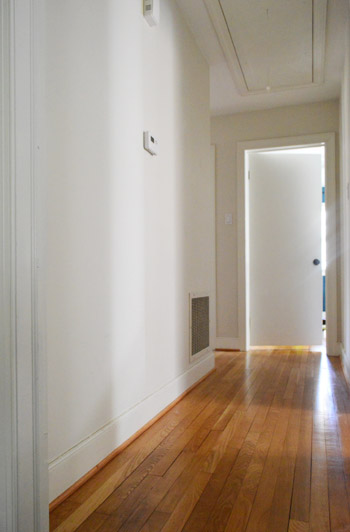
And this season’s challenge was the biggest one we’ve tackled by far. We tried our hand at adding some character with some easy board & batten in our formerly bare hallway.
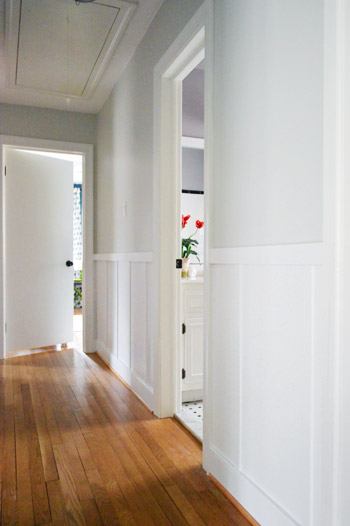
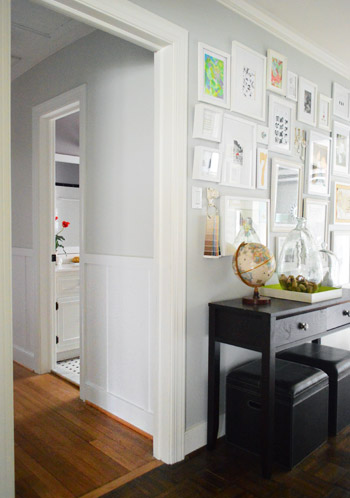
Which now, a week later, is looking like this. Woot!

Is it weird that I’ve been sitting on the floor just staring at it?
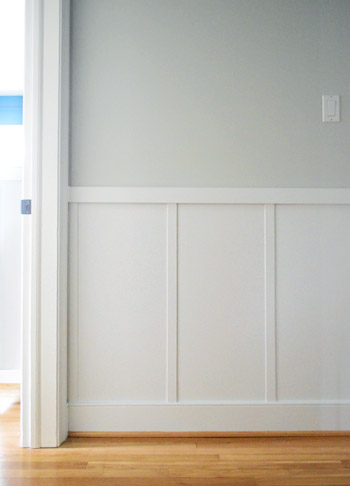
A few folks who had already installed board & batten or wainscoting commented last week to say that pictures don’t do it justice and they’re right. Photos are flat. But in person it’s just so dimensional. It really adds a ton of polish and interest to a formerly drab little hallway that we walk through dozens of times a day.
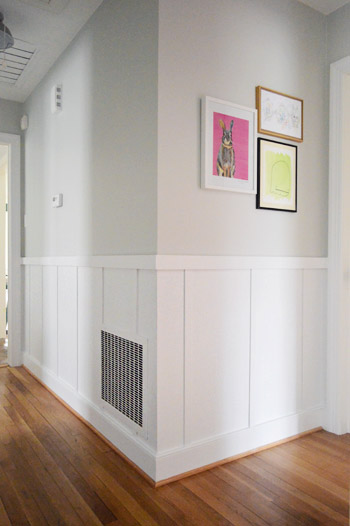
And when it came to how we got ‘er done, there’s thankfully no shortage of tutorials on the subject. So as per the challenge rules, I took inspiration (or Pintspiration, har-har) from a few awesome board-&-batten-tackling bloggers out there, and then we did own spin. Still have some more art to hang of course…
Here’s a rundown of the tutorials that we read before we took a crack at it:
- This one from Ana at Ana-White
- This one from Sara at Thrifty Decor Chick
- This one from Kate at Centsational Girl
- This one from Emily at Decor Chick
We’ll be back tomorrow with a full tutorial (including a video of each and every step!). We just have to get that all together (we were rushing just to take the photos for this post by today, so we didn’t have time to edit the video and write out the full step by step tutorial). The good news is that although the project took us nearly the full week that we allotted for the challenge, none of the steps were too hard by themselves, so it’s one of those projects that anyone can tackle as long as you take it one step at a time. And although we’ll be back with more details tomorrow (and a video of our entire process) our general order of the steps was this:
- measure & gather materials
- mark, level, and attach the top rails
- nail and glue the battens
- fill the wood holes and caulk the cracks
- sand the holes we filled and prime all of the wood
- paint the wood and the walls below the rail white
- paint the walls above the rail your color of choice (doing this beforehand is even easier)
As for what color we went with on the walls, we thought the same soft platinum gray color (Moonshine by Benjamin Moore) that’s in our adjoined frame hallway would make for a nice cohesive and open feeling (we worried that anything too dark on the walls would close in the small hallway too much). We really love how it accents the white board & batten effect on the bottom without being too high-contrast. It’s a soft tone-on-tone look for sure, and the dimension in the board & batten adds so much interest. Note: you can see in this pic that we still have to paint the trim in the frame hallway so it’s pure white like the board & batten.
We’ll have a full budget breakdown for you tomorrow too (still have to go through those receipts!). Seriously, the paint was still drying when we grabbed these after pics for you, so we can’t wait to sit down and write up all the hows and the whys. But anyone can do this! It took a fair amount of time, but nothing was too complicated. Thank goodness or it would have been the first Pinterest challenge that we didn’t actually finish. Haha!
Don’t forget to check in on Katie, Megan, and Michelle to see what awesomesauce projects they’ve whipped up (they’ll all be sharing theirs sometime today as well)!

And now here’s the part where we tip our homemade hats to you guys and invite you to share all of the fun Pinterest Challenge projects that you’ve tackled in the last week (right along with us, well at least virtually with us). If you’ve already blogged about it, just:
- click on the blue “Add Your Link” button with the odd cartoon head at the bottom of this post (you might have to do some scrolling, depending how many projects are added)
- add a link to your specific blog post about your project in the url field (not your home page)
- where it says “name” write a descriptive name for your project (ex: “Homemade Leaf Wreath”) as opposed to your actual name
- we’d also love if you could quickly link back over to our project posts within your own (here’s Katie’s, Megan’s and Michelle’s) – it’s also nice to link to your inspiration project on Pinterest as well as to directly link to the original project/site, just so they get some love too.
And if you’d rather just link over to your project in the comment section, feel free to do that – or even add a link to a free photo sharing site like Flickr with your pics if you don’t have a blog (remember to set the gallery to public so we can all see it). I’m waay too excited to see what you guys have been up to! Seriously, Petersik. Calm down.

Katie says
That looks absolutely amazing, y’all! Way to go!
Suzanne says
Looks great! I vote for another house tour video!
YoungHouseLove says
Oh yeah, we’re well overdue on that!
xo
s
Abbey says
I love the look of Board and Batten. I want to do it in our nursery but we have very textured plaster walls and I think it would look funny… any thoughts or anyone out there who has done it against plaster with good results?
YoungHouseLove says
Oh yes, if you click the link to Kate’s tutorial that we linked up with in this post, she had textured walls and explained her process. Hope it helps!
xo
s
Claudie says
It looks gorgeous! I’ve always wanted to do a similar treatment in our dining room. Unfortunately, it adjoins the living room with no clear way to end it. Maybe I’ll just do the entire open space one day, but it probably won’t be soon!
I can’t wait to see some pictures on those walls! Have you thought about just making everything in that hallway Clara-related? Either pictures of her or artwork that she’s done? If you guys have another, you could always incorporate the new little one as well. I think it would be very sweet!
Claudie says
Or even using family photos would be cute. I’m having a little hallway envy right now. Ours has very little actual wall space. The closets are nice, but it’s hard to do a gallery wall on bi-fold closet doors! :)
YoungHouseLove says
That would be really fun!
xo
s
Jennah's Garden says
I plan to post mine tonight. It’s a “not sure if pinterest fail” lol, so we’ll see.
In the meantime, I have a giveaway going on for some excellent easy mom hair products (and another one going live soon for seeds and seed storage)!
Enter here: http://www.jennahsgarden.com/2013/02/hairstyles-for-busy-moms/
Lucy says
I’ve been a reader for many years and I love so much of what you guys do, but this my be my all time favorite project. Simple, yet it adds so much character. Looks so crisp against the gray walls. Well done!
YoungHouseLove says
Aw thanks Lucy! It’s funny because I think my three favorite projects in this house have all been walls (and two are hallways). Those would be: the frame hallway, the board and batten hallway, and the teal bookcase-backs that we added to the wall in the dining room! Isn’t that funny?!
xo
s
katie says
it looks amazing! definitely gives the hallway a more polished look…i am bookmarking this for when we own a place :)
Heather @ What Does She Do All Day? says
It looks fantastic! I’d really like to do that in our entry way, but then I feel like I’d have to take it up the stairway as well. And then if I made it to the top of the stairs I’d have to do the whole upstairs hallway. Darn open floor plan!!
Jeanna says
A-ma-zing!!!! That is all :)
Sarah says
Looks GREAT! I have been planning on doing it in my dining room for a good year now but keep debating between putting something (a board) on the walls first to make it smooth, or just leaving the textured wall as-is. Does it look okay even with the textured wall in between the boards??? It always looks great in pictures I just want to make sure it looks good in real life, which it sounds like it does by how much you love it?! Thanks!!!
YoungHouseLove says
Most people with textured walls use a thin cheap board between the battens so it’s nice and flat and then paint it all so it’s seamless. If you click the link to Kate’s tutorial in this post, it explains how she did that :)
xo
s
Stephanie says
LOVE all the character it brings to the hallways! I’ve been wanting to do this myself! BUT…..
– What about if you have textured walls? I’ve always assumed I’d have to buy wood boards to cover it up for a smooth and sleek look. Any suggestions?
YoungHouseLove says
Oh yes, if you click the link to Kate’s post in this post that we linked over to as inspiration, she explains how she did it on textured walls :)
xo
s
Kim S says
This. Looks. Gorgeous.
Seriously, this finishes the hallway so well. Love it!
michelle says
Ugg my comment didnt show up so I’ll try again. I’m curious as to how you figured out the spacing between each board. Did you measure the wall then….then what? Lol thats he point where I get confused. Math is not my thing :)
YoungHouseLove says
We’ll share all those details tomorrow (spoiler: we cut a board to a certain size and used that as a spacer, so there wasn’t as much measuring required :)
xo
s
Jessica Hill says
I am super stoked to see the tutorial tomorrow! I am wondering if it would look weird to add some to our master bedroom….
Thanks for the great link party!
Gabbi says
I 100% want to do this in our hall, but I feel like I’d never be able to. Yours came out amazing…great job, you guys! :)
YoungHouseLove says
You can totally do it! Wait until you see the details tomorrow- it really is possible!
xo
s
Lindsay says
So pretty! I have a little hallway in my house that could use some perking up, this may be just the thing. The part I’m never sure what to do about with these sorts of things though is how do you figure out the spacing? I mean, sure, you initially pick a spacing of however many inches (because it just looks right), but then what do you do when that doesn’t work out right at the edges of the walls? My poor little precision-lovin’ mathematical brain will just NOT ALLOW for the spacing to not be identical on all the walls, but what if it doesn’t work out right? GAH! ;)
tl;dr – Looking forward to your tutorial! hehe.
YoungHouseLove says
We’ll share all those details in tomorrow’s post (hint: there’s an easy way to use a spacer to help keep it low-math, haha!).
xo
s
Meghan says
Wow! This look fantastic. You commented a few months back about how elevated the house looks with the addition of the mirror over the fireplace in the kitchen – I think the board and batten does the same thing for the house now.
YoungHouseLove says
I think you’re right!
xo
s
SandyP says
Hi All,
I am a great fan!!! Love the effect and the huge difference it makes!!! Also jealous it took you only a week LOL. We begun ours 3 weeks ago (on and off)and we are still at it. I have a question. Our hall as doors on both sides, we got stumped on how to do the vertical spacing when we hit a doorway. Curious if you decided on the spacing (ours is 16.5″ apart) and just started at one end and measured and laid the verticals if there was wall and if you hit a doorway you kept measuring the spacing and kept going or you did something completely different. Also ( I know sneaking in a second question after I said I had just one)do your verticals line up on both sides of the wall? I should just wait for tomorrow’s tutorial, can your hear the desperation? Love you guys and your amazing talent!!
YoungHouseLove says
We’ll hopefully cover all that tomorrow, but our method was to space it all out the same amount and then just eye it (if a doorway made it look weird and we could cheat it to make it look better we’d shift it and step back and look again – until we loved how it looked). Hope that helps!
xo
s
Mindy says
It looks fabulous! We have a similar hallway in our ranch style house as well. I would love to do B&B down it but am afraid with how narrow the hallway is that it may make it seem even narrower. It seemed to make your hallway seem bigger. So, may I ask how wide your hallway is??
YoungHouseLove says
It’s 40″ wide. Hope it helps!
xo
s
Katie says
So lovely! I can’t wait to see more pictures and what art you guys put up in that hallway. I read what Clara’s reaction was above in the comments, hilarious!
Laura says
It looks awesome, you two! I have a narrow-ish hallway that I was considering treating the same way, and I worried the extra millimeters would encroach on walking space. Do you feel like your hall “feels” narrower because of the added boards? (Your hall looks pretty similarly-sized to mine, which is 3’2″ wide.)
YoungHouseLove says
Our hallway is 40″ wide and oddly enough it feels wider with the board and batten – maybe the same way that big horizontal bands (or stripes) can make people look wider? Haha!
xo
s
Rebecca Lately says
That is so awesome! It looks really, really nice!
Sarah says
Thanks so much for hosting this!! It was so much fun!
-Sarah
limitedspaceorganizing.blogspot.com
Misty says
ooohhh myy gosssh. its beautiful!
Pam Groom says
Wow, that really made the hall look classy. Good job.
I painted stripes on my kitchen dining area walls and made a teapot chandelier from two teapots, six teacups and a sugar bowl. It was oodles of fun. I happen to LOVE tea.
http://www.flickr.com/photos/93577571@N06/8513731998/
Pam
Melinda says
Love, love, love!! I’ve been dying to do this to my home that is currently builder basic, but I’ve been a little afraid to go for it. Seeing the results makes me want to hightail it out of the office, make a beeline to Home Depot, and get started. (of course, I won’t because there’s a whole bunch of measuring to do first, but nice thought…)
Samantha says
Wow, makes a huge difference! You guys did an awesome job! Excited for your tutorial–we’ve been wanting to do this in our dining room and after seeing your hallway, I’m adding our hallway to my project list! :)
Thanks for hosting the link party!
Carole says
It looks great and really adds character. On an unrelated matter, I was wondering if you can help with the fac that I can never view pictures on Katie Bower’s blog. They are never visible whether I access her site from different computers. I’m wondering if there is anything I must change on my settings in order to view the picutres or if other people have encountered this problem.
YoungHouseLove says
Oh no, I have no idea why that would be. I think she hosts them on photobucket, so maybe at home and at work that’s blocked for some reason? Maybe google around for “why can’t I see photobucket photos?” and see if anyone can help?
xo
s
Carole says
Thanks Sherry. I’ll look into photobucket.
Jess says
Holy cow you guys – this looks so amazing! Here I was feeling all proud of myself for actually making something found on Pinterest. You took it to a whole ‘nother level. Great job.
(Mmmm…for some reason I don’t see the “add a link” button, or the other links – I’m guessing it is my computer. I’ll just add it here instead: http://theaveragejess.com/pinterest-for-the-average-girl-diy-his-and-hers-towel-hooks/.)
Off to check out the other projects and add some more inspiration to my Pinterest boards!
YoungHouseLove says
So sorry you can’t see the button, maybe it’s blocked if you’re at work?
xo
s
Ashley says
It looks so good! It really makes the hallway seem so much bigger!
Shannon S. says
It looks so amazing! Perfect for a long hallway like yours. Thanks so much for hosting the Pinterest challenge again! I can’t wait to see what everyone comes up with! :)
Megan B says
This looks amazing! Nice job!
Jill says
It looks great! I just did B&B in my entry way and it completely changed the whole look of the house. And no, you are not crazy to sit and stare at it… I’ve been doing the same thing for the last week! :-)
katie says
Love love love board and batten! And y’all did a great job! We added board and batten in our entry a while back and I’m still itching to put it in half of our other rooms – I just adore the look.
qs777 says
Looks great! I have wanted to do that for our long hallway for some time but just have not gotten around to it. I already have my gallon of Moonshine, though. (That came out wrong, but you get the idea) :) Could you tell me how wide your hallway is? I think ours might be too narrow, although it is almost 20 ft. long. Thx.
YoungHouseLove says
Ours is 40″ wide. Hope it helps!
xo,
s
kirsten oliphant says
Love it! Really improves the look of the hallway. And very timely for me, as we are about to start a full kitchen reno and I want to get rid of a weirdly placed sort of half-chair rail + paneling combo and do something like this instead. So I showed this to my hubby, who was like, “Are these those SAME people? Do they just do projects all the time and then do more projects on top of projects??” He was really impressed, though. And! I think it made my honey-do list seem very small, in thinking about doing all the things you guys have done to your house. So, thanks! :) I can’t link up as I’ve not Pinterested anything, but here’s where we’ll be doing a bead and batten type of thingy: http://www.stillhatepickles.com/2013/02/half-painting.html
YoungHouseLove says
Hahaha that’s so funny!
xo,
s
Morgan says
Looks AMAZING!! I wish we could get away with board and batten in our Spanish casita – yours looks just awesome.
Katie S says
This looks great!! If we owned our apartment, I would be all over this!
I’m not positive my comment went through earlier and my computer is acting funky with the links up above so I’ll just post my flickr page link here instead…
My husband made this sweet headboard for me (inspired by a pin of mine) for Valentines day, check it out!
http://www.flickr.com/photos/58242174@N05/8512519939/in/photostream
I cried like baby when I came home and saw it :) I’m such a sap!
YoungHouseLove says
So sweet!
xo,
s
Elizabeth @ Southern Color says
The board & batten looks great! It gives the hallway a nice finished look. Thanks for hosting another fun Pinterest Challenge :)
Stephanie says
It looks awesome! One of the things I love about board and batten is that it works with so many looks. We installed it in our nursery and despite the fact that we completely re- decorated the room for our second child the board and batten still works beautifully with the design. I’m hoping out next house has stairs because I would love to run it up them.
YoungHouseLove says
So sweet!
xo
s
Emily says
Looks great!
Question that was raised with my coworkers when we all checked out your progress (there’s usually a turning of the monitor and me doing my best impersonation of Vanna White) –
What do you think about the 1/4 round moulding at the bottom of your baseboards. I’m seeing they’re not painted but rather the color of your floors. When we first moved into our house we had the same thing and I painted them out to match the baseboards – I think of it as part of the wall and think it adds some heft to the baseboards. My coworkers are with me on that. Curious if you’ll paint yours or go as they are.
Thanks!
YoungHouseLove says
We just go with however they are in the house (we like keeping it cohesive and in every room). So here, even where the trim was painted white, the quarter round was always refinished to match the floors. So instead of running around every room and painting quarter round (which I’d totally do if I had the time, haha!) we’ve focused on bigger projects that we notice a bit more (since it blends in with the floor anyway). And the funny thing we’ve learned about unpainted quarter round is that it hides hair and dust and scuffs much more than the white kind does, so that’s a plus!
xo
s
Marie says
Thanks so much for hosting. As a relatively new blogger I always appreciate it when my favorite bloggers host link parties. This challenge gave me the motivation I needed to do a project. My project (3D paper tulips) took me less than an hour and it really brightened my guest room. I also enjoy looking at everyone’s links and discovering wonderful new blogs to read. I discovered several of the blogs I read regularly through link parties. Thank you!
Laura says
Love this look!
I have a design question. I have similar hardwood floors and I have a question about the quarter round molding that joins the floor and the baseboard. I would like to paint my quarter round the same color as the trim and lose the stained look. Have you ever heard of this? Or seen it? Or thought about doing it? I’m going to do it just because I think it will make the trim more prominent (and it will match better than the stain used on the trim and the floor). Thanks! Love it!
YoungHouseLove says
Oh yes, many folks do that! We just do whatever is done throughout the house (we didn’t want to paint all of our ours, so since it was stained we left it). But many folks paint it!
xo
s
Katie S says
My comments keep getting eaten up by your spam filter (I think)!I have tried commenting to add my flickr link 2 times now and it keeps disappearing. Boo!
In the past I have had this same problem on your blog. Please help, I’m not spam, I promise!
YoungHouseLove says
Oh man, sorry Katie. Maybe try submitting the link as a bit.ly (http://bit.ly) link and perhaps our spam filter will play nice that time?
-John
Laura says
Oh my word! Emily and I were asking the same thing at the same time. I’ll read your answer there!
John @ Our Home from Scratch says
Wow, it looks great! And you were able to knock it out pretty quickly! Looking forward to the how-to. Looks perfect.
Kim says
Absolutely LOVE the board and batten. I’m looking forward to the breakdown. I wanna see how much it costs, ’cause I’m dying to do some in my hallway!
Emily@Decorchick says
Aw thanks guys! So glad you were able to use my tut as a reference too and thanks so much for the linky love. :) Man that post is almost 3 years old and my old photos make me want to GAG! haha.
Your B&B looks killer. xxoo
YoungHouseLove says
Thanks Emily! We really appreciate the post (even if it is old!) for giving us some confidence on this project!
-John
Jenelle Ricci @ Del Mar Fans & Lighting says
You guys did such an amazing job! Love it! My fiance and I are in the process of buying a new home! I would love to do a project like this. If you don’t mind me asking, how much did this cost you to do?
YoungHouseLove says
We’ll cover that in detail tomorrow, but since we had most of the materials on hand (paint & tools) it only cost us $57 for all of the wood and $70 for the nail gun.
-John
CFBetcher says
I’m so excited! Not only did I take the Pinterest Challenge, I also created a Flickr account in order to share it with you!
http://www.flickr.com/photos/cfbetcher/sets/72157632876805192/
I chose an Animal project that I wanted to do anyway, but I knew you would particularly love it too! This also completes my daughter’s art spot, topsoil that’s amazing.
Love the board and batten! We did it in our half bath with wallpaper above.
YoungHouseLove says
Haha, I love it! Put a forest animal on it!
xo
s