It’s Wednesday the 14th… so it’s time to share this season’s (completely unofficial) Pinterest Challenge (not sponsored by Pinterest or anyone else, just dreamed up by Katie to make us stop pinning and start doing).

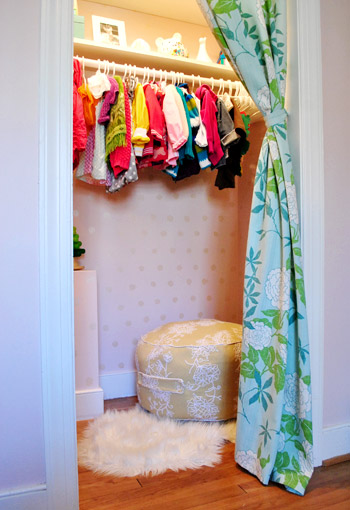
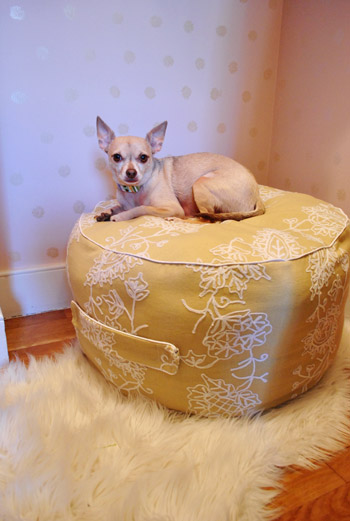
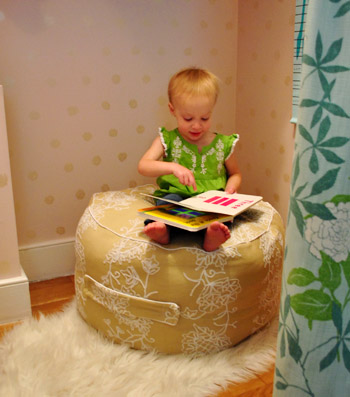
I actually tackled a homemade beanbag for Clara’s closet, which I mentioned last Wednesday when Katie, Erin, and Cassie and I issued our little get-off-our-bums-and-make-something challenge.
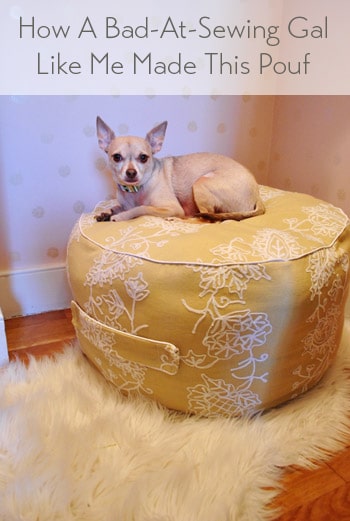
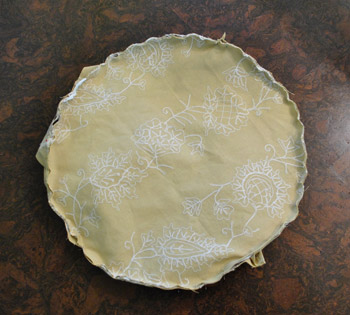
As are the rules, I took inspiration (or Pintspiration, har-har) from the projects below and then I did my own spin. Which added up to this comfy little bean-bag…
… for the bean to plop down on…
… or the pooch to hang out on…
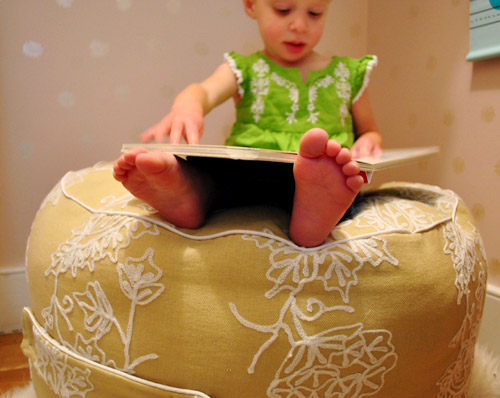
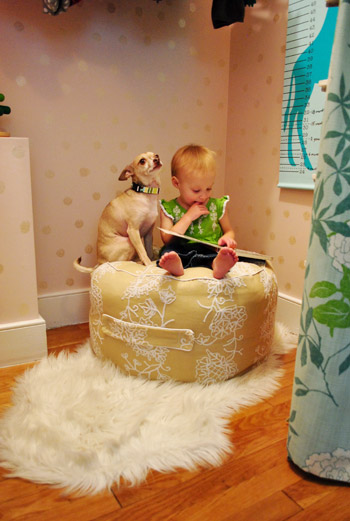
… or for a toddler reading to a chihuahua…
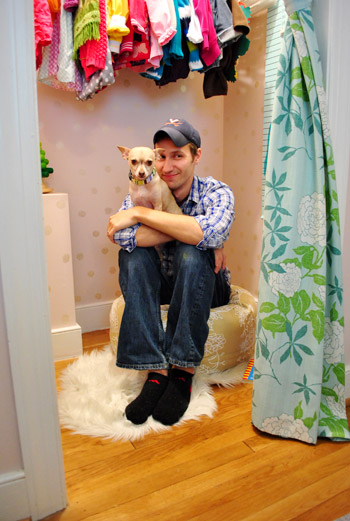
… or a tired momma or daddy (it works for that too).
And after declaring my goal, two kind commenters shared a link to this blog, which had an awesome tutorial that I decided to go with.
It was clear, concise, and pretty darn easy to follow, even for a novice like me, so I can’t say enough about how much it came in handy! Oh my gosh, and I actually mastered piping. This is big guys. So big I actually had to call my mom and tell her. Big sewing strides going on in our house. Haha.
My method? I just crossed my fingers, tried to follow the instructions, and did my own riff when it came to size (I wanted something a bit bigger than 17″ wide, so I made my pattern 22″ wide (by just sizing up the instructions that were over here). But seriously, a seamstress I am not. So all you fancy sewing folk try to hold your giggles as you read about the most-likely-not-proper ways that I cobbled this thing together. The result is comfy, looks good, and gets two toddler thumbs up, so I’m thrilled! And it made all of that sewing machine wrestling (more on my tumultuous relationship with my sewing machine here) worth it. And now, more pics:

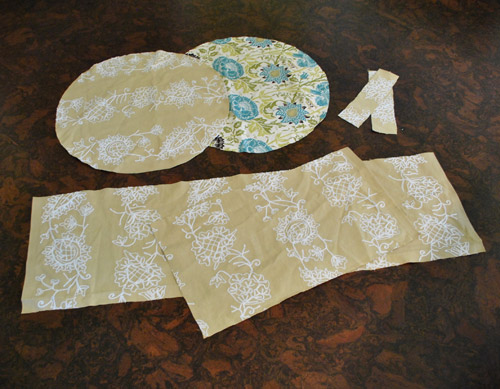
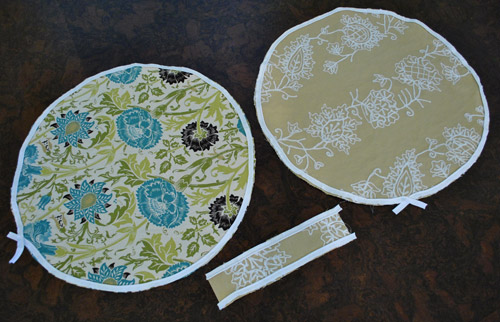
And here’s how I made it (there are much clearer explanations and pics over on this blog, where she clearly knows gobs more about sewing than I do!). First I cut out two 22″ circles, two tabs to make the handle, and fabric to make the rectangular-wrap-around part (all measurements/pattern details are on this blog). I used leftover fabric that I had from a book project actually (wahoo, secret sneak peek!) but only had a yard so I was just shy of having enough to make the last circle so for the base I just used other fabric I had on hand (both are from a local fabric store called U-Fab but I don’t know the fabric name/model since it’s an outlet – so sorry!).
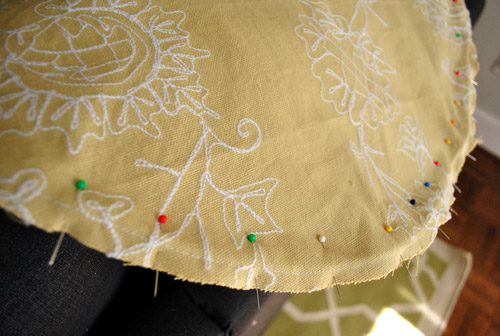
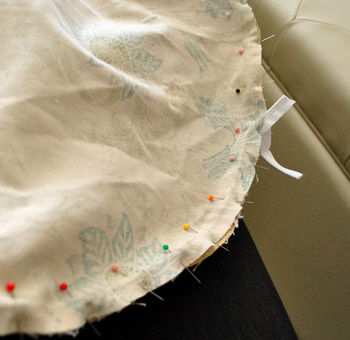
Then I pinned my piping around the perimeter of the fabric (piping side in, with the end lining up exactly with the perimeter of the fabric, print side up).
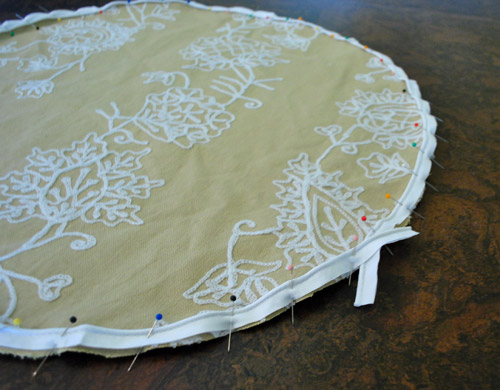
And I left the ends like this as directed in the tutorial. I also did the same thing for the other circle of fabric…
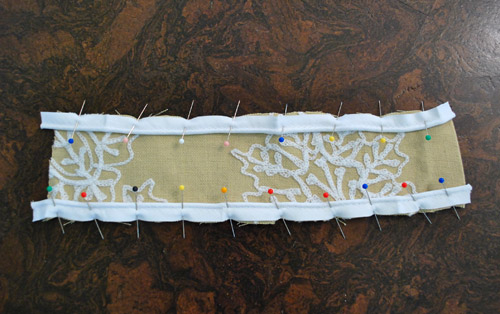
… and used piping on either side of one of my fabric tabs to make the handle.
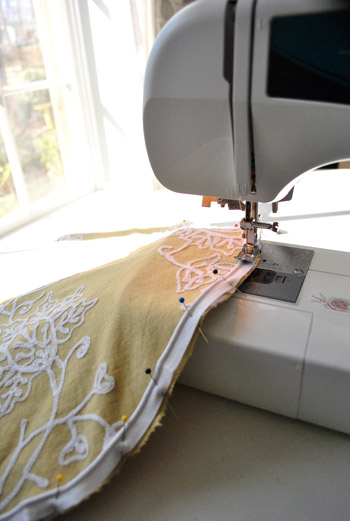
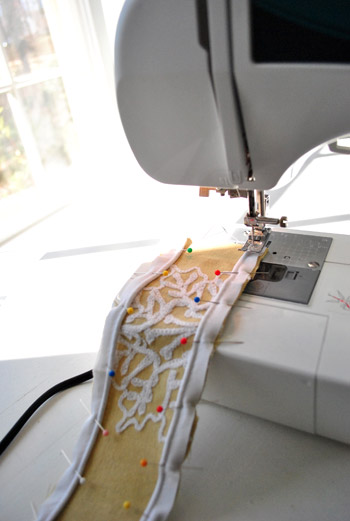
Then I stitched them all on the sewing machine, being sure to follow the stitching in the piping with my needle. I thought it would be hard to stay right on top of that line of thread, but it was actually really simple and I got into this zen-like rhythm with it. So there’s hope for non-sewers out there (I would have laughed if you told me last week that I’d describe any sewing step as zen-like).
Then I did the exact same thing with the other circle…
… and also ran a little stitching along the piping on each side of the handle.
Then I had these:
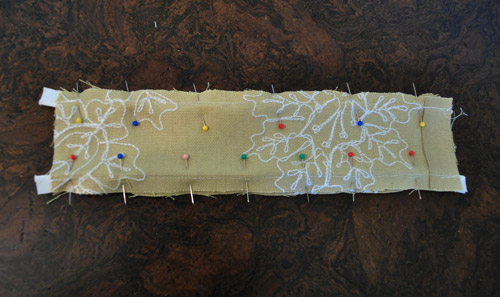
Next I pinned the other side of the handle to the first side (print side in) and stitched along the thread on the other side that I had stitched when I followed along the piping.
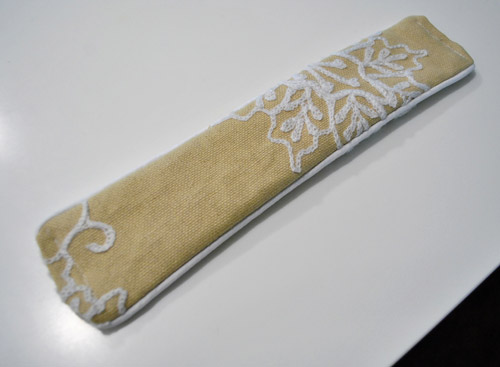
Then I turned it inside out, which is where I got to see my purrrty purrrty piping. I know it’s just a handle, but at this point I ran outside to show John. Seriously, I was proud with a capital P. Then the sewing gods brought me back down to earth.
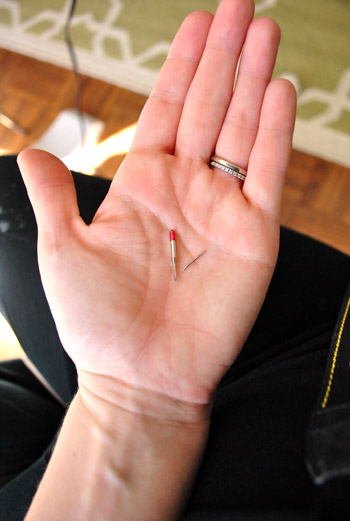
While sewing the ends closed (just tucking them under and running them through the machine to get a line of thread to hold the handle closed) I broke a needle. Bam! And it was scary and frustrating and all that jazz. But I got back on the veritable horse. Thank goodness my sewing machine came with some extra needles so I just popped one back in there and was off to the races again.
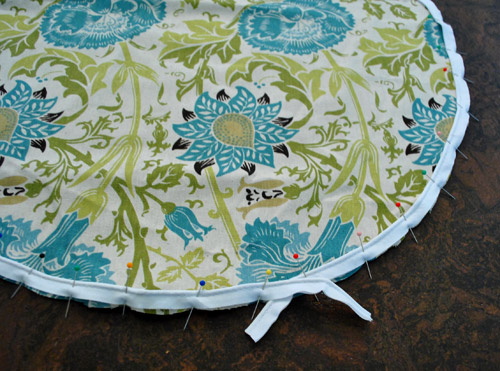
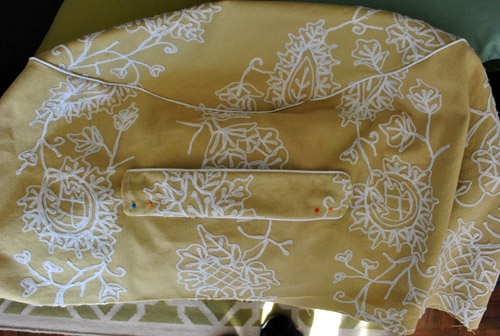
Next was pinning the circle to the long rectangular piece of fabric that wrapped around the entire perimeter (print side down).
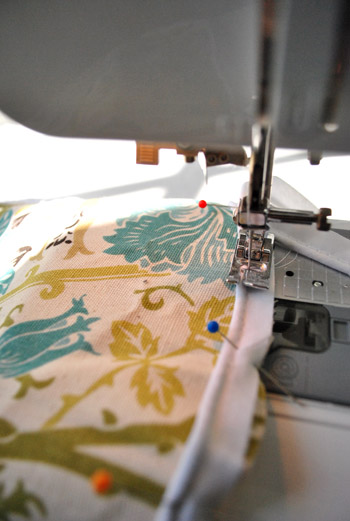
Then I ran that through the sewing machine, again following the line of thread that I made when I sewed the piping on. See that subtle line of white thread around the perimeter below? I just stitched right over that.
And then turned things rightside out, to see this beautiful sight. Wahoo! A partially piped beanbag! Then I pinned my handle in place and stitched that into place by making a box with an X in the middle of it (there are great pics of this on the site with the tutorial that I linked to ten million times above).
Then I turned it back inside out and pinned the other circle to the bottom of the rectangular piece of fabric that creates the middle part of the beanbag and stitched along the piping thread line again.
Except I didn’t seal the whole circle because I needed to turn the whole thing rightside out again…
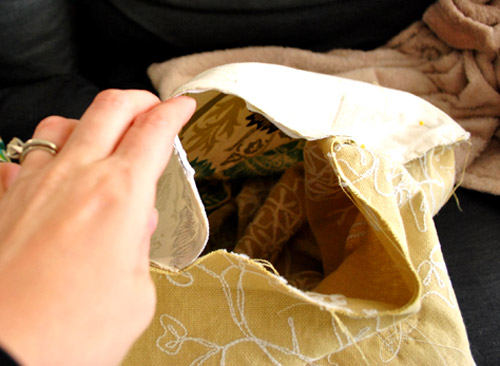
… and stuff it with batting (I used four old pillows we had stashed in the linen closet that were well past their prime for the guest room but perfect for being recycled as beanbag innards).
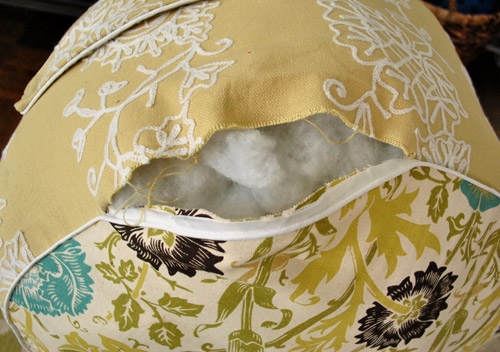
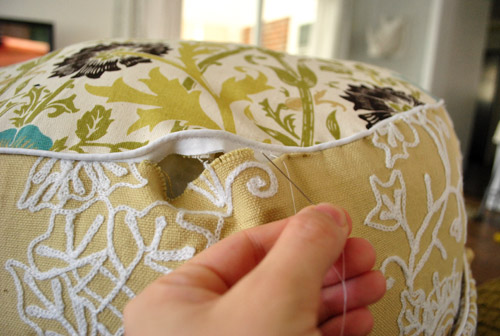
Then I hand stitched it shut. I gotta admit that I purchased a zipper in the hopes of adding that (so I can unzip it and remove the batting to wash the cover) so I hope to “upgrade” my little beanbag someday. But in the meantime, I can always use a seam-ripper to open the hand-stitched part and just resew that up after I run it through the wash (sewing this five inch part shut took about four minutes total).
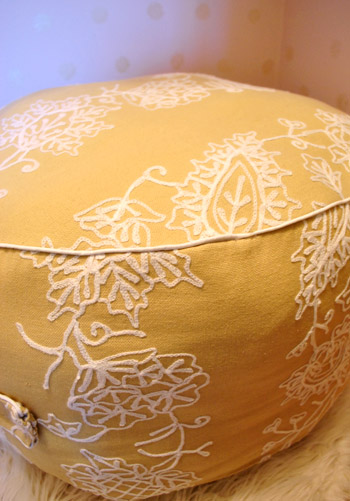
And now for the craziest thing of all. See how the pattern on the top of the beanbag sort of curls over the top and drips down the side since it all lines up?
Um, yeah, that was an accident. The fabric was inside out at that point, so I randomly pinned it and stitched it and turned it rightside out later and said “holy cow, that was the best accident ever.” John even noticed it and sweetly complimented me on my “attention to detail” later, to which I sheepishly responded “total accident, dude – the fabric was inside out and I didn’t even notice- I just randomly pinned it and sewed it up.” How crazy is that? Must be beginners sewing luck.
So that’s how it all went down. Of course for the tenth time, this tutorial is waaaay better than mine, so be sure to check it out if you have any questions! Now for the money stuff – here’s the budget breakdown (thanks to a bunch of 50% off coupons at JoAnn):
- $0 for one yard of leftover fabric (originally from U-Fab here in Richmond)
- $2.38 for two 25 yard packs of white piping (from JoAnn thanks to coupons)
- $1.19 for a zipper that I vow to someday add (from JoAnn, again thanks to coupons)
- $1.50 for white thread (from JoAnn)
- Total: $5.07
Oh and don’t forget to check in on Katie, Erin, and Cassie to see what amaaaaazing projects they whipped up (they’ll be sharing theirs sometime today as well)!

And now here’s the part where we invite you to share all of the fun Pinterest Challenge projects that you guys have tackled in the last week (right along with us, well at least virtually with us). If you’ve already blogged about it, just:
- click on the blue “Add Your Link” button with the odd cartoon head at the bottom of this post (you might have to do some scrolling, depending how many projects are added)
- add a link to your specific blog post about your project in the url field (not your home page)
- where it says “name” write a descriptive name for your project (ex: “Homemade Beanbag”) as opposed to your actual name
- we’d also love if you could quickly link back over to our project posts within your own (here’s Katie’s, Cassie’s, Erin’s, and ours) – it’s also nice to link to your inspiration project on Pinterest as well as to directly link to the original project/site, just so they get some love too.
And if you’d rather just link over to your project in the comment section, feel free to do that – or even add a link to a free photo sharing site like Flickr with your pics if you don’t have a blog (remember to set the gallery to public so we can all see it). We can’t wait to see what you’ve been up to! Freaky-deek-excited doesn’t even begin to describe it.

Karen says
I used a lint roller to clean a lampshade, but I don’t have a blog and didn’t take pictures of it. I also made s’mores bars which even my dessert-phobic husband loved (he ate more than I did and I’m 8 months pregnant)!
p.s. I did both of these things without remembering it was pinterest challenge time (8 months pregnant= hopelessly forgetful), what a happy accident!
RobinDenning says
I have always known there is a seamstress inside you. Glad to see it coming out.
And I do the same thing all the time regarding zippers and pillows. It really is easy to pick it apart, wash it and hand-sew it back together.
Yay for you!!
Shannon @ Compartment Life says
Which of the submissions did you guys enjoy the most?! I loved the bean’s beanbag poof. Great job sewing!
YoungHouseLove says
It’ll take us all night long to check them all out, but we love every last one of them!
xo,
s
Meredith says
Ah! LOVE what you made! I’ve been wanting to make some version of a floor cushion/bean bag for my husband (yup, that’s right, my husband…) so hopefully this will be the push to get me started. This weekend I made blocks for my daughter:
http://offboulevard.com/2012/03/block-party/
caroline @ c.w.frosting says
Impressed with your sewing, not to mention the piping! I do most of my “sewing” with a glue gun. Finally did some pinterest projects coinciding with your challenge, yay! I usually don’t get around to it in time. Thanks for hosting!!
Michelle says
It looks great!
I only got through page 1 of comments and see that someone mentioned using a zipper foot for piping (you should totally mention that in your write up since the original tutorial did not). Changing feet is generally quite easy and your manual should explain it.
Also, my other tip to make this project easier – is if you leave an opening for turning and stuffing along the straight line of the rectangular side panel instead of along the curved top/bottom circle – that will be easier to hand stitch closed. (I hope that made sense.)
Finally, the rectangular panel is IMO the best location for a zipper. Which you can add to your next pouf (because to put a zipper in this one – you’d basically need to take it apart to add the zipper at this point. Seriously, if you can sew in piping you can sew in a zipper.
YoungHouseLove says
Love the tips! Thanks!
xo,
s
oneida says
WOWWW! that is super amazing that you did that! i am a novice too. i was going to put a novice ‘sew’er but now i am realizing that looks like sewer. definitely not a novice sewer. it is really beautiful and looks like it would be $220 or something at anthro ha ha
Lisa Ornelas says
I love it Sherry! I know you don’t sew much, but you can not tell. Love the piping! I just made a pouf for my sons room from the Amy Butler “Gumdrop” pattern. That’s an easy one as well. :)
Where do you guys get your sheepskin rugs? Is it the Rens from Ikea? I want to get one for my sons room but they seem so small.
Thanks!! And congrats on the Pouf/ottoman!
YoungHouseLove says
They’re the faux sheepskin ones from Ikea! I love that they’re bigger and washable (and animal friendly!).
xo,
s
Samantha says
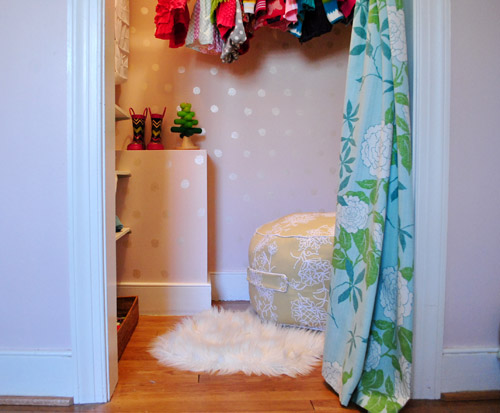
Great idea! And it goes so well in Clara’s closet! Thanks for hosting!
Elisha says
These challenges are going to make me start back blogging again.
Heidi P. says
Wow! Awesome job! I was under the impression that piping was tricky, but you make it seem like a breeze! Way to go!
Jenna at Homeslice says
A-MAZ-ING. I know you don’t consider yourself a pro sewer, but I am seriously impressed. I would never know that bean bag was homemade! The piping is especially great. love it!
Caroline says
One handy tip about zippers — they’re easiest to install in straight seams, so the simplest place to insert one in this poof is in the seam that makes the rectangular side into a tube. (I can’t quite figure out when that happened in the above stages, but I know it must have! :) ) That also tends to put the zipper automatically on the “back” side of the poof.
Good luck!!
YoungHouseLove says
Thanks for the tip Caroline!
xo,
s
Alyssa says
Holy monkey! It looks excellent. You’re faaaar too humble re: your sewing skillzzzzz. I really need to give up the hem tape and find a good deal on a sewing machine.
Kimberly says
What a beautiful job! Clara is one lucky girl to have such a sweet little space. I’m jealous of that closet and I am 44 years old. ;)
Heather says
This turned out so great!!! You give me courage to pull out my sewing machine again.
Shaina says
Maybe someone already posted this…but I wasn’t about to read through all of the comments to find out… ;) Anyways, I don’t know about the beige fabric, but I know the fabric with the blue flowers is called “Sweet William”. I’ve had my eye on it for some time over here…
http://www.tonicliving.com/productsdetails.asp?productid=1185
Oh, and AWESOME job! :)
YoungHouseLove says
Oh yes, thanks for the tip Shaina!
xo,
s
Hannah @ Figuring Out Life says
Simply awesome! I can’t sew anything (not even to put a button back on a pair of pants), so to see a project like this is intimidating. But hearing your story gives me hope that one day I might be able to tackle projects like this when I have little beans of my own!
P.S. That fabric is gorgeous!! :)
Kaity says
I’m so excited by this I want to run home and make one right now! And I never knew that’s how the whole piping thing worked *super excited face*
Kal says
Love how it turned out. I am trying my own challenges too- on a much smaller scale. Lol. Pinterest rocks, they have such great ideas. Can’t wait to try something bigger than these:
http://kalcountingcows.blogspot.com/
Thanks for starting the “challenges.” It’s fun to follow along and try some new stuff :)
Linda @ it all started with paint says
Love the pouf. Love the fabric. Love the baby. Love the pup. Love the baby reading to the pup.
Love how excited you were about the piping!
:)
Linda
P.S. Thanks for hosting this fabulous party and inspiring us all to get off our big old bloggy butts and do something!
YoungHouseLove says
Aw, you’re welcome Linda! It’s our pleasure since it’s so much fun to feast our eyes on all the inspiration!
xo,
s
Heather says
Awesome job on the “poof”!!!! I’m just starting to sew and I think I’ll have to try one myself! This was my “big” Pinterest project – http://lifeasthepatels.blogspot.com/2012/03/happy-march.html
Heather says
Technically, this one was more complicated…
http://lifeasthepatels.blogspot.com/2012/03/my-gift-for-grayson.html
Jessica says
It looks so great and I love that material! I’ve never used piping before, but I think you’ve just inspired me to try it out some time.
Jenny says
While I love the beanbag, my question is about the bean: Where did you get that darling green shirt she’s wearing? And for that matter, where do you tend to shop for her clothes? She always looks like a little doll!!
YoungHouseLove says
Aw thanks! Lots of her clothes are hand me downs and all the rest usually come from Old Navy (on clearance) – like that shirt!
xo,
s
Brittany says
ADORABLE!
Kristin says
I LOVE the fabric you chose for your cushion, which looks awesome by the way! I made two of these for my friend’s twins birthday this past year (I posted it to her Flickr group, they’re the denim ones). The kids loved them and they call them their tuffets (haha). I never imagined that I’d be able to make them either, but they were so easy with the instructions on her site! :)
Emily says
Congratulations! I’m really impressed with how quickly you have learned to sew (and that you were able to sew piping so well without a zipper foot!!) Looks great!
Katherine W says
That looks awesome! Now I’m inspired! Great job!!
I don’t have a blog but pinned my own little boot tray project on my own board, so here goes.
I used a cookie sheet I almost threw out (because it was sad and old), some spray paint and some 12″ x 12″ pebble tile that I cut to fit. I have a 10 month old so I couldn’t have any loose choking hazards around. I think it turned out well and I am excited to have a place to put muddy or wet shoes now instead of tracking things all over the house!
During:
http://pinterest.com/pin/139541288424321171/
After:
http://pinterest.com/pin/139541288424321136/
Sandra says
Hi Sherry,
I think it turned out great! I’d like to may one of my own for my own little beanie baby (and my two doggy babies) but had a question … did you sew over your pins? I’m a little new to sewing and it looks as if you had in some of the images (since I see pins and stitches).
Sandra :-)
YoungHouseLove says
Oh no, I pull them out as I go, but I do it at the last second (right before they go through) so my fabric stays in place!
xo,
s
liz says
if you thought sewing piping like that was zen wait until you try it with a piping foot. if you have a new machine it’ll likely be a snap-on snap-off situation for the easiest foot switching ever! give it a try :)
YoungHouseLove says
Thanks for the tip Liz!
xo,
s
tara says
hi sherry! the bean bag looks so professional… i can see why you are thrilled. i recognize your leftover fabric! i used a different-hued version of the same print for a poof in my living room. mine has pink and orange flowers instead of the black and blue on yours. anyhow, i bought the fabric at Calico Corners, which is a chain home decor fabric shop. also, just did a quick search and found it on their website! it’s called Mingei White.
http://www.calicocorners.com/product/designer+fabrics+for+the+home/shop+by+pattern/floral+and+foliage/mingei+white.do
and… you can barely see a corner of my poof in a post i did on a different sewing project… it’s after step 6. :)
http://indecentorder.blogspot.com/2012/02/kitchen-wipes-how-to.html
YoungHouseLove says
Thanks for the fabric tip off Tara! Love your pouf!
xo,
s
Jen @ HaHas for HooHas says
I love Pinterest. And hate it. There, I said it! It’s made me a perfectionist/monster/hoarder/freak show.
Annnnnnd, I may or may not mentioned you both in a story about Pinterest.
http://hahasforhoohas.com/pintervention-funny-story/
Love the new bag for the Bean though. :)
YoungHouseLove says
Haha – too funny!
xo,
s
Rivka says
That is a huge project to tackle as only your third one! WOW! But isn’t this a pouf not a bean bag chair? There’s no “beans!”. Beans or pellets would make it more loungey too. Well with all my advice I could never make such an amazing project no matter what it is!
YoungHouseLove says
Haha, yes, I guess technically it’s a pouf, but it’s nice and fluffy. You sink right in (see how compressed it gets when John climbs on?).
xo,
s
Lynette says
Thanks for the challenge! We have a monthly Pinterest party with a group of crafty friends. This Saturday night is “Button” night. We make a board where each of us can pin ideas…and recipes of course..gotta have a little food too!
Heather says
So, so proud of you!!! Way to go, Sheri! It looks beautiful!!!
Heather says
Sorry! I meant Sherry!
Andrea says
Oooh Sherry, so inspiring!! It looks like even I could do it :D
Sarah says
Your Pinterest challenge is fantastic! And allow me to encourage you. I am in a combat zone and have done more pinterest projects here in Afghanistan in the last year than I have done in a lifetime stateside. I have made mini albums, giant paper stars, plaques for our doors, cake stands out of found things in the CRSP yard etc…If I can do it in an “austere” environment, then there should be no excuses stateside LOL!!!! Keep up the good work, your blog is something I look forward to.
Laurie says
Sherri,
So glad you chose this project. When I saw it I knew you could do it! The ones my daughter and I made turned out great for my 10 month old granddaughter Evie. She loves crawling to them and face planting-so cute! I linked a pic.
Fallon says
Totally random, and has nothing to do with this post – but did you know that when you Google “backyard wedding decor”, you guys are the first link that comes up? :)
YoungHouseLove says
No way!!!
xo,
s
Jena @ Involving Color and Home says
I love the bean bag! I actually used the same flowery fabric on my no sew roman shade that I just linked up. It’s from Tonic Living called Sweet William Teal. I love how it looks on your project!
Elizabeth says
Sherry this looks incredible! You should be so proud of yourself!
Nora says
Love the bean bag! It looks so cute there! You guys inspired me and I’m so happy I got to participate and make my own project (diamond tufted headboard)!
sara says
hello…
I love it…is pretty…
can you invite me to pinterest?? pleaseeeee
thanks
sara
YoungHouseLove says
Just pop over to our facebook page to ask someone to send you an instant invite! They’re usually really fast about that!
xo,
s
Ashly says
Way to go! I’m a fairly experienced sewer and I’m impressed that you took on this project- piping is tough! The bean bag turned out great! BTW- Try to change your needle after every project. Also, use a needle based the material you’re sewing instead of the Universal needles that come with the machine- it’ll make sewing much easier and prevent needle breaks in the future.
YoungHouseLove says
Great tip Ashly!
xo,
s
Jane says
I too love UFab. I shop at the one in Charlottesville. Here is the link for the Richmond store: http://www.ufabstore.com/u-fab/u-fab_-_discount_fabric_outlet.html If you see a fabric online, you can order it by calling them. They also have a FB page.
Heather H says
We are in the process of creating a pinterest kitchen. Pinterest was invaluable when I was choosing our design elements. I took elements from lots of photos to create what will hopefully be my dream kitchen.
Barb says
Don’t know if you still check comments the day after a post or not, but just in case you do, I thought I would post this question here. I know there has been some talk in the blogosphere about potential lawsuits arising from pinning content that doesn’t belong to the pinner. Has this changed the way you pin? Have you deleted pins/boards because of this? I was looking at your boards today and I could have sworn you used to have more pins and/or boards. Any thoughts on this developing story?!
YoungHouseLove says
We love pinning from sites that have a Pin It button (like we do at the bottom of our posts). This way we know the person welcomes pinning (we love it!) and has added that button to make it easier!
xo,
s
Meghan says
Hi Sherry,
I love the bean bag. Great job with the sewing too! Just curious, is that wallpaper in the closet? If it is, do you remember what wallpaper it is? It is too cute!
YoungHouseLove says
It’s actually a potato stamp I made and stamped the walls with metallic paint! If you search “potato stamp” I think it’ll come up!
xo,
s
Lisa Leake says
I love how it turned out (and the fabric too)! I am not sure if anyone else mentioned this in the comments, but using a “zipper foot” while sewing piping could make things a little easier. That’s how I sew trim, and it works well.
YoungHouseLove says
Thanks for the tip Lisa!
xo,
s