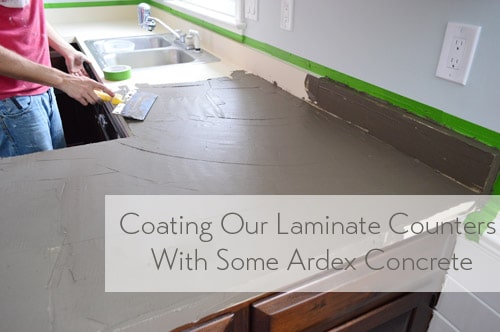
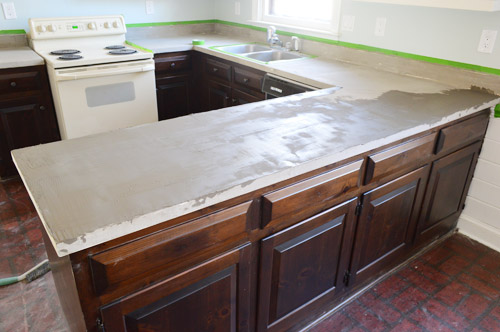
So we did it. We concrete’d our kitchen’s laminate counters. Sherry shared this quick peek at our first coat in Friday’s post, and we’re back with the final results, the details of how we got there, and an in-action video to hopefully help explain the process.
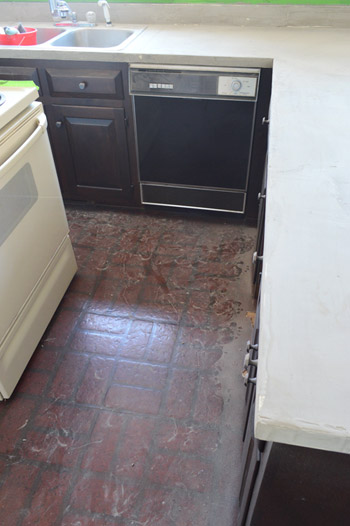
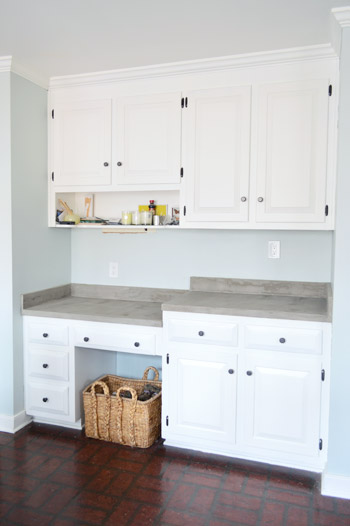
We’re really happy with how they turned out. Pictures don’t do it justice, but the whole room feels a lot more updated and less laminate-y. It’s giving off kind of a stark/cold vibe in these photos, but after we add some colorful window treatments, stuff on the shelves/counters, and remedy that bad faux brick flooring (and that almond stove) we think it’ll feel like a whole new room.
I’m not going to sugar coat it, though. It was a lot of work. And a lot of dust.
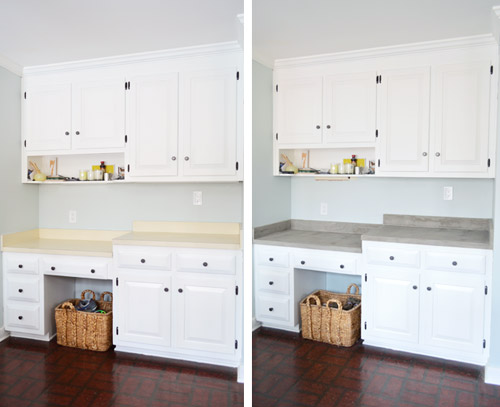
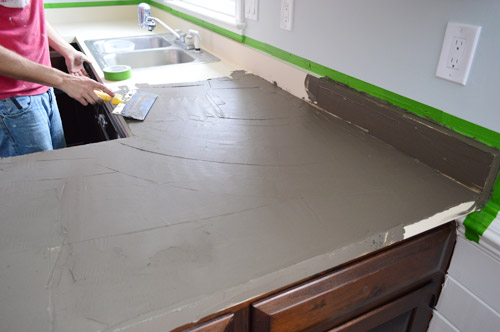
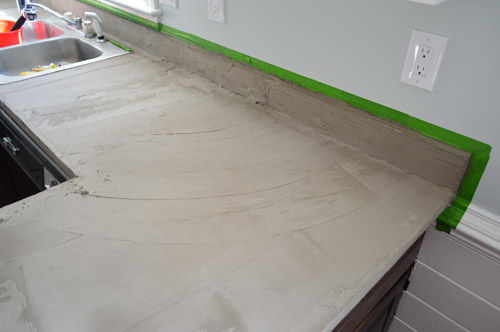
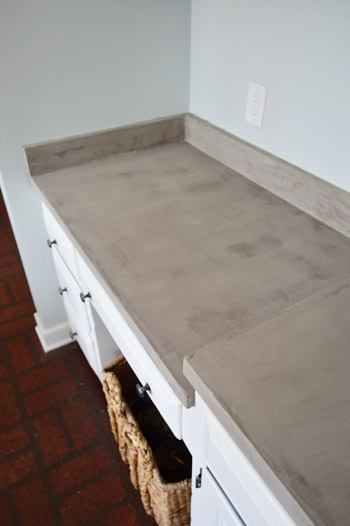
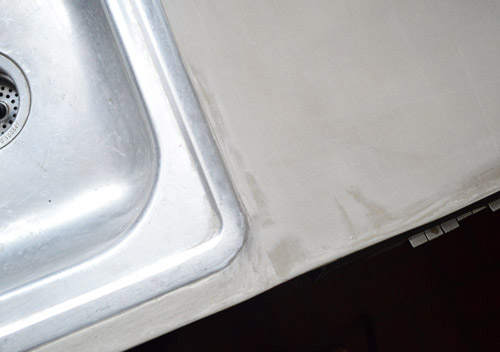
Here’s a reminder of what the counters looked like before. We had creamy-yellow laminate (with the occasional burn mark or scratch). In addition to the main kitchen area, we also gave the concrete treatment to the nearby nook by the eat-in part of the kitchen. We haven’t sealed the counters yet (we haven’t been able to track down either of the two products that our research points to using), so the color will probably get a bit deeper after that step.
We did this using Ardex Feather Finish, which we’ve been really interested in trying since seeing a few other attempts like these from Kara Paslay, Little Green Notebook, Sarah’s Big Idea, and A Beautiful Mess. Somewhere between all of their pretty pictures and the low price tag for Ardex ($19 per bag) I had assumed this would be a quick and easy task. Oh silly me…

Maybe it was because we’re first timers, or maybe it was because our work area was especially large (we were dealing with 45 square feet of counters thanks to the U-shaped area in the cooking zone and the nook area by the table), but it turned out to be a tiring and messy job that spanned across five days. It wasn’t very complicated or difficult, just more labor and time intensive than we realized we were getting ourselves into. So let’s dive into the process. Forgive our photos for not being chronological. We took a bunch throughout our four rounds of applying/sanding the Ardex and I’m just using the ones that are most helpful. Let’s begin with supplies!
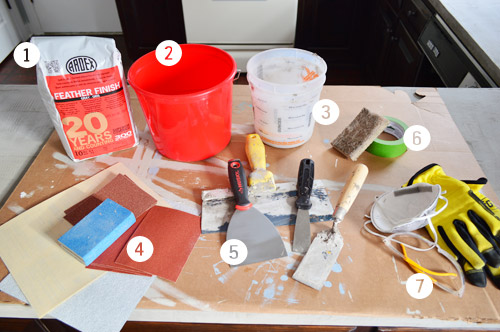
- Ardex Feather Finish, obviously. It’s not easy to come by, but you can hunt for a local distributor on their site or just follow this affiliate link to get it on Amazon. We ended up using 2.5 bags, though I think we applied it a bit thicker than necessary.
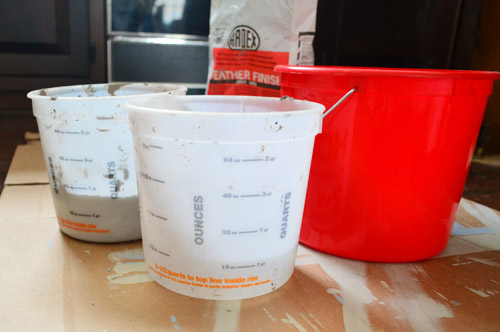
- Mixing buckets: We used one of these small red buckets for mixing our Ardex (it mixes with water). We made pretty small batches, so this was a great size.
- Measuring buckets: We used these (one for water, one for Ardex powder) to make sure we were mixing the right ratio in our red bucket.
- Sandpaper: A variety of grits – both high and low, as well as a sanding block for easy gripping. We used mostly 60, 120, and 220 grit.
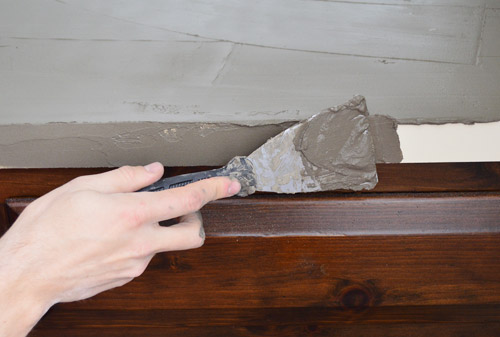
- Spreading tools: We used the flat trowel (on right) for mixing in the bucket, then used the other three for spreading. The big 10″ drywall knife was good for big flat areas, the 4″ putty knife was great for backsplash and edges, while the small guy helped us get into tight spots, like around the sink.
- Stuff for keeping walls clean: We kept a sponge and paper towels on hand to clean up any drips or splatters on the wall. We also taped off some areas too (more on that later).
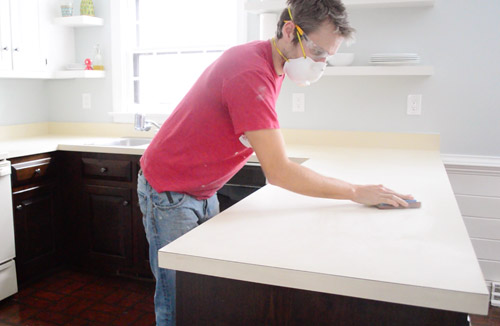
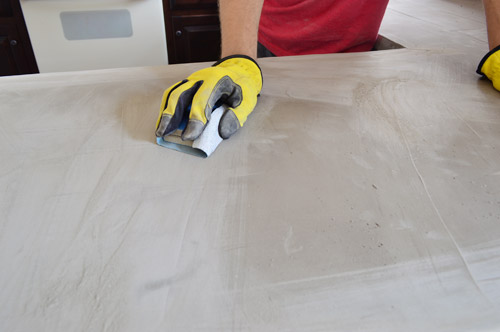
- Protective gear: During the sanding process the glasses and dust mask helped keep stuff out of our faces (Sherry preferred our heavy duty respirator) while the gloves were great for keeping our fingers from getting crazy raw.
Speaking of sanding… the first step was to rough up the existing counters with some high grit sandpaper. This was before we realized our fingers would be taking a beating from all of the sandpaper gripping. We wised up and added gloves and used nice big sanding blocks wrapped in high grit paper about ten minutes into it. It went much easier after that.
The Ardex bag suggests a mixture of 2-parts powder to 1-part water, but we found that balance to be a little bit on the thick side – making it hard to spread and what we believe led to our first layer being, well, on the thick side too. So we erred on the side of a bit more water from that point on.
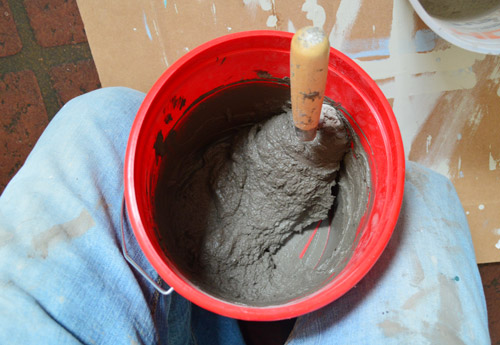
Like grout or thinset, the goal seems to be a toothpaste-like consistency. Thick enough that it doesn’t run or drip off your blade, but thin enough to spread easily. If you’re mixing larger batches it suggests a paddle mixer, but we did just fine by hand (Sherry took a turn mixing things too and didn’t have any issues doing it by hand). Since it starts to harden within about 15-20 minutes, we never wanted to mix up too much at once anyway.
Spreading it on the flat surfaces was kinda fun, in a weird way. It was like icing a giant cake and using a big 10″ blade made it pretty fast to get the big areas covered. The backsplash was another story, but we’ll get to that in a second.
Here’s a quick video Sherry took of me applying the third coat, since we thought it’d helpful for you to see the stuff in action. I’m not claiming my technique to be great or anything, but we did find we got a bit better each round (Sherry also thought we got better at sanding/smoothing each layer as we went). Which is good news because your first couple of layers will get covered up anyways – so they’re kind of like low-risk practice rounds.
When it came to doing the sides, we switched to a smaller putty knife. We usually did these after we had applied most of our mixture to the top, that way what was left in the bucket had set a bit more and was less likely to slide off the vertical surface.
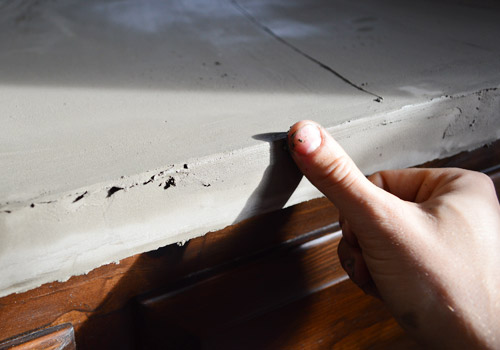
At first we found the edges to be challenging since it was easy for stuff to build up there. What we realized a couple of rounds in was that after about 20 minutes the Ardex had hardened to an almost clay-like consistency, and Sherry or I could come back and smooth the edges with a damp finger. My favorite part was sneaking up behind Sherry all Ghost-style to smooth them from behind her back. Who says there’s no romance in DIY?
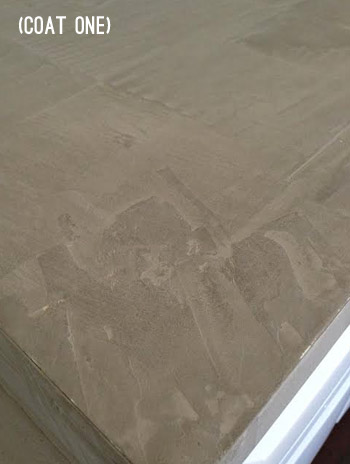
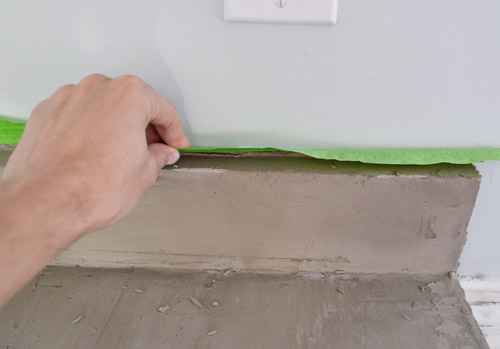
Here’s our first round after it dried. You can see Sherry taped off the wall to protect it when I lamented how much was getting on them as I went. In hindsight we’re still unsure whether that ended up being a smart decision. It certainly made us less paranoid about being messy as we went, but removal was a bit of a pain and not perfect since we were essentially concrete-ing the tape to the wall in a few spots.
We decided to ditch the tape after our second round of counter smoothing, so we slowly worked our way around the room peeling it off (we feared that too much concrete build-up would trap the tape in place forever). One thing that we found during this process was that pulling it down from the top (rather than ripping it to the side like we do after painting) did a better job of getting a clean edge and not just tearing the tape. But we did have to chisel it free in a few areas… so I’m not sure if it was a time saver in the end.
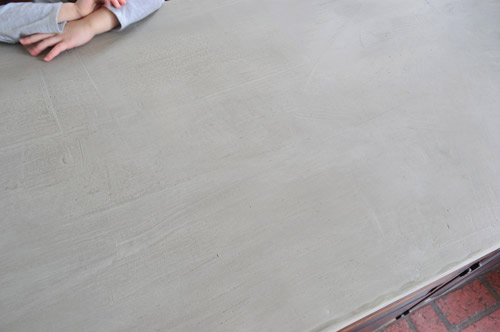
Things looked pretty rough after our first round (well, after every round actually). But that’s where the fun mess begins: the sanding step. Here’s where you smooth out any rough spots or ridges so that the next layer can go on evenly and ultimately get you to a flat, smooth finish.
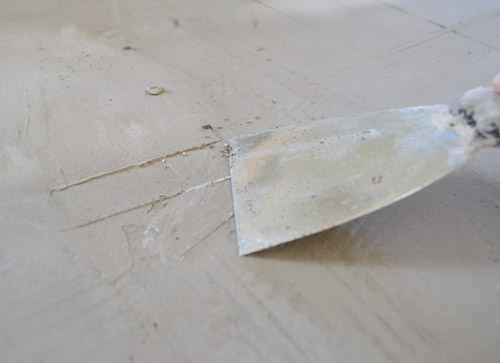
After letting the surface dry overnight, first Sherry would go across the top with a putty knife and scrape off any obvious ridges that were left by the drywall knife during the Ardex application. Even though it had hardened, it wasn’t tough to do. Blobs and ridges just popped right off as she scraped back and forth over them.
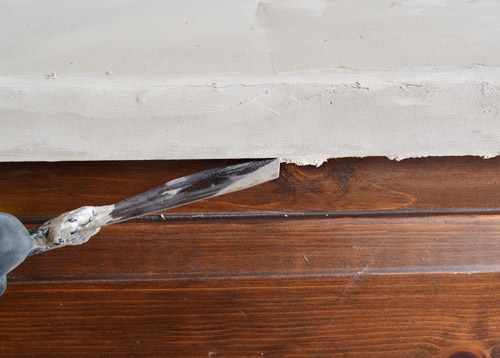
The most satisfying thing was cleaning off the bottom edge. Sherry realized we could just run our smaller putty knife along those and sheer off any irregularities, which left us with an awesomely crisp line on the bottom. Best part of this project by far. Could’ve done it all day.
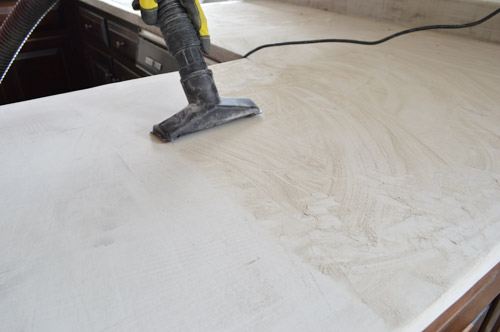
That step was quickly followed by our least favorite part: sanding, sanding, and more sanding. We chose to do it all by hand, since we feared that our power sander would just sand everything down to the laminate again (or leave rough ridges or marks as it traveled around the counter). Plus, with all of the tight spots like the backsplash and around the sink, we figured it would be easier to maneuver by hand.
We used a sanding block (for easy grip) wrapped in fresh sandpaper each time. For sanding every layer except for the last one we used a really rough 60-grit paper to make smoothing ridges and rough spots easy, but after the last coat of Ardex (we did four coats) was all smoothed on and dry, we switched to 220-grit paper to make sure we didn’t leave big/rough scratches in that top coat of concrete.
Sherry also realized that it was helpful for us to pause while sanding each section to vacuum off the excess dust as we went (thanks shop vac!). This was especially helpful because sometimes the dust would disguise an area that needed a bit more sanding. Plus, it just helped for sanity reasons, since we felt like we were keeping the mess more contained that way.
Speaking of which, the mess was the biggest surprise to us. Despite reading other people’s experiences with it (and obviously, we knew sanding was involved), I don’t think either of us had mentally prepared for the fact that there’d be a fine gray build-up of powder EVERYWHERE. And since the kitchen is such a central and highly traffic area of our house, keeping it clean ended up being a big time suck (after each round we would sweep, then vacuum, and then mop the floors to be sure nobody tracked anything throughout the house when they passed through over the five days that we worked on it).
After our first coat, we noticed the laminate was peeking through in a few spots after our initial sanding step – mostly on edges where it’s really easy to scrape everything off if you’re not careful. But that’s one reason you do multiple coats, so we weren’t too panicked.
Here you can see a second coat beginning to get applied over the first. Note the difference in color between the wet Ardex vs. the lighter stuff (that’s how it dries). We actually think once we seal it, it’ll get closer to the wet color though, so that should be interesting to see.
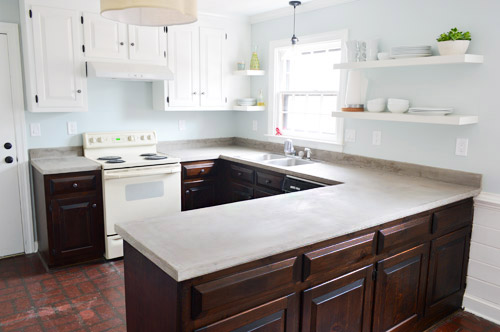
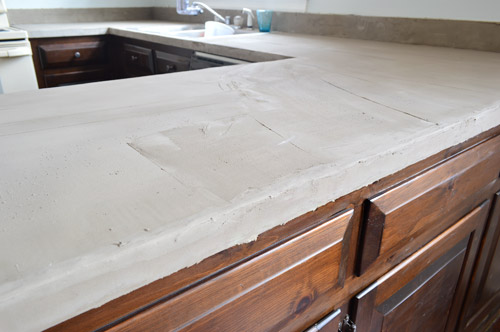
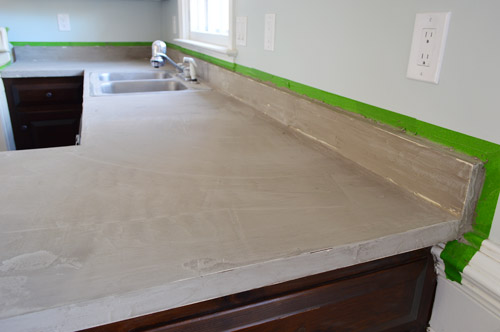
Here’s a shot of our final counters (well, pre-sealing). You can see it’s still not perfect, which everyone notes is one of the charms of this Ardex technique. You get that sort of imperfect, industrial look, but it definitely feels more solid & stone-like (as opposed to plastic-y like laminate).
I’ll admit that I had to come around to the idea of appreciating the flaws of the finish. Sherry was immediately charmed by it, but the perfectionist in me resented the fact that this type of project doesn’t yield perfectly uniform results. I think once we seal it I’ll appreciate it even more (that will darken it a little and remove the chalky finish in favor of a more polished look) so I’m really looking forward to that.
By far the hardest area to get smooth was the backsplash, just because it was a small area that was difficult to reach and seemingly made up entirely of edges and corners. So both applying the Ardex and sanding it was challenging and required a bit of body contorting on my part (lucky Sherry was too pregnant to reach it in most areas thanks to her belly being in the way, which had me slightly envious by the end of this process).
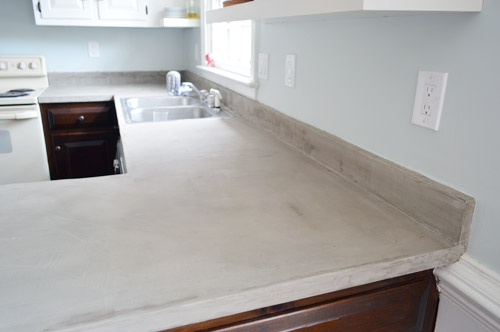
Another tough spot was around the sink. If this were our “forever” counter, I would’ve gone through the trouble of removing the sink, but we’ve got some old copper pipes that are pretty much corroded together down there (which would mean bringing in a plumber to switch this out). So we opted to save that for Phase 2 of our kitchen update and just taped / sanded around it. The results were actually better than I expected.
Challenges and flaws aside, we’re happy with the overall improvement to the space. It feels good to rid the kitchen of another old yellowed surface and make the room feel a bit more updated. Just cover the floor with your hand and squint – ok?
And although the time that we spent on this update was longer than we envisioned (probably around 15 hours spread across five days, including prep and clean-up) the cost was still pretty fantastic. The three bags of Ardex (again, we only needed 2.5 to do four coats) cost $57 in total – and we probably spent another $20 in buckets and sandpaper. So for 45 square feet of countertops, we paid just $1.71 per square foot to update it – which is pretty hard to beat.
That doesn’t include the sealer though, which is next on our list. We’ve read a ton of sealer reviews since it seems that the wrong sealer can cause more scratches, stains, and even issues like bubbling down the line – so we want to get it right. The two most highly recommended products seem to be Ardex Clear Concrete Guard High Performance Sealer and GST International Satin Seal Water Based Acrylic Sealer. Does anyone out there have a preference between the two? We can’t find either of them locally so we’re going to have to order one of them online and wait for it to come, but we’ll definitely share what we end up going with, how it goes on, and what it does to change this finish – as well as updating you guys on how these counters end up wearing for us over time.
Update: You can check out what we used to seal them here, and read an update on how they’re holding up here.
Psst – Wanna know where we got something in our house or what paint colors we used? Just click on this button:


Helen says
I’m so happy you guys did this! I’ve been tempted to try it for a while now, but my husband has been skeptical, so now I have something more concrete to show him (see what I did there?)!
Some questions:
-Did you ever think about doing this before doing the cabinets? We still need to update our cabinets, but aren’t sure which would make more sense to work on first – the cabinets or putting concrete on the countertops.
-Do you know how porous the concrete is in terms of stains/food? We had thought about wooden slabs, but decided against it for that reason. Once the concrete’s stained is it pretty easy to clean?
YoungHouseLove says
From what we understand when it’s sealed it’s nice and easy to clean (like stone counters for the most part). It would definitely work to do concrete before redoing your cabinets, although doing it this way didn’t seem to hurt them, so it’s flexible.
xo
s
Amanda says
Love this look & shared with the hubby over lunch today! He was curious about whether or not there would be an issue with the difference in “give” between the new concrete surface & the original countertop surface underneath. Imagine you’d have to put quite a bit of ooomph behind any pounding for it to even matter, but with concrete being more brittle, wondered if you’ve heard any accounts of ardex cracking when/if the surface underneath flexes. Now that I think about it, even foundation settling (or an earthquake?)could result in this. Grew up just west of Richmond, so know those are rare. :-)
YoungHouseLove says
We have heard of some people saying they had issues with staining and scratches usually due to the sealer they use I think? We also read one account of someone getting a bubbling issue, but the Ardex has polymers in it to bond to laminate (it’s made for this application) so it’s not supposed to crack or flake off. If you watch the video you’ll see John hitting it pretty hard with his spackle knife to knock some concrete onto the counter and it’s pretty strong stuff. We definitely will update you guys if we have any issues (stains, scratches, bubbles, cracking, or beyond!).
xo
s
Marcia says
Do you guys EVER run out of energy? Must say the countertops look great!!!
Melissa says
I just had to say that I got my adorable hooks in today…and by far, my favorite is the woven picture hanger! Unfortunately, the hooks on the key got bent in shipping so I’ll have to exchange that one next week.
The aqua octopus one just happens to match the awesome Neopolitan Dash & Albert cotton rug I picked out with my Red Barn Mercantile gift card. (Along with a really cool navy/white wool chevron rug, might I add, and a baby gift!) Red Barn generously stacked the promo code with my gift card.
Thanks so much again for the giveaways!
YoungHouseLove says
Aw thanks so much Melissa!
xo
s
Amy L. says
Thanks for keeping it real! I love how it looks, but would hire someone to do thus for me. Other bloggers made it look easy but it’s more labor intensive than I thought. :)
Tricia says
A friend owns a coffee shop and she used this type of product on her tables. She had some fun with the colors and buffed and sealed them. A year in and they are holding up well. One of her customers does custom faux stone castings for building restorations and he helped her with the tables.
YoungHouseLove says
Love hearing that!
xo
s
kathyg says
the gray with the white cabinets is really striking! love that. not so much with the dark cabinets. i think i see cabinet painting in your future!
stellamarbella says
Awesome as usual Petersiks! I was just looking at your stove and wondering if you’ve considered doing something fun with it, like a high temp enamel in a bright colour. It seems like since you have the ‘hot plate’ kind it might work pretty well. And since you’re not planning on keeping it long term could be a fun project. I believe some auto body paint places will do appliances too though I’ve yet to find one.
Carla says
It’s the moose woman again!
I’m getting this image in my head of how the counters will look when polished, sealed and polished again. If they turn out looking more like gray slate, that could be pretty awesome with the white cabinets.
I think my big concern is that the counters do look like laminate covered in concrete. It seems like an insane amount of work for something you may want to overhaul when you start exploring a redesign of the shape and size of the counter tops, especially what could be a bar area. I think your eating nook area needs more stuff going on. I’d love to see some stools and a nice overhang on the counter. Your kids will love playing there as you work in the kitchen.
But I know they’re going to be pretty awesome when they’re done. I think my reaction would have been more positive had I seen them completely finished. And said rather sheepishly, I am now wondering how this might play out in our sun room next to the kitchen, where we have a huge long row of cabinets and a pink counter top. If I redo the counter top (we can’t afford something new), then of course the kitchen counter top would have to match, and suddenly …
WHOOSH!!!
I’m a concrete convert. Maybe.
YoungHouseLove says
Haha, thanks Carla! I can’t wait to see them sealed either!
xo
s
Steph Reiner says
I love this look! We’re in the middle of a complete kitchen reno and we’re going to pour concrete counter tops for part of the kitchen (the island will have butcher block to warm things up).
Question… have you guys heard of Cheng’s Sealer? It’s supposed to be really good for concrete counters but I had never heard of the 2 you mentioned so I guess I’ll have to do some more research.
Also, have you noticed any water stains or anything since they’re not sealed yet? This has definitely confirmed my choice to do white cabinets and concrete counters. I love this look! I just realized I said that twice but whatevs.
YoungHouseLove says
We haven’t noticed any water stains (we have definitely gotten it wet) but we are not breaking out cooking oil or messy things like wine until it’s sealed. As for Chengs I’ve heard mixed reviews but it’s so nice it’s good safe.
xo
s
Laurel says
This does not look fun at all. Looks so so messy and not a very nice alternative to a solid surface. Are you happy with the result? Besides being cost effective would you do it again?
YoungHouseLove says
I think we are reserving judgement until it’s sealed and we’ve lived with it, but we think it’s a huge improvement over yellow laminate already!
xo
s
Linda says
That looks great! Do you think you could add some ground glass to add some sparkle and depth?
YoungHouseLove says
That would be cool! I wonder if it would make sanding it rough?
xo
s
Benita says
Looks awesome!
Your Ceiling says
This looks fantastic! You two have the patience of saints and a great attitude to boot. Keep up the good work!
Marty says
Arden is easily found at industrial concrete suppliers like White Cap. They gladly sell to anyone.
Ian Anderson says
Jeeze guys, I’d have been wary to tackle that and I’m a builder! I would have been terrified of the two external corners chipping or something, probably on the very last minute of sanding lol!
Congrats for showing that you’re not afraid of the wet stuff!
Mandi Holmes says
this looks great, guys! this is definitely on my list of things to try one day when we own our home. also, that video was mesmerizing. i watched it at work, so the sound was off, and i totally zoned out.
YoungHouseLove says
I told John the same thing! I was standing there watching while filming (it was on a tripod so I was just watching the window on the camera, mesmerized).
xo
s
Sarah | The Cyclist's Wife says
The counters look great but I feel like now the lower cabinets look dated. I think they need paint! Anyone else?
YoungHouseLove says
Some other folks have voted for paint there too! We’re going to wait until they’re sealed and we have things back on the counters since we think we might like the balance of warm + cold (cool wall color + concrete counters might be nice with wood stain in the mix) but we’ll definitely keep you posted!
xo
s
Jeanne says
Great job! I had no idea you could do the concrete (faux-crete) as a thinset layer. Live and learn. I read all the links you gave, and the filler for that produce is wood. That’s why it’s faux-crete. Still really really dusty. Funny how none of the others mentioned anything about the dust.
Reading the last link you listed, the blogger mentioned using food safe sealer, but couldn’t find any at the time (now there is some available). Will you be going that route (http://www.amazon.com/CHENG-Concrete-LLC-Countertop-Sealer/dp/B009VJDIC8) or just being really careful and using cutting boards? Can’t wait to see it sealed. I think it’s going to complement everything perfectly as a darker shade. And I’m with Sherry on this one…the imperfections are really cool – adds character. :)
YoungHouseLove says
We have read really mixed reviews on the Cheng stuff so we’re not sure we’re brave enough to give it a go after reading some not so excited stories about people using it, but it’s so nice that it’s food safe. One of the sealers we’re debating with awesome reviews does say something like “safe for the occasional food contact” or something semi-confident like that (haha!) so we might go with that and just stick to cutting boards since we never rolled dough out on the laminate or cooked on it directly anyway.
xo
s
Jeanne says
I wonder if you can seal with regular sealer on the bottom layer or two and seal with food safe on top? Anyway, It’s going to be great! I’m half tempted to update my own laminate counters like this. :)
YoungHouseLove says
Ooh that would be interesting. I wonder if layering them would work or they’d get sticky or cloudy.
xo
s
Emily says
Thank you for posting this! I’ve been trying to convince my husband for over a year that we should do concrete counters and he’s always said it’s too much work. I hadn’t seen anyone do a concrete layer over top-I might be able to convince him to go with this!
We just did a phase one to our kitchen and probably won’t be able to fully renovate for another 2+ years. The one thing I majorly hate about the current kitchen in the counter-this could fix that…
Julia@Cuckoo4Design says
I have been wanting to try this! Love it!
Amanda S. says
Good work,you two! Johm I wouldn’t be “jealous” of pregnant Sherry- I was also someone who threw up throughout the day during pregnancy and it was pretty much the worst experience ever. The kitchen is looking great!
Cindy Lyon says
Even though it was a lot of work, that is a fabulous inexpensive update to the counters!
May I make a suggestion for the floor? What we have done for two bathrooms (and plan to do for our kitchen and dining area sometime in the next year) was to replace the old ugly flooring with inexpensive peel & stick tiles BUT we left a bit of a gap and grouted between them. We chose tiles that look like stone and have fooled most of our friends and family! I’d be happy to send photos if you’d like. :)
YoungHouseLove says
I’d love to see pics of that Cindy!
xo
s
Wendy says
I am so glad that you are concreting your countertops and I can’t wait to see how it works out. Re your almond stove – can you craigslist it and get a white one off there too. I noticed that there are quite a few white stoves on Richmond’s craigslist that look like they are in good nick.
YoungHouseLove says
Thanks Wendy!
xo
s
Emily H. says
Ack! I love this! I saw this on pinterest a few weeks ago and was wishing I could do this in my kitchen. You guys are awesome, your kitchen is transforming beautifully.
Okay, dumb question…we have black granite countertops that I hate. They absorb all the light. When you researched doing this did you see if it’s possible to cover the granite with concrete. I’ve tried finding someone who’s done it, but I’m thinking it’s not doable.
Thanks!
YoungHouseLove says
I’m not sure it’s made for going over natural stone like granite. Has anyone tried that?
xo
s
Erica says
We have tiled counter tops. Do you think this method would work on this surface if we really rough them up? We also have tiled back splash (horrific tile) and am thinking it would be a lot of concrete (kinda static looking) if we concrete’d the back splash in addition to the counter tops. Do you think clear caulking could work to cover the joints of the back splash (currently thinking of doing bead board or tin tiles over the tile)? Love how courageous and fearless you two are with your renovations!
YoungHouseLove says
I’m not sure but maybe try calling or contacting Ardex to ask if it would work in that application?
xo
s
Margaret says
Hi John and Sherry! LOVE LOVE LOVE your new countertops and pretty much everything about you guys! :)
Just have a random question for you (and any other readers that may have run into this and could offer advice!). We’ve recently installed a new porch light, YAY! However, because of the siding, it doesn’t sit flush against the wall. Can/should you cut a hole siding? Is that safe since it’s outside? Is there something else we could do so that there’s not a gap between the light and the layres of siding?
You guys are the greatest!
YoungHouseLove says
Hmm, we have never encountered that. I wouldn’t want to give you bad electrical advice, so I’d try posting a photo on a forum with experts/electricians or even getting a pro to come out and help (don’t want to risk a fire or flooding the fixture with water and breaking it).
xo
s
HeatherM says
Be VERY careful with the counter until you seal it. Any wet glass/ wet anything could probably leave a permanent mark on the countertops. That happened to my aunt, and she was very upset about the permanent marks on her countertop- until her cat knocked over an entire pitcher of ice water onto the counter, effectively staining the whole top a shade darker.
YoungHouseLove says
Haha, saved by the cat!
xo
s
caroline [the diy nurse] says
I’m so happy you guys did this! It really brightens up the room somehow. We wanted to do this but we’re about to sell and I don’t know how others would react to it even though I love it. We also have the bullnose edge which I don’t think would look as good as your sharp edges.
I’ll pocket this the day I move into my dream home though- I just love it!
Ikl says
I am so suprised that everyone thinks this was worth the time and effort, since when you do a full kitchen reno down the line, these are sure to be tossed. Yes, they were cheap fix, but the work that went into this project, coupled with the fact that there are so many imperfections, and rules about what to place down on them, upkeep, and scratches, etc…. I guess to each his own. I for one would have lived with laminate until the full reno!!!!!
Jackie says
Kudos on the hard work! – question for you, along the way did you have any revelations regarding the color? As in, did the color turn out as you expected? If not, in what way was it different? And, did it make you want to play around in photo shop regarding the colors of the cabinets? I think the white desk area looks so much better than the dark lowers (sorry, hope you’re not offended!) You’re so good at photoshop and I’m so not -I’d love to see even a mock-up of what white all over would look like. Even if just to disqualify why you don’t like that idea.
I think that white lowers would be better given you have 3 different appliance colors right now – white on the bottom would make only the oven the odd man out.
Just wanted to also mention that the coolest thing about taking on this project is where it can take you in the future. Having added this type of experience under your belt- it feels like down the road if you’re building a bar outside on your deck or a craft island for your daughter – whatever the project may be you have an additional technique you can fine-tune, tweak, or evolve into something else all your own. Is there any future semi-related types of projects this made you think of so far?
YoungHouseLove says
I think we like the idea of dark lowers with the cool color on the walls and the industrial concrete to keep some elements in the room warm, but we’re also not opposed to adapting things as we go (we’re hoping once we fill the shelves and counters again and add window treatments it’ll make sense – and a panned out shot with the wood table and twine chandelier makes more sense of those wooden lowers as well, which we’ll share as soon as the counter clutter is off of that table. And as for future projects, you’re completely right. We’re so glad to have this experience under our belts because we could definitely see how it would be fun to redo a tabletop or something with this method, especially since we still have half a bag left!
xo
s
Lauren says
Thank you for trying this out! I’ve been waiting for your opinion before trying this in my kitchen. Did you have a backup plan in case it went terribly wrong?
YoungHouseLove says
We hoped it would be ok since we read a lot about it before jumping in (the tutorials we linked to in this post definitely gave us some confidence), but it is a little scary when you just dive in like that. I think we just had to go for it though or we’d always wonder, ya know?
xo
s
Rose says
How far do you think you guys will take this Phase 1 update throughout your house? It almost seems like you are spending too much time and energy on updates you don’t plan to keep especially bc it seems like this content feels like blog fluff. I think your last houses were executed so nicely and it was nice to see all of your creative updates but this doesn’t make much sense. Also, wouldn’t you have sealed them prior to posting this blog entry? This would’ve at least given your readers a true sense of the success or fail of this project. I’m sure there will now have to be a separate post about how you sealed them and how they look when it could’ve been an all-in-one post. I think it’s time to scale back on posts and keep your content interesting by doing updates that are worth your time. Sorry to sound mean but it’s an honest write up of what I think your blog is turning into.
YoungHouseLove says
Even before we had a blog we did a bunch of Phase 1 updates in our first house’s kitchen, so it’s just how we approach expensive room makeovers like a kitchen/bathroom that we need to save up for (you can read more on that here). We tend to share things as we go, so two posts for an involved project are pretty typical (heck, we’ve written 2 posts on building a dollhouse or making a headboard – and have also shared tutorials for how to tile with a 2nd post about grouting & a 3rd about sealing). If you’d rather read things at a faster pace maybe just drop in once a month? That’s like DIY in fast motion ;)
xo
s
Shaina says
Good effort and I’ll wait until the final post to see it all done, but so far I am not loving it.
The color of the concrete counter top clashes with the brown base cabinets. I would paint those dark lowers either white or gray or even blue like the show house kitchen.
I would also remove the backsplash because it makes it more obvious that you went over an existing countertop. Yes, a backsplash would add to the budget but maybe you could find a cheap alternative backsplash for phase 1?
YoungHouseLove says
We love popping off the backsplash (we’ve done that a bunch in bathrooms) but in this case they were behind the counters, so it would have left a gap around the whole room instead of the counters butting up against the walls, so for Phase 1 we’re happy to live with them this way. It’s a definitely improvement from the yellow laminate!
xo
s
Amanda says
I can not wait to try this!! Our kitchen is the only “new” part of our 1940’s house, but it just is not my taste. Redoing the whole thing would price us out of the neighborhood…but I’m hoping a few tweaks like this will make it feel more like home!
YoungHouseLove says
Good luck Amanda!
xo
s
Sydnie F says
You guys are flying through projects lately! I hope Baby is easy on you so you guys can have a nice DIY-vacation after his arrival. Thanks for the motivation and inspiration, as always!
YoungHouseLove says
Aw thanks Sydnie! I definitely think when this boy comes along there will be a mandatory adjust-to-a-newborn-period, so we’re having fun knocking things off the list while we can :)
xo
s
Jen says
I was telling my husband about diy concrete counters just last week! We have so many more pressing projects that will take $$$$ that we know a major kitchen reno won’t be doable for quite some time. I’m so excited that you guys did this! You guys are awesome at making even intimidating projects approachable. I can’t wait to see how it looks after sealing!
Tara says
I love concrete countertops. I had no idea that you could do it over laminate. I can’t wait to see what it loos like sealed.
On a side note did you watch Nate on American Dream Builders last night?!!! I thought it was a fun show, but I could do with less drama and more design!
YoungHouseLove says
Yes, I loved seeing Nate! The one thing John and I thought was kinda quirky was how there was obviously a giant team who helped with things (the wallpaper was magically hung, the landscaping/exterior was a giant overhaul) but you never saw the team and the show didn’t acknowledge it. On Design Star or Extreme Home Makeover you know there are helpers (carpenters, wallpaper hangers, landscaping teams, etc) so it was strange to miss that component. Maybe it’ll show up more as there’s more editing time (when more folks get eliminated?).
xo
s
Reva says
Like I said, you guys do the best. tutorials. on the internets. Thanks so much for this! They look really good and I can’t wait to see how they look sealed, and how they hold up for you.
YoungHouseLove says
Thanks so much Reva! We’ll definitely keep you posted!
xo
s
kimberly pinkerton says
Absolutely awesome!!! We did this almost a year ago and we love the look. In our case we had laminate countertops that were rather new and we knocked out a wall between our dining room and kitchen to create a bar height counter. It is a parsons/ waterfall styled counter so we used Ardex on the top, bottom, and sides down to the floor. We are still very happy with the results. We sealed our counter with the second option you mentioned and I believe we ordered it from Menards online. The total cost of our project was under $100.00. I wish I knew how to post a picture. ;)
Great job as always!
Kimberly
YoungHouseLove says
That sounds awesome!
xo
s
kimberly pinkerton says
If you would like to take a peek at my Ardex counter, I have picture on one of my Pinterest boards. “Kimberly of pearsnest” is my user name and my board with some of my projects is called “PinkertonTeam Designs.”
:) Kimberly
YoungHouseLove says
Thanks so much Kimberly! Can’t wait to check it out!
xo
s
Denise says
It looks so good! Awesome job! I have always wanted to try the concrete counters..we too have the ugly yellowish/cream laminate. You guys work hard and steady all the time, the counters look wonderful! Getting things done before the little guy’s big arrival?!!
YoungHouseLove says
Heck yeah, we’re on a nature-imposed deadline! Haha!
xo
s
Debbie says
We did this six months ago, and I love it. My advice, test the sealer in a small area and wait … I was shocked at how much it changed the color and overall look. I like it, but it was a dramatic difference.
YoungHouseLove says
Thanks for the tip Debbie! So glad to hear that you’ve lived with yours for six months and still love it!
xo
s
Joanna says
I’m looking forward to seeing your updates on this! This is something I’m now really tempted to do in my own kitchen as the countertops are terrible!
When we moved in, the cabinets were dark green and the walls terracotta orange. We were hoping to get away with painting the framework of the cabinets and fitting some Ikea doors, but the kitchen seems to have been a DIY hackjob by a previous owner and no pre-made doors we could find would work, so we just painted the whole set of cabinets (white) and fitted new handles.
Now the countertop is the obvious eyesore since it can be distinguished from the green cabinets, ha! It’s definitely been a hack job; it has chunks cut out of it where the previous owner had needed to fit furniture on the other side but the counter had stuck out too far and there’s a lot of cut/piecing lines where different size counter pieces were put together. There’s a space made for a dishwasher, so I think someone had reconfigured the kitchen to make that hole and had to cut apart and repiece the counter to make it work. Cementing over it like this would cover up those cuts and make it look a lot cleaner! I’m just not looking forward to all that mess it creates though :)
Naomi says
What do you think about applying the Ardex sealant and then a food-grade sealant on top of that? So you get the durability of the Ardex sealant but also the convenience of being able to casually set an apple on the counter?
YoungHouseLove says
One of the two sealers that we’re eying says something about being food-grade (the Adrex brand one) so we’re definitely looking into that!
xo
s
Kristen says
That video stressed me out so much! IS HE GOING TO MAKE IT IN THE 5 MINUTES TIME FRAAAME?!?! WHAT about all the cement that just FELL ON THE FLOOR??? lol
Looks great, totes worth it. Yeah I said that on purpose.
YoungHouseLove says
Haha!
xo
s
Sandra says
Wow, what an amazing transformation! I would have removed those troublesome splash backs so it looked more like a slab. Can’t wait to see it sealed!
Ellen says
My husband and I have done a number of poured concrete countertops. The best finish we found is a wax product called Osmo (or Osmo coat?) intended for wood floors. It is earth friendly and food friendly, and the best part is you can touch up areas later if needed with no fuss. We did one set of countertops with a concrete sealant and after a couple of years the sealer started to wear… and you can’t just put another coat on, you need to sand etc and ugh, not in my kitchen! I love my poured countertops, and the best part of them is that you do the sanding outside of your kitchen :).
YoungHouseLove says
Thanks so much for the info! We were looking into more food-safe wax options last night, so that’s really helpful!
xo
s
Sarah Kyle says
You guys! I just opened my Garden & Gun magazine and there’s a picture of Clara in the Virginia insert! So cool!
YoungHouseLove says
Isn’t that crazy?! When Virginia Tourism invited us to rep our home state for their real people campaign, we were so honored. VA 4 LYFE!
xo
s
Elisabeth says
I don’t particularly like the look. Feels kind of “rough” and unfinished, even with a sealer. I’m perplexed with the choice.