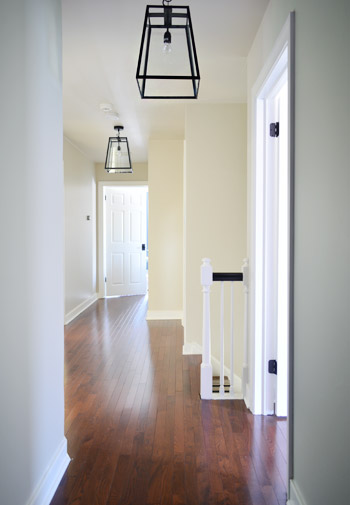
From moment one of seeing this house, something about the view of a series of three lights all in a row(ish) in the upstairs hallway made us inexplicably excited. Just call it “the tri-light zone” effect. We just knew that arrangement had serious potential. You know, once we looked past the old carpeting and the blue trim.
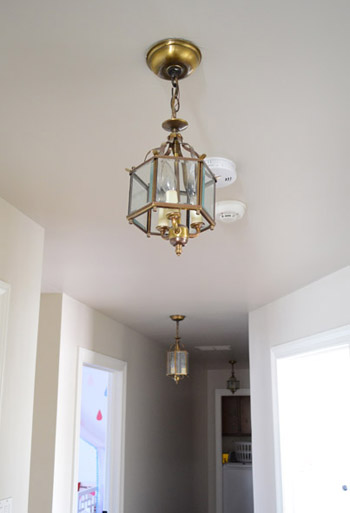
The existing lights were a little undersized for us (pictures don’t do it justice, but this is a 33 foot long hallway!), so although we considered spray painting them another color (oil-rubbed bronze? red? navy?), I worried it’d make them look a bit more gothic cathedral than we wanted. Plus, all three of them were crooked, one of them had a broken stem, and the middle one was actually bigger than the other two.
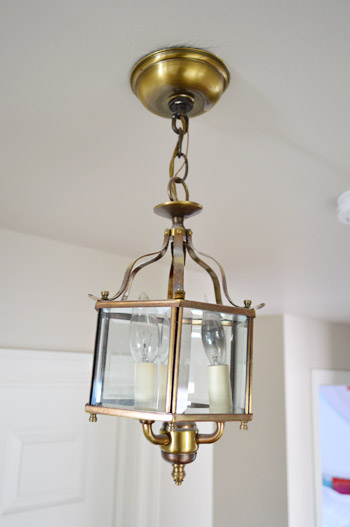
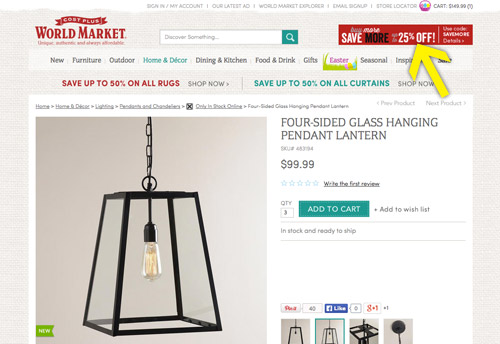
I’ve had these fixtures mentally bookmarked for years. Ever since we saw them in a House Crashing that we did in Portland, OR in 2012 I’ve wanted to work them into our home somehow. I like that they’re a mix of classic and modern, and that their dark finish offers some nice contrast but isn’t too heavy looking thanks to all the glass. The good news is that Sherry was with me (we don’t always agree on lights, so sometimes finding something we both like takes a while). The only issue was that the $250 price tag was a bit much for us since we’d need to buy three of them.
We hoped to find something similar at a local lighting outlet that we frequent (and even checked craigslist and the ReStore occasionally) but coming by three identical fixtures was tough. Then Sherry got an email alert about a World Market sale (25% off orders over $150) which lead her to these puppies – and we realized that after the sale they’d be $75 each, which means we could buy all three for less than the price of our single inspiration fixture!
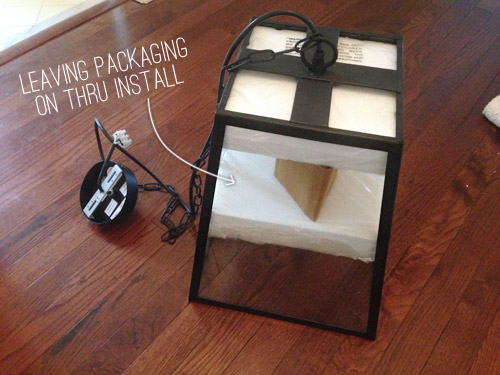
Normally I wouldn’t take you through the installation process again, since I feel like I’ve done lots of posts like these – but I actually picked up a couple of tricks (albeit small ones) from observing the electrician work his magic at the showhouse. Trick #1 being leave the protective packaging on during installation. I guess I’ve always been so eager to unveil our new purchases that the first thing I usually did was strip away all of the plastic, cardboard and styrofoam. But I had a “well duh!” moment watching the electrician leave it all on (well, whatever didn’t interfere with installing it) to help prevent any damage while he worked. Of course he took it off before firing up the power and adding a bulb, but just hanging them with the added protection felt a lot better than rushing to strip it before manhandling things into place.
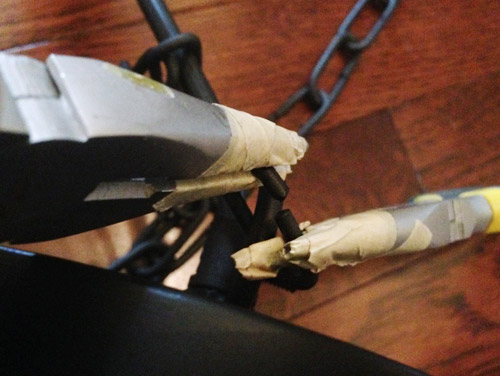
Obviously I would’ve loved to let these babies hang down on their chains a bit, but our 8ft ceilings weren’t gonna let it happen. So we had to shorten the chain by prying the links open with two pairs of pliers, the tips of which I wrapped in masking tape to keep them from scratching the finish off.
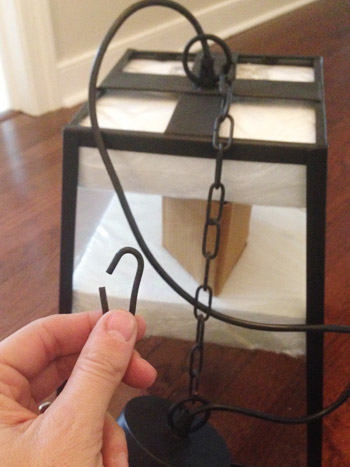
The previous lighting had been a bit low for my 6-foot self (well, the middle one outside of Clara’s room was – since that lantern was inexplicably larger than the other two), so we decided to hang the new lights by just one chain link – which would put them all a couple inches higher than that old middle light (it hung about 75″ from the ground). So even though these are larger scale fixtures, the bottom of each lantern ended up being 77″ from the floor after installation.
But back to the single link method. I kept one link handy, but left a longer string on the fixture for the time being. More on that in a minute.
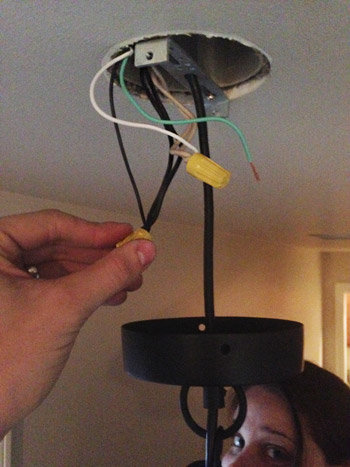
In addition to shortening the chain, I had to shorten the cord. So using my wire cutters I cut open the wire cover, pulled it off, and then stripped the ends of the white, black, and green wires.
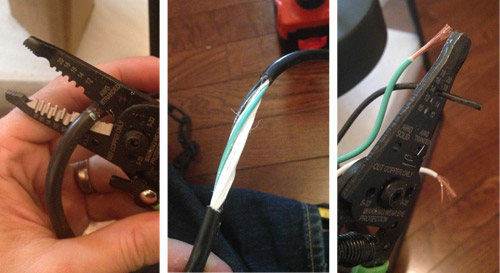
With Sherry supporting the fixture, I connected the wires to the matching ones in the ceiling. Sorry for the grainy pic, but we had the power off so lighting was limited up there.
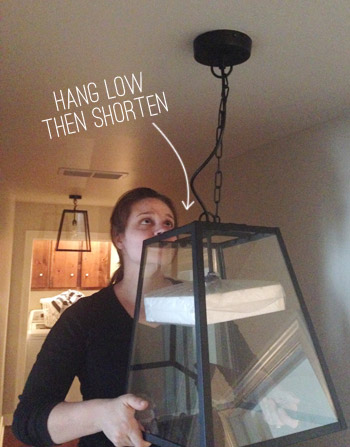
The second trick I picked up was to hang the fixture low and then raise it to your final desired height. With most light fixtures it’s much easier to raise them (by removing chain or feeding more wire into the ceiling) than to make them lower, especially if you’ve already cut your wire. So not only is this an easier way to get your perfect height, in our case it made installation much easier because Sherry didn’t have to hold the light as high and I wasn’t wiring in such a cramped space between the fixture and the ceiling.
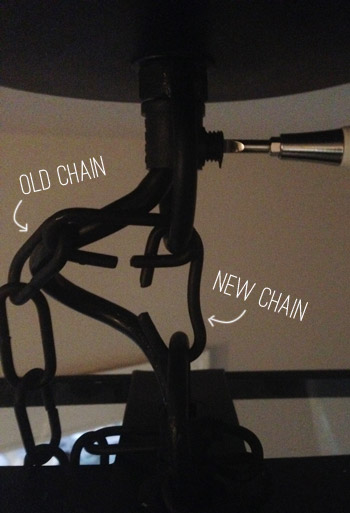
Once everything was secured, I swapped out the long chain for the my single link and pushed the excess wire up into the canopy. You can see my screwdriver tightening the screw that pinches the wire in place.
It still took a fair amount of time to get all three installed. Maybe 3 hours? I always have a tough time guessing since I’m slowed down by photo taking and, in this case, fielding showhouse calls. But in the end we love the result.
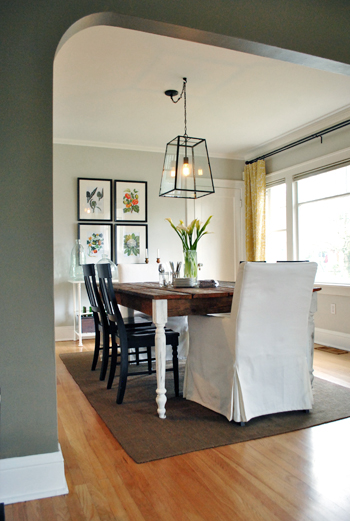
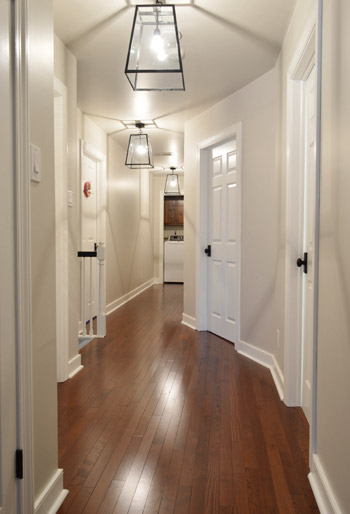
Just like the light in our foyer downstairs, we really like the high contrast look that these add. Even the way they tie into the dark door hinges, doorknobs, and the stained stair rail and runner that lead downstairs seems to make things feel more deliberate. They’re a bit oversized for the space, which may bother some folks – but it’s kinda what I dig most about them.
Adding some substantial wainscoting, interesting art, and other hallway updates should definitely bring more balance. So here’s our remaining to-do list:
- Reinstall & maybe modify the doors in front of the laundry area
- Add crown molding (not looking forward to those angles!)
- Add some nice thick wainscoting (it’ll bring more substance to the bottom half of the hallway)
- Get some art going on
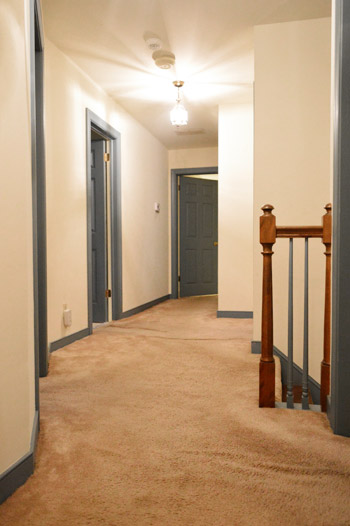
Just for fun, here’s a hallway before shot for comparison.
In the function column, I feared that it might be a little darker (going from three 3-bulb fixtures to three single bulbs), but these take a higher wattage (60 instead of 40) and somehow the glass seems to reflect so much that it actually feels brighter. Could also be that half of the old bulbs were burned out too, so there’s that.
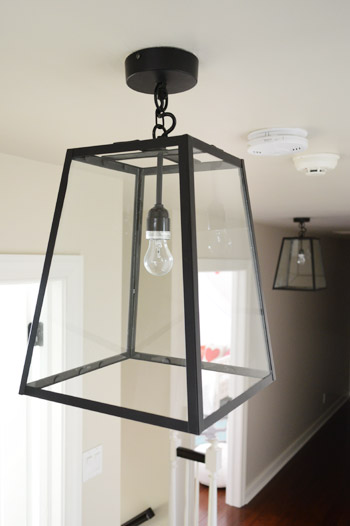
Here’s how things look with the clear bulbs that came with the fixtures when they’re on. They throw some angular shadows on the ceiling, but if we want less of that look we can switch them out for frosted bulbs (eventually we’d love to get LEDs in every fixture).
UPDATE! We’ve finally transitioned our entire house to LED lights (they save tons of energy & money, and they’re a lazy person’s best friend because you never have to change them). For anyone wondering, these are our favorite interior LEDs. Their glow is warm & natural (not weird/blue like some of the others we’ve tried) and they use around 90% less energy.
*This post contains affiliate links

Lisa says
Very nice! Personally, I love the shadows the lights make on the ceiling. I think it adds more interest to the hallway. I can’t wait to see this space when everything is crossed off the to-do list.
Jadie says
I can’t believe how different that hall looks. The fixtures look great! I love them.
Stephanie C. says
They look AMAZING!! Would love to see a pic of John near one so we can get the real scale of it all :)
Joi says
Looks great, guys! We just installed those same exact ones in our house [three, too!] in our dining room and kitchen. Blogging about them soon. :-)
YoungHouseLove says
So funny!
xo
s
Mary says
The chain length isn’t mentioned on World Market’s website – do you know how long the chain that came with it is? Wondering if it would work for an entryway! Thanks. And it’s on sale right now too. $79.99
YoungHouseLove says
Maybe about 2.5′ of chain was on there? Hope it helps!
xo
s
Julia [Chris Loves Julia] says
Soooo good. Amazing update!
Michelle says
Another trick for chains…when opening a link, instead of pulling the ends apart, twist the link to create the gap, it’s easier to twist back together and get a tight closure without mis-shaping the link.
YoungHouseLove says
Smart!
xo
s
Annie says
Love what you picked. Hate where you put it. I thought the light was amazing in your inspiration pic. Can see why you wanted it in your home but given the relativity low celings and the normal narrowness of a hallway. Gah! Feels really off to me. Would love it over a table
Jen says
Long time snooper, first time commenter… I really liked the edison style bulb that world market shows in the picture for the light fixture. the clean lines and the glass really show off the beautiful old bulbs. Much more beautiful and elegant than a CFL or LED.
lauren says
Those look great. The original ones were uuuuuuuuuugly… when you were talking about painting them, I was screaming “NO NO NO!!!” in my mind, haha. This is a major improvement!
Jerri says
Love those! May I ask how tall the ceilings are in the hallway? I was ogling that same fixture but was concerned about how much headroom there would be for my husband and any tall(er) guests that might walk through. I think John is probably a couple of inches taller, though, so if these work for you…
Anxiously awaiting your response…
YoungHouseLove says
We have standard 8′ ceilings (the quirk is that they’re more like 8’2″, but they’re basically the same as most average rooms :)
xo
s
Luxie says
I think recessed lighting would have been a better choice. Is there a reason why you two stay away from them? Do you have any worry about them getting broken when the kids get bigger? I have visions of a soccer ball or sword or nerf gun, etc. in my head.
YoungHouseLove says
We like recessed lights in rooms like kitchens or living rooms to illuminate a bunch of areas (like around the cabinets, etc) but I think we like choosing things with more shape and interest in rooms like bedrooms, hallways, and foyers when we can. We both grew up in houses with four kids and some glass fixtures/chandelier so we can only hope ours survive like those did. We shall see…
xo
s
Pri says
Guys, you don´t forget the picture after decor in the nursery room, that picture with you three :D
https://www.younghouselove.com/2014/01/nursery-progress-brainstorming-and-a-rug-find/
YoungHouseLove says
We were just talking about how we have to take that!
xo
s
Shelby says
Awesome light fixtures! And always so thrifty with your savings! I must admit, that I also love the shadows they cast!
Pam says
Love the look. We replaced the kitchen lights with EXPENSIVE LED bulbs. I HATE them. The light is so harsh. I can’t afford to just throw them away. What a mistake that was.
Allison says
Love it! This is great to see, we’re starting an attic renovation very soon, and will need 3 lights down the hallway. I had those same Ballard ones saved, but great to see a cheaper option!!
Dee says
Looks great! Do you know what size light they used on the house crash? I love it! Thanks.
YoungHouseLove says
Not sure of the size but it looks bigger than ours. Anyone know?
xo
s
Diane says
Love the lights! Just wanted to share a tip. I’ve been in and am happily returning soon to the lighting industry. I’m sure these fixtures aren’t too heavy, but using regular pliers to open chain links can weaken them due to the twisting motion which can cause them to later break and fall from the ceiling. You can pick up a pair of chain pliers which are made to safely open and close chain on lighting fixtures from electrical distributors or lighting showrooms. They’re super easy to use and make the installation much safer. Hope this helps! Love your blog!!
YoungHouseLove says
Great tip! Thanks!
xo
s
Angie says
At first I thought, yeah, these are a bit much for the hallway. But when you mentioned wainscoting in the future, I got excited! The additional “heaviness” the wainscoting will bring to the lower field of vision will even things out and make this hallway look really substantial and classy.
Kal says
I love those lights – unexpected, but not “odd” (that’s intended as a compliment, albeit potentially poorly worded)!
We’re trying to fancy up our upstairs hallway lights, too, but having the worst time finding the right mix of both me and Mr. Liking them, price, and cohesion with the rest of the space (plus the added challenge of one being above the stairs and the other a flushmount over the hallway). I’m heading over to your forums to beg for some inspiration!
http://halffinishedhouse.blogspot.com/2013/11/half-finished-house-tour-upstairs-hall.html
Leigh Anne says
I love it, of course. So much so, that I just ordered one for our dining room. I’ve been searching for two months for a light and I was experiencing some commitment phobia! Now I’m super excited! It’s hard to find lighting that I like but that isn’t trendy, because changing lighting every couple of years just ain’t gonna happen!
kerri says
i love the shadows they cast. love those fixtures!
Alexa @ travelmiamor says
love these!!!
Heather says
Those are the same lights I want for hanging above our island when we redo the kitchen! I didn’t know how they looked in person so this is PERFECT. Our area is going to be so open and huge and the ceilings are really high. The size in your photos confirm these are the number 1 light for me right now. We’ll see what Andy turns up with in the next year (you just never know with that guy), but these are now DEFINITELY at the top of the list.
Oh man how badly I want to start busting down walls and putting that new kitchen in.
Val says
We were able to find LED lightbulbs on super sale because the utility company and Costco had a rebate. We went to a store farther from our house because only one county had the rebate but saved around $10 per package of 3 bulbs. Check the websites for surrounding utility providers for a deal in your area.
YoungHouseLove says
Love that!
xo
s
Hannah says
I love the new lights! I had my eye on the original for our kitchen. I’m glad to know there’s a more affordable option.
We just added a gallery wall to our hall and we love it!
http://branchandtwig.com/framed-adding-gallery-wall/
YoungHouseLove says
Love me a gallery wall!
xo
s
Natalie Stachon says
LOVE! Great call on the new fixtures. They tie in perfectly, as you mentioned.
Jessica says
Good news about disliking the Edison bulbs…! There are LED versions of them that only run about $10 a bulb (per Amazon), and cast a much less yellow glow! We are planning on updating our current Edison bulbs in our massive 1180 watt chandelier with the LED Edison bulbs for efficiency and to take the wattage down to 720!
YoungHouseLove says
Great tip!
xo
s
Lindsay says
Ahhhhh! I love those!!! They look so great and I like the light that they cast against the walls. So pretty!
Reshma Sanjeev says
I was not a fan of this kind of lights….I feel they are undressed. But the last picture makes your hallway look so bright….I changed my mind. I am liking it now. Not completely though….:-). The flooring, the lights and the paint makes your hallway look so bright and clean and neat.
Renea says
Hubby and I just finished a bathroom remodel that took in half of a hallway closet which meant moving a door in the hallway. We re-textured the wall, painted, changed out two light switches and an outlet. All we lack is the trim work. I am going to replace the old gold knobs with brushed nickel for a less broken-up feeling. We have 10(!) doors down the hallway.
YoungHouseLove says
Woah! That’s going to look awesome!
xo
s
Susan says
Love the new fixtures and how they tie into the doorknobs/etc.. Are they on a dimmer? For those late night baby walks/feeds you may want to be able to tone those down a bit.
Oh and buy the LED’s when you can-they are really worth it.
Get the bluish/daylight ones, NOT the soft white-they throw light so yellow everything looks like smoker’s teeth!
We saw our electric bill cut in HALF ( actually a tad more than exactly half)by using LEDs exclusively.
They are expensive-we shelled out 120 bucks in light bulbs, but in just two months were at our break even point.
Our electric company (SDG&E) has a website where you can monitor your home usage(like the Nest thingy) and it was amazing to see the difference.
Now we are in the “uses the least amount of energy compared to other homes your size” category.
Have you seen this? Mission Impossible/Babies escaping cribs :)
https://www.youtube.com/watch?v=sDaRLZF9HqY
YoungHouseLove says
Such awesome info on bulbs. Thanks! And as for the lights, they’re not on dimmers but that would be an awesome upgrade!
xo
s
Lily says
What, what a huge change! So much better than BOTH befores!
xo Lily
http://whilemyboyfriendsaway.blogspot.com/
Cate O'Malley says
Wow, such a huge difference in the before and after shots of the hallway – it looks great!
KristenS says
As I was reading this post, I got an email from Fab.com… titled “Enter The Tri-light Zone”. It must be a tri-light kind of day! :) Your tri-lights look great and thanks for the new tips. My husband and I were just talking about changing out some fixtures.
YoungHouseLove says
So funny!
xo
s
Saskia says
Love the look! on the last photo the shade of the lights give a bee-hive pattern!
Bailey says
Love this update!! These fixtures are beautiful, and I agree that they go so beautifully with the other dark details you guys have in that hallway. Your before and afters are always insane – I always make my boyfriend come look at them, even though he doesn’t follow your blog haha.
Amanda says
These look amazing! I love the big statement these make in the hallway. They look fabulous. I’m jealous I just have a stinking apartment to decorate. HA! I couuuuld change the lights but it would be a waste of money, so I’m trying to layer in other things like furniture and things.
Kelly @ The Moon and Me says
The lights look fabulous! I kinda like the way they send those angular shadows out. Add interest…and they really brighten up that hallway. :)
Kelly
Sarah says
I just don’t get how you paint your trim so nicely!! Great Job! It always looks so awesome. I’m SO nervous to do mine! Which post would you suggest to review how to do it, that breaks it down the best?!? And, I still have all the pictures from that Portland house crash, too! Love it, I have the Ballard light in my kitchen… and Rockport Gray in my laundry room and office! ;)
YoungHouseLove says
If you click the projects tab under our header in the paint section there’s a post about cutting in (with a video) that probably will help most. It’s not trim, but cutting in is similar (use a brush, keep head level with it, etc) so I hope those tips help!
xo
s
kathyg says
Lights look great! I love the bigger is better theory in lights in general.
I have trouble cutting in at the ceiling, but none whatsoever around doors/windows/floor. I think it’s because of the head in line with the brush thing. I usually just give up and paint the ceiling the same color!
Sandy says
It’s funny but putting larger light fixtures up actually gives the illusion of your ceiling being higher than it is. Excellent upgrade! I love those fixtures.
Evie says
Sherry, looks wonderful! I’m curious to know if all three lights are on the same switch. I was thinking it would be great to be able to operate them independently so for example there isn’t a sudden bright glare into the baby’s room when you open that door at night.
I am still looking around for just the right light for over my dining room table….. Just right as in giving me an involuntary “Oooooooh!” when I see it. But I’ve got a question about how high to hang it over the table, and I wondered if you remember how many inches above your kitchen table the bottom of your light is…and if John tangles with it if he leans over. My table is 45″ square, which is pretty big, but I’m 5’11” tall, and I keep thinking if the light’s not really high I’ll bump my nose–but if it’s really high it’ll look silly… Thanks!
Evie
YoungHouseLove says
I think around 32-35″ over a table is great for a fixture (no issues hitting it while seated) and the hall lights are on two different switches (the two on the laundry side of the hall are together and the one by our bedroom is on another one).
xo
s
Samantha Izaks says
Quick question that has been on my mind for awhile now. How come you are allowed to change your own lighting fixtures and do some electrical work and plumbing work? Here in Australia (to my knowledge & understanding) any & all work relating to anything electrical or plumbing no matter how small MUST be done by a licensed electrican/plumber. What are the rules in the US?
YoungHouseLove says
Here you’re allowed to do a lot if basic things but need permits/inspections for things like adding additional electrical, expending the plumbing etc (but switching lights or changing a toilet is a job anyone is allowed to tackle).
xo
s
Samantha Izaks says
Oh ok. I guess that includes stripping wires like John did here. You wouldnt beable to do that here. A electrican must do that & to install them too. You can ofcourse change the bulbs. With plumbing you can change the taps/spouts/basins etc yourself but all connections to the mains (the same with electrical) has to be done by the proper people. Its a good thing that I know of, either in person or through friends & relatives, people in these fields who are happy to do some work for a carton of beer!
YoungHouseLove says
So interesting to hear the differences!
xo
s
Kati says
That would be so funny! “Hello, local authorities… I need someone to come change the bulbs.” LOL!
Emily says
I’m thinking that this would be an awesome light for our front porch! When buying lights do you have to make sure they’re okay to use outside (the way you do with Christmas lights) or are all standard fixture lights okay to use both indoor and outdoor? I don’t know how buying lights work (yet.)
YoungHouseLove says
I would call and check that they’re “listed for outdoor use” since it can be dangerous to use indoor lights outside. Good luck!
xo
s
Crystal says
Looks amazing! What a difference!
Kelsey says
I didn’t read through all the comments, so I don’t know if anyone else has mentioned it but…I know you have a love of bees/honeycomb pattern…did you notice the pattern on the wall?! I bet you are in love with that!
YoungHouseLove says
Someone else pointed that out! Didn’t even notice, but love it now!
xo
s
Katie says
Oh I LOVE them! Great choices as usual! It’s like a whole new house up in there!
Molly says
Yay, I also bought this fixture on sale recently! I have it in my TV room where we don’t really need additional light, so I’m using an edison bulb for looks only. I had it installed with this simple ceiling medallion: http://www.homedepot.com/p/Westinghouse-16-in-Beaded-Ceiling-Medallion-7773300/203077499
YoungHouseLove says
Sounds sweet!
xo
s
Rachel says
You have 8 foot ceilings? How high are these fixtures? I love the idea of something hanging in our hallway but with a hubby at 6’3 and brothers at 6’5 it just seems too tight.
YoungHouseLove says
Our ceilings are 8’2″ tall on average (old house quirks, haha) and these lantern bases are 77″ from the floor (John’s 6′ tall, so at 72″ there’s some nice clearance above him).
xo
s
Stephanie says
Hi Sweet P’s! With regard to changing out the bulbs to CFL: you would be surprised how easily those bulbs get shattered by little boys and their strange love of kicking balls, shooting Nerf guns, and JUMPING up to hit the ceiling (my girl doesn’t do that!) so I support not using them in your pretty hallway. Plus I think they are unattractive with such pretty lights! Regardless of ugliness I use them throughout my basement to be a responsible earth being and make up for not using them in the rest of the house. We’ve had 3 shattered inside the light fixtures thanks to my boy playing with his friends. Jus’ sayin’–it happens!!
xo Stephanie/Des Moines
YoungHouseLove says
Yikes, thanks Stephanie!
xo
s