After victoriously completing the two end sections of our three-piece DIYed console table (explained here), I turned my attention to the middle portion. You may recall that this piece will be entirely hidden between the other two (and sandwiched between the back of the sectional and the wall) so I could’ve gotten away with a very simple platform on which to lay the long tabletop that will span across all three pieces that we’re planning to make out of our already-around reclaimed pallet wood. But we figured that would just be wasted space, so we took the less simple route of creating some hidden storage in the middle piece. Allow my sketch to explain:
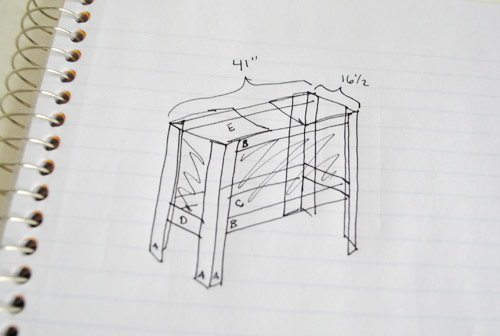
Who am I kidding, my sketching skills haven’t improved so allow me to explain instead. Basically the piece is a 41″ long table with an opening in the middle of the top. Under that is a platform shelf that will act as the bottom of the storage “area.” We considered building sides out of wood to enclose the entire storage “box” (where I’ve “shaded” on the sketch) but to save money and keep the weight of the piece down, we’ve decided to just staple taut fabric around those four sides instead (again, since no one’s gonna see it). Basically it’ll be a fabric box with a strong wooden frame and a solid wooden bottom.
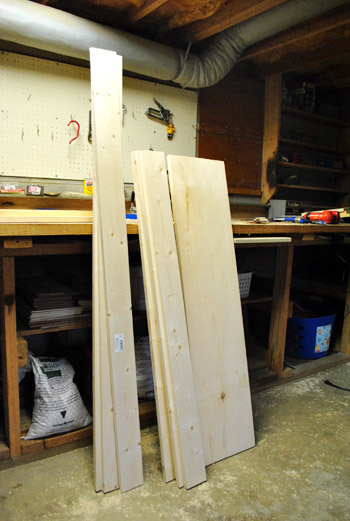
Maybe this will make more sense once you see it being built. Here are my supplies – a bunch of 1 x 4″ boards and one 1 x 12″ board. We had a lot cut at Home Depot again, but didn’t worry about getting them cut nearly as precisely (since I can easily cut 1 x 4″s with my miter saw at home).
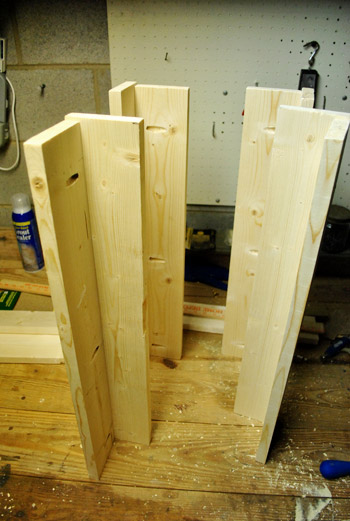
First up was the process of creating four 24″ tall legs. I of course was reminded that cutting a 48″ piece of wood doesn’t leave you with two precise 24″ pieces (notice the uneven tops). The width of the saw blade leaves you with one that’s more like 23 7/8ths. But I managed to work around it, so don’t worry about that for now.
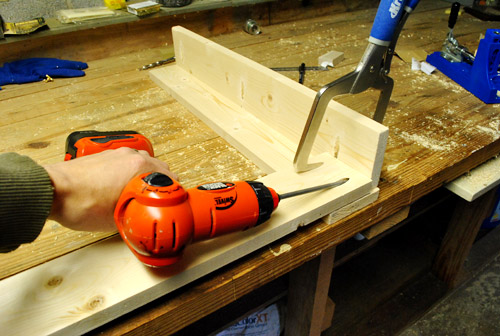
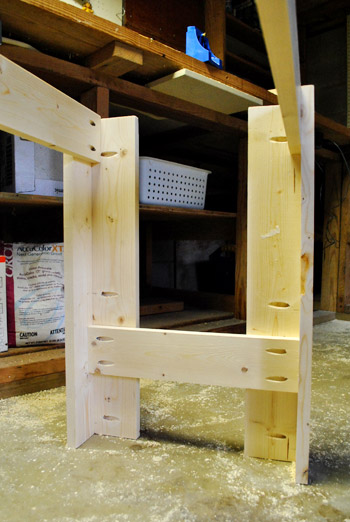
Then I added a long rail at the top to connect two legs together (I lined it up with the 24″ leg, not the slightly shorter one, which ensured that it would be level and the right height when it was complete). Again, all of this was done with my beloved Kreg Jig, which I also used to make the other two sides of the console table that I shared on Monday.
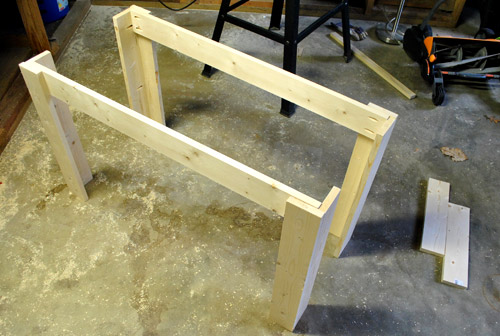
Next I used those two shorter boards (seen on the floor of the picture above) to connect these two pieces. These pieces would also become the support for the bottom shelf.
I sorta forgot to photograph the next step (boo me), but it was creating that lower shelf. To save money I just laid two 1 x 4s flat across the piece (resting on the support shown above). Obviously this didn’t fully fill the 16″ space, which is where that 1 x 12″ that I purchased came in handy. I just laid it on top of the newly attached 1 x 4″s (centered on top of them) to create a nice solid shelf.
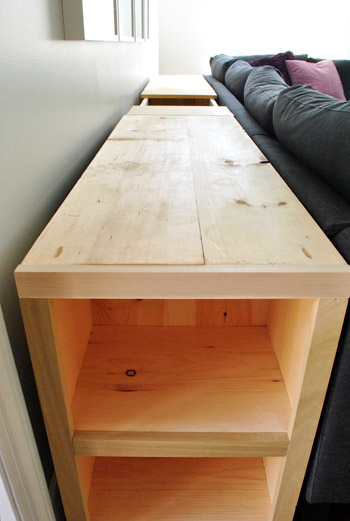
You can sort of see what I’m talking about in the finished pic below:
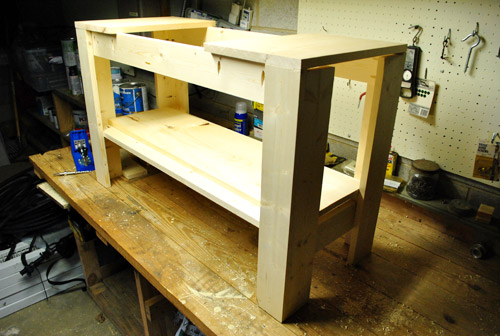
As for the top, it’s just some of that 1 x 12″ that I had leftover from building the two end pieces. I affixed it to the top on either side – leaving the hole in the middle that we wanted.
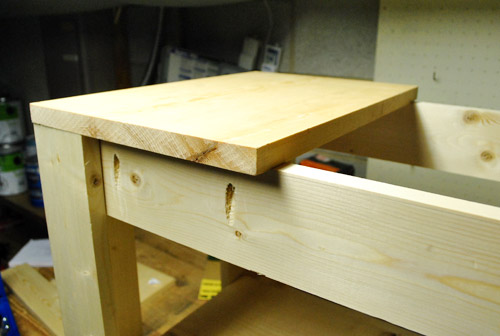
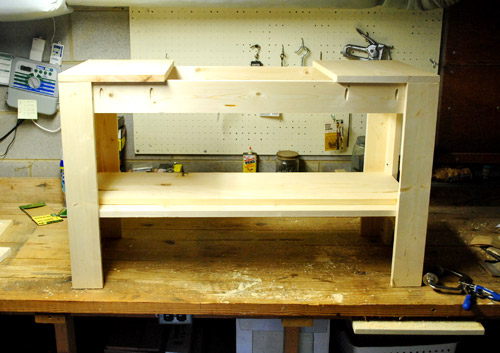
Not the prettiest piece in the world, but once we get the fabric stapled to the sides to enclose the storage “bin,” it’ll do the trick (heck we might even drop some storage baskets in there for some separation/organization). And it doesn’t have to be that pretty since we’ll be adding our long reclaimed pallet “counter” on top of all three consoles (with a small and flush lift-off-able piece to access the storage compartment whenever we’d like).
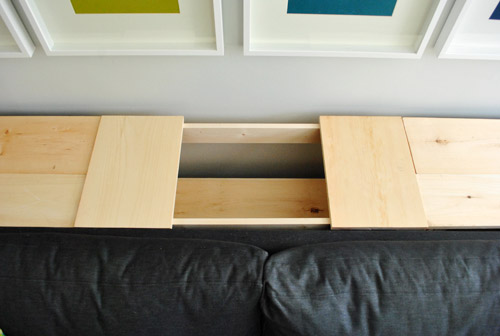
I know it’s really hard to envision how we’ll make the rustic countertop – and how we’ll keep that top-entry storage area accessible from above – so we’ll share those details when we tackle it along with lots of photos (we’re still not 100% set on a specific plan of attack) .
Oh yeah and obviously we’ve moved all of the pieces into the room (even though they still need to be stained and countertopped):
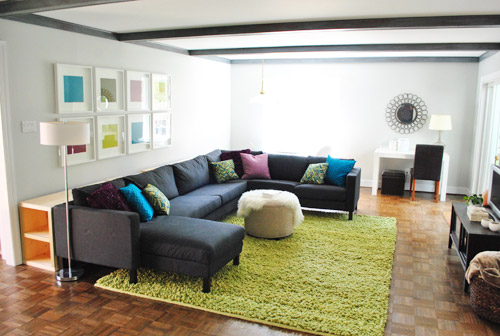
Admittedly it was a bit jarring to see everything shifted like that. But after one night living that way, it felt like a big improvement. The relationship between the sectional and the too-small-just-for-now media cabinet seemed cozier and sitting 17″ closer to our pretty small TV certainly made it easier to read subtitles and weather forecasts. Plus when we finally ditch the awkwardly placed floor lamp on the end of the sofa and bring in two chunky table lamps on either side of our huge console table it’ll feel even more balanced and connected to both the wall and the sofa. They’ll help us bridge things and add function and some height on either side of our big frame grid, which should be really nice. And you know Sherry’s already on a serious lamp hunt. She’s crazy like that.
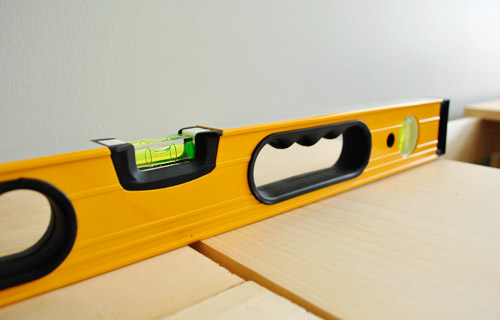
But there was one let down to the whole thing. It’s not level. Not because of the way I built it, but because of the room. The floor in there is a bit “wavy” at points. We noticed it from our very first walk through of the house, but our inspector assured us that there’s nothing structural to fear – just a little settling (which is apparently why they installed parquet, instead of less “flexible” and forgiving hardwood planks). So even though they’ve made my console adventure more challenging, at least Clara has figured out one plus to the situation: it makes playing with her ball a lot less work (she found a “magic spot” on the rug where her ball always comes back to her, no matter which direction she rolls it):
So I knew going into this that expecting a piece of furniture spanning 140″ (almost 12 feet!) of uneven floor might be asking for trouble. Luckily it wasn’t too bad. There was mainly just this one spot where two of the pieces didn’t line up.
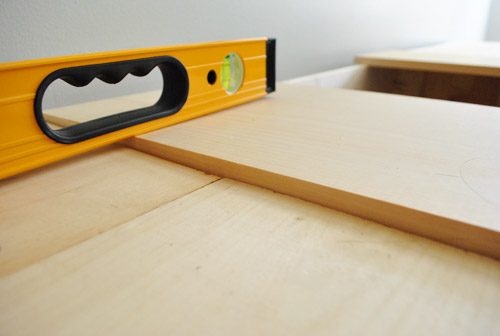
Enter these little fellas to the rescue:
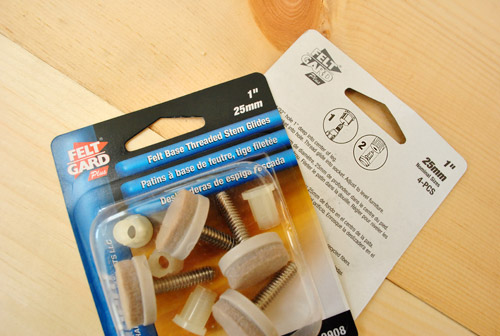
They’re basically like those adjustable feet you find on appliances. I opted for them over felt pads alone because the ability to tweak the height by spinning each foot ’til everything was perfectly level would be invaluably time-saving.
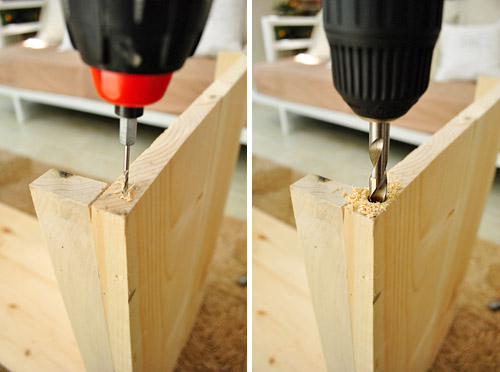
Installing them was pretty straightforward. Just drill a big hole in the bottom to fit the plastic guide and then screw the foot in. Since the hole was so big (nearly 3/8ths of an inch) I worked up from a small pilot hole to the big kahuna (which even required me breaking out my bigger drill) so I wouldn’t crack the wood.
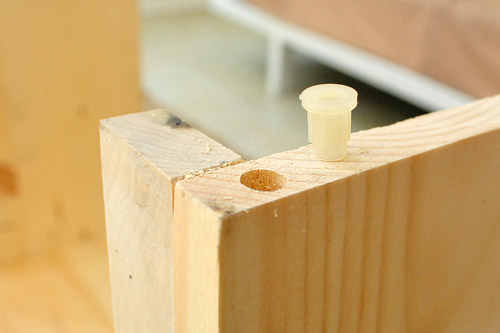
I also realized that using an even bigger drill bit to make the opening at the top a bit wider would allow the top lip of the plastic guide to sit flush in the wood. So with the padded leg screwed in it looked something like this:
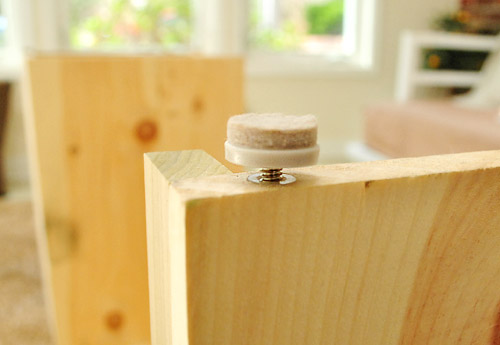
After adding these to most of the corners (and couple of flat felt pads to others that needed less of a lift), I eventually achieved what I was going for: LEVELNESS! (or is it levelocity? leveliciousness?)
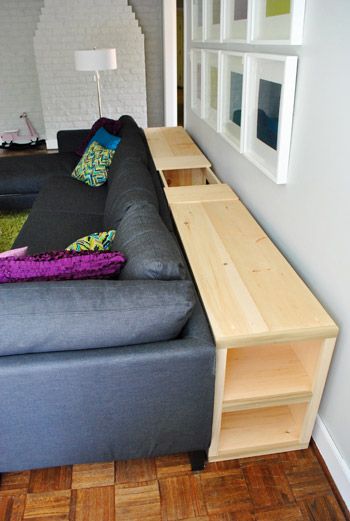
I have to admit that I was a bit nervous that getting it level would be impossible, so I was pumped when it happened – and relatively quickly. Plus this wasn’t the only time that luck was on my side. We also realized that we serendipitously built this center piece so that we still have access to the wall outlet behind Karl (which will be imperative once we buy table lamps for the console). Gotta love happy accidents.
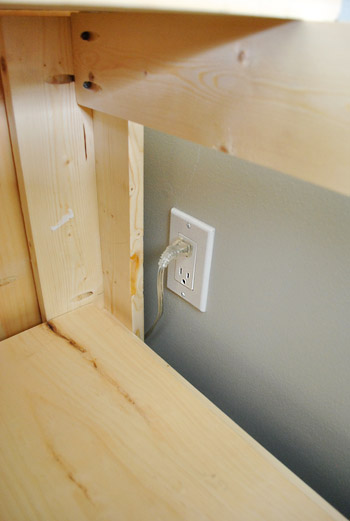
It means we’ll have to be a bit creative when it comes to stapling the fabric sides on, which we still plan to do so we don’t lose remotes or baby toys down that crack between the wall and the console (thanks to the baseboard that keeps them from being perfectly flush- but that smidge of space is imperative for lamp cords anyway, so it’ll all work out in the end).
But we’ll cross that bridge – and the staining and top building bridges – when we come to them. You know we’ll take a ton of photos to share too. For now I’m just basking in the glorious totally-level situation we have going on now. Ahhhh….

Bree says
Yanno, since it’s NOT flush with the wall, what about putting hinges on the top so that you can access the piece you need to? Make 3 seperate tops that run flush, but on the one piece you want access to, put hinges on it to access the storage. Hope I’m not speaking greek.
Anyways, that’s my suggestion! Good luck! I am LOVING seeing how this is turning out!
YoungHouseLove says
We’ve definitely considered hinges, we’re just not sure if we want a lift off top for easier access to large items (if it sits flush but can lift off like a box top, we can find things in any corner and cram large things in there without worrying about dinging up the wall while swinging it). Should be interesting…
xo,
s
Bethany Annechino says
Oh, how I wish I could just take you with me on my local shopping ventures. Not only does my local Home Goods currently have a pair of lamps that were MADE for this room, but I find pairs of incredibly gorgeous lamps at my Goodwill constantly that ask only for a coat of spray paint to look like a million dollars. I am a bit of a lamp addict. My husband won’t allow me to rescue them all, so it would give me much pleasure to find them a good home. ;)
Andi says
The console is nice and all, but… Clara is just too dang cute! She stole the show:)
Jessica says
I can’t decide what’s more impressive… that John built this thing, or that Clara the genius baby found the perfect spot on the floor to play catch with herself. Future physicist?
alison says
Nice update on the console. I was wondering how it would look behind the couch.
That video is hilarious. I’m impressed that Clara can play with a ball and not have it taken away by Burger. Balls are off limits inside the house for our son since our dog is beyond obsessed with them.
Lindaroo says
Isn’t the bin a little deep? You might lose Sherry if she dives in there to get an extra coaster from that low shelf!
The gap between the console top and the wall; isn’t that necessary for lamp cords anyway?
I have some furniture made from reclaimed wood, and it’s beautiful. Gave it a light, watered-down paint wash, then sanded it to bring out the grain, then rubbed in car wax(!), let it harden, and buffed it to a soft, warm, completely waterproof finish. Try it, you’ll love it!
YoungHouseLove says
Yes! You’re right about that smidge of space being needed for lamp cords. As for how deep the storage area is, it’s only 16″ deep, which is perfect if we end up sticking a basket or two in there for organization. We didn’t want it to be too shallow and not really work with anything. When John sits on the couch he can actually lean over and touch the floor over the back of the sofa (I can’t, but I don’t have monkey arms like my hubby) so it should work for us! Here’s hoping anyway.
xo,
s
cate says
If the fabric doesn’t cut it, I’m sure you could find a big rectangular basket to put in the storage space.
And Clara is a smartie :)
Mary @ stylefyles says
what a smart baby! haha I love how she just lays there, kicks and keeps the ball rolling back to her.
Your storage cabinet is coming out so well. I can’t wait to see the finished product!!!
Kelly says
You know how when you’re a little kid there are some things you had deduced about the world and then you find out when you grow up that it was not true? For instance, when I was young I though that all gunshot wounds were instantly fatal. I guess a few times I heard of people being “shot and killed” on the news and didn’t hear of anyone being shot and surviving, so I generalized (just guessing). I thought of that because I wondered if Clara thinks that balls come back to you like a boomerang when you roll them away. I imagine she has played with balls in other areas that don’t have a convenient depression in the floor, so she probably knows it doesn’t happen all the time, but what does she think is happening there? If only we could read the mind of a baby. Their brains develop so fast, it would be really fascinating.
YoungHouseLove says
Haha, we think she thinks she’s magical, but only when she lays in that spot. It’s so cute!
xo,
s
Ana Silva says
Very good build. I am very impressed. Can’t wait to see the final product.
r8chel says
I love it that Clara essentially has a boomerang ball. :)
Kel says
Great project so far. I’m currently designing my bed headboard thingy and something like this is what I envisage as the end product although not a chunky. So this post has come at a perfect time to help with my brainstorming sessions.
Keep up the great work John & Sherry it’s what makes this site a great daily read.
Jenny says
When I saw the uneven table, I though, “Gosh, I bet you could use felt pads!” Brilliant idea. :-)
Does Clara go back to that spot to play? She is clearly brilliant too.
YoungHouseLove says
We find here there all the time. It’s hilarious. We think she thinks she has magic powers that only work on that part of the rug. Haha.
xo,
s
Lori says
That looks great! I wish I could get my husband to build something that fast!!! (Fabulously cute outfit on Clara, btw.)
Laurie says
Looks like a great hiding place for Clara someday! Seriously, nice job!
Allison says
Lucky Clara! That is the world’s most awesome spot for rolling that ball. So cute that she found it.
magnoliachica says
Levelitude!
I was also thinking that you could velcro the fabric to the leg near where you would want to reach the outlet.
I’m really enjoying seeing how this console turns out! With the help of my dad, I planned and built a bookshelf and bench with storage for our teeny apartment. It’s always a good feeling to have something that you’ve made and which fits your needs!
kim says
ok so…i’m lovin the console but what happened to the painted light hanging over the table in front of burgers window??? did i miss a post on that???
YoungHouseLove says
Oh yeah about a month ago I wiped it down with a wet cloth. It was casting an odd blue haze on that corner of the room in photos, so thank goodness it was so easily undone!
xo,
s
Aubergine says
Hi – I have high skirting/base boards that stopped bookcases sitting flush against the wall. I cut out a small section (an upside down ‘L’ with a curved tail would be my best description!) at the base of the bookcases so that they now sit well. It isn’t particularly noticeable. Would that work for you?
YoungHouseLove says
We actually thought about that but decided that we’d need room for lamp cords back there so that smidge of space is actually going to come in handy!
xo,
s
erica says
the best part about this post…BURGER! omg, that is the cutest and funniest thing ever. too bad you can’t embarrass him someday and show them at his wedding. he’s too spoiled. i love it!
Julia Brown says
Great work! I just made a rustic wood and white painted stereo console out of pine…I found that using BRIWAX and beating the wood to hell got the job done right…I don’t know what you guys had in mind to finish the wood but you should give the briwax a try brush it and rub it off in places..its mexican furniture magic sauce!
YoungHouseLove says
Ooh sounds interesting! We’ll have to check it out!
xo,
s
Pamela says
“Handy” men are sooo sexy. :) Don’t you agree, Sherry?! Not all guys intuitively know how to build things (& nicely, too), so John – you just go on with your bad self & keep up the fabulous levelocity!! The video of Clara was the sweetest thing…so cute that she favors that certain rug spot.
Shelly says
This project looks fantastic!!! Nice work! I am always excited each day to read what the next post is at Young House Love, and you never disapoint!
Suggestion: why not remove the baseboards just for the length of the consol? Make the whole thing flush with the wall.
You could cut them right at the end so when Karl ends the base board picks right back up and no one will notice.
If this furniture arrangement is here to stay, it might be worth it to elimate the possibility of papers, toys, (not to mention dust, dirt, etc) falling down that crack.
Just a thought!
Excellent work with making your own furniture!
YoungHouseLove says
We actually thought about that but decided that we’d need room for lamp cords back there so that smidge of space is actually going to come in handy!
xo,
s
Ban Clothing says
Storage is always fantastic… I think I would pull the couch away from the consol and shove it full of season stuff like christmas decorations, extra blankets, winter clothes etc. and then just push the couch back. This way you only really need to access it once or twice a year. I like the idea of having a storage drop box behind the couch that is accessible all year round… will definitely help keep hide toys among other things. I think it’s great that you guys build stuff… it makes me feel like I can DIY some furniture as well.. although I probable won’t because my husband the carpenter would cry having to look at it every day.
kristel says
i just told my husband to watch the video of clara, and he said, “i think she’s going to have a warped sense of physics because of this.” i am laughing so hard.
Joanne says
Well done John! This looks great!
Katie says
The console looks fantastic! And the video of Clara is sooo cute!!!
lesli devito says
OMG, in our old country house, nothing is level, whole rooms and their decor are based on a wedge here and a wedge there and I am soooo excited to see these wheeley things you screwed in the bottom of your console. I will be buying a case of those babies!
LOVE Claras ball, our kids have magic places like that too!!! take care!
shannon says
I’m sorry, much as I loved John’s sketches and the killer build thus far, my favorite part was watching Clara with that ball. SO hilarious!!
Sarah says
I was totally going to suggest removing the baseboard since no one will see it and just storing it somewhere so you could put it back on if need be, but I saw someone already suggested that. I don’t think it would look weird to have the lip off the back and not on the front and would make sense so nothing falls behind that HUGE table! :) Love it!
Vivian says
You both are brilliant. And that little baby of yours, even more so! Wow, you never fail to impress! Thanks for making my mornings always so inspiring.
Lindsey says
I LOVE the console. Great job, John!…but I must say that Clara’s Magic ball trick stole the show on this one :)
lisa says
i found this while surfing blog-land this morning. it looks like this guy had the same genius idea, only he made a headboard with storage!
http://woodandfaulk.com/make/wooden-crate-headboard
YoungHouseLove says
Oh yeah! That’s totally the idea we’re going for – glad to know it’s been done successfully before. :)
-John
Christie says
That looks SO awesome, y’all! Great job! I can’t wait to see it all cute and finished!
Scott says
We recently have been looking at console tables to purchase for behind our sectional too (I don’t have the skills to build one). I saw this console table on Home Decorators Collection and thought the top might be a good example of the rustic countertop you were planning to attempt.
http://www.homedecorators.com/P/Holbrook_Console_Table/
YoungHouseLove says
Definitely Scott – we’d be super proud if we could achieve something like that. Thanks for giving us another inspiration pic!
-John
candace @ thecandace.com says
Wow, impressive work John! I’m loving how this project is turning out – and can appreciate your creative ways of adapting to your older home’s irregularities of levelocity!
Also, you’ve got a clever little cutie on your hand with finding the magic ball trick spot – hilarious!!
RLB says
You creativity and skillfullness (skillfullocity? :)) are impressive.
Have you considered removing the base molding so the console sits flush to the wall? That would look better I believe, and would also prevent things from slipping down behind it. I suppose you could cut the top a bit wider than the width of the console and have it sit flush to the wall, but that would look odd at the ends.
YoungHouseLove says
Yup, we’ve considered both of those solutions but we need that sliver of space for lamp cords so it’ll actually come in handy.
xo,
s
Diana says
Beautiful!! But have you considered perhaps placing some lighting inside the table to show off your lovely beams and gallery wall? Even some low wattage uplights would add some pretty/dramatic light at night. But simply loverly!!
YoungHouseLove says
Always a possibility!!
xo,
s
Amber Anderson says
Great job on the sofa table! You got me in the mood to build something this weekend. Thanks!
Have you ever checked out this blog/website? http://www.knock-offwood.com/
I’d be surprised if you haven’t. She creates plans for gorgeous furniture pieces we see from stores like Pottery Barn, William-Sonoma, Crate & Barrel, etc., and shares them, along with photo tutorials on her site so we can all make gorgeous furniture and not spend all the $$$.
YoungHouseLove says
Yes! We actually linked to Ana in our last console building post- it’s where we found the inspiration for the bookcase ends on each side!
xo,
s
Marla says
The Kreg Jig is the bomb! My hubby has made some amazingly beautiful and sturdy built-ins in our home with it. It’s a must-have for DIYers! Love the console design!
Adriana says
My kids(3,9&10) loved watching Clara play with her ball. The 2 older ones (boys) said “Look! She’s using the force!”
Love how the console is coming together and can’t wait to see it once it’s completed.
Izabelak says
John, you’re the man for taking on this project. It looks great! Question, for both of you: while working on a project, do you ever get frustarted and walk away because you want to throw your tools around?
YoungHouseLove says
Oh yes. There are definitely bleeps and tool tossing and all that jazz. One thing is guaranteed when it comes to DIY, and that is that nothing is guaranteed. So things can take longer and be a lot more complicated than we ever guessed. The funny thing is that sometimes we go into projects expecting the worst and those are the easy ones. It’s the ones that we think are going to be easy that get us. Haha.
xo,
s
Kevin M says
Nice work, John, isn’t it a great feeling to be able to build something so useful and nice enough to show off? I am itching for some more free time to build a couple more pieces of furniture for our place.
Whitney Charles says
Hi Sherry,
Regarding your uneven floors, did you guys actually put in new flooring to (sort of) correct the settling? My house is over 100 yrs old (105 really, but once over 100 what difference does a year make?) and we have rolling hills in our floor. I’m trying to form a well-rounded opinion on what we should/can do. I’m more interested to know if you did anything else to correct the problem besides parquette floors (not an option-the entire house has wood floors)
YoungHouseLove says
You can definitely redo the flooring in an attempt to level things out (from self-leveling concrete to other flooring solutions, we’d consult with an experts to see what they’d recommend). As for us, we plan to live with them and love our old rolling hills. Haha. We don’t mind old houses with quirks, and since the slope isn’t noticeable (except when it comes to 12′ console tables and small matchbox cars and toys), we’re ok with it. Haha.
xo,
s
laurenjanelle says
I love that you custom built it. It’s a great solution to making the room feel cozier. I would not have thought of using those foot pad things to make it level, that’s genius!
jja says
Console looks really good, but not there where it is now. You have a big, nice home and sectional should stay “alone”. It seems to me somehow squashed, and in a room of that size no need for that.
Clara is amazing! Sugar-sweet :-)
Meghan says
1) Clara and the ball rolling are so cute.
2) I wonder (and maybe I’ve missed it in previous posts) do you choose eco-friendly building products? Wood/lumber in particular? I wonder if you have suggestions for “green” building supplies. Thanks!
YoungHouseLove says
We just try to use wood that’s sustainable and affordable (like white wood) and avoid anything that has been glued together (like particleboard) and anything treated (like wood meant for outside) since those can offgas indoors. Hope it helps!
xo,
s
Stephanie says
Can I just say that it should be illegal to laugh as hard as I did at that video of Clara playing with the ball! How cute was that?!
Meghan says
where did you get the green rug, if you don’t mind me asking?
YoungHouseLove says
That’s from overstock.com. If you search “come to momma” in quotes on our sidebar it should bring you to the original post about ordering it. Hope it helps!
xo,
s
Josie says
Love the living room even thought the floor is not level lol and clara likes it too haha.. cute video guys love your blog!