After victoriously completing the two end sections of our three-piece DIYed console table (explained here), I turned my attention to the middle portion. You may recall that this piece will be entirely hidden between the other two (and sandwiched between the back of the sectional and the wall) so I could’ve gotten away with a very simple platform on which to lay the long tabletop that will span across all three pieces that we’re planning to make out of our already-around reclaimed pallet wood. But we figured that would just be wasted space, so we took the less simple route of creating some hidden storage in the middle piece. Allow my sketch to explain:
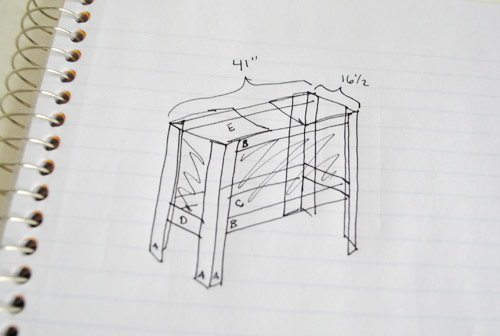
Who am I kidding, my sketching skills haven’t improved so allow me to explain instead. Basically the piece is a 41″ long table with an opening in the middle of the top. Under that is a platform shelf that will act as the bottom of the storage “area.” We considered building sides out of wood to enclose the entire storage “box” (where I’ve “shaded” on the sketch) but to save money and keep the weight of the piece down, we’ve decided to just staple taut fabric around those four sides instead (again, since no one’s gonna see it). Basically it’ll be a fabric box with a strong wooden frame and a solid wooden bottom.
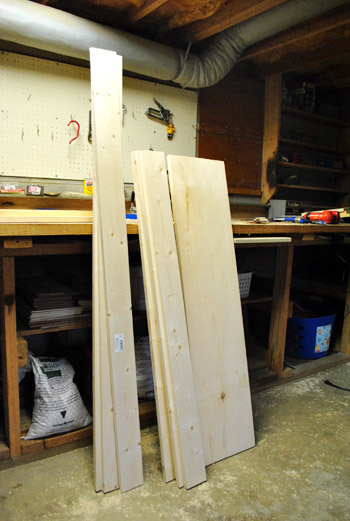
Maybe this will make more sense once you see it being built. Here are my supplies – a bunch of 1 x 4″ boards and one 1 x 12″ board. We had a lot cut at Home Depot again, but didn’t worry about getting them cut nearly as precisely (since I can easily cut 1 x 4″s with my miter saw at home).
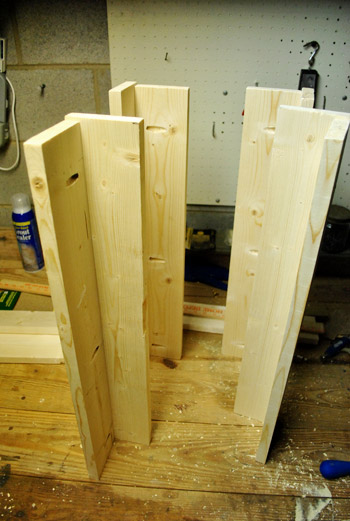
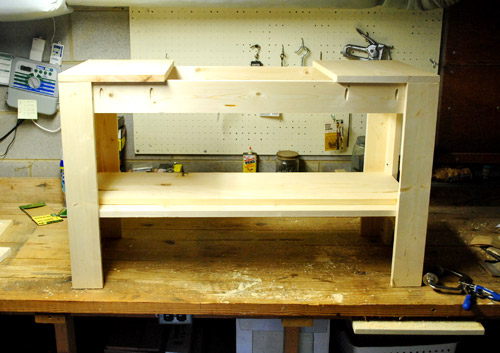
First up was the process of creating four 24″ tall legs. I of course was reminded that cutting a 48″ piece of wood doesn’t leave you with two precise 24″ pieces (notice the uneven tops). The width of the saw blade leaves you with one that’s more like 23 7/8ths. But I managed to work around it, so don’t worry about that for now.
Then I added a long rail at the top to connect two legs together (I lined it up with the 24″ leg, not the slightly shorter one, which ensured that it would be level and the right height when it was complete). Again, all of this was done with my beloved Kreg Jig, which I also used to make the other two sides of the console table that I shared on Monday.
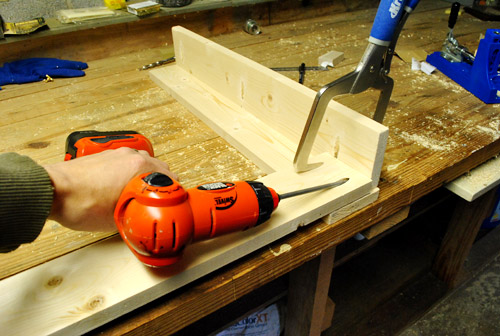
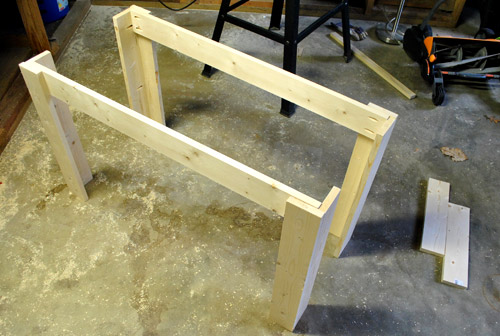
Next I used those two shorter boards (seen on the floor of the picture above) to connect these two pieces. These pieces would also become the support for the bottom shelf.
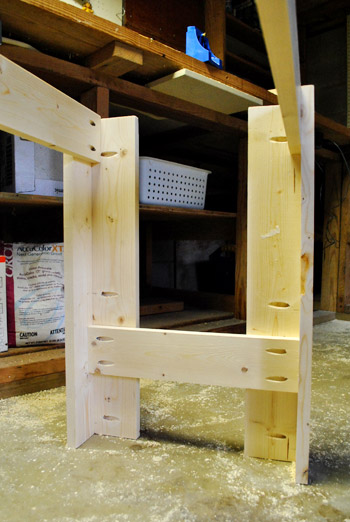
I sorta forgot to photograph the next step (boo me), but it was creating that lower shelf. To save money I just laid two 1 x 4s flat across the piece (resting on the support shown above). Obviously this didn’t fully fill the 16″ space, which is where that 1 x 12″ that I purchased came in handy. I just laid it on top of the newly attached 1 x 4″s (centered on top of them) to create a nice solid shelf.
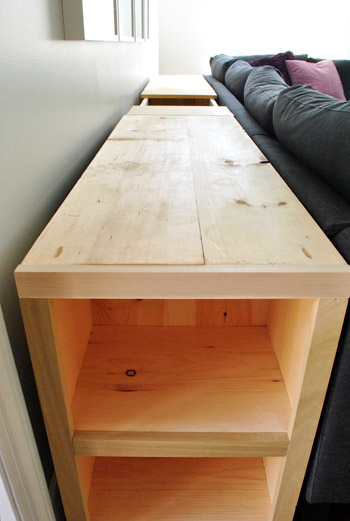
You can sort of see what I’m talking about in the finished pic below:
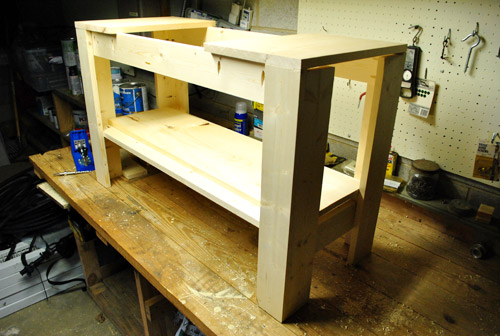
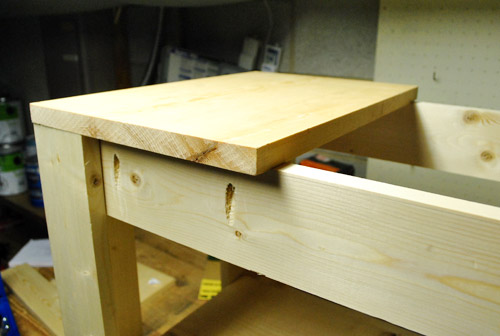
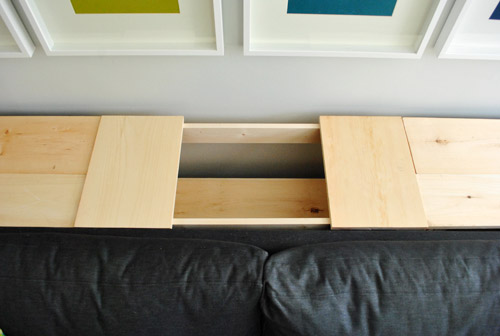
As for the top, it’s just some of that 1 x 12″ that I had leftover from building the two end pieces. I affixed it to the top on either side – leaving the hole in the middle that we wanted.
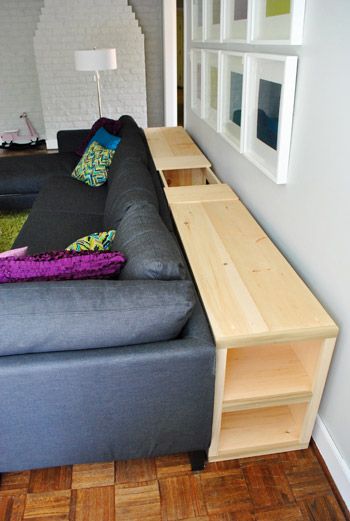
Not the prettiest piece in the world, but once we get the fabric stapled to the sides to enclose the storage “bin,” it’ll do the trick (heck we might even drop some storage baskets in there for some separation/organization). And it doesn’t have to be that pretty since we’ll be adding our long reclaimed pallet “counter” on top of all three consoles (with a small and flush lift-off-able piece to access the storage compartment whenever we’d like).
I know it’s really hard to envision how we’ll make the rustic countertop – and how we’ll keep that top-entry storage area accessible from above – so we’ll share those details when we tackle it along with lots of photos (we’re still not 100% set on a specific plan of attack) .
Oh yeah and obviously we’ve moved all of the pieces into the room (even though they still need to be stained and countertopped):
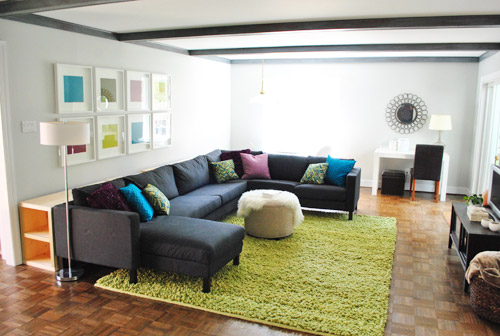
Admittedly it was a bit jarring to see everything shifted like that. But after one night living that way, it felt like a big improvement. The relationship between the sectional and the too-small-just-for-now media cabinet seemed cozier and sitting 17″ closer to our pretty small TV certainly made it easier to read subtitles and weather forecasts. Plus when we finally ditch the awkwardly placed floor lamp on the end of the sofa and bring in two chunky table lamps on either side of our huge console table it’ll feel even more balanced and connected to both the wall and the sofa. They’ll help us bridge things and add function and some height on either side of our big frame grid, which should be really nice. And you know Sherry’s already on a serious lamp hunt. She’s crazy like that.
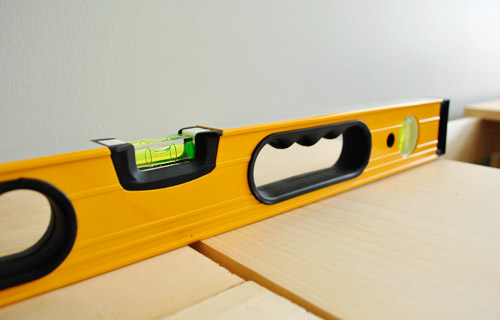
But there was one let down to the whole thing. It’s not level. Not because of the way I built it, but because of the room. The floor in there is a bit “wavy” at points. We noticed it from our very first walk through of the house, but our inspector assured us that there’s nothing structural to fear – just a little settling (which is apparently why they installed parquet, instead of less “flexible” and forgiving hardwood planks). So even though they’ve made my console adventure more challenging, at least Clara has figured out one plus to the situation: it makes playing with her ball a lot less work (she found a “magic spot” on the rug where her ball always comes back to her, no matter which direction she rolls it):
So I knew going into this that expecting a piece of furniture spanning 140″ (almost 12 feet!) of uneven floor might be asking for trouble. Luckily it wasn’t too bad. There was mainly just this one spot where two of the pieces didn’t line up.
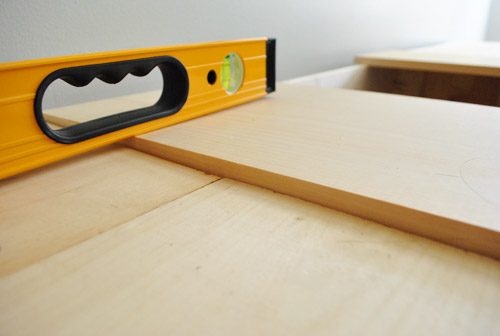
Enter these little fellas to the rescue:
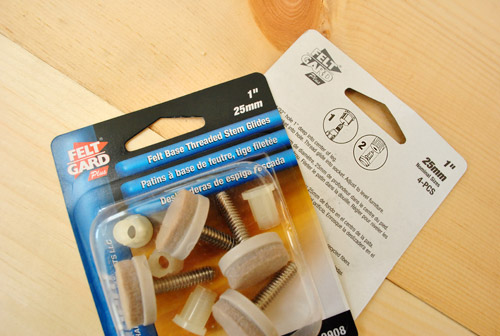
They’re basically like those adjustable feet you find on appliances. I opted for them over felt pads alone because the ability to tweak the height by spinning each foot ’til everything was perfectly level would be invaluably time-saving.
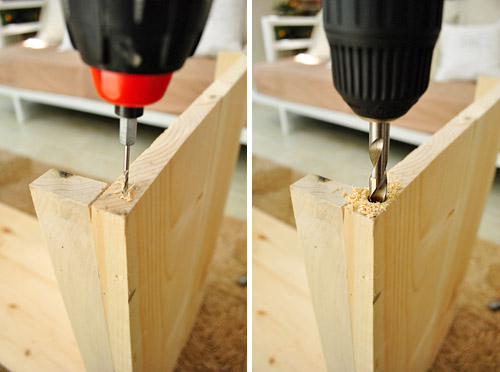
Installing them was pretty straightforward. Just drill a big hole in the bottom to fit the plastic guide and then screw the foot in. Since the hole was so big (nearly 3/8ths of an inch) I worked up from a small pilot hole to the big kahuna (which even required me breaking out my bigger drill) so I wouldn’t crack the wood.
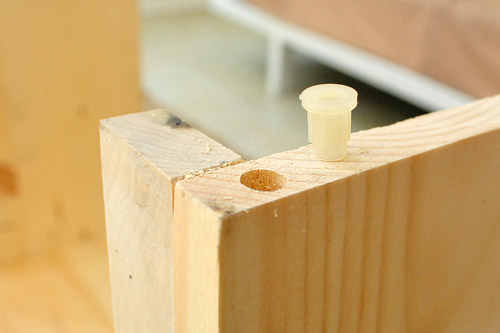
I also realized that using an even bigger drill bit to make the opening at the top a bit wider would allow the top lip of the plastic guide to sit flush in the wood. So with the padded leg screwed in it looked something like this:
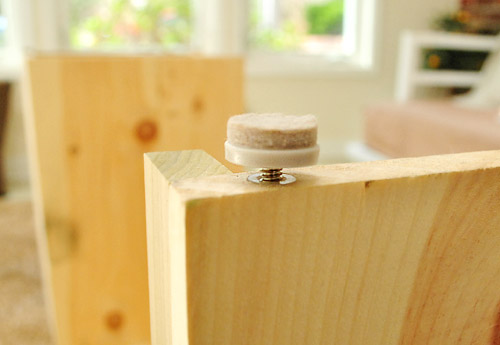
After adding these to most of the corners (and couple of flat felt pads to others that needed less of a lift), I eventually achieved what I was going for: LEVELNESS! (or is it levelocity? leveliciousness?)
I have to admit that I was a bit nervous that getting it level would be impossible, so I was pumped when it happened – and relatively quickly. Plus this wasn’t the only time that luck was on my side. We also realized that we serendipitously built this center piece so that we still have access to the wall outlet behind Karl (which will be imperative once we buy table lamps for the console). Gotta love happy accidents.
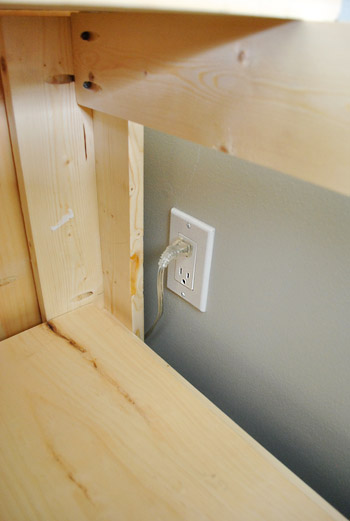
It means we’ll have to be a bit creative when it comes to stapling the fabric sides on, which we still plan to do so we don’t lose remotes or baby toys down that crack between the wall and the console (thanks to the baseboard that keeps them from being perfectly flush- but that smidge of space is imperative for lamp cords anyway, so it’ll all work out in the end).
But we’ll cross that bridge – and the staining and top building bridges – when we come to them. You know we’ll take a ton of photos to share too. For now I’m just basking in the glorious totally-level situation we have going on now. Ahhhh….

jen says
LOVE the Clara video! Too funny
Care says
totally impressed! great job!
jen says
Great job! I love the idea of a storage area in the middle. If you wanted it flush, I’d consider taking out the baseboard just behind it.. you can always replace it later if need be.
YoungHouseLove says
Great suggestion! We thought about that but figure that the rest of our furniture like our desk and media cabinet all sit about a half inch away from the wall too (since baseboards are everywhere in the room/house) so it’s not that big of a deal to us – but it’s always an option down the line if it starts to bother us!
xo,
s
Wintry Mix says
The word that’s coming to my mind is “ingenious.” I am seriously impressed with the design of this piece…never in a zillion years would I have thought of building in top access for the middle section so that it would be usable storage. Very smart!
egt729 says
looks fantastic! maybe you can put some sort of basket in the middle section that is supported by those top rails? i have a shelving system made from these baskets and you might be able to find one that fits into the “hole” without falling through? http://www.containerstore.com/shop/elfa/components/elfaDrawersAccessories
i’m not certain what you plan to store in the middle section but perhaps some larger items on the bottom shelf(extra blankets, etc.) and then remote controls, etc. in the basket?
just a thought that i hope makes sense! i’ve only had 4 cups of coffee today.
YoungHouseLove says
Yup, makes total sense! We’ve been toying with the idea of dropping two baskets that we already have in there since they fit perfectly!
xo,
s
Amanda says
I love the look of weathered shipping pallets, too. The issue is the major chemicals and processes that they must go through to stay insect-and-mold-free while they are being used for their intended. I made a side table top from pallets, but left it outside so it doesn’t off-gas inside the house. Maybe y’all already figured out a way to seal it really well?
YoungHouseLove says
Yup, we’re freaks about that stuff so we’re totally aware and have already researched an 100% safe way to seal them so they’re so safe that Clara and Burger could lick them. We’re nervous nellies like that so we’re rather be über safe than sorry! Details when we get there!
xo,
s
Jessie@www.mixandchic.com says
Great work on the console, John. I just love Clara on that video. She had so much fun just rolling the ball over and over again while lying on the same spot. She’s so cute! I can watch the video again and again. Anyway, can’t wait to see what kind of lamps you guys get for the rooms.
Jessie
Lacey says
LOVE the video of Clara- that is hilarious that either way the ball goes (to the left or right) it somehow ends up back at her in the middle. She is too cute…you can see her looking back like, “Did you see that guys? Did you see my trick?”
Sara says
Maybe someone already asked you this, but is the pallet wood from a shipping pallet? Those things are treated with all kinds of nasty chemicals to keep them from spreading bugs and mold, fungus, etc around the world, and not something you would want inside your home (I think there was even a House episode about them once)
YoungHouseLove says
Yup, we’re freaks about that stuff so we’re totally aware and have already researched an 100% safe way to seal them so they’re so safe that Clara and Burger could lick them. We’re nervous nellies like that so we’re rather be über safe than sorry!
xo,
s
AKMama says
It’s looking all Domino-worthy in there. :)
Suzannah says
The consoles might be to heavy, but if you put feet on the bottom of them, that would help with the leveling issues. At least it would help trick the eye into thinking its more level than how they currently sit. They’re looking great though!
YoungHouseLove says
Check out the bottom of the post! We added feet and they’re 100% level now. John is my hero!
xo,
s
Elizabeth says
What kind of video is embedded…because all I have is a blank white space.
/sadface
YoungHouseLove says
That’s from YouTube. Maybe it’s blocked at work for you?
xo,
s
Elizabeth says
Weird…I’ll go check YouTube directly. Thanks!
YoungHouseLove says
So sorry for the trouble!
xo,
s
Elizabeth says
No trouble! Just watched it on my phone! Hilarious…and every time I see that rug I want to LIE ON IT! Lucky Clara!
Kate says
for the fabric, so you still have access to the outlet, you could use two pieces (edges finished with your no-sew tape of course) of fabric that overlap a bit, like the back of a pillow sham. They wouldn’t readily open so things would fall out, but still allow you access.
Just a thought :)
YoungHouseLove says
That’s definitely a possibility! Thanks for the suggestion.
xo,
s
leanne says
This reminds me of the episode of Friends when Joey makes that giant entertainment system and blocks both bedroom doors! Glad you were able to plan more precisely! Great job!
YoungHouseLove says
Bwahahaha, that was the best episode ever. Well that one and the one where Joey tried to speak french. Hilarious.
xo,
s
Sammy says
nice!! I’m curious how it’ll look all finished.
Are you planning to stain the console dark brownish, white or some totally unexpected funky color? With a reclaimed top nearly everything will look great!
YoungHouseLove says
We’re thinking of going deep brown on the sides and keeping it natural and rustic on the top (since the pallets have varied colors and tones).
xo,
s
Suzy says
Just rip those baseboards out and store the molding in your basement rafters until you decide you need it again!
Your project looks great!
YoungHouseLove says
We thought about it but have lived with the tiny sliver of space and it doesn’t really bother us. We figure all the other furniture in our house isn’t flush thanks to baseboards, so it’s no biggie. But if it is we can always take out the molding for sure.
xo,
s
Diana says
You guys are so handy and I’m always amazed by every project you do! So inspiring!
laxsupermom says
I’ve never seen those little self leveling legs before. They seem like the perfect solution for those of us with older houses. The consoles look great! Can’t wait to see them finished with counters.
Lilly says
That Clara’s Magic ball trick video made me crack up. I have two questions that have nothing to do with the amazing job that John is doing building that console. 1. Did u make slipcovers for ur pillows with ur napkins? If so, can u share how? because I’m under the impression that u don’t sow (like myself). 2. Where are the gray-beige, velvet like pillows u bought for the couch? I didn’t see them in the video this morning either, did u return them or are they somewhere else where I missed them? Oh are they under the napkin covers? Ok that was way more than 2 questions but anyways.
YoungHouseLove says
1. I drape my Sue napkins over pillows to create faux pillows but haven’t DIYed them yet. I have big plans to take it on (and share all the details) someday though!
2. We actually lent those gray pillows to a friend since pillows sort of cycle in and out of rooms in our house and she was obsessed with them (and they were just sitting unused in our playroom since they compete with my fake Sue the Napkin faux pillows).
xo,
s
Christa @ BrownSugarToast says
BRAVO!!!! That looks so cool! When you first talked about putting a console table BEHIND the sofa, I really wasn’t seeing it. But I love it! Way to go on the room. It is seriously looking awesome! love the colors too!! I really might borrow that “Sue the napkin” trick if we ever move. :)
Laura says
Did you all ever consider doing a top sliding cover(s) for part of the middle section instead of leaving it open? I’m sure that once you talk about the countertop it’ll become fairly obvious whether or not this would actually work, but it seems like a plausible option.
YoungHouseLove says
Oh that’s not going to stay open! We have a whole top to add, so there will be a part in the middle that sits flush but lifts out like the top of a box for easy access. Details when we get there!
xo,
s
Loren says
Great job, when you explained the three-piece console table I was wondering if you’d thought about putting storage in the middle. I’m not 100% sure I understand how you are planning to access it. But the piece definitely helps balance out your room.
Jen @ The Decor Scene says
Love it. I makes the LR cozier now. Can wait to see the top on and how the center storage turns out.
Will you paint or wallpaper the inside of the “end” storage areas for a pop of color or interest? Can’t wait to see it all come together.
YoungHouseLove says
I think we might just stain that part dark so the varied rustic wood planks on the top can “be the star.”
xo,
s
Suzannah says
Oh, yeah…you did add feet! Silly me! I got so excited that I might have a helpful suggestion that I didn’t finish reading the post. Ha!
Genius solution though! ;)
Bree says
Great job!! Definitely impressed by your console building skills.
Ashley @ DesignBuildLove.co says
that turned out awesome! And I LOVE the idea to use the “feet” to level everything out. Great jobs guys! Build-outs are sooooo fun!
Amy G. says
Hahaha! I loved the video visual!
Allison Jag says
Guys –
Hate to break it to you…
While John’s table is certainly nice – Clara’s magical powers were hands down the highlight of this post for me! Sorry! ;P
Molly says
You know what, Clara is having the most exquisitely blessed childhood. Surrounded by love and having her family around her every minute of every day. I know you work hard for what you have but you are so lucky too! The job you love allows you to be awesome parents – you guys are doing great!
Erin N. says
It looks great! (Clara’s going to totally believe she’s a telekinetic when she gets older =))
judi says
2 comments…
1 – oh my goodness that video is pretty hysterical!
2 – the previous commenter mentioned the EXACT thing i was going to reference as my second comment; although i was actually going to ask if you’d consider removing the baseboard behind the piece? i have a beautiful china closet that’s been handed down for generations in my home and it kind of bugs me that it doesn’t sit flush against the wall. i wouldn’t want to cut into the bottom of it, but i sometimes wonder about just taking off the molding right behind it.
Reenie says
Oh…gosh ~ I prob would have been shaving pieces off the entire unit to make it even ~ I would have never thought of those little “adjustable legs.” It looks great…and huge ~ but Karl’s a big boy!! ;)
OMG…..video of Clara too cute ~ I thought it was really a “magic ball.” HA!!
bridget b. says
that video of Clara was the cutest! what a smart baby!
Caitlin @ Desert Domicile says
Looking good! Can’t wait to see how you finish it off :)
Emily says
Our dog will not stay off of our sofa table! He absolutely loves climbing on it and laying down! I think it’s cooler to the touch than our couch so it’s a perfect spot when he’s hot but wants to hang out with us. But Zeppelin has always curled up on the corners of the couch so the table was just a larger addition!!
Margo says
Having just finished covering chair seats with vinyl, I wondered if that would be an option. It is strong, doesn’t ravel, and might be easier to work with than fabric. It would be easy to cut a small opening for access to the outlet.
YoungHouseLove says
Always a possibility! We might just use an old piece of fabric that we have on hand though (we’re cheap like that- hah).
xo,
s
jbhat says
I am beyond impressed. John! Too bad you are taken ;)
jbhat
Michelle says
love clara’s ball trick. . .she has a lot of the same clothes as my little bug. . . Evie is wearing the same pants as Clara today :)
Love the table. We just bought a new sectional too and I am considering using your table idea. . . just haven’t landed yet between that and a couple of storage ottomans pushed together to coral toys. Looking forward to seeing the finished product in your room!
LIZ says
What a fun project – and it’s coming along nicely! Still can’t wait to see what you have in mind with the fancy top piece!
Adam says
Looking forward to seeing this completed, you have me intrigued with your idea for a reclaimed pallet top. And I love how Clara has found her favorite spot on the rug; I bet that keeps her entertained for hours!
Jessicah says
Clara’s ball trick is great!!! Although, once again a bit jealous of how low-key she is…my 11 month old’s new trick this week is stacking up the couch cushions and using them to climb ONTO the couch, so she can walk back and forth on the couch. GAH! Almost gave me a heart attack the first time I saw her on the couch.
I bet the smooth slanty floors are fun for baby belly-scootching too though! :)
Abby says
Clara steals the show again! What a cutie…
Josie says
Can you securely mount a surge strip near the top of the middle section but inside the enclosure so that you’d have easier access for the lamp cords or any other miscellaneous outlet needs? You wouldn’t have to reach down floor level to unplug to change a light bulb or plug in a Wii charger for guests but it would still be secure from small hands.
YoungHouseLove says
That’s a genius idea! Love it!
xo,
s
Meredith says
I wonder if something like this would work for us…or if it would just turn into another ledge for crap. I like it conceptually though. My sofa sits against the wall and everyone uses the “edge” of the sofa where it meets the wall to stash remote controls, glasses (eye glasses, not drinking glasses), that sort of thing. Maybe this could be a better solution.
Rosie says
I’m wondering if there’s a way to “Ikea” the legs somehow so that it can fit flush against the wall. It’s a great piece!!
Claudia says
We have a similar issue, there isn’t a single straight wall in our house. I love the proportions in the living room with the console there!
Melanie says
Clever Clara. Anytime someone drops an item that rolls (like a pen or an earring), you’ll know exactly where to look for it.
The console’s looking great too. :p
Megan says
Leveliciousness. I like it.
Meredith says
That was my favorite part of the post. :)
Christina says
I’ve lived many places with uneven floors, and we always use the lazy man’s trick: pieces of cardboard cut or folded to shape. :)
Haley says
If you are worried about things falling in the gap you could get some foam, like from computer packing, paint it to match the wall color and attached it to the back of the console about 5 or 6 inches down. You shouldn’t be able to see it if you only place a few feet of it in the middle where most of the items will hang out.