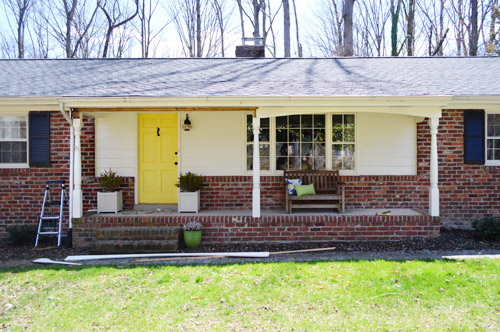
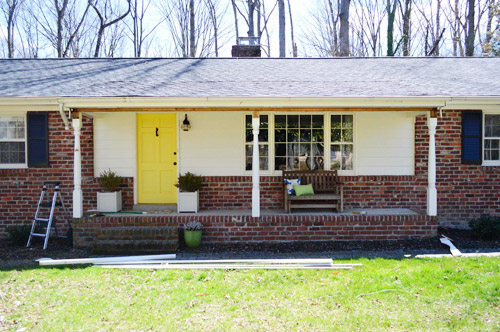
We’ve been talking about streamlining (buh-bye scallop) and beefing up the porch (namely those columns) ever since we moved in back in 2010. And it’s finally warming up enough for us to tackle an outdoor project after a long winter – seriously, we were still getting snow a few weeks ago.
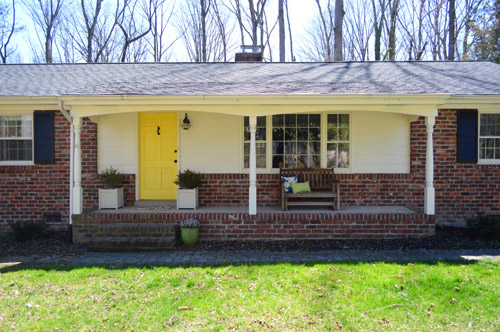
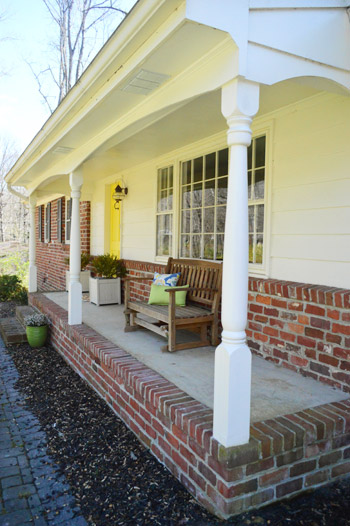
Most of the ranches in our neighborhood either have chunky square columns or a more traditional colonial style. We prefer the former, but inherited the latter. Along with a curved scallop header that isn’t exactly our style either.
Our first house had an issue with a scalloped header too, which Sherry tackled back in 2008 (one of her most exhausting projects to date – which she recounts here). She ran into some challenges when some metal flashing didn’t want to give up the ghost – and thanks to the fact that she wasn’t quite tall enough to make the task easy (she did this by herself as a surprise for me while I was at work one day). But we loved the more updated, clean-lined look that it gave our first house. So it was finally time to get on it here…
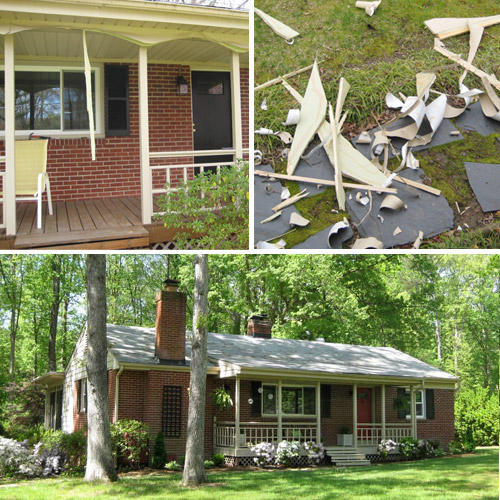
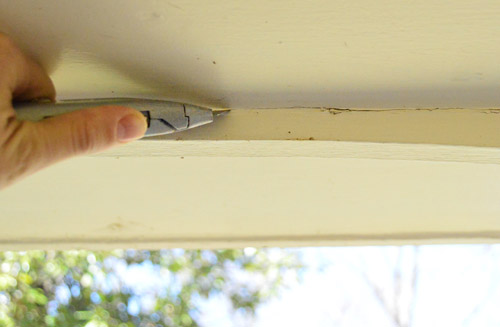
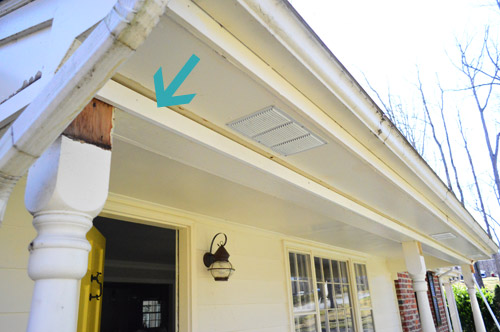
Of course this porch is a whole new beast (no metal flashing, a lot more wood trim and stuff to deal with, and columns that we’ll be altering this time). So before we started hammering away at things, I ran a utility knife across the seams to “encourage” the paint the break in the right spot – not crack, peel or flake off in areas that we didn’t want it to. This is always a good idea before demoing surfaces that have been painted together – especially with lots of thick layers of exterior paint.
I was fully prepared for our demo process to be exhausting, considering the horror stories that Sherry told me about her last attempt at scallops, so I was cautiously optimistic when a few whacks with a rubber mallet easily loosened the scalloped header while Sherry watched with bated breath.
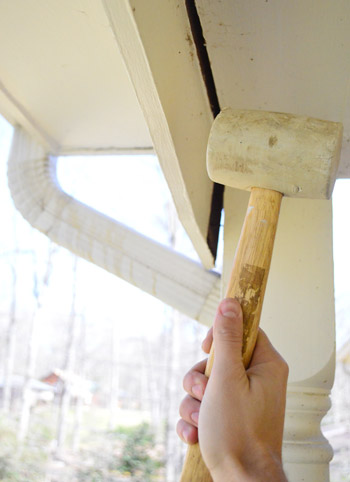
Thankfully, once things were loose, we were able to quickly pry that part of the curved scallop off with a crowbar.

Not too pretty looking yet, but at least the demo wasn’t too bad:
The combo of not having metal flashing to contend with AND my height being available (along with 4 hands, which are always better than 2) helped things work in our favor for sure this time. Soon enough all of the scallops were gone and we were already feeling better about things. Now we just had to put a new straight header (along with those boxed our columns) together.
We started off by nailing and gluing a simple pre-primed piece of 1 x 3″ pine where the scallops had been. Curvy header out. Crisp, straight header in.
That was the easy (slash boring) part. This is where the fun began – boxing out the columns.
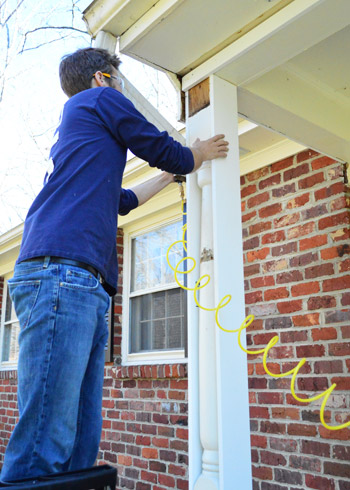
Rather than go through the trouble of removing the existing columns, we decided to achieve our more modern, chunky square column look by just “boxing” them in on all sides with some pre-primed pine boards – which is faster and easier (not to mention cheaper). Our columns were a few inches shy of 8 feet tall, so we had to trim each board first (thanks circular saw!).
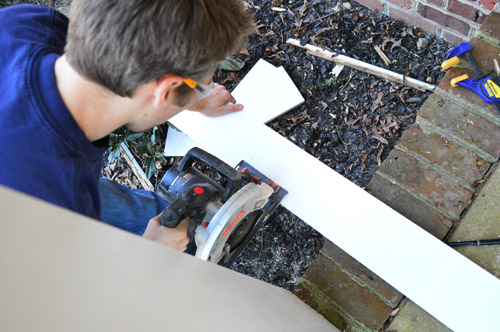
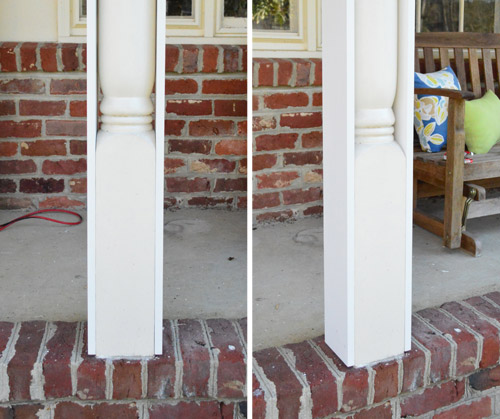
Here you can see what one column looks like with two sides of the box added. Our columns were exactly as wide as a 1 x 6″ board (we will now pause to thank the home improvement gods for that awesome discovery) so it didn’t require any additional cutting besides trimming the length, as shown above.
We attached them with some heavy duty wood glue followed by a few 2″ nails into the bottom and top (where the new boards rested flat against the square part of the old columns). We also added a few screws to keep them extra secure for the long haul.

Since adding those two 1 x 6″ boards essentially made our columns wider, we had to use 1 x 8″ boards for the other two sides. That sounds confusing, but it made them end up as 8″ x 8″ squares since the sides of the boards overlapped (this very rough Sherry-sketch should hopefully make sense of the overlapping concept that I’m trying to explain).

Well, actually they’re around 7.5″ square since 8″ boards are never really 8″ (they’re more like 7.5″ wide). But you get the idea.
As for physically boxing the columns out, two things really helped: our nail gun, and Sherry’s hands. Obviously the nail gun made things go faster and this whole project is ideally a two person job (although once we had things secured in a few places Sherry could step back and snap some fantastic photos like this one).
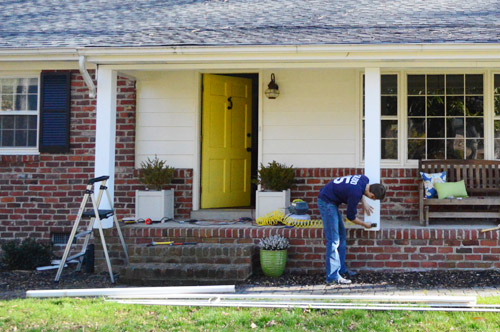
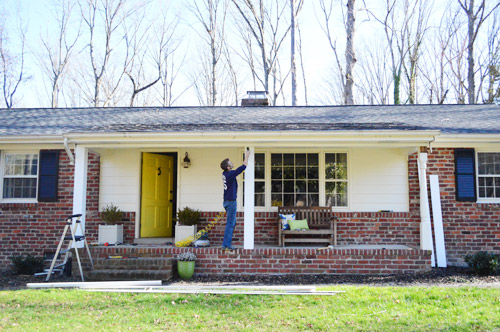
The process actually went fairly fast, just not fast enough for us to finish before Clara came home from her afternoon with Grammy & Tom Tom. So our progress got cut short a bit – but you can at least see where we’re headed. Oh but see how the header looks a little thin compared to the newly boxed out columns? We have plans to beef that up under the roofline so it’s nice and balanced. Stay tuned…
So here’s our remaining to-do list:
- get that last column boxed in
- add a chunkier header piece to visually balance the columns
- get all of those seams caulked (don’t want any moisture getting in there)
- paint everything so it’s seamless
So we hope to be back with some true before and afters once we knock those things out. In the meantime, you can also check out this little loot-related craft that Sherry whipped up for Clara (and Will Bower) over on Young House Life.

Anyone else moving on to outdoor projects finally? What’s on your spring DIY agenda? New flower beds? A patio upgrade? Mulch galore? Or are you making fake money? Be careful that it’s not too realistic (don’t wanna end up in trouble…).

Ethne @ Wom-Mom says
Much improved! I bought fake money at Target and it looks so real, I’m worried it’ll end up in their piggy banks. Also, way to rub in that you had snow A FEW WEEKS AGO. We got snow LAST NIGHT! Haha.
ale norris says
the husband & i recently moved in to what we hope to be our forever home, so we’re working on lots of projects right now. our main focus is on the backyard since we hope to host several parties this summer, so we’ve been spending a ridiculous amount of time working out there. but it’s worth it! right?? that’s what i tell myself when i’m literally caked in dirt and have eaten and/or snorted more bugs than i can count.
Callie says
Fun update! That nail gun. So multi-talented.
When I do this kind of project that is more of a styles-have-changed type project rather than needed-help project, I can’t help a funny thought or two over how we crave variety and newness in fashion. I think it’s because we sometimes have our elder Amish/Mennonite friends Moses and Sadie over to help us (Moses was an Amish contractor before retiring) and sometimes they exclaim over some change or other: “oh! are popcorn ceilings not in style anymore!” :)
Callie says
Which is not at all to be critical, because I think it’s a great update and I really like your guys’ style! It just made me think of it since that’s something I think about now and then. I like your balance of layered-in-time with distinctive modern flair :)
YoungHouseLove says
Oh yes, I totally know what you mean! When we’re switching out a green toilet we always laugh and say “this was awesome once!”
xo
s
kristen says
this looks great! but the off-centered bench is tweaking my OCD! :)
YoungHouseLove says
Haha! Oh yes, when we’re done we’ll get that squared away.
xo
s
Sarah says
What a different squaring off the columns can make! I like it! Can’t wait to see it finished.
Sarah
http://www.etsy.com/shop/owleyevintage
Crystal says
Love the change! Am I crazy or didn’t you paint the siding last summer a gray color?
YoungHouseLove says
We just did swatches on it but then painted back over them when we realized it would be weird just to paint the porch siding (the sides and back of the house are cream too, and painting those is a huge job).
xo
s
Mike @ Midwestern Bite says
The boxed columns look great!
I’m building way too complex of a garden system at our new home that will hopefully all but eliminate the need for irrigation. I’m chronicling the madness on our blog.
Why do boring rectangular raised beds when I can dig 12″ deep trenches on contour so they will naturally trap rainwater as it runs downhill, then fill those trenches with old wood scavenged from our woods so they’ll absorb all that moisture and slowly release it?
The technique is based on something called Hugelkultur.
Next week I’m tackling a 100’x60′ slant fence to keep the millions of deer and other critters out. :)
Donna says
That does seem to be way more ” you “. Have you guys thought about painting the exterior brick, or do you prefer it as is?
YoungHouseLove says
In VA it’s desirable to have unpainted brick houses (they’re no maintenance, and painted brick is high maintenance since we have green mold here) so we think it’s great to leave it unpainted :)
xo
s
Stahli says
The weather keeps teasing us! Yesterday it was in the mid 70’s and today we woke up to freezing rain! I had to go dig out the heavy coats for the kiddos…again!! We are going to work on the deck in the next month or two. I am tired of having to make the kids wear shoes or get tweezers out for the splinters. We might even finish painting the playhouse!
Jess says
Are you considering any decorations on the columns? They look a bit plain, and just adding som trip about half-way would look great (sorry, my english isn’t good enough to explain what I mean)…
YoungHouseLove says
I think we’ll leave them as-is for now since many other homes that we love in the neighborhood have columns just like them and they’re nice and clean. Once we paint them I bet they’ll blend right in :)
xo
s
Allison says
We just bought a beautiful new hammock for our backyard (and are currently searching for some lounge chairs to match our dining table), but it’s still snowing on a regular basis here in Winnipeg, so it doesn’t look like we’re going to be able to make any improvements to our back yard any time soon.
I am so jealous of your green grass.
sara says
Looks like you guys are making good progress already! We just got a few sunny days … and I took full advantage labouring and brainstorming (digging gardens, pulling vines off garage… http://sara-another100yearoldhousereno.blogspot.com/2013/04/creating-home.html;); hopefully by the summer some of the ideas will have blossomed.
Deb says
Looking good! I’m so jealous that you are doing outdoor projects already. Up here in Ottawa, we still have a foot of snow on our lawn, and a snow storm in the forecast for Friday. Spring is taking so long to arrive this year!
Hill says
You say “long winter”… it snowed here yesterday (Fort Collins, Colorado)! I don’t think it will be spring till June :(
Thanks for letting us live vicariously through you!
YoungHouseLove says
Aw man, sending warm wishes your way!
xo
s
Morgan {Style Oyster} says
My husband did the box out method for our plain columns too. We get comments all the time. He went the extra mile and added a wainscot-like molding to it, so it added architectural interest. Great job on yours, looks much more modern!
Emily says
The porch is looking great! We don’t have a porch, sadly. But we recently finished fencing in our yard so we can spend time in this warm weather out there with our new pup! We also planted flower bulbs that are blooming and add so much to the front yard. We’d love to have a patio/porch one day.
http://emilyandtylerglover.wordpress.com/2013/04/01/fencing-in-the-newest-member-of-the-glovers-by-tyler/
YoungHouseLove says
So sweet!
xo
s
Krissy says
Now that it’s warm, we’re going to finish re-siding the house. Using the sawmill to cut hemlock into siding, and then staining all of it!
It’s not warm enough up here to plant flowers yet, but soon!
Jeanna says
Gosh, it’s gonna look great! Love the columns. On a completely off topic note, I was wondering if you ever got your crown done in the house, and did you ever decide what you wanted to do with Clara’s dresser?
YoungHouseLove says
Wahoo! Crown’s done so we just have to paint it and post all about it! As for the dresser, I’m still stewing. Haha!
xo
s
Meghan says
My Dad and brother worked tirelessly over March break to turn our 2 bedroom home into a 3 bedroom home (my two kids sharing a very small 9ftx9ft bedroom was adding up to very little sleep for all of us, and no space for their stuff). A wall went up and we no longer have a formal dining room. Now it is painted and he is moved in, and we are working on the finishing touches. Then we have to address my daughter’s now half-empty bedroom, and the newly combined living room dining room combo space. Sounds daunting when I type it all out, but it’s actually lots of fun and very refreshing…..and all done on very little budget….like less than $700 for all those spaces combined!
YoungHouseLove says
That’s amazing Meghan! Congrats on all the hard work you guys have done!
xo
s
Christina says
I love the look of the porch without the arches. Its like getting your eyebrows waxed- totally opens up the porch space.
YoungHouseLove says
Haha! Comment of the day!
xo
s
Kelsey Noll says
I love the columns! We have the metal wrought iron ones and they just look puny on the front of our house. Hubby and I were just discussing plans to box them in. But first this spring was hanging my hammock which we did last weekend and then building a fire pit! I am so glad it is finally spring in Florida!
Bryony says
Looking good! Alas, since we’re in a rented flat, there isn’t much outside DIY I can get stuck into…though I’m considering rigging up some window boxes with little lavender plants. Otherwise, all my DIY is inside, and will involve quilting and painting curtains. (Also, making my own stencil: eek!)
YoungHouseLove says
Sounds like fun Bryony!
xo
s
Angela says
i’ve seriously considered writing anonymous letters to neighbors with undersized columns. it makes me nuts. it’s a real problem in US architecture that needs to be addressed. We need more people like you in the world!
Kristin says
Wow! This looks great! Can’t wait to see the finished product!!
Adrienne says
Thank you! THANK YOU! for correctly using “bated” breath (and not baited). You just made my little copyeditor’s heart smile!
And yay for projects that are easier than feared!
YoungHouseLove says
Thanks Adrienne! I’m usually the typo king, so I’m glad I got that right. Ha!
-John
vivianna says
We are getting ready to paint the exterior house, which is very much needed. Ready for this? Blue (like a recycling bin blue) turquoise trim (more on the greener side than blue) and a magenta door! My neighbors are gonna love me :)
YoungHouseLove says
Wow, that sounds brave!
xo
s
Chana says
I think it’s pretty funny that you mention your long winter; oh to have only seen snow a couple weeks ago! Here in the great white north, we’re still buried, and – though it’s melting – we did have some fall even just this Sunday! But on the plus side, the porch looks awesome!
Kitty says
Thanks for this! This is very similar to my 1960’s split level in NOVA. I did a little research and learned that a lot of homes built during this time have neo-Colonial touches. It drives me crazy that my clean- lined ranch style home has fanciful columns and light fixtures. Such a weird combination! I look forward to tearing down my scalloped overhang, beefing up the porch posts, and updating the exterior light fixtures to something more boxy and clean. Great post!
Dana says
Found several awesome posts on your blog several months ago when the hubs and I bought our first house. Just got your book from Amazon yesterday and already went right through it! Pages are flagged of projects that inspired me, and a shopping list is starting to form. Thank you for sharing your creativity and know how you’ve gained through making two houses “home”.
YoungHouseLove says
Aw I’m so glad! Good luck with everything Dana!
xo,
s
Teresa says
This looks great. We are starting on a raised veggie garden. I think I will take photos along the way. Thanks for the idea.
karen @ paperfancy.com says
What a huge difference a few pieces of wood made. The columns look great! I really need to look at our landscaping but now it’s SO HOT! I’m waiting for the perfect 70 degree day before tackling that project. Could be a while!
k.
Todd says
Hey guys. Add “buy 50-ft compressor hose” to your list! It’ll get the noise of your compressor away from your project and is a lot easier to maneuver than the coiled yellow one.
YoungHouseLove says
Thanks for the tip Todd!
xo
s
bekah says
Nice change! I am looking forward to seeing the next phase of the project.
I am working on (well..the whole house, we just moved) the mudroom, and so far I am still in the ‘get rid of the ugly and clean’ stage…
http://www.countrymousetales.com/2013/04/the-mudroom-stage-1.html
Does that count as ‘outside’?
I am stoked about actually making it pretty one day though – which leads me to a question completely unrelated to your post. (Sorry). Have you ever painted concrete? Is it slippery? I’d hate to be responsible for my grandmother breaking a hip. I remember when you stained and stenciled concrete, but I couldnt remember if you ever full out painted it?
YoungHouseLove says
Oh yes we painted it with porch/floor paint, which is meant to be walked on so it’s not slick (wet flip flops on it = skating rink, but that’s true about wet flip flops pretty much anywhere, haha). I would go for the less shiny finish if there’s a choice and as long as it’s meant for floors you should be all good :)
xo
s
Erik van't Ende says
Hey,
Great idea to box the columns. I don’t know if I would’ve had that one pop up in my mind. Looks a lot better for sure. Can’t wait to see the final picture!
For me I’ll finally get our front garden done. Started with that like September last year and got stuck in the middle of it. We also need to get some painting done. (With ‘our’ and ‘we’ I actualy meant: my parents. But since the first one was my project already…)
Keep up the good work cuz u guys rock!
Greetz from a fan in the Netherlands,
Erik
YoungHouseLove says
Thanks Erik! All the best of luck with everything!
xo
s
Lauryn says
What a lovely, simple change, and yet it has a huge impact! The porch looks wonderful. When it comes to DIY outdoor projects I feel your pain about this horribly long winter. I’m in Michigan and it is still in the 40’s here! In fact, the weather forecast calls for snow today :( Tear. I cannot wait for it to warm up around here so my hubby and I can get outside and get creative. Last year we finally got our back patio up and running. This year I hope to add some colorful pillows and spice it up a bit. On my list: globe solar string lights. We love to host dinner parties out there and I think they would make for some amazing ambiance. I can’t wait! Michigan just needs a reminder that it’s Spring ;)
Dalaney says
This really makes a world of difference visually. We are considering purchasing a house with ornate iron columns. Can we so just replace them with wood columns?
YoungHouseLove says
Yes, you could probably either box them out like this or somehow replace them (of course the porch has to be held up by supports while you switch them out, but I bet there are online tutorials and maybe even videos on youtube!
xo
s
Dave says
A small note on porch post/columns. If you can avoid wood then do it! Wood on the porch can be totally compromised in just a few years under the right conditions and if certain bugs get at it.
We just put in a bunch of fiberglass columns in our renovation, here are some pics of our porch: http://elbafarmhouse.blogspot.com/2013/05/pillar-progress-more.html
YoungHouseLove says
Those look great!
xo
s
Jackie Toye says
I got a little scallop going on with my porch too. House built in 1961. Thanks for the tip on how to get rid of it. I love every house style and I have tremendous respect for the thought and craftsmanship that went into them, but I want the scallop to Go Away. hahaha.