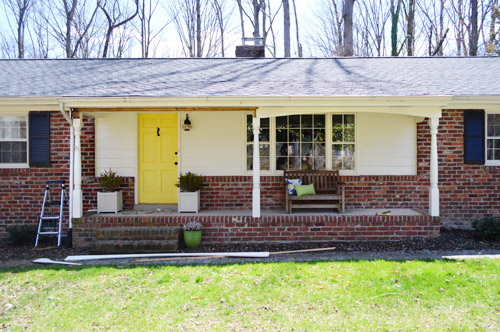
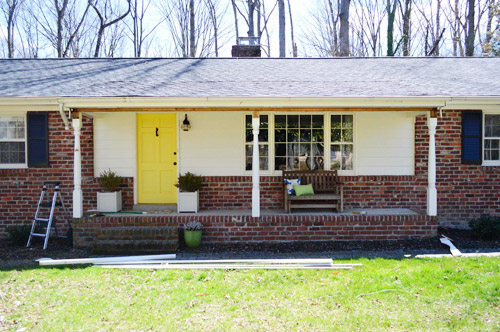
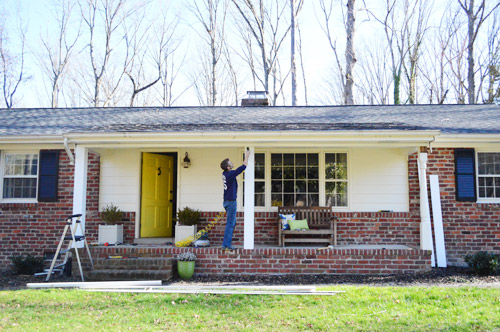
We’ve been talking about streamlining (buh-bye scallop) and beefing up the porch (namely those columns) ever since we moved in back in 2010. And it’s finally warming up enough for us to tackle an outdoor project after a long winter – seriously, we were still getting snow a few weeks ago.
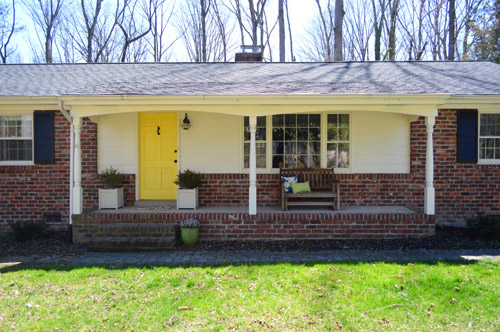
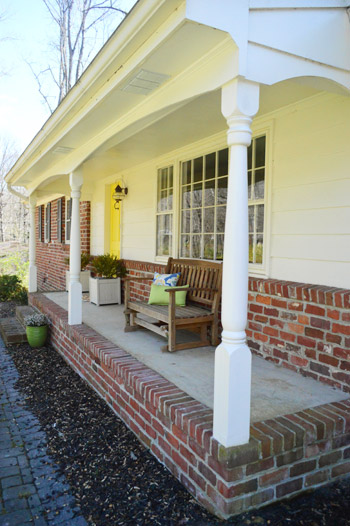
Most of the ranches in our neighborhood either have chunky square columns or a more traditional colonial style. We prefer the former, but inherited the latter. Along with a curved scallop header that isn’t exactly our style either.
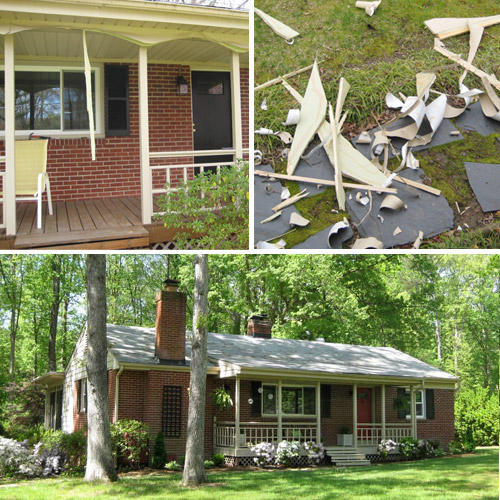
Our first house had an issue with a scalloped header too, which Sherry tackled back in 2008 (one of her most exhausting projects to date – which she recounts here). She ran into some challenges when some metal flashing didn’t want to give up the ghost – and thanks to the fact that she wasn’t quite tall enough to make the task easy (she did this by herself as a surprise for me while I was at work one day). But we loved the more updated, clean-lined look that it gave our first house. So it was finally time to get on it here…
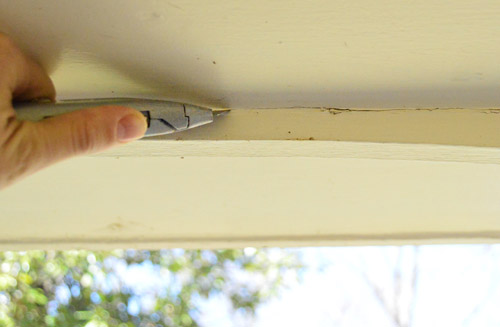
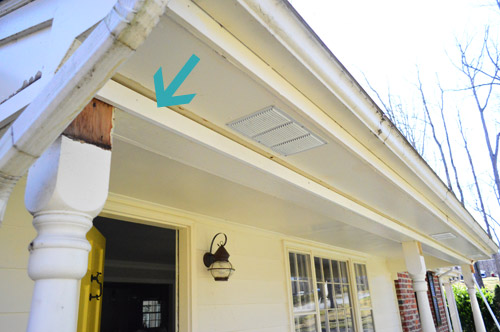
Of course this porch is a whole new beast (no metal flashing, a lot more wood trim and stuff to deal with, and columns that we’ll be altering this time). So before we started hammering away at things, I ran a utility knife across the seams to “encourage” the paint the break in the right spot – not crack, peel or flake off in areas that we didn’t want it to. This is always a good idea before demoing surfaces that have been painted together – especially with lots of thick layers of exterior paint.
I was fully prepared for our demo process to be exhausting, considering the horror stories that Sherry told me about her last attempt at scallops, so I was cautiously optimistic when a few whacks with a rubber mallet easily loosened the scalloped header while Sherry watched with bated breath.
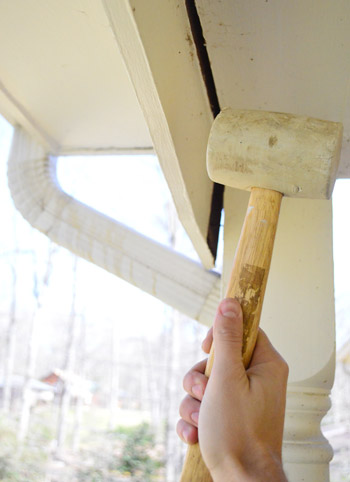
Thankfully, once things were loose, we were able to quickly pry that part of the curved scallop off with a crowbar.

Not too pretty looking yet, but at least the demo wasn’t too bad:
The combo of not having metal flashing to contend with AND my height being available (along with 4 hands, which are always better than 2) helped things work in our favor for sure this time. Soon enough all of the scallops were gone and we were already feeling better about things. Now we just had to put a new straight header (along with those boxed our columns) together.
We started off by nailing and gluing a simple pre-primed piece of 1 x 3″ pine where the scallops had been. Curvy header out. Crisp, straight header in.
That was the easy (slash boring) part. This is where the fun began – boxing out the columns.
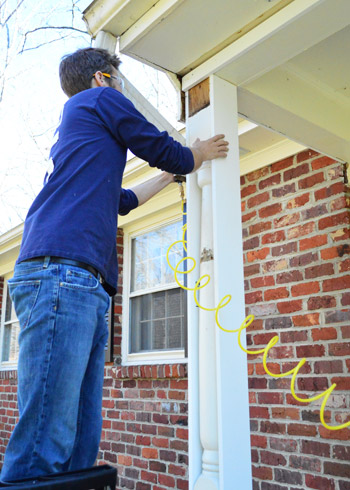
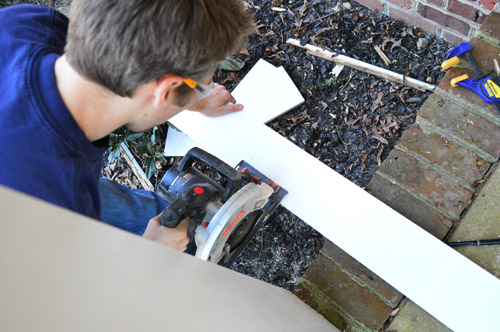
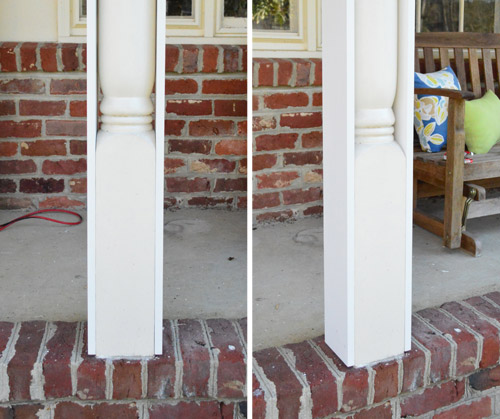
Rather than go through the trouble of removing the existing columns, we decided to achieve our more modern, chunky square column look by just “boxing” them in on all sides with some pre-primed pine boards – which is faster and easier (not to mention cheaper). Our columns were a few inches shy of 8 feet tall, so we had to trim each board first (thanks circular saw!).
Here you can see what one column looks like with two sides of the box added. Our columns were exactly as wide as a 1 x 6″ board (we will now pause to thank the home improvement gods for that awesome discovery) so it didn’t require any additional cutting besides trimming the length, as shown above.
We attached them with some heavy duty wood glue followed by a few 2″ nails into the bottom and top (where the new boards rested flat against the square part of the old columns). We also added a few screws to keep them extra secure for the long haul.

Since adding those two 1 x 6″ boards essentially made our columns wider, we had to use 1 x 8″ boards for the other two sides. That sounds confusing, but it made them end up as 8″ x 8″ squares since the sides of the boards overlapped (this very rough Sherry-sketch should hopefully make sense of the overlapping concept that I’m trying to explain).

Well, actually they’re around 7.5″ square since 8″ boards are never really 8″ (they’re more like 7.5″ wide). But you get the idea.
As for physically boxing the columns out, two things really helped: our nail gun, and Sherry’s hands. Obviously the nail gun made things go faster and this whole project is ideally a two person job (although once we had things secured in a few places Sherry could step back and snap some fantastic photos like this one).
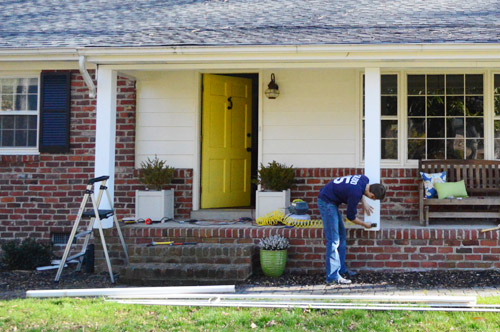
The process actually went fairly fast, just not fast enough for us to finish before Clara came home from her afternoon with Grammy & Tom Tom. So our progress got cut short a bit – but you can at least see where we’re headed. Oh but see how the header looks a little thin compared to the newly boxed out columns? We have plans to beef that up under the roofline so it’s nice and balanced. Stay tuned…
So here’s our remaining to-do list:
- get that last column boxed in
- add a chunkier header piece to visually balance the columns
- get all of those seams caulked (don’t want any moisture getting in there)
- paint everything so it’s seamless
So we hope to be back with some true before and afters once we knock those things out. In the meantime, you can also check out this little loot-related craft that Sherry whipped up for Clara (and Will Bower) over on Young House Life.

Anyone else moving on to outdoor projects finally? What’s on your spring DIY agenda? New flower beds? A patio upgrade? Mulch galore? Or are you making fake money? Be careful that it’s not too realistic (don’t wanna end up in trouble…).

Joanna @ Our Freaking Budget says
It’s going to look so good! How did you know that beefing up the columns would make the porch look better? Did you research other porches, or has it just gotten easier to know what needs to be changed now that you have years of DIY experience under your belts? I know I don’t like some of our furniture or some aspects of our house, but I don’t know how to figure out what would make it look better! Maybe it just take’s an artist’s eye!
YoungHouseLove says
Good question! We just looked at other ranches in our neighborhood that we loved and noticed that they had square columns and then we thought “how can we make ours square? could we box them out?” and then we just researched how we could do it. It really helps to look at inspiration (photos or houses in person) to help you picture something. Hope it helps!
xo
s
Luisa says
Great changes guys! I am hoping you can add information about the importance of testing for lead paint on a project like this. Even though there is no sanding involved, you are disrupting an older painted surface which undoubtedly creates lead dust. Many people do not think of this when they go to demo older surfaces and are unaware of the importance of following a lead safe protocol.
It would be great to see more of this on your awesome site!
Thanks!
YoungHouseLove says
Oh yes, great tip! We’ve addressed lead paint a bunch of times and actually learned that we don’t have lead paint here, which is why we didn’t mention it for the porch (we talked about that back in this post). But we had it in our first house and we religiously test old furniture all the time before we tackle it. If you search “lead paint test kit” on our site’s search bar, all of the times we mention it will come up (over a dozen of them, haha!) :)
xo
s
Michelle @ www.birdsofberwick.com says
You’re off to a great start! This weekend’s agenda is a 3-sided shed addition to help with extra storage for the snowblower, lawn mower and all that fun stuff! With a little help from one of Anna White’s plans we’re hoping we can do this ourselves! Fingers crossed!
Tad says
We “beefed-up” our columns a few years ago. We used “never rot” boards. They’re PVC material and looks great. Did you consider a similar product?
YoungHouseLove says
We used good ol’ pine on our first house’s header project back in 2008 and once we caulked and primed and painted it we were so happy with how it held up (five years later we still drive by and start at the porch, haha). So that’s why we did it again, since it worked so well the first time for us.
xo
s
Necole @seriouslysassymama says
We rent, so the husband and I are planning landscaping instead of building anything. My husband loves to landscape, so I buy it and he plans it. It is going to be very simple and pretty when we are done.
LisaR @ Who Stole My Baby? says
All your posts make me super scowl-y about the fact that I can’t touch a thing in our apartment. Time to move so I can start tearing things up and then losing interest half-way through.
YoungHouseLove says
Haha, happy tearing-it-up Lisa!
xo
s
Liz | Hogs Ever After says
I might have missed a post about this in the past (just started reading in January), but what do the columns for your carport look like? Do they match this new beautiful clean-lined post style? If not, do they get a makeover too?
YoungHouseLove says
Yes, they’re square! It’s hilarious that half of them were curved and half are square, but it’s less work for us, haha! :)
xo
s
Brynn says
We are doing a major (and much needed) kitchen overhaul, but since we had some nice weather, we are working on the front lawn finally too! (we moved in in January!)
Lilly says
Love the idea of boxing out a current column instead of removing the former – sneaky!! I am hoping to replace our current porch column, which is one of those wrought iron ivy trellis looking ones (I don’t know if there are as common in the north, but they’re almost a sign of a dated house here). I wonder if this would work for a larger column like I have. We’re also hoping to redo our back porch. I’m using our boy Jonathan Adler’s Shelter Island house as the inspiration point!
YoungHouseLove says
Ooh that sounds pretty!
xo
s
Andrea says
Nice! Our “take that” to our 1960’s ranch porch was to remove the ornamental wrought iron columns and replace with square wood ones. We first thought of boxing them in but they were too big, so off they came… to reside in storage in our garage! I just couldn’t get rid of them – who knows, in a few years we may want that look again!
christina @ homemade ocean says
It always amazes me that you all make these little tweaks that TOTALLY change the look of your home. It’s incredible.
katie | deranchification says
This is looking great! I love the bigger squared columns. Can’t wait to see the after pictures! We need to remove a similar scallop from the the bottom of our kitchen and bathroom cabinets and now I have some more motivation seeing how much better this looks. In the meantime, I need to get on planning for some new plants out in front of our side fence and something to grow over our new garage pergola!
Mich says
Nothing outdoors happening here, except more shoveling. WOE IS ME!
YoungHouseLove says
Aw man! So sorry for everyone who still has snow. Sending warm thoughts your way!
xo
s
Ida says
Hi! Your porch is looking fantastic! Over at our casa we are working on a patio makeover, with TONS of spray paint!
Sarah says
I’m so glad for spring! An early snow caught me mid-way through painting our new porch. We’ve also got tons of crown molding to install and it’s much easier if we can lay it all out and spray it with my handy Wagner outside so we’ve been waiting for spring to tackle that project! It’s just about time to plant my gladiolus as well. Busy Busy but I love getting to work in the sun!
Peggy McKee says
Hi–I have a question–not about the current post–but I hope you will answer it anyway.
When you worked on the hall recently, you put down some kind of paper to protect the floor. What kind is it? Where to buy it?
Many thanks, Peg
YoungHouseLove says
That’s “rosin paper” and it’s available by the roll at Home Depot :)
xo
s
Lauren Reese says
It’s almost like you’re reading my project mind–two of your last projects (covering the posts + fireplace) are in-progress at our house. It’s so helpful to see how you did it as we struggle…er…power-through. Keep on!
YoungHouseLove says
Aw, I’m so glad Lauren. You can totally do it.
xo
s
Starr @ The Kiefer Cottage says
I planted berry vines yesterday as well as some bamboo. And we’re gearing up for a major outside re-do. Siding, driveway, roof, windows! It’ll start in about a month, and I can’t wait.
YoungHouseLove says
I love hearing about all the fun outside stuff you guys are doing. Lots of digging going on!
xo
s
Kitty says
It has snowed every week of the year so far, including on my birthday last week.
So far this week has been snow free and we’re cautiously making plans to sort out our garden for the spring and summer :D
I’m glad it was so much easier than removing the scallop at your previous house!
YoungHouseLove says
Thank goodness!
xo
s
Stacy says
I love how it looks already with the columns blocked in! I wanted to tackle some outdoor planters but I saw on Centsationalgirl how much she paid to make them and I’m thinking maybe I’ll just buy them instead – cost seems to be about the same. Was also thinking about tackling some gardening this year but my OB says not to until after I have baby – which will be June – and by then it will probably be too hot to tackle. I am just going to call a landscaper I guess.
YoungHouseLove says
Aw, congrats on the bean you’re baking!
xo
s
Melissa @ HOUSEography says
LOVE the look – I saw the question about pressure treated wood. Non-pressure treated will hold up for a while but in a termite prone area like VA, I would probably use pressure-treated or one of the many amazing faux-wood trim products out there, especially anywhere close to the ground. We’ve had termites… not fun! You may save some money up front but down the road (like 10 years or more) you may have a problem. BUT, I love how it looks and can’t wait to see the result!!!
YoungHouseLove says
Oh yes, I worried about termites when we moved to VA, but in our first and second house we never had any (over 7 years of annual inspections) so we actually heard a few experts guess that both homes were treated with something crazy back in the 60s/70s that makes them completely unappealing to termites. Scares me to think about how toxic that was, but we haven’t seen so much as one tiny termite in 7 years of owning two homes here. Now I’m off to knock on some wood… haha!
xo
s
Donna Jean says
My husband, his dad and grandfather just installed our new front door this past Saturday. It looks so pretty! But we painted it before it was installed (I made my husband read and re-read the tips in your post about painting your front door – it seriously looks like it was factory sprayed!) but it got some dings in it during installation. Any tips on how to touch it up? It’s a metal door and the paint seems a little peel-y in the dinged spots. I’ve still got to paint the inside of the door, but I love coming home and seeing my nice, pretty, springy, green door! Now, to paint the shutters so they match (or at least don’t clash!)…
YoungHouseLove says
Hmm, I would sand it down in those spots as well as you can to make it smooth and apply one more full coat over the whole door. If you still see them I would try another full coat. Hope it helps! Sanding to get it smooth first really is key because painting over peeling paint never really looks smooth (paint shows more sins than it hides).
xo
s
LMG says
oooo…perfect time to ask: caulk recommendations? I love the versatility of silicone caulk outside, but it leaves a shine that exterior paint just won’t cover. Any tips on getting that shine out? :)
…also crossing my fingers that deck staining is next project…i have to stain my fence and just wondering how long it needs to dry out from winter before I apply. stain manufacturers won’t call me back. :(
YoungHouseLove says
We love Dap Window & Door Exterior caulk that’s white and paintable. We’ve used it for years and love it!
xo
s
Carolyn Smith says
I’m all about curb appeal. Can’t wait to see what you will add next! A front porch on a home adds so much charm. Good luck with your renovation.
Maren says
I can’t wait to see the finished product! Looks great so far. My husband and I spent the afternoon working in the yard and flower beds..well only one of the flower beds because our trash cans were full by then. It was 65 out and then yesterday it rained, then sleeted, then hailed, then hailed some more. But the hail was like snow and it stuck to the ground and now it’s 27 and the roads are covered in a sheet of ice. Nebraska weather is WEIRD. Saturday is going to be 66 and sunny, so we’ll be back in the yard :)
Claudia says
I want a porch!
Stephanie@Simply Swider says
It looks great! We did the same thing to out front porch. We had these terrible spindly victorian looking posts combined with old bright blue outdoor carpet. Eck! We added a square beefy moulding to the top of the posts too to give them some added weight. P.S. I love the planters on either side of your door. Did you make those or buy them?
YoungHouseLove says
They were from Home Depot a long while back and we painted them.
-John
Jennifer says
It’s going to look awesome! We’ll be doing the same thing to our back porch later this summer. We just started the process to put a pool in (fingers crossed it will happen), so after that is done we’ll be working on the porch, landscaping and decorating. I’m already having palpitations over how much outdoor furniture costs!
Jen says
Over here in the middle of California we prefer to do yardwork in the winter because the summer is way too stinkin hot to do anything outside!! We’ve been slowly pulling out some English-Ivy-Gone-Rogue all winter (imagine our excitement when we finally found the “mother ivy” vine which was over 2 inches thick) and this weekend we’re going to install drip and plant our first veggie garden! Love what you’re doing with the front – looks awesome as always!
Kate says
Wow- it definitely makes a huge difference. I love the new, streamlined look!
Lisa says
That totally refreshes the whole look of the house! I am thinking about adding a portico on my little ranch – I think I will need to hire a pro for that though. So random question for you guys – do you use Google Reader? I do and it’s going away in June! Do you recommend something else? How do you guys keep up with your daily blog reads?
YoungHouseLove says
Yes, I’m SAD! I love my google reader. We haven’t figure out what to switch over to (I’m a procrastinator, haha) but we wanted to share an update on that front when we figure it out :)
xo
s
Heather says
I tried out bloglovin’ & Feedly and I LOVE Feedly. It’s VERY similar to G-Reader, but more visually appealing.
Darnetha @ ChippaSunshine says
Your columns look great! Nice Job! On our to-do list this spring is to upgrade our porch columns, as well. Ours are warping, they weren’t installed correctly. :(
YoungHouseLove says
Oh no! Hope the second time’s the charm!
xo
s
Robin says
I just cleaned all the leaves off our patio so my boys could go out and play out there! Yay! And my friend is coming over tomorrow to help me clean out our shed. She’s a VERY brave woman. I’m sure there are killer spiders out there!
Angela says
Love big boxy columns and love that the scallop is gone! What bothers me is that even though the middle column is centered on the porch itself it is off center to the window. Looks odd to me like maybe two columns should frame the front door and then have a wider expanse until you reach the third column. That way all front porch elements are evenly framed. Does this even make sense?
YoungHouseLove says
Oh yes, if we could move them magically we would, but it would be a much bigger (and more expensive) project to tackle that, so we’re focused on boxing them out for now :)
xo
s
Katie says
Super random question…I noticed your front door is open in pictures, any particular reason (besides letting in a breeze..I love spring!!). I think my eyes immediately went to that little detail because I have 2 dogs and one would dart out the door and never look back! :( I’m guessing Burger isn’t a runner.
YoungHouseLove says
We had it open for a breeze, to let Burger in and out, and because the cord for the nail gun was coming out from inside the house :)
xo
s
Misty says
I am so ready to box in our columns on our front porch. I hope that ours is not too complicated. Nothing ever works out so easy on our remodels. I love your blog and all the great ideas.
krys72599 says
So far, during our few warm days, we have:
1. pulled hostas out from under the mailbox and replaced them with flowering heath (Kramer’s Red)
2. stripped the garage, primed it and repainted it
3. stripped the fascia board on the front porch, primed it and repainted it
4. powerwashed the back deck and the front porch
and today we will be
5. painting the front porch deck
Jennifer says
It looks amazing, but aren’t you guys worried about the pine boards rotting out? Wouldn’t it have been better to use wood that can withstand the elements, like cedar or pressure-treated? I’m just wondering because I always have outdoor project ideas that my husband squashes because wood that can stay outdoors is so expensive. Would love to hear your thoughts.
YoungHouseLove says
We did pressure treated with our deck but for our first porch in 2008 we used the same materials and they’re doing great! As long as it’s all primed, caulked, and painted it’s safe from rot (the scalloped header that we removed from 1961 when the house was built appeared just to be pine as well – but it held up great).
xo
s
Anne says
I think this weekend will involve weeding the flower beds. The front ones aren’t too bad, but the back one essentially 8 square feet of weeds. At least we finally found some paper lawn and yard waste bags at Kroger. I hated putting biodegradable materials in plastic bags.
jbhat says
I am so glad you did this. I hate scallops on a home’s exterior, or in a kitchen (ugh, that’s the worst)–but love them elsewhere–like on your rug, or a scalloped hem, for example. I’m not sure if there’s anything else that can either read so absolutely dated or so fresh and clean-lined as a scallop can. Funny.
jbhat
Tyler Anne says
I definitely am digging the boxed columns. I have this very dominate, chunky column that’s a total eyesore on my porch. Though, I can’t call it a porch because it’s basically just a concrete box in front of the door. However, I have a lot of flower beds and feel like if I do some magic in them then the front “porch” wont’ be as noticeably bland! Now I just have to find some plants that are pretty but also manly for my dude to love too!
Monica D says
Thank you so much for this! We have 2 ugly metal (with white paint flaking off of it) poles holding up our porch that we’ve wanted to box out. Now we know what to do. Any thoughts on how to attach the wood to the metal pole or just box it out and attach it to the top of the porch (stucco) and bottom of the porch (cement)? BTW, I LOVE your blog.
YoungHouseLove says
Hmm, maybe try attaching wood brackets to the metal pole somehow and then drilling the wood boards into the wooden brackets to hold them?
xo
s
Megan says
It looks so good! So clean and streamlined – love it! We are in the midst of building a patio from scratch…now I’m trying to remember if you guys did that at your old house – I will have to go check your archives. I’m so glad its finally warm enough to be outdoors!
Ali says
Love it! Isn’t it crazy how hot it is today? Snuck up on us.
I love the upgrades to the front! We have boxy columns like yours, except they have matching rails on the front stairs with these ugly pointy things on top. We need to do something about those. :)
We are planning on ripping out some weedy stuff on the side of the house with these ugly concrete edges and putting in a small patio with a fire pit. We’ll see how that goes. :)
C Payson (NS) says
A few weeks ago – ugh, it was still snowing here yesterday!
We tackled our front porch last year, ripping out the ugly old rail tie flower beds, all of the railings etc.. put in a stone wall (square pad thingy) where the garden was so I have a solid place to put planters and then replaced the rest with a wood/black aluminum spindle kit from HD!
We love it but now we want a new black screen door to match and plan to tackle the rear deck as well!
Loving the new front porch look and totally headed the craft store to make some play money, our girl is leaving me broke with all of the change I give her – we have $2 coins here too so it can really add up!
Kelsey says
I love your inside projects, but I love, LOVE your outside projects! Since it’s already spring in VA (we still have four more months of winter in New England), when can we see an update on your backyard? I’m so curious to see if that vine fell off your tree after you cut out a chunk at the bottom!
YoungHouseLove says
Oh yes, we can’t wait to share a vine update! Let’s just say we had to take matters into our own hands (and still are working on it…). But soon I hope!
xo
s
Stephanie says
I cleaned up the front trim and – alleleuia! – de-uglied the light fixture on our porch. Fifteen years ago it must have been sassy-brassy, but until Sunday it looked neglected and maybe spritzed with acid. Thank you, Rustoleum aged bronze hammered finish spray paint, for letting me get a few more years out of this sucker. I want to replace it with something more Craftsman style, but this will do for now.
Jaimie says
Looks good! I personally prefer the square style too. We have been working on a lot of small projects around our house getting it ready for when we move out this summer (planning to lease it). It’s an interesting perspective when you are doing things that you won’t be living with long term.
Megan says
That looks great! It’s so awesome when a small change can make such a huge impact. So many plans now that the weather is warming up! I’m itching to paint our front door (yellow thanks to this blog’s influence and it’ll look amazing with our blue & gray exterior paint), need to finish up the dog run I’m installing, planting a million plants, and a kabillion other things.
Crystal @ 29 Rue House says
I REALLY like the new clean lines. Now I’m going to have to go home and see if ours are scalloped or not!
So excited for warm weather!!!! We just called the town to get info on building a garden shed in our backyard. Need to come up with a plan for that but hopefully we’ll get that done in the next couple of months. Also want to DIY an outdoor double chaise, add french doors to dining room giving us access to backyard which will lead to building a small deck and patio.