If Teddy ever forgets what letter his name starts with, he now has a whole wall to remind him. That’s right, it’s always “T” time in there. Har-har.

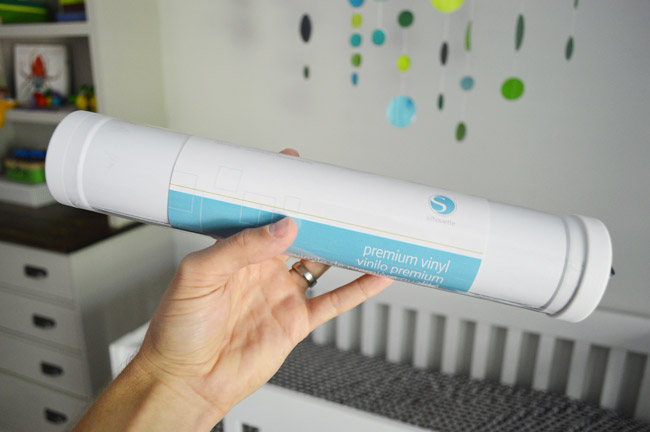
As we mentioned a few weeks ago, Sherry and I settled on a plan for a subtle accent pattern on the wall between the built-ins. Our original plan was to paint the Ts, like Sherry did for Clara’s raindrops. But after some of you suggested things like vinyl decals in the comments, we decided to give that a whirl instead. Vinyl has become a pretty mainstream option these days, especially for kids’ rooms. It’s removable and affordable, so we see the appeal. This tube – which is meant for Silhouette craft cutters – was $5 from JoAnn with a coupon. We don’t own a craft cutter, but that didn’t stop us from cutting simple line shapes by hand.
First we had to determine the size of our Ts. The wall space was around 88″ wide, so I figured some multiple of 4″ would make life easiest. But I mocked up two sizes with printer paper cut into 1/2″ strips – just to be sure that we both liked the 8 x 4″ version because it looked right (and not just because the math worked out). Thankfully we did.

With the size selected, next we had to lock down the arrangement. I cut out a few paper templates, taped them up, and we moved them around until we liked the layout. Happily, the pattern that we liked could easily fit into 4″ increments.
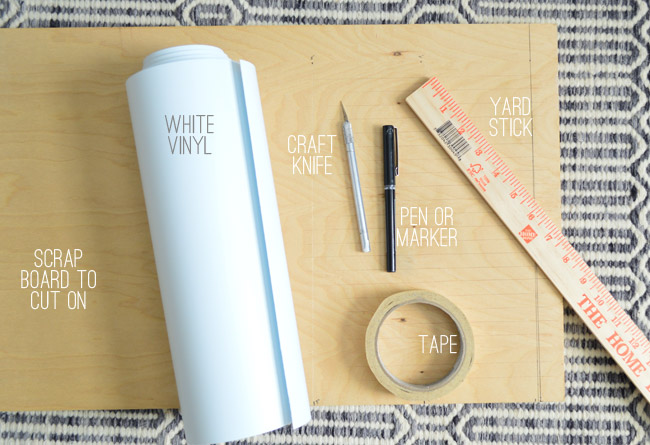
The next step was cutting a bunch of 1/2″ vinyl strips: some 8″ long, some 4″ long. I’m sure this would’ve been faster if we owned a craft cutting machine, but it wasn’t too hard to execute by hand. Here were our materials:
I started by making a simple guide on my board (three small pen dots on the wood at the zero inch, four inch, and eight inch spots). That way once the vinyl was rolled out, I could easily slice off an 8″ section.
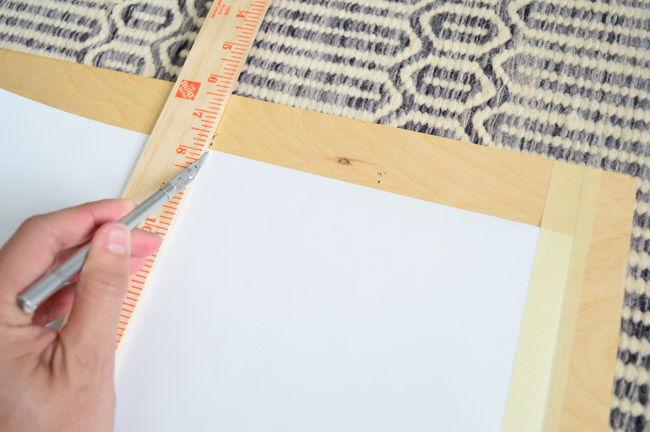
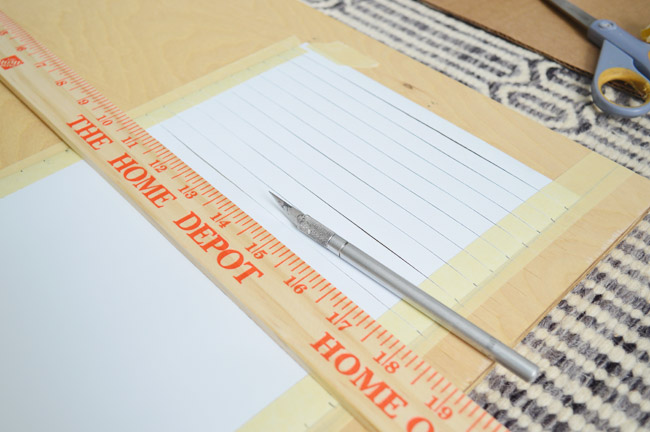
With a 8″ section of vinyl cut and taped down on both sides, I used the ruler to tick off 1/2″ marks on both sides of the sheet.
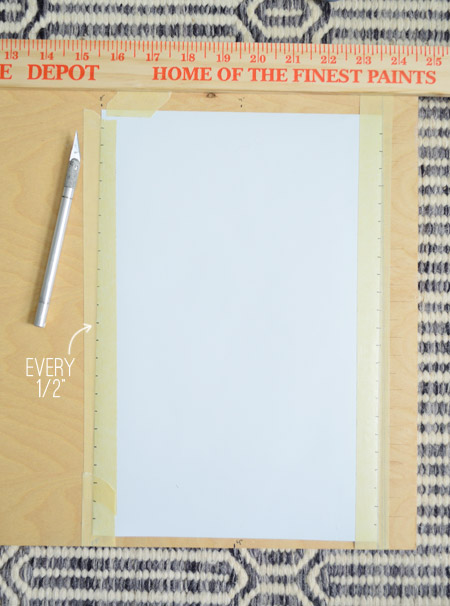
Then I lined up the ruler to each set of marks and sliced through the vinyl (it took 2 passes – one to get through the vinyl, and one to get through the backing). Then I just moved down the sheet until the entire thing had been carefully shredded into 1/2″ strips. Making 4″ long strips meant following the same steps, and ending with one last cut down the center. I needed about 70 in total. It wasn’t particularly difficult work (sort of that auto-pilot, get-in-the-zone stuff).
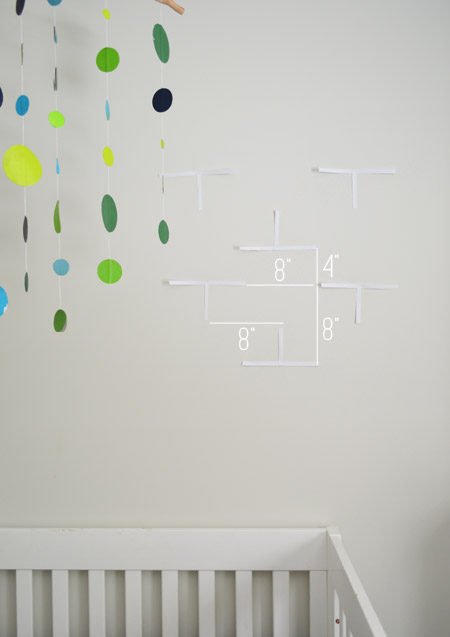
Applying the decals to the wall was also pretty simple and repetitive. Since we were basically creating a giant grid on the wall, I knew that keeping things level and equally spaced was key. So I started at the top middle of the wall and worked in small sections, making pencil marks with a level and yard stick.
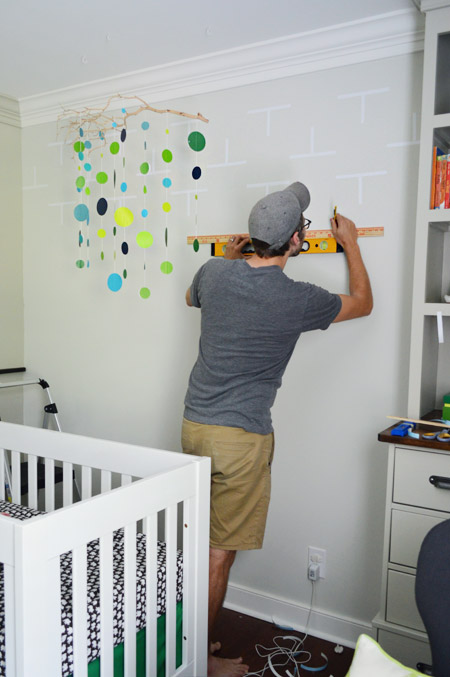
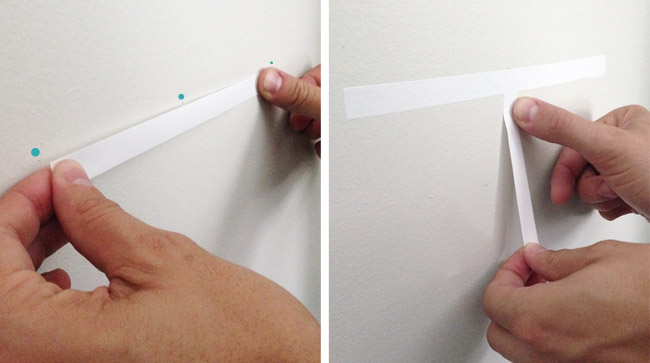
How I measured & marked the wall may be TMI for most people since it’s really specific to the shape/size of the decal you’re applying, but if anyone’s looking to recreate this look exactly, here’s the rundown. With my yard stick held vertically (and checked with a level) I marked the vertical spacing of each row – as seen below in the RED dots. Next I held the yard stick horizontally on each mark (again, checked by a level) and marked the middle and both ends of each T – as seen below in the BLUE dots. It sounds a lot more complicated than it was.
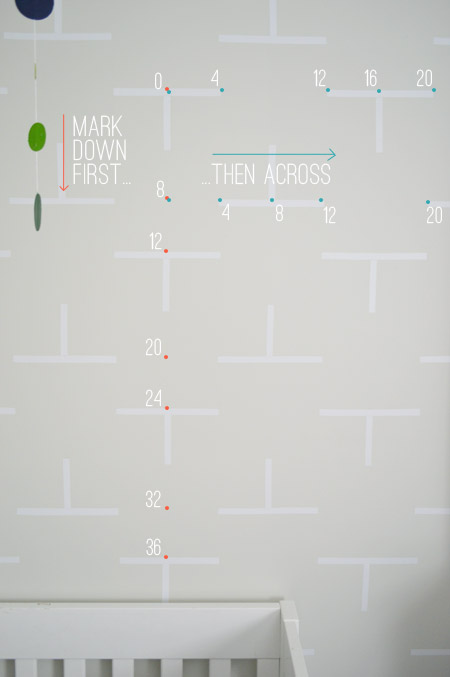
Then I used those marks to place the vinyl strips. You can sort of see my light pencil marks below, but I’ve added blue dots to help you see how they guided my placement of the 8″ strips. Once the long strip was placed, I used my center mark to add the 4″ vertical strip. I just eyeballed these since it was pretty easy to make such a short strip look vertical.
The vinyl was really easy to work with, so I’m glad we made that choice. It held tight to the wall with just a quick smooth of the finger and so far nothing has peeled up on its own (I started the project before Memorial Day and worked through last week, so some of the first strips have been up for almost two weeks). And just for kicks, I tried removing one to see what happened. It took a decent amount of work to get my nail under the edge enough to peel it off, and a decent amount of pressure to yank it off, but once I did it came off without damaging the wall. Initially when we considered vinyl vs. painting for the Ts, we worried Teddy might be able to peel them off when he’s older/more mobile, but I doubt Clara could remove one.
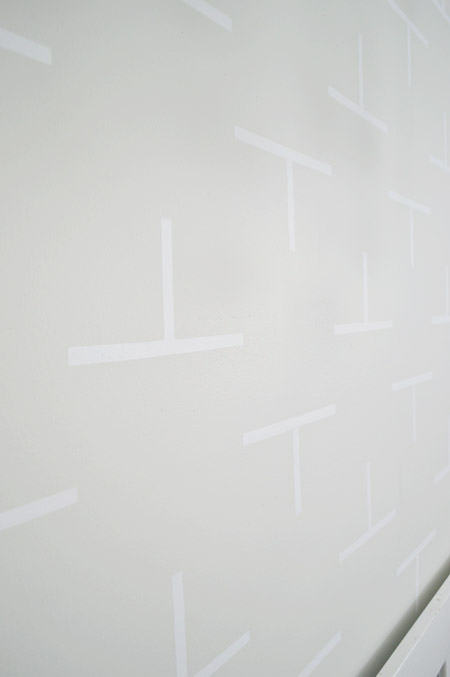
It was our first time working with self adhesive vinyl and I’m impressed with how crisp and grid-like the design turned out (something I’m not sure we could’ve achieved with paint alone). It’s nice to have some subtle pattern and interest between the built-ins. And the $5 price tag is pretty nice too.
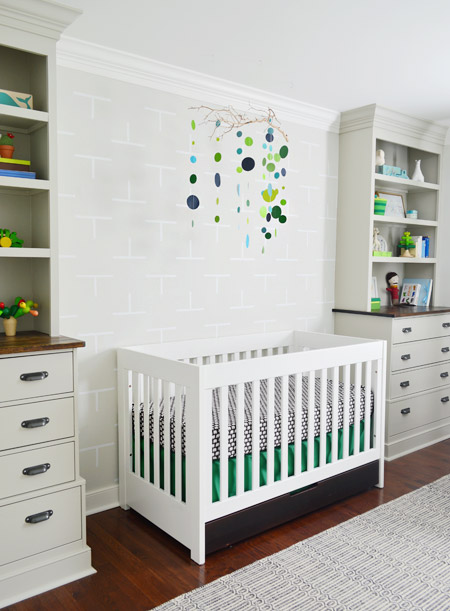
We didn’t extend the T’s behind his crib, just because we thought the lines would look busy with all of the crib slats. But I did save some extra strips to add once he moves to a twin bed (we also have about a quarter of the vinyl roll left for backup). But let’s not jump that far to the future yet, okay? This kid is already 12 pounds. They really do grow up too fast.
I like that if we ever tire of it (or if Teddy requests something else down the line), we can just remove it and move on. Although it does make my geeky heart swell a bit to imagine what Teddy will see in the pattern besides his first initial. A bunch of squares for hanging his drawings? A bunch of cliffs for careening toy cars? A giant Plinko board?
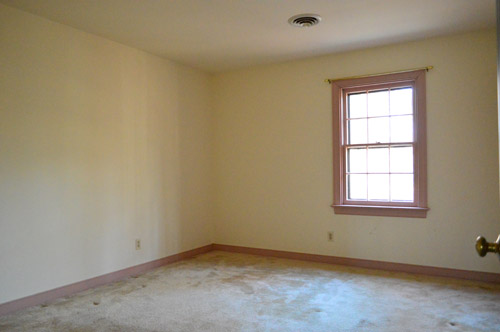
Other than needing a light fixture overhead, I think we’re done in here for now. And you know we love a good before and after, so here’s a reminder of the carpeted pink-trimmed room we started with:
Did you guys finish up any projects this weekend? Or do anything outdoorsy? We squeezed in a few long walks and even slipped through a street festival on Sunday. Teddy loved the candied bacon on a stick.
Note: I spared you all from like two dozen T-puns that I was thisclose to unleashing throughout this post. Like how I think the wall fits Teddy to a T. And how I hope he thinks it’s T-rrific. And how I didn’t need a TI-82 to calculate the placement of my decals. Remember those?
Psst- Wanna know where we got something in our house or what paint color we used? Just click on this button:


Sheila F says
I really like the simplicity of this look. It adds dimension without adding another bold color. Great job. Now on a completely unrelated topic. I left my stencil brush out without rinsing it! It dried for 2 days before I found it rolled to the back of my craft table. I thought it was ruined until I decided to try “stenciling” on a teflon cleaning pad. (You know a scrubber that you clean teflon pans with). Amazingly it cleaned all of the dried craft paint off the bristles! My brush is good as new! Thought I would just share with you to try if your brushes accidently dry with paint on them. Keep up the great work!
Sheila
YoungHouseLove says
So funny! Good to know!
xo
s
Nicola says
Oh my goodness, I love it! Such a subtle yet stunning addition. The before and after shot is amazing too – you guys are so good at this!
SherryB says
John! Puh-Leeze go back and add a ‘Teddy Action Shot’ to this post!
YoungHouseLove says
We need to take a picture of him ogling Daddy’s handiwork!
xo
s
Megan says
Amazed by your precision and patience… as always. Please keep us posted on the decals stick-a-bility. I have not had good luck with them holding, but I blame my slightly sand-textured walls.
Off-topic question… are you still as obsessed with J-Ad as you used to be??? I was searching some of your old house crashing posts and ran across a recap of your visit to one of his stores. I keep hoping more of the bold colors/patterns (i.e. Happy Chic) will make its way into your new house. Don’t get me wrong, your style/taste is impeccable… just seems to be more refinded and subtle. I see that trend across the blogs, so I assume it’s the new design direction. I think I am still stuck in 2012. :-)
YoungHouseLove says
Oh yes, still very much obsessed. I think our office will be full of J-Ad pops of color!
xo
s
Kates says
Are you using the same crib mattress as with Claire? How is teddy liking it?
YoungHouseLove says
Yup, it’s the same crib and organic mattress that we used with Clara. Seems to be working well!
xo
s
Kat says
I did a variety of vinyl decals in the nursery. It was so easy and I loved the look. You mentioned that you doubt Clara could remove them… but my daughter had de-constructed her whole changing table wall before she turned 18 months. She would just sit there and pick at them while I fought the good fight to try saving them. She was old enough by that point to know better than to try eating them, but she was incredibly fascinated by the sticky-ness and re-stick-ability. There were too many casualties and I lost that battle.
Krystle @ Color Transformed Family says
I like that it is a subtle pattern…and removable. Although I’m pretty sure I wouldn’t have the patience to cut out that many strips of paper. Having missed most of the posts about this room I like how easily it is going to transition for him as he grows up.
Meghan says
Love it! Rando, but where do you guys find most of your curtain rods? We are looking for something nice and sturdy. Thanks!
YoungHouseLove says
We used to get them at Target, but Home Depot and Lowe’s have some thicker ones so we lean towards those lately (these are Target though because we already had them on hand).
xo
s
haverwench says
I notice that this latest update to Teddy’s room has made it into the “House Tour” section, but the latest updates to the office (painted walls) and kitchen (Ardexed counters) have not…?
YoungHouseLove says
Thanks for the heads up! We try to remember to update that page as we go, but sometimes things slip through and we have to go back and fill them in :)
xo
s
Felisha says
where did you get the fan, that’s on the changing table/shelf
YoungHouseLove says
That was from Bed Bath & Beyond a while back. I think it’s by Hunter.
xo
s
Pixie Ronn says
This must have took so long, I love your dedication to making it so perfect! A fantastic touch! x
http://pixieronn.blogspot.co.uk/
Emily @ Life on Food says
I loved the T puns…next time leave them in!
Cassie Dearborn says
Vinyl wall decals, math, puns and and even a calculators?
You have satisfied my inner geek. New favorite post.
Jessica says
I love the idea of putting your child’s initial on their wall, it’s such a cute way of personalizing their space. Using vinyl is such a good idea – especially if you’re renting. :)
Cheryl says
I like the tone on tone look. This past weekend, I completed a bedroom/bathroom makeover that I managed to do while my husband was away. I have also discovered chalk paint for furniture.
Megan @ Our Pinteresting Family says
First off this room is gorgeous! I love all the fun details. This wall idea is fabulous. I love the T’s. Great work!!
Carlene Thomas says
I love the room.. Can I ask where did you get the window treatments from.. Just love it..
YoungHouseLove says
Thanks Carlene! They’re from Ikea a while back. Don’t think they sell them anymore, but maybe try ebay?
xo
s
Sarah @ Sarah's Daybook says
This is even better than I thought it would turn out!
Sarah
http://www.sarahsdaybook.wordpress.com
Mary says
The before and after is astonishing. Wish I had your vision!
Amanda says
This looks great! Subtle but really adds more interest to that wall.
Shunta says
The before & after pictures you all do makes my face go (insert scream face emoji) Gorgeous!
YoungHouseLove says
Hilarious! Thanks Shunta!
xo
s
Stacy says
This weekend we finished up our honeymoon in Punta Cana. Got back Sunday night. As for outdoorsy stuff, it was mainly lounging in one of two places. Either the beach or the pool. Perfection! Now it’s back to the grind. Gotta get the house ready to put on the market. Lots of really cute options in the old RVA right now. We’re really digging Stratford Hills & Bon Air.
YoungHouseLove says
Sounds amazing!
xo
s
Lisa says
How easily does the vinyl peel off the wall? My daughter (now 19) was really good at peeling the wallpaper border off the wall. It was right at the level for her to reach when she stood in her crib. I wouldn’t want Teddy to peel off any of these strips.
YoungHouseLove says
It takes a lot of dexterity to get a nail under one of the corners and then you have to pull with a lot of force. We worried Teddy could peel them off, but after applying and attempting to remove a few we realized that we don’t think Clara could do it!
xo
s
Cassie says
Oh my goodness. Most of the things you guys do I think, “I could do that with some sweat.” This is the first thing I’ve ever looked at you doing and thought, “No. Freaking. Way.” Go you guys! This looks great and I’m sure he will love it!
Lindsay says
This is such a beautifully simple idea. I’m sure you’ve shared it already, but did you make that mobile? It is gorgeous! What a lovely space for your little man to grow in!
YoungHouseLove says
Thanks so much! Here’s that link for ya: https://www.younghouselove.com/2014/02/wanna-see-a-pregnant-lady-in-a-crib/
xo
s
Sarah Akwisombe says
What a calming space, with such well placed attention to detail. I have a young one and am now seriously considering doing a feature wall of vinyl initial decals too. Really gentle aesthetic, but so effective! Really kool room guys :)
Lauren says
Whew! That looks like it took some major patience. Love how subtle the pattern is though! Cuteness all over the place!
Stephanie B. says
I love this!! Great job! I’m definitely too impatient to pull this off..maybe one day!
Anna // Gone Banannas says
When I read posts about these types of projects, I think to myself that you two must have the patience level of saints! It’s a good thing you do though because this is such an awesome addition to the room!
Grace says
Hello! I am alwaÿs incredibly inspired by your blog and creativity!
I was wondering if you DIY-Ed the tree mobile. If so, can you provide instructions? If not, where is it from?
Thanks a bunch!
YoungHouseLove says
Thanks Grace! Here you go: https://www.younghouselove.com/2014/02/wanna-see-a-pregnant-lady-in-a-crib/
xo
s