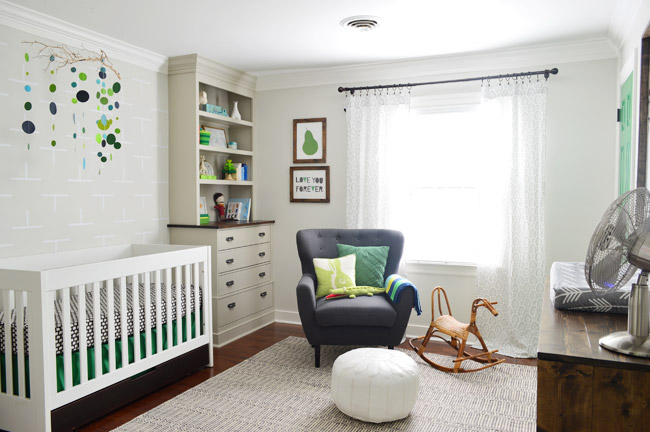
If Teddy ever forgets what letter his name starts with, he now has a whole wall to remind him. That’s right, it’s always “T” time in there. Har-har.

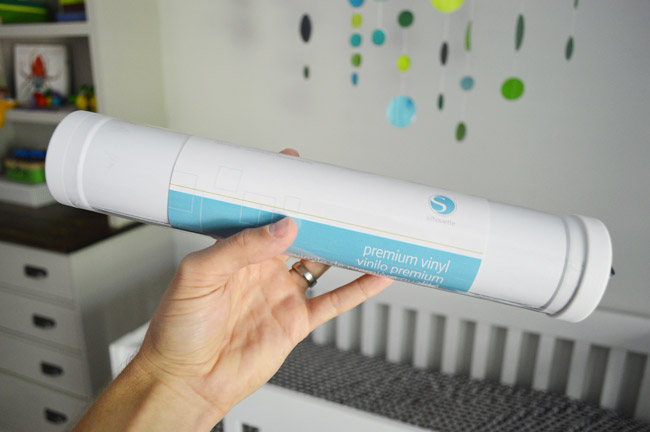
As we mentioned a few weeks ago, Sherry and I settled on a plan for a subtle accent pattern on the wall between the built-ins. Our original plan was to paint the Ts, like Sherry did for Clara’s raindrops. But after some of you suggested things like vinyl decals in the comments, we decided to give that a whirl instead. Vinyl has become a pretty mainstream option these days, especially for kids’ rooms. It’s removable and affordable, so we see the appeal. This tube – which is meant for Silhouette craft cutters – was $5 from JoAnn with a coupon. We don’t own a craft cutter, but that didn’t stop us from cutting simple line shapes by hand.
First we had to determine the size of our Ts. The wall space was around 88″ wide, so I figured some multiple of 4″ would make life easiest. But I mocked up two sizes with printer paper cut into 1/2″ strips – just to be sure that we both liked the 8 x 4″ version because it looked right (and not just because the math worked out). Thankfully we did.

With the size selected, next we had to lock down the arrangement. I cut out a few paper templates, taped them up, and we moved them around until we liked the layout. Happily, the pattern that we liked could easily fit into 4″ increments.
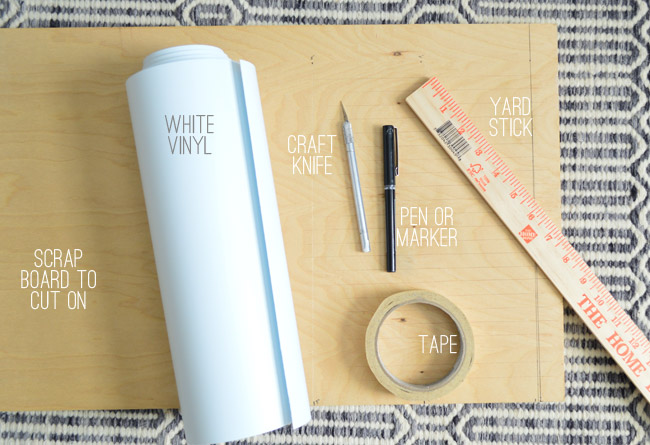
The next step was cutting a bunch of 1/2″ vinyl strips: some 8″ long, some 4″ long. I’m sure this would’ve been faster if we owned a craft cutting machine, but it wasn’t too hard to execute by hand. Here were our materials:
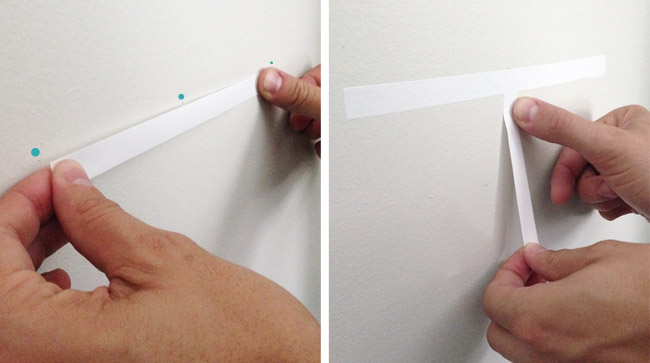
I started by making a simple guide on my board (three small pen dots on the wood at the zero inch, four inch, and eight inch spots). That way once the vinyl was rolled out, I could easily slice off an 8″ section.
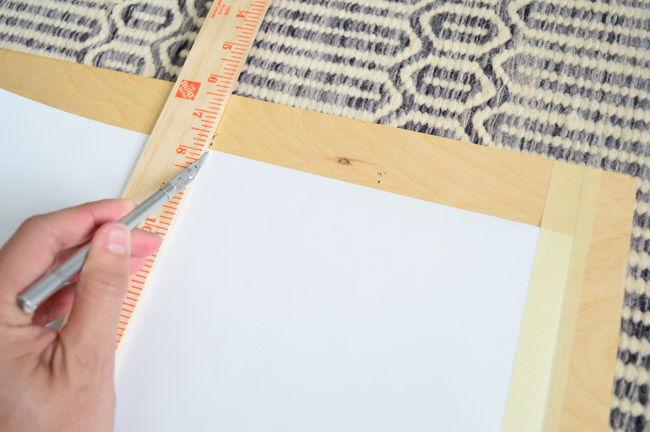
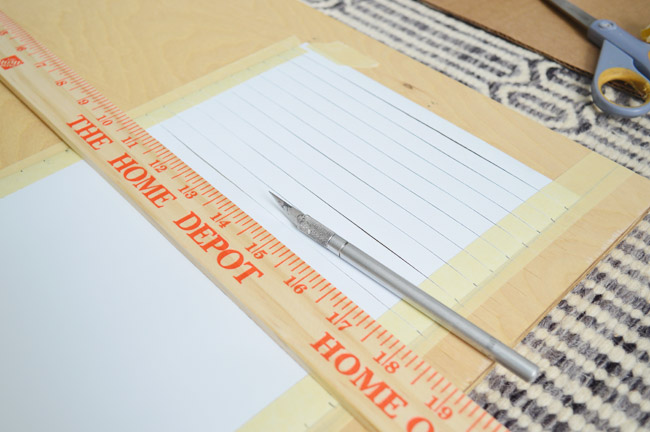
With a 8″ section of vinyl cut and taped down on both sides, I used the ruler to tick off 1/2″ marks on both sides of the sheet.
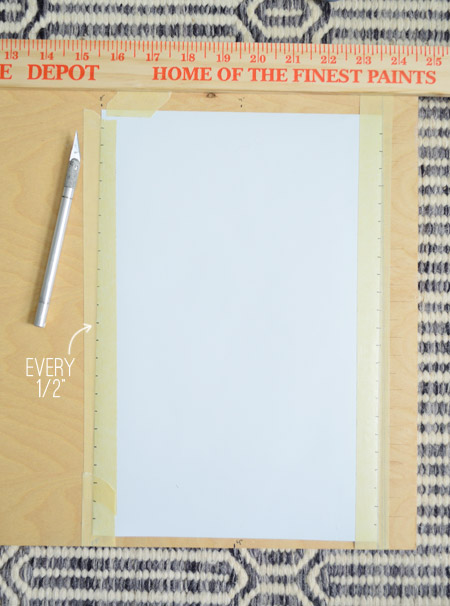
Then I lined up the ruler to each set of marks and sliced through the vinyl (it took 2 passes – one to get through the vinyl, and one to get through the backing). Then I just moved down the sheet until the entire thing had been carefully shredded into 1/2″ strips. Making 4″ long strips meant following the same steps, and ending with one last cut down the center. I needed about 70 in total. It wasn’t particularly difficult work (sort of that auto-pilot, get-in-the-zone stuff).
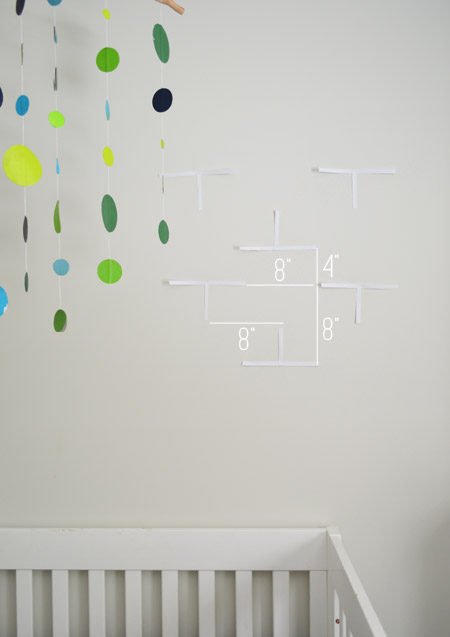
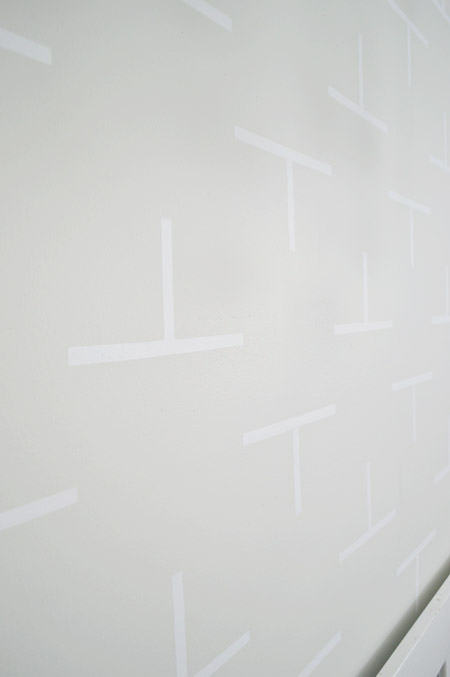
Applying the decals to the wall was also pretty simple and repetitive. Since we were basically creating a giant grid on the wall, I knew that keeping things level and equally spaced was key. So I started at the top middle of the wall and worked in small sections, making pencil marks with a level and yard stick.
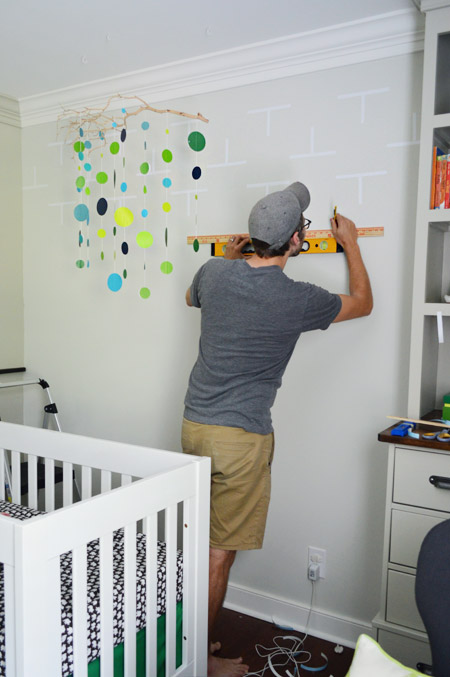
How I measured & marked the wall may be TMI for most people since it’s really specific to the shape/size of the decal you’re applying, but if anyone’s looking to recreate this look exactly, here’s the rundown. With my yard stick held vertically (and checked with a level) I marked the vertical spacing of each row – as seen below in the RED dots. Next I held the yard stick horizontally on each mark (again, checked by a level) and marked the middle and both ends of each T – as seen below in the BLUE dots. It sounds a lot more complicated than it was.
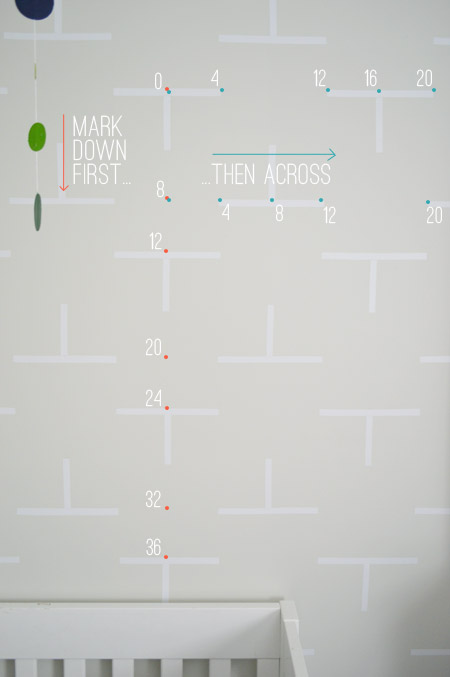
Then I used those marks to place the vinyl strips. You can sort of see my light pencil marks below, but I’ve added blue dots to help you see how they guided my placement of the 8″ strips. Once the long strip was placed, I used my center mark to add the 4″ vertical strip. I just eyeballed these since it was pretty easy to make such a short strip look vertical.
The vinyl was really easy to work with, so I’m glad we made that choice. It held tight to the wall with just a quick smooth of the finger and so far nothing has peeled up on its own (I started the project before Memorial Day and worked through last week, so some of the first strips have been up for almost two weeks). And just for kicks, I tried removing one to see what happened. It took a decent amount of work to get my nail under the edge enough to peel it off, and a decent amount of pressure to yank it off, but once I did it came off without damaging the wall. Initially when we considered vinyl vs. painting for the Ts, we worried Teddy might be able to peel them off when he’s older/more mobile, but I doubt Clara could remove one.
It was our first time working with self adhesive vinyl and I’m impressed with how crisp and grid-like the design turned out (something I’m not sure we could’ve achieved with paint alone). It’s nice to have some subtle pattern and interest between the built-ins. And the $5 price tag is pretty nice too.
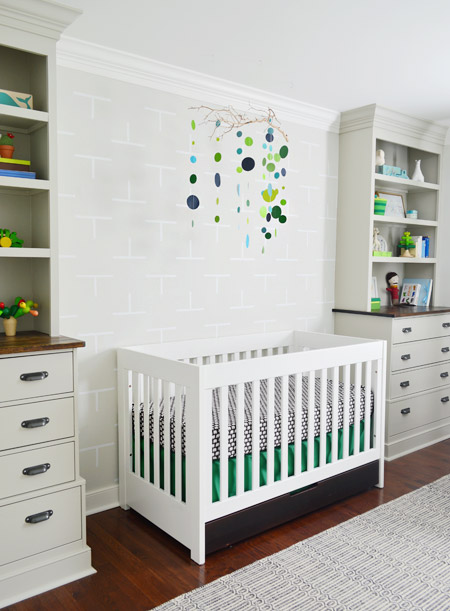
We didn’t extend the T’s behind his crib, just because we thought the lines would look busy with all of the crib slats. But I did save some extra strips to add once he moves to a twin bed (we also have about a quarter of the vinyl roll left for backup). But let’s not jump that far to the future yet, okay? This kid is already 12 pounds. They really do grow up too fast.
I like that if we ever tire of it (or if Teddy requests something else down the line), we can just remove it and move on. Although it does make my geeky heart swell a bit to imagine what Teddy will see in the pattern besides his first initial. A bunch of squares for hanging his drawings? A bunch of cliffs for careening toy cars? A giant Plinko board?
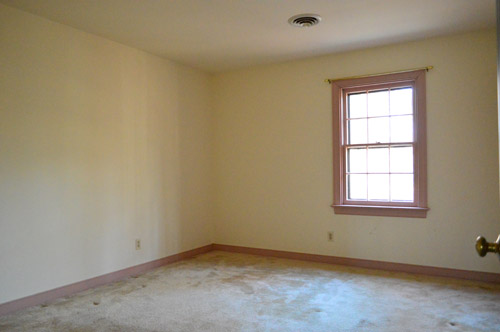
Other than needing a light fixture overhead, I think we’re done in here for now. And you know we love a good before and after, so here’s a reminder of the carpeted pink-trimmed room we started with:
Did you guys finish up any projects this weekend? Or do anything outdoorsy? We squeezed in a few long walks and even slipped through a street festival on Sunday. Teddy loved the candied bacon on a stick.
Note: I spared you all from like two dozen T-puns that I was thisclose to unleashing throughout this post. Like how I think the wall fits Teddy to a T. And how I hope he thinks it’s T-rrific. And how I didn’t need a TI-82 to calculate the placement of my decals. Remember those?
Psst- Wanna know where we got something in our house or what paint color we used? Just click on this button:


Tracy Carson says
Oh my goodness, this looks fantastic but it made me have flashbacks of studying for SAT’s or an AP Math exam. I am so glad there are gifted people in the world who can handle these equations for visual pleasure!
Here is our latest project, we just finished our nursery for our THIRD Baby Boy! You guys will get a kick out of the patience and perseverance of my amazing, dedicated non-DIY husband!
http://carsonfamilyofthree.blogspot.com/2014/05/baby-boys-nursery-reveal.html
YoungHouseLove says
Love it. He’s a champ!
xo
s
Betsy says
Oh, John!!! You are being such a T-ease with all those puns!!!
Cheryl @Living Design says
I love how this adds some interest to the wall without being too busy behind that great mobile!
I do a lot of cutting with X-acto knives, and I want to recommend that you guys get a metal ruler with a cork back for next time. In my experience it can help with a consistently smooth cut, and the cork back prevents slipping while you work.
YoungHouseLove says
Love that tip! I used one of those in my art school days all the time! Wonder if I still have it somewhere…
xo
s
Tiffany K says
This is so cute and so simple in appearance that I think it makes the room! I love it!!!
Lora says
Your vinyl trick looks great! Clean and neat. You have a while before he is up and about, but be advised, that when our daughter could pull herself up, she began to pick at the seams of the wallpaper…she loved the sound of ripping paper :)
YoungHouseLove says
Thanks Lora! We worried about that too at first (John talked about it in the post :)
xo
s
charlotte m. says
Okay, am I the only one to notice, or maybe I missed the explanation, but what is the thing on the ceiling that looks like an exhaust fan vent?
YoungHouseLove says
That’s a heat/air vent. All the ones on the second floor are in the ceiling like that. I’m not a fan. Haha!
xo
s
Olivia says
I love it! Sort of subtle and not too busy – looks really nice. Typo note: “They vinyl was really easy to work with…”
YoungHouseLove says
Thanks Olivia! All fixed.
xo
s
Christine says
The room is so neat and fun looking! This weekend, after like 3 weeks of getting the wrong paint samples from Lowes, I finally spoke to a manager and he made sure I got the right color of Ben Moore Irish Moss. I LOVE your green closet door, but I didn’t realize how difficult it was to get BM color matched at Lowe’s! The first time they gave me a dark forest green, then the second time, a light blue-green teal. We finally got the right color and I love it. Thank you for the inspiration!
YoungHouseLove says
So glad they got it right!
xo
s
donita says
That looks great!! Teddy and Clara’s rooms are so unique! I love them.
I have a tip for cutting strips. You can buy a rotary cutter and cutting mat at Joann Fabrics ( use a 50% off coupon, they are not cheap). You can also buy the wide clear rulers that have lines on them. I put felt pads randomly on the back, the kind that go on the inside of cupboard doors. The pads keep the ruler from moving when you are using the rotary cutter. I use my cutter, mat and ruler a lot. The blades in the cutter change out easily. I have one for fabric and one for paper. Hope this makes sense. Hope it helps!! :-)
YoungHouseLove says
Thanks Donita! Sounds awesome.
xo
s
Maria says
Looks awesome! But you guys are actually insane. OMG!! I would never have the patience for that! Go you!
Kathy says
Wow, I love it. Teddy has my favorite room in the whole house, although I think everything y’all do is pretty awesome. A great low cost and creative idea. I might do something like this in my tiny guest bath. Even picture frames take up to much room in there.
Meg says
Fantastic job! My OCD heart would have palpitated while attempting to get all the Ts straight and orderly, and the result is very impressive!
Karen says
Love the vynal action going on! Sherry, I’m surprised that you don’t have a rotary cutter, mat, and ruler in your tool arsenal. Even with small sewing projects, they are invaluable! When I saw how much measuring and dot spacing John did on the cutting board and masting tape… I just about went batty! The x-acto blade, the wood slivers from cutting on the wooden board… Gave me shivers. A good 40-50% coupon from JoAnn’s or Michaels, would have you all set up and rolling along. Seriously guys, the rotary cutter, ruler, and self-healing mat aren’t just for sewing or quilting! I use them for anything I measure and cut from flooring to craft projects. I even got my 70 and 80+ year old parents using them easily, and effectivly. You should check them out.
YoungHouseLove says
Love the tip! Thanks Karen!
xo
s
tashamonster says
I used seagull vinyl stickers on my son’s nursery wall and it turned out fantastic. I ordered off of etsy…I don’t think I could of made them myself. For renters (like myself), vinyl is perfect!
Another job well dobe, guys!
Lily says
You did such an amazing job with this project! I bet he is LOVING it!
x Lily
http://whilemyboyfriendsaway.blogspot.com/
ashley jensen says
We just installed hex backsplash in our kitchen over the weekend! Now I just have to calk around everything and work on hiding some dicey spots up under the cabinets. It is crazy how uneven those suckers are!
Ashley@AttemptsAtDomestication says
The T’s are cool! I like the slight contrast on the walls. Do you think you could use the vinyl in a bathroom or would moisture from a hot shower mess with the adhesive?
YoungHouseLove says
That’s a really good question! Anyone try it? Would love to hear how they hold up in a bathroom!
xo
s
stephanie says
I work in a sign shop, and assuming the vinyl is an exterior grade (typically 7-10 year outdoor life) it would be fine. Think about all those lighted box signs you see around time. The lettering is typically just vinyl. I would recommend seeking out a local sign shop to be sure you got an exterior grade instead of and indoor grade vinyl.
Dalenna says
Not actually mad (just think your kid is cute): but how could you have a Teddy room post without a Teddy picture in it????
The wall looks great!
YoungHouseLove says
Haha, I know, right?! I blame the fact that he was attached to my chest 90% of the time that John did this project. Hungry boy!
xo
s
stephanie says
It looks great! If you wanted something more intricate, or just didn’t want to spend that much time again on cutting by hand I’d recommend talking to a local sign shop. They have professional grade vinyl plotters, lots of colors to choose from, and the software to make pretty much any vector shape a reality. Based on your measurements I’d say your decals would run about $20 which is obviously more than $5, but not bad for the labor saved (also speaking from experience in Roanoke, not Richmond). Just a thought for commenters that may not want to do that much DIY. :-)
YoungHouseLove says
SUCH A GREAT TIP!
xo
s
Tom M says
Great job! This is a bit of a Rorschach test. I see little platforms from an old school video game. Add a little vinyl Mega Man to hop around those ledges.
YoungHouseLove says
So funny!
xo
s
Sandy says
I absolutely love how Teddy’s nursery turned out. The T decals are such a great personal touch. I have used the Silhouette vinyl on a textured (orange peel) wall before and it works just fine. You have to rub your finger all across it to get it sealed completely on the surface but it stuck with no problems.
Mary says
I totally had an 82. Now I have a 83, 84, 89 and Nspire. The Nspire is the fancy new thing and it comes with computer software and its all color. It’s crazy complicated. (Sorry for nerding out on you…I’m a math teacher, I own a lot of calculators)
YoungHouseLove says
Sounds awesome to me.
-John
Carolyn says
I like the Ts…wonder if you considered painting over them and removing the vinyl …the kids probably won’t be able to pull them off…and it probably sounds like a pain…or impossible…
YoungHouseLove says
We did think about that but they’re really stuck on there (John talked about that in the post) – so much so that we worried painting over them would seal them to the wall so we couldn’t remove them at all! Has anyone tried it?
xo
s
Brenna says
Hey guys,
do you remember the color of the paint you used on the walls? Just curious – it’s a great light color without being draining and all white and blah =/
the design looks great! kudos to you for your patience!
Brenna
YoungHouseLove says
Thanks Brenna! It’s Going To The Chapel by Ben Moore.
xo
s
Erika says
Hey Guys,
I don’t know if this has already been addressed, but if those decals are vinyl and not pvc free, they are toxic and off gas neurotoxins that are dangerous for babies and adults alike. It’s especially not good to have around a sleeping space, where babies do so much growing. (It looks great though! I hate that they even sell stuff that isn’t safe and am kind of embarrassed to post this — but I thought you’d want to know.)
xoxo
YoungHouseLove says
Thanks for the tip Erika! I think it’s PVC free, but I’ll have to double check!
xo
s
Jeanna says
The room came together so beautifully, the T’s are the final perfect subtle touch :)
Rebecca says
Wow, it looks great! I, too, am a fan of vinyl decals in a kids room – so many options and so easily changeable over time. As someone who installed them over my son’s crib, you may want to move the crib away from the wall once he can stand (I know that feels a long way away now). I once walked in at the end of my son’s nap to see that he had pealed off every decal within arms reach and happily reapplied them to himself and the interior of the crib. He was so proud of his hard work. I’ve heard similar stories from other parents, too.
YoungHouseLove says
Thanks for the tip Rebecca!
xo
s
Sayward says
I love it! I’ve been eyeing up the gold vinyl polka dots people have been putting on their walls (such as Lauren Conrad). The whole room looks great and that subtle detail makes it feel so finished.
And since you asked, this weekend I GOT ENGAGED!!!!! AHHHHHH!!!!!!!!
YoungHouseLove says
CONGRATS SAYWARD!
xo
s
Evelina says
Congratulations!! (from a fellow LC fan!)
Stephanie says
So creative!! Looks awesome :) quick question where is the crib from and blue chair?
YoungHouseLove says
The chair is from Joss & Main a while back, and here’s a post about our crib hunt.
xo
s
Liz || Shopping My Closet says
Wow, very meticulous work! Looks great!
Liz @ http://www.shoppingmycloset.com
• • Join skirt link-up all week! • •
Lisa E says
Looks great. As others have mentioned, love how it’s subtle and therefore not competing with that wonderful mobile. Kudos to you for your patience. I don’t have any, ha! So smart to use that vinyl. I want to make my own stencil and would never have thought to use that.
Eryak says
I love all of your posts and always read them all. We are building a new house and we took lots of inspiration from the showhouse and your house..enough so that my husband teases me incessantly! :) However I’d love for a couple more lifestyle posts.. how everything is going.. what type of kid-friendly less strictly diy/home stuff you guys are doing, etc. Or stuff like you used to post some for BabyCenter, etc. Keep up the great work!!
YoungHouseLove says
Thanks Eryak! We’d love to share some posts like that soon!
xo
s
Megan C. says
I think it looks great and such a better (and more unique) idea than the striped accent wall. I did like the idea someone mentioned in the comments of painting over the Ts and then peeling them off. Mostly because I am concerned about the potential choking hazard down the line. It really depends on the kid. My six-year-old never could have peeled those off but my two-year-old would have had those all off the wall in under ten minutes when she was only ONE-YEAR-OLD. Seriously.
Gina says
Happy Monday, Petersiks :)
Can’t say I’m a fan of this project, sorry. Can’t please everyone, I know. However, I am dying to see what you do with the dining room. Any plans for that in the forseeable future? Do you think you will go light or dark with the walls? Or window coverings for the windows that don’t have any? Furniture for the verandah? Kitchen floor? Hallway bath? Those kinds of things just interest me more. Thanks!
YoungHouseLove says
Thanks Gina! We’d love to share some posts about that. We’re contemplating furniture for the veranda, a few dark colors for the dining room, and curtains for some rooms without them along with planning office updates. We move a lot slower these days, but we’re excited to get to that stuff.
xo
s
Gina says
Thanks for your reply, Sherry. I am looking forward to all the things you listed above :)
Dorothy says
Looks great! Here’s hoping Teddy doesn’t peel the decals off like my 18 month old did.
Diane says
I bought the same fan from Amazon. Also love the retro look:
http://www.amazon.com/Hunter-90400-Fan-Brushed-Nickel/dp/B00JWXQDY8/ref=sr_1_1?ie=UTF8&qid=1401727556&sr=8-1&keywords=hunter+table+fan
Kristin M says
Oh honey. We’re onto TI-83’s being the low-model now. (I’m a high school math teacher, and I’d say TI-84’s are the most common in my school.) TI-82’s have slid down in status to like the boxy Volvo’s of graphing calculator-dom. Some kids even have the TI n-spire. It’s basically an iPad. You should do a google image search for it if you haven’t seen it yet.
Love, your Fellow Math Nerd Kristin
YoungHouseLove says
I love hearing back on what’s new in calculator-ville from you guys.
-John
Jena says
These comments are making me grin :) fellow math nerds….!! As a poor college engineering student I actually asked for a ti-89 for Christmas last year and my rockstar parents obliged. Ohhh dear. <3 you guys!!!
katalina says
exacto question….completely random but you do show an exacto in one of your photos!
I need an exacto to eject my memory card out of my camera and not enough time to send off to get repaired.
how will I get through security with an exacto at the airport– should I be looking for a weird tweezer instead??!!
YoungHouseLove says
I think the idea for some kind of tweezer is a good one! Or maybe a stiff paperclip (one of the thicker ones?). Anyone have an idea for Katalina?
xo
s
Sylvia says
Congrats with baby boy Teddy! We actually have a (12-year) old girl named Teddie (with ie). Love the name, both for boys and/or girls. She was also named after named after my Dad, Theodore.
Sxx
YoungHouseLove says
So sweet!
xo
s
Becky Horst says
I giggled at the T puns!
Joanna @ TheNestbook says
Yes! So cute! We used decals in my baby boy’s room too and I love them. It’s nice to know that you can just take them down if you get sick of them. It’s funny — we have a similar thing going with the neutral wall color and white decals. :) I think I already shared this with you, but here it is again! http://www.thenestbook.com/2014/04/28/room-tour-jacks-nursery/
Don’t you love how the decals look like paint until you get super close? Best of both worlds.
YoungHouseLove says
Love that room!
xo
s
Sarah says
I was cleaning out an old box yesterday and found my TI-82 from high school! Somehow that thing has been with me for 20 years. It doesn’t even work anymore, but I haven’t been able to throw it out yet.
Tamara says
That looks really great! I also love it that if/when you decide to paint the room, you have a pre-applied stencil, should you choose to use it, and that wall would still look great once the vinyl is peeled off. A two-fer!
Annie says
It looks great, and will be easier to change up instead of having to sand down a stencilled wall.
It’s interesting to see the change in you guys, though. Remember when Clara was first born and you were really into the whole organic, no-VOC, no-BPA thing? You even had the chemist brother on to talk about what chemicals were safe and unsafe. And now you’re all PVC and sharpies and alkyd paint. Do you think it was a post partum anxiety thing? I obsessed about other things post partum, and my pre-existing organic solvent aversion sailed on through unchanged.
YoungHouseLove says
I definitely think it could have been first kid anxiety mixed with just loosening up a little over time. We still like to be green when we can, but we’re not perfect by any stretch!
xo
s
Lee Ann says
Okay, that project totally shows off your geek AND patience factors!!! No way I’d ever have that much patience, not to mention math skills! Great job, though.
Jean (notsupermum) says
Oh my goodness, John must have the patience of a saint! That must have taken an age, and the accuracy required is just beyond me. If I had been tasked with that job it would NOT look like that. Well done John!
Tiffannie says
John, did you have any T-Pain” after hanging all those decals? :P
YoungHouseLove says
Best. One. Yet.
-John
Steph Reiner says
Oh my goodness… I got impatient just reading about all that! Props to you for sticking it out because it looks great! I probably would’ve chucked the whole thing at the wall after having to cut one paper template… I briefly considered polka dots in my girls room and then realized ain’t nobody got time for that (meaning my 38 week pregnant impatient self doesn’t want to do it). Unless you guys are feeling bored and want to fly out to Cali to paint some polka dots…
On a side note… we installed Ikea cabinets in our gutted kitchen this weekend and we’re hoping the rest (counter, sink, appliances) gets done before Baby Girl #2 shows up in 2 weeks! :D
KRISTINA says
Such a stunning transformation! I am so impressed. And not to rock your world or anything but my daughter is now using my college TI-83 in high school. Time flies for sure!!
Elisr says
I have a Cricut and bought a variety pack of 8×11 sheets of different colored vinyl from eBay. Then I found plastic tumblers at Dollar Tree in all different colors. I made gifts for 3 girls I mentor with a filagree pattern and their initial and then made cups for all the bridesmaids & bride for my sisters wedding vwoth their initials in the color of yhe wedding (the bride’s said “Mrs.”). I also made bday favors for my son’s first bday (goldfish theme) with each child’s initial on an orange cup. I still have a lot of vinyl left and I think about 50 sheets was $25.