We have nothing bad to say about about the Price Pfister faucet that we purchased as part of our kitchen remodel back in 2007 (especially since we scored it for a mere $71 on eBay).
But sometimes change is a good thing. Why? Because the kind folks at Delta faucets generously offered to let us take their new Pilar Pull-Down Faucet with Touch 2O Technology for a spin.
Psst- Want one too? Stay tuned for this week’s giveaway since we actually wrangled one for a lucky random winner as well!
The Pilar’s sleek brushed nickel finish is a perfect match for our kitch and the Touch 2O feature sounded right up our alley- especially with all the painting, sanding, caulking and general messiness that comes with the bevy of DIY projects that we’re always taking on. Basically, you can turn the water on and off by simply touching any part of the faucet or handle with your fingers, wrist, elbow or any other piece of skin that’s not covered in soap, paint, dirt, etc. Sounds like a DIYers dream, no?

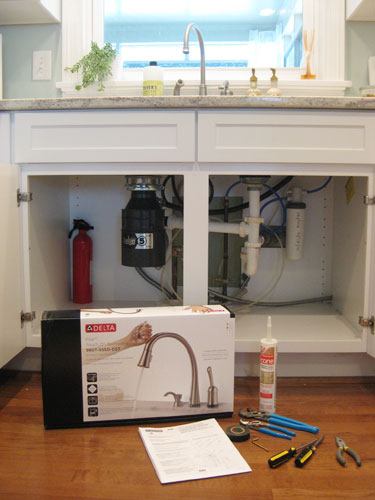
So once we delicately broke the news to our old faucet, it came time for it to gather its stuff and move out (not to worry, we’re happily giving it a second life by donating it to The Habitat For Humanity ReStore). When it comes to faucet switcheroos, we’ve removed and installed about four or five bathroom faucets, but never a kitchen faucet (our granite and sink installer put in our last one) but I figured it’d be pretty straightforward. I just cleared out the under-sink cabinets, assembled my tools, turned off the water and readied my plumber’s crack (not pictured).
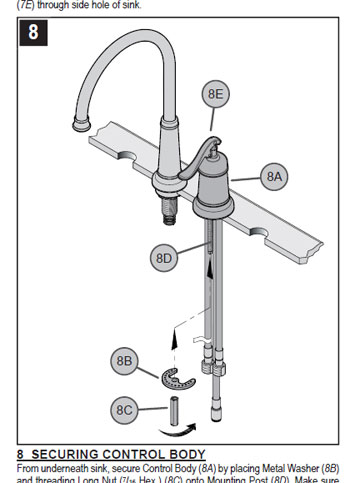
I actually resisted the urge to take pictures of the ol’ removal process, thinking it would be so simple that it didn’t warrant breaking out the camera- but I actually hit a small hurdle pretty much off the bat: I couldn’t figure out how to unscrew a certain piece. The solution? I just hunted down the instructions online (since a lot of manufacturers put PDFs of these things on their websites these days) and realized that I misunderstood the way the pieces connect (specifically I thought 8B and 8C were fused together, so I hadn’t even attempted to simply unscrew 8C from 8B). Problem solved.
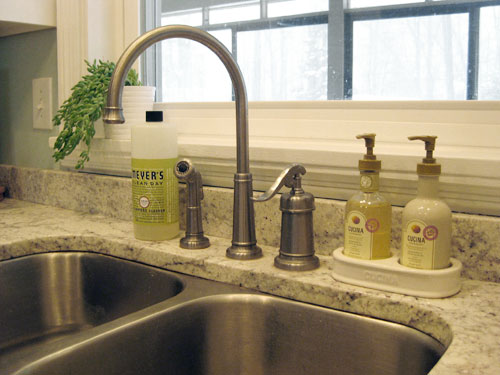
From there it was only a few minutes before I had everything removed and boxed up to be donated to the Habitat ReStore (generally speaking, we just unscrewed things under the sink that held the fixtures in place above the sink). Then after some mild scrubbing, I was left with four clean holes in the countertop that begged to be plugged up with a new faucet. Now you might be wondering why we had four holes when that before picture only shows three fixtures. Well, we originally had the soap pump that came with the Price Pfister faucet installed, but we found that it leaked on the granite a lot (and got jammed up quite a bit) so it soon got the boot in favor of our beloved Cucina soap/lotion caddy (that never leaks AND easily covers the unused hole).

So with the sink just begging for a new faucet, the installation of our sparkly and high tech Delta model proved to be surprisingly easy (I assumed this would be harder than the former faucet removal but it was seamless and simple- especially since I already had the included-in-the-box instructions on hand to refer to). First came screwing on the gooseneck spout, which was just simply tightening a collection of washers and nuts on the underside of the granite while Sherry held the spout in place on the other side.
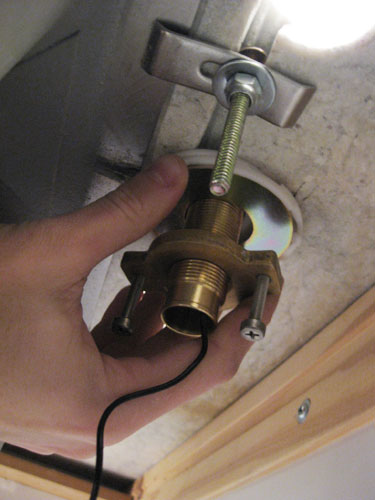
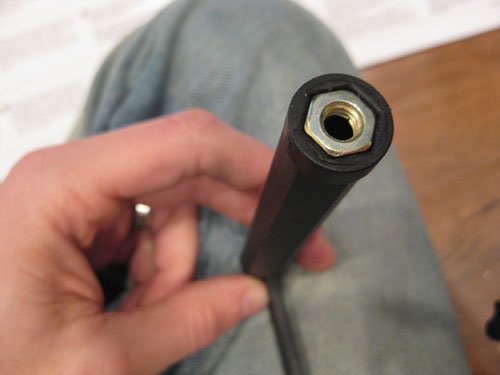
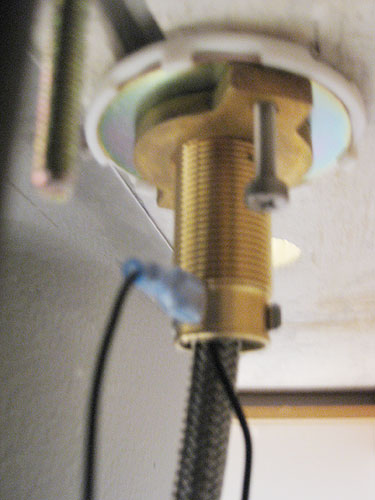
Then came doing something similar to the handle (i.e. valve). This required a special long tool (included) to tighten the nut over a super long bolt (similar to parts 8B and 8C that had proven confusing to remove on the old faucet). You can see how the nut fits into the top of a long plastic tube that then slides right over the long bolt.
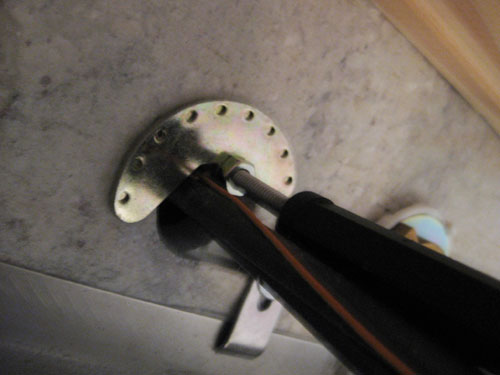
Here you can see the tool in action after having tightened the nut into place. Pretty straightforward if you ask me, especially since so far all the tubes and wiring were already hooked up for me (yes, our fancy schmancy faucet actually came with wiring).
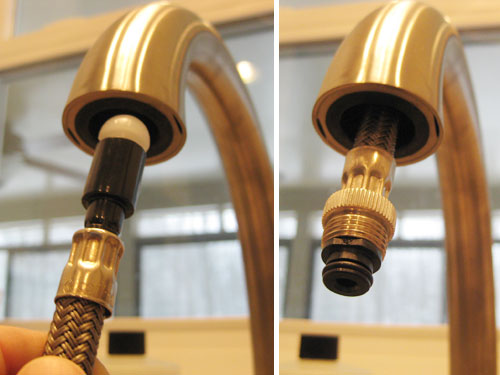
The next step was feeding the extension hose through the faucet. All that took was popping in a simple white nub to help the tube slide through with ease, and then just leaving enough still sticking out so it didn’t get lost inside the gooseneck. This is where we would later screw on the nozzle end, which makes it functions as both a standard faucet and a pull-down sprayer. Gotta love a multitasker like that.
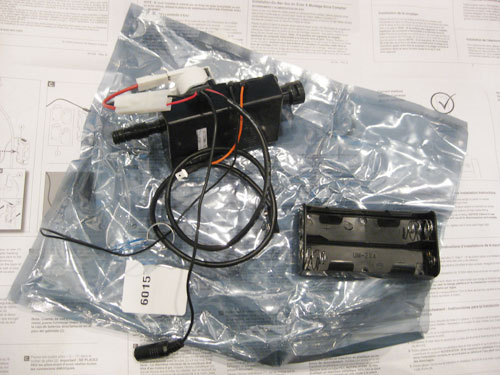
Here’s where it starts to get high tech. After all, the Jetson’s-esque touch feature doesn’t just happen by magic. Enter the Solenoid. I don’t know how it does what it does, but I do know that it came it one of those static-eliminating bags that I’m used to getting computer parts in. Like woah.
The Solenoid connects to the valve on the top side by snapping it into a plastic tube that already extends from the valve and using a metal clamp (the goldish thing below) to hold it in place. Then I snapped the spray hose (after removing the white plastic guide) into the bottom of the Solenoid and used a black plastic clamp to hold that in place. Our faucet was now one step closer to becoming a bona fide robot.
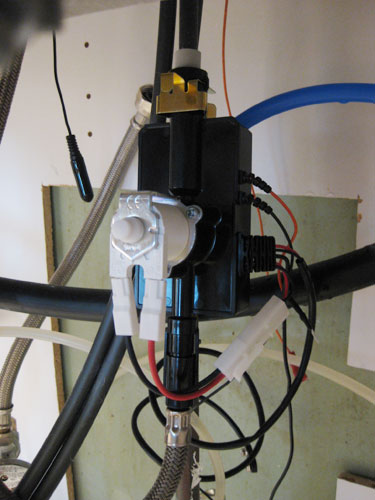
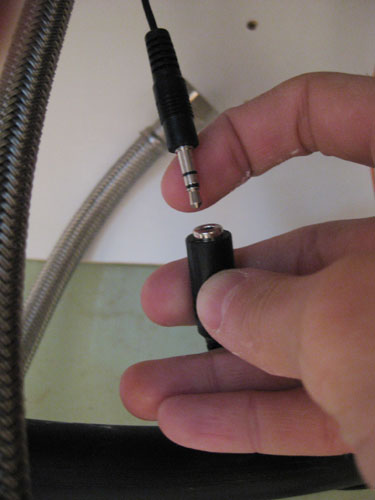
After that it was just up to me to connect a series of wires from the Solenoid to other parts of the fixture. For example I attached a metal clip to the bottom of the spout (sorry for the blurry pic – it’s dark under there!)…
…and these two corresponding wires from the spout and the Solenoid (not exactly sure about the science behind all of this, so I was just dutifully following directions at this point).
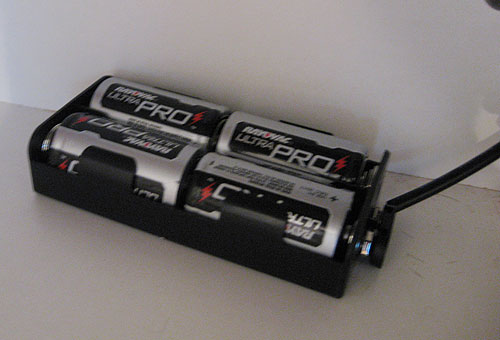
And of course you have to attached it all to a power source. In this case that source was a battery case that fits four C-sized batteries, which- much to our pleasant surprise- are actually included! When does that ever happen? Oh and there is an adhesive on the back of the battery pack if you wanted to stick it to the cabinet wall, but we opted not to commit ourselves to one spot yet and just rested it on the base of the cabinet (this should make pulling it out to change batteries extra easy).
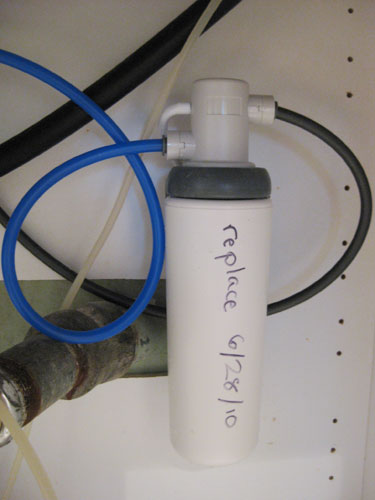
With the electrical done, it was time to put my plumber’s hat back on, take off my belt, and reconnect the water. The hot water was pretty basic – I just attached the black plastic tube from the valve to our hot water connection. The cold water was a bit different due to the water filter that we installed last summer. Fortunately, the new tubing was the same size as the blue plastic tubes used by our Filtrete filter- so I was able to just cut the new tube at an appropriate length with a small hack saw, insert it into the filter and I was done.
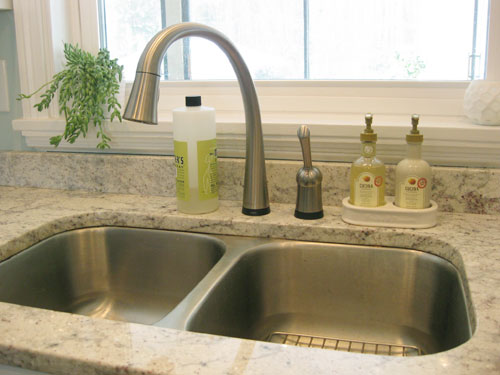
Then I just turned the water back on the traditional way (by turning on the pipes under the sink and using the faucet handle to get water a flowin’) and tested for leaks by using a paper towel (it’s our patent-pending technique… just place a dry paper towel under the pipes, turn on the water, and pray that the towel stays dry). Once we established that there were no leaks or snafus when it came to our installation, I readied myself to attempt to turn on my kitchen faucet in a whole new way: just by tapping it (we love that the faucet can function just like a normal one and that the touch-activated feature can be turned on and off). But first take a look at our new faucet in place:
Once again we opted not to install the included soap pump so we just used the Mrs. Meyers bottle to cover up the second pre-drilled hole in our counter. Some people might not think that two covered countertop holes are ideal, but we realized that we’d much rather have the room to grow (in case we ever decide to install another four-hole faucet down the road- since we plan to be here til we’re old and gray) rather than having to get someone in to cut new holes if that time comes. Basically we think of our sink as having a ton of flexibility- and we’ve never had an issue with water finding its way around the soap or lotion and dripping into the cabinet base below so it’s a pretty foolproof system. Plus there are also lots of sites like this that sell “hole covers” to make things even more secure and water-safe if we ever want that extra protection for the long haul- so that’s always a nice option.
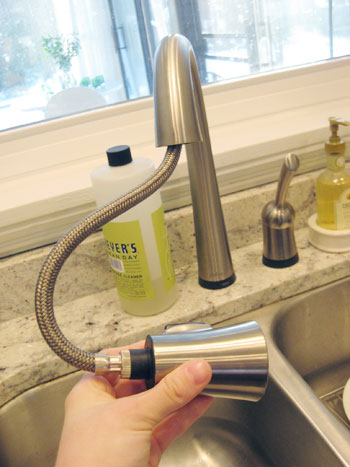
Plus, we love having the pull-down sprayer built right into the spout rather than coming from a separate source. And it toggles between a solid stream and a multi-stream spray with a switch on the back of the nozzle. Nice.
We also love the heft of our new faucet. We never realized how light and semi-chintzy our other one felt by comparison (since we’re constantly swinging our faucet from side to side between each basin of our double sink, the new one really feels solid and substantial- always a plus).
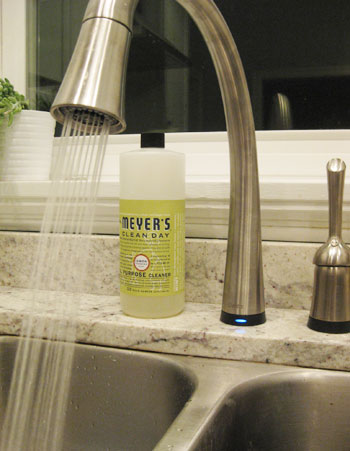
And the whole touch thing? Works like a charm. Though at first I didn’t realize that you have to have the handle in the on position for it to kick in, so there was some momentary alarm during my first few attempts to touch activate things without success. But as soon as we flipped the handle back towards the window- into the on position- then all we had to do was tap any metal part of the faucet (spout, neck, underside- anywhere) and it would click on or off instantly. Plus there’s a little blue light at the base of the spout that lights up when it’s being touch activated.
The other cool thing is that since we’re constantly pushing the spout from one side of our double sink to the other, it’s actually smart enough to know when you’re tapping it (which will turn it on and off) and when you’re grabbing the neck to move it (thereby wrapping your fingers around it). So it actually won’t activate and turn on/off if you grab it to move it- just when you tap it. Yeah it’s pretty much an Einstein-caliber faucet.
And since we know people are probably wondering about fingerprints (since this faucet begs to be touched) the instruction manual actually encourages people to touch the underside of the faucet to minimize fingerprints but we’ve been tapping it pretty much all over and we haven’t noticed one fingerprint to speak of. The brushed nickel finish really does a great job of obscuring them (or keeping them from popping up in the first place). Whew.
My only wish? I’m kinda disappointed that it doesn’t talk to me in some Knight Rider-ish voice: “Welcome John, what can I wash for you today?” Oh well, Delta’s probably still working on that feature. We also love that the batteries are only activated when the faucet is actually being touched on or off, so it’s not like they run all the time when we might only touch it for 40 seconds a day. Smart.
So that’s how we painlessly switched out our kitchen faucet and lived to tell the tale (and wash our hands after a job well done). We hope our little step by step photo sesh comes in handy if you find yourself under your sink with a wrench in the near future. And of course if your new faucet doesn’t come with wires and batteries it’s sure to be an even simpler installation process. You can totally do it, probably in less than twenty minutes.
Oh and don’t forget to swing by later today for a chance to win your very own Delta Pilar with Touch 2O Technology (which retails for somewhere around $300). And until we come back with our big weekly freebie this afternoon, we’d love to know if anyone else has tried out this wave of the hand-washing future device? Or do you have any other special technology in your home that makes life a bit easier? Motion-sensored lights? Heated towel bars? A coffee maker on a timer? If not do you dream of some special high-tech device or invention that would make your house hum like a well oiled machine robot? Spill the sci-fi beans.

paul says
Thankyou for helping me to to realize how the odd Price Pfister clamp system worked. Now that research break is over I can go finish installing the new Delta Faucet I just purchased.
YoungHouseLove says
So glad!
xo
s
Jon Scott says
Thanks for the helpful article. Very informative. My wife and I have been considering changing our kitchen sink faucet for a while. After reading this I’m fairly confident I could do it myself. Now we just have to find a new faucet we both agree on!