Since we last checked in on the sunroom last Thursday, Sherry and I have managed to check four more things off the list: installing two ceiling fans, cleaning the concrete floor, leveling it, and cutting the tile and planning out our pattern (aka: dry fitting). But excuse me while I backburner the fan installation tutorial (I promise it’ll pop up in a few days) because we’re just too psyched to share those three tiling prep steps with you guys. We made some serious weekend progress – more than we thought we would – and we couldn’t be more excited about the tile pattern that we landed on. In fact, I’m probably outside tiling as you read this… so hopefully within a week it’ll all be fully installed and grouted and ready for the big reveal!

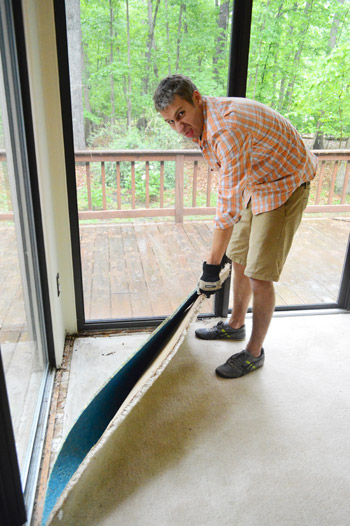
So let’s talk about how we got this tile train moving (and if you didn’t realize you boarded the tile train, you can check out this post for why we’re headed to that destination). Our trio of prep tasks were to: remove a lingering smell, level the ground since this is now open to the elements and we didn’t want water pooling in certain places, and determine our tile pattern (border? no border? running brick pattern? modern grid?). Let’s start with deep cleaning the concrete to eliminate the odors it was holding onto – because, as you may recall, this room was once covered in a wall to wall carpeting that got wet over time due to broken doors and wood rot, so it was definitely something we needed to attend to.
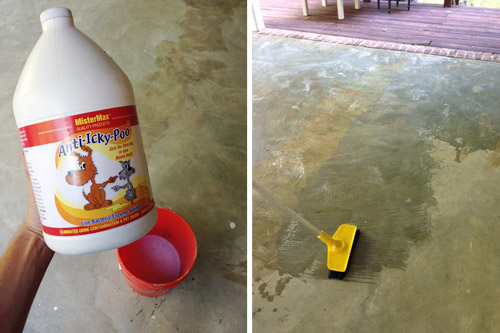
In our post about removing the old carpet a bunch of you actually recommended using this product (MisterMax Anti-Icky-Poo) which many of you described as having a hilarious name but also being the best thing you’ve ever tried on deeply penetrating odors. Even though we’d be tiling over the cement, we wanted to make sure every time it got hot outside there wasn’t any old whiff of something that wafted up from the cement floors). Most of the more obvious smells had thankfully vanished once we removed all of the glass doors to permanently air things out, but since we’d already bought the bottle based on your recommends, we figured it couldn’t hurt to scrub some on just to be sure nothing would re-emerge on a muggy day. It’s really easy to apply (scrub on with a brush + let dry = smell’s gone).
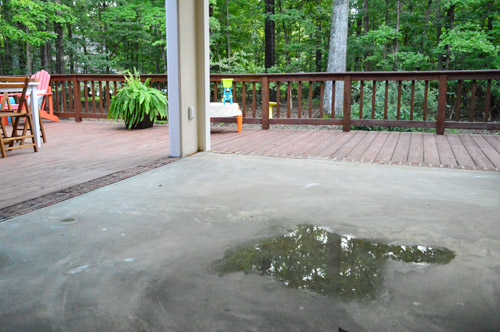
The other issue we needed to solve before tiling was taking care of some not-so-level spots. With the glass doors removed, the space does collect a bit of moisture when it rains. For the most part it dries off quickly, but small puddles do form in a couple of low spots – most of which seem to be closer to the house (in spots where we’ll probably have furniture). And furniture sitting in little puddles after every heavy rain = not so great.
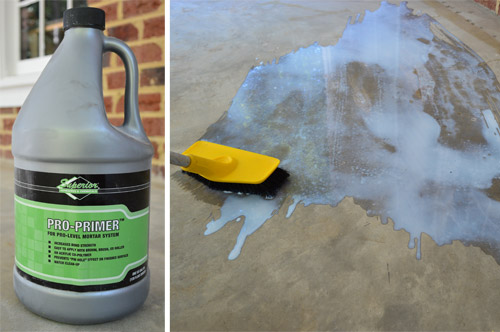
So we decided to give self-leveling concrete a try. It sounded scary (and messy) to us at first, but after watching a few videos online it actually didn’t seem so bad. We got all of our supplies at The Tile Shop which, in addition to the concrete mix itself, included a primer they recommended to help the new cement bond to the existing surface. Unlike a paint primer, it was a really watery substance that I could brush on super fast.
One bag of self-leveling concrete was supposed to cover 15 sq. ft. and I wasn’t planning to do the whole sunroom floor (since I just wanted to fill in some low spots and, if anything, create a very slight slope away from the house). So I ended up getting five bags – but only using four of them. I also got two buckets so I could mix two batches at once, but only used one because the 5-gallon Home Depot bucket ended up not being big enough. So if you’re attempting this at home, go straight for a 6-galloner (the Tile Shop one fit the bill).

Speaking of buckets, I also bought this “measuring bucket” that’s designed to measure out the perfect amount of water for one bag of concrete (if you fill it too high the water drains out of the hole and then you’re all set). I felt a little silly for paying $2 for a bucket with a hole in it, but it ended up being worth the peace of mind that I got from not having to worry that I made my mix too soupy or not soupy enough.

After pouring the water in my 6-gallon mixing bucket, I added a bit of the cement powder at a time – mixing it really well before adding more, until the bag was empty. You basically have to mix this stuff with a paddle-mixer (i.e. giant whisk attached to a drill) so I was glad to have already purchased one for my upcoming tiling job.

This stuff is actually really watery. You picture cement being kinda like a thick cake batter consistency, but this was more like sunscreen that’s been sitting out in the heat. But it’s that liquid-y property that actually helps it level things off mostly on its own.
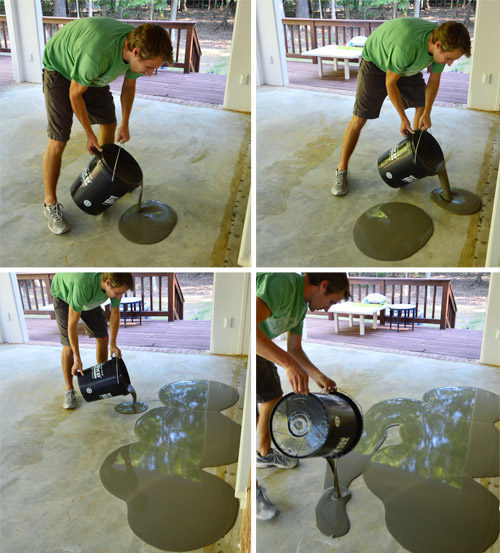
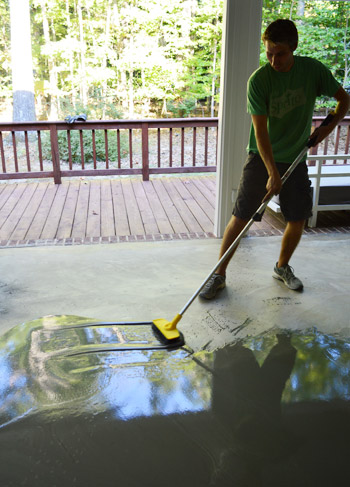
It doesn’t do all of the work for you, but it definitely works with you as you go. I used a broom to push some of my puddles together and into corners. But it wasn’t hard or meticulous work by any means. Wherever I swept, the liquid just magically reformed into a level, flat surface. It’s almost like that liquid that Alex Mack or those kids from those old Capri Sun commercials would turn into, just less silvery.
I ended up using four bags in total and you can see how the area closest to the window was already starting to harden by the time my last batch (to the left of it) went on.
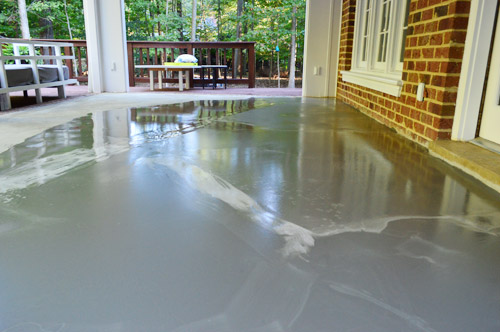
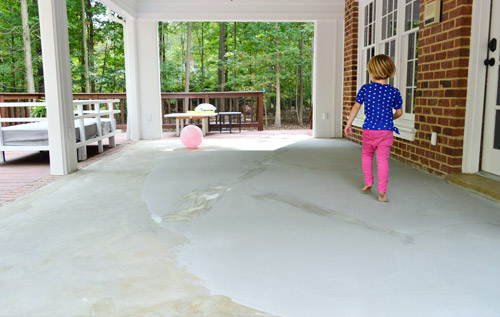
But it wasn’t until the next morning that it was completely solid and ready to walk skip on.
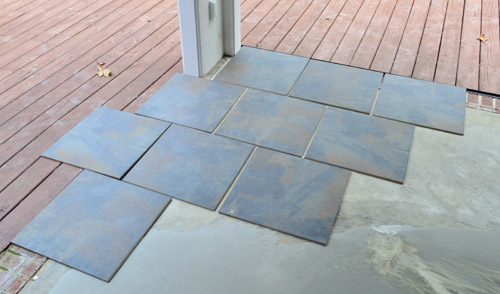
With that out of the way, we could finally start placing tile. Well, start planning to place tile. Sherry and I were 99% sure we wanted to do a brick-layer pattern with our 20″ x 20″ square tiles. But we weren’t quite sure where we wanted to start the pattern and whether or not we wanted some sort of a border. So we broke open a box or two and started playing around.
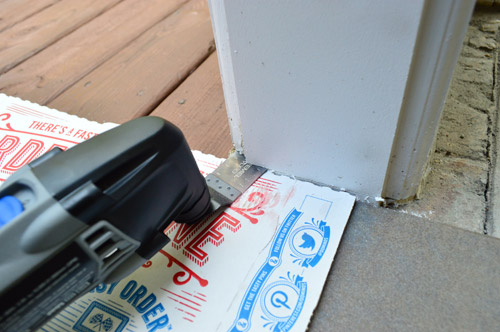
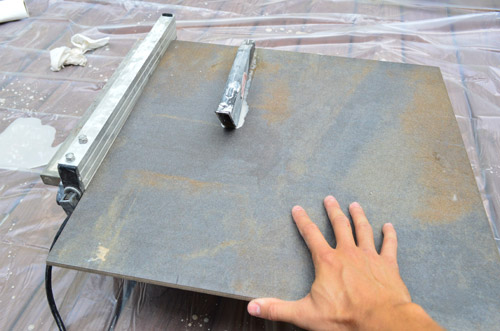
The first thing that the exercise confirmed is that we needed to cut out the bottoms of our door jambs. We did this for our wood floors inside too. It basically lets the flooring slide under the trim, saving you from having to intricately cut your tile around it and ultimately gives you a cleaner look. To determine the height I set my flat saw (aka Dremel Multimax) against a tile and a piece of cardboard (to protect the tile from the saw and to adjust for thinset height).
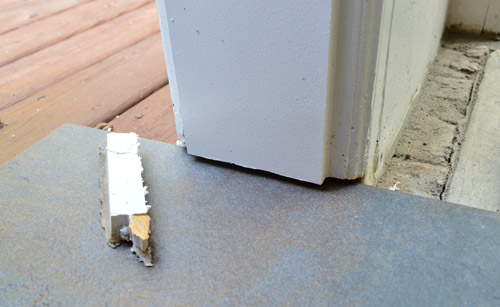
See? You end up with a much cleaner edge once that chunk of trim is gone. And once the thinset raises the tile a smidge more it should be a nice tight fit (which we’ll then seal with clear exterior caulk to protect the wood from any moisture/rot).
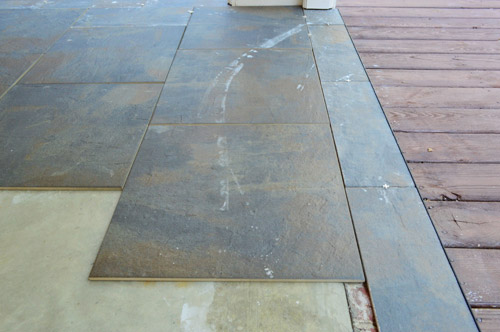
The other thing this exercise confirmed for us is that we definitely want a border. It not only helps to define the edge more crisply (and ended up looking a lot more high end to us) we realized it would also make the tiling job a lot easier when it came to cutting tiles around the posts (instead of notching things out, I could make the border the same width as the posts and just lay them down to create that outside edge which squared off everything so that interior rectangle of tiles would require fewer cuts). So after a lot of moving and cutting and shifting and more cutting, this is the final pattern that we came up with:
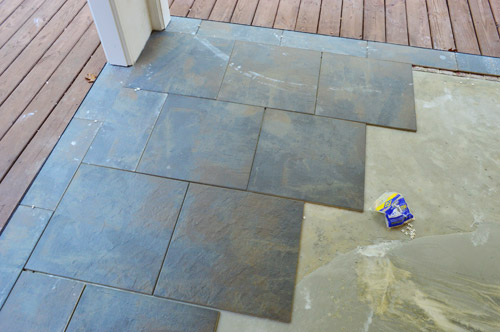
I had to create the border pieces myself by cutting the square tiles on the wet saw. But luckily I was able to get three border pieces out of one tile, so we didn’t have to sacrifice too much scrap to this cause!
It wasn’t the most fun task to slice up eight tiles this way (to make 24 border tiles to complete the perimeter) but we think it was a huge improvement over the unbordered look. It defines the edge nicely (which is helpful because there is a slight step up from the deck into the sunroom) and, by doing all of these cuts during my prep stage, it’ll hopefully make my day(s) of tile-laying go a lot faster. Oh yeah, and forgive the hazy water mark from the hose in the shot below, it wiped right off.
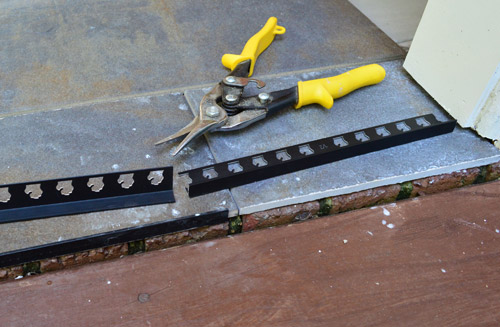
But before I leave the topic of edges, one thing we were concerned about was how the exposed edge of the tiles would look from the deck (and if it would get beat-up over time). So we bought these metal edging pieces (that can be easily cut to size with some metal snips) to give our edges a finished look. I realize they look very in-your-face in this photo below (they’re more of a matte charcoal tone, but for some reason they look shiny and black below) but if you look at the photo above you can see it actually blends pretty nicely with the tile to create a thin charcoal rule around the border that looks clean and finished (without exposing the chalky cut edge of the tile).
My goal is to get all of the tile set by the end of the day tomorrow and then it just needs to be grouted and clean up for us to share those big before and after pics with you guys – hopefully by the beginning of next week. And fan enthusiasts – fret not. I’ll be back with a pretty detailed post about how we installed them (turns out they weren’t as bad as we feared). What did you guys do this weekend?

Sarah says
A little pet peeve of mine:
Cement is an ingredient in concrete. The terms are NOT interchangeable.
It would be like referring to a batch of cookies as flour. As in, “Look, I baked you a batch of flour!”
YoungHouseLove says
Thanks Sarah! Someone else tipped us off to the flour analogy! So helpful!
xo
s
Keegan says
Your floor is looking cool! Is it sad that your reference to Alex Mack just made my day? My husband doesn’t understand my Nickelodeon references :)
Laughing Abi says
That is going to look UH. MAZE. ING.
We painted and caulked and painted and caulked our porch project this weekend in between thunderstorms. (Mother Nature does not sympathize with DIY schedules.) Hoping to start the floor later this week. Wish we were tiling so I could just follow along with your instructions. Still waiting with bated breath to see your reveal. And wishing our weather was as cooperative as yours – John isn’t even wearing long pants in those pics!
YoungHouseLove says
Oh man, you’re so right about Mother Nature! Turns out we’ll be trying to tile and grout between storms that are predicted for this week, so it should be interesting!
xo
s
Kaara says
I love it! I can’t wait to see the finished room!
We had our tile laid in the same pattern this summer too, I absolutely love it! I couldn’t be happier with choosing to have it done that way.
amykoop says
this looks amaze balls! your home looks so great already so excited to see more!
I had an off topic question. That gorgeous fern in the pot on your deck? did you plant it? will you keep it out all winter? and what direction does it face? i am wanting to pot some ferns but wondering if it’s too late. We’re in Vancouver BC
Thanks guys!
YoungHouseLove says
Aw thanks Amykoop! They’re from Home Depot and they’re just called ferns in the signs I think (maybe Boston Ferns?). Here in VA they usually don’t live over the winter unless they’re planted deep in the ground (we had some under our magnolia in the last house that came back year after year) so deck/porch ones in containers tend to die off each year, so I’m planning to buy new ones each spring I think. I love that the deer aren’t eating them and they’re so big for a small amount of cash, so they’ve been a good pick so far!
xo
s
Sarah says
When you first posted about turning the sunroom into a more “outdoor” space, I was a little sad. Now that it’s taking shape, however, I totally love it! I love the tile and all the little details – super excited to see the big reveal. Great job, guys!
Crystal @ 29 Rue House says
It is going to be awesome guys! Sorry if this got mentioned in the comments (or the post but I don’t think it was) but do cutting the the tiles leave a sharp edge?
Someone at a small tile store once told me I couldn’t take big tiles and cut into the shape that I wanted because it’d leave sharp edges that would cut feet. (I liked the color but not the shape). I didn’t entirely believe but let me know what you think!
P.S. I like your new comment disclaimer. While in theory I like your previous “approve all comments” policy, the negative comments left me with the feeling of negative energy that I didn’t like since I come here for happy stuff. And I also wish you didn’t get that negative energy either…it isn’t good! :)
YoungHouseLove says
I think it might depend on the type of tile, but thankfully these guys aren’t too sharp when they’re cut, so once they’re all set at the same depth and grouted there shouldn’t be any edges that are any more pointy than the other non-cut ones.
xo
s
Gaidig says
Some tiles have beveled or rounded edges, so if you cut them into smaller pieces, the edge conditions would be different on different sides of the tile, and it could look really bad.
YoungHouseLove says
Great point!
xo
s
Rebecca says
I work for a flooring company and I’ve never seen transition with little Michigans cut out! We use the Schluter brand (and consequently tend to call all of those kinds of transitions “Schluter”–kind of like Kleenex). For future reference (and not that I’m suggesting you should have done for this install), but you can install them backwards if the tile is going up against carpet. Sometimes installing the transitions the “right” way can make it hard to get the tile level since it adds a little extra thickness.
I’ve been following you guys for many years now and I have to say that this is one of the most impressive visions thus far! Since you’ve had sun porches in the past, it’s awesome to see that you’re pushing past what has been typical and coming up with a solution that makes me green with jealousy! Keep the great ideas coming! Congrats on the Bun, too!!
YoungHouseLove says
Thanks so much Rebecca! You’re so sweet, and I love the carpet/transition tip!
xo
s
Gaidig says
It *is* hilarious that they are little Michigans. I think as cutouts they’re supposed to key in to the thinset so that the thinset will holds the edge in place when the thinset dries and it’s nice to have the thinset on the inside so that it won’t spill over the edge onto a wood surface, etc.
Julie @ A Life Exotic says
Wait… I need a minute to get my head around the fact that those Capri Sun commercials are “old” now. Where has my youth gone?! ;)
YoungHouseLove says
Haha, I had the same thought!
xo
s
Mrs. Money says
Eek! I feel like this is such a huge tease. ;)
Christina B. says
I’m going to jump on this “This looks awesome, and I can’t wait to see the ‘after’ photo” train!
On a different note: Is anyone else unable to see your twitter tags? I can see the pictures and videos – just not any words (pic descriptions or hashtags).
YoungHouseLove says
Weird! Anyone else having this issue?! Thanks for the tip Christina!
xo
s
Hannah H. says
I can’t see the twitter tags anymore either. It’s been about a week. I can’t see them on any computer I’m using (home, phone or work computer). I thought it was just me.
YoungHouseLove says
Boo! Anyone else having this issue with their blog? Other bloggers know what’s up? Might have to consult Doctor Google…
xo
s
Hannah H. says
Sorry – I meant the instagram tags is what I can’t see anymore. No biggie – it led me to your facebook page which I haven’t checked before. I can read what the tags were there. When I saw the pile of wallpaper with no tag I was like “what is this amazing mess!” I saw in another comment that you got halfway through that. Can’t wait to see the results!
YoungHouseLove says
Aw thanks Hannah! So sorry those are MIA! We didn’t change anything on our end but we hope they pop back up!
xo
s
Christina says
The Alex Mack reference just made my day!
Katie says
Where did you buy the Mister Max Anti Icky Poo? Were you able to find it in a store or did you have to get it online?
Excited to see the tiling finished and the fans!
YoungHouseLove says
I found it on amazon I think? Oh wait, I searched it and got it directly from their site I think (cheaper shipping).
xo
s
Kate E. says
Looks exciting! Question about that odor-removing product (icky-poo-whatever it’s called)… can that be applied to drywall? I have a rental property that has a horrific odor and we’ve tried everything. The walls are painted, but I’m wondering that product says anything about applying it to walls? I’m wondering if it could be applied before a fresh coat of paint?
YoungHouseLove says
Hmm, I’m not sure. Maybe email the maker/site to see (it doesn’t mention drywall specifically on the package).
xo
s
Angel says
Try NokOut. Its completely safe and natural and gets rid of ANY smell. And I am pretty sure you can spray it on anything. I know you can even spray it on skin, or use it like dry cleaning on delicate clothes so I am sure a wall would be fine.
Kirsten says
OMG, Alex Mack! I wonder how DIY would change if you had her powers…?
YoungHouseLove says
Haha!
xo
s
Brianna says
We are thinking about DIY tiling our laundry room. Currently we have linoleum. Could we put the tile over this? (What my husband wants to do) Or to do it correctly should we pull it up then prep the floor, etc? (What I want to do). I feel like pulling it up would be the best bet because what if the linoleum were to shift? Our house is fairly new (1.5 years), and I have no clue what is under the linoleum. LOVE your website!!!!!!
YoungHouseLove says
You’d need to rip up the linoleum and would probably need to use cement board screwed into the subfloor. You can visit the Tile Shop and they have so much info (just bring a pic on your phone of your space and try peeling back one tile to see what’s under it and they should be able to tell you what you need to do).
xo
s
MelanieL says
We built a boat this weekend…just in case the rain never ended:) Speaking of the Tile Shop, how cool was it that I opened my office’s copy of Indianapolis Monthly at lunch today and saw you guys in their ad!! I gasped, in a good way, ha ha! Love you guys and congrats on babe #2.
YoungHouseLove says
Ahh! Thanks Melanie! And building a boat?! Amazing.
xo
s
Gabbi @ Retro Ranch Reno says
Love your tile choice…it’s perfect for your space!
Michelle @ A Healthy Mrs says
Love the tile pattern! And the Alex Mack reference :)
Jasmine says
Hey just want to say that I’ve really enjoyed reading about your journey in the new house. Finding exciting content when so many small mundane changes need to be made in a new house can become boring to readers, but you guys picked a great “1st” project with the sunroom and I am so intrigued! I can’t wait to see it all come together, thanks for thinking of your readers!
YoungHouseLove says
Aw thanks Jasmine!
xo
s
Dolly says
Hello from Southern California and congrats on the coming baby! I love reading your blog. :) I found your blog in May, after we bought our first house last December and had our first baby (a boy) in April.
I have a question: what are the dimensions of the border tiles and how did you decide on the size of them?
We have a back patio that used to be a sunroom too, but previous owner had to completely demolish the structure due to termite damage. So now the patio consists of just cracked/broken interior tile on top of concrete. I would love to re-tile it sometime too, though we are new to all this home stuff and having a baby keeps us busy!
YoungHouseLove says
We just used the length of the tile (20″) and the width was determined by the width of the columns – so they ended up being around 6″ wide (so we could get 3 per tile).
xo
s
Laura & the Shell says
Ohmygosh, this HAS to be your forever house! The tile looks so good. This gigantic back porch/outdoor space is just so amazing. It makes me think of a vacation house. You’ll be on vacation all the time! Haha. Not really, but I do think this takes this house to another level. Great idea!
Megan @ The Brick Bungalow says
I love that tile! My parents have a very similar style and color in their bathroom and basement. They have a craftsman style house and it looks great with wood. I like it next to your wood deck too.
Jackie says
I love your Blog!!!! My husband and I are empty nesters….We’re in our early fifties. Gasp! I was a child bride…kidding..seriously, we married at 24 and have been together for 27 years. We’ve been in our current home for four years. This is our fifth and final house…I think! We love to purchase and renovate fixer uppers as you guys have done. It’s a fun process that we enjoy very much. Family and friends have suggested that we do this to make money on each house, but that’s really not the case. We do it for the simple joy of watching the transformation. We have been pretty lucky with resale on four of the five houses. I wouldn’t call us house flippers because we have lived in each house for many years. The shortest time frame being 15 months only because we had extremely nightmarish neighbors. Anyway, just wanted to share and let you know how much I enjoy your blog. Congratulations to both of you! Also, you have the most adorable little girl. She is so smart and articulate!!! It makes me so happy to see such a wonderful family. You guys remind me of my own family. I wish I knew 27 years ago how to blog….LOL! Did such a thing exist! LOL! I do have a bucket full of video and pictures. Keep up the excellent work and thank you!
Jackie
New Hampshire
YoungHouseLove says
Aw thanks so much Jackie, you’re so sweet! Loved hearing your story. So inspiring! Gotta do it for the love!
xo
s
Amy says
While I like the tile post and the pattern you chose…can you please explain the promotion for The Tile Shop? I find it dishonest that you strategically post the Tile Shop buckets in the pictures and are featured on Tile Shop’s instagram this morning. Do they pay you to include their name in your posts? This doesn’t seem like it fits your “not paid or perked” policy.
YoungHouseLove says
Sorry for the confusion Amy. We’re NEVER paid for post mentions. It’s actually illegal for any blogger to accept any freebie or payment in exchange for posting about something without clearly disclaiming that fact right within that post – plus we have a no swag/no sponsored posts policy (more on that here). We just buy materials from different places with our own money like any other homeowner, and then we blog about our experiences (so you never have to worry if we’re mentioning something because we’re getting paid for it since we have a policy against that). Many companies on Instagram (like Pottery Barn, The Honest Company, and The Tile Shop) mention people who have blogged/tweeted/IGed about their products, just because they’re excited for the free mention (none of whom are paid, at least to my knowledge). So there’s no “business transaction” going on behind the scenes (those need to be disclosed on social media with the hashtag “#spon” in order to be legal). Hope it helps!
xo,
s
Shannon [Our Home Notebook] says
I love the tile boarder. It looks so polished with it. What a smart idea!
Lauren says
John mentioned that he wanted to have it slightly slope away from the house. Were you able to achieve that? If yes, was it just because you didn’t apply all the way to the deck?
YoungHouseLove says
Yes, we essentially filled in the low points where those puddles were and then built it up a bit back around the house (and feathered it out towards the deck) so there was a very slight incline away from the house.
xo
s
Bre B. says
Thank you for the Alex Mack reference, it brightened my day! Love the tile and the border!
Katie says
It looks great!
You seem to mention The Tile Shop a lot- and they mention you- Do they pay you? I know you have a no free swag policy but is their some time of partnership/compensation? Sorry if this is known or already asked/answered.
YoungHouseLove says
Sorry for any confusion Katie! Nope, we never accept money (or freebies) in exchange for in-post mentions (you can read more about our policy here). It’s actually illegal for any blogger to accept any freebie or payment in exchange for posting about something without clearly disclaiming that fact right within that post. We’ve been buying stuff at The Tile Shop since gutting our very first bathroom (in our first house, before Clara was born) but we’ve never been paid for mentions from them or anyone else. So any chitchat about a product in a post is just because we paid for it with our own money because we liked it enough to want it in our own home. We like that policy because it means you guys never have to worry if we’re mentioning something in exchange for loot (instead of because we truly like it). Hope it helps!
xo
s
kristen says
I’ve always wondered about this since you guys use Joss&Main and Tile Shop a lot, and while they don’t pay you for mentions they are sponsors of your blog, so you are earning advertising dollars from them.
I’m not implying that you are doing anything dishonest, it just seems like a conflict of interest. It’s in your best interest to use their products since mentioning them on your blog along with the sidebar ad will drive readers to their sites, but you’re saying you’re not gaining anything by mentioning them.
YoungHouseLove says
We’ve always tried to clearly identify the products we use and the places we shop in our posts in an effort to be helpful. We mention lots of products and stores that have never been sponsors (HomeGoods, Ikea and Home Depot come up all the time and we have no connection to them) and we’ve had lots of sponsors that we’ve never mentioned in posts. But we realize it can look a bit suspect when those things overlap and we happen to shop with someone who is also a sponsor, so hopefully my super long comment will clear things up.
Our policy is to keep ads clearly marked on the sidebar, that way the content can just be stuff we genuinely like and want to buy for our house. Private sponsors have always paid a flat rate for a month on our sidebar, regardless of whether they get 10 clicks or 10,000. We don’t get a “bonus” or anything if we send them additional traffic, and we like that because it means we can post about what we’re buying and using instead of worrying that linking to or mentioning a certain product could pose a conflict of interest. You’ll notice we didn’t even link to The Tile Shop anywhere in today’s post, which certainly would have been important if we were trying to earn some sort of clicks.
In cases like Joss & Main and The Tile Shop, we were customers far before they were sponsors, so when they later approached us to be on our sidebar, we weren’t going to stop shopping there. Joss & Main is actually not even a sponsor of ours anymore. Just as we mentioned during our blogiversary week, we’re in the process of phasing out our private sponsor system (The Tile Shop’s ad runs out in two weeks as well).
I’m sorry if today’s post came across as overly promotional, but again, I was just trying to be helpful by recognizing the items we purchased and found useful. The Tile Shop’s instagram post using some of our pictures was as much of a surprise to us as anyone else!
-John
UPDATE: I also meant to mention that while we love shopping at The Tile Shop, we don’t exclusively use them for all of our tile projects (our recent fireplace makeover was done with tile from Home Depot, for instance). We looked at Home Depot and Lowe’s for this sunroom project as well, but didn’t find anything we liked.
K says
Whoa! Very disappointed to hear that Tile Shop is, in fact, a sponsor of the blog after Sherry did her best to deny it in her comment. “Private”, public, whatever; if you’re getting money from someone because of/for the blog, I think you should disclose it to your readers. It hurts when bloggers try to gloss those kind of relationships over like readers aren’t smart enough to figure it out. We’re not stupid!
YoungHouseLove says
Sorry for any additional confusion, K! They’re right on the sidebar under the word sponsor for anyone to see. There was no denial that they pay for sidebar placement, just a clarification that they never pay for post mentions. We don’t ever accept money (or swag) for post mentions nor do we make money based on sending anyone links in posts (our flat monthly sponsor rates don’t reward extra clicks at all). Again, as I mentioned above, we didn’t even include a link to their site in this post, and as Sherry mentioned, accepting money for post mentions without disclosing that fact is illegal for any blogger. We don’t even do sponsored posts with disclaimers because we like to keep ads and content 100% separate.
-John
Harmony_G says
Totally love the Alex Mack reference! (had a little squee moment!)
Your decision with the border was BRILL! Not having to cut around the posts and giving it a well defined edge was a double whammy of awesome. I cant wait to see it done. :)
Tricia | 724 South House says
I don’t know how you do it all! That tile is going to look fantastic!
Gaidig says
Thanks for mentioning the edging. It really adds that extra professional touch, and I think a lot of people don’t know about that sort of thing and don’t even think about it until it is too late.
Ian says
Oh my lovelies! I wish I’d know you were going to use self leveling compound I could have helped you…
Because next time make sure you find a “spiked leveling roller” (for self leveling compound) which is a kind of spiky plastic roller that you run through the wet compound, it levels it up unbelievably. Once used you’ll never go back, it’s that good. It kind of picks it up and puts it back down again all vibrated level with no ridges.
Still, it looks like you made a good job :)
Don’t forget to check the floor with a straight edge before starting the tiles and ‘file’ off any high spots with a floor file (evil looking rasp type thing) and the better you get it, the easier the tiling will be, trust me on that!
Good luck!
p.s. here’s s pic… http://goo.gl/942zKm
YoungHouseLove says
Thanks for the tips Ian! That spiked leveling roller sounds awesome.
-John
Diana says
We try to DIY most things but tiling is one of those things that really itimidate me. We hope to be tiling a shower (in our only bathroom…) within a year…I hope we figure it out ok!
sarah @makingitmyhome.blogspot.com says
Looks great! can you come to my house and inspire me to do all the projects!!!
Julianne says
Looks fantastic! I always appreciate when you share your thought process about the fine details, such as matching the size of the cut border tiles with the corner pillar for a polished look. Probably woudn’t even dawn on me until it was too late, lol, but visually, when you point it out, it makes a huge difference! Can’t wait to see how it turns out!! :0)
Jackie says
I really like that you’re using slate outdoors and echoing the materials used elsewhere in your home.
Dawn says
How well do you like your Dremel MultiMax? My husband wants one since we had our windows replaced and the installers used one of these oscillating saws for that. They had the Rigid brand from Home Depot. I read reviews online and am trying to decide which brand to go with….
Thanks!
YoungHouseLove says
I’ve been pretty happy with ours!
-John
Kate says
I am loving the improvements to the sunroom! Do you know if the self-leveling concrete can be used indoors? We are having the time of our lives with our hallway. It isn’t and after several attempts at putting in flooring (that slides due to the tilt!), we are now living on half wood, half concrete until we convince ourselves to make another attempt. I’m getting desperate.
YoungHouseLove says
Hmm I’ve heard of it being used in basements. Yup, just asked John and he said people use it in kitchens and bathrooms all the time. Good luck!
xo
s
YoungHouseLove says
And yep, people use it in the basements too!
-John
Kate says
Thanks! I knew I could count on you guys to know!
Becky Horst says
Loving the evolution of your “grotto” I’m curious you guys are big on painting brick. At first I kept waiting for the sunroom brick to be painted but then realized duh you’d need to do the whole house! But now I’m wondering if you are or would ever consider painting all your outside brick?
YoungHouseLove says
In Richmond it’s not a great option to paint brick since home values tend to decrease (untainted brick is no maintenance) and we get mold so painted brick typically needs to be scrubbed and bleached and obviously needs to be reprinted over time – so it’s just a lot of work in our area. I love the look though!
xo
s
Meredith says
Hey there! The sunroom looks awesome! We are working on our lanai in FL and have a similar uneven concrete floor that attracts little puddles of water :-/ John mentioned he was trying to do a slight grade with the concrete…were you able to do that? And do you have any tips for the process? I desprately want to use an exterior interlocking wood tile system in our space but the mini puddles on our floor have me worried about water drainage. And my lanai is enclosed so I have to direct the water somewhere or else it just sits :P Oh! And for my weekend, my hubby and I rearranged our master bedroom to enjoy the view from our window instead of using the window wall as our headboard, and went to a local Octoberfest :D
YoungHouseLove says
Yes, we essentially filled in the low points where those puddles were and then built it up a bit back around the house (and feathered it out towards the deck) so there was a very slight incline away from the house.
xo
s
Emma says
Great work guys! It looks amazing.
Totally unrelated but what ever happened to your awesome green ‘sideboard / entryway’ dresser?
YoungHouseLove says
That buffet stuck with the dining table so it’s in the dining room right when you enter (so it’s not visible in all pics).
xo
s
Jessica says
Great progress on the tiling. I think you left out one really important detail on the self-leveling concrete that we learned when using it on our last project.
The stuff starts to set up extremely fast. You have about 10 minutes after mixing to get it poured and spread the way you want it before it starts setting, and your broom strokes no longer “magically” disappear. Also pouring in multiple batches is especially tricky for the same above reason. Really difficult to get a second batch mixed and poured before the first batch starts to set and joining the two batches doesn’t work well.
Just thought I’d share so that some considering using it know some of the challenges too.
YoungHouseLove says
Great tip Jessica! I was definitely doing my best to work as fast as I could. It’s amazing how fast it starts to set.
-John
emily says
That first image of John…I feel like it’s missing a twerk!
Love this makeover. It is such an incredible transformation.
The momentum is building and i am getting excited like i do when i am pulling out a jenga piece.
Jenga Jenga Jenga
YoungHouseLove says
Haha thanks Emily! Although I think the world is a better place without twerking John… although the thought did make me laugh out loud!
xo
s
abby says
Dont make the same mistake we did….because it’s outside, the grout you use will need a sealer–and it will have to be applied every year! We dont like that far away from you in Richmond–and didnt know about this little dity!
YoungHouseLove says
Thanks for the tip Abby!
xo
s
Holly Tompkins says
Thanks so much for sharing! I have a few uneven places in my basement floor that I’d like to level out. I thought self-leveling concrete was scary stuff, I’m feeling a little more confident now!
Hayley says
Question on the self-leveling stuff…So. If one used this and the patio sloped (either to or away from the house), would it roll down and puddle until it was level with the rest of the patio? I don’t full get how that stuff works, it must be magic or something…
YoungHouseLove says
It’s sort of thicker than you’re imagining I think (not globby, but it’s not runny like water or anything) so it wouldn’t just follow a slope by dripping down it, it would sort of glob out to fill low points and then harden so there’s no more dip in the ground there anymore, if that makes sense. So we used it to fill in low points so they were level and then applied it close to the house (but not on the outside edges of the patio) to build up that area slightly so there was a tiny slope away from the house so water wouldn’t pool back there. Hope it helps!
xo
s
Nicole Dehlin says
Looks like you guys need a reducer strip like this:
http://www.ceramictool.com/ctc-ramp.html
or this: http://www.ceramictool.com/ctc-tranz.html
YoungHouseLove says
Thanks for the link Nicole! There has always been a slight lip between the sunroom and deck (even before we took the doors out) but we’re planning to add some sort of transition piece if we have an issue with it after tiling!
xo
s
Kevin says
You should have used an anti fracture membrane where the brick and concrete meet. That will be a joint that will want to move thru the seasons and could cause you some problems.
YoungHouseLove says
Thanks Kevin, the brick foundation already had the concrete slab on top (it’s been there 30 years and seems to be holding up awesomely without any shifting) so we’re thankful for that! Hope nothing shifts, but of course we’ll keep everyone posted if it does!
xo
s