Since we last checked in on the sunroom last Thursday, Sherry and I have managed to check four more things off the list: installing two ceiling fans, cleaning the concrete floor, leveling it, and cutting the tile and planning out our pattern (aka: dry fitting). But excuse me while I backburner the fan installation tutorial (I promise it’ll pop up in a few days) because we’re just too psyched to share those three tiling prep steps with you guys. We made some serious weekend progress – more than we thought we would – and we couldn’t be more excited about the tile pattern that we landed on. In fact, I’m probably outside tiling as you read this… so hopefully within a week it’ll all be fully installed and grouted and ready for the big reveal!
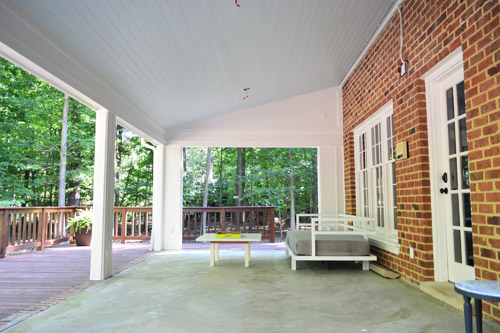
So let’s talk about how we got this tile train moving (and if you didn’t realize you boarded the tile train, you can check out this post for why we’re headed to that destination). Our trio of prep tasks were to: remove a lingering smell, level the ground since this is now open to the elements and we didn’t want water pooling in certain places, and determine our tile pattern (border? no border? running brick pattern? modern grid?). Let’s start with deep cleaning the concrete to eliminate the odors it was holding onto – because, as you may recall, this room was once covered in a wall to wall carpeting that got wet over time due to broken doors and wood rot, so it was definitely something we needed to attend to.
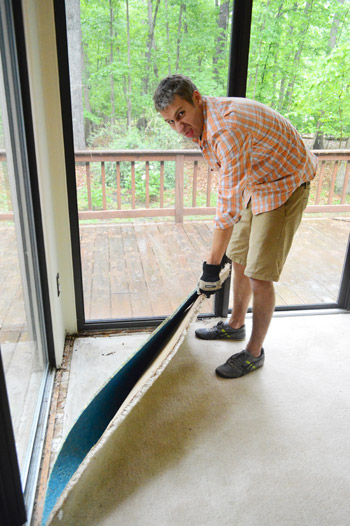
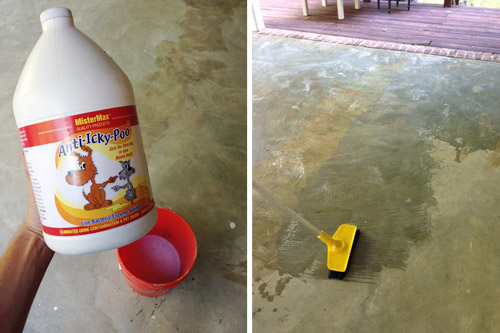
In our post about removing the old carpet a bunch of you actually recommended using this product (MisterMax Anti-Icky-Poo) which many of you described as having a hilarious name but also being the best thing you’ve ever tried on deeply penetrating odors. Even though we’d be tiling over the cement, we wanted to make sure every time it got hot outside there wasn’t any old whiff of something that wafted up from the cement floors). Most of the more obvious smells had thankfully vanished once we removed all of the glass doors to permanently air things out, but since we’d already bought the bottle based on your recommends, we figured it couldn’t hurt to scrub some on just to be sure nothing would re-emerge on a muggy day. It’s really easy to apply (scrub on with a brush + let dry = smell’s gone).
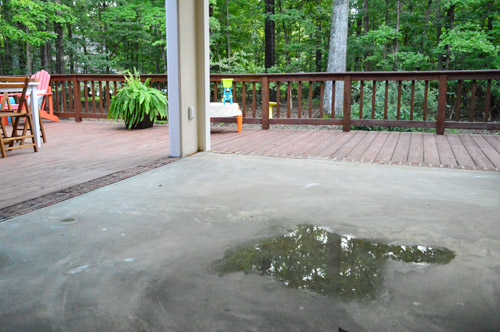
The other issue we needed to solve before tiling was taking care of some not-so-level spots. With the glass doors removed, the space does collect a bit of moisture when it rains. For the most part it dries off quickly, but small puddles do form in a couple of low spots – most of which seem to be closer to the house (in spots where we’ll probably have furniture). And furniture sitting in little puddles after every heavy rain = not so great.
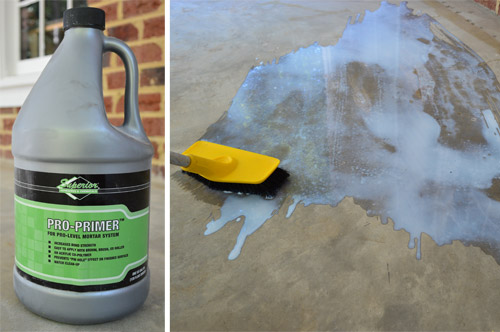
So we decided to give self-leveling concrete a try. It sounded scary (and messy) to us at first, but after watching a few videos online it actually didn’t seem so bad. We got all of our supplies at The Tile Shop which, in addition to the concrete mix itself, included a primer they recommended to help the new cement bond to the existing surface. Unlike a paint primer, it was a really watery substance that I could brush on super fast.
One bag of self-leveling concrete was supposed to cover 15 sq. ft. and I wasn’t planning to do the whole sunroom floor (since I just wanted to fill in some low spots and, if anything, create a very slight slope away from the house). So I ended up getting five bags – but only using four of them. I also got two buckets so I could mix two batches at once, but only used one because the 5-gallon Home Depot bucket ended up not being big enough. So if you’re attempting this at home, go straight for a 6-galloner (the Tile Shop one fit the bill).

Speaking of buckets, I also bought this “measuring bucket” that’s designed to measure out the perfect amount of water for one bag of concrete (if you fill it too high the water drains out of the hole and then you’re all set). I felt a little silly for paying $2 for a bucket with a hole in it, but it ended up being worth the peace of mind that I got from not having to worry that I made my mix too soupy or not soupy enough.

After pouring the water in my 6-gallon mixing bucket, I added a bit of the cement powder at a time – mixing it really well before adding more, until the bag was empty. You basically have to mix this stuff with a paddle-mixer (i.e. giant whisk attached to a drill) so I was glad to have already purchased one for my upcoming tiling job.

This stuff is actually really watery. You picture cement being kinda like a thick cake batter consistency, but this was more like sunscreen that’s been sitting out in the heat. But it’s that liquid-y property that actually helps it level things off mostly on its own.
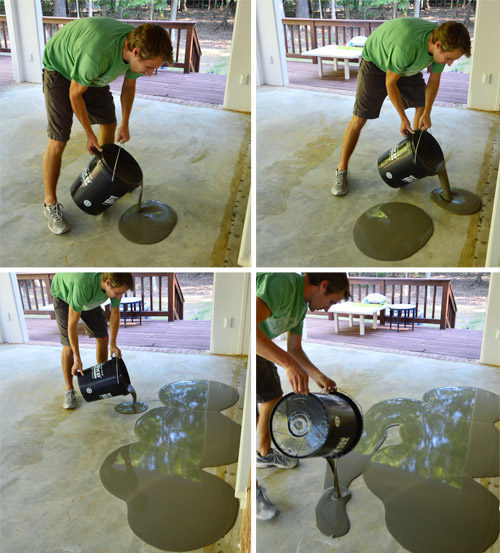
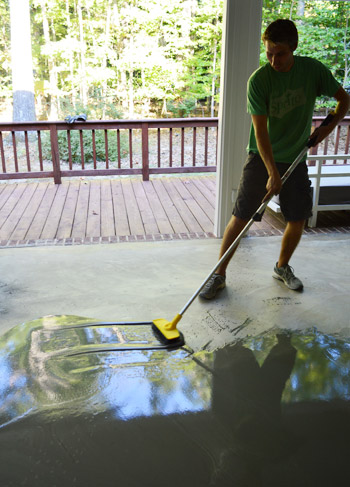
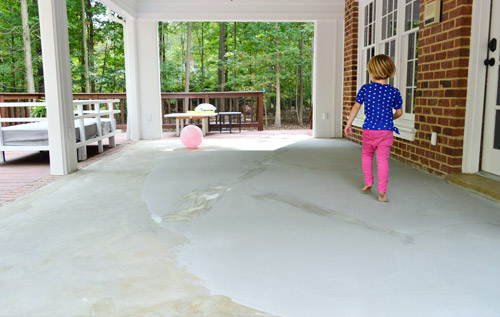
It doesn’t do all of the work for you, but it definitely works with you as you go. I used a broom to push some of my puddles together and into corners. But it wasn’t hard or meticulous work by any means. Wherever I swept, the liquid just magically reformed into a level, flat surface. It’s almost like that liquid that Alex Mack or those kids from those old Capri Sun commercials would turn into, just less silvery.
I ended up using four bags in total and you can see how the area closest to the window was already starting to harden by the time my last batch (to the left of it) went on.
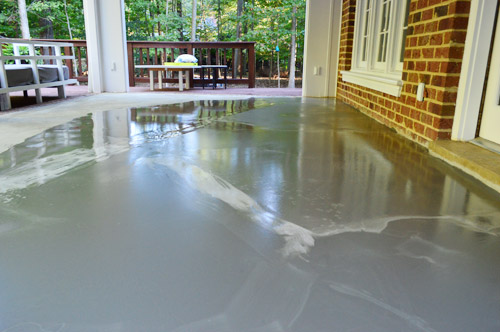
But it wasn’t until the next morning that it was completely solid and ready to walk skip on.
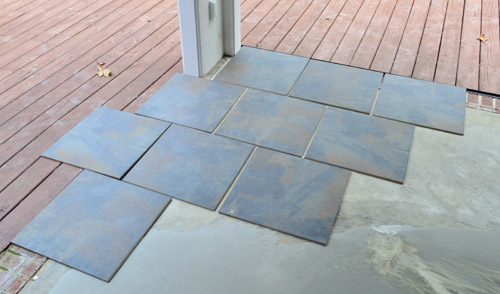
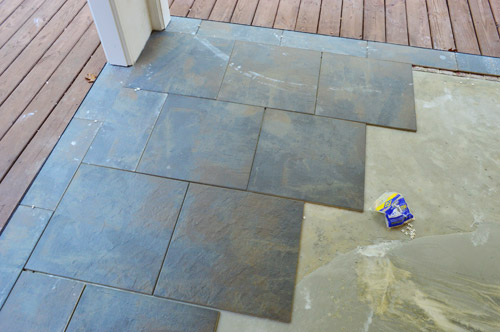
With that out of the way, we could finally start placing tile. Well, start planning to place tile. Sherry and I were 99% sure we wanted to do a brick-layer pattern with our 20″ x 20″ square tiles. But we weren’t quite sure where we wanted to start the pattern and whether or not we wanted some sort of a border. So we broke open a box or two and started playing around.
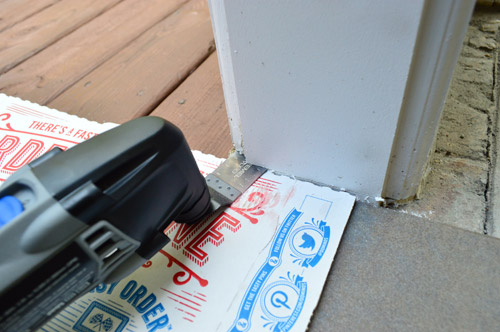
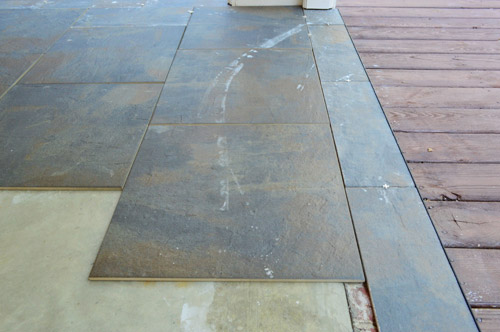
The first thing that the exercise confirmed is that we needed to cut out the bottoms of our door jambs. We did this for our wood floors inside too. It basically lets the flooring slide under the trim, saving you from having to intricately cut your tile around it and ultimately gives you a cleaner look. To determine the height I set my flat saw (aka Dremel Multimax) against a tile and a piece of cardboard (to protect the tile from the saw and to adjust for thinset height).
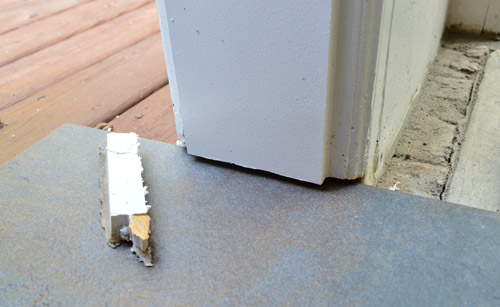
See? You end up with a much cleaner edge once that chunk of trim is gone. And once the thinset raises the tile a smidge more it should be a nice tight fit (which we’ll then seal with clear exterior caulk to protect the wood from any moisture/rot).
The other thing this exercise confirmed for us is that we definitely want a border. It not only helps to define the edge more crisply (and ended up looking a lot more high end to us) we realized it would also make the tiling job a lot easier when it came to cutting tiles around the posts (instead of notching things out, I could make the border the same width as the posts and just lay them down to create that outside edge which squared off everything so that interior rectangle of tiles would require fewer cuts). So after a lot of moving and cutting and shifting and more cutting, this is the final pattern that we came up with:
I had to create the border pieces myself by cutting the square tiles on the wet saw. But luckily I was able to get three border pieces out of one tile, so we didn’t have to sacrifice too much scrap to this cause!
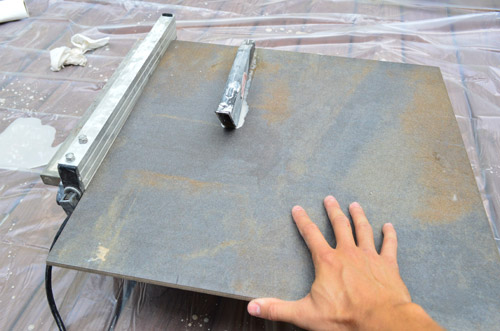
It wasn’t the most fun task to slice up eight tiles this way (to make 24 border tiles to complete the perimeter) but we think it was a huge improvement over the unbordered look. It defines the edge nicely (which is helpful because there is a slight step up from the deck into the sunroom) and, by doing all of these cuts during my prep stage, it’ll hopefully make my day(s) of tile-laying go a lot faster. Oh yeah, and forgive the hazy water mark from the hose in the shot below, it wiped right off.
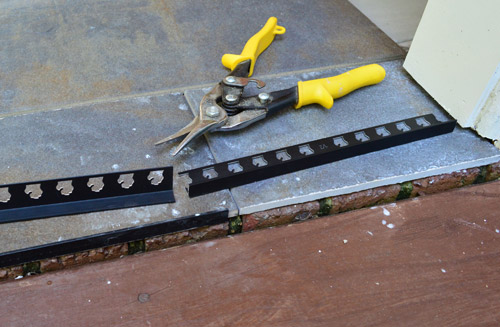
But before I leave the topic of edges, one thing we were concerned about was how the exposed edge of the tiles would look from the deck (and if it would get beat-up over time). So we bought these metal edging pieces (that can be easily cut to size with some metal snips) to give our edges a finished look. I realize they look very in-your-face in this photo below (they’re more of a matte charcoal tone, but for some reason they look shiny and black below) but if you look at the photo above you can see it actually blends pretty nicely with the tile to create a thin charcoal rule around the border that looks clean and finished (without exposing the chalky cut edge of the tile).
My goal is to get all of the tile set by the end of the day tomorrow and then it just needs to be grouted and clean up for us to share those big before and after pics with you guys – hopefully by the beginning of next week. And fan enthusiasts – fret not. I’ll be back with a pretty detailed post about how we installed them (turns out they weren’t as bad as we feared). What did you guys do this weekend?

Rosemarie says
lol Love your shout out to Alex Mack!
Jennie G says
Oh my god, Alex Mack! What a throwback! I got so excited I had to interrupt my post reading just to write this comment! :)
Katherine says
Love the tile border. Any reason that you’re covering the tile edges but not the brick edges?
YoungHouseLove says
Those bricks are already set, so we can’t get under them and cover the edges or use a border piece – but thankfully they blend in so much with the deck (since they’re the same color) that we hope it’ll all look nice and cohesive when it’s all said and done.
xo
s
Ginny @ Goofy Monkeys says
It looks great! I’ve often wondered about self leveling compounds, we may try it in a few spots in our basement.
Weekend? We had a fair mix of fun and productive time. The perfect weekend!
Courtney says
BAHAHAH, Alex Mack! I can’t tell you how often I think, “Wouldn’t it be convienent to be Alex Mack right now”
Jenn says
You guys amaze me. But on to serious business…can Sherry dress as Daenerys for Halloween, John as Littlefinger, and Clara as Tyrion!?
YoungHouseLove says
Haha! Clara was saying she wanted to be a lawyer and now she wants to be a jellyfish, so we’ll have to see where she lands. It would be funny to see John as Littlefinger though.. and I’ve always loved dragons…
xo
s
Nikki says
LOL at the Alex Mack reference!
Heidi says
The payoff is going to be amazing once all that tile is done! I can’t remember, but how thick is the tile? I might have guessed that outdoor tile would be thicker, but I guess with the cement support it doesn’t need to be.
http://jax-and-jewels.blogspot.com
YoungHouseLove says
Yup, this is standard tile for use outdoors, and although it seems a little thicker than average it’s not super chunky or anything. I think it just has to do with the density/strength of the material (ex: ceramic tile is bad for outside in our area since it can crack/break, but porcelain tile is stronger and better with flexing temps, so it’s generally known to be great for the job here).
xo
s
Tabitha Cavaness says
Whew! I was worried the self leveling concrete removed the pitch to the porch. Glad to read that John ensured the porch will slope away from the house. Even with a brick exterior water draining into your house could have cause a “pickle”. Great job! When will you begin to discuss nursery plans on the blog? We are TTC our second. So, I am in a baby/nursery frame of mind! LOL!
YoungHouseLove says
Aw thanks Tabitha! We covered that question in our post on Friday (just one behind this one). Hope it helps!
xo
s
Evelina says
Good luck John! You can do it!
That border looks so good. So smart to make it the same width of the columns. I would have never thought of that!
KathyG says
Good Work John! I actually Love to tile, and have tiled quite a few things in my day! indoors, outdoors, even some broken tile mosaics – It’s relaxing to me, really! I hope Sherry will feel good enough to help too? Just handing tiles, supplies is a huge help. I never liked those knee pads, but some kind of kneeling pad will be essential.
And one tiny notification, “concrete” is the stuff already dried, “cement” is a simply a component of concrete…like flour is to bread (cement+sand+water+admixtures=concrete). Pet peeve of mine.;) Can’t wait to see final product! Enjoy the journey.
YoungHouseLove says
Oh yeah I had fun helping to assemble and hang fans as well as doing the dry fitting for the tile and laying things out. I stayed inside during cleaning and self-leveling so I didn’t have to smell those fumes (more for my nausea than anything else) but I love getting in on the action when I can! As for the concrete/cement thing, we’re both so bad at that! Thanks for the flour/bread metaphor – it totally helps!
xo
s
Jess says
Haha! My dad is in the concrete business and uses the flour/bread analogy ALL. THE. TIME. Love that!!!
Oh and I really like the pattern. I wasn’t sold on the tile before. But I see it now!
Rachel says
Awesome! So glad for the info about the self-leveling concrete. We have a few low spots on our front porch that always collect water and they drive me crazy. So thanks for the tips! We’ll definitely put them to use.
Also, I am so glad you’re doing this project. We have had “tile the front porch with slate tiles” on our to-do list since we moved into the house. Thanks to you guys, now we know to get porcelain tiles that look like slate AND how to use self-leveling concrete. You didn’t know it yet, but your project is making ours so much easier! Thanks guys! :-)
YoungHouseLove says
You’re welcome Rachel! Good luck with your porch.
-John
Chasity says
I love the Alex Mack reference!!!
Alexe @ Keys to the Cucina says
I’m digging this tile, totally brings an indoor feel to the outside! Congrats on baby #2 as well!
YoungHouseLove says
Thanks Alexe!
xo
s
Nicole B. says
Did I read that is brick? It looks a lot like slate. Purty!
YoungHouseLove says
Sorry, it’s a slate like outdoor porcelain tile! There’s brick under it around the border though!
xo
s
Eric @ AddSomeCharacter says
Dominoes pizza, the ultimate DIY accessory/necessity
YoungHouseLove says
Amen.
-John
Instants de Louise says
Whoo ! Your sunromm is definitely going to be more awesome with those tiles (if that’s even possible) !
I definitely prefer the border look but I would question myself about the bricks under the border. I don’t think it gives a really nice and clean look. Do you like it like that or do you plan to do something about it ?
This week-end, it was final painting time in our dining and living room and reinstalling everything : http://instantsdelouise.canalblog.com/archives/2013/10/02/28129995.html !
YoungHouseLove says
We can always paint those bricks the same color as the border tile down the road if they bother us – they just blend so well with the deck in person right now (same reddish-brown tone) that it feels like they all “go.” But once we’re done we can always reevaluate and take a tiny brush with charcoal paint to the bricks to blend them in with the border!
xo
s
Instants de Louise says
I hadn’t thought about the paint option…
In the close picture (the last one), I found the bricks kind of pop out quite a lot, but I forgot there was a big picture to consider : if they blend well with deck, no problem !
Happy tiling !
Nancy says
I haven’t read thru comments, so maybe someone has already asked this, but I’m curious…
Does the tile work out evenly across the length and breadth of the room? Or do you need to start in the center of the front edge so that the end pieces on each side are equal in size to each other (so you don’t have ‘whole/half/whole/half’ at one edge and then ‘less-than-whole/less-than-half-etc’ at the other – at least they would match, even if less-than-half/whole) am I making any sense?!?!? ;-)
YoungHouseLove says
Great question! It looks like it should work out with half, whole, half, whole all the way across except at the end of each row the last tile will need a tiny shaving off the end. So visually you won’t be able to tell it’s not a full whole (or a full half) like the others in that row, but in reality it’ll be about a centimeter shorter. We were so happy it’s working out to be that clean!
xo
s
Debbie Vietmeier says
I just love a row of soldiers (aka border)on paving jobs. Makes the job look professional and complete. I work in landscaping/hardscaping and I always show potential clients how much better their new project will look with a border. I can’t wait to see your finished sunroom !!!
YoungHouseLove says
Thanks Debbie! It’s our first time doing a border and we’re total believers now! It just looks so nice and polished! So glad we took the time to map it out. We totally could have skipped it and just laid the tile if we were in a rush. #bulletdodged
xo
s
lizaanne says
Oh my gosh!!! That trim has little Michigan mittens on it!!! THAT IS SO COOL!!!!! :-)
~Crazy Michigan Girl <3
Samantha Cobos says
It is looking great, BUT will the metal edging pieces rust??
YoungHouseLove says
They’re made to be used outside (they’re coated with something to make them that charcoal color) so they should hold up well! Will keep you posted!
xo
s
Tatiana says
Dark tile is fun when it’s hot and sunny – you can fry eggs directly on it. 8)
YoungHouseLove says
We’re hoping since there’s an awning that the tile will stay shaded for the most part but we’ll have to report back. We mostly wear shoes outside since the deck is wood (splinters, etc) so I hope it doesn’t end up being crazy hot!
xo
s
Marianne in Mo. says
As I started reading, I hoped you would go with the border, and I was glad I saw you chose that idea. It will look so awesome!
My hubs and I are old hat DIY-ers. Not having money and not trusting someone else to see our visions MADE us learn to DIY. Now, 37 years later, we are often called upon to advise friends and family on projects. We tell them to ask dumb questions of those in the know, watch videos, go visit the library – that’s how we learned, and rarely failed. May not have been a professional job sometimes, but we learned a lifetime of skills! My hubs even had a deck building business on the side for a few years, learned from DIY! So,keep plugging away, learning and doing, you will never regret it! BRAVO!!
YoungHouseLove says
That’s so awesome Marianne! So inspiring to folks like us.
xo
s
Avone says
So exciting to hear stories like this, Marianne. My hubs and I are somewhere in the middle between you guys and John and Sherry (haven’t been DIYing for 37 years, as I’m only that old), we are closing on our seventh house this week. We learned everything because our desires outweighed our bank balance. In the beginning it was a chore and the end result was the goal, but DIY is now a love in and of itself!
meghan says
can you give some more info on the tile saw you are using? researching what to get for an upcoming project right now and would love the info!
YoungHouseLove says
It’s just the basic tile saw from The Tile Shop. John’s dad bought it years ago and we got it as a hand-me-down from him back when doing our bathroom remodel in our first house and have loved it ever since!
xo,
s
Hillary says
Whoa, you had quite a weekend! The self-leveling concrete info is really helpful…it’s cool to read about stuff here that you haven’t done before! The tile looks great; I really like the border.
Re: the lip where the flooring changes, I think you’ll probably end up wanting a transition there. We have a few different areas in our home where the flooring changes (the floor plan is a circle so having different floors in the kitchen means two flooring changes). We thought a small lip wouldn’t matter but we ended up tripping on it a lot, or stepping right on the juncture and hurting our foot, even though the two floorings are quite different colors and materials (wood and slate). For some reason having the sloped transition piece of wood made a big difference. Maybe it will be different in an outdoor space but thought I’d share our experience anyway!
YoungHouseLove says
Thanks for the tip Hillary!
xo
s
April says
Can’t wait to see the results!!
And just think you’ll have it finished to enjoy for the Spring and Summer parties next year!
Carmen says
I am so excited for this reveal! Looks great so far!!
GreenInOC says
There’s a hole in the bucket dear Liza…
As soon as a read the sentence about the hole in the bucket I thought of, “there’s a hole in the bucket dear Liza” – if you don’t know what I’m referring to:
http://www.youtube.com/watch?v=MAfCQ-t7xY0
The tile’s looking great! After you leveled the concrete, did you spray it down again to confirm it was all good or is the product “fail proof”?
YoungHouseLove says
Haha, we sing that song at music class! And as for the concrete we didn’t spray it down (we wanted it to be dry and ready for thinset/tiling) but we used the longest level we have and made sure that slight slope was next to the house and there were’t little dips in those old puddle spots anymore.
xo
s
GreenInOC says
Well I guess a level would work – doh on me!!
Leave it someone who sucks at DIY to ask a really stupid/obvious question!
YoungHouseLove says
No worries GreenInOC! I totally wondered if we should spray it all down and just watch what the water did, but John thought it might take a while to dry out, so he was the genius with the level idea! Haha!
xo
s
Joe Faraoni says
Nice work. You guys are a huge inspiration to me and the wife.
Waiting till next summer to do our porch/deck area.
This weekend we installed a bathroom exhaust fan. Let me tell you… you don’t realize how much you need it until you put it in and can see and smell an instantaneous difference.
Thanks for what you guys do here.
–Joe
YoungHouseLove says
Haha, go Joe! We installed one of those once, it’s an awesome upgrade!
xo
s
Barbara says
It never ceases to amaze me the things you guys take on. Every time I read a post of what you’ve done, I’m exhausted! I do NOT know how you do it, so I’m just chalking it up to the fact that I am part of that 1% in their 50s that reads your blog!
Tania says
We had to retold the kitchen floor at one of our rental properties this weekend and the giant paddle mixer thing burned out the motor on our DeWalt somehow, so we had to mix it all by hand….my forearms burn and I have blisters but the tile looks nice and that’s what matters. :-P
YoungHouseLove says
Oh no! I hope the motor can be fixed (or comes back to life when it cools off). What a pain!
xo
s
Megan Williamson says
You guys have been first on my morning blog hop for just over a year now, and I can tell you that we have learned from you guys to prep!! we.. ( I ) used to come home with a gallon of paint and just start painting now my husband says ” megan what would young house love say if they saw this!?” ( that’s what we call you!! haha) So thank you!!
Also this morning it came to me! The secret project is a line at Target!!??? ya? maybe? wouldn’t that be the greatest thing EVER!!!??? Here’s to hoping!!
YoungHouseLove says
Holy Tar-jay, that would be bananas! I hope when we reveal it that you guys aren’t all like “oh, that’s it?!” – haha!
xo
s
Evie says
Tile looks AMAZING. I can’t wait to see a long shot showing the blue ceiling with that tile!
Christine says
Your work outside in your sunroom inspired my husband and me to take down a stone column on our front porch. The grout was getting loose so it was safety hazard, but the column was also way bigger than needed. We replaced it with a substantial 6×6 and reused the rock to create a border for our flower beds. Such a simple, relatively inexpensive change made a huge impact on our curb appeal! Thanks for keeping me motivated :)!
YoungHouseLove says
That’s so awesome Christine. Must feel awesome to have that done!
xo
s
Heather says
Love that you’re going with a border; it looks great! Our weekend was filled with finishing putting new windows in the old house so we can side between the addition and old, and Andy cutting and putting up the insulation. We also did some fall garden harvesting, and started another project inside that has to be done before winter. Can I nap yet? Wait, I napped a lot this weekend. Can I nap again?
YoungHouseLove says
Ooh is that the peekaboo hole I saw on Instagram?! So excited about that project!
xo
s
Heather says
Haha yes, the inside project does have to do with that hole on Instagram :)Don’t get too excited – it’s a pretty practical thing (though we’re excited none the less). I laughed pretty hard at Liz from Bon Temps Beignet’s guess on what it was.
I need to start opening up my laptop in the evenings instead of keeping it as a paperweight on the coffee table and get some more posts up. I can never seem to prioritize it over everything else that needs to be done in the few hours/energy I have!
YoungHouseLove says
You’re plugging away on so many projects I don’t blame you for stepping away from the computer at night! I vote the new hole is a burrito chute. Purely for passing warm beany treats from room to room.
xo
s
Heather says
Bahaha burrito shoot. I love it. To be fair, this project will allow me to produce one of the components of burritos.
YoungHouseLove says
Haha, I like that hint! Clearly it’s a bean dryer.
xo
s
Anna says
You guys are my DIY heros! I’m so envious of the porch. It’s already looking awesome. John- I’m still trying to understand how the self-leveling concrete works. Did you have to spread it across the whole porch or just in certain areas? We have a concrete pad that was once used for a hot tub. It’s rough and sloped to the house. Would this work to smooth it out?
YoungHouseLove says
Yes, I think it would be perfect for the job. Just think of it as filling any dips/low points. So for those areas where some water collected we used the concrete to fill those and smooth things out and for the whole area near the house we just built it up a bit so it filled the low point and sloped gently away from the house.
-John
Sarah @ 702 Park Project says
You have no idea how excited I got when you pulled out the Alex Mack reference! Day = Made.
Annegirrl says
After months of inactivity on anything in our house we finally replaced the gross, stained, leaking toilets in our master and kids’ bathroom. Dual flash comfort height for the adults and a nice low 14.5″ seat for the little ones. While we were at it we installed the final faucet in our kids’ bathroom as well. The old one was just too hard for them to reach and turn on by themselves. The extra faucet length made rinsing it out after brushing teeth easier too. Kids aren’t able to get that toothpaste spit quite as close to the drain as adults.
YoungHouseLove says
That sounds like an awesome feeling Annegirrl! Congrats on getting it done!
xo
s
Anna says
100 points to you for the Alex Mack reference! Oh, and the floor looks great too. ;)
Heather W says
Hey Guys…looks great and can’t wait to see it done! My hubs and I planned on repainting our shed and cleaning out our garage. But thanks to torrential rain we stayed in and cleaned and as our luck would have it the library finally called to tell us that last seasons Dexter was in and our for two weeks so we are about in the middle of it and we already have this season’s recorded so we can watch that when we are done… Deb knows now WOW… can’t wait to finish that project! ;)
YoungHouseLove says
Ahh, it only gets crazier from there!
xo
s
Heather W. says
Ahhhhhhh… I CAN”T WAIT! So far I have not heard or seen any spoiler alerts to the ending. I saw one Facebook comment from a friend that she did not like how they ended it and was quite upset. Did you like/dislike how they ended it? Don’t give it away though please….
YoungHouseLove says
I was shocked for a while but mostly liked it. John was unsure but then we read a review about it and what the writers were doing/intending and I think it sat a lot better with us. We’re fans of the series, through and through.
xo
s
CALI says
If its possible I love yall even more for referencing Alex Mack!
oh ya, and the tile looks great! :)
Caity says
As a 90s kid…mad props for the Alex Mack and Capri Sun references. *high five* It was exactly the description needed to let us know what consistency you dealt with :)
Nikki says
Looking good! I’ve never heard of self-leveling concrete! I’m amazed and thinking it could really help our carport unevenness.
Sayward says
Alex Mack for the WIN!!!
Lilly says
Looking great! Question–were you able to make a slope away from the house? Or did the “self-leveling” feature prevent that? [Sorry if this was already asked/answered.] Can’t wait to see the tile all finished!
YoungHouseLove says
Yes, I was able to slowly build it up a bit there. We didn’t want it too dramatic (or the tiles wouldn’t sit well) so it was good for just a slight slope.
-John
Liz says
Woot! It’s looking awesome so far. I can’t wait to see the finished product :)
I also love that drill attachment because it looks like John is mixing a giant batch of cake batter, and now I want cake! Haha.
YoungHouseLove says
Haha, that’s what Clara said when she saw it laying around in the garage later. “Can we use that to make a big cake?!”
xo
s
Mamaw says
Love how the room is turning out, love the border around the tile, and love the measuring bucket. The bucket is genius!
Jess says
Love the Alex Mack reference! My Alex Mack story is that I started wearing hats all the time because I loved all the hats she wore on the show. I cannot pull off that look. It took me a while to accept that and now I cringe when I look back at those photos.
We bought that same tile edging for our fireplace re-tiling project and never noticed that they had michigan-shaped holes. I will be pointing that out to my husband tonight!
YoungHouseLove says
Haha, I CAN’T do hats either, try as I might in 5th grade. Oh the things we do in the name of being as cool as TV characters…
xo
s
Maximalist says
This room is really coming along! Great pattern choice – simple and sophisticated. Can’t wait to see it completed. Fuerza!
Paula says
Drooling over here! The tile and wood look great together! The sunroom re-do may be my favorite project to date. And either John has some mad tile cutting skills or I need a wet saw! Can’t wait to see the ‘after’ pictures.
YoungHouseLove says
Oh Paula, you need a wet saw! We love ours! I can totally rock that thing too, so I promise it’s gal friendly! And we have used it for so many projects (bathroom gut job, backsplash, fireplace surround, and now the sunroom).
xo
s