When Jennae sent over her bedroom before and after photos we had to share her DIY headboard project. Here’s her letter:
My husband and I live in a rental, we’re on a budget, and we love all things green (as indicated by my blog) – so decorating the bedroom wasn’t the easiest task. Our biggest challenge was what to do for a headboard. We searched the web for headboard ideas & tutorials (including yours) and then I finally remembered a product I’d featured on my blog a while back: Wall Flats from Inhabit Living. Wall flats are essentially paintable 3-dimensional wallpaper, although it feels more like stiff lightweight cardboard. They’re made of bamboo pulp and completely biodegradable at the end of their life cycle, so they met our green criteria. And a box of 10 tiles typically costs $86, but ever on a budget, we bought their “second-quality” wall flats (think irregular clothing) at $4.50 apiece. A miscalculation on my part meant we bought 12 tiles, but we only wound up needing 9. Still, even though we bought too many, our headboard still only cost us $55, plus $10 worth of foam tape, and we’re thrilled with the way it turned out. You can see how the whole room came together in this post. You’ll see we changed quite a few things in the “after” photo, but the headboard and the bedding were the biggest changes. – Jennae
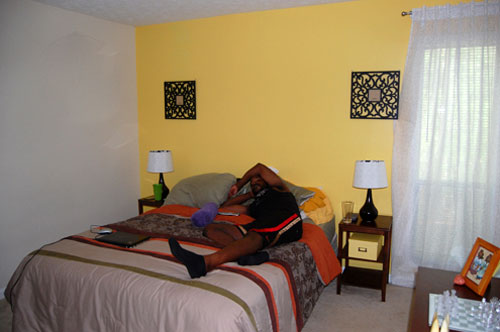
Here’s her room before the big headboard undertaking (ignore her husband, he was warned he’d be published if he didn’t move):
And here’s the same room after a little DIY headboard magic:
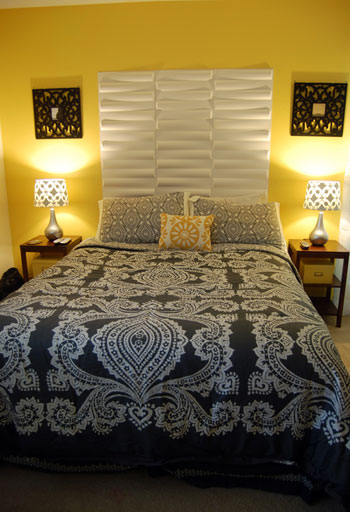
Didn’t Jennae do a great job? We love that she used discounted wall flats to get a great textured look on a budget- and since she’s a renter they’re completely removable (so they can go with her when she moves on). And considering that most headboards are hundreds of dollars (and she used eco materials- which are usually a lot more pricey!) we think she scored one heckova deal. Plus we love how modern and textured it all looks- especially when paired with such a lovely duvet with those great printed pillows and lamp shades. What do you guys think? Anyone itching to take on a project like this? It makes us wish we had another bedroom to tackle.

Heather says
She did a fabulous job!
Tia says
I love all of the color for a rental place! I’m wondering if they can lean up against their headboard? It sounds like it would get crushed if you sat against it to read. It looks neat though!
Tiffini S says
While I LOVE some of the “on the wall” headboard styles I’ve seen here and other places, I just want to know, does it bother anyone else to not have it attached to the bed? We had just a frame for a while, and between pillows falling into the crevice, the occasional neck pain from a head cranked over the edge of the mattress, and our son who seemed to be on a mission to get himself wedged between the bed and wall, it was NOT for us. We saved our ducats and just recently bought a whole sleigh bed. Not an expensive one, but just have the head and foot boards attached, along with side rails seems to make our mattress sturdier and definitely gives me a ‘bumper stop’ from sliding up (or down) too far in bed. Maybe we should just stop sleep-running, but it’s WAY better for us. I really do like how pretty and unique (and definitely cheap) you can make a wall only headboard, it just didn’t work for us. Are we alone in that?
staceys says
LOVE it! That turned out so bada**!!
I second the question Tia has- can you lean up against it- is it sturdy enough to prop yourself up and read a book?
Laura @ youngDCliving says
Wow, she did a really great job! I love the textured look and the addition of the new bedding–it’s really seamless. I also love the yellow/black combination, that can look so good. Well done!
I definitely want to try making a headboard one of these days :)
liz @bon temps beignet says
That’s awesome! Her before and after pictures look like 2 different rooms. I need a headboard for my guest room and that would work perfectly.
Thanks for the idea Jennae!
Caroline @ youngDCliving says
It looks great! I love the color scheme of the room, too, and the headboard really brings out the pattern in the duvet.
jessica says
This is awesome! I love the bedding too!
Jill Stigs says
Very cool! It reminds me of a powder room from Rate my Space that had wallpaper tiles in it. I think if anyone is struggling with a huge wall and no art, to use these and some molding around it (like a frame) would look good.
Lindsey says
I *love* this! Did you paint the wall flats at all, or did you just put them up as is?
Austyn says
Did she makeover the lamps with spray paint, as well? Beautiful job!
katie says
very nice! the lamps in both before and after look like the same–did they just take some silver spray paint and masking tape to the lamp and shade? if so, even better! it’s quite a classy look. =)
YoungHouseLove says
Here’s hoping Jennae stops in to answer your questions soon. So glad you’re all loving her affordable headboard project as much as we are!
xo,
s
Krystle says
She did a fabulous job! I especially love what she did with the lamps (even though it wasn’t the focus of her renovation)! Thanks for sharing!
Krystal says
That is amazing! Jennae really did a fantastic job.
Claudia says
I love the idea! The headboard looks so tall!
k+b adventures in renovating says
Everytime I see a neat headboard, i think ‘ok i want THAT one’ which might be why i still have 0 headboards. oops
karen says
Love it! And love the bedding – where is it from, Jennae?
k+b adventures in renovating says
Tiffini, I’ve always been worried about the same thing! I’m interested to hear others weigh in.. I’m forever pulling pillows out of the crevice! Maybe if you got something thick enough it would make up the gap? I dunno….
Margie says
Great job Jennae! I’m a renter too and it’s good to know that there are products to make a rental stylish and on a budget. Thanks for sharing!
Sarah @ The Ugly Duckling House says
This is so cool. YHL, your readers are so clever and innovative. Her lamps are actually very similar to the one on your Amazon list you have on the right of your blog.
YoungHouseLove says
Heck yeah, we LOVE our readers! And we LOVE those lamps.
xo,
s
Jean says
This is a beautiful transformation–so inspiring. I hope Jennae stops by because I just tried going to her blog to read more about the makeover and the site seems to be down.
Melly says
Very sharp looking! I too love the lamps and duvet.
tasha roe says
GOR-GEOUS!!
Jennae @ Green Your Decor says
Thanks everyone for your awesome feedback, and thanks Sherry and John for featuring our headboard!
The wall flats are definitely sturdy enough to lean on and read a book. We tend to put pillows between our backs and the tiles. They are pretty stiff, and we haven’t had any problems with them going flat yet.
To combat the pillow gap that inevitably happens with headboards that are attached to the wall rather than the bed, we actually put a single body length pillow under all our other pillows right up to the headboard. It stops the pillows we actually use from going into the crevice and gives us some extra cushioning to boot!
As for the lamps, we did just take some silver spray paint to them. We’ve had them for years, and I had never been a big fan of the color. The came with some tan microfiber shades, but I picked up the new ones from Target. The pattern is actually printed on the inside of the shade, so when the lights are off, it just looks like a plain white shade :)
And lastly, the bedding is by Amy Butler from her organic collection. You can get it here: http://www.bedbathandbeyond.com/product.asp?SKU=124605
Carol N. says
Love the headboard but I’m loving the bedding even more! I hope she pops in to give us the scoop on everythng in that room.
Jason says
OMG!! Fabulous!! I was going to DIY tufted headboards for my rooms in the new house, but this is way easier and so good looking! I’m doing this!
Amy B. says
I’m surprised no one else has asked this yet, but how do you buy the seconds? I can think of lots of ways to use this cool textural element!!
nancy says
I love those little tables and have been looking all over for that size. Where did you find those???
Ruth says
What a great change. I will have to check those out. I am trying to figure out the guest room.
jbhat says
What a clever solution. Thanks for sharing!
jbhat
Jennae @ Green Your Decor says
Hi everyone! I just went the the Inhabit site, and it looks like they don’t have any seconds right now. They recently updated their site (like a week ago) and their sale section is empty :( They are usually on the sale page, but even at full price, it’s not a bad deal.
And we also got the tables from Target a while back. I think they were something like $30 a pop, and they’ve held up really well. And lastly, we did put the wall flats on the wall as is. They can be painted, but they recommend the more permanent installation for painted flats, since they’d be heavier afterward. So thank goodness we were planning on keeping them white anyway :)
I meant to include a resource list, but if anyone else has any other questions, I’m happy to help!
Becky@OrganizingMadeFun says
Love that – so great for a small space, too!
hi-d says
That is hirlarious that her husband didn’t move. Sounds like something mine would have done.
Oh my goodness…I LOVE that headboard! So very cool. Thanks for sharing.
Alicia (Atypical Type A) says
I have never seen these before, thanks for bringing them to my attention. I have to admit my first thought was ‘Are they sturdy enough to lean against them?’ so good to hear they hold up.
Well done on your fabulous and sustainable makeover (and those lamps!).
Jen at Fresh Crush says
This is so great. I can’t wait to find an excuse to use these myself. If not as a headboard, as a cool textured piece of art? Might look interesting framed out in a really chunky frame. Fantastic makeover. Thanks for sharing Jennae!!
Kita says
I absolutely adore you guys! I have been a yhl follower for about three months now and hope to one day follow in your footsteps to great happiness! YOU GUYS HAVE IT ALL.
Gretchen says
This is fabulous! I am planning on adding a headboard to my husband’s and my bed and YHL plus this great post has given me so much inspiration. I can’t wait to start!
allison says
Great idea – this is gorgeous!
Anna says
Wow! I am completely in love with this! I’ve been wanting to do a headboard for my master for quite some time!
Casey says
LOVE the lamps & comforter! Great job Jennae!!
Roeshel@The DIY Show Off says
She did a fantastic job! It’s beautiful! And the entire room is one of my favorite color combinations. Love it!
Neely says
I love this! I have purchased a wicker folding screen that is just the right size to make a headboard for my full size guest bed, any suggestions on how I can attach it to the wall? I think I am going to take the hinges off so they don’t snag the pillows since they stick out a little. I was thinking maybe some heavy duty velcro since I don’t want to damage the screen (or the wall) too much…
YoungHouseLove says
Hey Neely,
As long as the velcro can handle the weight that’s an excellent idea. Otherwise visit your local home improvement store and tell them what you’re planning to do and hopefully they’ll give you a few more ideas. Good luck!
xo,
s
Carmen says
Hi, I have decided to upholster our headboard, but I am clueless on how or where to start. We already have a nice wooden headboard that we bought with the bed, so I cannot start from scratch. Any suggestions? The second question, how did you find out about the Target home design show last year? Thanks a million. Congrats on the Nate Berkus show. I really do hope that you guys can get it online.
YoungHouseLove says
Hey Carmen,
We haven’t tackled that yet (with a wood headboard) so perhaps you can google around for tutorials or follow links to blogs that have rundowns of that project? As for the Target show, it just popped up in our store so we saw it.
xo,
s
Jen says
Can anyone tell me where that duvet cover is from???? I my mind set on finding a grey one that I love and that just might be it!!!! :) Thanks so much!
-Jen
make_life_count@yahoo.com
YoungHouseLove says
The homeowner stopped in with that info a while back in the comments so I just cut and pasted what she said for ya:
The bedding is by Amy Butler from her organic collection. You can get it here: http://www.bedbathandbeyond.com/product.asp?SKU=124605
Hope it helps!
xo,
s