When Amy sent over her $100 backsplash makeover we were so inspired and just had to share. Here’s her letter:
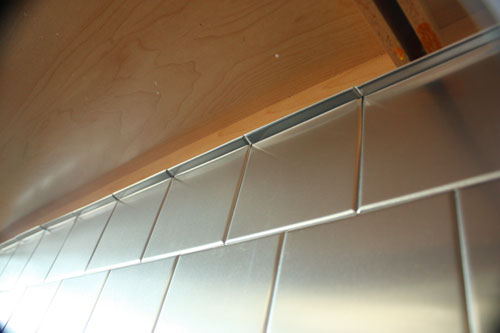
I whipped this out in about five hours and am very excited about the results! I bought nine packages of these light, thin stainless wall tiles. The tiles include double-stick foam squares for hanging, so there is no messy tile work. Some reviewers recommended Liquid Nails, but I was worried about making corrections if thing didn’t line up properly. I can go back if there is a problem, but they feel very secure! You can cut these tiles with a pair of scissors and even bend the tiles! I snipped a cut on each side and bent them around a ruler to make a 90 degree angle for corners and to cut down the size on my top row. It looks fantastic, and now I don’t have to trim around an unfinished edge. One thing to look out for – here is a slight grain to the tiles and you will see a reflection difference if you don’t hang them all in the same direction. This was one of my easiest home projects ever! The entire 27 square feet of tile cost me $94.77 (with free shipping!) and I also bought new stainless switchplates to match, so my total came to about $110.00. Hope you enjoy! You’ve inspired a lot of projects in my house, but this is my favorite so far! Thank you! -Amy
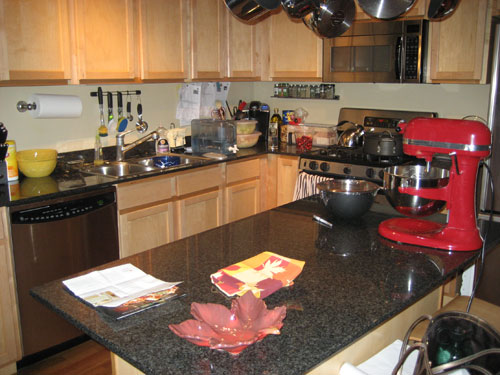
Here’s the backsplash before the amazing (and amazingly priced) stainless tile makeover:
And here’s the whole shebang after Amy stepped back to admire the finished product:
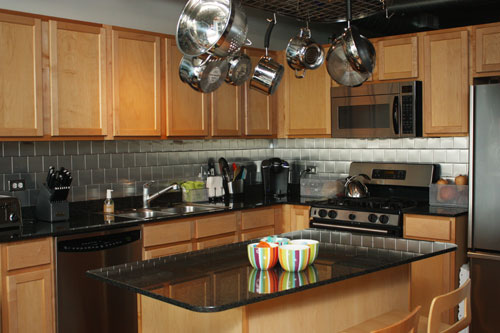
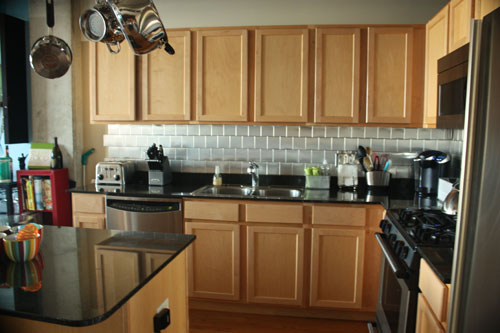
Don’t you love how simple yet sleek that is? We’re excited to hear that it’s a quick fix for anyone (even renters!) who want to upgrade their kitchen and hide dated tile without breaking the bank. Thanks so much for sending the before and after pics our way Amy! What a lovely view you now have when you’re whipping up spaghetti.

Donita says
THANK YOU for posting this make over. I LOVE THOSE!! In fact, was awake until 1:00 a.m. last night *couldn’t sleep* and was thinking of what I could do to the backsplash in our kithchen. We rent, have very low rent, and can do whatever we want to our house. :-) This is a brilliant idea, I love it.
Lemon says
OMG OMG OMG, you have no idea how much I want these. I’ve been toying with the idea of putting up a tile backsplash in my kitchen but couldn’t fully commit to the idea of having it done. With that said, I now *want* the copper tiles. They would go perfect with my countertop that looks like oxidized copper. SQUEE!!!
stylefyles says
That backsplash is BALLER. So awesome. It’s amazing how one simple change can completely turn a room around.
Kristen W says
Wow this looks awesome!! Definitely will keep this in mind, I LOVE the look of the stainless steel against that darker wood but it would still look AWESOME against white painted cabinetry. Awesome price too!
Chrissy says
I’m so happy to finally see someone who has used these tiles! They look great and I’m happy to hear they’ve lasted awhile. We have a rental home we’re looking to put up on the market again (it didn’t sell 2 years ago) and I had wanted to put these up in the kitchen. My hubby’s not so keen on spending money on the house to sell it, but maybe these pics will convince him that a little money will make it look way better! Thanks!
Amy says
Pam, I can completely see your point. However, our loft is a very open plan, and the kitchen and the living room are one big space. Before, our kitchen felt tacked on to the end of the room. The tile really helped define it. Now it holds its own as a separate room.
After several comments, I just had to try it…I pulled out the paper towel bar and decided to hang it. Since the tiles are already up, I decided to try screwing straight through them to see what would happen.
Let me tell you, these things are TOUGH! I had two screws to put in two tiles, due to placement. I used my trusty electric screwdriver and, with work, got the first screw through with zero tile damage. The second screw eluded me. I could not make a hole in these tiles! The screw gave in before the tile did, and I ended up denting the tile when my screwdriver smacked into it! No big deal…I can pull that one tile down and replace it.
Now that I’ve tried it, I think you could probably hang through the tiles quite easily as long as you used a drill to make your holes first. That’s what I get for laziness!
Thanks so much for the great comments – they have made my day!
Rachel says
I wish this would work in our kitchen but we rent and have yellow and blue tile counters. Yuck.
Amy says
Christa – I got the bowls as Crate and Barrel last May. There were several different pieces in that style, but I can’t find them on the website. They help corral all the countertop clutter!
Carla says
Wow, thanks for sharing! I’m wondering how you handle the ends of the tile. Just concerned if you have to cut the end, how to you finish the cut edge…like on the side of the tile.
Carla says
OK, I have to post again, lol. Amy, if you’re reading this do you think I could bend the tile under it so the edges are finished like you did for the corners? I want the tile to end together and not staggered.
Amy says
Hi Carla! I solved this problem up top by bending out and letting it line a small portion of the underside of my cabinets. I also bent it back to wrap around the corner where my fridge is set in, but only by 90 degrees. I don’t know if you could bend it all the way back to fold it under. You would probably end up with the corners sticking out at the bend, since they are rounded, not flat. There would also be a small hollow space. The beauty of these is that they are cheap and it’s certainly worth a try!!!!
You would definitely have a jagged edge if you cut it. That’s what I did under my microwave, because I could tuck them behind and they don’t show. But in plain view it would be objectionable.
My plan was to get a small piece of trim and cover the end. SInce I’m in a very industrial loft, the staggered look worked out for me. But if I decide to extend out to the end of the wall (filling that area to the floor and top of the cabinets), I can stick a (painted) piece of quarter round in the corner to cover the edge. If it’s on a flat wall, you need find different trim, but I really don’t think it would be difficult!
Catherine @ waking up with you says
Wow that’s look great and sounds so easy. Well done. It makes your kitchen look so much more modern.
heyruthie says
my grandma’s 1960’s split level had the EXACT same original stainless tile backsplash. even when they re-did the cabinets, they kept that cool backsplash. i always loved its retro charm. what goes around comes around!
Katharine says
that looks fantastic! and completely changes the look of the kitchen. they did a wonderful job. :)
Rebecca says
My husband and I LOVE this and are going to do this to our backsplash in our new split-level. Amy — do you happen to know how many individual tiles are in each box? We have to tile around a window and knowing how many tiles we have to work with would help. Thanks so much! Your kitchen is a true inspiration!
Amy says
Rebecca – there are 24 tiles in a box, covering 3 square feet. That makes each tile a little less than 4.25 inches per side. So happy you like it!
Take two on hanging my paper towel bar and spice rack was today. I easily pulled out the one damaged tile with a flat-head screwdriver and replaced it. This time I used my drill with a screwdriver bit rather than my cordless screwdriver. It took a little pressure, but the screws went through perfectly, without any tiles bending or buckling. Everything seems secure!
I would say you could hang things straight through these tiles just like you would hang them on any wall, as long as they aren’t heavy enough to need in-wall reinforcements.
Theresa Milstein says
This is a fantastic idea! Normally, everything stainless costs more than less glamorous options. This looks expensive.
AP says
OK wait – can you clean this easily without stuff seeping between the tiles? I’m literally about to buy all this and do it myself this weekend – amazing idea!
phaedra says
Okay, this looks super amazing. My kitchen is a similar floor plan – facing the great room. I thought about investing in more granite to have a luxurious-looking backsplash, but that comes with a luxurious price tag. My only question is if you think this would look just as great with black appliances. I have black granite countertops and black appliances. Thoughts? Suggestions?
YoungHouseLove says
It would look just as good! Definitely go for it!
xo,
s
bob says
best kitchen. I wish this would work in our kitchen
Amy says
My counters and the top of my stove are black, and I think it is a great contrast!
I haven’t had any trouble cleaning them. I’m sure that when I spray Windex directly on the tiles, a little goes between once in a while, but it doesn’t seem to be an issue really.
First of all, they fit together pretty seamlessly. I discovered this when I had to pull one down. It took some prying to get around an edge! I think this is partly because of the way I installed them – rather than doing one row at a time, I did all four rows together, so that installation moved sideways down the wall rather than doing first row, second row, etc. This helped me make sure everything was lining up how I wanted it and kept everything locked together tightly.
If you’re really concerned, just put the cleaner on your paper towel rather than spraying it on the wall, so there aren’t any drips!
Cindy says
That is my kitchen down to the color cabinets and countertop! I have black appliances. I have been thinking about doing a backsplash tiling for some time now but thought – nope. Seeing this done and reading how easy it was for her to do has now got me thinking….I AM DOING THIS TOO! I have a little less wall space then her so mine will cost less than $100.00 and that is exciting to me too! Thanks Amy!
Toby says
I like stainless tiles, they go with just about every kitchen style. For less than a hundred bucks, you can’t go wrong.
This is definitely a dramatic improvement, and well worth it. The tiles match the appliances and add a nice modern touch. Great job, I love it when homeowners take on their own projects. No better satisfaction than doing it yourself!
Some grades of stainless steel won’t hold magnets, it depends on the amount chromium and/or zinc in the alloy, I think.
Hope says
Amy, I’m wondering if you could tell me how easily the tiles warp? See, I have a very small laundry room with an awful vinyl floor, and I’m wondering if these could be a quick fix until we can afford something nicer. I know they’re designed just to be used on walls, but in a pinch do you think they’d work all right on the floor? Or are they too thin and pliable for foot traffic?
YoungHouseLove says
Hey Hope,
Since they seem to have a hollow back we don’t think they’d be good for any sort of weight or foot traffic but hopefully Amy will drop in with more info for you!
xo,
s
melissa says
these tiles are great – we used the same tiles in our kitchen about 2 years ago, and we always get tons of compliments on them. i was a little worried about the adhesive backing near the stove and sink, but they are still holding up great. i definitely recommend them.
Amy says
Hi Hope,
I would be nervous about using these as floor tiles. They are pretty tough, but the first time you drop something heavy they will probably end up damaged, even if they survive foot traffic (which I’m not sure they would). I also think they would be loud, slick, and tough to clean, since any liquid would seep down. It’s not a huge problem on a wall because very little will go through when they’re vertical, but on the floor they would not be watertight.
If you wanted to try this, I would definitely recommend starting with only one package and testing it out, rather than doing the whole room. You would definitely need a tough adhesive like liquid nails, which will make taking them out tough later on. I think I’m voting no!
Melissa – nice to know your adhesive is still holding strong!!
This has been so much fun. Thanks, Sherry! It’s amazing to hear such great feedback. What a big DIY confidence booster!
Dawn says
Just copied this project last weekend in my kitchen. It looks amazing with my black appliances. Thank you so much for sharing, Amy!
Christine says
I found this while searching for the YHL guide to tiling a backsplash. The crazy thing about this is I thought about this for our bathroom tile! I saw tile EXACTLY like this on Rehab Addict. She had to remove layers of paint from OLD tin tiles like this. I love this!