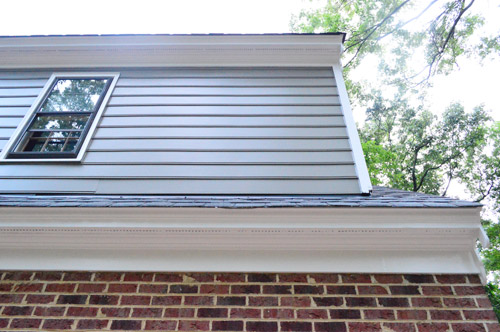
As if all the blue and mauve trim on the inside of the house isn’t enough, we had some outside trim that needed some attention. When we bought this house we knew we had four major things to deal with: the roof and the furnace, a few bad trees, and this last bear: some rotting areas of siding and trim that needed to be replaced along with a fresh paint job for the whole house. But at least we knew about all of them going into the house purchase (and the first two didn’t end up draining our wallets) – so maybe that softened the blow a little? Speaking of soft, I give you… our siding.
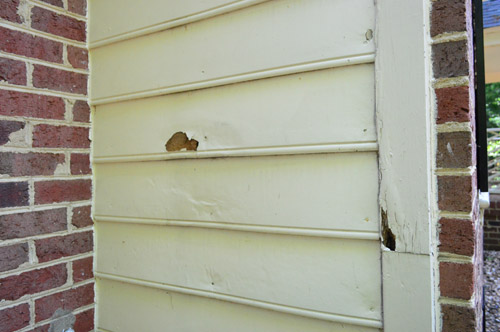
This hole was big enough for a bat or a mouse to crawl in. I’ll pause while you ewwww for a second.
Some of the wood trim and siding just couldn’t be salvaged and would need to be completely replaced. And the rest of it was in desperate need of a cleaning, scraping, priming, and two fresh coats of paint to protect it from rotting like the other stuff that was already too far gone. Given the extent of the rot, the sheer size of the project, and the fact that a lot of it was high off the ground, we knew it was a job for the pros. So we got four estimates and ultimately chose the crew that made us feel the most confident, who was a local chain called Certa Pro Painters. It didn’t hurt that they were recommended by a neighbor up the street along with a wish-she-was-our-neighbor friend of ours. They also were the most flexible (which enabled us to save an extra 1k by doing some things ourselves, but more on that later).
After picking who to go with, it was color picking time. We decided that we wanted the trim to be one color and the siding to be another color, just so the house had a little more dimension. We didn’t hate the existing cream on cream trim and siding, but we did love a few other possibilities more, especially after walking around the neighborhood and staring at other brick colonials to see what they had going on. So after a whole lotta house-gawking, we came home and stared at our paint deck.
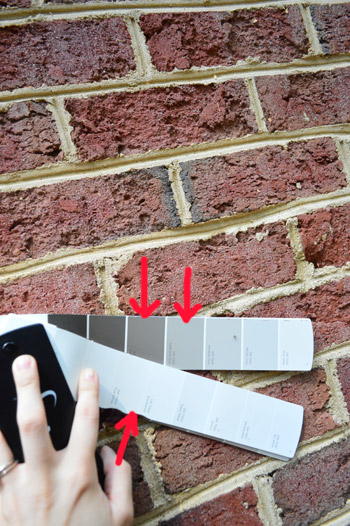
We decided we liked the idea of a putty color (not too brown, and not too gray – sort of right in the middle) since that tone is kind of “related” to the brick, so it ties in. We waffled back and forth between the two colors with the red arrow in that top swatch for a while and finally settled on the lighter one because we worried the darker one might be gloomy for the siding. Then for the windowsills and trim we picked a nice not-too-yellow-and-not-too-blue white tone.
Spoiler alert: we picked the wrong color and should have gone with the darker one for the siding. But thankfully we caught it early enough (just as the first coat was starting to go up) that they were happy to apply the darker tone as the second coat, which had great coverage since it was only a shade darker. So this is the final choice. Pretty, right?

It’s such a rich look, and because the brick is such a visually “weighty” color, it’s a really nice balance. The lighter color was so washed out it almost still looked cream – or even like a soft white. So… disaster averted!
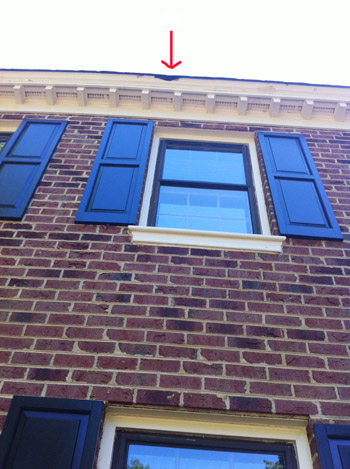
See how the triangle over the portico looks like it’s a soft whispy white-ish color? That was just one square lighter on that swatch (yet it looked about three shades lighter when the light hit it!). You can see Danny applying the final color right over it, which really helped the white trim pop more while holding its own with the strong brick and the dark shutters behind it. Whew.

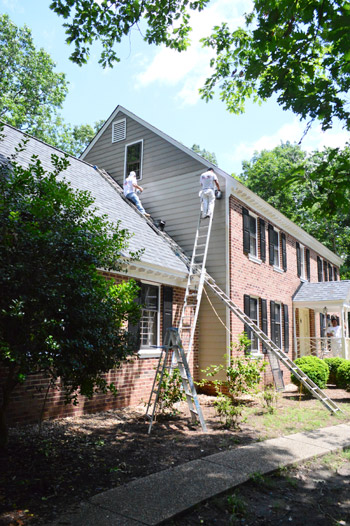
The process was actually pretty fun to watch (we didn’t envy them for a second up on those crazy ladders for five days in 90+ degree temperatures). The first step was power-washing the entire house, then they scraped the trim and siding before priming anything that was raw wood, and painting everything (two coats for the siding and trim, and one coat around the windows since they were just going from cream to white). If the wood/siding was in bad shape, they cut it out and replaced it. In the end, they had cut out and repaired about 20 pieces of rotten siding and trim, so it broke down to one day of power washing, two days of rot repair and scraping, and two days of priming/painting.
As for the paint, they used Duration by Sherwin Williams, which they said was awesome for the exterior and had really nice thick coverage (so we’re glad our house won’t be all sad and rotten again anytime soon). The colors we ended up going with were Snowbound (for the white trim) and Anonymous (for the putty colored siding).
We’re so happy with it. And we’ll never doubt those house painting tipsters again when that say “go a shade darker than you think for the exterior of a house since the light that hits it will wash things out.” We really thought we could just look at the swatches outside, but it was crazy how light/white that very clearly gray-brown swatch looked once it was up on the house! Three cheers for second chances. Oh man, we’re so thankful.
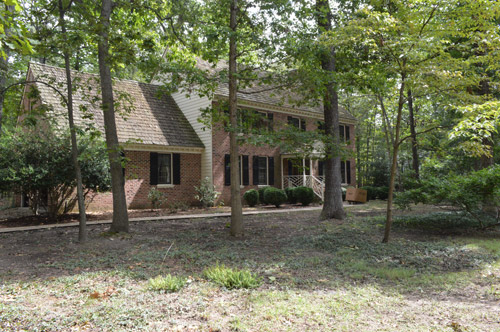
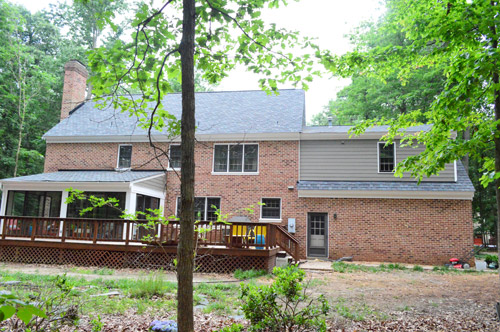
Here’s what the house looked like when we got it:
And here it is (a little closer) now. More dimensional, right? So much less… brown.
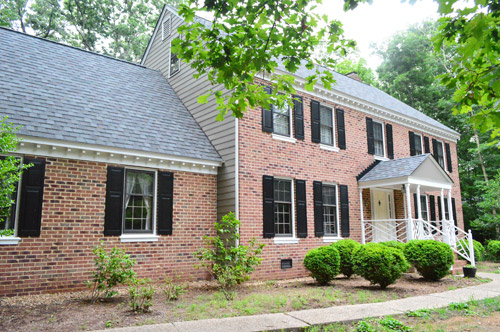
The new roof was definitely a game changer, but the fresh paint is a pretty noticeable upgrade too. Even just the white trim around the windows and the porch railing feels nice and fresh from the curb. It’s one of those things when we drive down the street to come home we’re still doing that double take since our brains are taking a second to catch up with the current look.

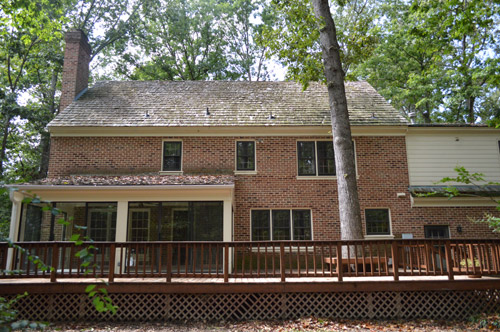
Here’s the back before, which we thought made the siding part on the top right look a little too light and unbalanced (gah, choppy photo, sorry!):
Now it just feels more evenly weighted, so it sticks out less and looks more integrated.
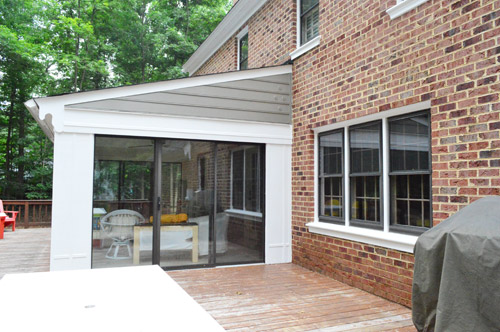
And here’s a closer shot that shows how the sunroom looked when it was all cream before.

Now it has a crisper feeling, and the dark storm windows on the house tie into the dark tones in the brick as well as the putty color in the siding – so the sunroom feels more tied in and less like a little add-on-pop-out in the back.
When it comes to the cost of rot repair/house painting, that definitely varies depending on where you live, how much rot you have, what type of house it is (mostly brick or all siding), how large your house is, etc. The receipt’s in one of our moving chaos piles (aka: lost in the Bermuda Triangle) but I think it was around 1K for all of the wood rot repair and over 2K for the scraping and painting. Update: Just remembered we got 10% off because John’s a member of ACAC, so any locals getting an estimate should show their membership card if they have one!
Writing the check was another one of those bleeding money moments, but we were able to knock 1K off their original estimate by offering to DIY some easier-to-reach spots ourselves that we had faith we could do well. So here’s a tip for anyone who loves tackling what they can while leaving the stuff that’s out of their league to the experts: just break it all down in your head and see what you think you can bite off. We said “hey, we’ll gladly paint three areas ourselves!” which are: the garage doors (we think we’ll go a tone darker than the siding with those)…
… the interior walls, trim, and ceiling of the sunroom (everyone quoted that since it’s technically an outdoor room), and the front door and sidelights.
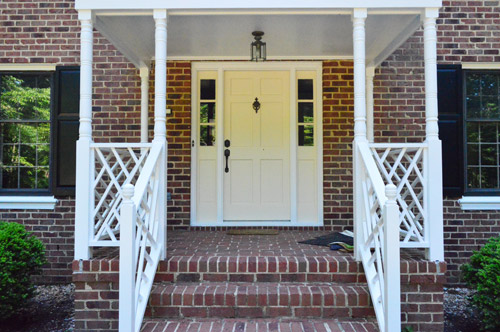
Not only did that save us a cool grand, it means we have more time to think about what colors we want in those areas. Predictably, I’m the most excited about a new front door color. Nothing’s off limits. Seriously, every swatch in the rainbow is in the running.
One roof-related casualty did occur when we accidentally ran over a screw that had landed in our driveway, but thankfully it was only a $29 fix (we could get it patched instead of replacing it) so all’s well that ends well.

Oh home improvement. You take our money and sometimes you even flatten our tires, but we keep crawling back.

Colleen Dittrich says
Hi Sherry,
What color white did you use for your trim outside? I didn’t see it noted anywhere but maybe I missed it!
I am working on picking paint colors for the outside of our house which has the same brick look on the front. I am considering the SW Anonymous color you used and changing a currently ugly green trim color to a white. I’d love to know what white trim you landed on to complete the look on your house. Thanks.
YoungHouseLove says
It’s Snowbound by SW.
xo,
s
Donna Huebsch says
Wow, it’s amazing the difference a paint color can make in the overall appearance of the house! Compared to the before picture, your house just looks – I dunno – happier now!
Jessica says
Your house is looking great! I have a similar house to yours and we’re also getting ready to paint this bad boy. We have a bit more, siding to paint. I was wondering if you had them paint your gutters too? Our gutters are cream and I would want them painted white, but the hubs is telling me it can’t be done. (Not that I want to get in the middle of a “discussion” but just want to know your experience!)
Thank you!!!!!!!
YoungHouseLove says
We actually only have a gutter in the back of the sunroom, but they didn’t need to paint it since it was already white.
xo
s
Kristyn says
I don’t know if I’m missing it somewhere, but what is the paint color called that you painted the siding with. Thanks so much! This is our spring project.
YoungHouseLove says
It was Anonymous by Sherwin Williams.
xo
s
Jennifer says
Hi! I think your house is so pretty. Keep up the great work!
I did not notice the name of the putty color you used or the white…
Did I miss it? If so I am sorry, if not can you share?
Thanks so much:)
YoungHouseLove says
The trim was Snowbound by Sherwin Williams and the siding is Anonymous (also by SW).
xo
s
Catherine says
I am having my house painted in a few weeks and I am wondering if the paint you used for the exterior is a flat or satin? (Or something else?). Have you been happy with your choice?
YoungHouseLove says
I think it was satin or eggshell for the siding and semi-gloss for the white trim. Hope it helps!
xo
s
Jan says
Do you know what type of paint you used for the trim? Satin? Gloss? Semi-gloss?
Thanks!
YoungHouseLove says
Semi-gloss so it’s nice and wipeable!
xo
s
Lisa H. says
What sheen did you go with on the siding and trim and doors of the exterior? We are also going to use the Duration paint and we have vinyl siding. Thanks!!!
Lisa H. says
I see your response above -sorry!! eggshell it is!
Jamie Howe says
Hi! I just wanted to share that I have completely copied you and used the ‘anonymous’ color to paint the exterior of my home. This project moved pretty quickly and I had to decide fast so I said ‘what would John and Sherry do?’. You always have great design choices and I tend to be paralyzed by making big decisions. This is a huge transformation for us, we have been living in a purple house for 10 years (we bought it purple). Purple is not too weird, we live in the same town as the “making it lovely” blogger, so crazy colors are the norm. anyway thanks for simplifying my decision!!!! ~Jamie
YoungHouseLove says
So glad! Congrats Jamie!
xo
s
Emma Fatton says
Not sure if I missed it or not but what is the names of the paint colors you all picked for both the siding and trim? It looks great!
YoungHouseLove says
It’s Anonymous on the house and Snowbound on the trim, both by Sherwin Williams.
xo
s