You guys may remember the sunroom quickchange that occurred a few months back when we turned our former third bedroom (which once housed a West Elm daybed and a desk) into Clara’s nursery. Being work-with-what-you-have people, we brought the daybed from that old bedroom of yore out into the sunroom, and we mentioned that someday we would hopefully get around to priming and painting it white for a more balanced look (since it’s about a foot away from our other already-white West Elm daybed). We actually didn’t think it looked too bad when it was dark since it worked with the metal framing on the glass doors that surround the room…

… but now that it’s primed and painted it definitely feels more balanced to us. You know we’re not huge everything-must-match people, but we thought since both daybeds had different pillows and a different design (one is a lot less intricate) that keeping them in the same white palette would keep the L-shaped arrangement from feeling too off-balance. Plus we have more tricks up our sleeves to add a ton of layered pattern, color and interest in future phases of this project (so the daybeds will serve as a nice calm foundation for the space). Stay tuned!

Of course it also helps that the trees are green again and we added some pops of color to each daybed (in the form of a few already-owned pillows that were displaced from the guest bedroom which we’ve since transitioned into our home office/guest bedroom/playroom). Oh and in case you’re wondering, the two floral pillows were a gift from a family member (we believe from Bed Bath & Beyond) and the larger blue pillow on the other daybed is from Marshall’s (snagged for $6 a while back).
And for anyone who’d like to know how we went about priming and painting our daybed, here’s the play by play. First we removed the mattress and the linens and placed all four feet on squares of cardboard:

Then we used Kilz oil-based primer (to keep the wood stain from bleeding through and ruining our finish) that we applied as thinly and evenly as possible with a brush. Note: to anyone who doesn’t paint nearly every weekend, you might want to toss down a drop cloth to safeguard the rug/floor against drips. We’re just cocky little painters who make do with the cardboard-under-the-feet-method, but it has taken us years of painting our hearts out to get there. Oh and if your wood surface is glossy (covered in polyurethane or polycrilic) you’ll need to sand it first to cut the gloss and help the paint adhere. Luckily our daybed was a very matte finish (dry and absorbent feeling, sort of the opposite of glossy) so we didn’t need to sand.

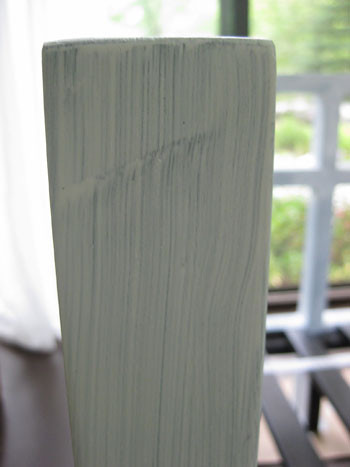
Usually only one coat of primer is necessary since you’re not trying to completely cover the piece and block out all of the black color, you’re just laying the foundation so the latex paint that you apply over it will stick well and that will block the color. It’s in primer’s nature to go on rather roughly (so never expect a perfect looking white effect when you’re done) and our best tip to you would be a nice even and thin application. It’s the people who try to load it on thickly for that matte look who run into tons of drying and bubbling problems later. Brush strokes are ok with primer- they’re practically unavoidable actually! In fact we snapped this close up photo to show you how one thin and even application of primer with a paint brush will most likely look. Then it’s time for paint.
The day after we primed (just to give it time to cure up and dry) we applied two thin and even coats of white paint about an hour apart. We used Freshaire No-VOC semi-gloss latex paint in their stock off-the-shelf white color. And we actually used a small foam roller to apply the paint for a smooth “machine produced” look. This way it would match the other daybed’s look instead of having the painted quality that a paintbrush can produce when you use it to apply those thin and even coats of paint (neither a 2″ angled brush or a foam roller are bad choices for applying paint, so it’s really up to you to choose what you feel most comfortable with and whether you want the glossy hand-painted look or the smooth machine-made look – kind of like Ikea furniture).
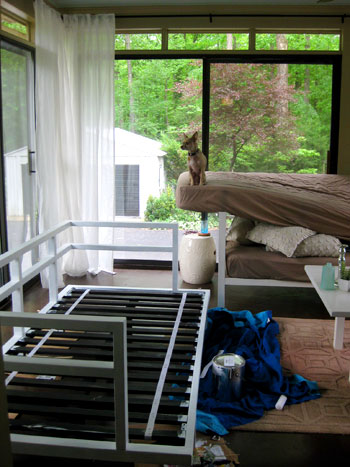
Again, a thin and even application of the latex paint is key. Pop quiz: how many times have I said thin and even in this post? I apologize, but it’s super important. It really is the difference between a terrible result and a great one. That and ample drying time between and after coats, which is why we leave a day between primer and paint, at least an hour between paint applications, and 3-6 full days before putting things on the painted item and using it again. In this case we let our daybed dry for a full week before loading the mattress and the linens back on and moving it back into place. We just hate risking any creases or dings from being too impatient. So we lived with the daybed looking a little chaotic for a while, but Burger seemed to love his new lookout tower. Sometimes I swear our dog is a cat.
And after things were all put together again it looked like it had always been white:

Plus we’re happy to report that the color of our painted daybed looks a lot like that of our already-white daybed, so they really work well together. We’re not super neurotic when it comes to our white tones coordinating perfectly, so we didn’t do anything like bring home white swatches and hold them up to the white daybed to get the perfect match, but that’s definitely something that you can do if you want your painted piece to perfectly match something that you already own. Our similar white tones were just kind of a happy accident.
And although Burger’s perch on the displaced mattress is gone, he seems pretty happy with the result. We just love how light and fresh the room feels thanks to all that glass, the airy white furnishings, those pops of green and blue, and the breezy white sheers.

So that’s part one of phase one, and the theme of this phase is all about working with what we already have. Happily the cost for moving the daybed in and repainting it was zero dollars (since the primer and paint was already on hand along with the daybed that was freed up by the creation of our nursery). But we also had a dresser and a large mirror that were displaced from the guest bedroom when we converted that into an office about a month after finishing the nursery makeover. And we also needed a small wooden bookcase in the office (for Clara’s toys) so we swapped the one that used to live in the sunroom (along with the mirror above it)…
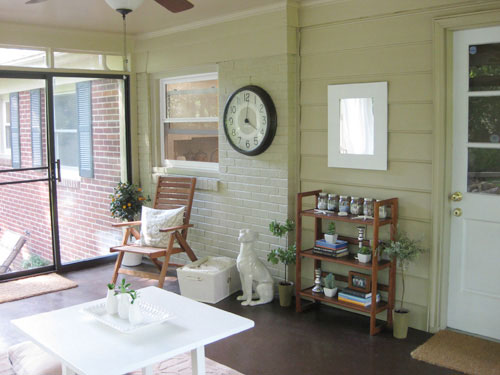
… with the dresser and mirror from the former guest bedroom.
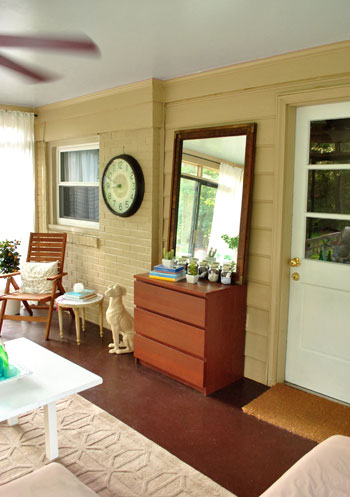
Everyone wins! The larger mirror and dresser provide lots of storage and reflect even more sunlight (along with our leafy green view) while the old sunroom bookcase can now be used to store lots of toys for Clara (the footprint of the bookcase is a lot smaller, so it works in the new office while the dresser never could). But again, this is just stage one of the sunroom switcheroo – so we have a lot more up our sleeves for this room in the pattern and color department! Hold tight for our next phase of the project.
But what about you guys? Have you ever moved a dresser or a daybed out of the bedroom and into a living area in your home? Have you painted something to help it fit in – or stand out? Spill it.
Psst- For more furniture painting tips and tricks, check out this very very very thorough tutorial. And happy painting!

Erin says
So nice! Love it. Makes me almost want to put a sunroom on the back of our house. *almost* ha ha. I love this switcheroo. My Mom and I love your blog and she was just saying to me the other day “so, what are they going to do with their blog when their house is all done? They won’t have anything to blog about!” done? HA! There are always projects to be done. Even if there was no reason (like a new baby) to switch, its still fun to switch and move things. So I said, “mooom, is YOUR house ‘to do’ list ever going to be done? Even if it was, wouldn’t you draw on your auxiliary, ‘someday I would like to…’ list???” so she said “oh yeah. good point. yay! I love their blog.” ha ha. Just wanted to share. Thanks as always for the inspiration. :)
Kali says
We’re actually in the middle of a living room overhaul ourselves. Below is a link to our blog post about it of course. The fireplace is being worked on even as I type so pay no attention to it’s dentist-office-orange-meets-yellow-brick-1950s appeal. The main change? Painting the awful oak pieces with brass hardware circa 1984. That alone spruced the room up. We also just replaced all the windows in our house so painting the new trim white is next on the list. Thanks for inspiring me to refinish the furniture! My husband, bank and budget love you!
http://teamdeboer.blogspot.com/2010/08/reveal.html
Kayakgirl73 says
Looking good. I reallly love your blog. I can’t wait tosee what you have in store for us this fall.
Handy Man, Crafty Woman says
very nice! Love the idea of the dresser being out in that room.
Mary says
We have been working on changing our former family room area into a dining room. I recovered the dining room chairs and hung an IKEA large white paper globe light to create a “chandelier” effect. When I realized I needed a buffet of some kind, I decided to pull out my daughter’s old changing table (w/o the changing table top of course). It has open shelves with a fabric curtain on the lower half and one shelf that I could have baskets inside of. I hung a mirror over it and it works perfectly!
Briar Oak Wife says
Looks great! I love how you repurpose your furniture – no need to buy anything new. I bet your budget for this mini room makeover will be practically zero!
Carole says
looks great! I love posts with Burger shots, he’s such a character!
Amy Wolff says
Do you use curtain rods for the curtains hanging in the sunroon, if so, did you hang curtain rods all three walls or just used corner rods?
THANKS!!!!
YoungHouseLove says
Hey Amy,
That’s actually something we’re tweaking and fully explaining in Phase Two, so stay tuned!
xo,
s
Emily @ The Happy Home says
oooh! i love the use of the dark trim contrasted against the bright white furniture!
burger is so cute sitting there on that perch, overseeing what is being done to his domain. he looks a little shocked, but i guess he’s ok as long as he has a cushion to call his own!
ginny says
Looks great! Thought you would want to now, when I just came to your blog a pop up slide show ad for Lowes played before I could see your blog. Never had that happen before.
YoungHouseLove says
Thanks Ginny! We actually just removed that rogue pop-up coding so it shouldn’t happen again once that removal has been processed (which can take around 15-30 mins- argh!). As you know we hate hate hate pop ups so they’re never authorized when they show up on our site. Thanks again for the heads up! We don’t know when they’re popping up unless people let us know and then we can put the kabosh on them!
xo,
s
Jocelyn Stott says
Looks great! Definitely gives balance and unity to the space. As always, well done :)
Jen says
I haven’t been able to go through the comments yet, so I’m sorry if this was already mentioned–I wanted to let you know that when I first went on to your site a few minutes ago, the whole page changed to an ad for something through Lowes. I wanted to let you know because I know you’ve said in the past that you don’t allow that.
I also wanted to let you know that I love the new updates to the sun room!
Brigid says
Not sure if you want/need to know this, but when I just went to come to read your blog, I was redirected to an advertisement for JM formaldehyde-free insulation found at Lowes. From there it had a “continue to site” button on top which took me to YHL. Is this something new that iwll happen occasionally when trying to get to YHL?
YoungHouseLove says
Hey Brigid & Jen,
Thanks for the tip! We actually just removed that rogue pop-up coding so it shouldn’t happen again once that removal has been processed (which can take around 15-30 mins- argh!). As you know we hate hate hate pop ups so they’re never authorized when they show up on our site. Thanks again for the heads up! We don’t know when they’re popping up unless people let us know and then we can put the kabosh on them!
xo,
s
nicole says
BIRD ME
A hawk. Noble and a sign of good luck.
Suzie @ cupcake monkey says
I am so envious of that room!…such a beautiful space!! We have a long list of painting projects, including the cabinetry in our bathrooms. I am scared to death to even attempt it for fear I will screw it up, so who knows if it will actually happen. :D
bostonadrianne says
Hi Sherry!
Long time reader (you guys rock), first time poster ;)
If you have any other info on the gifted floral throws that are potentially from BB&B, I would greatly appreciate it… I have an old chair that will be amazing when I re-upholster it but I’m on the (obsessive) hunt for the perfect fabric (the pattern on those pillows hits the mark exactly..!)
I did a quick search through BB&B online “toss pillows” section, but didn’t see anything to match. No worries if you don’t – just thought I would ask!
Thanks so much and keep up the great (inspiring) work!
YoungHouseLove says
Hey BostonAdrianne,
We’re so sorry but we don’t have any more info on those pillows other than they’re about three years old. Perhaps visiting a few local fabric stores will yeild something similar for you. Good luck and happy hunting!
xo,
s
Tonia says
It’s looks so fresh and clean. Paint does wonders. Thanks for reminding me of the foam roller, and waiting between coats, that’s always my problem I want to rush my paint jobs, and Burger had himself a time while the tranformation was going on.
Alison says
I love that room!!! Its so open and the windows let all that light in and you can see all the green of the trees. We just finished painting some ceilings in our house that were painted a very dark color and it has brightened up the rooms so much. Now its time for the kitchen and that is a scary thought. We will be following your tutorial on painting kitchen cabinets.
Katy(The Balanced Foodie) says
Hello, this is my first time commenting. :)
I actually had a question about the pictures. Were those taken with your Nikon? I’ve had my D3000 since November and was thrilled to see you all just purchased one as well! Do you use the kit lens? I’ve more recently fallen in love with it, I wasn’t sure at first because everyone had Canon DSLR’s but I’m so so happy I went with my gut instinct on the Nikon D3000. Your pictures are so crisp and beautiful, they look like they could be placed in a catalog! I know that it’s the natural lighting that really aids in taking great pictures but I’m still learning my camera and want to devote more time to figuring out how to get the best from it.
..and I just realized that was a novel, I apologize. :)
YoungHouseLove says
Hey Katy,
Yup, those shots (except for the before ones) were the Nikon. Love it! We do use the lens than came with it- and you’re right, the light in the sunroom makes snapping pictures in there a total treat!
xo,
s
Jamie says
Are you CRAZY??!! Painting on top of your rug and your nice, dark floors?! I would have spilled the whole bucket, just because it would have made a huge mess. You have MUCH better painting Karma than I…
mike says
We’ve been painting cabinets white. Front, then back. It feels like it will be forever before we’re done! I’m jealous you can put the brush down!
Chelsea says
So how do you guys find the time? You are blogging 24/7, taking care of Miss Clara, and still finding time for projects. My question is how do you organize/prioratize projects. Do you plan/draw out your plan then make a list of items you need? Or do you hit the store and go from there? How do you do it? I love the How Ya Bin Post, you guys should revamp that post and talk about random items you store (suitcases, mops, random items).
Love the blog!
YoungHouseLove says
Hey Chelsea,
We just try to take things day by day and we always have a few projects on our to-do list ranked by priority (based on available budget, the next room makeover on our agenda, etc). If we find ourselves ahead of schedule for the week (for example, if we have all the week’s posts written by Thursday morning) we’ll map out what we need, run out and grab it, and tackle what we can over the next few days and into the weekend. Since the blog is our full time job, home improvement projects are high on our priority list (higher than dinners out or movies or even food shopping sometimes!) so we definitely spend nights and weekends tackling them. But we wouldn’t have it any other way!
Oh and thanks for the post suggestion. We’ll add it to our admittedly long list. Stay tuned…
xo,
s
Alicia (Atypical Type A) says
Never mind the furniture, I want that VIEW!
Summer says
Do you think it would be out of place to use a daybed in a living/family room?
YoungHouseLove says
Hey Summer,
No way! We’ve seen plenty of daybeds in the living or family room (just load them up with pillows so they have nearly as much back support as a typical sofa). Hope it helps!
xo,
s
Beth says
LOVE the new matching daybed. One question though. Do you ever fear painting something? Like you might want it back to the original color and kick yourself when you have to strip it?
YoungHouseLove says
We usually take our time before painting something (in this case we owned the daybed for about three years, and it sat unpainted in the sunroom for at least two or three month). That way we can be 100% sure and tackle the project with confidence. Hope it helps!
xo,
s
Kath says
STUNNING.
MegM says
Although we didn’t move a daybed anyplace, we did create one recently! Our tiny guest room seemed to be completely eaten up by a full-sized bed, so I scored a handful of awesome pillows (that brought in some new pops of color to a tan-and-blue “beachy” oasis), slid the bed horizontally against the wall, propped up the new pillows, (slid over all the under-bed storage that stayed in place) and reclaimed tons of space. Now I have room for my easel, sewing machine, etc. So happy with it! As always, love what you’ve done; thanks for all the inspiration.
Jen says
Great job on the makeover so far! I also love the oversize clock you have in the sunroom. I’m looking for a large, unique clock for my kitchen. Any suggestions for sources?
Thanks!
YoungHouseLove says
We got ours from Target. They seem to still have a bunch there. Hope it helps!
xo,
s
lutz says
I envy this room..everything green through the glasses…so cozy atmostphere
Susan says
I love it! It looks amazing!!!
KatelynLikesThis says
Haha, that picture of Burger perched on the mattress is hilarious!!! My dog loves to perch on stuff too! No idea why…he scares me when he does!
tracylee says
I love the transformation, but what I’m really concerned about is that dog statue underneath the clock… I’ve been looking for something like that for ages. Any ideas on where I could find one?
YoungHouseLove says
We found that guy at HomeGoods. Love him! Hope it helps.
xo,
s
Claire says
I love that rug you have in the sunroom. Any suggestions on where I could get something similar in style maybe in a lighter color? I like the fact that there is pattern in a type of inset with the same material.
YoungHouseLove says
That’s from JC Penney (called the Honeycomb Rug by Chris Madden) so maybe check there or on overstock.com or even eBay? Good luck!
xo,
s
Kate says
As a follow up one the wierd marks on poly that I had a question about… I think I figured out that it was caused by some dusting spray my mom had given me! It left a film on the top that made the table top look pretty and slightly darker, but anything that rubbed on the surface took off some of the film and left a lighter splotch. Rubbing it with my finger made it “disappear” since I was spreading out the oil/wax/whatever the cleaner had in it. After I went over with it with my water/vinegar spray a couple times it lost that waxy sheen and is back to a uniform color with no wierd spots.
Now it’s back to simple vinegar spray for me!
YoungHouseLove says
Mystery solved! Thanks for sharing!
xo,
s
Kristen says
Hi there,
I just wanted to let you know that I went to the paint store here in Chicago and asked for Kilz oil-based primer, and the man behind the counter told me that they hadn’t carried it since 2009 because it didn’t meet the minimum VOC requirements! He said I’d have a hard time finding it anywhere in Illinois because it’s more or less ‘banned’. Just thought I’d let you know! He was able to give me an alternative and it’s working out grand.
YoungHouseLove says
Hey Kristen,
We did hear that certain states (like California) were banning oil-based primers so it’s not much of a surprise that other areas are following suit! We definitely take extreme care not to expose ourselves to many VOCs (and not to expose Clara and Burger to any at all) so we do all of our painting outside with masks on and we allow things about a week to dry/offgas before bringing them into our house (sometimes stashing them in our detached garage with the door open for ventilation). It’s tough if oil-based primers are banned from being sold though, just because we have definitely tried to use water-based primer over and over again with nothing but disastrous results (tackiness for months, peeling, bleeding, etc). Maybe there’s a new low-VOC primer on the horizon that really works?! Fingers crossed…
xo,
s
Melinda Lear says
I love the feel of this sunroom. Do you remember the dimensions on your sunroom? We are going to get one and want to see if it is around the same size. Ours will be 13×20 I believe. Thanks so much. Look forward to all that you are going to do to the new place!
YoungHouseLove says
We think it was around that size actually! You can check out our FAQ page for the exact measurements. Hope it helps!
xo,
s
Kavita says
Thank you so much for these detailed instructions! I just bought the dark-colored West Elm Overlapping Squares daybed from craigslist and you’ve given me the confidence to paint it white! I’m just a newb, but I assume the overlapping squares daybed is also matte finish (it’s the same one you have that was purchased white already)?
You probably hear this hundreds of times per day, but I just wanted to say how awesome you both are! Because of this blog (and if my painting of the daybed goes well), my next project is to find a vintage dresser from craigslist and paint it another color!
YoungHouseLove says
Aw good luck Kavita! As for your finish, if it feels glossy just sand it a bit to rough it up. If it feels sort of sanded or dry already, it’s probably ready without sanding. Hope it helps!
xo,
s
Wendy B says
I have a quick question for y’all. My husband and I are in the process of building the West Elm Overlapping Squares Daybed (thanks to the community at Ana-white.com and my husbands awesome math skills :)). We want to build it so that it can be taken apart and moved if necessary (not drilled all together). So back to my question… How does your store-bought daybed come apart for transport?
YoungHouseLove says
We actually haven’t taken anything but the mattress off since we initially assembled it (we just moved it standing on one end in the truck with boxes packed around it). I think we probably could take the sides off along with the back. Maybe?
xo,
s
Rupa says
Hello,
Just came across your blog while searching for picture gallery display. Love all ur makeovers. I cant stop viewing all ur posts. I love ur white daybed with design on sides. Where can I find similar one? I am looking for a daybed for my baby’s nursery, for seating and occational guests. All her furnitue is white so this will be perfect.
Thanks.
YoungHouseLove says
Hi Rupa,
That daybed is from West Elm (we got it as wedding present) and you can still purchase it! http://www.westelm.com/products/overlapping-squares-daybed-p054/?pkey=e|overlapping-squares%2Bdaybed|5|best|0|1|24||1&cm_src=NLASEARCH||NoFacet-_-NoFacet-_-NoMerchRules-_-
-John
Rupa says
Thanks John. Its no longer available. But i’ll try to find something similar. Anyways, love your blog.
Meghan says
Just wondering what/where you got the stencil for the floor and what color is the blue you used? Love it
YoungHouseLove says
The stencil was from http://sunnyspaint.com/ and the color was Martha Stewart Lagoon. Hope it helps!
xo,
s
Stacey says
I love this daybed that you painted. I was wondering if you could tell me where you got it? I am new to your young house love but I am loving every minute of it!
YoungHouseLove says
Thanks Stacey! It’s from West Elm a while back.
xo
s