This is it. My most favoritest art ever. Yes I know that’s a big statement. A big statement with a non-word, at that. But it’s all deserved because I’ve framed and hung my bike art and I’m in love. Not only with how the final product looks, but how easy and cheap it was to achieve. So forgive me if my enthusiasm is more annoying than usual today. I’m a man with a love of all things bike and all things easy. Wait, that sounds wrong…

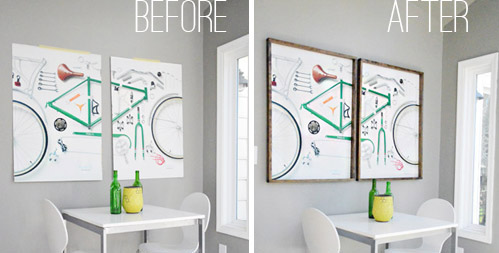
So here’s that wall before with my retail display cast-offs just pitifully taped to the wall.
And here they are all framed up. In frames that only cost us $14 to make ($7 each!) and whose most challenging step was finding the patience to let the wood stain dry before I could finally hang them. Seriously, they weren’t hard to make in the least.
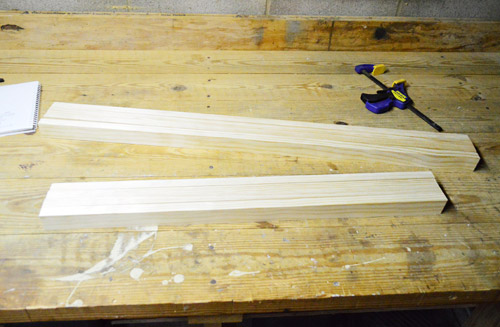
Here’s how it all went down. Er, up. My $14 was spent on four boards of 6 foot long 1 x 2″ pine from Home Depot.
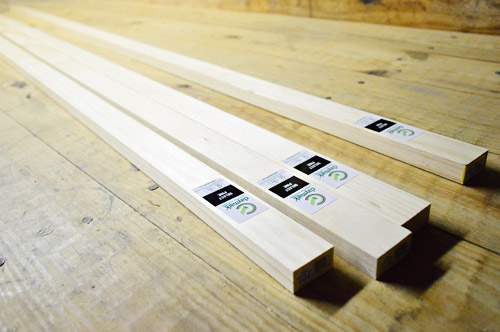
Since we were building two frames, that meant we needed four boards of the same length (for the sides of each of the two frames) and four shorter boards of the same length (for the top and bottom of each of the two frames). To make sure I cut the four sides of my frames (and the four tops/bottoms of my frames) evenly, I clamped four boards together and cut them all at the same time (you could have your boards cut to size at the store if you don’t have access to a saw, btw).
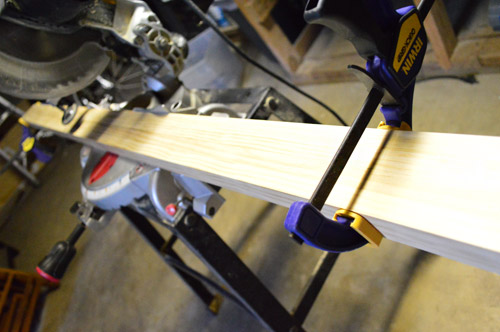
So two clamped cuts later I had four long boards (for the two sides of the two frames) and four short boards (for the top and bottoms of each of the two frames).
The short boards were cut to 1-inch longer than the width of the poster to create some overlap (i.e. each poster is 27″ wide, so I made the boards 28″ wide). The side boards were cut to 1-inch longer MINUS the width of the two top boards (i.e. each poster is 39″ tall + 1″ – 0.75″ for the top board – 0.75″ for the bottom board = 38.5″). This will make a bit more sense soon, I promise…
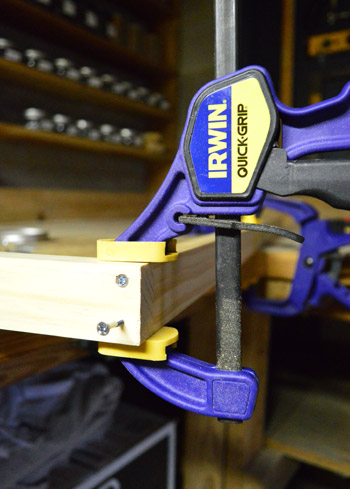
I chose not to complicate matters by doing mitered corners and went for more of a rough and raw look. So attaching the boards into a rectangular frame was pretty easy and completely miter-saw free (seriously, if you had Home Depot cut your four boards to the right sizes, all you’d need to do is the following part at home).
I clamped the pieces tightly together and screwed through the top and bottom boards into the side boards. Oh and it did help to make pilot holes first with a small drill bit so my wood didn’t split when the screws went in.
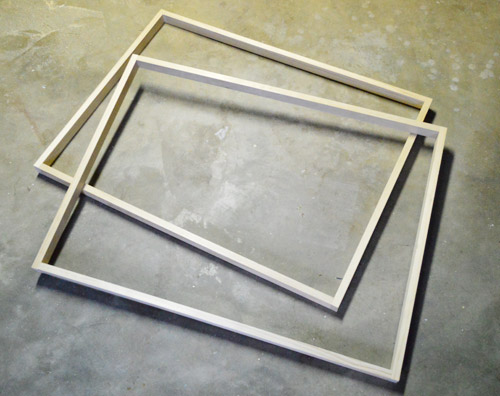
Here’s what my two frames looked like once everything was screwed together. I didn’t do anything to cover up my screwheads since I figured not many people will be staring at the tops or bottom of the frames once they’re hung (you’d have to be pretty dang tall or lying on the floor to see them). Plus I was going for the raw and imperfect look anyway. A bike’s gears show, so what are a few screws in a few not-easily-seen locations?
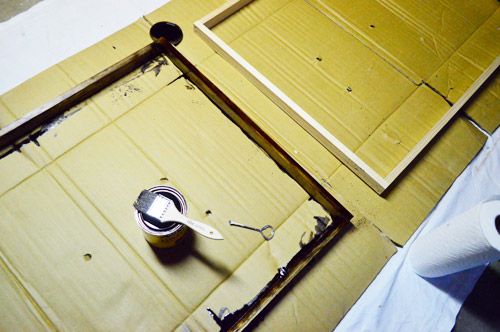
I contemplated leaving the wood raw (since that’s how we originally saw them at store) but Sherry and I agreed they’d look better in a dark stain (we used Minwax’s Dark Walnut since we still had a small can leftover from some project long ago) to tie into a few other wood items in the room like a wood side table and some wooden art over the daybed. Once the stain dried, I put a coat of Safecoat polyurethane over it and patiently waited another night (torture I tell you) to put everything together and hang them up.
With everything dry, I laid my posters face down on the back of the frames. The inch I added to each side meant the poster sat on the frame comfortably without being visible along the edges. My poster was printed on pretty sturdy paper (it’s similar to thick poster board) so I was able to just staple it around the edge in a few spots as a means of attaching the art to the frame. If you’re trying this with a poster on thinner paper you might want to consider gluing it to a piece of sturdier poster board to make it less flimsy (maybe use a glue like rubber cement or spray adhesive that won’t make the poster wrinkle when it dries?).
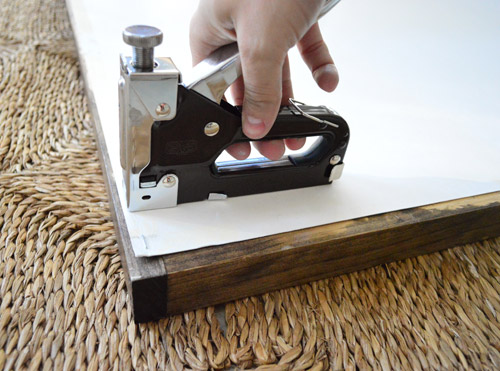
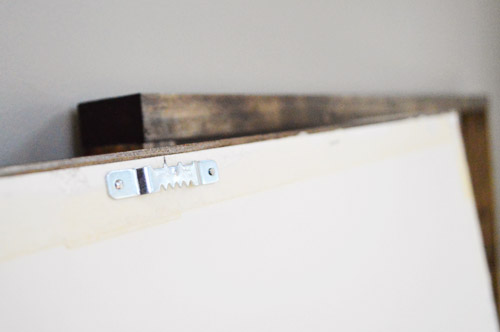
Once I put a few staples around the edges (I did about four per side, but depending how stiff your paper is you might need more) I attached some simple picture frame hanging hardware through the poster and into the wood of the frame – so it wouldn’t show through on the front or anything:
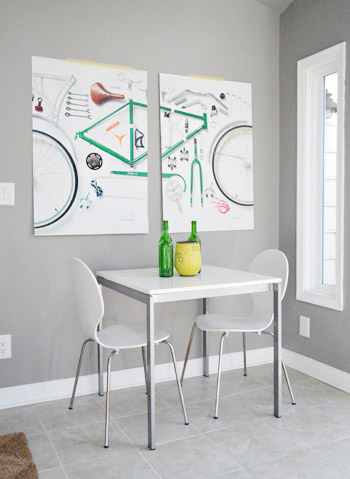
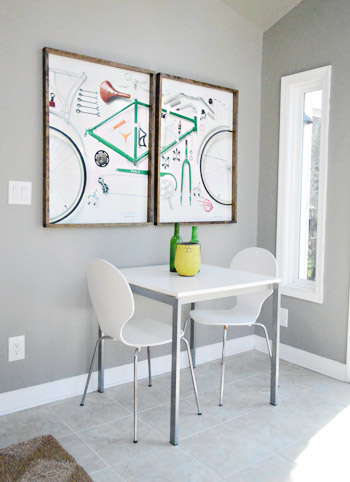
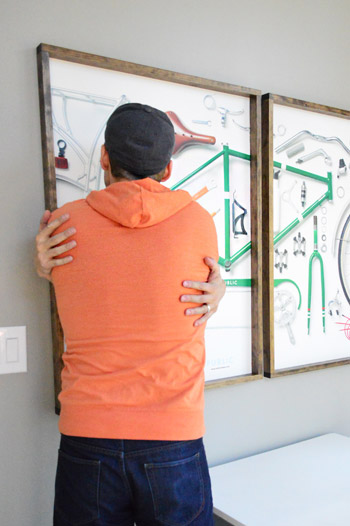
Then those babies were ready to hang. Cue the angels. Part the clouds. I am in bike art heaven. Oh yes, and ignore the way-too-airy table and chairs. Once we have a chunky storage piece of furniture (we have our minds set on something, so we should have that update for you soon) the bike art will have the nice grounded and proportionate look that it deserves.
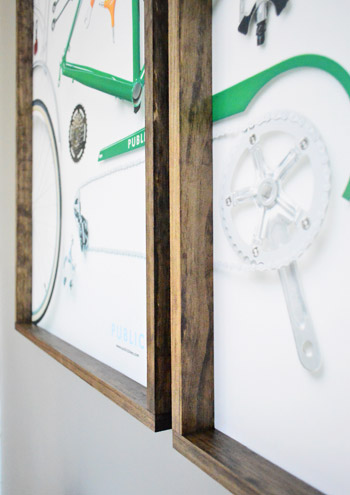
Seriously though, I’m pretty stoked about how they turned out. Obviously the art itself (featuring a deconstructed bike by Public Bikes) is the real star. But I like to think that my frames have at least earned a “best supporting actor” nomination. And heck, they’re honored just to be nominated.
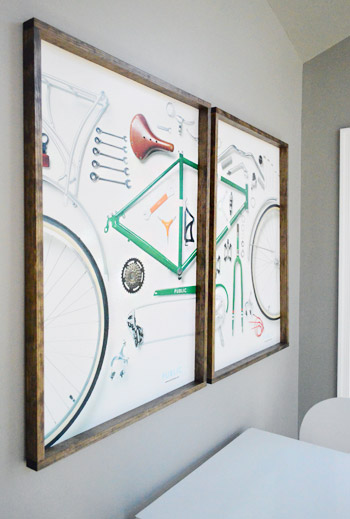
We’re both really happy with our decision to use the boards so they raised off against the wall a little bit – giving the poster some dimension instead of just being big and flat. That thick frame feels uncommon and artful – and thanks to the posters being so firm and un-delicate, we don’t anticipate any issues with there being an absence of glass. They’re just like poster board so we think they’ll hold up for a nice long time (of course we can always add glass or plexi if we change our minds, but for now we love them completely unobstructed).
Then I had an impromptu make out session with them.
Sherry probably won’t have to witness that again (I can’t make any promises), but I’m glad I can see these babies from the window over our kitchen sink. So she may catch me gazing lovingly at them while doing dishes. And it might just be a love triangle since she occasionally lovingly gazes at me while I do dishes.
So that’s the latest in the sunroom. Can’t wait to share the storage-y piece of furniture that we’ll be adding under the bike art. Soon I hope!
Update: We finally created this Shop Our House page to help you hunt down any furniture/accessories that you see in our house, along with all of our paint colors.

Jeannette says
your bike picture reminds me of the work of a Swiss artist: http://www.hammertoff.de/the-art-of-clean-up-by-ursus-wehrli/2011/08/28/
He published a whole book with pictures like that from our everyday life. I love them!
YoungHouseLove says
That’s so cool! It’s like http://thingsorganizedneatly.tumblr.com/
-John
jenny says
love the frame idea! SO simple and looks great!
And the make out session is, well, a little disturbing, but quite hilarious too! ;)
Kayla says
There are a few things that I absolutely love about this simple project: 1) love those chunky, easy frames. I think the dark stain really makes them pop. 2) I am really digging the emerald green (at least it looks emerald on my computer screen) in the posters themselves. I know it’s Pantone’s color of the year, and it’s one of my favorite colors to decorate with, even though you don’t see it very often. It also feels a little outside of your typical color wheel, but it looks great in that space!!
Tara says
Hilarious – I just built almost the exact opposite frame setup. I bought a cheap art print on a poster site and wanted it to look like it was on canvas, but it’s oversized and a weird shape and I’m poor. Haha. So I built a faux wood canvase with pine and a piece of hardboard, and midway through I decided staining it would look cooler than painting the sides. It turned out super awesome – as did yours! I really like the bike art, too :)
Emily says
I love these frames. I bought some posters I love froma bull-fighting arena in Spain a few years ago. There are about 3 ft high and no frame I can find anywhere. We tried building something with mitered corners but found it way to difficult. They are not hard posterboard so do you have any suggestions or recommendations on how to add plexiglass?
Thanks!
YoungHouseLove says
If you scroll back a few comments I chatted about how we could add plexi down the line. Hope it helps!
xo
s
Emily says
Where do you all buy the Safecoat sealer? I live in RVA and have checked Home Depot & Lowe’s with no luck. Thanks! Love the new art :)
YoungHouseLove says
We get it at greendepot.com.
xo,
s
Shelley says
Oh, but I LOVE the way the posters look with the table and chairs! It’s got a trendy, European Cafe vibe! I can picture you there, deep in conversation, discussing Nietzsche or the film version of “On the Road”! I love the whole tableau! :)
YoungHouseLove says
Haha! We sound so smart in your fantasy!
xo,
s
Sarah says
Hi! I found this clock on Etsy today and just had to show you, John! I’m sure you could DIY it instead of buy it from the UK.
http://www.etsy.com/listing/101523869/bicycle-wheel-clock
YoungHouseLove says
Really cool!
-John
Michelle says
I see you have your washer and dryer stacked – have been thinking of stacking my front loaders to give me some extra storage space in my mudroom/laundry room. would love any insight you have about it – pros? cons?
YoungHouseLove says
We were sure to order a stacking kit to make sure it would be covered under warranty if anything broke (if you stack them without a kit things can go haywire). We generally have liked the set up since it’s a lot more space efficient for this room (and you don’t have to crouch down as much as you did when they were both on the floor) but we miss the counter we used to have over our others which were side by side at our first house. There are pros and cons to both setups I think!
xo
s
Kathleen@ Home Wasn't Built In A Day says
I think it’s cool when a dude loves his space as much as the chick.
Claire @ Claire K Creations says
They look fantastic and I think I could even manage whipping some up myself!
Ann says
Can you tell me how to make this same frame WITH glass?
YoungHouseLove says
Lowe’s and Home Depot sell plexi (they even cut it to size for you) or you could get a frame company to sell you panes of glass cut to size. Then the edges and corners of the glass will be nice and perfect since they cut it very cleanly for you. We could just use clear adhesive to attach it to the front of the frame and box in the posters :)
xo
s
Amy says
Is that a can of SNUFF in your back pocket?
YoungHouseLove says
Nope, just a tape measure. :)
-John
Tania says
Love this! Before the baby, we had a tradition of renting a tandem bike every vacation we went on and cycling around whereever we were visiting (yes, including Manhattan) so I was thinking of putting up a large tandem bike poster but was concerned about framing costs for such a large piece, but this is a great idea. Thanks once again, YHL!
YoungHouseLove says
So cute!
xo
s
Katy says
This is my favorite post from you guys ever. LOVE it. I think I’ll try this out by getting poster prints of my favorite wedding photos – there are a couple I’d like in huge scale photo canvases, but it’s hard to justify the cost because they are so expensive, we’re in a rental and will likely move a lot in the next 10 years because of DH’s job, and who wants to spend that much money when you’re not sure if you’ll even like them? This will enable me to try the large scale photo thing out very inexpensively AND be able to change them out guilt-free in a year or so. Also, if a mover ruins something that costs less than $20, who cares?
Please do more cheap, personal & rental friendly projects. I could use some ideas.
kit @ DIYdiva says
John – The frames look great! Here’s the thing that always gets me when I’m building my own… if you’re putting something more substantial than a poster in them, the wood has got to have a lip for it all to sit flush, right? This used to drive me crazy back before I started compulsively buying tools (and I admire your tool-buying restraint, as I have none) but all I’m saying is, the palm router is my bff when it comes to frame building these days (like with this chunky chalkboard frame , for example). Do you have one? Or have you built a notched frame to hold glass or mirror without one? I’m curious if someone has found a better way for cheap, quick frames… (I mean you can do it on the table saw, but only if you don’t love all your fingers.)
YoungHouseLove says
Sounds awesome! We have a Dremel that we have used to route things out, but a palm router sounds awesome. Thanks for the tip! Anyone have any other tips/ideas for Kit?
xo
s
Donald says
John – I saw this video just now and thought of you – for when you want to take your picture framing to the next level :) so incredibly easy. wow, I must read like spam. http://www.youtube.com/watch?v=9m4jEiekLKY
YoungHouseLove says
Looks really cool. Thanks Donald.
-John
Andrea says
Just wanted to say “thank you” for this post and how-to! I purchased a VERY LARGE topographic map print from Schoolhouse Electric (which we saw on a house crashing post of yours awhile back) and have been struggling with how to (affordably) frame it ever since. My husband just used this post to create a similar frame and its perfect! Thanks, as always, for your great inspiration.
YoungHouseLove says
Ooh, sounds awesome!
-John
Monica Justesen Photography says
This looks awesome! I never would have thought to do that, but I love the way it turned out!
Angela L says
John, here’s your next project! Check out #8 in this list. :)
http://www.buzzfeed.com/stacylambe/26-ordinary-objects-repurposed-into-extraordinary
YoungHouseLove says
Cool!
-John
marissa says
Happy to see the art found a wonderful place in your home!.. and er, that you loved them so much to make-out with them LOL The darker frame makes it pop so much better than the natural dinky frame in the store. Looks awesome :)
Hanna says
Brilliant! Must go frame something…
Julia says
Thanks for the demo. I just moved into a new place and went to a professional framing shop last weekend to start getting some posters on the walls. I thought I was going to pass out when they told me how much it would cost to frame one poster. I wish I was exaggerating. I’ve got… eleven that need framing.
I’m getting on this! Ordering the wood now. Thanks for giving me a great second option – those posters look baller. I want to make out with them too.
YoungHouseLove says
Good luck Julia! You can do it!
xo
s
Dusty says
I want those prints also! I’m in love with them.
Sandy says
Ok, I’m so very bad at math anyway, but I’m still trying to figure out why the adding one but subtracting blah blah blah for the side part of the frame? I’m sure it’s totally obvious to everyone but I need it spelled out. lol
YoungHouseLove says
The key is just to cut your two short boards 1 inch longer than the art you’re framing and then cut the side boards 1 inch longer minus the width of the two top boards (not the length, just the width). So if your art is 10 x 15, and your boards are .75″ thick like ours, you’d make two 11″ boards and two 14.5″ boards. Because 15 plus 1 is 16, and 16 minus 1.5 (which is .75 x 2) is 14.5″
Hope that helps!
xo,
Katie says
I just came across a photography series called ‘Things Come Apart’ and it reminded me of you. The chainsaw print seems like it could be pretty sweet ‘man-art’ for the basement.
http://www.exposureguide.com/culture/photographer-shoots-50-disassembled-objects-in-photo-series-things-come-apart/
YoungHouseLove says
So cool!
xo
s
deanna says
i know this is way late responding to a jan post in june BUT i came across this art book and was instantly reminded of your bike art! (i want to take the book apart to frame some of the pictures for my own decorating!) http://www.amazon.com/dp/0500516766/ref=tsm_1_fb_s_amzn_moc9d2
YoungHouseLove says
So funny, I just added this to my Amazon wish list last night!
-John
jenn says
I heart my public bike. So I understand.
Scott says
This bike event in Des Moines sounds like something John would like to attend. Lucky for him, you can view the bike art online too.
http://bikemonthiowa.com/pedalart/
It’s a poster party for the bike community! Be sure to stop by the PedalArt poster show gallery opening Friday evening at the new Des Moines Social Club. Last year’s event drew a throng of admirers of bike-themed posters.
YoungHouseLove says
So cool!
xo
s