“How’s it hanging?” That was the big question last week. Not in the “Hey, how ya doing?” sense of things, but more in the “Um, how are we gonna hang this $60 hood we found on Craigslist” kind of way.
Sherry talked last week about how we planned to encase it in a DIY’d wood cover (see inspiration pics back on last week’s post). Both of us were so excited about (1) the price tag and (2) the final look that we didn’t really think through the middle part: actually installing the darn thing. So yeah… #planningfail?
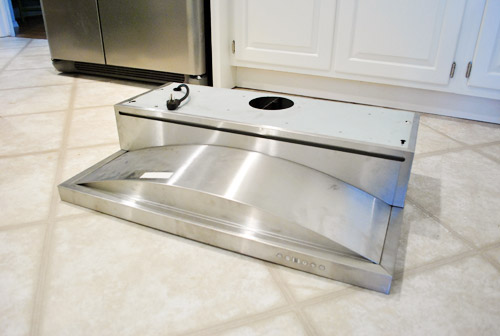
Here was our challenge (beyond just not having any of the installation materials or instruction): this is an under-cabinet hood and, well, we don’t have any cabinets to install it under. I figured that there were dozens of sites online detailing how to convert an under-cabinet hood to a wall-mounted one, so I wasn’t worried… until my Google searches started coming up empty. That’s when I started to second guess our plan. Was this just something that couldn’t be done?
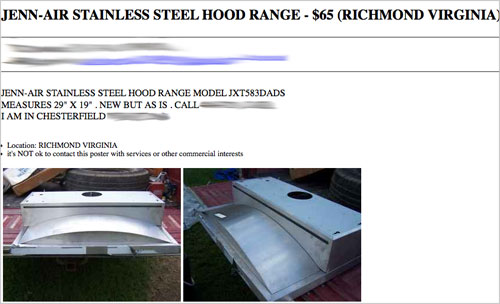
Then I discovered these.

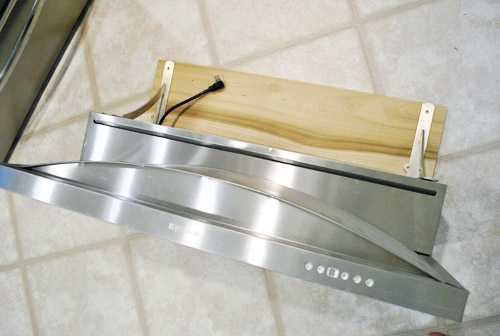
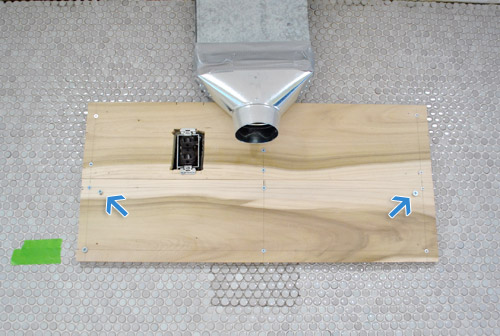
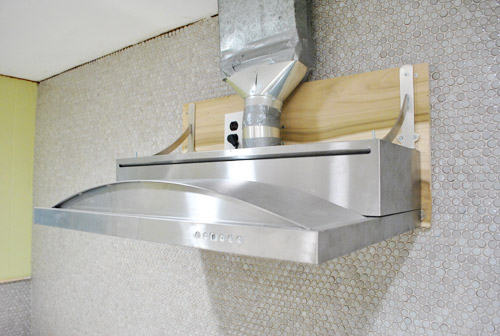
We didn’t buy these (our hood is Jenn-Air brand). But the fact that Kenmore sold bracket specifically “for mounting range hoods to wall when overhead cabinet is not used” meant it was not a completely crazy idea to retrofit ours to hang on the wall as well. So Sherry and I concocted a plan, did some shopping, and readied ourselves for some hood hanging (and possible hood hanging failure, as is always a possibility when we attempt to figure this stuff out as we go). This picture will make more sense soon, but just know it involved some wood pieces as a makeshift mounting panel and some heavy duty metal brackets as a stand-in for a cabinet.
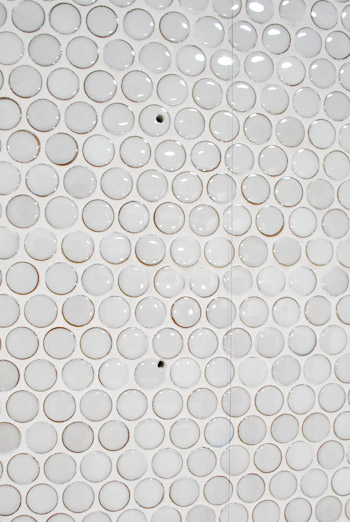
But before we could put our plan in motion, some details needed to be taken care of. You know, little things like oh-yeah-we-didn’t-tile-high-enough-under-the-vent-pipe. Another lapse in planning. Oh well, it took about 20 minutes to whip up a small batch of thinset and fill it in with some spare tiles. Yes, it was slightly maddening to have to go back to the tiling phase (especially for eight measly rows) but by this point we’ve learned just to laugh. Wince a little. Laugh some more. And get it done.
Then we mapped out all the important stuff on the wall to ensure that things would hang where they were supposed to hang. Looks pretty crazy, right? But I promise it makes lots of sense…
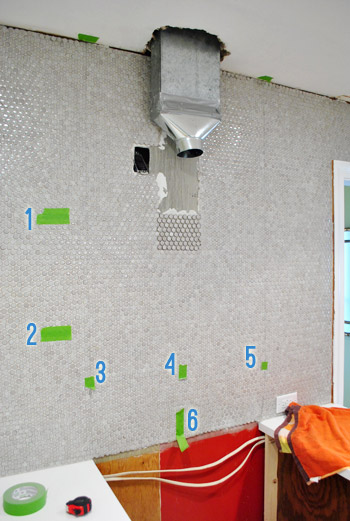
All of this painters tape is marking important reference points, such as:
- 1 & 2: Where our floating shelves would go – important because we wanted the bottom of the hood and the top shelf to be lined up (which was about 34″ from the top of the counter which is right between the hood manufacturer’s recommended 30″ – 36″ distance from the stovetop)
- 3, 4, & 5: Where our studs are – important so we could attach the hood securely to the wall
- 6: The center point of our stove – important so the hood would hang squarely over the stove
In case you’re wondering how I located the studs, it was actually thanks to some forethought on Sherry’s part. Back when that wall was open she begged me to somehow mark where they were before we tiled and covered everything up, so I opted to make small marks on the ceiling to keep track of where each stud was. Then I taped a piece of thread to that mark, tied a paper clip to the other end (to weigh it down) and voila – a perfectly marked stud all the way down the wall. And once we hang our crown molding around the ceiling those little stud-marking dots will be hidden once and for all.

With all of our guides marked, it was time to screw in our first piece of wood. Here’s the deal with the wood. The hood by itself was technically wide enough to hang from two studs, except the studs didn’t line up with the two notched holes in the back of the hood (which were at either end) and I didn’t trust that it would hold that way even if they were lined up perfectly.
So we figured we’d screw a slightly wider-than-the-hood piece of wood into two studs (and use a heavy duty anchor to secure it in a third location) and then hang the hood onto additional screws that lined up with the hood’s notched holes. We actually got a contractor’s blessing (just didn’t feel right drilling into our pretty wall o’ tile without double checking our plan with an expert first. So after that phone call we took a few deep breaths and moved on to the next (very scary) part of our plan: drilling into our tile. GASP.

I bought a special bit that’s meant for glass and tile. It took a bit of pressure, but eventually I got all of my holes drilled. Though I think we both silently freaked out the entire time drilling was in progress.
Once we got over having riddled our tile with holes (okay, there were just six) I used some 2.5″ screws to secure the chunky plank of wood to the wall. I have to tell you, feeling those screws grab the stud so tightly was one of the most confidence inspiring parts of this process. I felt like I could’ve hung my whole body weight from this thing – that is, if I was able to grip the tiny ledge with my lanky girl fingers.
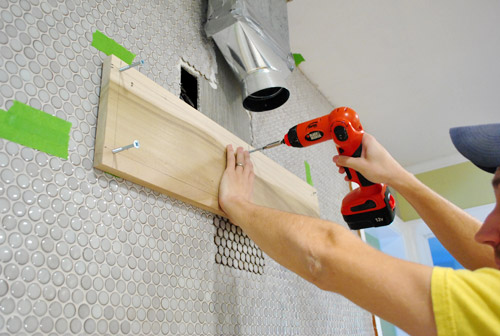
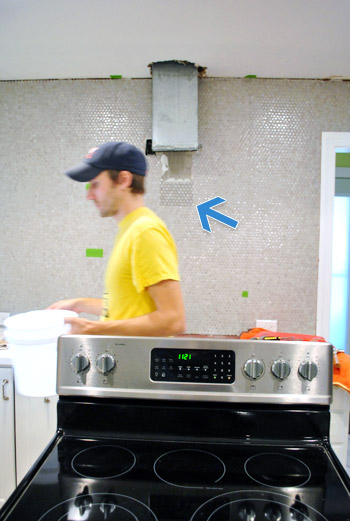
With one board in (to hang the hood from) I then had to attach a second one (to hang the brackets from) also with long screws into two studs and a third set of screws into heavy duty anchors to further enforce things. Then it looked a little something like this. Note: the vent pipe is slightly off-center, not the boards (so once we build the frame for the hood that will be solved and it’ll all look centered). Oh, and the blue arrows are pointing to the two screws that the hood will hang from.
We felt pretty good when we realized that most upper cabinets are just held to studs with screws and then loaded up with dishes and plates and other items (and then a hood might be added on top of all that weight) and the whole shebang stays up.
Speaking of which, it was time to put the hood up (since the brackets would need to go up after the hood). Okay, so maybe this part was scarier than drilling into tile. We half pictured the whole wall of tile pulling off of the studs. But lucky for us, it didn’t budge. It was up there solid as a rock. Which is good news, because clearly I could use less time worrying about hanging hoods and more time spent shaving…
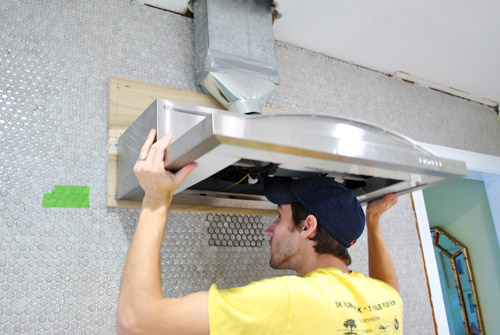
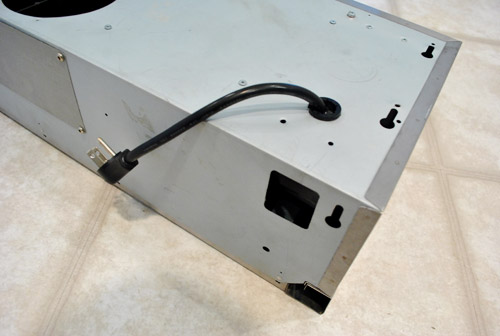
Anyways. Sherry supported the hood just in case (she’s the perfect height to rest it on her head from underneath it while standing on a small stepladder) and I attached the brackets to the wood panel and then into the hood using the same slots where it would’ve attached to a wall cabinet.
It was feeling plenty secure by this point, so I relieved Sherry’s head from hood-holding duties while I secured the second bracket and she took some more photos.
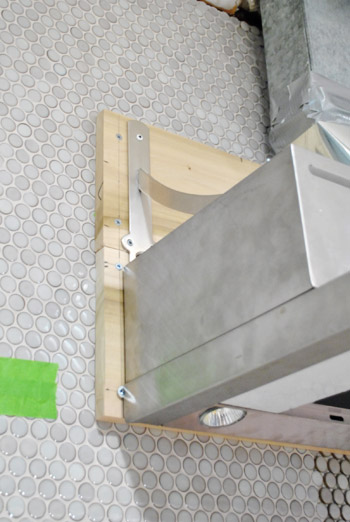
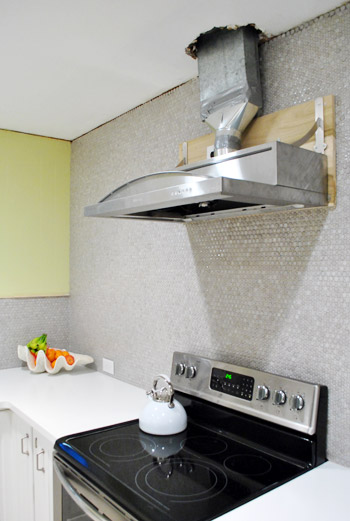
Once it was tightly held to the wall, I took care of some of the finishing touches – like attaching the vent pipe to the hood and plugging it in (btw, how lucky were we that the existing plug hole in the range hood was pretty much perfectly placed for our outlet???) – and we were in business. Phew! Update: We’ve since learned that metal foil tape (sold at hardware stores) is better for taping that duct together than duct tape (regardless of the more fitting name of the latter – haha) so we’ll be retaping that vent with foil tape to keep the seal nice and strong for the long term. Thanks for the tip guys!
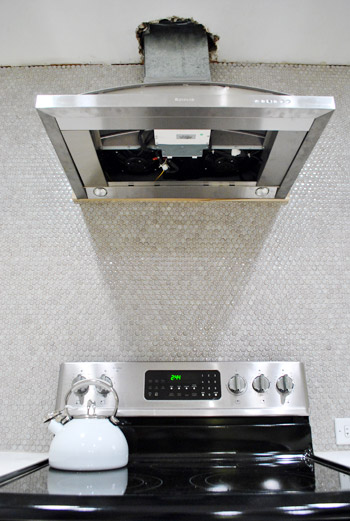
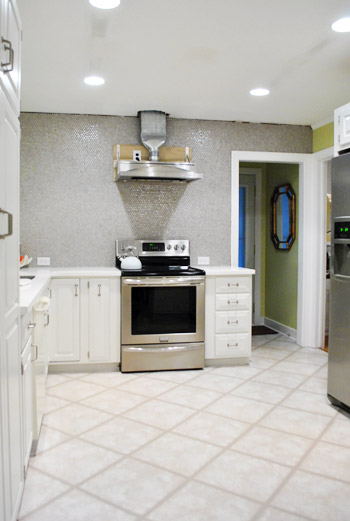
Okay, so admittedly it looks kinda ugly right now. The exposed pipe / wood / giant hole in ceiling aren’t really a good look, are they?
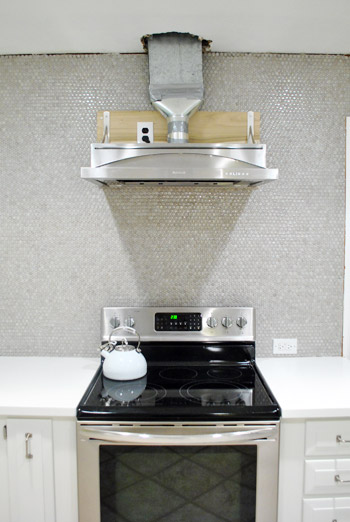
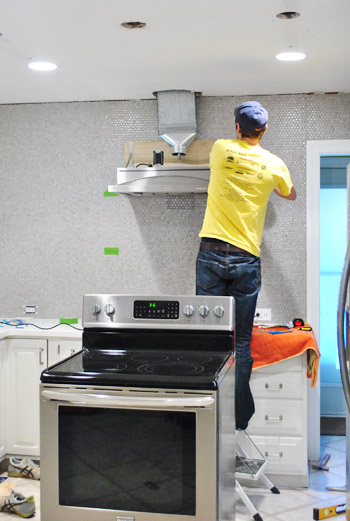
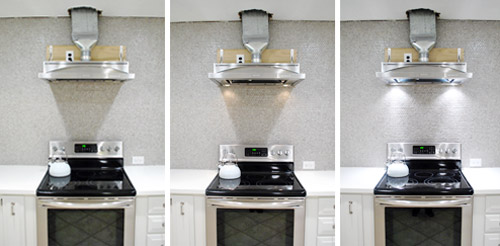
But it was a good start. Not only did we have a hood for the first time in over two months, but we had a hood that wasn’t crazy close to the stove like our old microwave was (we hung it 34″ from the top of the counter which is right between the hood manufacturer’s recommended 30″ – 36″ distance from the stovetop). And this hood has two fancy light settings. Oooooh. Ahhhhh.
And I know the exposed wood looks kinda crazy – especially because it sticks out about an inch on the sides. But I promise this is all part of a plan (hint: they’ll make for a good spot to attach my homemade wood hood cover), so just bear with me for a couple of days.
Oh and don’t mind this POV, we didn’t have the filters snapped in yet (they’re basically big stainless steel rectangles, so it looks a lot better from below once those are in). We’ll have to share more photos soon.
Now in case you’re still worried about this thing coming crumbling down overnight (we were – we actually pulled the stove out before we went to bed the first night just in case!), know that it has survived a few full days now with nary a creak or shake. So without jinxing ourselves, Sherry and I are calling this hanging project a success. All is good in the hood, as they say. Between the long screws going firmly into those studs and the heavy duty brackets also adding extra from-the-top support, this guy is pretty darn secure. So after a few days of breath-holding, Captain Careful can officially exhale.
Now for the fun (?) part – building a pretty wood cover for it. Somebody crank up my jams! We’ll be back with all those details in a few days, but in the meantime, what did you guys do this weekend? Any heavy-object hanging? Tile drilling? Using your head to support something? Oh and something crazy crazy crazy is going on in our house today (well, it starts today and lasts for the next three weeks!!!) so we’ll fill you in on all that tomorrow (once we have lived through one day of it and have some photos to share).

ScullyPA says
Good to know that not all jobs have to be thought through all the way in order to make it work. : ) My husband and I are redoing a bathroom, and I didn’t know how to patch the holes left from the old ceramic toilet paper holder and towel bar. I just picked up some patches from Lowes, and then looked up what to do with them after I slapped them on the wall. I was dismayed to learn that the mesh should have been reinforced and/or bigger than what I used. However, I kept at it, and I think it will be ok, so long as no one decides to push hard on the wall, which may be ok, considering their location. (I was waiting to see you guys patch the holes in your ceiling, but I’m impatient and want to get ‘er done.)
Mental note — do the research first. I just thought it looked easy enough.
Kitchen is looking great!
James Olsen says
You know I am pretty much in the minority here, being a guy who is totally into all this DIY stuff, the wife laughs that I am trying to get my own blog off the ground…But I digress, I have a question about the hood, is all the other ducting and such already installed into the wall or are you going to have to do that as well?
YoungHouseLove says
Luckily all of the ducting was already there so I just had to attach it. Phew!
-John
YoungHouseLove says
Thankfully that’s already in there, so we just had to connect ours and it was ready to vent!
xo,
s
Sam says
I just wanted to say how wonderful your kitchen looks so far and I can’t wait to see the new range hood. You guys are so inspiring!
erika m says
Looks great…even with the exposed stuff…I can imagine it coming together…great job!
jackie smith says
LOOKS AMAZING!
we gutted a kitchen & some gross drywall from our rental property this weekend & bought some laminate to put down…now need to decide about the trim…leave or paint?
Shelley @ Green Eggs and Hamlet says
Looks awesome, you guys are such an inspiration!
As cool as it would be if I could say I did a building/installation project like this, my Sunday was spent helping my mom paint her bathroom. SHe had torn down the old wallpaper about 9 months ago and had never progressed to the painting stage so we finally did it this weekend. It looks great! Nex tup is painting and glazing her bathroom cabinets.
kaylan says
looks so good even in its unfinished state! i’m really looking forward to the budget breakdown at the end of this project… the saves here has to be substantial.
as for my weekend – we (perhaps naively) decided to paint our apartment. after 6 hours we’re halfway through priming… and our apartment is only 488 sq/ft. the prep work was a lot more time consuming than i expected. it will be worth it in the end though, i have faith!
heather says
Yay for a range hood! I dream of having one someday (that and a six burner stove with double ovens – unlikely). This weekend I was exhausted from not sleeping well, so I feel like I did nothing but I guess we got some stuff done. The hubs finished and oiled our walnut shaker side tables (reveal post in a few days one they are cured and put in place). Then I threw my Carhartt’s on and crawled my butt up into our barn to grab some salvaged pine boards so I could build a basic shelf above our laundry area to hold everything. It’s still drying now (we used biscuits and glue to join them, so it takes a few days). Besides that I worked on our wedding album (yay for that place you recommended), crocheted some more rounds for my rug, made a batch of soap and started rebatching some other scraps of soap into new bars.
It sounds like a lot more now that I write it out haha. It really wasn’t.
Erin @ His & Hers says
Hmm…something that will last 3 weeks and you’ll want pictures of. I have a few guesses: A) Sherry will begin counting her ceramic animals; B)Clara will paint a room; C) you’ll take down all of that gorgeous tile and put up a plaid bunny wallpaper border instead. Am I close? ;)
The hood looks so snazzy! Glad it worked out with attaching it to the wall so you didn’t have to scrap the whole thing.
YoungHouseLove says
Haha- sorry to say that you’re not close at all. But I appreciate the imagination that went into those guesses! Haha.
xo,
s
Shawn says
Two things – (1) Good job. What a great post, and adventure in home reno. Who knew how much goes into hanging a vent hood? (2) I’m impressed with your drill (I’m in the market for a new one). Can you tell me what you use? Keep up the great work!
YoungHouseLove says
It’s just a Black & Decker battery one (sometimes we use a plug-in one for more power) but we like it! It’s from Home Depot and was around $39 I think.
xo,
s
Judy says
It looks great. This whole kitchen redo has been very interesting. I can’t wait to see the final result. How do you turn the hood on? I can’t see any buttons. Can Sherry reach it?
YoungHouseLove says
Haha- yes! They’re about two inches above my head so it’s just a raise-your-hand action like working our stacked dryer.
xo,
s
Addie says
Eeeek! You guys are ahhhhhhMAZing! I’m always impressed when you’re able to hack something to make it work for you. So, so cool. However, today’s post made me especially happy because I’ve been patiently waiting for you to drill into those purty penny tiles.
See, I want to hang open shelving in our kitchen, and we have floor to ceiling white subway tiles. I haven’t even mentioned it to my husband yet, because I knew he’d flip out at the idea of us drilling into those tiles. So I figured I’d wait for you guys to do it, so that I can show him how it worked for you. Sometimes our DIY-confidence is lacking, and we turn to you for inspiration and support. So thanks!
Speaking of drilling into hard materials, though, I’m listening to the grinding sound of our plumber chisling into the cement walls of our basement. We got home last night from a weekend away and discovered water pouring into our boiler room. Ack! Nothing in the basement is ruined, though, except the wall, because the water is coming out about 3 feet from a drain. Small miracles.
We knew this was a job for da pro’s, for sure. Turns out the supply pipe to our whole radiator heating system failed. Sigh. It’s a good thing we love our 1930’s row home!
Thanks again!
Krys72599 says
We finished putting up our bedroom fireplace – have only to add the mantle and it will be done! Since it’s at our lakehouse we can only work on weekends… Sorry the ladder’s in the way!!!
http://www.flickr.com/photos/krysjack/6790662891/in/photostream
YoungHouseLove says
Woah- that must have been a huge job! Amazing!
xo,
s
Ofelia, México City says
This hood looks so wonderfull… What is next? The floor? The waiting is killing me.
Beth says
Yay! It’s really coming together! I’m guessing (hoping) that the multi-week happening is your new floor. I’m excited about that part…. oh the anticipation!
Amber Young says
Hey you two – just wanted to drop in & let you know I nominated you for the Versatile blog award! My husband & I are inspired by you everyday to tackle our projects DIY style! :)
http://eternally-red.blogspot.com/2012/01/sweet-blog-award.html
YoungHouseLove says
Aw thanks so much! So sweet of you!
xo,
s
Mandi says
I’ve been reading your blog since I read about you in the Washington Post. We live in and renovate old homes, too, so you guys are right up our alley. (But, we’re not bloggers, so… oh well.)
Just another little piece of encouragement for you guys- I love your house, your blog, your kitchen, Sherry- your hair!, and reading about your house changes and lives in general. As you said, keep on keeping on! I think you rock.
Amber Wallace says
This is so awesome! I am loving all the progress and would love to install a back splash and hood someday. Keep up the great work!
Ashley @ sunnysideshlee.com says
It’s looking great guys! Coming together beautifully!
mp says
MUCH better than the microwave!!!
Nicole Y. says
Ok so this is totally unrelated, but I just find myself having to scroll through the whole post every time I want to see comments. Whether it’s clicking on the number of comments at the top of the post or going to the next page, I’m usually sent back up to the top of the post, then I have to scroll all the way down. Is it possible to program the website to take us straight to the comments section? Or am I the only scary stalker reader that likes to read lots of comments and needs this feature? :)
YoungHouseLove says
Hey Nicole,
If you click the comment box at the top of the post it should jump you down to the comment section – but sometimes it takes a second for the page to fully load for the jump to happen, so maybe that’s why you’re not seeing it immediately? Sorry if it’s not working for you.
-John
Nicole Y. says
I guess I’m just too fast for my computer! :) Great job on the kitchen, so excited for more updates!
Samma says
Nicole, when I click ‘next’ it jumps down to the comments for me, too. But not until after the page loads first — I just use the time to re-enjoy the pictures =) I read in Google Chrome.
Teresa @ wherelovemeetslife says
Before I read this whole post I tried to imagine how you guys hung this thing… and it seemed like it would be really complicated! You guys made it look super simple :)
And what a teaser! lol, can’t wait to see what you guys are up to!
Emily says
This looks so great! I would be freaking out about drilling into that tile too, and having all that just fall down around me. Sounds like y’all are extra careful though and make sure to do it right the first time!!
We were busy busy busy this weekend, working on multiple projects. I got my garden started- I can’t believe it’s already time to plant again!! http://davenportdiy.blogspot.com/2012/01/crowded.html
Amber Merkel says
Love John’s Lanky Girl Hands comment. Almost thought Sherry started writting for a second.
Jill says
I was on the fence about the penny tile back splash, but now that it’s all coming together I love it! I want to marry that wall, okay maybe not literally (not like the crazy lady that married a building this last weekend in Seattle,WA) but definitely has wheels turning in my head for our upcoming kitchen remodel! Thanks for all the the great inspiration!
Teresa says
It looks great! I’m thinking of doing something similar to my own home and it’s nice seeing the steps involved. I love everything about your kitchen.
One thing however… You should probably use aluminum tape on the duct rather than duct tape. I’m not sure why they even call it duct tape since it’s good for just about everything, except ducts.
Keep up the good work!
YoungHouseLove says
Yep, we’re gonna make that switch!
-John
YoungHouseLove says
Thanks for the tip! We added an update to our post about that and plan to change it out soon!
xo,
s
Erin says
How’s It Hanging? Too funny, your blog makes my day.
Julia says
Seeing the photos of you all drilling into that gorgeous tile! Eeek!! You two are much braver than I! I am so glad it worked out though, and I can’t wait to see the finished results once the range hood cover is in place. :)
•k• says
So funny to see you post this because I’ve been staring at a hole in my ceiling and a range hood that is up, but still covered in white plastic for about 3 months now. We need to figure out how to shorten the chimney pieces that will cover the mess similar to what you are looking at now and are just scared to make the cuts. We also had the silent freak out while drilling into our tile. You’re moving faster than we are, that’s for sure! Good work.
Emily says
This has nothing to do with this post but since you love pinterest so dearly I wasn’t sure if you had seen the “gawker” sites. There is foodgawker, craftgawker, weddinggawker, and dwellinggawker. They have some really neat stuff!! Thought you might want to check them out!! And there is an app for each of them on the iphone!
robyns says
My DIY project for the weekend was replacing some ugly wooden drawer pulls on a yard sale dresser with these beautiful ones that I found at Pier One. They look like giant turqoiuse dandelion heads. I pet them every time I walk by. And even though they were 8 dollars each and I needed 8 of them, I only paid about 18 dollars for them. Thank you Christmas gift cards! My husband doesn’t get the concept of girl math, he keeps saying “I can’t believe you spent $64 on knobs!” And I’m like, “I didn’t! I spent $18!” You understand right?
YoungHouseLove says
Wahoo! That’s so exciting. They sound totally gorgeous and fully pet-worthy.
xo,
s
Stephanie says
We installed new countertops, sink and faucet this weekend. We have made a total of 5 trips to home improvment stores but are getting close to being done. The countertops are done we are just having problems reinstalling our garbage disposal…it’s the stuff that you don’t plan on giving you problems!
Your tile and hood look great!
Amy @ Lovely Nest says
Of course you two would DIY something like this and it turned out great! Can’t wait to see the whole hood finished! The kitchen is looking so pretty!
Jennifer says
So. I guess I am not getting it. Why didn’t you hang the hood first and then tile around it? Right now it looks like you are going to cover a great deal of tile with a wooden cover, which may look fine against the remaining exposed tile, but I was just wondering if this is the customary way to do this: tile first, cover a lot of tile later with a hood. Because I would just not want to waste money on tile if I could install the hood first and tile around that. But I am sure the end product is going to be WOW, as per usual.
YoungHouseLove says
We knew that cutting penny tile was a pain from our first four hours of trying to figure it out, so we knew that if we installed the hood we would have to tile all around it (make a ton of cuts) so we opted to adhere the hood and shelves afterwards just by drilling through the tile. We still didn’t tile all the way behind the hood, and actually got to return a ton of extra tile so we ended up under budget. There are probably lots of ways to do it though so we just took a guess and did it this way and thankfully it’s going to all look seamless once we add the hood cover (which has always been the plan). Hope it helps!
xo,
s
Abby J. (formerly C.) says
Wow, this is definitely one of those projects that I could not visualize at all until I saw it hung on the wall. Can’t wait to see what the hood cover looks like!
We had a pretty heavy duty weekend too, built some Ikea cabinets with glass fronts to store all our wedding gifts!
Leila says
LOL I cant believe you were tackling this project while I was out buying my very own hood . http://www.windsterhood.com/products_hi30.html
This week we will work on add some glass to our cabinets doors, and the finish painiting.
But tonight we will go out to buy the tiles.
So for the next month we have, tiles + finish upper cabinets + hang new hood , sell old microwave… Im tired already lol
YoungHouseLove says
Haha – you can do it! I’m rooting for ya!
xo,
s
emansfield says
I love my high powered hood! There is nothing like firing that bad boy up when you’re cooking onions or something that smells up the whole house. You guys are going to LOVE it!
Wendy says
Your penny tile wall is looking great. I am wondering how you find the drilled holes in the tile wall when you are screwing the board in? Do you just measure the board? I have had trouble hitting the holes with my screw when I do this and I wonder if you have any tips. Thanks.
YoungHouseLove says
I put the screws into the wood enough just so the tip was sticking out the other end. Then when I put it against the wall the I could feel the tip fit into the hole, meaning I knew I had lined it up with my pre-drilled holes.
-John
Patti says
I love how you guys just hold your nose and jump in, I can really see it all coming together now! And the title of this post is perfect for the hood and how you left us in the end … hanging!
miriam says
This weekend was a DIY failure for me… first I tried to hang a towel hook by our bathroom sink, and ended up knocking a few too many holes in the wall. This led to my first adventure with drywall patches.
Then our dishwasher broke and after fiddling with it for hours, we finally called the repair shop… to the tune of 225 clams. (At least this failure wasn’t our fault; the dishwasher needed a new water valve.)
Finally, we rearranged some furniture in our bedroom– no disasters there, thankfully! Here’s hoping that next weekend is a little less failuriffic!
YoungHouseLove says
Oh bummer – so sorry to hear it!
-John
Dee Dee says
I hung curtains ( for the first time ever!!). I’m amazed at how much it changes my living room, and slightly ashamed at how long it took me to do it ( I had the curtains lying on the living room floor in their shopping bag for months!)Can we say dude, get on that?!
I felt so triumphant about hanging them on my own, with only minor problems, that I went out and bought supplies for a pinterest project I’ve been meaning to do….supplies which are currently sitting on my living room floor. sigh.
jeannette says
to see you two attack mysterious and scary projects one after another is beginning to restore my faith in humankind. ruh roh.
Georgia says
You guys amaze me in your braveness. You absolutely rock the DIY. I would be terrified about trying to hang something like that.
Rachael says
Oh, man! I am so excited to see it all finished. The anticipation is killing me :) I didn’t do anything nearly as great (or heavy-lifting) as you guys, but I did finally finish our hall bath makeover… woot! http://willowbeehandmade.com/2012/01/30/hall-bath-makeover/
Gwenalyn says
I did some hanging this weekend… but nothing quiet so heavy or complicated. I was also hanging out on your blog drooling over inspiration rooms. http://randomrantingsofaramblingredhead.blogspot.com/2012/01/roman-shades-and-living-room-envy.html
I can’t believe how quickly your kitchen is coming together, it looks amazing! We have a hood over our range, but we didn’t find out there wasn’t a vent until after we bought the place. Doesn’t do us a lot of good! Guess we’ll have to figure out how to vent it eventually! Glad yours is in working order! :)
YoungHouseLove says
Aw man, I hope you guys can get that working someday! You’re so sweet to drool over our blog this weekend.
xo,
s
Jace says
Wow, a really impressive install. The hood is beautiful and no doubt functional as well. I have a question about purchasing big ticket appliance items from Craigslist. Not that this was very “big ticket” at $65, but the principal still applies. Are you ever concerned when making a purchase like this that you’ll get it home and it won’t work? I’ve considered buying an appliance or two this way before, but I always get cold feet when I think about spending a few hundred dollars on something that I can’t plug in or check out first. Do you have any thoughts/fears about this?
YoungHouseLove says
Oh yeah, and we had a moment after hanging this where we thought it wasn’t working – just ended up I still have the power turned off! But we did hold our breath a little bit, but we figured at $65 it was worth the gamble.
-John
Colleen says
I’m sure it will hold! You guys are very careful.
Not at all like the previous owners of our home! Last fall I was startled by a huge crash. After looking all over, I discovered that the very large cabinet over the toilet had come crashing down (along with everything inside it)!! Luckily no one was “using the facilities”!
It must have been slowly pulling away from the wall for years!
alg at rental house rules says
Dudes… stressful!! Good work!!
Kudos for keeping at it — where there’s a DIY will, there’s a way, right? ;)
cheep3r5 says
Probably already mentioned but…
Rangehood kit
http://www.thisoldhouse.com/toh/photos/0,,20339217_20731402,00.html
Also I saw a blog where they built a rough in with 2 x 4 then it was just a matter of details with plywood box, mouldings, etc. and paint. If I can find the blog, I will post it. I think I their kitchen posted on my Pinterest Kitchen Love board. (http://pinterest.com/hollyr4/kitchen-love/)
YoungHouseLove says
Off to check them out!
xo,
s
Joy says
Woot woot! Lookin good! Last weekend my boyfriend and I replaced our old leaky 1960’s salmon low profile toilet. I had grown pretty attached and had mixed feelings about replacing it with the standard white one (I did splurge for the eco friendly dual flush with the fun buttons!) Thank god I had been browsing your posts and found your step by step guide. I ordered it online and didn’t know I needed a new wax ring! Alas we still had to make 3 trips to home depot! Pretty typical Joy and Jeff project! :) Well wouldn’t you know it… this weekend our old faucet started dripping at an alarming rate! So in true Jeff and Joy fashion we decided to replace it…and yes, we had to go to home depot 3 times before we had it all hooked up right! Geez Louise!