How you like them handles?
(Handles, apples. It’s all the same. Right Matt Damon? What? You don’t think Matt Damon reads this blog? Of course he doesn’t.)
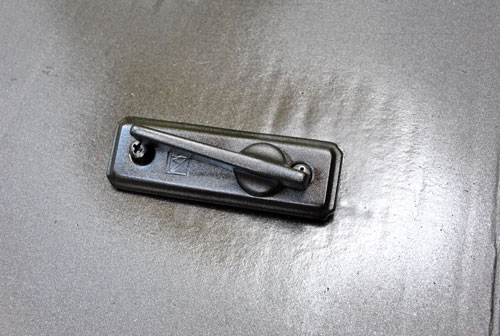
Anyway, I’m back to share the hardware makeover play-by-play and a ton of pics that we couldn’t squeeze into our door-painting post on Wednesday. So fasten your seat belts. Oh yeah, it’s gonna get crazy. First I have a secret. The hardware on our sliding doors in the living room looked like this:
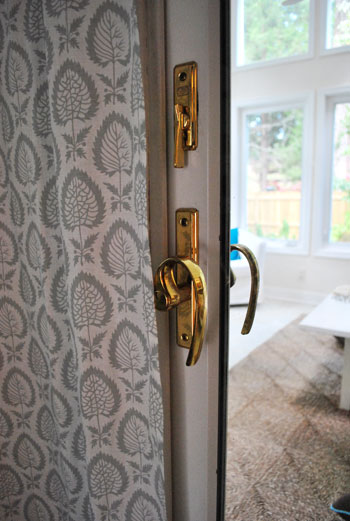
Le yikes, right? It’s all sorts of bad with the swoopy handle. If you look a little closer it’s not even shiny and new looking gold, it’s all rusted and neglected…
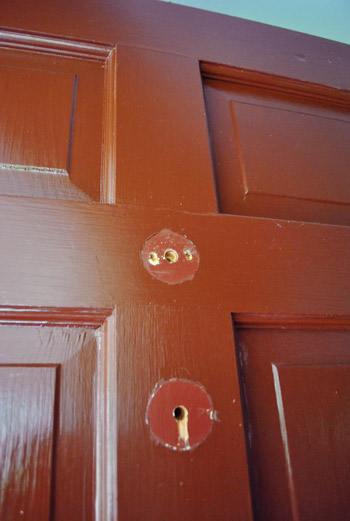
So as you can probably tell from the photo above (duh) down they came. We stripped the hardware off of both of the sliding doors in about five minutes (I took one side while John got the other one) by just unscrewing things on the front, back, and side to free them with a regular old philips head screwdriver…

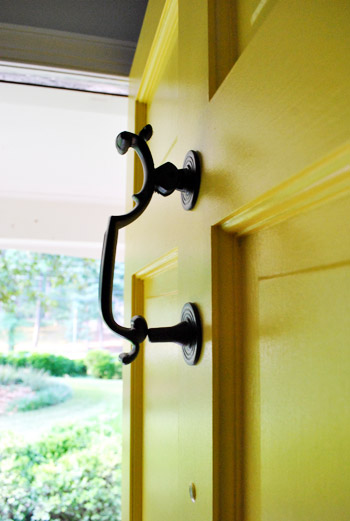
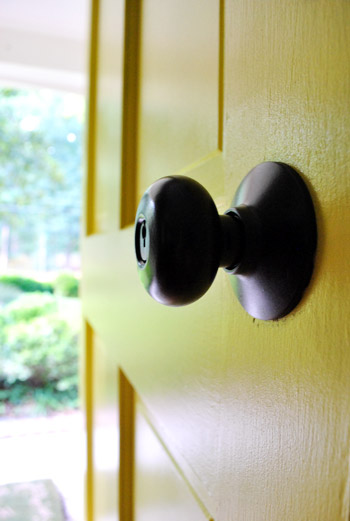
… and then we removed the doorknob and the rusty old door knocker on the front door (also with a screwdriver – there were exposed screws that we just removed from the back).

You can check out our door-painting post for more details on that stuff (like how we sanded the paint around the hardware that we removed so it was nice and smooth before painting).
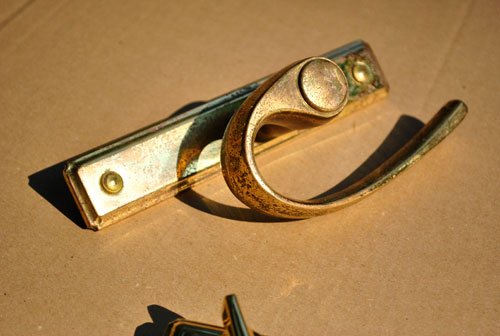
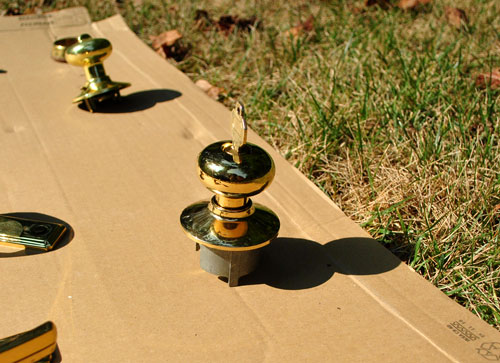
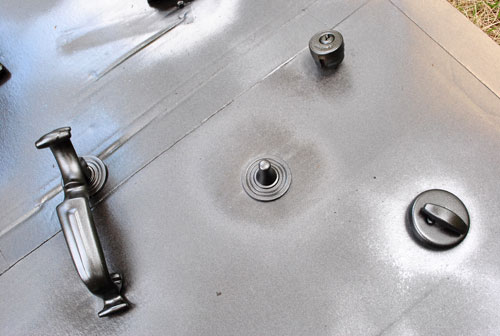
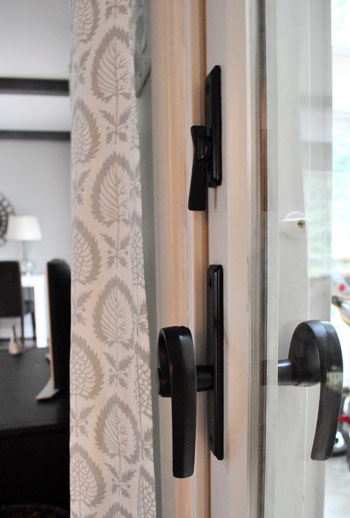
But back to our pile o’ removed hardware. Here we have the sliding door hardware along with the doorknob, deadbolt, and the door knocker from the front door:
It was like a Gold Hardware “Where Are They Now?” Special on VH1. Some folks weren’t as crusty as others, but they were all well past their prime.
So after some decent amount of online research and chatting up the paint pros at Lowe’s (there’s a woman at the one near us who is phenomenally knowledgeable) we learned that the most recommended method for refinishing hardware (to gain the most durability and long-lasting finish) was:
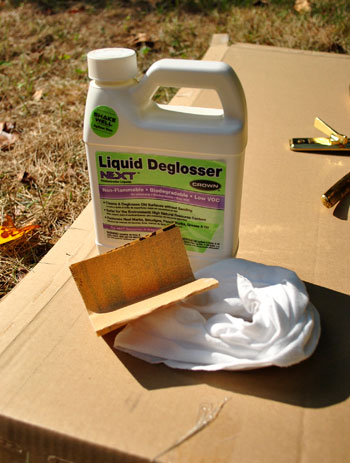
- Sand as much of the hardware as you can with high grit (200+) sandpaper to rough it up
- Use a liquid deglosser (like this one) to degloss everything to get oils and sanded particles off of the hardware before spraying
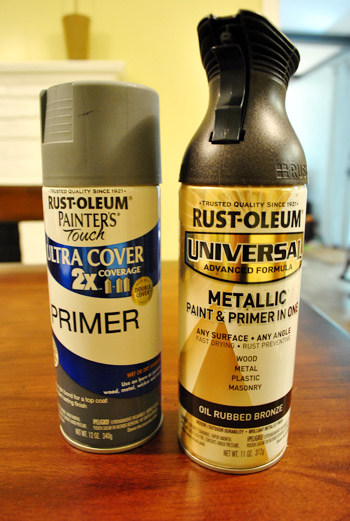
- Apply one thin and even coat of high quality spray primer meant for metal (we grabbed Rustoleum Painter’s Touch Ultra Coverage Primer in gray since we figured it would blend more than white)
- Apply two to three thin and even coats of high quality spray paint meant for metal in your color of choice (of course, our poison was: Rustoleum Universal Metallic All-Surface Spray Paint in Oil-Rubbed Bronze)
So I grabbed my high grit sandpaper and started on the first step: sanding.
Ahhhhhhhhh. Baaaad idea. The sandpaper left tons of obvious scratches in the gold finish that I knew wouldn’t completely be covered by thin coats of primer and spray paint. I should have taken a picture of the one side of the doorknob that I thought I ruined with the dumb sanding step but I was too busy freaking out. So naturally I made some sort of sound that resembled a walrus screaming and chucked the sandpaper as far away as possible while cradling/apologizing to my doorknob and promising him that I’d never hurt him like that again. Luckily I realized the knob would be installed with that part underneath, so only Clara-height children may be able to see the slightly roughed up texture on the underside. Whew.
Update: A few smarter-than-me commenters recommended trying steel wool or super high grit automotive sandpaper to rough up the surface, so I plan to try that next time. Just tossing that out there for anyone who might be doing this (who may want extra “insurance” that the spray will hold).
So it was out the window with step one, and on to step two: deglossing. I just used some rubber gloves and a rag to apply the deglosser and then let everything dry a little so it wasn’t soaking wet before moving onto step three: applying one thin coat of spray primer. But when I went to grab the primer I noticed something intriguing on the ORB can next to it. It said “paint & primer in one” right on the label. Duh. No need to beat a dead horse.
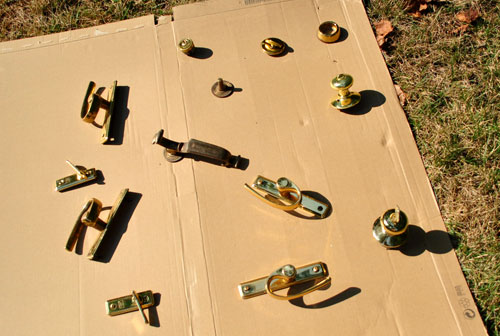
So I trusted my beloved ORB spray primer + paint to lead the way and just applied three thin and even coats to all of my hardware (that I strategically placed on cardboard so I could access all of the exposed parts by piercing the long metal interior hardware rods through the cardboard so they stood up). I will now repeat that thin and even is the key when it comes to spray paint. If you apply thin & even coats they won’t be globby and thick, and they’ll bond/cure very strongly, which will greatly reduce any issues with things flaking, scratching, or peeling down the line.
Oh and see that key? That’s a secret.
I decided I didn’t want to muck up the inside of my lock with spray paint, so I used a spare house key to block the spray from getting into the lock (while allowing me to access the rest of the knob). I didn’t push the key all the way in for fear that the top of the key would block some of the outside of the doorknob, so I just stuck it halfway in so it would block the interior part without inhibiting access to the metal facade around it. Then I just removed it and used it on the deadbolt’s keyhole when I sprayed that.
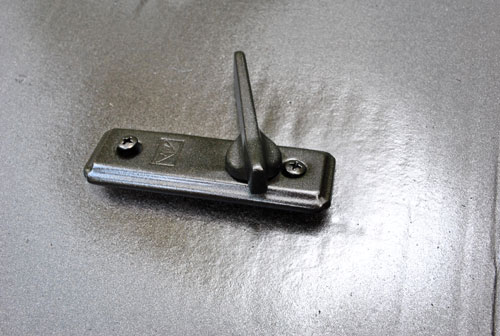
Oh and another spraying tip would be to put all of your screws into the hardware and pierce them through the cardboard so the ends of them get sprayed to match (like the two that you see below). Also, be sure to move things like latches back and forth between coats to make sure you can access all areas of the hardware with spray paint. Like this…
… and this:
About an hour later (I probably waited 20 minutes between each of my three thin and even coats, just to be sure it was nice and cured before piling more on) I was left with these beauties:
Who sees a winking face? Just me?
I probably waited six full hours after my last coat of spray paint before reinstalling anything. Just to give them a lot of time to fully cure and ensure that I wouldn’t scratch or ding something while putting them back on the doors. I can’t speak to the long-term durability of this process since it has only been… oh, about 48 hours. But I can tell you that reinstalling them went really smoothly and everything works just as well as it used to and nothing was even remotely marred or dinged during installation or in the past two days since.
So I guess we’ll check back in with an update about how they hold up over the long haul (these doors are used every single day thanks to a dog who loves going in and out). But so far, so good. And it definitely beats buying all new hardware (we figured we didn’t have anything to lose in trying to make the old stuff work before resorting to trashing it and splurging for all new hardware).
Oh and it bares noting that things look pretty black in some of these pics, but it’s just because ORB is a mystical creature. So it’s hard to capture the true color that you see in real life (which is a rich metallic-y chocolate). Actually, the exterior sprayed shots above show the true color really well. It still looks like that inside, it’s just seemingly impossible to get it on film.
Perhaps the most exciting thing is that in taking this style quiz, the thing that I loved most about the room they said was “my style” was the white door with the dark hardware. And now it’s mine. All mine. Mwahahaha. (<– yup, I broke out my maniacal laugh)
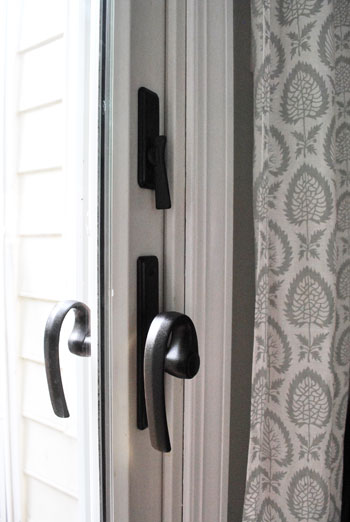
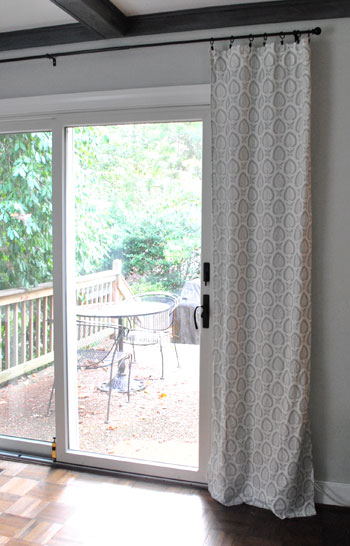
I think it looks delish with the oil-rubbed bronze curtain rods and the dark beams. And John digs it too (delish just isn’t an adjective he’s apt to use).

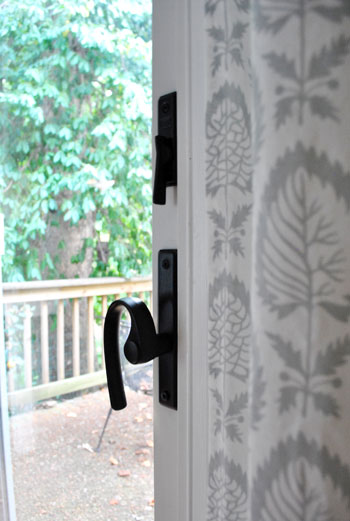
Me-ow old sliding door friend. My how you’ve matured. Well, as much as a twisty twirly old 80’s knob can really mature.
And you’ve already seen our freshly sprayed front door hardware, but let’s just revisit it for a moment:
So yeah. We’re happy with our little almost-foiled-by-the-sandpaper process. Although I must admit that after I sprayed the underside of the knob, the scratches were hardly noticeable. So maybe if you’re a staunch rule follower (and not a freaked out walrus impersonator like me) you could get away with the sanding step. Either way, I have high hopes that the deglosser and included-primer will do their job when it comes to adhesion (especially since our old scratched and rusted fixtures weren’t too glossy or shiny to begin with).
As for the ORB finish: Hi my name is Sherry, and I’m addicted to oil-rubbed bronze. They say you can’t help who you love. But it could be worse. I could be addicted to sanding things, which would have been a cruel joke since sandpaper was the kryptonite of this project. I wonder why. Has anyone else successfully sanded their metal hardware before spraying it? Was it not all scratched up? Maybe it just looked “brushed” in the end? I just didn’t trust myself to do it all in one consistent direction (aka: not make a hot mess that was oh so obvious after the spray-job). So in summary, my method was just to: use a liquid deglosser (although I’ll also try steel wool or extra high grit sandpaper next time), lay everything out on cardboard standing up so it could be sprayed evenly from all angles, use a half-inserted key to block any keyholes, spray everything thinly and evenly in 3 coats applied every 20 mins or so, be sure to move toggles and locks so all parts of the hardware were sprayed, and let it cure for about 6 hours before rehanging it.
Oh and the total cost of this project was $6 for the spray paint (I was able to return the unopened can of primer and I already had the deglosser and that dastardly sandpaper on hand). But for someone who needs to purchase deglosser, you might want to budget four more dollars for that. Considering a new knob, deadbolt, knocker, and two locks and four handles for our sliding doors would probably come to about $200, I think we got one heckova deal. So I’ll let you know how they hold up. If they’re anything like our ORBed sofa legs (which we sprayed five months ago, and they still look mint) we’ll have bona fide jazz hands going on. So it’s probably only a matter of time before I really go nuts and remove every last interior brass door and hinge and go to town. Like I said, my name is Sherry, and I’m addicted to oil-rubbed bronze. Holla.
Update: Our handles are still holding steady. Check out the update post here.
Wanna know where we got something in our house or what paint colors we used? Just click on this button:

*This post contains affiliate links to items we have purchased and loved*

Cate says
We just bought our first house (closing in just a few weeks!) and I was commenting about how much I hate brass hardware and want to replace it. After searching online and realizing what an expensive task it could be (not that it’s realllly expensive, but we are young and would rather put that money toward something else), I was getting discouraged. This post is amazing and perfectly timed! Can’t wait to be able to try this out once we are in the house!
Thanks so much! We read your blog all the time and find so much inspiration, especially since a strict budget is always important.
Emily Knoll says
Hi Sherry, I love ORB too and have been searching for new bathroom faucets (didn’t realize how expensive they are – even $110 is more then I wanted to spend). Do you think we could attempt this on bathroom faucets, and if so, do you have any advice? Thank you!!
YoungHouseLove says
We’ve heard from some folks who did theirs with great success! Just sand, prime, do the whole thin and even thing, and even consider using spray sealer for more durability. You definitely want to tape off the mouth of the faucet where water passes though (since you never want spray primer or paint to touch something that contacts food or water since it’s not food safe).
xo,
s
Rebecca says
This post has so inspired me to go to town on our brass knobs in our new house. I bought some satin nickel paint/primer last weekend and plan to spray away this weekend. I hope they turn out as good as yours!
Thanks for the great tips!
abby says
This is the perfect post for me to read this week. All summer I’ve tried to decide on a new shutter/front door color(s) and this weekend is painting day. So the front door post was great. But I went to Lowe’s to price new ORB handles and they were $130+. I had decided I was going to try to spray paint the storm door handle but hadn’t thought of the regular door handle until reading this! Thanks for the idea and step by step directions and saving me about $120 (after buying the deglosser and spray paint:)) Love your blog!
Jessica S. says
Hi Guys,
Thanks for the great ideas and your front door looks awesome!
Question: Would you go for a satin nickel on the front door and storm door or an ORB? We are trying to decide. We have a black light fixture on the front of the house too so that makes me think that the satin nickel would clash with the light fixture that is right next to it.
Have a great day!
Jessica
YoungHouseLove says
I think either one would work really well- so it’s all about what you prefer better (we’ve seen lots of satin nickel with black light fixtures as well as ORB, so you can’t go wrong).
xo,
s
Steph Stimson says
I painted ALL of the old door knobs in my house this summer with ORB and I can say that the spray paint (3 coats on top of a coat of auto primer) definitely hid any scratches the fine-grit sandpaper treatment they got before painting. The knob on the garage door has a few scratches on it but think that’s from our hardwood flooring installers banging their equipment into it…nothing a few more coats of ORB won’t fix. Best stuff EVER!!!!!
Megan says
Fingers crossed that this will go as smoothly for me this evening…original owners swapped out only two of our seven BRIGHT gold door knobs, for whatever reason!
Victoria says
I know it’s only been a few weeks but how is the hardware holding up?
I’m thinking of spraying all of the 60yr old brass knobs in my house this weekend as a precursor to replacing all 22 of them. Yikes.
YoungHouseLove says
So far it still looks mint! Here’s hoping it stays that way over time…
xo,
s
Samantha @ Mama Notes says
Okay, I am doing my doors this weekend and I just did one so far. Question – did you guys do the, ohhh what’s it’s called? Not the door hinges but the little thing that the door knob goes into when it’s closed? You know?? I noticed it looks pretty silly having the doorknob black with it right next to the gold piece….
YoungHouseLove says
I actually didn’t do ours because miracle of all miracles it was already an oil-rubbed bronze color. No idea why! Maybe rust or some sort of strange oxidation? But I think if you sanded yours and prime/painted it with thin coats (very very thin, just mist it) and give it lots of curing time it might hold up ok. Good luck!
xo,
s
Jen says
Don’t know if anyone else has posted about this, but what is your thought on the finish? I just followed your steps and painted our laundry room door knobs, but they definitely feel gritty. There’s not the smooth finish, and they feel painted. Did your doorknobs come out that same way?
YoungHouseLove says
Hmm, I wouldn’t describe ours as feeling gritty. Maybe as feeling “matte” if that makes sense. They don’t feel super glossy and shiny (oil-rubbed bronze metal usually doesn’t) but if you want some sheen/shine I bet you could spray them with some sort of clear sealant (which will add durability and shine). Good luck!
xo,
s
Renee says
I have been a reader for months, but I never felt I wanted to comment until now!
One, We just this past summer replaced ALL of our door handles with ORB…..I kept thinking that there HAD to be a way….. to just paint them….. I even did an internet search….. man I wish you had posted this about 6 mos. ago. You would have saved us about $1,000.00.
Two,I read your post when it came out, but last week I was looking for a “lamp” for our family room…. I found a great one…. but it was BRASS….. I immediately bought my cheap $3.00 lamp and I am in the process of working on it now.
Faucets….now there is an idea… I figured you had to tape off the water way… Good to know I am not the only crazy one who…. wants to change faucets…. but doesn’t want to pay a ton to do so!
Thanks for the great posting…. now… back to my project!
Emily Caltagirone says
Its been a month. . .how are they holding up? Any nicks or scratches, paint peeling? I am seriously considering doing this to our brand new house (all 7 door knobs are brass: garage door, front door and 5(!) french doors)
YoungHouseLove says
They still look perfecto! Yay! We’ll update you if anything happens though. I would definitely sand with high grit paper or steel wool if you can- just for the most strong bond!
xo,
s
Kelly says
I may have already commented on this post, but we just painted our bathroom fixtures with ORB. We skipped right to painting (no sanding)…they look fine now, but we’ll see how long they hold up. Thanks for the inspiration, and I am sharing your idea/post on my blog as I show my fixtures…hope that’s ok!
YoungHouseLove says
Of course! So glad it worked for ya!
xo,
s
Malisams says
You totally inspired me, and I ORBed our fugly brass door hardware this last weekend. Our doors are now totally sexy. So, you know, thanks for that. :)
YoungHouseLove says
Yay sexxxy doors!
xo,
s
Marynn Udvarhelyi says
Just wanted to say a BIG thank you for this post! I live in a rental that I treat like my own house and fortunately the owner allows me to do pretty much whatever I want and what I want now is to get RID of these ugly gold doorknobs!!! I was saving up to buy new ones (one door at a time…woulda taken FOR-EV-ER) but now I’m going to ORB them. Love your blog, love your ideas, and just thought I’d stop in to thank you :)
Liz says
How is the handle holding up? We are about to replace our handles and I was thinking of doing this first to try and save a few bucks. Thanks for any update you may have!
YoungHouseLove says
Everything still looks great but it has only been a few months. We’ll do an update with pics a little more down the line. I think as long as you sand or steel wool them you’ll have the best luck!
xo,
s
Valerie says
Any updates on how the ORB hardware is wearing? I’m thinking about doing this to some bathroom fixtures in our rental place (in the hopes the landlord wouldn’t notice), but want to make sure it’ll wear well first!
If only I could think of a way to cover the ugly brass-trimmed shower doors, other than just putting a shower curtain over them.
YoungHouseLove says
Update: as of now they’re still mint! Not a scratch on them. It hasn’t been very cold out yet and it has only been a few months though- so we’ll have to stop in with a more thorough update in a little while. I would definitely recommend using steel wool or some sort of high grit sandpaper just to scuff them up to get the best possible foundation for paint.
xo,
s
Lara says
We finally did this project this weekend. We recently moved and needed to get a new deadbolt and door handle, etc. Instead of buying everything new, we bought a new deadboolt and then painted the door knob and handle to match. It worked like a charm!
Thanks!
Christine says
Hey $herdog!
Would you recommend using your magic ORB paint on the door hinges as well? Are your finishes still holding up 3 months later?
I will support your ORB addiction!
YoungHouseLove says
Still looking mint! I would definitely recommend trying to rough things up with high high grit sandpaper or steel wool for even more durability, but so far everything is looking great! Thin and even really is the key (so things don’t flake or chip!
xo,
s
Terry Peacock says
Found this blog today (12/30/11) and sooooooo glad I did. Was shopping for new ORB fixtures on HomeDepot site to redo a bathroom. Will probably purchase new faucets (as old ones really suck) – but will PAINT the knobs, towel racks, toilet paper holder, etc. WhooHOOO – moolah saved! Question for ya- the doors in my home are solid wood and stained (walnut). Most of trim is creamy white – but do you think the ORB finish would look good against the wood doors,too? Would love your opinion.
Happy New Year!
YoungHouseLove says
Wahoo! So glad! I think ORB would look gorgeous with walnut doors and creamy white trim. Yum!
xo,
s
Jessica G says
Sherry- we are painting our front door as well…probably a paler yellow (gray house exterior, want it subtle, but bright)…but we tested the color with different types of hardware (we currently have brass) and we’re thinking something dark too…I re-read both this post and the one about the door painting and discovered you also have brass hinges. Did you leave them brass? I feel the whole project hinges on this decision and I was hoping you’d have some advice. Also, I apologize for the terrible hinge pun. Any tips on hinge touch-ups? :) Thanks!
YoungHouseLove says
Our hinges were so dark on the parts that show if that makes sense (the hinge part on the inside that you see a smidge of almost looks ORB) so we just left them. If they read as shiny gold I think I would have tried to spray them or just rebuy them (they’re a lot cheaper than door handles and knockers). Hope it helps!
xo,
s
Jessica M. says
So…I am thinking about doing this and wondering how it has been holding up?
YoungHouseLove says
Still great! You can see the door hardware in our outside holiday decor post and it still looks great!
xo,
s
Chris Lam says
awesome, don’t forget that you can do your kitchen cabinet knobs and pulls also. That spray paint can be used on wood that has varnish on it too. Just passing on a tip.
christie
Amanda says
Curious how these are holding up? I’m thinking of ORBing some interior door handles around here, but they get pretty high traffic use so I’m interested in how yours are doing.
YoungHouseLove says
Amazingly enough they still look mint but when we do our interior ones we’ll definitely go the extra mile and try super high grit sandpaper or steel wool (for added insurance).
xo,
s
Rosa says
I’m curious to know how well they held up? I was planning on replacing all the brass handles/hardware in our old house this spring, but painting would be a simple alternative!
YoungHouseLove says
Still look mint amazingly enough! Will have to update with pics, but they all look the same!
xo,
s
delloraine says
I love ORB! I used to use a combo of red primer and flat black to “rust out” my hardware and garden accessories.
3 years ago I painted my exterior antique brass door hardware and sealed it with rustoleum clear satin. I did not prep it like you did and only one door handle has worn down. I have also done my light switch plates, flush mount brass light fixtures, chrome bath fixtures: towel rods, toilet paper roll, flush handle(plastic) and sink fixtures, and also the metal air vent grates. All with great success. My door knobs were left in place and I taped around the door with newspaper and painters tape. Worked great. Dry time is key I think. plenty of dry time. Texas heat is great for that. love your blog!
Elizabeth says
Just read your post on the ORB door knob redo. I was thinking of doing the same to our brass doorknobs at home, but wondering how the job holds up over time. Is yours still looking good as new after 8 months or so?
YoungHouseLove says
There’s a few small lines where it’s rubbed off a bit to reveal some of the gold beneath – just where our handles have kind of hard edges, so maybe a rounder doorknob wouldn’t have the problem at all. We don’t mind it because it’s very very very subtle and if anything just gives it a slightly antiqued look.
-John
Sherry says
I haven’t visited your blog before, so I don’t know how old your house is, but your door hardware is to die for! Of course the new coat of paint helps, but even without it the shapes, the unique design, are unforgettable. Lucky you! And now they’re positively stunning!
Jennifer says
I just did the same finish to my kitchen cabinet pulls! I have also done that finish in light switch plates. Another place I used the spray was to frosted and mirror backed cabinets in a mobile home. They look fantastic!
Maggie says
I used a circle cutter from my scrapbooking days and a large sheet of contact paper on my first attempt without taken them off. For round knobs, it works good…I just should have used more to catch overspray and drips on the door and sealer…it’s a pain to try to recover that with white paint.
Also, I didn’t know about the deglossing and priming. Will be adding that! I may hit every door in this house before the summer’s over. I didn’t mind the gold, but LOVE this color and it really updates things! I didn’t realize how dated it looked until seeing before and afters!!!
Holly says
A co-worker turned me on to your blog – LUV! I just priced replacing all our brass fixtures with ORB fixtures… over $1500!!! NO THANKS! I’m curious to know if this held up for you – I’d much rather spend a fraction of the cost of replacing fixtures with a little elbow grease and spray paint than not feed the family for a couple weeks!!! Please let us know how it worked out. :)
YoungHouseLove says
Oh yes, we did an update post here. Still holding steady!
xo,
s
Jess @ Crunchy Hot Mama says
Random ? Will the handle look/feel different after deglossing? I just did one & it doesn’t look or feel any different. Not sure if I did it right or put enough on there so I can get get my ORB on.
YoungHouseLove says
It most likely will feel the same way but will have less greases from hands or other things on it that keep paint from sticking. On wood it’ll feel dried, but not usually on metal. I would definitely sand things too though, just with high grit paper to rough them up. We’ll be doing that on all of our internal door knobs just for added insurance!
xo,
s
Nicole says
Ok! I am going to copy just about every thing on your blog! But for now I should probably start small :) I will be attacking all the knobs in our house next week. Do you think it is necessary to spray the hinges of the doors as well? Or do you think that would be to much? My house is going for the cottage/shabby chic look… and the doors are white paneled. Tee. Thanks!
YoungHouseLove says
Aw, you’re so sweet! I’m not sure if the paint would rub off on hinges (haven’t tried that yet) so maybe if your doors are white and the hinges are painted white just leave them and go with sprayed handles for a little pop of hardware? Good luck!
xo,
s
Adrienne says
Now that it has been a year is the paint still holding up?
YoungHouseLove says
Mint! Even did an update post with photos :)
xo,
s
Drew says
I would avoid using steel wool because, as you scratch the doorknob, you are leaving tiny, microscopic bits of steel impregnated in the doorknob. This will encourage something referred to as dissimilar metal corrosion: essentially, different metals don’t like being in contact with each other and set out to destroy each other. Your best bet would be to use scotch-brite pads (which are made of plastic) to scuff the old finish. They sell scotch-brite wheels that you can stick in a power drill and speed things up a bit without chewing up the door knob too much. Also, if you can find it, there is a primer that we use in aviation for similar applications that protects the metal and helps the paint bond. Look for zinc-chromate or zinc-phosphate.
YoungHouseLove says
Great tips! Thanks Drew!
xo
s
mags says
I have recently bronzed my knobs and hinges too. I wished I had research a little more but they still look OK, just don’t study them too hard. I have come to the part in my project where I have to make a decision about the color of my hinges. I enjoyed your blog so I thought I was ask your advice. In two of my bathrooms the pulls on drawers and cabinets are silver I have been bronzing everything. I am super anal so I feel like the inside knob and hinges need to be silver also, while the outside ones need to be bronze. What do you suggest and if you agree, which I hope you do, how do I spray one side silver and the other bronze without messing it up? I can use painters tap for one side but I’m afraid if I use it one the side I spray it will rip it off. While I’m asking you questions what about my fron door. I feel like I need to do those too, but my husband said not to worry about the exterior doors, I think he is afraid I’ll screw them up. Would you spray the hinges to your front door too?
YoungHouseLove says
I haven’t tackled hinges yet since I worry they will rub and scrape and peel. Maybe try replacing your hinges instead of buying the spray paint for a long-lasting result?
xo,
s
Debbie C. says
After reading time and time again about the joys of spray painting I have tried a few small projects. Now I should have learned with the other 3 items but didn’t. THi sweek I attempted to spray paint a metal lamp. Even though I know better, because you told me, I did NOT go with three thin coats. Needless to say, but I will, I had to completely strip off the new now I am almost ready to take your advice. How many times did it take you to learn?
YoungHouseLove says
Oh man I can relate! It took me at least a few disasters before I convinced myself that being patient and slow was better than starting all over again after doing it drippy :)
xo
s
Shawn T. says
Hi — I just stumbled upon this great post. I noticed it’s dated 8/2011… Has the finish held up? I need to replace all the mismatched and ugly door knobs in my house but would prefer to just paint them if I can get at least a year out of a painted finish. (If they’re at least the same color then the fact that they don’t exactly match won’t be so obvious!)
Sooooo — did the finish hold up? Would you do it again?
Thanks much!
–Shawn
Shawn T. says
Never mind!!!! I just saw your comments / responses to others. Whoops!
YoungHouseLove says
No worries!
xo
s
teresa says
This is awesome! Just wondering how the spray’s holding up? Would you do it again? :)
YoungHouseLove says
Still holding up well! We posted an update and it still looks mint.
xo
s
Isobelle says
We are about to paint our front door yellow……. as in like 2 minutes. (we copied) Sought inspiration from you guys..Wish us luck!
YoungHouseLove says
Love it! Lots of luck!
xo
s
Mike says
How have the ORB handles stood up to a year+ of use/wear and tear? Thanks!
YoungHouseLove says
They’ve actually held up great! There’s a little bit of “patina” around some of the edges which shows a line line of gold coming through, but it actually looks kinda nice that way.
-John
Pam says
I was just watching a Nate Berkus Show re-run and it was all about busting painting myths. He declared that you should never paint door hardware or hinges, like, ever! You need to update him with this post!
(I can’t wait to update my ugly gold hardware by the way – good thing I read your blog so I know I can do this!)
YoungHouseLove says
Hah, that’s funny! I do worry that hinges could rub off since they grind against themselves- we just did handles and the door knocker!
xo
s
DarleneC says
LookS amazing!!!!
I am off to the store to get my supplies. Do you think this process and paint would work for the Donald Trump :) gold trim on my “mature” fire place insert?
YoungHouseLove says
It totally should! You might want to find high heat spray paint.
xo,
s
Heather says
I did a ceiling fan with the same finish except I added some aged copper (so pretty when you layer the two) I sanded with a 150 grit and then got to spraying and you can’t tell I ever sanded it. I never used a deglosser, I just cleaned it really good. Hope that will help you with future endeavors.
Martha says
Just used this tutorial last night and we are SO happy with the results! We bought a new door and the mission style hardware was WAY out of the budget. I ended up finding a modern set but by painting it ORB it looks very missiony (if that’s a word). Anyway, I’m raving about this to everyone, thanks!
YoungHouseLove says
That’s so awesome! Congrats Martha!
xo
s
toni from says
I had to revisit this post and see how you spray painted your doorknobs because we are buying a new-to-us house and close in about a week now. Woo hoo! I am planning on painting all of our doorknobs and hardware after the holidays, they are now brushed nickel and nice, but I prefer ORB, just like $herdog, am I right? How are your doorknobs holding up over a year later? Should I spray mine or just live with the brushed nickel for awhile.
YoungHouseLove says
Oh yes, still holding up really well! We even did an update post with pics of how they’re all still doing great (there’s a link in this post to that for ya)!
xo
s
Amanda Peterson says
I love your finished look!! I just NEED to know how long these handles lasted..or if they are still looking great? I just did this to our “old house” a month ago and they are crazy scratched up. Maybe it’s because I have four kids, or maybe it’s because I used sandpaper…maybe both! I googled my mind crazy before preparing, priming, and spray painting ALL our ‘beautiful’ gold-ishy handles in our house (also waiting much longer than 6 hrs. to install!!) and I really wish I could’ve came your blog then! Please keep us posted how they are holding up!!!
Amanda Peterson says
BTW I did the hinges…and mine are holding up better than the knobs! I love your blog!! ERR, wish I found it months ago!
:)
YoungHouseLove says
So glad!
xo
s
YoungHouseLove says
Still look awesome! We even posted an update with photos (we linked to it in this post)! Hope it helps!
xo
s
Judy @ Cleaning Junkie says
Thanks so much for sharing this amazing post on the oil rubbed bronze door knobs!! I wouldn’t have dared to paint my door knobs if it wasn’t for your blog :) which saved me a couple hundred dollars! I have only done my first trial to see if I could do it and I love the results so I’ll def spray paint the rest of the knobs.
The only trouble I found was with the deglosser – I totally didn’t use it right lol But it still worked, I’ll be more diligent on my next trial..
Thanks again!
Judy
YoungHouseLove says
So glad Judy! Congrats!
xo
s
eileen says
JUst wanted to say thanks so much for this blog! I had pinned the spray painting the bathroom fixtures, but your instructions were awesome. I used your door painting post too and painted the door and the hardware in the same day. My only regret is that I didn’t take a very good before picture:( My door looks amazing and it’s thanks to you! I’m a good painter, but hadn’t heard about the deglosser before, so that was a handy tip. When I find my motivation, I’m going to do the handle pulls in my kitchen and bath(I’m trying to work up the courage to do the bathroom fixtures, but the brass on them is hard to get to so I need some more practice first!)
YoungHouseLove says
Aw, so glad Eileen!
xo
s
Beth says
Ha, I used that oil rubbed bronze spray paint yesterday on outlet and vent covers – love it so much! Now I will move on to door knobs :) Thanks for the idea! I hope your are still holding up.
YoungHouseLove says
Still going strong thank goodness! Good luck Beth!
xo
s