How you like them handles?
(Handles, apples. It’s all the same. Right Matt Damon? What? You don’t think Matt Damon reads this blog? Of course he doesn’t.)
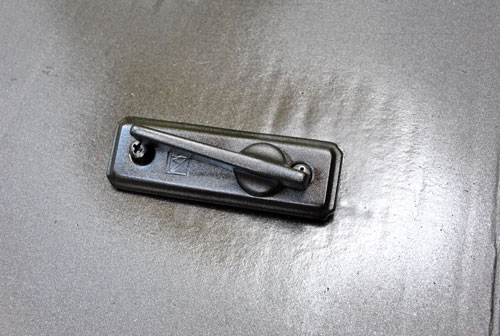
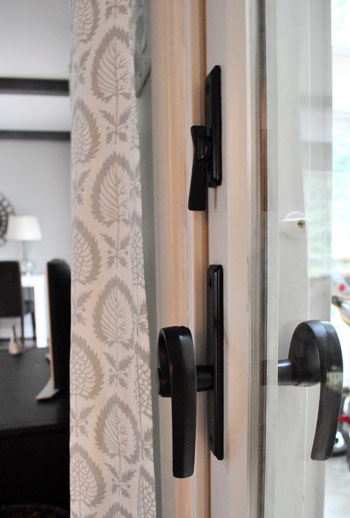
Anyway, I’m back to share the hardware makeover play-by-play and a ton of pics that we couldn’t squeeze into our door-painting post on Wednesday. So fasten your seat belts. Oh yeah, it’s gonna get crazy. First I have a secret. The hardware on our sliding doors in the living room looked like this:
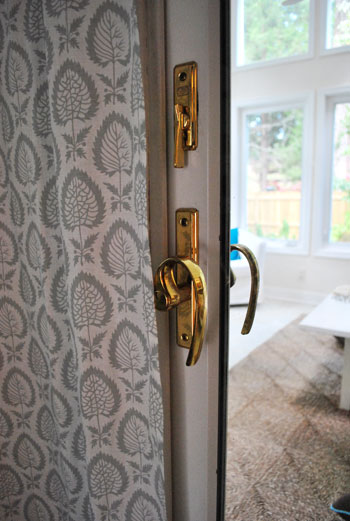
Le yikes, right? It’s all sorts of bad with the swoopy handle. If you look a little closer it’s not even shiny and new looking gold, it’s all rusted and neglected…
So as you can probably tell from the photo above (duh) down they came. We stripped the hardware off of both of the sliding doors in about five minutes (I took one side while John got the other one) by just unscrewing things on the front, back, and side to free them with a regular old philips head screwdriver…

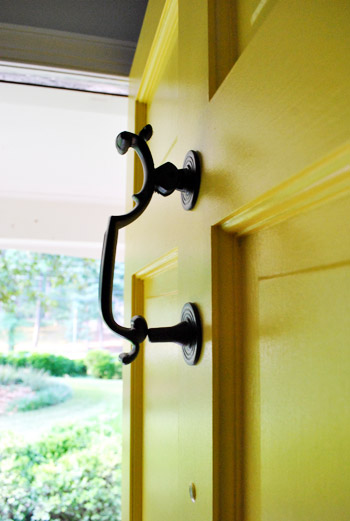
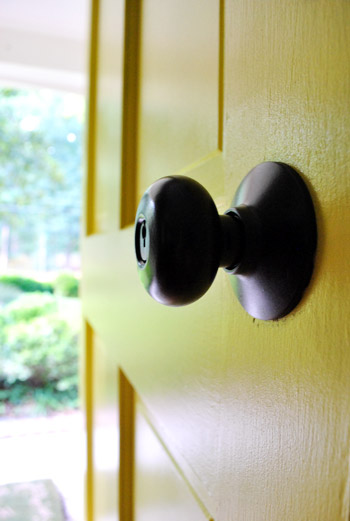
… and then we removed the doorknob and the rusty old door knocker on the front door (also with a screwdriver – there were exposed screws that we just removed from the back).

You can check out our door-painting post for more details on that stuff (like how we sanded the paint around the hardware that we removed so it was nice and smooth before painting).
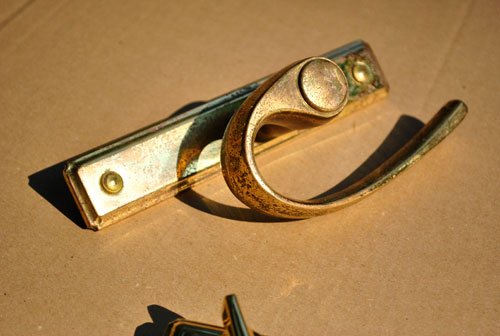
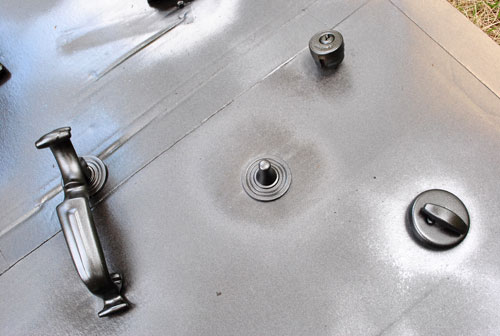
But back to our pile o’ removed hardware. Here we have the sliding door hardware along with the doorknob, deadbolt, and the door knocker from the front door:
It was like a Gold Hardware “Where Are They Now?” Special on VH1. Some folks weren’t as crusty as others, but they were all well past their prime.
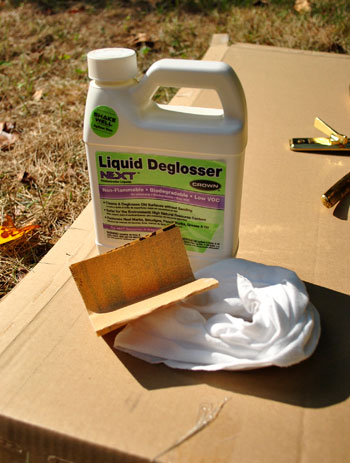
So after some decent amount of online research and chatting up the paint pros at Lowe’s (there’s a woman at the one near us who is phenomenally knowledgeable) we learned that the most recommended method for refinishing hardware (to gain the most durability and long-lasting finish) was:
- Sand as much of the hardware as you can with high grit (200+) sandpaper to rough it up
- Use a liquid deglosser (like this one) to degloss everything to get oils and sanded particles off of the hardware before spraying
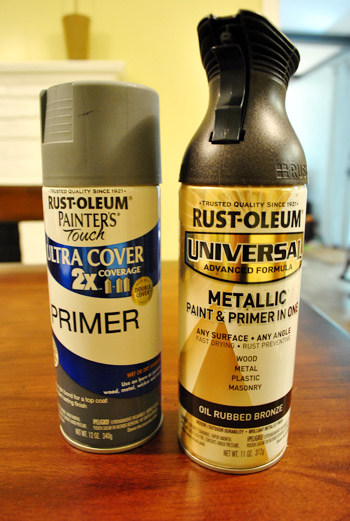
- Apply one thin and even coat of high quality spray primer meant for metal (we grabbed Rustoleum Painter’s Touch Ultra Coverage Primer in gray since we figured it would blend more than white)
- Apply two to three thin and even coats of high quality spray paint meant for metal in your color of choice (of course, our poison was: Rustoleum Universal Metallic All-Surface Spray Paint in Oil-Rubbed Bronze)
So I grabbed my high grit sandpaper and started on the first step: sanding.
Ahhhhhhhhh. Baaaad idea. The sandpaper left tons of obvious scratches in the gold finish that I knew wouldn’t completely be covered by thin coats of primer and spray paint. I should have taken a picture of the one side of the doorknob that I thought I ruined with the dumb sanding step but I was too busy freaking out. So naturally I made some sort of sound that resembled a walrus screaming and chucked the sandpaper as far away as possible while cradling/apologizing to my doorknob and promising him that I’d never hurt him like that again. Luckily I realized the knob would be installed with that part underneath, so only Clara-height children may be able to see the slightly roughed up texture on the underside. Whew.
Update: A few smarter-than-me commenters recommended trying steel wool or super high grit automotive sandpaper to rough up the surface, so I plan to try that next time. Just tossing that out there for anyone who might be doing this (who may want extra “insurance” that the spray will hold).
So it was out the window with step one, and on to step two: deglossing. I just used some rubber gloves and a rag to apply the deglosser and then let everything dry a little so it wasn’t soaking wet before moving onto step three: applying one thin coat of spray primer. But when I went to grab the primer I noticed something intriguing on the ORB can next to it. It said “paint & primer in one” right on the label. Duh. No need to beat a dead horse.
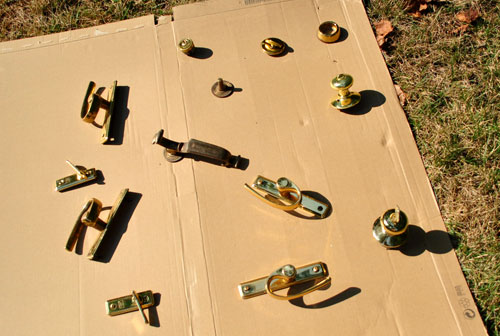
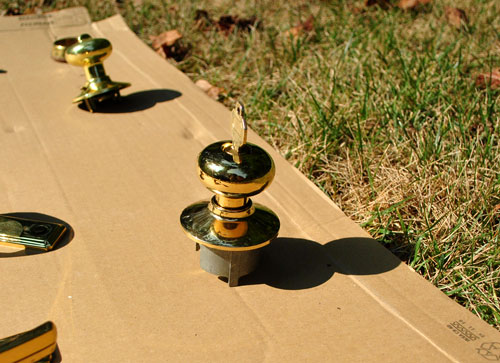
So I trusted my beloved ORB spray primer + paint to lead the way and just applied three thin and even coats to all of my hardware (that I strategically placed on cardboard so I could access all of the exposed parts by piercing the long metal interior hardware rods through the cardboard so they stood up). I will now repeat that thin and even is the key when it comes to spray paint. If you apply thin & even coats they won’t be globby and thick, and they’ll bond/cure very strongly, which will greatly reduce any issues with things flaking, scratching, or peeling down the line.
Oh and see that key? That’s a secret.
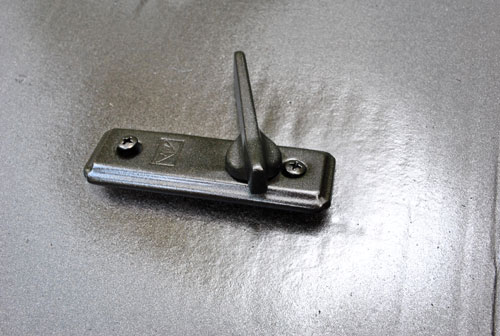
I decided I didn’t want to muck up the inside of my lock with spray paint, so I used a spare house key to block the spray from getting into the lock (while allowing me to access the rest of the knob). I didn’t push the key all the way in for fear that the top of the key would block some of the outside of the doorknob, so I just stuck it halfway in so it would block the interior part without inhibiting access to the metal facade around it. Then I just removed it and used it on the deadbolt’s keyhole when I sprayed that.
Oh and another spraying tip would be to put all of your screws into the hardware and pierce them through the cardboard so the ends of them get sprayed to match (like the two that you see below). Also, be sure to move things like latches back and forth between coats to make sure you can access all areas of the hardware with spray paint. Like this…
… and this:
About an hour later (I probably waited 20 minutes between each of my three thin and even coats, just to be sure it was nice and cured before piling more on) I was left with these beauties:
Who sees a winking face? Just me?
I probably waited six full hours after my last coat of spray paint before reinstalling anything. Just to give them a lot of time to fully cure and ensure that I wouldn’t scratch or ding something while putting them back on the doors. I can’t speak to the long-term durability of this process since it has only been… oh, about 48 hours. But I can tell you that reinstalling them went really smoothly and everything works just as well as it used to and nothing was even remotely marred or dinged during installation or in the past two days since.
So I guess we’ll check back in with an update about how they hold up over the long haul (these doors are used every single day thanks to a dog who loves going in and out). But so far, so good. And it definitely beats buying all new hardware (we figured we didn’t have anything to lose in trying to make the old stuff work before resorting to trashing it and splurging for all new hardware).
Oh and it bares noting that things look pretty black in some of these pics, but it’s just because ORB is a mystical creature. So it’s hard to capture the true color that you see in real life (which is a rich metallic-y chocolate). Actually, the exterior sprayed shots above show the true color really well. It still looks like that inside, it’s just seemingly impossible to get it on film.
Perhaps the most exciting thing is that in taking this style quiz, the thing that I loved most about the room they said was “my style” was the white door with the dark hardware. And now it’s mine. All mine. Mwahahaha. (<– yup, I broke out my maniacal laugh)
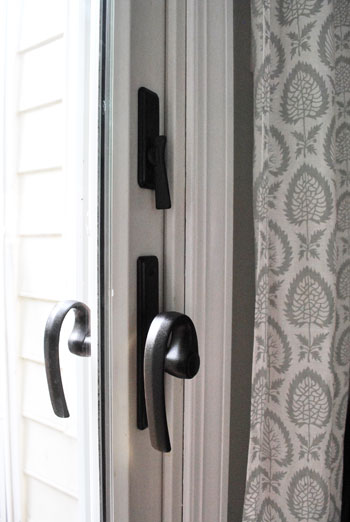
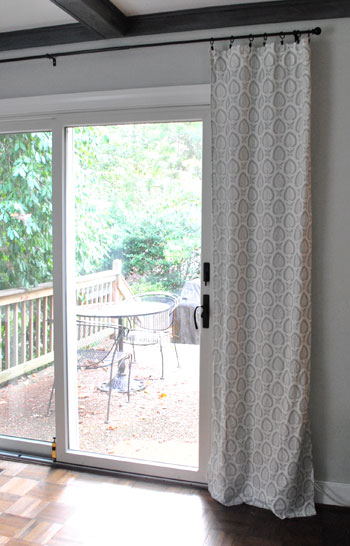
I think it looks delish with the oil-rubbed bronze curtain rods and the dark beams. And John digs it too (delish just isn’t an adjective he’s apt to use).

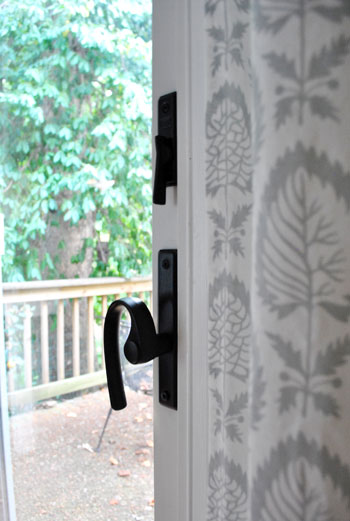
Me-ow old sliding door friend. My how you’ve matured. Well, as much as a twisty twirly old 80’s knob can really mature.
And you’ve already seen our freshly sprayed front door hardware, but let’s just revisit it for a moment:
So yeah. We’re happy with our little almost-foiled-by-the-sandpaper process. Although I must admit that after I sprayed the underside of the knob, the scratches were hardly noticeable. So maybe if you’re a staunch rule follower (and not a freaked out walrus impersonator like me) you could get away with the sanding step. Either way, I have high hopes that the deglosser and included-primer will do their job when it comes to adhesion (especially since our old scratched and rusted fixtures weren’t too glossy or shiny to begin with).
As for the ORB finish: Hi my name is Sherry, and I’m addicted to oil-rubbed bronze. They say you can’t help who you love. But it could be worse. I could be addicted to sanding things, which would have been a cruel joke since sandpaper was the kryptonite of this project. I wonder why. Has anyone else successfully sanded their metal hardware before spraying it? Was it not all scratched up? Maybe it just looked “brushed” in the end? I just didn’t trust myself to do it all in one consistent direction (aka: not make a hot mess that was oh so obvious after the spray-job). So in summary, my method was just to: use a liquid deglosser (although I’ll also try steel wool or extra high grit sandpaper next time), lay everything out on cardboard standing up so it could be sprayed evenly from all angles, use a half-inserted key to block any keyholes, spray everything thinly and evenly in 3 coats applied every 20 mins or so, be sure to move toggles and locks so all parts of the hardware were sprayed, and let it cure for about 6 hours before rehanging it.
Oh and the total cost of this project was $6 for the spray paint (I was able to return the unopened can of primer and I already had the deglosser and that dastardly sandpaper on hand). But for someone who needs to purchase deglosser, you might want to budget four more dollars for that. Considering a new knob, deadbolt, knocker, and two locks and four handles for our sliding doors would probably come to about $200, I think we got one heckova deal. So I’ll let you know how they hold up. If they’re anything like our ORBed sofa legs (which we sprayed five months ago, and they still look mint) we’ll have bona fide jazz hands going on. So it’s probably only a matter of time before I really go nuts and remove every last interior brass door and hinge and go to town. Like I said, my name is Sherry, and I’m addicted to oil-rubbed bronze. Holla.
Update: Our handles are still holding steady. Check out the update post here.
Wanna know where we got something in our house or what paint colors we used? Just click on this button:

*This post contains affiliate links to items we have purchased and loved*

Felicity @ Our Little Beehive says
Love. Just love.
CurlyGurl says
I have given in to the power of the ORB. ;) I bought my first can this week and I am in love. Already have a list of things to ORBicize. My husband is a bit afraid. Anyway, thanks for the inspiration.
Jessica D says
I’m a newbie to your blog (reading for about a month) and I absolutely love it! When you reference an old post I click the link to see what you’re talking about so I can catch up and get a complete picture. I just read the post about your Donald dream and it cracked me up, like laughing out loud at work (oops!) Anyway, thank you so much for that flashback. Hilarious!
Christine says
Hey $herdog!
I love the idea of refinishing the existing hardware instead of buying new! I’m thinking we could use this idea for our hinges instead of buying ALL new! I am a bit concerned about chipping on the hinges since they are moving parts, but its definitely worth a shot!
…. and thanks, because now my hubby has a ORB obsession too! :P
Michele Jacobs says
I am so inspired by you guys! I can’t wait to try this out on my 1980’s gold knobs through out my house. You’ve also inspired me to revamp my laundry room too. Thanks for the boatloads of inspirations … keep it coming!
Ali says
I know this isn’t the point of this post but, I LOVE those curtain panels! Like I think about them all the time and wish I had several panels for my home! Any chance you all saw them on your last IKEA trip? Why were they discontinued? They are beautiful!
~ Ali
YoungHouseLove says
So sorry Ali! They were discontinued a few months back and we haven’t seen them since (although we hear they can pop up on ebay sometimes).
xo,
s
Hilary says
They turned out awesome. I did this on the dummy knobs to our bathroom doors and they’ve held up well but we rarely use them. I used the flat brown primer – I don’t think my ORB can had primer built in – excited to go stock up on that!
Merideth says
I am so excited about this post! Do you know how to remove paint from door hardware? My door hinges need that before I begin the scratch, degloss, prime, paint, repeat process.
YoungHouseLove says
I’ve heard you can soak them in hot water and then scrub them with the hard scrubby part of the sponge? Hope it helps!
xo,
s
Rebecca says
They look great! I think I need to do this on my door handles too. And can I just ask you since you became addicted, how many cans you’ve gone through? I wonder how long it lasts.
YoungHouseLove says
Hmm, good question. I think I used one can for the legs of my desk chair and the sectional and maybe one can for the mailbox and the frames? Maybe that was all one can actually. It lasts a while! I always tell my friends to buy two cans and then if they only need one they can return the unopened one (but running out of spray paint while you’re all dressed in painting clothes and having to run out for more is so annoying). Oh and all this hardware took less than half a can I think. Still have lots left.
xo,
s
anissa says
FYI
Brass does not rust. Solid brass has no iron in it and so it will not rust. It will tarnish. Brass is an alloy of copper and zinc. The copper component in brass will oxidize into a greenish or bronzy-brown, sometimes with crystals, called Verdigris or Patina. If you see actual rust, the orangey red build up, then you have a piece of steel plated with brass and the coating of brass scratched or chipped away allowing moisture to get into the steel creating rust.
YoungHouseLove says
Interesting! Thanks for the info!
xo,
s
AmandaonMaui says
I actually like your curly slider handle, especially now that it’s a much better color. I think it looks pretty modern, and I love the combination with the silver like gray on the curtains.
eRin @ growing up senge says
I share your love of ORB, but haven’t turned into a full blown spray-ORB addict yet. Your freshly ORB-ed handles look great!
Now I’m all itchy to ORB something, and to move to near to your local Lowes where someone actually knows something about anything. The people in our local Lowes paint department make me want to throw things! But I haven’t. Yet.
Matt Damon says
Right $herdog. (What? You think I’m too cool to read your blog?)
YoungHouseLove says
Haha, I would have been convinced except for the mattdamon@iamreallynotmatt.com email address…
xo,
s
Matt Damon says
;)
YoungHouseLove says
Oh my gosh, Matt Damon winked at me. Tell everyone you know.
xo,
s
Donna says
I hate to be the one to tell you guys this but I did the same thing with the brass fixtures on our storm door. I’m not a big fan of storms doors to start with and ours had shiny brass fixtures so I gave the ORB spray paint with primer a whirl. I just did it this past Spring and already I have shiny gold showing through on the door handle. The lock and kick plate are fine but the handle is not holding up to daily use. I even scuffed them real good with sand paper first but that still didn’t help with the durability. No doubt I liked the ORB look better and I will definitely keep re-freshing them until I eventually pull the storm door off. I hope yours hold up better.
YoungHouseLove says
Thanks for the info! It sounds like some folks have had over a year of success with theirs while others have issues pop up. We’ll definitely keep you posted as to how ours fare (with lots of pics and words no doubt). Haha.
xo,
s
ashlee says
sherry,
where do you get your ORB spray paint? i searched high and low for some the other day (at three different hardware stores) because i have some beautiful (but very dirty and icky) second hand vases i’d like to paint.
then i read online that rustoleum no longer makes ORB paint. sad face.
keep in mind that i’m in canada and things may differ here. either way, i’m totally depressed over my lack of ORB vases.
YoungHouseLove says
Oh man I wonder if it’s regional! Ours is always on the top shelf at Home Depot.
xo,
s
ashlee says
i’m learning that spray paint appears to be the ‘be all, end all’ of home decor. my window screens have this horrendous brass coloured trim, and the cranks of our casement windows are the same. since painting the window frames/casings white, i thought, how am i supposed to live with all this brass nonsense? so i spray painted the stuff white, and while it isn’t perfect (up close it looks pretty awful, but who’s looking that close up?) it seems to do the trick for now.
Mrs. Moore says
My parents spray painted some of their door knobs about a year ago (ORB of course!!) and they have held up really well! Hopefully yours will too!
YoungHouseLove says
So good to hear! Our fingers are crossed! Either way we’ll report back with all the details!
xo,
s
Samantha @ Mama Notes says
This is awesome! I am so excited. Our door handles are also gold and nasty and we wanted to replace them. But yeah, new is so expensive. I had no idea we could just spray paint them! Best news ever!!!
Jenna says
My hubby repainted our front door hardware which gets constant use with ORB probably 6 {?} months ago. We didn’t sand, didn’t use deglosser, didn’t prime, and they are beautiful and holding up great! Other than a little scratched right where you insert the key, they look as good as they did the day he painted them. Perfection!
YoungHouseLove says
Wow- that’s awesome to hear Jenna!
xo,
s
krista says
Your changes definitely look awesome, but I’ll offer my tip of advice for longevity – lacquer. After stripping, sanding and repainting all the hardware in our 90 year old home, we were advised to lacquer it to make the finish last longer. It has helped, but definitely in those high use areas the new painted finish has rubbed away, even with the lacquer….and it’s only been a few months. I’ll be curious to see how yours does though – good luck!
YoungHouseLove says
Thanks for the tip! We have heard from some folks who have had luck with and without lacquer, so we’re definitely open to trying it out. We might leave these as they are and report back about how they wear and try sanding and lacquering the second round of interior hardware to see if there’s any difference. You know, like some sort of weird science experiment. Haha.
xo,
s
MichelleLG says
fyi: joey and lana from “making a house a home” (who i learned of and now love b/c of your Pinterest challenge!) recently used a Dremel to sand off the gold coating on door hardware. check it out:
http://joeyandlana.com/joey-and-lana-home/2011/8/16/o-me-g.html
also, my mom tried to sand down an ugly old filing cabinet using steel wool and it was a disaster (picture peeled up metallic shards- not pretty). maybe others have had better luck?
i am loooooving the oil rubbed bronze spray paint! we’re getting ready to close on our first home (yey!!!!) and i’m already scheming my DIY reno plan for the kitchen: paint the cabinets white and spray paint the hardware ORB. :o)
one question for the ORB queen/guru: i’m thinking about giving the kitchen faucet hardware a few “thin and evens” of ORB as well. do you think the paint job could hold up under the normal sink moisture/wear and tear? have any experience with the durability of Rustoleum in an water exposed sort of setting? if i give it a try, i promise to report back :o)
thanks S!
YoungHouseLove says
Thanks for the link! Love the dremel idea! As for ORBing a faucet, we have heard it can work and hold up really well (someone here commented and said hers has looked awesome since 2009!) but be sure to tape off the part where water passes through if you’ll be brushing teeth/drinking from that faucet (spray paint isn’t food-safe, so it’s not water-safe either). Good luck!
xo,
s
{hooked on hickory} says
lookin’ spiffy! orb looks fab and that yellow door. wowza! love!
ashley
Nicole Miller says
Hi John & Sherri!
First off, let me say that I looooooove your blog. It’s my fave!
So when I was in the spray paint section at Lowe’s with my boyfriend today, I thought of you both! I pointed out the ORB to him and he really liked it! He’s buying his parents old house, so he’s updating a lot (on a budget). When we made it to the kitchen hardware section, we found some drawer pulls that were the perfect shape, size and price (80 cents each!!). But ,of course, they were icky brass. I casually mentioned that we could probably use the ORB on them to be cost effective. Guess what?! He went for it! I showed him this post and now he’s going to do all of the door handles in the house!! Isn’t that exciting?! On a side note, I also convinced him to DIY his own concrete kitchen countertops! I’m on a roll, right? Lol.
Anyways, thanks for providing so much wonderful inspiration!
hi says
Wow! This turned out AMAZING! What a brilliant idea to put a key in the key hole and then spray. Also, doing the screws that way as well. Sure beats how I’ve painted hardware in the past!
Karen T. says
Girl, you are a nut. Your post made me laugh out loud. I am planning on sprucing up my knobs and such so I greatly appreciate the tutorial. Keep em coming!!! :)
Rhiannon says
Alright it’s official…ORB spray paint is the best thing that has ever happened to home improvement!
Kel says
What a clever cost effective upgarde. I did not know this could be done. I learn so much from you guys.
Tamara Hutchison says
I would love to do this, but we live way up in the far north of Canada. Any readers know how this would hold up with the snow?
Gigi says
They look great! I painted most of the hardware in my house about a year ago in a matte black finish. I prepped the hardware with a wire wheel (to remove the peeling clear coat and get down to bare metal) and then used self-etching metal primer (awesome stuff!) before painting. I protected it all with three coats of clear and so far it’s all held up very well.
Shana says
I’ve been following your blog for 8 months now and I really enjoy it! Quick question – I am loving the ORB look but we live in a country that doesn’t have spray paint and I can’t bring it in on the airplane do you have any other suggestions for refinishing fixtures and hardware without spray paint?? Thanks!
YoungHouseLove says
Hmm, I’ve heard about this magical product called Rub N Buff, so maybe that can be brought on an airplane (from what I understand it’s something you rub on and buff- haha). Good luck!
xo,
s
Heldy says
Wow, what a transformation. I have to admit I’ve never seen such ‘original’ sliding door hardware. It may be 80’ish, but it sure looks better than the old standard hardware;)
Jasmine says
Wow! They look so new after being spray painted! Maybe I’ll give it a try. Our 100-year-old house has the original brass doorknobs, but all scratched or ‘black’ from the brass wearing off… Weekend project maybe?!? I’m excited!
diane says
Great DIY job but when you are ready to splurge visit our site for some hardware that will really make a statement. While the lever looks great no one but your closest blog friends will know what it looked like before but a custom door handle will catch everyone’s attention. btw..love the blog
Alicia says
Guess who went and bought a an of ORB? Yep, me. I read this post and promptly talked my hubby into taking me to Home Depot. He’s a skeptic about painting the door handles but I think he’s coming around to the idea. I like it so far! Thanks for the idea!
YoungHouseLove says
Wahoo! Have fun!
xo,
s
Tim (HouseOnADime) says
Great idea! Door hardware can really ad up, and you saved thousands! Keep up the good work. With enough elbow grease, home ownership can be affordable!
Katherine says
I think we go to that same Lowe’s. My husband will turn around and walk out if that paint lady isn’t working! She definitely knows her stuff. And the repainted front door looks great! I want to do mine now.
YoungHouseLove says
Haha- she’s the best!
xo,
s
Melissa says
Amazing! I have some hideous brass hardware on some interior doors that clashes with the original ORB hardware in the house, but can’t afford to replace it all, so I’m going to give this a shot!
Also, off topic but somewhat related if you stretch your imagination just a wee bit, but I’ve scoured your archives for days and either I’m blind or the answer just isn’t there. I was wondering if you had any advice for me. I am about to (attempt to) paint two pieces of laminate “wood” furniture. Do you have any advice for how to do it best? And do you know how I can protect and seal the paint just without adding a glossy or very shiny look?
YoungHouseLove says
This tutorial might be helpful: http://livingwithlindsay.com/2009/05/how-to-paint-laminate-furniture.html
We haven’t done it and hear that some folks haven’t had luck at all (laminate is really slippery so it can peel or scratch off) but it’s worth a shot!
xo,
s
Melissa says
Thank you so much! That’s exactly what I was looking for!
celestte says
What a great idea – spray painting door hardware. I spray paint everything else; I never thought to do the same with door hardware. Which as I’m sure you know is VERY expensive. Thank you!
Alissa says
Thank you so very much for this post!! My husband and I have been wanting to do our french doors to our sunroom. They are heavy duty doors with the key lock and everything, and, oh yeah, and the ugly brass hardware! After reading your post yesterday, we went to Lowe’s and bought exactly what you said to. We spray painted them lastnight… Or should I say early morning(?) lol. We put them up on the doors today and they look great!! We always thought about buying new ones, but they were around $200, even on ebay! So thanks for the step by step details and many pictures.. I just recently found your blog and I love it! My husband and I bought our first house over a year ago, and we have been having a ball making it “ours”. And like your wedding, we did ours on a budget (and outdoors) plus I did mostly everything myself :) Guests had a good time, and it was everything we dreamed of! I love taking up a good challenge to save as much money as possible! Anyway, once again, thanks for great post and inspirations! Take care :)
Dawn says
Ah, liquid deglosser! I did the same thing with my ugly old hardware but I didn’t use the deglosser so now they look new but with runs of fresh paint, which, you’re really not supposed to know it’s paint so, it’s bad. I’ll try the deglosser next time.
Still lovin’ your blog!
Janet S says
You guys inspired me to to start my fall paint the hardware project today! 33 doors – 60 knobs 90 hinges at first count. Big house lots of doors. We could afford to get new but why buy new when they work and fit. They need some TLC as house was built in 1996.
Asked at Lowes yesterday about ball park price for door knobs $20 for ORB knobs sets for bedrooms (no keys)$3 for hinges x 3 per door.
Will report back on our progress and results.
YoungHouseLove says
Wow, that’s a big job! Good luck! Definitely try scoffing them with high grit sandpaper or steel wool if you can for extra “insurance”!
xo,
s
Claire says
It’s funny because I read your blog just about everyday and this is not the first ORB post I’ve read, but today it finally dawned on me that instead of obsessing over the Restoration Hardware ORB switch plates and outlet covers that we will never buy, I should try spray painting the ones we have (they have to be replaced anyway because the hubby and I both hate the look of painted switch plates and outlet covers, of which out new house has at least 25). I’m hoping we can get the RH look at a YHL price point!
Stephanie says
I need to jump on the ORB bandwagon. Has anyone seen it in stores in Toronto? Or London, Ontario? I checked out my local Canadian Tire, and they carried the line, but not ORB specifically.
Thanks, all!
carly says
AHHH! Our local HD (Northern VA) is sold out of ORB! I think the ORB love is catching on!
YoungHouseLove says
Haha, that happened at ours but now they have a separate display of it! And more than enough to go around! Here’s hoping yours overstocks it next time!
xo,
s
Karen J says
Our house had worn brass doorknobs when we moved in. We bought ORB ones to replace them. It was 30+ doorknobs which adds up $$$-wise. We knew from research that the darkness of the ORB finish can rub off over time. However the ORB finsh on our doorknobs is already rubbing off after just two years on a few of the heavily used doorknobs. We didn’t buy the most expensive brand but they weren’t the cheapest either. We may have to use some ORB spraypaint to fix our new ORB levers!! Anyway, I’d love to hear how your handles hold up over time.
YoungHouseLove says
Wow, never thought about how new ORB knobs could rub off. We’ll definitely keep you posted on our DIY ones!
xo,
s
Mina says
THANK YOU!! I recently took off all the brass door knobs in my new place & was about to toss them when I saw this how-to. You really saved the day and I started ORBing away this afternoon. I haven’t mastered the “light coats” yet. I think I get trigger happy. I might have ORB again tomorrow but in any case, thanks so much! Oh – I couldn’t find the Next Liquid Deglosser at HD but found another brand. I’m just a bit worried because none of the shine really went away after I rubbed the deglosser on. We shall see! Hope yours hold up and I hope mine do too:)
YoungHouseLove says
Waiiiiit! Definitely use steel wool or super high grit sandpaper if you still have shine! That way you’ll get a lot more of a durable result. Good luck!
xo,
s
Mina says
Oops! I already sprayed them! I stink at light coats:( Had 1 with drips which isn’t too bad since I did about 8 doorknobs. I have to admit – they look pretty, pretty good! But thanks for the warning. I’ll definitely use the steel wool or sandpaper for the next round of knobs. Thanks!
YoungHouseLove says
Glad they seemed to turn out ok! Good luck!
xo,
s
Megan W. says
love it! We did this to all of our brass doorknobs and some cabinet hardward on a built-in in our office about a year ago, and they still look great! We didn’t even prime, just 2 coats and they still look good as new. Love me some rustoleum=)
Megan W. says
ps, do you think it would hold up on a Roman tub faucet? we replaced our double sink faucets in the master bath and have a glorious tub with an awful WHITE (yes, white) faucet…replacing it would be $200-300 and MAJOR since there is no faucet access to change it. Just tape really well around it and hope for the best?
YoungHouseLove says
We’ve heard from people who ORBed their faucets as early as 2009 and they’re still holding up really well! Our only safety suggestion would be to tape off the inside of the faucet so the water doesn’t flow over the ORB since you probably don’t want to submerge yourself in paint particles that might get dislodged (and you definitely don’t want to drink them, so this tip goes for sink faucets too). Good luck!
xo,
s
Jill says
Sherry and John,
Have you considered painting the door frame in high gloss black? Just looking at the front of the house makes me want to frame that cheery door and make it stand out even more! We did it with our red door and it looks really amazing. Just wondering! :)
YoungHouseLove says
It’s definitely a possibility down the line! Who knows where we’ll end up out there!
xo,
s
Christy says
Hey Sherry,
Apologies if this question has already been asked, but did you notice any of the spray paint coming off at all, for example when grabbing the door knob, does any paint come off on your hands? I’m toying with the idea of doing this (oil aged bronze, too!) for the bathroom, with the towel and tp holders, and thinking through if the paint will rub off on the towels.
Thoughts?
Christy
YoungHouseLove says
Nope, we even used a screwdriver to reinstall the screws and even the metal tip of the screwdriver grinding against the screws didn’t take any paint off. Of course sanding or using steel wool will help even more with adhesion, and we’re not sure how long-term it’ll be since we just did it recently, but we’ll keep you posted!
xo,
s
Monica says
I really want to do this to my front door hardware too! What a great idea! Ok, one question- did you spray paint the hinges? My front door has a gold knob, gold kick plate, and gold hinges. Any suggestions? Would you try this on interior door hardware?
YoungHouseLove says
We didn’t spray our hinges since they’re not visible from the front and are painted over to match the back of the door from the back (in white). They didn’t bother us since they blended in so we didn’t bother to take the door off its hinges, but if you wanted to do that to make them match you definitely could. Just sand them and keep it thin and even so nothing grinds or rubs off!
xo,
s