How you like them handles?
(Handles, apples. It’s all the same. Right Matt Damon? What? You don’t think Matt Damon reads this blog? Of course he doesn’t.)
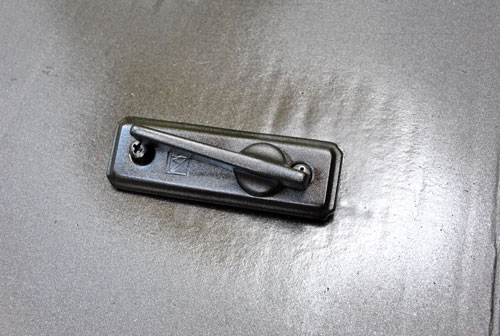
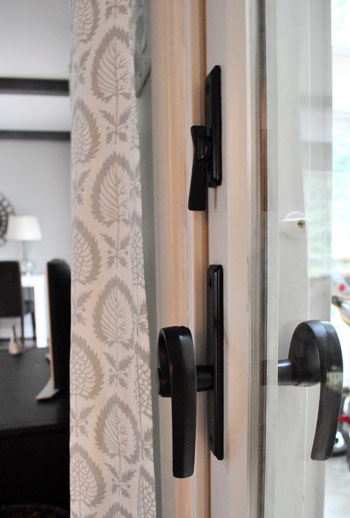
Anyway, I’m back to share the hardware makeover play-by-play and a ton of pics that we couldn’t squeeze into our door-painting post on Wednesday. So fasten your seat belts. Oh yeah, it’s gonna get crazy. First I have a secret. The hardware on our sliding doors in the living room looked like this:
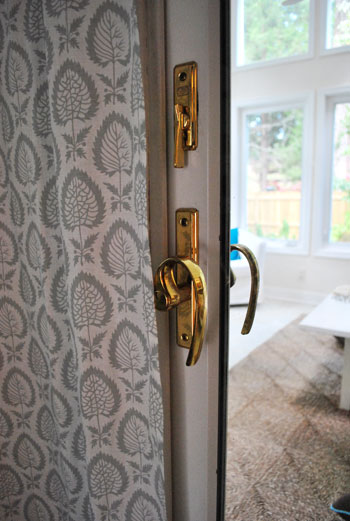
Le yikes, right? It’s all sorts of bad with the swoopy handle. If you look a little closer it’s not even shiny and new looking gold, it’s all rusted and neglected…
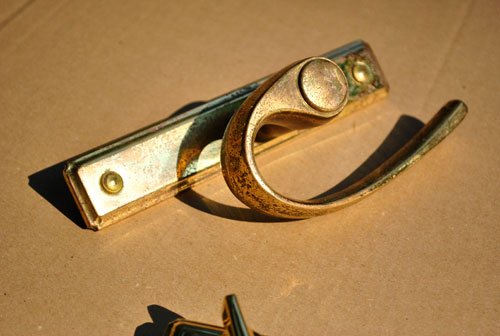
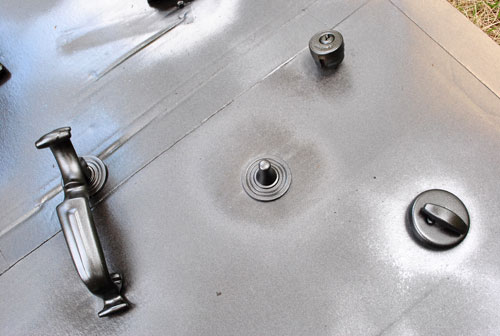
So as you can probably tell from the photo above (duh) down they came. We stripped the hardware off of both of the sliding doors in about five minutes (I took one side while John got the other one) by just unscrewing things on the front, back, and side to free them with a regular old philips head screwdriver…

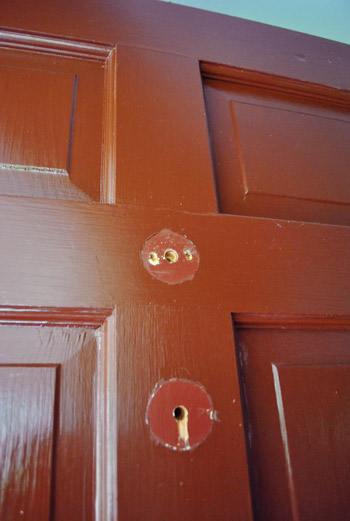
… and then we removed the doorknob and the rusty old door knocker on the front door (also with a screwdriver – there were exposed screws that we just removed from the back).

You can check out our door-painting post for more details on that stuff (like how we sanded the paint around the hardware that we removed so it was nice and smooth before painting).
But back to our pile o’ removed hardware. Here we have the sliding door hardware along with the doorknob, deadbolt, and the door knocker from the front door:
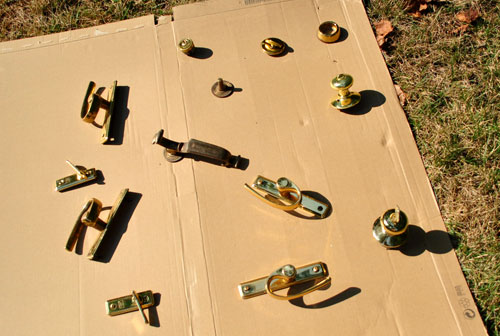
It was like a Gold Hardware “Where Are They Now?” Special on VH1. Some folks weren’t as crusty as others, but they were all well past their prime.
So after some decent amount of online research and chatting up the paint pros at Lowe’s (there’s a woman at the one near us who is phenomenally knowledgeable) we learned that the most recommended method for refinishing hardware (to gain the most durability and long-lasting finish) was:
- Sand as much of the hardware as you can with high grit (200+) sandpaper to rough it up
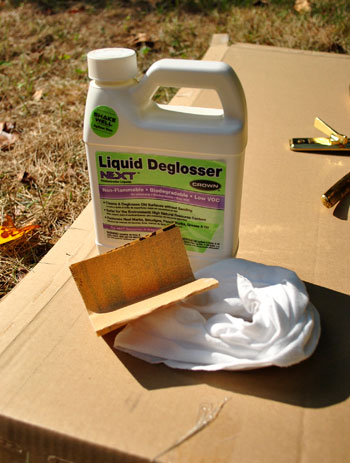
- Use a liquid deglosser (like this one) to degloss everything to get oils and sanded particles off of the hardware before spraying
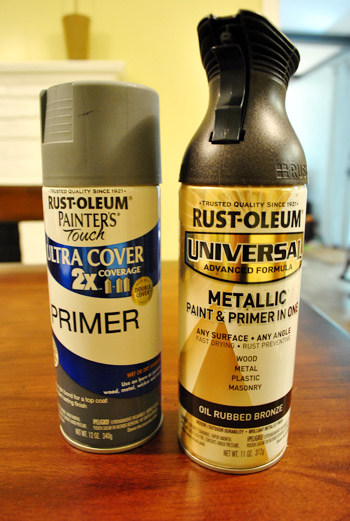
- Apply one thin and even coat of high quality spray primer meant for metal (we grabbed Rustoleum Painter’s Touch Ultra Coverage Primer in gray since we figured it would blend more than white)
- Apply two to three thin and even coats of high quality spray paint meant for metal in your color of choice (of course, our poison was: Rustoleum Universal Metallic All-Surface Spray Paint in Oil-Rubbed Bronze)
So I grabbed my high grit sandpaper and started on the first step: sanding.
Ahhhhhhhhh. Baaaad idea. The sandpaper left tons of obvious scratches in the gold finish that I knew wouldn’t completely be covered by thin coats of primer and spray paint. I should have taken a picture of the one side of the doorknob that I thought I ruined with the dumb sanding step but I was too busy freaking out. So naturally I made some sort of sound that resembled a walrus screaming and chucked the sandpaper as far away as possible while cradling/apologizing to my doorknob and promising him that I’d never hurt him like that again. Luckily I realized the knob would be installed with that part underneath, so only Clara-height children may be able to see the slightly roughed up texture on the underside. Whew.
Update: A few smarter-than-me commenters recommended trying steel wool or super high grit automotive sandpaper to rough up the surface, so I plan to try that next time. Just tossing that out there for anyone who might be doing this (who may want extra “insurance” that the spray will hold).
So it was out the window with step one, and on to step two: deglossing. I just used some rubber gloves and a rag to apply the deglosser and then let everything dry a little so it wasn’t soaking wet before moving onto step three: applying one thin coat of spray primer. But when I went to grab the primer I noticed something intriguing on the ORB can next to it. It said “paint & primer in one” right on the label. Duh. No need to beat a dead horse.
So I trusted my beloved ORB spray primer + paint to lead the way and just applied three thin and even coats to all of my hardware (that I strategically placed on cardboard so I could access all of the exposed parts by piercing the long metal interior hardware rods through the cardboard so they stood up). I will now repeat that thin and even is the key when it comes to spray paint. If you apply thin & even coats they won’t be globby and thick, and they’ll bond/cure very strongly, which will greatly reduce any issues with things flaking, scratching, or peeling down the line.
Oh and see that key? That’s a secret.
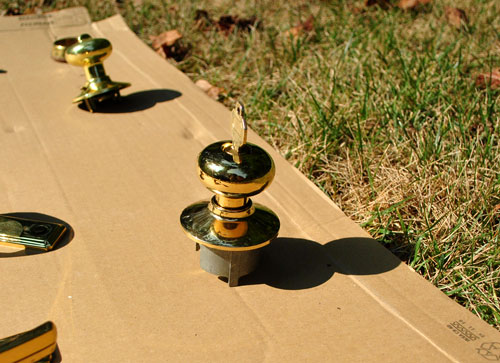
I decided I didn’t want to muck up the inside of my lock with spray paint, so I used a spare house key to block the spray from getting into the lock (while allowing me to access the rest of the knob). I didn’t push the key all the way in for fear that the top of the key would block some of the outside of the doorknob, so I just stuck it halfway in so it would block the interior part without inhibiting access to the metal facade around it. Then I just removed it and used it on the deadbolt’s keyhole when I sprayed that.
Oh and another spraying tip would be to put all of your screws into the hardware and pierce them through the cardboard so the ends of them get sprayed to match (like the two that you see below). Also, be sure to move things like latches back and forth between coats to make sure you can access all areas of the hardware with spray paint. Like this…
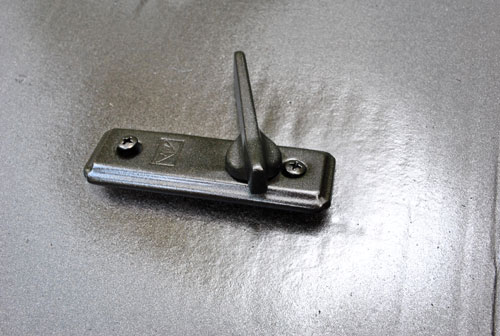
… and this:
About an hour later (I probably waited 20 minutes between each of my three thin and even coats, just to be sure it was nice and cured before piling more on) I was left with these beauties:
Who sees a winking face? Just me?
I probably waited six full hours after my last coat of spray paint before reinstalling anything. Just to give them a lot of time to fully cure and ensure that I wouldn’t scratch or ding something while putting them back on the doors. I can’t speak to the long-term durability of this process since it has only been… oh, about 48 hours. But I can tell you that reinstalling them went really smoothly and everything works just as well as it used to and nothing was even remotely marred or dinged during installation or in the past two days since.
So I guess we’ll check back in with an update about how they hold up over the long haul (these doors are used every single day thanks to a dog who loves going in and out). But so far, so good. And it definitely beats buying all new hardware (we figured we didn’t have anything to lose in trying to make the old stuff work before resorting to trashing it and splurging for all new hardware).
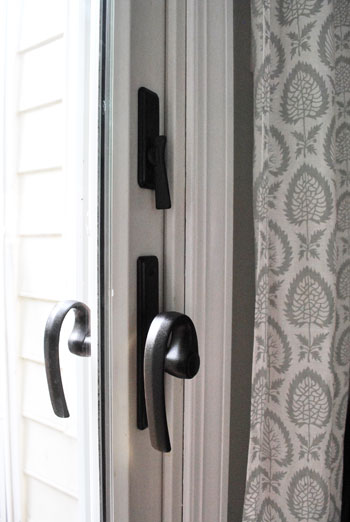
Oh and it bares noting that things look pretty black in some of these pics, but it’s just because ORB is a mystical creature. So it’s hard to capture the true color that you see in real life (which is a rich metallic-y chocolate). Actually, the exterior sprayed shots above show the true color really well. It still looks like that inside, it’s just seemingly impossible to get it on film.
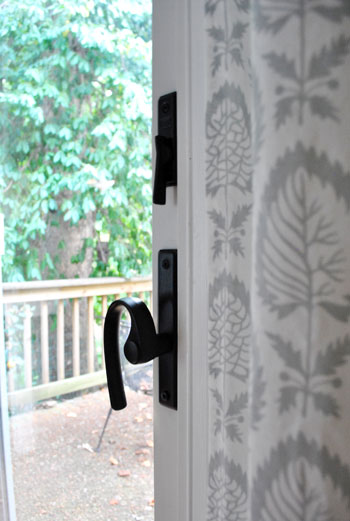
Perhaps the most exciting thing is that in taking this style quiz, the thing that I loved most about the room they said was “my style” was the white door with the dark hardware. And now it’s mine. All mine. Mwahahaha. (<– yup, I broke out my maniacal laugh)
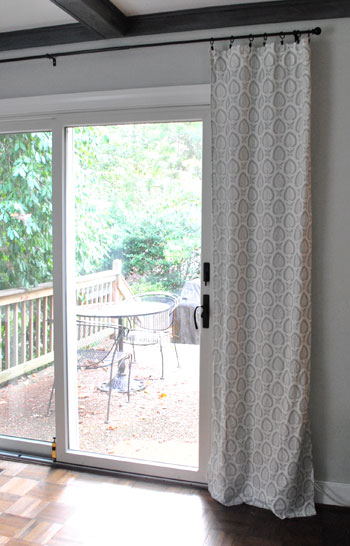
I think it looks delish with the oil-rubbed bronze curtain rods and the dark beams. And John digs it too (delish just isn’t an adjective he’s apt to use).

Me-ow old sliding door friend. My how you’ve matured. Well, as much as a twisty twirly old 80’s knob can really mature.
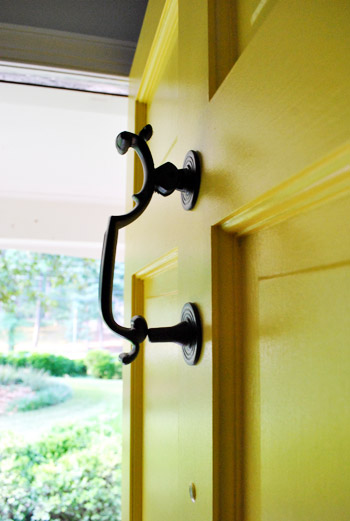
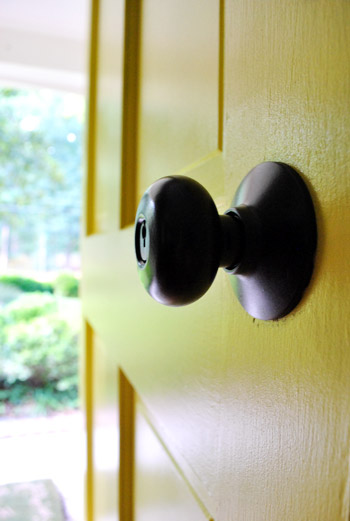
And you’ve already seen our freshly sprayed front door hardware, but let’s just revisit it for a moment:
So yeah. We’re happy with our little almost-foiled-by-the-sandpaper process. Although I must admit that after I sprayed the underside of the knob, the scratches were hardly noticeable. So maybe if you’re a staunch rule follower (and not a freaked out walrus impersonator like me) you could get away with the sanding step. Either way, I have high hopes that the deglosser and included-primer will do their job when it comes to adhesion (especially since our old scratched and rusted fixtures weren’t too glossy or shiny to begin with).
As for the ORB finish: Hi my name is Sherry, and I’m addicted to oil-rubbed bronze. They say you can’t help who you love. But it could be worse. I could be addicted to sanding things, which would have been a cruel joke since sandpaper was the kryptonite of this project. I wonder why. Has anyone else successfully sanded their metal hardware before spraying it? Was it not all scratched up? Maybe it just looked “brushed” in the end? I just didn’t trust myself to do it all in one consistent direction (aka: not make a hot mess that was oh so obvious after the spray-job). So in summary, my method was just to: use a liquid deglosser (although I’ll also try steel wool or extra high grit sandpaper next time), lay everything out on cardboard standing up so it could be sprayed evenly from all angles, use a half-inserted key to block any keyholes, spray everything thinly and evenly in 3 coats applied every 20 mins or so, be sure to move toggles and locks so all parts of the hardware were sprayed, and let it cure for about 6 hours before rehanging it.
Oh and the total cost of this project was $6 for the spray paint (I was able to return the unopened can of primer and I already had the deglosser and that dastardly sandpaper on hand). But for someone who needs to purchase deglosser, you might want to budget four more dollars for that. Considering a new knob, deadbolt, knocker, and two locks and four handles for our sliding doors would probably come to about $200, I think we got one heckova deal. So I’ll let you know how they hold up. If they’re anything like our ORBed sofa legs (which we sprayed five months ago, and they still look mint) we’ll have bona fide jazz hands going on. So it’s probably only a matter of time before I really go nuts and remove every last interior brass door and hinge and go to town. Like I said, my name is Sherry, and I’m addicted to oil-rubbed bronze. Holla.
Update: Our handles are still holding steady. Check out the update post here.
Wanna know where we got something in our house or what paint colors we used? Just click on this button:

*This post contains affiliate links to items we have purchased and loved*

Lauren Moyer says
Love it guys! I’m getting ORB lust!
Dusa says
Hee, I knew when I read yesterday’s post there was going to be more ORB lub! But the pics of the front door read ‘black’ – ah, the mystery of ORB…
Elizabeth says
Am I the only one who started singing…”front, back, side to side…front back side to side:…just me?
YoungHouseLove says
Great, now I’m singing it. Haha.
xo,
s
Elizabeth says
LOL! It will be in my brain ALL DAY!
Ellen says
I ORB’ed our closest door knobs one year ago… goodbye brass! They have held up really well. I’m curious to see how your outdoor door handle holds up. And then I’ll do ours! They are that snazzy gold too!
Amy @ this DIY life says
I think we should start an ORBA group – oil rubbed bronze anonymous…but those who love it really love it, so it’s not really anonymous. Scratch that idea. I’m with you on the color not photographing well though. It looks black so often. I was totally jazzed when I got a good picture of it on Tuesday (http://thisdiylife.files.wordpress.com/2011/08/101_1224.jpg?w=640&h=480). It’s the best one I’ve ever gotten anyway.
YoungHouseLove says
Ooh yeah, she’s a vision.
xo,
s
Amanda says
Do it! EVERY SINGLE DOOR KNOB. It looks soo sexy. Yes, I just said a knob looks sexy. Because, well it does. Especially with the white door, and the curtain rod.
Beth says
I love your blog, but sometimes it makes me hate myself! We literally had those EXACT same 80s handles on our sliding glass doors. I didn’t even think to spray paint them, but I despised them, so they had to go. We only had three options that would fit our door, and I really didn’t like any of them. I picked the cheaper, lesser of three evils which still cost $100… Sigh… I seriously need to put all projects on hold until you do them!!!
YoungHouseLove says
Woah- $100! So sorry girl. Wish we had done this sooner.
xo,
s
Lisa says
Looks fantastic Sherry! Can any of your readers help me? I have a steel front door with a decorative glass insert. There is brass/gold trim INSIDE the window (between the panes of glass) that forms the decorative design. I know I can remove the window from the door, but would that give me access to the metal-looking trim, so I could maybe somehow paint it, or silver-leaf it, or something (?), to get rid of that ugly gold color? Or will it all hold together as one unit and I can’t get to that trim? Hope this makes sense!
YoungHouseLove says
I have no idea! Does anyone know? Maybe try posting a pic of it on Facebook and perhaps someone with the same window will answer your question?
xo,
s
Melanie says
A picture would be handy. If it’s essentially built like a stained glass piece, you can patina the metal once you remove the decorative glass panel from the window. You need to use different kinds of patina for copper foil vs. leading, so you need to know which one you’ve got. I’m betting on it being copper foil.(Copper foil is basically an adhesive strip of soft copper that gets stuck to the side of the glass and then wrapped up onto either side. Then, you apply flux and solder along every single bit of foil to seal the glass together. Leading is a u-shaped length of lead that you slide the edge of the glass inside. Then, you just solder the pieces together at all the joints. The two look pretty different visually.) I recommend Novacan patina; it’s a pretty simple process. (Feel free to ask questions if ya’ need help.) I do want to stress that you should probably keep the kids away and make SURE you wash your hands well after messing with the window in any way, just in case you’re dealing with leading because it’s… well, lead.
heather s. says
I have the same window in my doors. I tried to take the window out to do just what you mentioned and I couldn’t do it. It was all one solid piece so I couldn’t get to the metal on the inside…
Christine says
Ha! I have that exact same swoopy gold slider handle and I’ve been hating on that gold since we moved in two years ago. I never even thought of painting it, but I have a slight ORB obsession too and may have to “borrow” your idea!
Thanks for the inspiration,
Christine (a fellow Jersey girl)
Robin @ Our Semi Organic Life says
Love the ORB! The little twisty handle is actually kinda cute.
Kate says
You’re really not helping me with my obsession to spraypaint our bathroom light fixtures in ORB…
Lisa A says
Love this post! We have re-used all our old window hardware on our double hung windows. Soaked them in paint remover to get all the 10 layers of paint off but it never ocurred to me to paint them! Thanks!
erika m says
I’m a weirdo…I like all the hardware to match…everywhere. So my question is, what color are your hinges, are they ORBed or another color…do you think door hinges (interior or exterior) have to/should match…could you explain some of your reasoning in your answer? Thanks
YoungHouseLove says
The sliding doors don’t have hinges and the front door’s hinges were already painted over (they’re only visible from the inside and they’re white like the door so they blended enough not to bother us). Hope it helps!
xo,
s
katie says
That yellow front door looks AMAZING in your header pic. And the close ups of the ORB hardware looks great with the yellow as well. And I can’t believe how much better the swirly sliding glass door hardware looks in ORB!
I’ve been addicted to brushed nickel hardware in this house but I’m definitely thinking ORB is the way to go in my next home. It’s beautiful!
Also, my hubby insisted on buying all new knobs for our doors rather than spray painting our old brass knobs. He didn’t think the spray paint would hold up on something used so often. I’m hoping you’ll report back on that someday. Because I am the tightwad of this relationship and if I can save $200 you bet I will!
YoungHouseLove says
Haha, I promise to report back- be it good, bad, or ugly!
xo,
s
almk42 says
My husband was a non-believer, but I made him get a can of your ORB Rustoleum when we needed to paint a cable face plate something other than white to match our living room. After he used it, he was sold. I’m trying to convince him we need to take every doorknob down in the house and ORB them. It’d save us about $8 a door, and we have a lot of doors. He’s concerned it won’t hold up well because our doorknobs are original (c1971) and have some kind of strange crackle finish to them. At least they’re regular bronze colored right now and not glossy gold…. like our front door hardware…. which I am totally going to make him paint now. :)
YoungHouseLove says
Hmm, I think what I would do is just test it out on one. Maybe an out of the way closet door? And I’d definitely use fine grit sandpaper or steel wool to try to get the crackle finish smooth so it’s ready for paint. Good luck!
xo,
s
Elizabeth says
I know exactly what doorknobs you are talking about ans there would be no sanding away of the crackle. But I bet they would spray paint fine!
laura says
I am so weirdly excited to do this to all the doors in my house (especially the exterior doors) that I can barely breath! I want to leave work and go home and do this! I have been waiting for this post because I CANNOT stand our gold door hardware! I am so excited that it worked for you guys! My husband said it wouldn’t stick and it would make things non-movable. So, I am going to prove him wrong!! Thank you! Everything looks great!
Gina says
I have to admit the orb is growing on me…but I am more of a greyish-shade kinda girl. I googled hardware finishes and some of the orb looked a little reddish? Definitely want a matt finish..aged bronze looked nice too.
BTW, Just a few weeks ago, we installed upper kitchen cabinets on top and bottom on either side of my fireplace for desk space as well. Lower kitch cabs take up sooo much floor space. We used 2x4s as the desktop, wiped on 1 coat of flat white and then used an ebony stain. I was pretty pleased at the gray weathered look it got. But with the white cabs AND white brick fireplace, it needs something to break up all that white. One more thing, since we were using cabinets we had in storage and leaving room between the ones on the floor for a chair, the upper cabinets do not extend to the outer sides of the lower. At first, I panicked, but since it’s symmetrical, it looks a little more open and I love it.
YoungHouseLove says
Hmm, our ORB definitely looks like cast iron with a bit of a chocolate shimmer, so I can see how you’d consider it to be warm-ish. But see the rods in the pics in this post right under the gray beams? They’re ORB (as are all the other rods in this house and our last house) – so they seem kind of like neutrals, so they “go” with things like gray beams and walls. Aged bronze might be grayer though (haven’t tried that). Good luck!
xo,
s
Kelly H. says
I removed my front door hardware first thing this morning in anticipation of this post! I hadn’t thought about putting a key in the lock to keep paint out — thanks for that tip. If anyone needs me, I’ll be out in the yard spray painting the ugly old brass out of my life!
YoungHouseLove says
Haha, have fun Kelly!
xo,
s
Pam (pamcakes and eggs) says
I love the handles! Every time I see the ORB spray at home depot, I think of your blog!
dee says
Can you paint a ceiling fan using this technique? Mine is shiny gold.
YoungHouseLove says
I would think so. It won’t even get handled a lot so I think it would hold up really well. But I would take it down and try to sand/prime/paint it (not just spray it without primer or roughing it up a little) in case it’s glossy. Good luck!
xo,
s
Jane in STL says
YES! I’ve done several and love the updated look. No more shiny brass. Also updated these with new light kits. So much better. success
Suni says
I can’t wait to hear how this holds up! I’ve wanted to do this with all my old nasty brass door knobs and hinges – I was just scared it would scratch or chip away with use – you know wedding rings and stuff beating it up. I’m eager to hear how this is holding up a few months from now!
YoungHouseLove says
We’ll definitely share any and all updates!
xo,
s
Jane in STL says
I’m on my 4th or 5th can of ORB. I can’t live without it. What if it goes out of style?
I have had mixed results with the door hardware projects. 1st project was the door to the screened porch. It’s held up beautifully. 2nd project was the door we use every time we come and go. Results not as good. There are some scratched off spots on the exterior but I figure it gets a ton of abuse: keys, jewelry, etc knocking around on the surface. So I just spray it again. This time, no need to remove the hardware. Use the newspaper and painter’s tape method, cover everything even the floor and surrounding area (more than you think necessary). Spray and it will look just fine for months.
Jen says
I love the updated look so much more than the old, worn out brass hardware. Very nice!
I assume, since it wasn’t mentioned or pictured, that the screws to the hardware held up okay after painting. As in, the screwdriver didn’t chip or wear down the paint in the screws when you put everything back on?
YoungHouseLove says
Nope, they look great!
xo,
s
danielle says
i think i need to get on this ORB bandwagon…
I have a gray house with black shutters (center hall colonial style). I also have two light posts outside next to the driveway – they are black and the paint is chipping on the bottom and need some love…think spraypainting them ORB would look good or not a good idea b/c of black shutters – should i just stick to black (they are currently black)? might be clashy?
YoungHouseLove says
I think either would work. ORB works really gorgeously with black as well as with other ORB. Can’t go wrong!
xo,
s
Lisa @ Life in Green says
Looks great!
I spray painted door handles about 5 years ago and they’ve held up quite well…with some paint just now starting to wear a little on the front door which is used a lot.
Marilyn says
Looks great. I’m wanting to paint an older style aluminum storm door, any suggestions.
YoungHouseLove says
I’d just ask the pros at the paint desk what they recommend for that (or google around for tips). Good luck!
xo,
s
Vicki J says
I have been waiting for this post.. When we moved in our house 24 years ago we personally installed all the gold finished products we could find.. who knew gold would be out one day?lol anyway some updating would be nice rather than replacing everything!
Also I have the cutest bathroom towel racks an tp holders etc rescued from my grandmothers home that are (shocker) gold with fish on them.. not cutesy but formal fish lol I sooo want these in my home and thought the auto body shop could electroplate them but hubby said it would cost too much… here is the solution!!!
and one more thing… we used the silver pewter finish on some plumbing fixtures a month a go because we could find a perfect match at the store–works like a charm
YoungHouseLove says
Such a smart solution!
xo,
s
Hannah says
I have a glossy white metal bed frame that was a hand-me-down. I plan to ORB it in the next few weeks so it has a more modern look. Since the current white paint is glossy, would you recommend using the liquid deglosser (and/or steel wool) before spray painting? Also, I noticed that Rustoleum also makes a “hammered finish” Universal spray paint in a similar color to ORB. Have you used that color?
Oh, and you guys are the reason my husband is OK with me tackling some of these projects … seeing you guys be the “guinea pigs” for some of these projects and takes out a huge element of “she might totally screw this up and ruin everything.” So thanks!
YoungHouseLove says
I’d use both. First I’d use super high grit sandpaper or steel wool and then I’d follow that with a deglosser. As for the hammered finish, we haven’t tried that but have seen projects done with it and it’s great! Good luck!
xo,
s
Jen @ The Decor Scene says
Gorgeous!!! I do love ORB. I think I might have to do either ORB or brushed nickel for all our door handles. Right now anything that is new we have bought brushed nickel finished hardware, but that is mostly for our outside doors. But we do have ORB in our home with ceiling fans, chandeliers & curtains rods. We actually have more ORB now that I think of it. Nuts I dropped the ball on that one when we were buying the new front door hardware because we couldn’t use the old set on the new door. Same thing for our new back door.
Sooooooo, “Sherry with the addiction to ORB”, do you think it would be ok if I spray painted the interior doors in our home ORB and not brushed nickel like the front and back door? Maybe in a few years I could spray the front & back door hardware ORB, but right now the hubby would kill me. ;)
YoungHouseLove says
Oh yeah, I’m all about mixed metals. We have orb curtains in rooms with silver table and floor lamps (our living room). I say go for it!
xo,
s
Jen @ The Decor Scene says
Cool! Thanks for your opinion! Here I come ORB spray paint. Because I hate my shiny gold interior hardware on my doors. :)
Mindy says
Yeah, it’s like you’re stalking my head. I’ve been wanting to change out my front door hardware since, ahem, well since I bought my house in 2001. Hardware is SO expensive!!! So lately (last month or so), I’ve been obsessing over the idea of spray painting it instead of waiting to win the lottery. I am SO doing this. I even have my paint color picked out for a fresh coat on the door first. Yay, I’m so dang excited! Thanks for the tips!
Tessa says
I sanded, primed, and ORB’d my 60s brassy/coppery kitchen cabinet knobs a couple years ago and it’s held up great. (A tiny bit of chipping on only a couple knobs.) Couldn’t see the sanding scratches through the finish at all. I think my ORB spray paint was “hammered” finish. I also ditched the big 60s circle plate that was behind them (though after I took the time to sand, prime, and paint those too :P) for a much more updated look, just a simple ORB knob!
Paige says
LOVE the black door knobs. I am so going to try this!
alison says
looks great, considering it for my own house! one question though, did you guys not change your locks when you first moved in? just curious.
YoungHouseLove says
We got all the keys from the previous owners, who we befriended through the home-buying process (they even threw us a welcome to the neighborhood party before closing, so we trusted that there weren’t any keys floating around). Truth be told we have a pretty awesome alarm system that would still go off if someone entered with a key (we have to enter our code every time we return home even when we use our key).
xo,
s
elaine says
This looks fantastic!!! Gold door knobs in my place have just been warned! :)
Nicole S. says
I second the steel wool. Always appropriate for metal. I think the hardware looks great! (And kudos for hopefully turning on some 80’s brass lovers to ORB!!!)
Malorie says
I was just thinking about doing this earlier this week to the 70s door knobs inside our house (and maybe the hinges?). The door knobs are two tone with part almost like a brushed nickel and part a goldish bronzy hideous color :)Thanks for the step by step instructions!
Jamie says
AHHH! I needed this post literally YESTERDAY! I just ORB spray painted metal hardware for a dresser remake and failed to degrease, prime OR use a spray specifically for metal! I imagine it’ll chip off soon, at which time I’ll do it the RIGHT way. :) Good to know!!
j says
Should have coated those with a clear gloss or satin clear coat to add extra durability. Handles/knobs get grabbed a whole lot more than sofa legs.
YoungHouseLove says
True! We’re definitely planning to just see how they do and post updates whether it’s good or bad (many folks who didn’t seal theirs and used the same exact spray paint have mentioned theirs still look good a year+ later) so we’ll have to see how it goes! Perhaps if they don’t hold up well we’ll be sure to sand every last inch of them and seal ’em too.
xo,
s
Lisa P. says
Crap. Now my excuse of hardware being too expensive to replace has been thrown out the window. I better go get my spray on. Thanks for all the helpful tips, as usual – you guys rock!
kathy says
It’s so great how you guys not only save money but reuse good old things. Like that swoopy door handle….who’d have thought it could look so modern and artsy again? Love it.
I know I’m a few posts late, but have you ever painted a steel or fiberglass front door? Last time I painted our wooden door it was fine, but I’m sort of nervous about tackling our new (no longer warpy) door. Any suggestions? Thanks!!
YoungHouseLove says
I would just ask what they recommend at the paint store (when we got our paint for the front door they specifically asked what kind of door we had and recommended the paint we used, so I bet they know what’s best for metal doors too). Good luck!
xo,
s
Rachel in NC says
I had my first ORB spray painting experience last week! I had a gold curtain rod and a grey-ish lamp that I wanted to use in my nursery, and the ORB goes so well with the dark furniture!
When my husband came home, his first question was “Why did you paint them black? I thought you wanted bronze!” haha
YoungHouseLove says
Haha, husbands!
xo,
s
Shari @ Chicago Cuisine Critique says
Looks great! :)
Liz says
I spraypainted our interior doorknobs using the same type of paint you used, only in black satin, and they turned out great. I sanded them first with 220 sandpaper and no scratches showed through at all, and I wasn’t even careful about how I sanded. I think higher grit sandpaper might be key? (haha, key, doorknob…)
YoungHouseLove says
Yup, from what I hear using the higher grit stuff is the key (or using steel wool) so I definitely plan to do that next time!
xo,
s
Jenn says
I’m so excited that you guys did this (I know you mentioned it in the past) AND provided a tutorial that I’m simultaneously making walrus noises and doing jazz hands. I haven’t attempted this yet, but I want to tackle every single bronze fixture in my entire house. My fiance thinks my hatred of bronze is crazy. It’s good to know I’m not the only one!
Megan H. says
I’m sure there’s a post about this that I’m just too lazy to go find but where’d those sweet curtains come from?
Did you make them?
If you made them, where’d that killer fabric come from?
(Pardon my extensive use of prepositional phrases.)
YoungHouseLove says
Haha, those were from Ikea a while back but they discontinued them (gasp!). Maybe try ebay? I think they were called Arvine or Alvine Kottar?
xo,
s
Lindy says
I love those curtains, where did you get them?
YoungHouseLove says
They’re from Ikea a few months back but they discontinued them (so sad). I think they were called Alvine Kottar though. Maybe try ebay?
xo,
s
Elisa @ What the Vita says
We sanded and primed and spraypainted our hardware for our campaign nightstands… when I sanded the first one, my husband freaked out at all of the scratches so I stopped and we sprayed that one to see if the scratches would show through. It didn’t – the silver spray paint covered it up beautifully, so I went ahead and sanded everything for maximum adhesion and it’s still looking mighty fine to this day! Been around a month so far, so the jury is still out on how long the paint will last, but the scratches definitely didn’t show through.
Jenn says
so i’m thinking this same concept will work on knobs and pulls in my kitchen? PLEASE say yes!!!
YoungHouseLove says
I’d imagine so. Just be sure to rough them up with high grit sandpaper or steel wool and degloss and use primer and do all those other helps-paint-adhere things (thin and even, baby!).
xo,
s
Alexis says
Soo I was starring at my sliding glass door handle (which looks very similar to yours) the other day and thinking how much that needs some attention badly! And there you go and post this amazing handle re-do – you guys are awesome!
I can’t wait to try revamping mine with the help of your helpful tips!! Unfortunately I have a few other major things to take care of around the house before I redo mine. But thanks again!
Laci Waner says
Holla!!