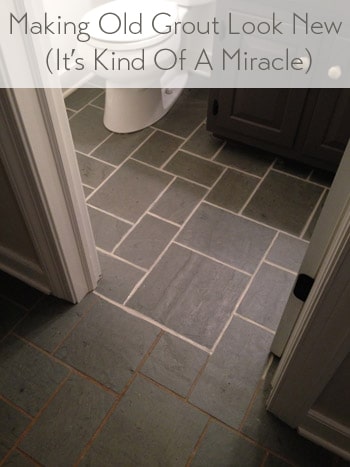
The discolored and dirt-stained grout in the tile floor of our foyer looked super old and gross, but after trying nearly a dozen cleaners and cleaning tricks we nearly gave up. Then we finally find THE SOLUTION to making the grout look white and clean again!
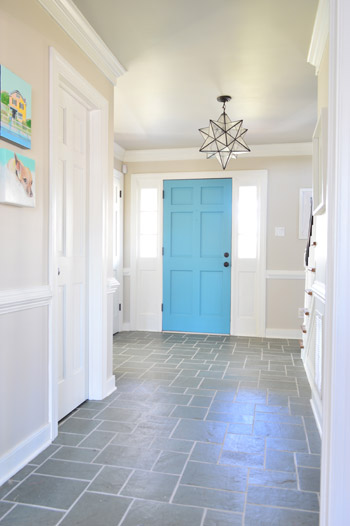
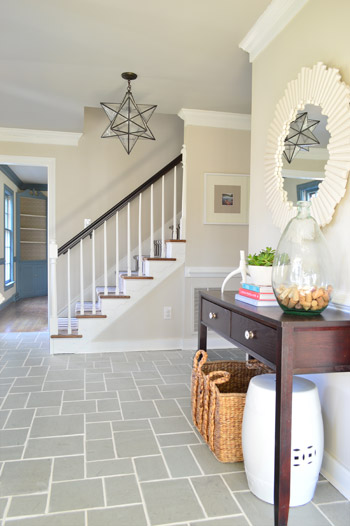
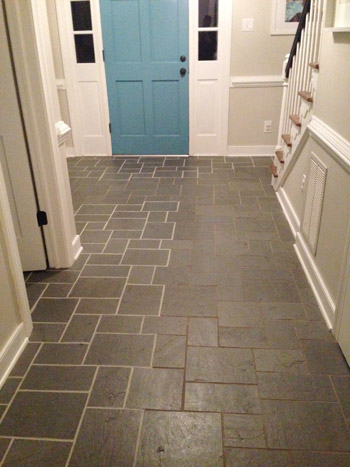
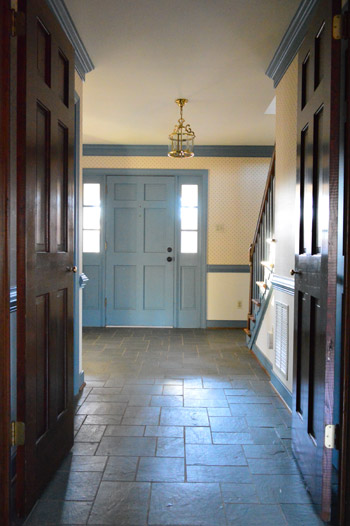
Now that we’re done, you can see how the view just got a heckova lot better around here. The crisp white grout lines play off the white trim and make the whole space feel newer and cleaner.
The funny thing is, it wasn’t actually cleaning that did the trick. So if you’ve got a similar issue with discolored or stain grout, here’s our official intervention: stop scrubbing! Well, maybe give scrubbing a fair shot, but don’t be discouraged if it gets you nowhere. There’s another way!
Cleaning Tricks That DIDN’T Work
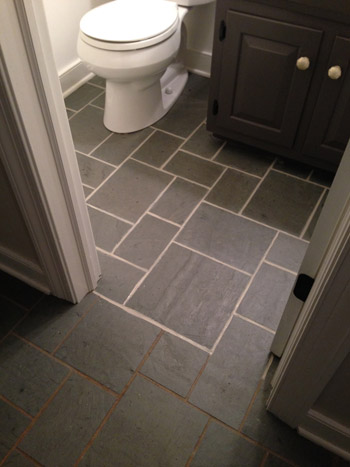
As you might recall, for the past six months that we’ve lived here, it has looked like this.
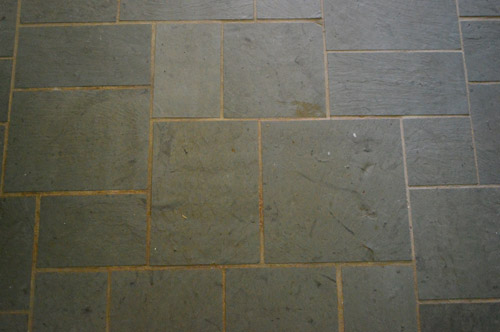
I gave nearly every method under the sun a shot to make that grout look clean. After repeatedly scrubbing the heck out of it, I knew that it was actually very (very, very) clean… it just was so discolored and stained in certain areas, that no amount of blood, sweat, tears, or elbow grease could make it look that way.
Some of my attempts to clean grout included (but weren’t limited to):
- various baking soda paste mixtures
- various white vinegar solutions
- copious magic erasers
- specialty grout cleaning floor sprays/potions/scrubs
- bleach pens
- oxygenating cleaners like Oxiclean
- Mrs. Meyers powdered cleanser + a wire brush
- Barkeeper’s Friend + a wire brush
- a borrowed steam mop
- scrubbing with a stiff bristle brush
- lots and lots of muttered cursing
The Solution To Getting White Grout Again
By this point I did what most people would do. I gave up and ignored it for another few days (what’s a few days after six months of no-dice results?). And then I finally faced facts. The grout either needed to be scraped out and regrouted entirely (which makes for a pretty messy job, especially in the main hallway of our house which connects the entire upstairs to each room downstairs) or it needed to be refinished.
Thankfully a few of you tipped me off to a product you’ve used with success called Polyblend Grout Renew. Let me just skip to the punchline: it worked, and I wish I had tried it before spending six months scrubbing my mind out.
The cost? A cool $12 from Home Depot. (Update: it’s closer to $20 now, but there are more affordable grout pen alternatives available.) Can I get a what what? Note: this might sound like an ad for the stuff, but Grout Renew doesn’t know us from Adam – I’m just beyond grateful that it worked.
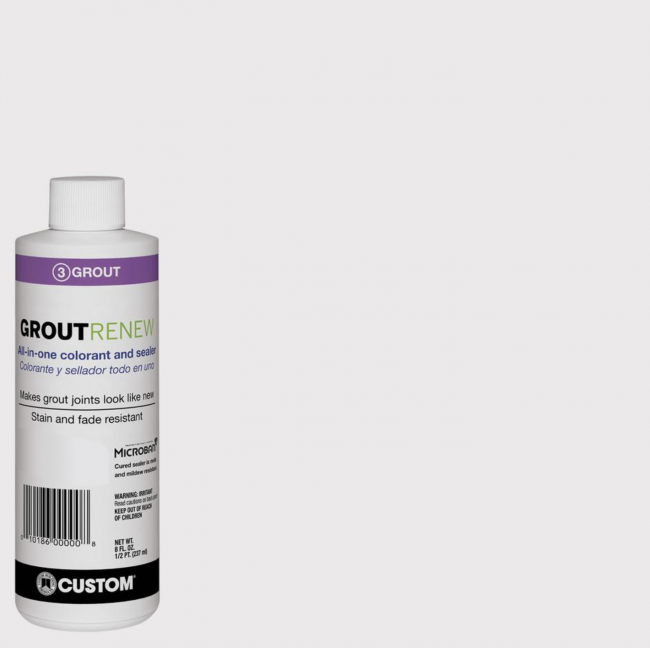
Choose Your Grout Paint Color
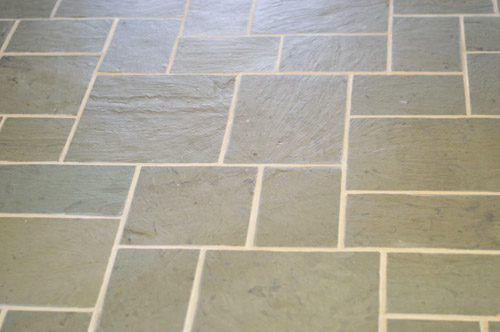
GroutRenew comes in several colors now – over 3 dozen, in fact, including several shades of white and off-white. So you may be tempted to go for the brightest white to get the cleanest, freshest look (that’s “Artic White” pictured below). However, just like paint colors, the brightest, whitest version may not be best for you.
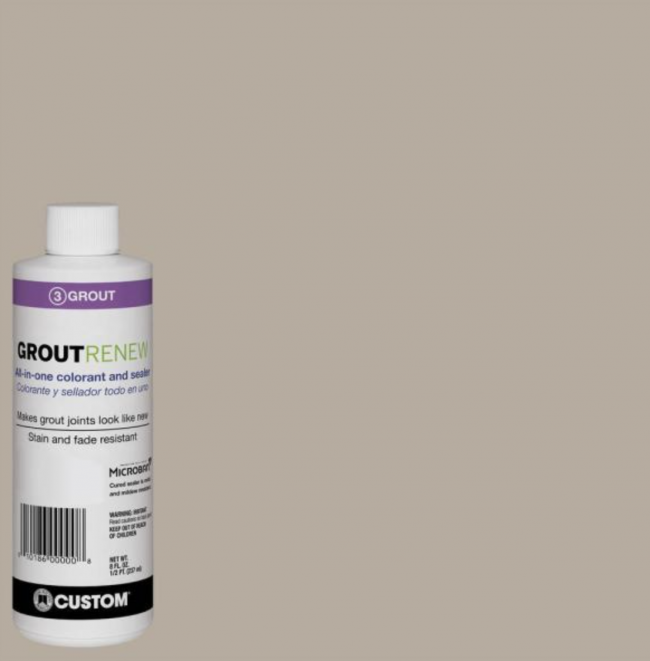
Be sure to take some time to look at your room, your tile, and your lighting to make sure you’re choosing something that blends well with your space. You can always test out a few colors too before committing to one. John and I actually considered two colors – Natural Gray and Oyster Gray, which both look pretty dark compared to the brighter whites. We had seen a neighbor with darker grout in her slate floor, so we thought it was worth considering.

In the end we chose Oyster Gray (shown below) which is still a mid-tone Ivory color – definitely not a bright white. But it looked the most natural and still seemed very bright in contrast to the dark slate tile, without looking artificiall white. Any brighter and we worried it would look like someone in a Crest Whitstrips ad! You know, almost too blinding.
Oh and the Grout Renew was low odor and low-VOC, so this pregnant lady could get down with it. I did wear a respirator, along with opening windows, just because I’m into added ventilation and bad Bane impersonations.
GroutRenew Alternatives
This is the only product we’ve used, but there are some others on the market if this particular one is not available. Lowe’s sells a similar product by MAPEI that comes in a squeeze bottle. Amazon also has a well-reviewed Grout Pen product that comes in a white or beige option. Again, we haven’t personally tried those, but they may be some alternatives to consider if the PolyBlend is not available to you.
How To Apply Grout Paint
The downside to this solution is that it can be time intensive (and patience testing) depending on the size of your surface. For this floor, it took nearly eight hours to apply. But since I had easily spent 25 hours trying various stain lifting methods before resorting to this, well, eight hours with a bottle of Grout Renew was a small price to pay for VICTORY.
Step 1: Clean Your Tile & Grout
I know I said scrubbing wasn’t the solution, but it part of the process. I’ll pause while you laugh since I had already done that TEN MILLION TIMES. But like any surface you’ll be painting, you want to make sure it’s clean of dust and debris. So at least we’re not talking a heavy-duty scrubbing, just your regular washing to remove surface dirt should do.
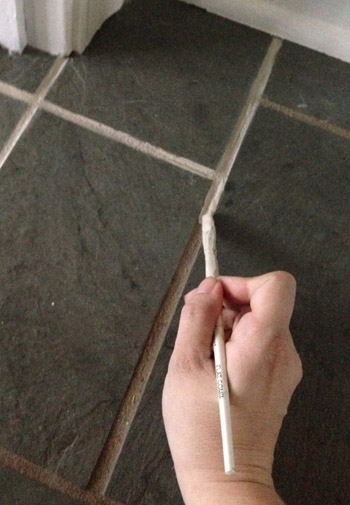
Step 2: Pick Your Brush Or Application Tool
The instructions suggested using an old toothbrush to apply the GroutRenew it into the grout lines and then let it dry for 24 hours. I went with a thin craft brush instead because I had way more control (read: way less mess on the tile surface). The thin paint brush was also easy to dip directly into the bottle when I needed to load up with paint.
Step 3: Plan Your Starting Point & Exit Route
If you’re painting a floor, like we were, you’ll want to sure you don’t paint yourself into a corner (or at least if you do, you can carefully tiptoe across your tile without stepping on the cracks). I started in the half-bathroom because I figured I could work my way out of the room and close the door behind me so it could dry.
It was the opposite of fast. But it worked. Slowly I eked my way out from around the toilet and right out the door, which took about an hour and forty five minutes.
Step 4: Be Ready For Mistakes
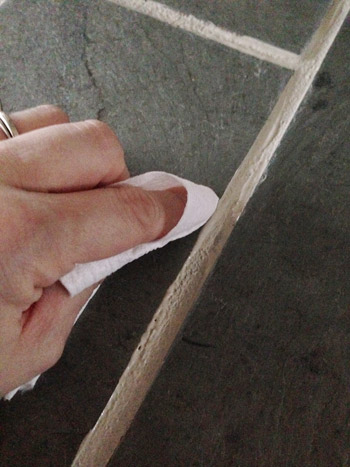
Even with a small craft brush there were still times when it got on the surface of the tile, and there was a very short window for wiping it off before it set (and then had to be scrubbed with a fingernail, which was a huge pain) so I literally would do one or two cracks at a time and then quickly follow up to smooth both sides of the seam out with a small piece of toilet paper (this would remove any from the surface of the tile as well as make the sides of each seam nice and straight looking). A paper towel or clean cloth would work as well. That is, if toilet paper isn’t fancy enough for yo?u.
Step 5: Be Patient & Pace Yourself
Being pregnant, the bathroom was all I had energy for on Day 1. Day 2 involved three more hours of line painting and wiping, and I opted to do 50% of the foyer in a strategic way so we could all still walk on the other half of it. Here’s a shot to show you how hilarious John is. I said: ok, get creative with this picture so my giant respirator doesn’t look weird. I like his version of getting creative – just lop off the whole head area.
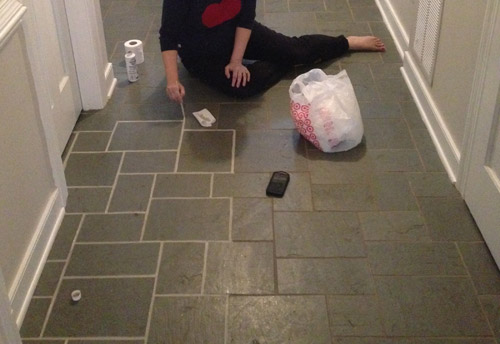
The second day was the hardest day by far, just because I was still kind of sore from contorting my pregnant body around in the small half bathroom the day before, and the little knobby parts of each of my ankles were dragging on the tile as I scooted around like a dog with fleas, but it was all worth it. Worth it and then some!
Day 3 was another three hour process, but it was the most exciting day because I could see the light at the end of the tunnel. The end of the longest-running house battle that I had ever waged was near. I just worked my way around the foyer doing the other half of those pathways that I had done the day before, and I ducked into that last closet while pausing occasionally to fist pump and work on my clean grout acceptance speech (“I’d like to thank the academy, and the grout gods who invented this cheap bottle of miracles and unicorns”).
Step 6: Let It Dry
After each application process, we gave that section a full 24 hour drying period and made sure nothing got wet for 72 hours (since that was another warning on the bottle). It’s a good deal lighter than the old grout was, which still makes us say “whoa now” when we walk through the hallway, but we think it’s just our eyes adjusting. Maybe after 6 months our brains just can’t get over the fact that it finally looks clean!
We also had about 1/4 of a bottle left all of this, which was great in case we need some touch-ups down the line. I’ll definitely update you guys if anything funky happens, but so far it has been great. I mean, just look at how far it’s come from the before:
Update: After nearly two years of use, even with semi-frequent moppings, muddy shoes/paws, and a whole lot of foot traffic, our grout still looks identical to when I applied this stuff (you can see an updated picture that we shared after six months of use here). For the folks who can’t find it in stores, here’s an affiliate link to it on Home Depot.com. There are also alternatives like grout pens on Amazon.
Originally Published in 2014
Psst- Wanna know where we got something in our house or what paint color we used? Just click on this button:

*This post contains affiliate links to things we have actually purchased and love*

Paige @ Little Nostalgia says
YOU GUYS. This is perfect timing, because we have nasty old grout in our upstairs bathroom and it’s on our list of things to fix this year. I had been looking at bleach pens, but now that you’ve told us about this, I’ll just skip right to the big guns.
It looks sooooo much better!
Terrin says
This is sort of random and not grout-related, but I love the mirror in your foyer! Did you guys make it or buy it? Thanks!
YoungHouseLove says
Thanks Terrin! That was from Joss & Main a while back!
xo
s
Mary Kaye says
Sherry, you and John amaze me with your drive in getting everything done! I am doing some projects but live alone so it’s not as fun when you don’t have someone to work along side but my sister does help me from time-to-time. The grout looks awesome! Nicely done.
YoungHouseLove says
Aw thanks Mary Kaye! All the best with everything! I love good tunes when I’m tackling something alone. Makes the time go faster I think!
xo
s
Marci says
I’m not sure if this happened to anyone else but just reading the words “wire brush” sent chills down my spine (the kind you get when you hear “nails on a chalkboard”)… can’t imagine actually using the method…lol. Anyway, looks great!!!!
YoungHouseLove says
So funny!
xo
s
Lakitia A. says
It’s amazing how much your house has transformed over this small amount of time. It’s beautiful!
Bonnie C says
Told you! Sure beats tearing up the tile (which is what I wanted hubby to do – he said NO)
haley says
Hi Sherry,
I have a really oddball question. What is your general schedule for cleaning your house? We are in the middle of doing quite a bit of remodeling/work on our house, and sometimes it seems like a lost cause, so was curious how you tackle keeping your house clean, while also constantly working on it. I notice that you’re frequently barefoot, so I figure your floors must be pretty clean!
Thanks.
YoungHouseLove says
We try to do things as we go (dishes right after dinner, cleaning a bathroom randomly when I’m in there, vacuuming the upstairs one day and the downstairs another day, etc). It beats doing everything on one long Saturday or something. There’s more info in the Cleaning & Organizing section of our Projects page (see that tab under the header?).
xo
s
sally says
Oh man! What a find! Our super sixties pink (tub and all, ya’ll) bathroom will be getting some love in the near future. Thanks so much for sharing!
Miranda says
I’ve actually disliked the slate in your entryway since you bought the house because I felt like it could never get clean and it drained so much light out of your beautiful foyer…but this? Holy buckets Batman, I actually love it! It looks really great!
Your hard work really paid off!
Jennifer B says
Looks amazing! Thanks for sharing!
Amanda says
I wonder if this would be safe to use on kitchen counter tile grout?
YoungHouseLove says
I don’t think it’s food safe. Anyone else know? Or have suggestions?
xo
s
Ginny says
This post could not have come at a better time. I too have scrubbed and scrubbed the darn grout in our spare bathroom and it still looks dirty!! Can’t wait to pick up a bottle! Pumped!! Thank you!
Chris says
Thank you for posting this!! The grout in my kitchen is AWFUL and we rent, so we don’t have the option of tearing anything out/replacing. But I’m sure doing this won’t be a problem for our landlord. I can’t wait to finally see a brighter floor after two years of staring at ugly brown/gray grout!!!
Kelly {the Centsible Life} says
So excited you tried this! We did it about 6 months ago after living with NASTY grout in our kitchen for YEARS. Like you nothing we tried worked.
This has been a game-changer for our kitchen floor, as long as you don’t look at the rest of the kitchen! ;)
I didn’t seal it, and clean it and spot-clean it regularly without any issues. My only word of caution to folks is to take your time and stretch a lot! LOL! Like you said it’s a long process but one that in the end makes an enormous difference.
YoungHouseLove says
Love that, Kelly! Stretching is key. Haha!
xo
s
Celina says
Wow, what a difference. I’m definitely investing my money and time into this. Thanks for the great post!
Ellen says
So excited to learn about this, as I have grout in serious need of help. I had the same slate entry hall in my first house way back in the 80’s and went through all those same failed cleaning attempts that you did. Eventually sold the house without ever having this kind of satisfaction!
Stephanie says
It looks so good! We have incredibly dingy tile as well. I used OxyClean and it made a big difference (it actually is dirty), but I think I may try this for some of the other parts of our house.
Sara says
That looks amazing! I have been wondering about this stuff for our white bathroom… small hex tile floor and subway tiles wainscoting. I told my contractor I wanted black grout and he told me I would hate it and talked me out of it. So now, 3 years later, even though we dutifully sealed and clean regularly the floor grout is dinghy and gross. So, 1. would you attempt blackening the white grout? and 2. am I crazy to do such tiny grout lines around and 8×8 bathroom? and 3. would you continue the black stain up onto the walls and tub surround? Thanks for testing it out for the rest of us!
YoungHouseLove says
I would totally go for it! It sounds like it’s what you’ve always wanted, and for $12 it’s worth a shot I think!
xo
s
Meghan says
Yes… I used to use this stuff on my kitchen counters (they were tiled by the previous owner!) It works… for a time. I found I had to touch it up every few months in the highly used areas since it also got dingy. I hope it works better for you on the floors than it did for me on the countertops! It looks much better, though, for sure!
YoungHouseLove says
Thanks Meghan! Will keep you guys posted for sure! Perhaps the sealer spray would help? A few folks have used it and spray sealed it occasonially and they say that years later it’s holding up so well! Here’s hoping…
xo
s
Sally G. says
I totally hear you on the frustrating dirty grout . The awful builder-grade tan tiles in our kitchen wouldn’t be quite so awful if the previously tan grout wasn’t black. It’s disgusting. The prior owners of our house did a number on the stove too, I’ve never seen one so dirty! I’m on round 3 of trying to clean the stove, but we’re planning a kitchen reno that will involve tearing out the tile , so for now I’m just giving our grout the evil side-eye.
Alice says
Wow! Just, wow!
Cinny says
Woah! I can’t believe the difference!
I have to say, I wasn’t 100% sold on the changes you had made – paint color, etc. The floor just killed everything. BUT NOW. Woaaahhh, mama. It look’s like a completely different room and ties everything together nicely! :)
YoungHouseLove says
Aw, thanks Cinny!
xo
s
Nichole K says
Egads lady! It looks like you installed new tile! I’ve always loved the slate (it reminds me of my college house which had the same stuff) and now it looks brand spanking new. I know eventually you want the kitchen and foyer to have the same flooring, but for several hours and $12, what an amazing transformation.
Dianna says
Maybe a dumb question, but… What is the difference between this Grout Renew and painting over grout?
YoungHouseLove says
This has polymers in it that are meant to bond with cement grout, so it’s stronger and more durable and stain/peel resistant than just painting it would be.
xo
s
Danielle Purtle says
Oh wow it is wonderful!! I love it so much, that I am now wishing I had icky grout to make new. Jealous!!
Alison says
I absolutely cannot believe what a HUGE difference the new “grout” makes- isn’t it amazing how sometimes the simplest, least expensive updates can totally transform a space? I’m totally going to do this with my fug bathroom tile grout now!
Amanda says
I have been having the same issue with the tile in my kitchen in bath. I am a renter but when I moved in the grout was black and there were places it was white. Which meant it was very dirty and stained. I scrubbed and the floors look WAY better but the stained areas are kinda driving me nuts. I have looked into using the product you used but I have two dogs and a cat and am worried about keeping them off the tile while it dries. How did you keep your pup off the tile?
YoungHouseLove says
We just blocked him off upstairs (so he had free rein of that whole floor) or if he seemed like he wanted to be downstairs we carried him into the living room and barricaded him in there. He’s mostly a sleeper, so he just slept in various places and didn’t seem too miffed. Haha!
xo
s
Anna // Gone Banannas says
Oh my goodness! I am so sorry that it took so long to do and you had to scoot around but hot diggity dog (I grew up in NJ, but sometimes I just. can’t. help. using phrases with a southern twang haha) that floor looks gorgeous! I am so glad you were able to find a solution instead of having to completely re-grout!
Pam says
Looks fabulous! On another note, I did the grout in my bathroom with 409. Spray on, wipe off =)
DAF says
I don’t think you need to seal it. The product is a grout sealer itself, so it would be redundant and a whole bunch of extra work.
YoungHouseLove says
Yeah, I figure since we heard from folks who just used the same product and also sealed it occasionally with good luck that we might just do it down the line (for example, instead of re-painting it every 6 months to use the “sealer” part of this stuff, I could just spray seal it in six months and wipe it down, which is much easier than getting on the floor and painting each line).
xo
s
Rebecca says
My kitchen tile was old and dirty no matter how I scrubbed or what I scrubbed it with. I tried several things in the three years I’ve lived there with no success . . . until I sprayed it with a product called Krud Kutter. I found it at Lowes, and it claims to be nontoxic and biodegradable and has a “better chemistry” endorsement from the EPA. I let the cleaner sit for about 5 minutes and then scrubbed the floor with all my might using a deck scrubbing brush. I wiped up the dirty suds as I went with paper towels. Then I wiped the floor again with a wet sponge, to clear any excess residue and make sure our dog didn’t ingest the cleaner. The Krud Kutter worked beautifully. All the little crevices in the tile and the grout look like new. I’m thrilled with the results.
YoungHouseLove says
Wow, that sounds awesome!
xo
s
Alice says
OMG! I have been loving your new home and all the updates you’ve done so far, but hated that tile until today!
Now, I can’t wait until you tackle the dining room!
Gina says
That looks great! I cannot imagine sitting on the floor for that many hours with a bun in the oven! Your description made me laugh out loud!
I have an opposite problem on my kitchen backsplash. The grout and travertine tiles are so similar its blah. Do you think it would work to darken the grout on a backsplash? My other idea is to rip it all out and put in glass tiles but its so new (only a few years) I feel like that’s crazy and I have no idea what that would involve to remove and replace.
YoungHouseLove says
Oh yes, I bet you could get so much definition with darker grout! And instead of regrouting you could use this. Just test it to be sure it’s not bad with the travertine (sometimes that soaks things up and you want to be able to wipe down the tile without this staining it if it goes beyond the crack).
xo
s
Kristin says
This is amazing. I’m so excited. I have slate floor in my bathroom and despite the same furious scrubbing you’ve done, there have been no results on the grout. THIS IS GOING TO CHANGE MY LIFE! (okay fine, that’s slightly dramatic, but whatever- WHITE GROUUUUTTTT!)
Kristy says
Oh my gosh, I had no idea this product existed. I’ve been living with gross grout in my bathroom and kitchen, and my strategy had been to ignore it for the next five years until we redo our kitchen. :) But now I don’t have to live with it! Hooray!
Nicole says
Why would you re-do it in such a light color! As a professional, I always go at least equal, if not darker 1 shade, for floor grout. It’ always gets dirty and looks messy if it’s pale like this. Looks good for magazines, not good for living with it.
YoungHouseLove says
Our neighbor has it in this light color in her foyer and half bathroom along with her kitchen (and has lived there for years, with three pets and a kid) and loves it! Hers looked like new, so we were sold!
xo
s
Koliti says
It’s like “Photoshop in a bottle” – perfect $12 fix!
I have black & white tiles with black grout – and a while back I spilled white paint on the black grout. I’ll have to check to see if they have this is black.
I’m glad you and your pregnant tummy & contortionist-self didn’t get stuck behind the toilet! I can just imagine you telling the cute firemen who came to rescue you, “Hey check out those crisp grout lines!”
YoungHouseLove says
Haha!
xo
s
frances says
Looks great. I used a similar product 15 years ago in my shower; it’s just starting to look stained again now. I didn’t seal, my product says it was colour and seal in one.
BTW — it’s “whoa”, not “woah”. Pet peeve.
YoungHouseLove says
All fixed! Thanks Frances!
xo
s
Emily @ Life on Food says
We have slate flooring on our entry hallway. I don’t know what to do with it. It is two different colors one similar to yours and another red toned color. They are not even and more rough. I think they will be a beast to take out. It leads into the kitchen which we are going to redo down the road and are thinking of taking it out then. You are a trooper for all that time on the ground.
ashley jensen says
Wow! I love everthing about the tile now, the pattern, the color, etc! It really compliments the ceiling and wall color too!
patty says
it looks white in the photos though it’s called Oyster Gray – is it darker than it appears in the photos pls?
YoungHouseLove says
I’d describe it as a light gray. In person it looks light gray and not white (the dark tile in the photos just makes it look lighter by comparison, but if you held a white piece of paper next to the grout it would be much lighter and more obviously gray). Someone did say that she thought the product was a bit lighter than the color on the bottle for the tone she chose, so maybe testing two before deciding would help?
xo
s
Kari says
Did you ever get to play with those fun square plastic boards with the wheels on the corners in grade school gym class? I always think how handy they would be for projects like this!
YoungHouseLove says
Those were so much fun!
xo
s
Stephanie says
Wow, it looks like you had a whole new flooring put in!
Diane says
Looks great! I had my own floor circus here – wood floors to the living room, laminate in the kitchen (a porcelain tile look) and old 8″(?) gray ceramic in the foyer. Some day, some day I’d like all heated tile from the foyer through the kitchen, but I found a groutable vinyl that was a reasonably close match to the kitchen, grouted it the same gray as the faux grout lines of the laminate, and the eye doesn’t see “whoa! so many floors” anymore. I have an area rug in the foyer, too. You could probably find a slate-look vinyl for your kitchen that would make the difference much less obvious. Add a rug near the transition to the kitchen and … ??
YoungHouseLove says
That’s another fun idea!
xo
s
Cecily B says
Just an FYI… my mom used this in her kitchen for their grimy grout… it does not hold up with continuous cleaning. Meaning, after about the fourth time we cleaned the floors, the grout has started to look the same. the swiffer pad was the same color as the grout paint. It would be nice if they had a sealer to go over it after you paint it on. It may last longer that way.
YoungHouseLove says
Oh no! Others have said they used a separate spray sealer and it has held up awesomely so I think I’ll try that and keep everyone posted. Someone else mentioned that they used it in their bathroom 6 years ago and it still looks awesome and she didn’t even seal it. I wonder if something about your mom’s cleaning products is abrasive (it says you shouldn’t use anything like that, or it can start to lift or get dingy).
xo
s
Emily says
Holy moly!!! It seriously looks like a completely different house. I would gladly listen to your Oscar acceptance speech, you deserve to give one! That’s a ton of hard work especially with a baby bump! What a huge transformation.
Sarah says
Con-grout-ulations! It looks amazing!
Please continue to post the way before pictures (I know you already do a lot of the time), it’s so fun to see the entire progress, and it’s such a good way to show how much some minor changes can really have an impact on a space.
YoungHouseLove says
Oh man, I love a good grout pun. High fives for that one, Sarah.
xo
s
Rebecca says
WOWEEEWOWOW!! Absolutely stunning!!! Well done!! Love seeing all of your house progress!!!
Lisa says
I am so happy to see this post. I just used way too much of the holiday break doing this same thing to my bathroom floor grout. It was harder (more time consuming) than I imagined, and I kept feeling like I must have been doing it wrong. Seeing you go through same just made me feel worlds better. One note — my tile is the shiny stuff, with very narrow grout lines. On that kind, after it dries, you mist with water and just buff the bejeezus out of the tile with a rag, and it comes right off. Yay to both of us for getting this arduous task checked off the list!
melissa says
Hi, looks great. Do you mind sharing your wall paint color? I love it.
YoungHouseLove says
Thanks! It’s Edgecomb Gray by BM (with Revere Pewter on the ceiling).
xo
s