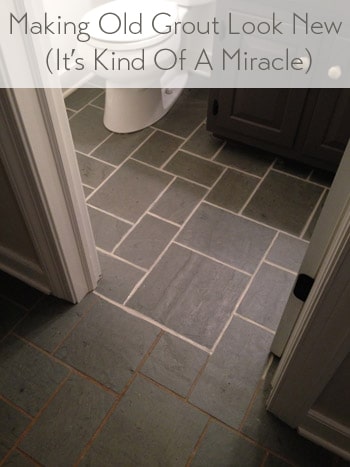
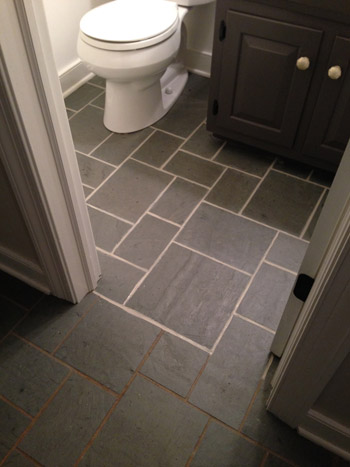
The discolored and dirt-stained grout in the tile floor of our foyer looked super old and gross, but after trying nearly a dozen cleaners and cleaning tricks we nearly gave up. Then we finally find THE SOLUTION to making the grout look white and clean again!
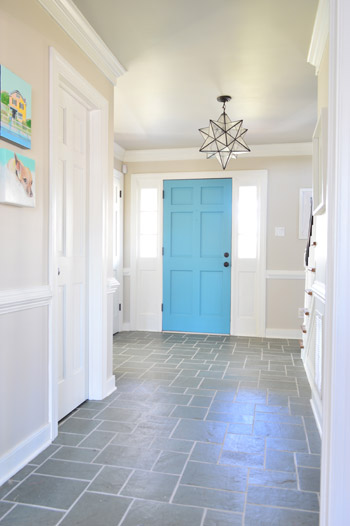
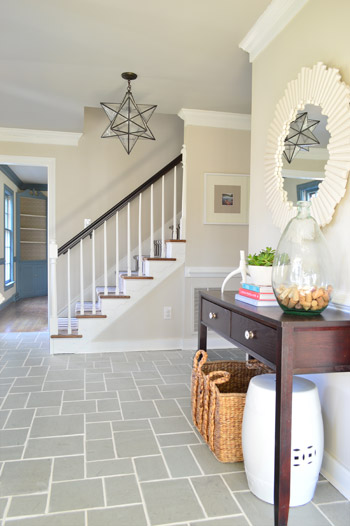
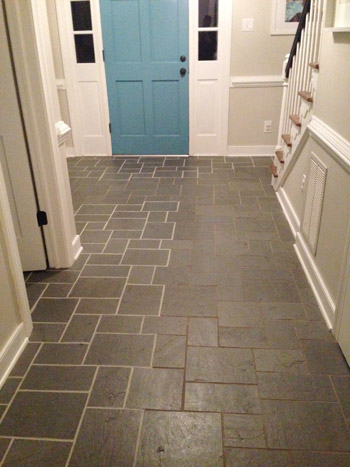
Now that we’re done, you can see how the view just got a heckova lot better around here. The crisp white grout lines play off the white trim and make the whole space feel newer and cleaner.
The funny thing is, it wasn’t actually cleaning that did the trick. So if you’ve got a similar issue with discolored or stain grout, here’s our official intervention: stop scrubbing! Well, maybe give scrubbing a fair shot, but don’t be discouraged if it gets you nowhere. There’s another way!
Cleaning Tricks That DIDN’T Work
As you might recall, for the past six months that we’ve lived here, it has looked like this.
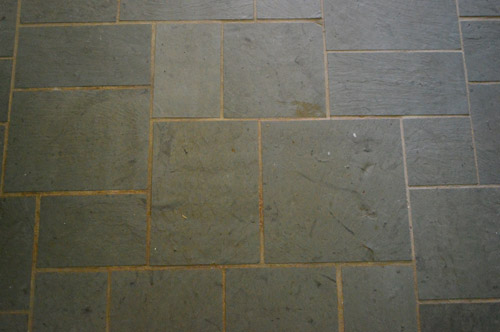
I gave nearly every method under the sun a shot to make that grout look clean. After repeatedly scrubbing the heck out of it, I knew that it was actually very (very, very) clean… it just was so discolored and stained in certain areas, that no amount of blood, sweat, tears, or elbow grease could make it look that way.
Some of my attempts to clean grout included (but weren’t limited to):
- various baking soda paste mixtures
- various white vinegar solutions
- copious magic erasers
- specialty grout cleaning floor sprays/potions/scrubs
- bleach pens
- oxygenating cleaners like Oxiclean
- Mrs. Meyers powdered cleanser + a wire brush
- Barkeeper’s Friend + a wire brush
- a borrowed steam mop
- scrubbing with a stiff bristle brush
- lots and lots of muttered cursing
The Solution To Getting White Grout Again
By this point I did what most people would do. I gave up and ignored it for another few days (what’s a few days after six months of no-dice results?). And then I finally faced facts. The grout either needed to be scraped out and regrouted entirely (which makes for a pretty messy job, especially in the main hallway of our house which connects the entire upstairs to each room downstairs) or it needed to be refinished.
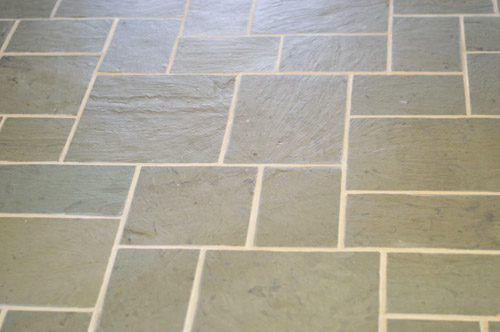
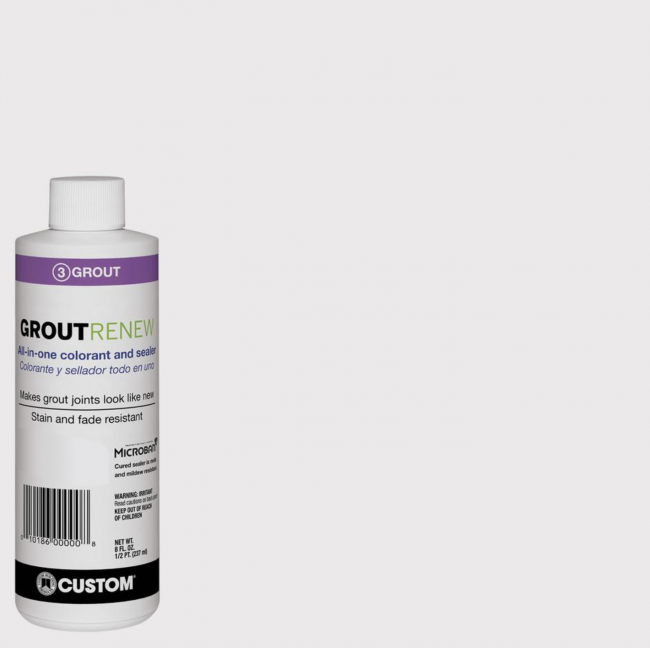
Thankfully a few of you tipped me off to a product you’ve used with success called Polyblend Grout Renew. Let me just skip to the punchline: it worked, and I wish I had tried it before spending six months scrubbing my mind out.
The cost? A cool $12 from Home Depot. (Update: it’s closer to $20 now, but there are more affordable grout pen alternatives available.) Can I get a what what? Note: this might sound like an ad for the stuff, but Grout Renew doesn’t know us from Adam – I’m just beyond grateful that it worked.
Choose Your Grout Paint Color
GroutRenew comes in several colors now – over 3 dozen, in fact, including several shades of white and off-white. So you may be tempted to go for the brightest white to get the cleanest, freshest look (that’s “Artic White” pictured below). However, just like paint colors, the brightest, whitest version may not be best for you.
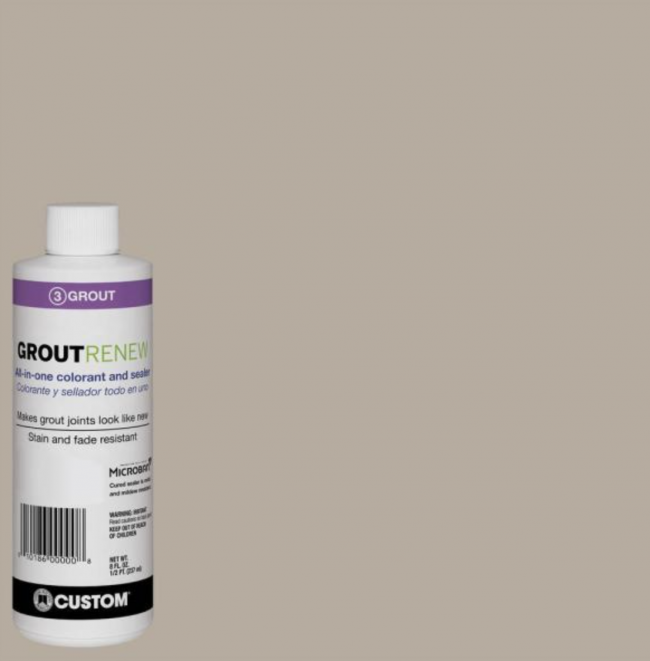
Be sure to take some time to look at your room, your tile, and your lighting to make sure you’re choosing something that blends well with your space. You can always test out a few colors too before committing to one. John and I actually considered two colors – Natural Gray and Oyster Gray, which both look pretty dark compared to the brighter whites. We had seen a neighbor with darker grout in her slate floor, so we thought it was worth considering.

In the end we chose Oyster Gray (shown below) which is still a mid-tone Ivory color – definitely not a bright white. But it looked the most natural and still seemed very bright in contrast to the dark slate tile, without looking artificiall white. Any brighter and we worried it would look like someone in a Crest Whitstrips ad! You know, almost too blinding.
Oh and the Grout Renew was low odor and low-VOC, so this pregnant lady could get down with it. I did wear a respirator, along with opening windows, just because I’m into added ventilation and bad Bane impersonations.
GroutRenew Alternatives
This is the only product we’ve used, but there are some others on the market if this particular one is not available. Lowe’s sells a similar product by MAPEI that comes in a squeeze bottle. Amazon also has a well-reviewed Grout Pen product that comes in a white or beige option. Again, we haven’t personally tried those, but they may be some alternatives to consider if the PolyBlend is not available to you.
How To Apply Grout Paint
The downside to this solution is that it can be time intensive (and patience testing) depending on the size of your surface. For this floor, it took nearly eight hours to apply. But since I had easily spent 25 hours trying various stain lifting methods before resorting to this, well, eight hours with a bottle of Grout Renew was a small price to pay for VICTORY.
Step 1: Clean Your Tile & Grout
I know I said scrubbing wasn’t the solution, but it part of the process. I’ll pause while you laugh since I had already done that TEN MILLION TIMES. But like any surface you’ll be painting, you want to make sure it’s clean of dust and debris. So at least we’re not talking a heavy-duty scrubbing, just your regular washing to remove surface dirt should do.
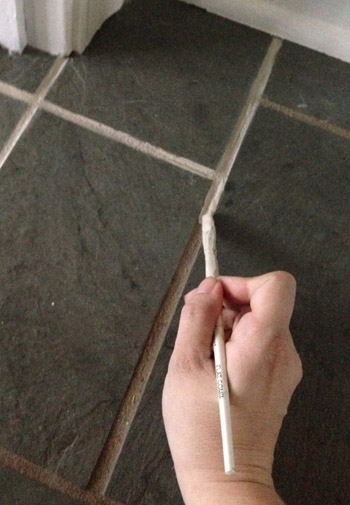
Step 2: Pick Your Brush Or Application Tool
The instructions suggested using an old toothbrush to apply the GroutRenew it into the grout lines and then let it dry for 24 hours. I went with a thin craft brush instead because I had way more control (read: way less mess on the tile surface). The thin paint brush was also easy to dip directly into the bottle when I needed to load up with paint.
Step 3: Plan Your Starting Point & Exit Route
If you’re painting a floor, like we were, you’ll want to sure you don’t paint yourself into a corner (or at least if you do, you can carefully tiptoe across your tile without stepping on the cracks). I started in the half-bathroom because I figured I could work my way out of the room and close the door behind me so it could dry.
It was the opposite of fast. But it worked. Slowly I eked my way out from around the toilet and right out the door, which took about an hour and forty five minutes.
Step 4: Be Ready For Mistakes
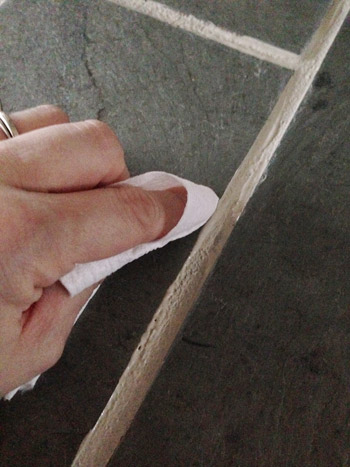
Even with a small craft brush there were still times when it got on the surface of the tile, and there was a very short window for wiping it off before it set (and then had to be scrubbed with a fingernail, which was a huge pain) so I literally would do one or two cracks at a time and then quickly follow up to smooth both sides of the seam out with a small piece of toilet paper (this would remove any from the surface of the tile as well as make the sides of each seam nice and straight looking). A paper towel or clean cloth would work as well. That is, if toilet paper isn’t fancy enough for yo?u.
Step 5: Be Patient & Pace Yourself
Being pregnant, the bathroom was all I had energy for on Day 1. Day 2 involved three more hours of line painting and wiping, and I opted to do 50% of the foyer in a strategic way so we could all still walk on the other half of it. Here’s a shot to show you how hilarious John is. I said: ok, get creative with this picture so my giant respirator doesn’t look weird. I like his version of getting creative – just lop off the whole head area.
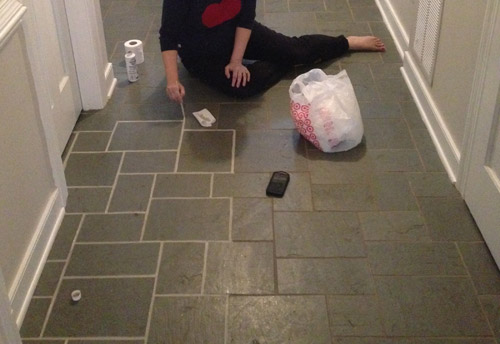
The second day was the hardest day by far, just because I was still kind of sore from contorting my pregnant body around in the small half bathroom the day before, and the little knobby parts of each of my ankles were dragging on the tile as I scooted around like a dog with fleas, but it was all worth it. Worth it and then some!
Day 3 was another three hour process, but it was the most exciting day because I could see the light at the end of the tunnel. The end of the longest-running house battle that I had ever waged was near. I just worked my way around the foyer doing the other half of those pathways that I had done the day before, and I ducked into that last closet while pausing occasionally to fist pump and work on my clean grout acceptance speech (“I’d like to thank the academy, and the grout gods who invented this cheap bottle of miracles and unicorns”).
Step 6: Let It Dry
After each application process, we gave that section a full 24 hour drying period and made sure nothing got wet for 72 hours (since that was another warning on the bottle). It’s a good deal lighter than the old grout was, which still makes us say “whoa now” when we walk through the hallway, but we think it’s just our eyes adjusting. Maybe after 6 months our brains just can’t get over the fact that it finally looks clean!
We also had about 1/4 of a bottle left all of this, which was great in case we need some touch-ups down the line. I’ll definitely update you guys if anything funky happens, but so far it has been great. I mean, just look at how far it’s come from the before:

Update: After nearly two years of use, even with semi-frequent moppings, muddy shoes/paws, and a whole lot of foot traffic, our grout still looks identical to when I applied this stuff (you can see an updated picture that we shared after six months of use here). For the folks who can’t find it in stores, here’s an affiliate link to it on Home Depot.com. There are also alternatives like grout pens on Amazon.
Originally Published in 2014
Psst- Wanna know where we got something in our house or what paint color we used? Just click on this button:

*This post contains affiliate links to things we have actually purchased and love*

Patti says
Wow, it looks so good. We are much much older than the two of you and have always lived in brand new homes. We have become bored with the homes in our area (well, unless they are $450,000 and up). I pinned a room of yours a long, long time ago but will visit often now that we are buying gently love and needs care.
Jessica says
Question for you- the bottle says to do an acid grout cleaning and then a sealant on the tiles BEFORE you apply grout renew– did you do that? I would think a sealant would prevent the grout renew from bonding properly, but I don’t know a lot about this and don’t want to miss a step that’s crucial. Thanks!
YoungHouseLove says
I had scrubbed and scrubbed the grout so much beforehand I knew it was clean so I just applied grout renew. But testing it in a small spot to make sure it doesn’t react poorly with your tile or existing grout makes sense (I started behind the toilet just in case).
xo
s
Emily says
I have to tell you. I bought this months ago after your post – It was pretty much right after we moved into our house and my future mother-in-law came to see our house. While I was at work, my boyfriend allowed her to clean the guest bathroom!! That I had already cleaned the day before their arrival. When I got home, she proceed to show me how to clean tile (in our already clean but with very ugly and old grout lines) with bleach spray and a nail brush. I’m sure all of her friends back home now think that I’m a horrible homemaker despite only living in the 100 yr old house for two weeks.
Anyway, fast forward to this past Saturday, where I picked that bottle up and spent hours of my life painting teeny, tiny grout lines because they’re coming back to visit this week and I spent the last six months not painting my grout. Now, our grout lines look amazing!!
I didn’t dare attempt the floor… it is pink, white and black basket weave and I thought if I painted those lines, I’d go crazy. I’m going to stop by Sally’s tonight and get some of the 40% peroxide that you used on your old basket weave floor years ago.
Your blog is helping people and more importantly, helping families!! Here’s hoping this visit does not lead to a cleaning tutorial.
YoungHouseLove says
SO GLAD! I love that story!
xo
s
Michelle says
Your before picture looks identical to what we have in our house. I will definitely be trying this for our grout! But how did you get the slate themselves so clean? I read your list but did something work better than the others? I’d rather not try them all :) Thank you for any suggestions!
YoungHouseLove says
I would just use a bristle brush and soap and water. It’s a lot of labor, but it cleans the stone nicely without bleaching it or anything.
xo
s
Jen says
We just built a new house. I think this is what the builder used to correct the wrong color grout in our bathroom. I wish they were more careful with application; it’s messy with a lot of the stain on the actual tiles. Also, we have noticed some chipping in the shower, and the gray grout is peeking through the brown stain in those areas. Don’t know if this is the exact same brand.
And wow; your foyer looks amazing! Way different than before. Wish I were handy like that around the house; it was just easier/cheaper for us to build a new house than re-do an existing house. But of course we had to build pretty far out from the city.
Melanie says
I loved your post on renewing the grout in your bathroom and hallway. I am poised to start this project in my bathroom. I notice that the bottle of Grout Renew says “prepare joints by cleaning with TileLab Sulfamic Acid Cleaner or Grout Haze Remover. Did you do this step? It doesn’t sound like it from your post. Can I safely skip this step and get good results? I love following your blog.
YoungHouseLove says
I didn’t do that since I had scrubbed the grout within an inch of its life with a ton of cleaning products, but it wouldn’t hurt to use grout haze remover beforehand if you haven’t scrubbed as much.
xo
s
Lindsey B. says
Love this! Where is that amazing light fixture from as well? I love stars!
YoungHouseLove says
Thanks Lindsey, it was from a local shop called The Decorating Outlet, but I’ve also seen them on ebay and flash sale sites.
xo
s
Suree says
Wow! Looks great! I have slate tile throughout my whole house… Any advice on cleaning? The previous owners must have gotten a great deal on it and first j liked it but now it’s a pain to keep it clean. Wish I could demo and replace them but it would be so messy and cost a fortune!
YoungHouseLove says
We tried to scrub this so many times! I think cleaning the slate was easiest with a mild soap (like Mrs Meyers) and water and an oMop. Hope it helps!
xo
s
Allison B says
I am in love with your foyer!!! What is the tile?? I’m looking for something just like it for our kitchen.
YoungHouseLove says
Thanks Allison, it’s just slate tile that came with the house :)
xo
s
Yvonne says
I absolutely love the transformation! Thank you for all of the wonderful ideas you’ve given me over the years. I’ve been following you since house number one and you both truly inspire me!
charlotte m. says
I just had an AHA moment last night, even though I read this post when you first wrote it. I need to do this to fix my kitchen tile grout once and for all. I have already tried all the things you did, even replacing the grout once in the last 9 years since we laid the tile. Did you ever end up sealing the grout? Just wondered. Thanks so much for all the helpful things you share with us.
YoungHouseLove says
Never ended up sealing it, but it’s doing so well!
xo
s
ashley says
I LOVE this post! Wow!!! Congratulations! I love that you listed all the things that you had tried–for a half second, I was thinking, “oh, I bet if she tried…” (fill in the blank with essentially the list that I then read that you had already tried!). I love it when there is a product that actually does exactly what you want it to do, and so beautifully. I’m sure you are pleased as punch! I’m sharing with a friend who has an entire floor of his house with the same time and “before” grout.
April says
I found your blog way back in 2008ish when I was still living at home (in Hampton, VA, btw!) and loved it. I moved to TX, got married, and we bought our first home….so while doing DIY projects (including SCRUBBING grout repeatedly), I remembered y’all and came back so excited to finally be able to use some of your home improvement tips! Thank you for sharing with all of us!
Anyway, I just used this product today in our guest bathroom and WOW! Such an easy fix, I can’t wait for hubby to come home and see it. On to the kitchen and entryway!
Marianne says
Can this product be used on tile inside the shower – on the shower walls? We usually have to re-grout and seal every few years.
YoungHouseLove says
We have heard from people who used it in the shower and loved it!
xo
s
Angela-Rose says
This is a very delayed comment but I just used this product in my kids’ bathroom, after searching your blog for “foyer grout” because I couldn’t recall the name of the product, and I’m SOOOOOO happy!!! They have a faux marble tile and it looked old with the dark grout (courtesy of 1992!) but now it looks like I just laid brand new tile. I used Snow White and the whole room looks so much brighter! So, thank you!! :)
YoungHouseLove says
Woot! It’s awesome right?! So glad it worked for ya.
xo
s
susan says
anyone know of anything like this for a shower? by the time two contractors destroyed our bathroom redoing a bad shower pan i wound up with shingles from the stress of it all and already need regrouting and am not going through the processing of all the dust, etc…. anyone know of anything similar that was used on the floor to use in a shower??? i need help!!! thank you!
YoungHouseLove says
We hear this works in the shower too! Hope it helps!
xo
s
Cute Beltz says
OMG!!! I am so excited about this post!! Because like you, I have been in a constant battle with my floors and this is my solution. Yippie!! Thanks for the post and I am off to Home Depot!! *BIGGGGGGGG SMILE*
Cory Waltmathe says
Excellent work you did on your tile. I think you did the right thing, cleaning it up first before applying that grout renew thing. That way, it will be stickier and will last longer. Your tile might still look muddy if you put it immediately, though. Nice recommendation!
Lindsey says
Hi Sherry and John! I’ve shared this article multiple times and am finally about to tackle this project! If you’re looking for an idea for a post, could you please provide an update as to how your floor’s looking now and specify how often you plan to seal and how? :) Thanks!!
Lindsey says
Argh – sorry just saw your response above that you haven’t sealed! :)
Anna says
How is the grout renew holding up? I’m thinking about using it in my guest bathroom.
YoungHouseLove says
Still great! Very happy with it.
xo
s
Lacy Lovett says
Hi. I saw your post via Pinterest and immediately used this product. (We had 3 different colors of grout in the kitchen, so it had to happen. Now it looks great!) I have one question for you. What product do you use to clean your floors? The one I had been using on that tile I think is solvent based, and I don’t trust it on the recolored grout. Any recommendations?
Thanks for the post. You saved my bacon!
Blessings,
LL~
Caroline says
My husband and I discovered this product a few years ago. We painted the grout in our bathroom first which took a really long time. My husband decided that he would find an easier way where we didn’t have to be as careful when painting it on. He instead used painters tape to block off the lines. This worked amazingly and cut the time to complete our kitchen floor to less than half of the time it had taken to complete our small bathroom. Thought I would share! It’s amazing, my bathroom and kitchen still look great! I’ve even painted the caulking around my tub to match. I recommend this product to people all the time!