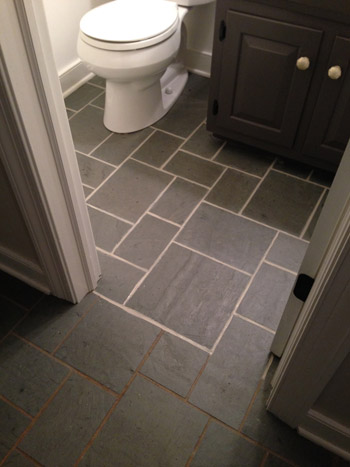
The discolored and dirt-stained grout in the tile floor of our foyer looked super old and gross, but after trying nearly a dozen cleaners and cleaning tricks we nearly gave up. Then we finally find THE SOLUTION to making the grout look white and clean again!
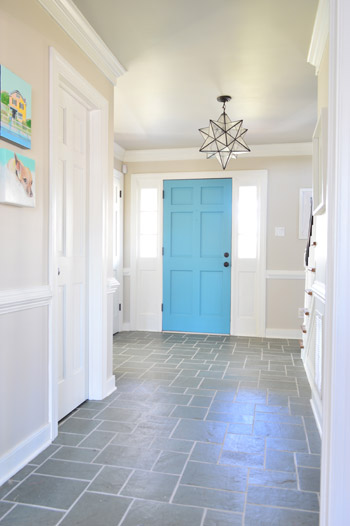
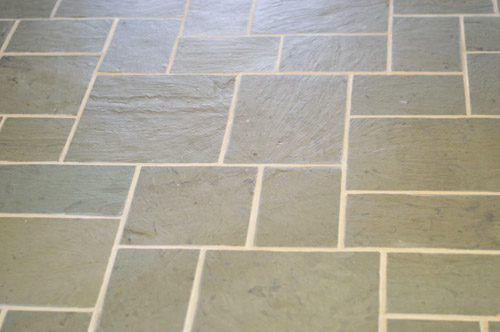
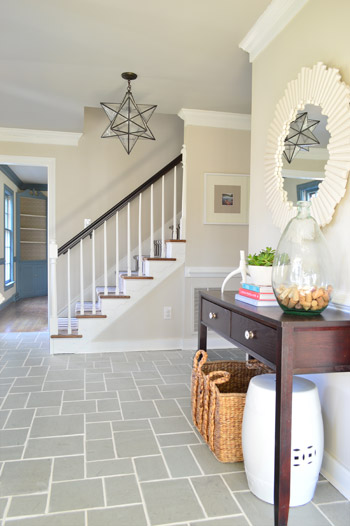
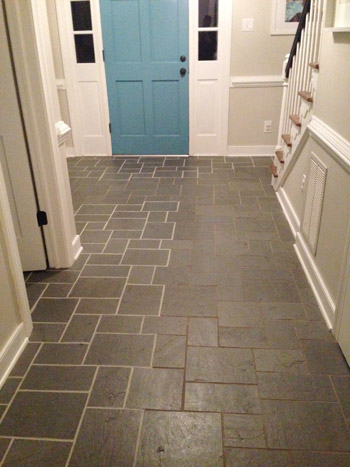
Now that we’re done, you can see how the view just got a heckova lot better around here. The crisp white grout lines play off the white trim and make the whole space feel newer and cleaner.
The funny thing is, it wasn’t actually cleaning that did the trick. So if you’ve got a similar issue with discolored or stain grout, here’s our official intervention: stop scrubbing! Well, maybe give scrubbing a fair shot, but don’t be discouraged if it gets you nowhere. There’s another way!
Cleaning Tricks That DIDN’T Work
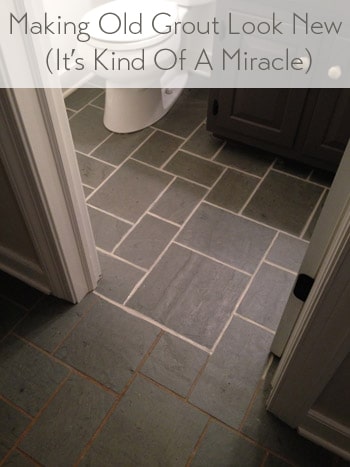
As you might recall, for the past six months that we’ve lived here, it has looked like this.
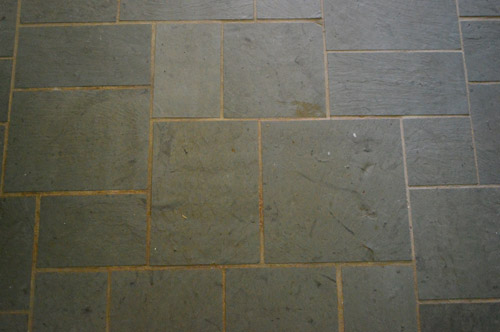
I gave nearly every method under the sun a shot to make that grout look clean. After repeatedly scrubbing the heck out of it, I knew that it was actually very (very, very) clean… it just was so discolored and stained in certain areas, that no amount of blood, sweat, tears, or elbow grease could make it look that way.
Some of my attempts to clean grout included (but weren’t limited to):
- various baking soda paste mixtures
- various white vinegar solutions
- copious magic erasers
- specialty grout cleaning floor sprays/potions/scrubs
- bleach pens
- oxygenating cleaners like Oxiclean
- Mrs. Meyers powdered cleanser + a wire brush
- Barkeeper’s Friend + a wire brush
- a borrowed steam mop
- scrubbing with a stiff bristle brush
- lots and lots of muttered cursing
The Solution To Getting White Grout Again
By this point I did what most people would do. I gave up and ignored it for another few days (what’s a few days after six months of no-dice results?). And then I finally faced facts. The grout either needed to be scraped out and regrouted entirely (which makes for a pretty messy job, especially in the main hallway of our house which connects the entire upstairs to each room downstairs) or it needed to be refinished.
Thankfully a few of you tipped me off to a product you’ve used with success called Polyblend Grout Renew. Let me just skip to the punchline: it worked, and I wish I had tried it before spending six months scrubbing my mind out.
The cost? A cool $12 from Home Depot. (Update: it’s closer to $20 now, but there are more affordable grout pen alternatives available.) Can I get a what what? Note: this might sound like an ad for the stuff, but Grout Renew doesn’t know us from Adam – I’m just beyond grateful that it worked.
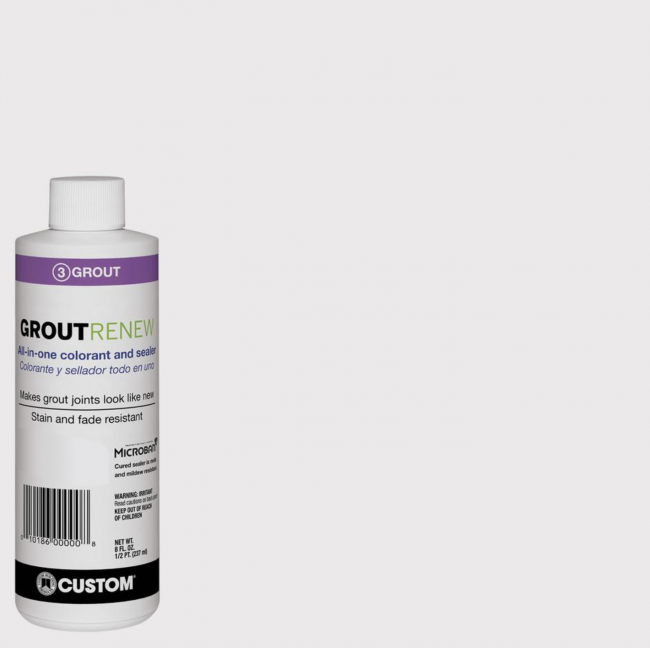
Choose Your Grout Paint Color
GroutRenew comes in several colors now – over 3 dozen, in fact, including several shades of white and off-white. So you may be tempted to go for the brightest white to get the cleanest, freshest look (that’s “Artic White” pictured below). However, just like paint colors, the brightest, whitest version may not be best for you.
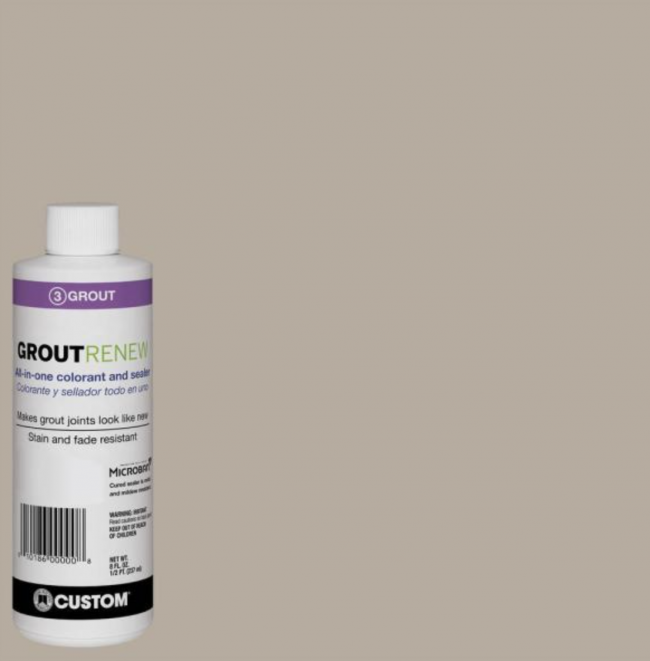
Be sure to take some time to look at your room, your tile, and your lighting to make sure you’re choosing something that blends well with your space. You can always test out a few colors too before committing to one. John and I actually considered two colors – Natural Gray and Oyster Gray, which both look pretty dark compared to the brighter whites. We had seen a neighbor with darker grout in her slate floor, so we thought it was worth considering.

In the end we chose Oyster Gray (shown below) which is still a mid-tone Ivory color – definitely not a bright white. But it looked the most natural and still seemed very bright in contrast to the dark slate tile, without looking artificiall white. Any brighter and we worried it would look like someone in a Crest Whitstrips ad! You know, almost too blinding.
Oh and the Grout Renew was low odor and low-VOC, so this pregnant lady could get down with it. I did wear a respirator, along with opening windows, just because I’m into added ventilation and bad Bane impersonations.
GroutRenew Alternatives
This is the only product we’ve used, but there are some others on the market if this particular one is not available. Lowe’s sells a similar product by MAPEI that comes in a squeeze bottle. Amazon also has a well-reviewed Grout Pen product that comes in a white or beige option. Again, we haven’t personally tried those, but they may be some alternatives to consider if the PolyBlend is not available to you.
How To Apply Grout Paint
The downside to this solution is that it can be time intensive (and patience testing) depending on the size of your surface. For this floor, it took nearly eight hours to apply. But since I had easily spent 25 hours trying various stain lifting methods before resorting to this, well, eight hours with a bottle of Grout Renew was a small price to pay for VICTORY.
Step 1: Clean Your Tile & Grout
I know I said scrubbing wasn’t the solution, but it part of the process. I’ll pause while you laugh since I had already done that TEN MILLION TIMES. But like any surface you’ll be painting, you want to make sure it’s clean of dust and debris. So at least we’re not talking a heavy-duty scrubbing, just your regular washing to remove surface dirt should do.
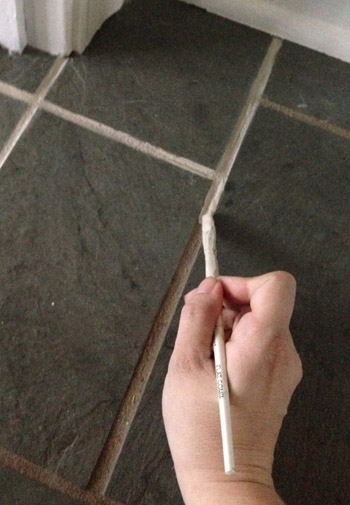
Step 2: Pick Your Brush Or Application Tool
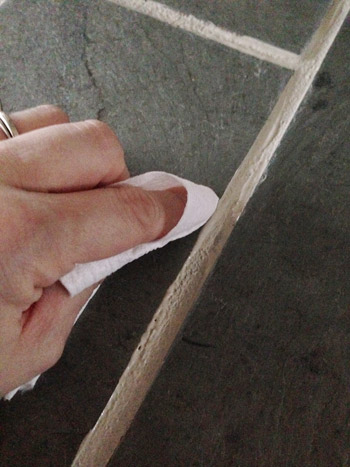
The instructions suggested using an old toothbrush to apply the GroutRenew it into the grout lines and then let it dry for 24 hours. I went with a thin craft brush instead because I had way more control (read: way less mess on the tile surface). The thin paint brush was also easy to dip directly into the bottle when I needed to load up with paint.
Step 3: Plan Your Starting Point & Exit Route
If you’re painting a floor, like we were, you’ll want to sure you don’t paint yourself into a corner (or at least if you do, you can carefully tiptoe across your tile without stepping on the cracks). I started in the half-bathroom because I figured I could work my way out of the room and close the door behind me so it could dry.
It was the opposite of fast. But it worked. Slowly I eked my way out from around the toilet and right out the door, which took about an hour and forty five minutes.
Step 4: Be Ready For Mistakes
Even with a small craft brush there were still times when it got on the surface of the tile, and there was a very short window for wiping it off before it set (and then had to be scrubbed with a fingernail, which was a huge pain) so I literally would do one or two cracks at a time and then quickly follow up to smooth both sides of the seam out with a small piece of toilet paper (this would remove any from the surface of the tile as well as make the sides of each seam nice and straight looking). A paper towel or clean cloth would work as well. That is, if toilet paper isn’t fancy enough for yo?u.
Step 5: Be Patient & Pace Yourself
Being pregnant, the bathroom was all I had energy for on Day 1. Day 2 involved three more hours of line painting and wiping, and I opted to do 50% of the foyer in a strategic way so we could all still walk on the other half of it. Here’s a shot to show you how hilarious John is. I said: ok, get creative with this picture so my giant respirator doesn’t look weird. I like his version of getting creative – just lop off the whole head area.
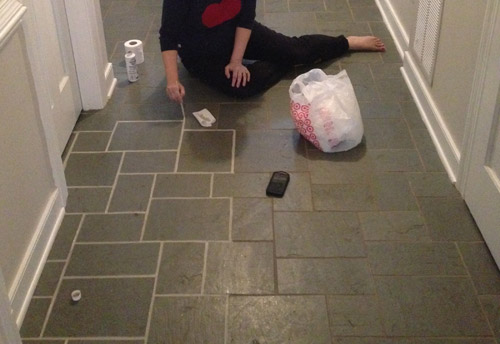
The second day was the hardest day by far, just because I was still kind of sore from contorting my pregnant body around in the small half bathroom the day before, and the little knobby parts of each of my ankles were dragging on the tile as I scooted around like a dog with fleas, but it was all worth it. Worth it and then some!
Day 3 was another three hour process, but it was the most exciting day because I could see the light at the end of the tunnel. The end of the longest-running house battle that I had ever waged was near. I just worked my way around the foyer doing the other half of those pathways that I had done the day before, and I ducked into that last closet while pausing occasionally to fist pump and work on my clean grout acceptance speech (“I’d like to thank the academy, and the grout gods who invented this cheap bottle of miracles and unicorns”).
Step 6: Let It Dry
After each application process, we gave that section a full 24 hour drying period and made sure nothing got wet for 72 hours (since that was another warning on the bottle). It’s a good deal lighter than the old grout was, which still makes us say “whoa now” when we walk through the hallway, but we think it’s just our eyes adjusting. Maybe after 6 months our brains just can’t get over the fact that it finally looks clean!
We also had about 1/4 of a bottle left all of this, which was great in case we need some touch-ups down the line. I’ll definitely update you guys if anything funky happens, but so far it has been great. I mean, just look at how far it’s come from the before:

Update: After nearly two years of use, even with semi-frequent moppings, muddy shoes/paws, and a whole lot of foot traffic, our grout still looks identical to when I applied this stuff (you can see an updated picture that we shared after six months of use here). For the folks who can’t find it in stores, here’s an affiliate link to it on Home Depot.com. There are also alternatives like grout pens on Amazon.
Originally Published in 2014
Psst- Wanna know where we got something in our house or what paint color we used? Just click on this button:

*This post contains affiliate links to things we have actually purchased and love*

Sally says
WOW!! That looks amazing!! I can’t get over the difference. I had grout in my old kitchen that I hated, I definitely would have tried this stuff. I’ll keep this in mind in case I am ever faced with ugly grout again:)
Susan says
After running the gamut of cleaning ideas & running out of options, we used Grout Renew in a house we were selling. Sold in 3 days in down market and the buyer kept remarking on the clean showers. She actually asked at the Closing about our cleaning products… That bottle of Grout Renew has its own little shrine in the garage.
YoungHouseLove says
That’s awesome!!
xo
s
Rob says
Awesome results, very impressive! Your foyer (the before pic) looks almost exactly like the one in our new house – what color did you choose for he walls? It looks awesome. Also, where did you get the hanging light?
YoungHouseLove says
Thanks Rob! The light’s from a local place called The Decorating Outlet, although I’ve seen them on amazon and joss & main. And the walls are Edgecomb Gray with a Revere Pewter ceiling (both by Ben Moore).
xo
s
Jane says
My stubborn problem was very faded and dingy dark burgundy vinyl shutters. They were so faded by the sun, they looked white. At first I was going to replace them, but then I thought maybe I could paint them. Well, getting those shutters off of the house is hard! So, I didn’t know what to do, since there is no handy man to help me out with these home improvement conundrums! I was back to buying new ones OR hiring someone to take them off an paint them. I figured that either way I went, nothing could hurt them now. So, I sprayed them all down with Armor All, just to see if it would work. The normal Armor All that everyone uses on their cars. MIRACLE OF ALL MIRACLES. Thirty minutes of work and my shutters looked BRAND SPANKING NEW. The before and after pics are unreal. Best part….that was three years ago. Still perfect. So, for anyone with faded shutters, just grab a bottle of Armor All and spray away. (Spray and then rub on, let dry, done.)
YoungHouseLove says
Holy cow, that’s amazing!
xo
s
Morgane @ Bear, Dolly and Moi says
it looks so good! We have the same tile in the entry way, I think something like that was done to them a while back (before we bought the house) and it seems to hold very nicely.
Elizabeth says
I think we must have had the same builders for our house–we have the EXACT same tile floor in our foyer and the same faux brick floor in our kitchen meeting with wood floor in the living/dining rooms. Freaky! We bought this house as a fixer-upper, so since it’s so similar to yours, I’ll just let you come up with all the ideas and copy whatever you do, ha ha! I am definitely doing this grout project. I was dreading scraping out the grout and redoing it, so I’m so glad to hear of this solution. Thanks for posting!
YoungHouseLove says
So funny! We’re house twins!
xo
s
Christine says
Wowsers!! That looks amazing! It completely brightens up the entire space! Love the contrast between the stone and grout. I have a love affair with the color grey :o) The door looks so much happier now that it doesn’t have to stare at dirty grout all day. Really, really worth the 8 hours, I’d say.
Rachel y says
Sherry,
My foyer tile and grout looks very similar to yours except for one thing: the clever homeowner before us grouted to ABOVE the surface of the tile, so the grout looks like it’s oozing over the edges. I obviously need to remedy that part. Would you scrape down a bit then use Grout Renew or just make it a project from hell and regrout?
YoungHouseLove says
I would try scraping it off the face of the tiles with a fingernail or rough sponge or brush (test in a small spot to be sure you’re not damaging the tile). You also might be able to use vinegar or some sort of stronger solvent to remove it just from the face of the tiles (don’t get it in the cracks or it could take the finish out of the grout line as well). Good luck!
xo
s
Yalanda says
OMG, looks amazing! Totally takes the tile from meh, to YEA!!!!
Natalie says
WOW! This is by far one of the best transformations yet! That grout was horrible! Your entry way is now PERFECT! What a massive transformation! Definitely my favourite space in the house.
Keep up the great work!
Elizabeth says
One other question: I have this exact same tile and have noticed several chips here and there. Have you had this problem and been able to come up with any solutions?
YoungHouseLove says
I think if you have chipped tile you’d need to cut it out (maybe with a dremel) and replace it, hopefully if you find the same tile (or have extras) it’ll look nice and seamless.
xo
s
Angie K says
I want you to know that my diy crush just turned to full on starry eyed in love with you guys! I’m literally going to Home Depot as soon as I drop my middle one off at school!!!
Just last week I got some specialty grout cleaner and sealer because I was so grossed out by the grout in my kitchen. A blog post from years ago that you guys did got me all inspired and excited — I was going to have floors that didn’t take hours of hands and knees scrubbing with still gross and dirty grout???? Sign me up!!
Except, hours of hands and knees scrubbing the grout with pretty much your entire list up there still left nasty grout that I had a few mommy time-outs locked in my bathroom very close to tears and temper tantrums.
I’m so super excited now! I’m trying to figure out which color to go with though — I have white 12×12 tiles with bluish gray “marbling”. Looks like you guys bought a couple colors, or were those pictures of the bottles taken at the store? I’m torn between bright white and light gray…
btw — I caught up on weeks of posts last night and my little Marcy has the same reindeer jammies as Clara. Marcy was with me when I was browsing and pointed saying “Dee-Dee Dair” (Baby Reindeer) and then forced me to spend about 10 minutes checking out Clara’s gifts on the post. It was pretty adorable :)
YoungHouseLove says
Yes, we got two bottles, brought them home and held them up, and then returned the one we didn’t use! There are lots of colors in the store though, so if you see one you obviously love among the group you could just make off with one, or you could bring a few home to see which ones “go” with the tile in person. Oh and as for the reindeer pajamas, that’s so cute!
xo
s
Kathleen says
Oh. Em. Gee. That looks awesome!! I have some discolored grout I need to hit up with that stuff.
Hanna Cage says
That first picture makes me happy every time I see it. :) Looks awesome!
Andi says
Hi guys! I tried reading through all the comments before asking, but I didn’t see a similar question. Is it grout or paint – or what is it? We have a ton of tile, which equals a ton of grout. We had it steam cleaned once, and it was like night and day. But I am willing to consider other options – though this would take me days because we have so much tile! But I would endure for clean-looking grout!!!
YoungHouseLove says
It’s a specially formatted grout epoxy, so it’s not just regular paint, but made to bond to grout to change the color and make it look like new (it’s also stain resistant, can get wet, etc).
xo
s
Sara says
what sealer are you going to use?
YoungHouseLove says
Not sure yet, have to find one meant for slate. Will update you guys with details!
xo
s
Eve says
WOW! That’s all I can say! When I saw your pictures my jaw dropped, I got pie eyes, and that’s all I could say!
YoungHouseLove says
Haha!
xo
s
Jordan says
Wow what a transformation. The foyer looks great. The tile amazing. Thank you for this post, I have a similar tile/grout problem in my kitchen and did not know this product existed. Your foyer looks so swanky now you need to have a cocktail party there!
Ashley says
Wow, this is great!. I must say, I read your blog every day and I am always impressed by your work, but I just had to comment on this. This, to me, is such a great transformation-maybe the best ever. It really is the little things that make all the difference. Keep up the good work and we’ll keep cheering you on, end zone dance and all. Brush those shoulders off!!
YoungHouseLove says
Thanks Ashley!
xo
s
J says
WOW-that floor against the color of the front door is amazing-I can’t stop looking at the picture, LOL. Job well done.
YoungHouseLove says
Thanks so much J!
xo
s
Nancy says
This is such a helpful post. I have about 1,000 sf of grey tile with charcoal grout. Even in charcoal the grout gets discolored and dingy looking and nothing can make it right again…except this miracle product you used. I SO doing this. One. line. at. a. time….I’ll think of it as my winter project or maybe may 2014, 2015 and 2016 project…ha!
Thanks again for the great product find and share.
Katie says
Looks amazing! Do you know anything about actually painting tile? We have a black/green/grey/red combo going on underneath our woodstove, and I really don’t want to tear it out…would a similar thing (on a larger scale) work on actual tile/stones?
YoungHouseLove says
We have never done it, but see that they sell various tile refinishing kits at places like Home Depot now. Anyone have tips or experiences for Katie?
xo
s
Barbara C says
WOW! Seems like it was a LOT of work, but that floor looks fantastic now. Great job.
Sandra T says
Holy grout, Batman! Why the heck don’t you guys have Lowe’s or HD for sponsors?? You always make their stuff look great, and I know you get sales for them. Have they contacted you at all? Or you them? Your whole foyer looks better than ever! :)
YoungHouseLove says
Aw thanks Sandra! We think it could be sticky to align ourselves with one of those brands because then you’d wonder if we’re recommending something for ulterior motive reasons instead of just because it works. So it’s nice and simple to just try products from various home improvement centers as we need them and give you honest reviews.
xo
s
Kate S. says
Oh, how I wish this product existed 20 years ago!
Ana says
We used this in our kitchen… definitely use a sealer as there are spots in high traffic areas that already need a touch up (we did not use a sealer but will this time).
angie says
YES! We used this in ours too. Its like magic! In love with the stuff and my super clean grout lines! :)
Annamarie says
OMG! LOVE you for this post! Bought a 1940s ranch style home with the same exact tile! I have kept up with your blog and all the foyer posts–hoping you would tackle that slate tile! I am so excited to work on this project myself very soon!
Thanks!
Cassi says
Such a dramatic improvement! It seems odd, but this is one of my favorite fixes in your new house. The after shot of your hallway is beautiful!
Shelley says
Too funny. I just finished using a grout colorant and sealer in my main floor bathroom shower. We just moved in and the grout was stained and dingy. It now looks brand new! I’m hoping it makes cleaning a dream. I still have the floor to do yet. Next week.
Your floors look great!
Karla@{TheClassyWoman} says
Can I tell you that this has been a huge issue for us too?! We had our tile professionally cleaned with steam but it’s 50-yr old tile and left dirt marks in some areas and not others, it looked worse than before it was cleaned. I am SO glad to have found this post, there are other product but not low-odor/low-voc. I contemplated doing this while prego also but now that baby girl is here, I’m going to tackle it while she’s sleeping. We have two small baths so I’ll do one and then go back and do the second bath the following week. The price is awesome too! Your foyer looks amazing!! What a transformation and the grout really makes it shine now!
Beth Marie says
My word this is AMAZING, like magic in a bottle — well not totally but you get it. Thanks so much for sharing, your entry way now really looks like a space made of sunshine!
Christine says
This is awesome! I have never heard of Grout Renew, but I NEED IT. I consider this post a public service. By the way, do you know if it will fill little dings in the grout?
YoungHouseLove says
I think it’s just a colorant over top, so it won’t fill grout dings but it’ll probably make them less noticeable. You could also add more grout to everything to even it out, wait for it to dry, and then do this on top.
xo
s
Danielle says
I wasn’t really feeling the slate, but it literally looks SO much better!
Missty says
Any suggestions for tiles that so close together, theres almost 0 grout lines, but just dirt. Might give it a try, with a tooth pick..yikes this sounds crazy.
YoungHouseLove says
It’s totally worth a try!
xo
s
Leah says
Wow, that looks amazing! My Grandpa has that exact same tile in his foyer and hallway, and I’ve always loved it. When we were small, my sister and I used to play hopscotch on it :)
He’s pretty hard to buy Birthday/Father’s Day/Christmas presents for, so maybe I’ll “renew” his grout for him this year! Thanks for the idea!!
YoungHouseLove says
That’s such a sweet idea!
xo
s
Ashleigh M. says
Oh my gosh…oh my gosh!!!! I’m running to The Home Depot tonight!
Victoria says
It looks great, and I also have been planning to try this in my kitchen. Can you share what kind of respirator you used?
YoungHouseLove says
I have one from Home Depot that we got years ago and it has no brand name on it or anything, or I’d share the info! So sorry! It’s the kind that has filters you change out and looks like a gas mask and there were only one or two to choose from.
xo
s
Kingsmom says
That looks AMAZING! This is what I’m going to try on the kitchen counter tile rather than paint the tile. Yeah!!
Melissa says
Thanks for posting about this. We remodeled the bathroom almost two years ago…and yeah, I never sealed the very WHITE grout in between the TINY 1×1 marble tiles. I was scared to ruin the marble, and eventually the grout turned disgusting gray in places. Can’t get it clean. Guess it’s time for a weekend of Netflix and a very tiny brush! Thank you again.
Shay says
You are my savior Sherry!
We have white tile floors in some rooms as well as the back splash in our kitchen with white grout. I hate it. It never looks clean no matter how much I scrub and it brings down our lovely tile! Adding contrasting grout has been on my to do list since we moved in three years ago.
This post just saved me lots of research, and putting it off any longer. That dark gray will be perfect.
Barbara says
Does it replace missing grout, or do you have to do that first?
YoungHouseLove says
You’d have to do that first – this is just an epoxy to cover stains or change the color.
xo
s
Jessi says
Omg, you’ve brought tears to my eyes. I am doing this to my tiles ASAP! Amazing! I love you guys. Seriously. Stay tuned for picks!
YoungHouseLove says
So glad! Good luck Jessi!
xo
s
Sherri says
No way! Absolutely no way possible that is the same tile!! I scrolled down today to look again because of the amazing transformation. I think the tile fairies came into your house one night and had their way with you, I mean your tile! It truly looks like new tile/slate has been laid. I just had to chime in with over 700 others because I was so impressed. And to do that when you are pregnant, scooting around on the floor like that takes determination to the next level. Excellent job, Sherry!
YoungHouseLove says
Aw thanks Sherri!
xo
s
Cinemarie says
Oh my goodness, this really makes all the difference to me. That old grout was such an eyesore – this freshens the room up so much – WOW! Excellent work guys!
Nicole says
That looks so good! Amazing how much lighter the space looks now! I’m just sorry you had to try so many different things that didn’t work before you actually found something that did.
jill says
looks amazeballs $her-dawg… question: do you think it will work taking light grout to dark? we have off white grout in the bathrooms with off white/cream tiles. the grout is so hard to keep clean (we prob used the wrong kind of grout)… anyways, i think we should go darker with the grout so it won’t always look dingy. what do yall think?
YoungHouseLove says
Yes, I bet it should work well! Might need a second coat to get it nice and dark but then it’ll hopefully stay that way for the long haul (it’s stain and fade resistant).
xo
s
Mamaw says
We need to redo our dove grey grout as well. Thanks for the info, tips, etc. Our whole house is tile. Not a spot of carpet anywhere, so it’s gonna take me a while. It looks great, thanks for giving me the push to get it done.
Selena says
What a difference this made!
It gave me a great idea for our kitchen. We had our backsplash tiled with travertine about 4 years ago and I chose a grout that was a few shades too dark. I’m wondering if I could use this product to lighten it up. I might do a test-run behind the refrigerator to see how I like it. Please let us know which product you decide to use to seal it. Thanks for sharing!
Brenda says
That looks just fantastic, I couldn’t believe it when I saw the picture. It makes the foyer look finished, I really think the tile goes well in there. Great way to save on all new tile!