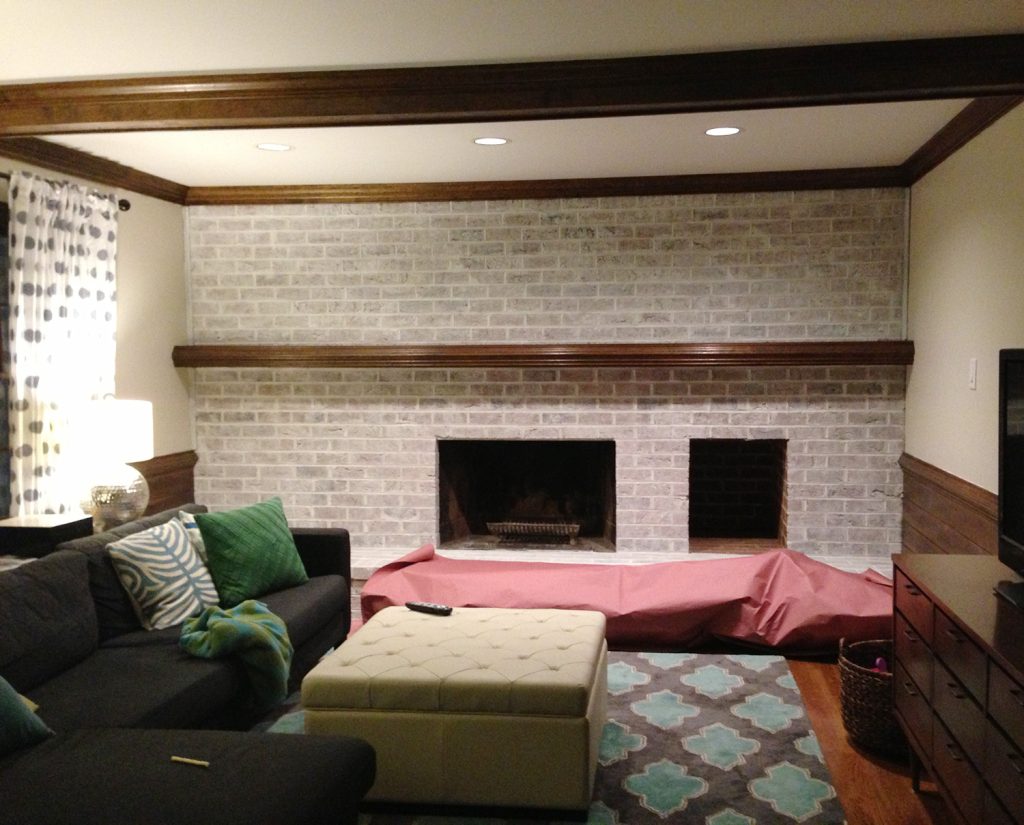
Did you know you can give your whitewash your brick fireplace with paint you already have around the house? We were able to give our fireplace wall a fresh look in under a day and with no money spent!
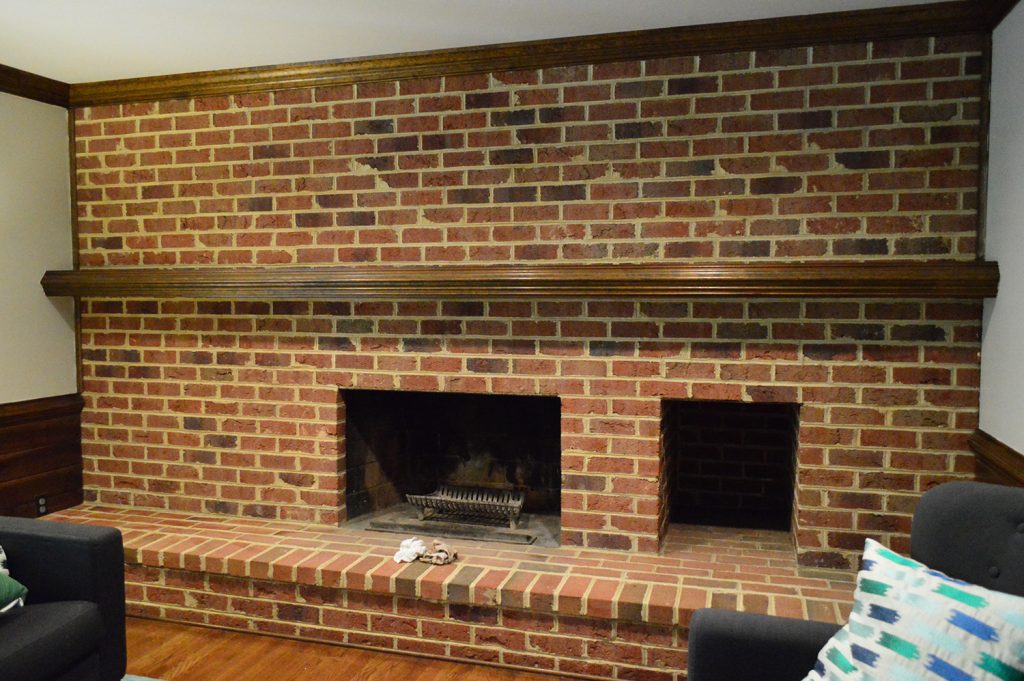
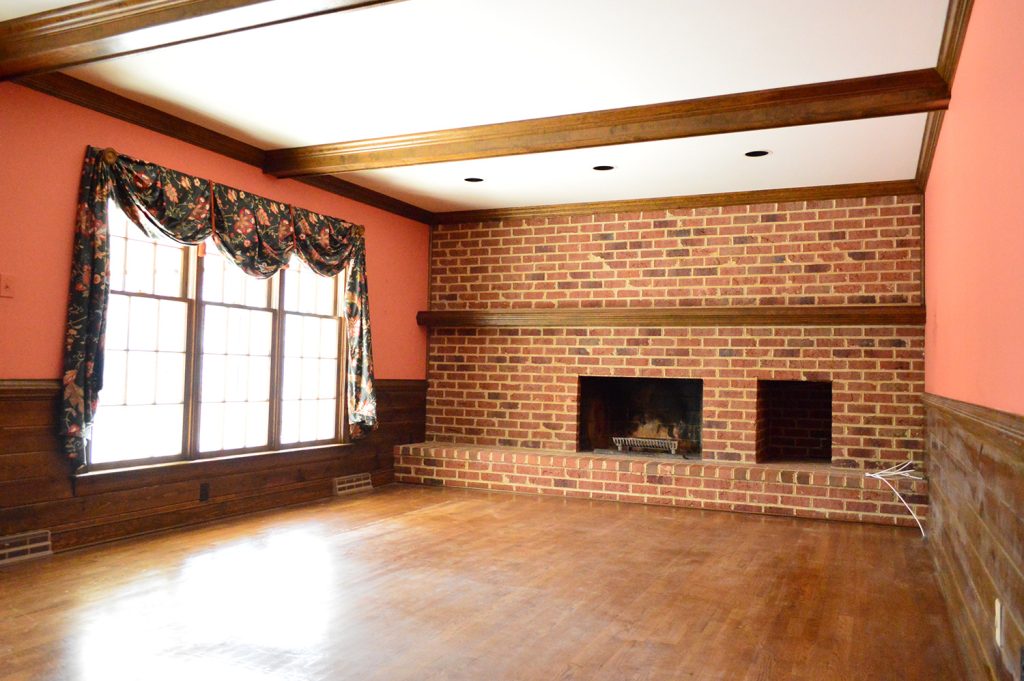
We don’t mind unpainted, exposed brick, but in all of our houses it’s been an unattractive orangey-brown brick – not that pretty rustic red brick you find in New York apartments. So in previous homes we’ve straight-up painted those walls because we LOVE the look and texture of painted brick. But after seeing a few whitewashed brick walls over on Pinterest and reading a few tutorials online, we decided to give whitewashing a spin this time. We figured if we didn’t like it we could always just paint over it!
Luckily, we really like it! The room is far from done, and it might not be a forever thing, but for a day of work and a total cost of $0 we’re really pleased with the outcome.
Materials Needed For Whitewashing Your Brick
This supply list is short & sweet and probably includes a lot of things you have leftover from other painting projects:
- Regular white latex paint
- Paint pail or other container for mixing
- Paint stir stick, spoon, or other mixing device
- Paint brush
- Water
- Rags or old t-shirts
- Drop cloth and/or rosin paper
- Scrub brush or wire brush (optional)
They do make special whitewash paints and even more durable limewash applications for exterior use (similar to the paint we used when we painted our home’s brick exterior white), but for a simple interior project like this it’s fine to save your money and use regular paint you’ve used on your walls.
And, like the material list, the steps are pretty easy too. Here’s how I knocked it out in a day.
Step 1: Clean Your Brick
First, I wiped down the brick to make sure there weren’t cobwebs and old soot all over it – just a good once over with an old rag did the trick. However, depending on the condition of your brick, you may want to use a scrub brush or wire brush to remove any loose material or dirt.
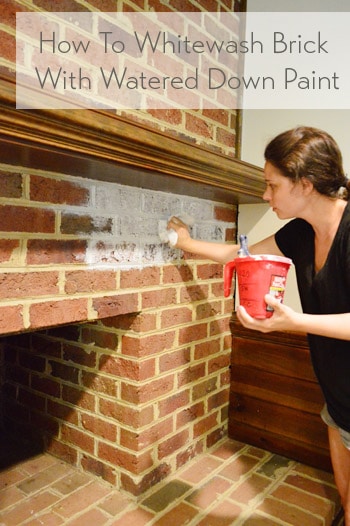
Step 2: Create Your Whitewash Mixture
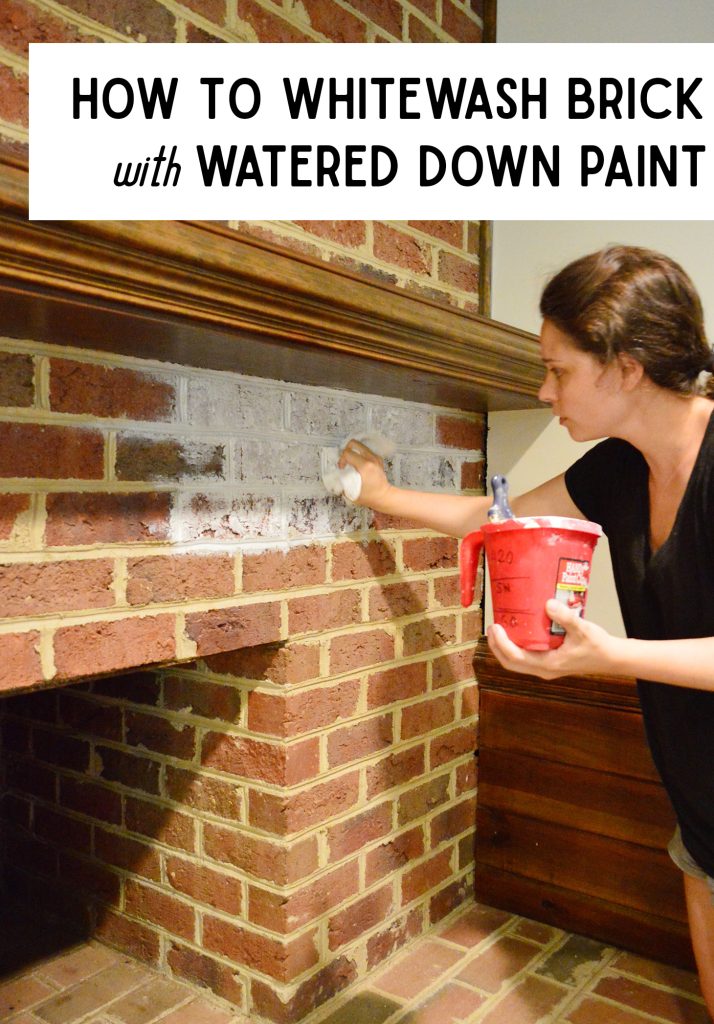
Next I mixed up a mixture of one part water + one part paint in my paint pail. I used Simply White by Benjamin Moore in an eggshell finish since had some leftover from a previous project. But any of these best white paint colors would work. The consistency was pretty drippy and watery. Imagine taking a gallon of paint and pouring out half of it and refilling that half with water.
Step 3: Apply With A Brush & Rag Technique
I used a regular paint brush to “wash” on a thin layer of this watery mixture over the whole surface, brick by brick, including the mortar. I moved quickly and sort of smeared it onto each brick with the brush, and then dabbed over it with a rag – just to remove any excess paint and absorb any drips (since it was so runny those popped up from time to time).
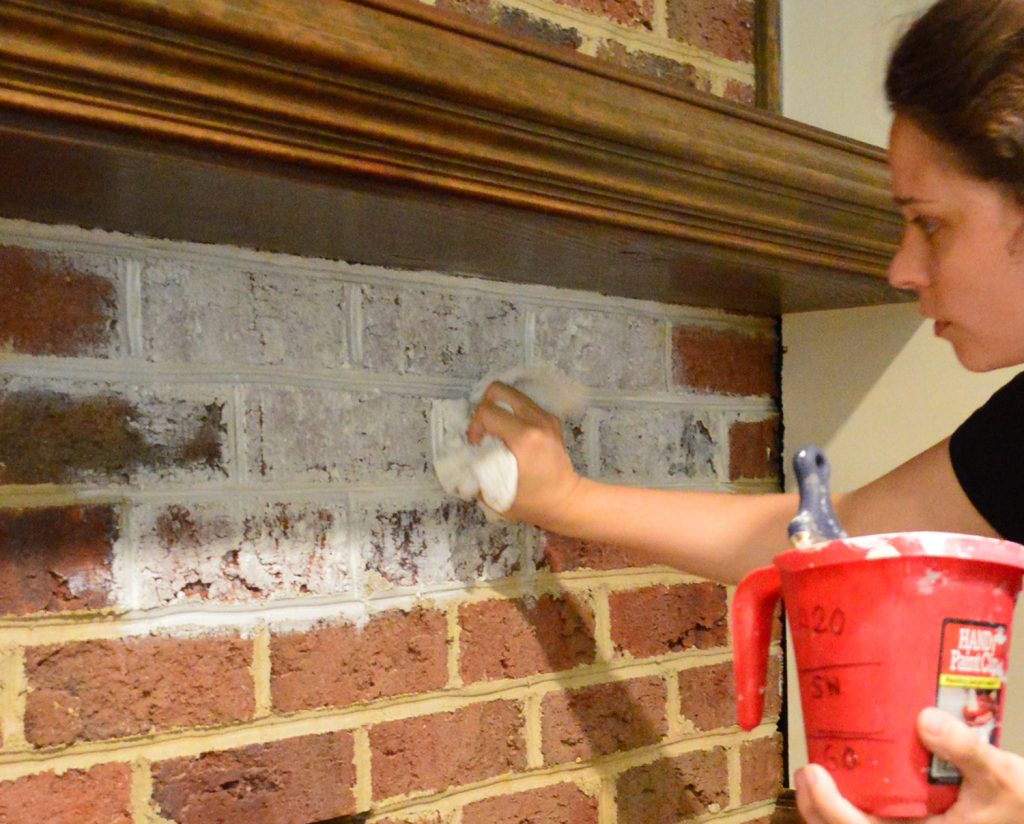
The dabbing took more arm strength than the washing-with-the-brush step, and I tried to work as fast as I could – just because I had heard that it could go pretty quickly and I couldn’t wait to step back and survey a larger area to see how it looked.
Here’s a quick video of the process for ya:
Note: You can also watch this video on YouTube.
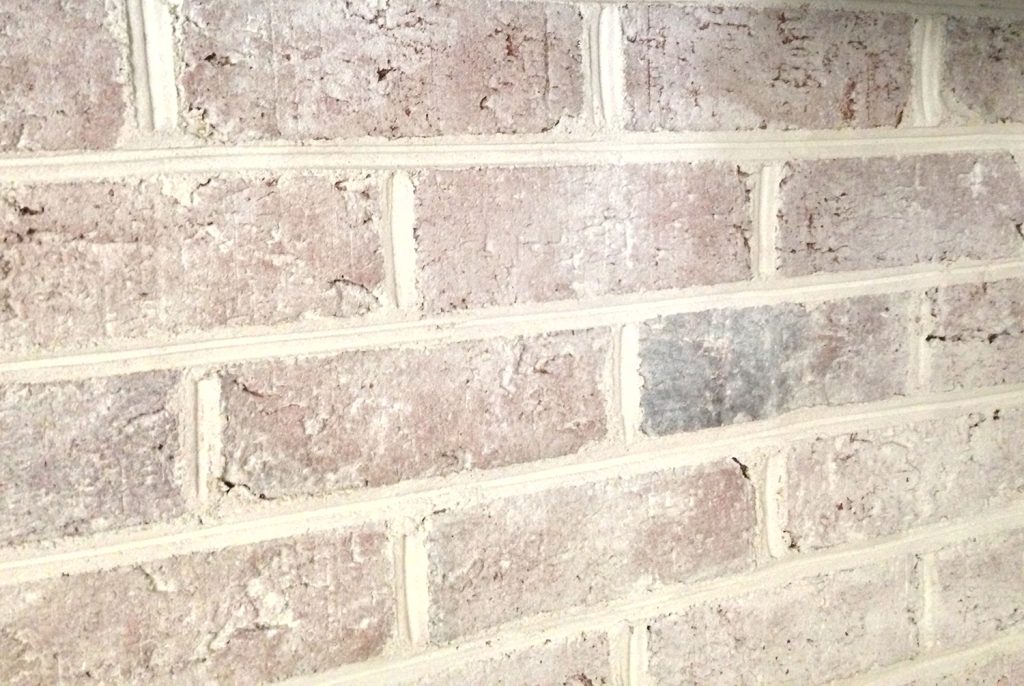
The bricks soak up the wash pretty quickly. When you first run your brush over them it may seem like you’ve straight up painted them white. But after you dab and the paint has a chance to soak in, the brick’s coloring comes oozing through.
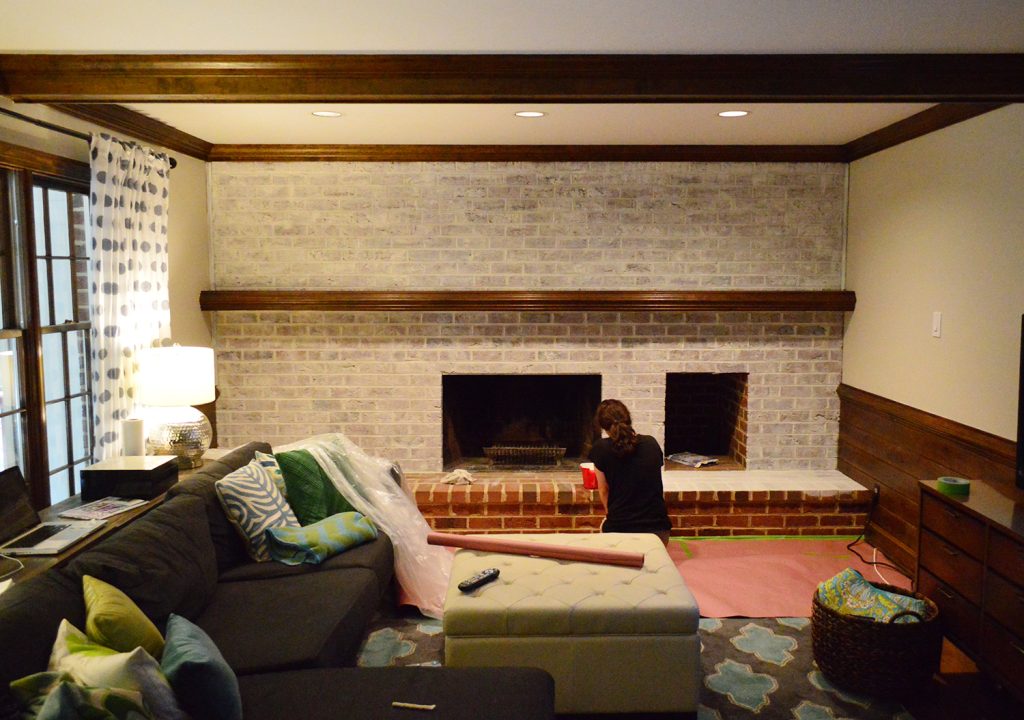
After finishing my first coat on the wall, I moved to the hearth and realized I was about to get drippy paint-water all over our wood floors. Oops! So I took a second to tape off the floor with rosin paper. It’s waterproof, which is nice because I didn’t have to worry about any drips soaking through to the floor.
Step 4: Let Dry & Evaluate
It probably took me about two hours to do the first wash and by then most of it had soaked in and dried. So, I stepped back and was faced with the question: should I leave it or do another pass? That’s the beauty of this technique – you can apply additional coats to make your whitewash more solid / opaque if you don’t like the original results.
I decided that in person too much dark red and brown was still showing through in a few areas (it’s harder to tell in these photos) so I decided to go for a second coat.
Step 5: Apply Additional Coats As Needed
For my second coat, I mixed up an even waterier second wash and then went over the wall again – just to add a bit more haze. So if my first whitewash mixture was equal parts paint and water, this second mix was more like one-third paint + two-thirds water.
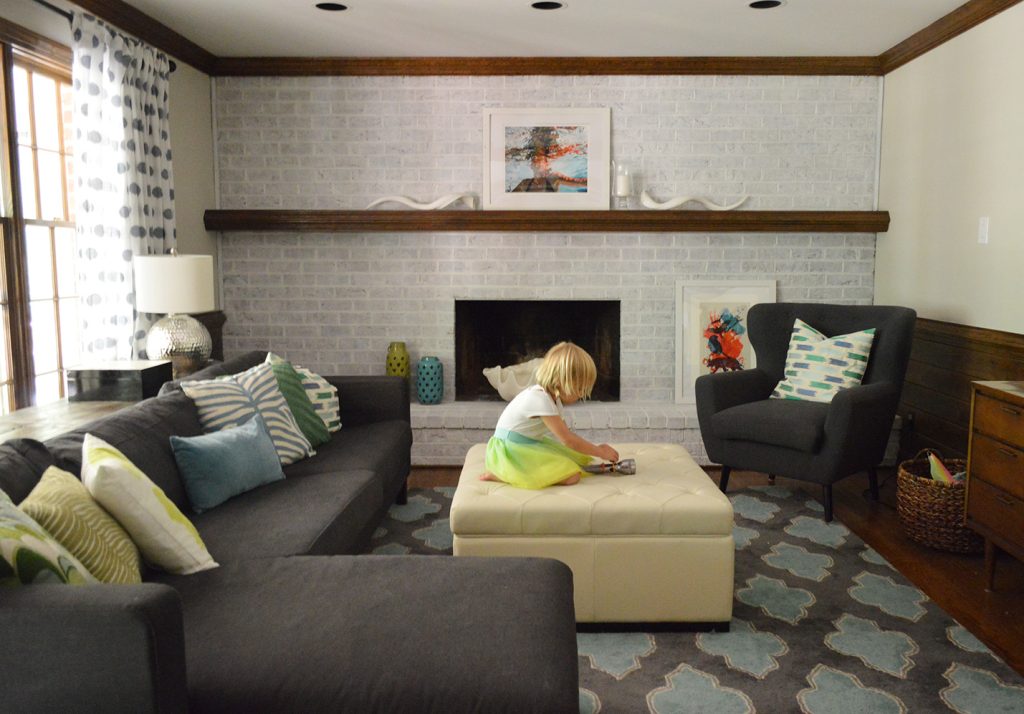
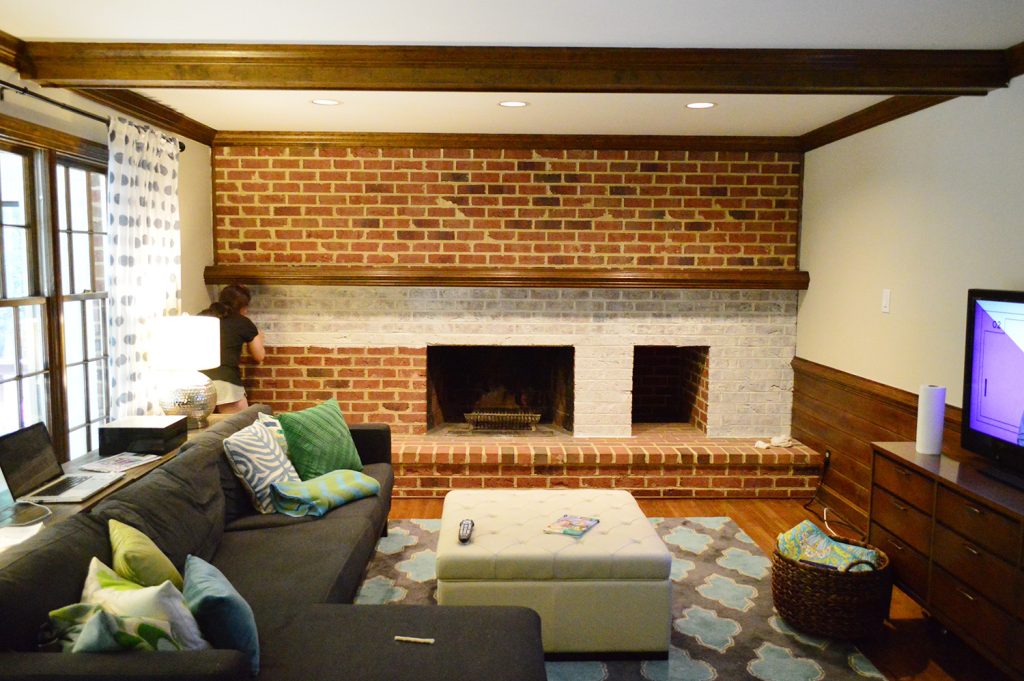
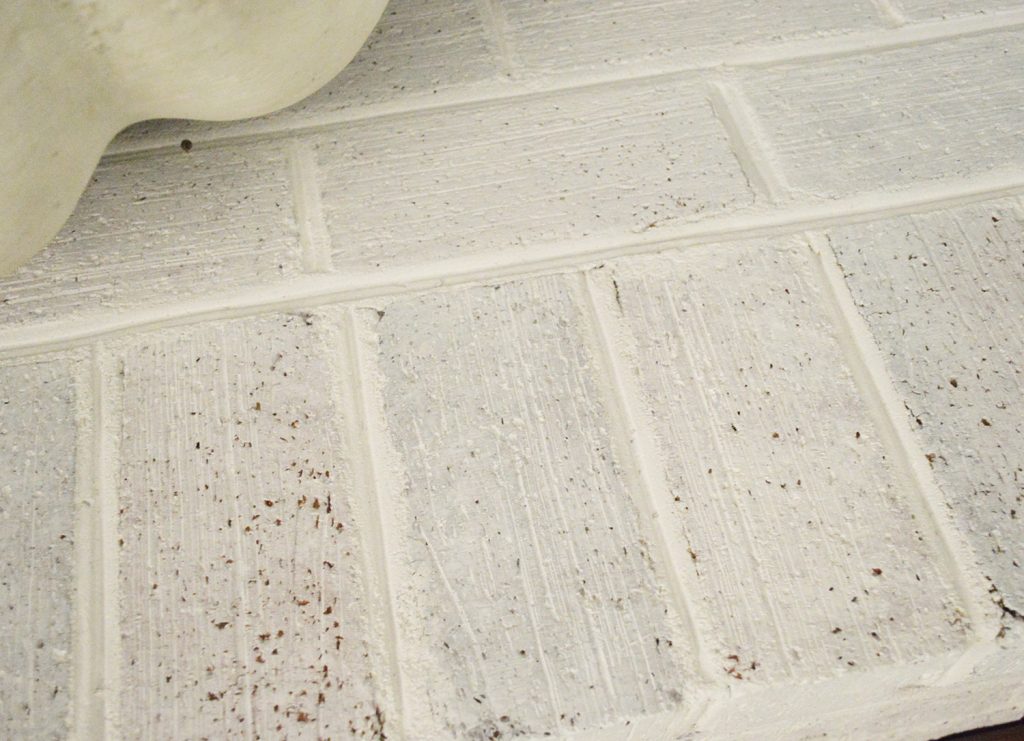
That coat was much faster – maybe an hour, tops. After that second pass, I was really happy with it. The room no longer felt as dark and cavernous, but the brick still had a lot of texture and detail in person (this photo makes it a bit harder to see than in person, unfortunately). I love the weathered effect that it gives without feeling too “faux finished” or “Medieval Times” (not that I didn’t love that place as a kid).
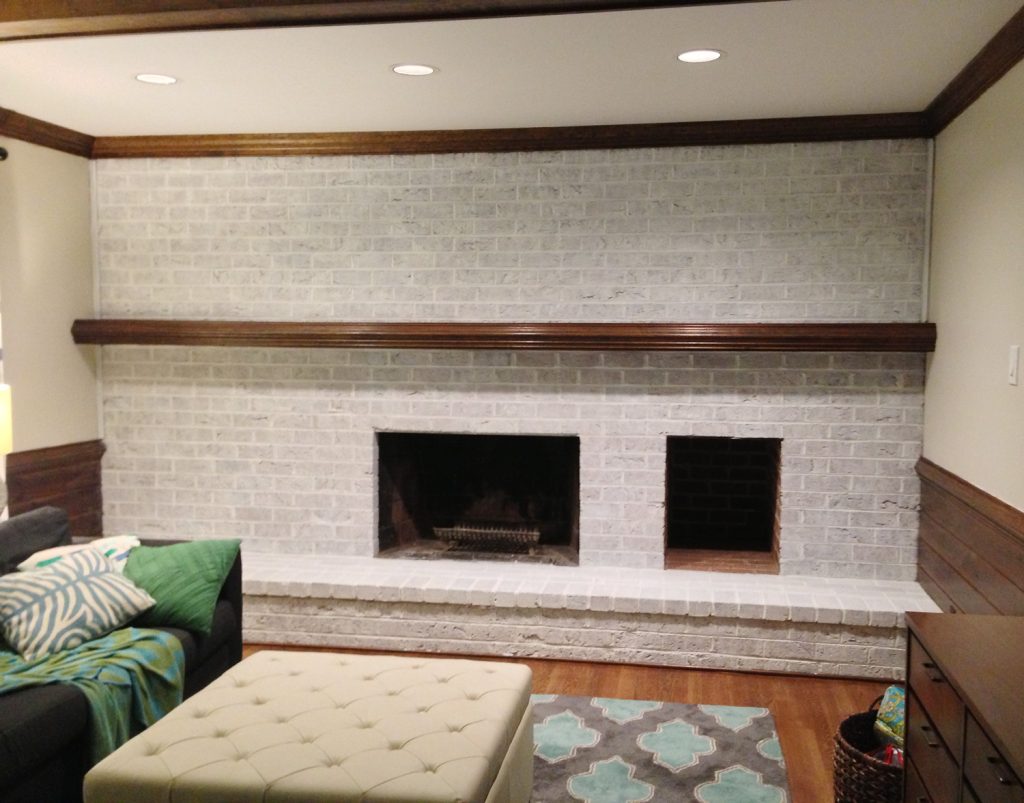
From afar the wall looks sort of chalky and textured and varied – as opposed to the glossy and super white result we would’ve gotten from painting it normally. When you get closer you see more of the pretty details of each brick. Some are a bit lighter. Some are darker. Some are craggier. It’s a nice mix.
We still have a long ways to go in this room, but whitewashing this once dark wall was a HUGE help in making the space feel brighter and less cavernous (which is tough, since it gets the least natural light of any spot in our house).

Either way, I’m glad the room is looking decidedly less salmon these days.
Some folks have asked if we’ve considered painting the wood beams, wainscotting, and mantle. We’re definitely leaning towards it, but we don’t want to rush into anything. I always say never to paint brick or wood unless you are 100% sure you’ll like it since it’s so hard to undo! Basically, wait until you can’t stand waiting another second to paint it and only then should you grab a brush.
Update: We Painted It!
After a few years of living with the whitewashed brick, we decided we needed to significantly lighting up the living room even more. So using a paint sprayer with painted the brick and wood Benjamin Moore Simply White, and it did wonders for the room.
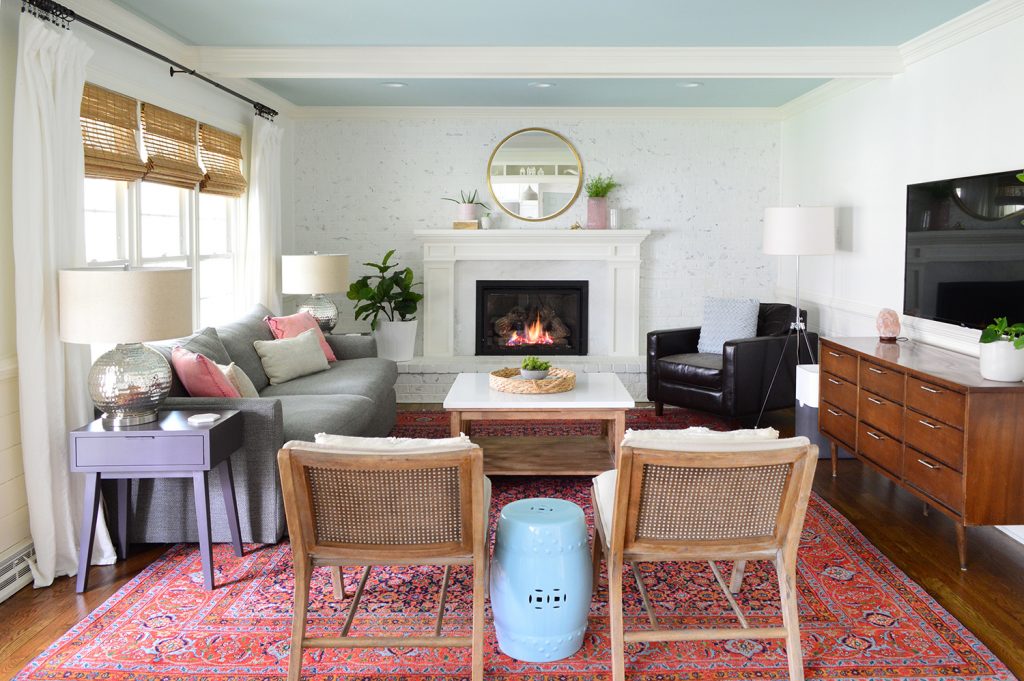
A whole lot else evolved in the room over the 7 years between the original whitewashing and when the above was taken (we constructed a new mantle, changed out some furnishings, etc), but we’re grateful that the whitewashing project gave us the confidence to make major changes to this space.
Update- We finally created this Shop Our House page to help you hunt down any furniture/accessories that you see in our house, along with all of our paint colors.

Theresa says
I love it! Excellent job. Thought I would give my 2 cents, because I’ sure, everyone actually cares what I think haha.. anyway… I really think the wall color should be different, darker. White on cream is not my fav.
Henry says
Wow it is totally change the impression of the whole room, reduce the flare from the original color of the bricks. The room feel calmer and brighter.
Angel says
I have to agree with some other people… this is the first time I don’t think I have been able to see your vision. The whiteish + off white with all the matchy wood and the modern furniture is making me go “huh?” BUT I have full and total faith in The Middle Makes No Sense and I can not wait for the day the finished room pops up on my screen. Its going to be like a surprise party for my eyeballs.
YoungHouseLove says
Aw thanks Angel! Who knows, we might end up repainting those walls down the line. We can’t wait to paint the wood trim because we hope that’ll tie things together, but we never know where we’ll end up! Haha!
xo
s
Jill says
I love it! I think it helps lighten and update the room! Things are sure progressing- at least a lot faster then they would around my house. I’m living vicariously through your re-do! We’re in year 3 of slowly completing the bigger but less glamorous things like appliances and fences. Its fun to watch your progress!
april says
I did not have a chance to go through the other comments, but I don’t love it. Sad face. I don’t know what it is, I think I actually liked the brick look. Maybe I am a crazy person. hahaha. Maybe I am the only one. I actually liked the salmon walls too!! I remember a picture you posted, maybe on IG, of Burger sitting in the room with the salmon walls and brick and beams thinking, gosh I hope they don’t paint over all of that!! Oh well, love ya anyway!
Janet says
I have a question about the paint on your woodwork and doors. We repainted our woodwork and doors with one coat of Benjamin Moore’s Natura semi-gloss Dove White seven days ago. The paint is still tacky to the touch. Did you encounter the same problem? Have any of your readers encountered the drying problem?
YoungHouseLove says
Hmm, did you use primer? That helps to grab the paint and if you apply thin and even coats (of primer and paint) they should hopefully cure up nice and solid. Maybe it has been extra humid so they’ll stay tacky a bit longer? Hope it hardens up soon for you!
xo
s
Nancy B says
Love how this turned out. I only had a vague idea in my head about how to whitewash and it sounded hard. You made it sound totally do-able! Thanks!!
Kim says
I went back and looked at the original inspiration pic for the whitewashing because I remember really liking that, and was surprised to see how different your result was from the inspiration. Why do you think it turned out so different, do you think lime washing or using a different paint color would have made it more true to the inspiration, what would you have done differently to achieve the look etc. would be a good post because I think a lot of people would be interested in something like that, seeing as how achieving the inspiration look is always a struggle in DIY.
YoungHouseLove says
I think if you look at our detail shot (the only one that seems true to life for some reason) it seems a lot closer to it – but yeah, I think maybe lime or even rubbing concrete on the front to haze it might have achieved that look as well. It was hard to find tutorials for those methods, so I hope more bloggers and DIY sites share some like that! I’m a curious girl now that I’ve tried one method…
xo
s
Ricki @ The Questionable Homesteader says
Oh I love this! The close up of that brick is fabulous! All those different colors and textures, I’m in love.
I’ve just recently discovered white washing and am completely in love with it. I’m not really a big white fan, but I love the look of white. I know, a bit of a contradiction, but I think it was just to flat for me as I’m finding the color variations on wood (and now brick) are making me fall in love with white (ok not white white, but white wash ;) )
Thank you for sharing, now I need to find a way to bring some brick into my house so that I can white wash it.
ajira says
It’s gorgeous! Wow. And it was so funny to think, ‘oooh, how cool would it look to paint all that dark wood on the walls and ceiling white’ and then read that you were planning to! Great minds and all that, hey? Ha. Looks great now and also can’t wait to see what you create. The hole looks weird empty but maybe with wood in (like the birch logs another commenter suggested) it would make more sense? I love how much better it looks with the simple remedy of some art leaning over it. Reading your blog inspires me about my own home and I love it. Thanks!
jeannette says
whew. the incandescent glow of the former brick was keeping me up at night.
this looks especially beautiful, kind of romantic, like pemberly looming up in the fog, or something.
great work in the last couple of days. guys. that sun room was skanky, and your easy-to-do-withouts always shock me because i don’t realize what most people have to have all the time. i was raised with meatless nights at home, sweet potato and salad, what a delish dinner and a great idea..
Christy Niebaum says
Ehrmergerd! White wrash!
That’s how I imagine an “ehrmergerd” meme would turn out for white washing brick, anyway.
I lurv it! Can’t wait to see the tan-ish walls pop once the wood is painting. Great progress, guys!
Sonia says
Hi sherry. I am a big fan of YHL and have been reading since the days of the first kitchen reno. Please please invest the time and energy into improving your photography skills. The pics are overblown and overexposed. There is no way your camera cannot capture the depth and texture of the whitewash you talk about, you have great technology, just learn to use it better., The pics you take now really do a disservice to the quality of your renovations and all the hard work you put into the blog. This is not a criticism but just a bit of friendly advice. I will continue to read and enjoy your blog. Best of luck and big hugs to Clara and Burger
YoungHouseLove says
Thanks Sonia! Whenever we look back in the archives, we’re amazed at how far our small grainy photos have come, but we still have a lot more to learn! I’d love to take a class in my spare time one of these days. I do think my camera could capture the whitewash on a sunnier day if I used the tripod as I mentioned, so I’m definitely planning to give that a go as well :)
xo,
s
Monique says
OK, for what it’s worth, I’m commenting as your cyber-friend.
First, I want to say thank you for letting us into your home life. You guys are the best. You are so creative and lovable.
Second, I’m no interior designer, and I don’t think anyone should make decisions, especially personal ones based on what other people think.
That being said, my two cents is that if you paint the woodwork white, the living room will lose its warmth. That same thing happened to another blogger’s kitchen, she spent weeks trying to figure out how to add the charm back in, until she up and moved.
If your current wood weren’t gorgeous, I would not have said anything. But again, as your cyber-friend, I wanted to give you another perspective.
Back to what I said at the beginning, though, keep doing what you’re doing. Namely, do what you love.
YoungHouseLove says
Thanks so much Monique! It’s definitely nothing we’ll do without thinking it through thoroughly! Our first house’s den had lots of brick and wood (beams, paneling, mantel) and we painted it all and loved it. It still felt like such a warm and cozy room to us. But it’s definitely a personal thing!
xo
s
Dominique says
What I remember most about skip it was loosing it when my Air Force father and my family we moved internationally when I was 7 or 8. I was sad for months! Everything else seemed to make it overseas just fine.
Sophia says
I love your passion in your house. This is slightly off track from the whitewash but I love the couch. Where did you find it?
YoungHouseLove says
Thanks! It’s the Karlstad sofa in “dark sivik gray” with the add on chaise from Ikea.
xo
s
Carol says
I’m in the don’t-adore-the-whitewash-but-maybe-it’s-the-photography camp, but I love the white stone idea. If you scroll down this link to the 4th or 5th picture, you can see a mid-century modern with a fireplace wall much like yours (complete with two openings – look what they did there!) that made me go aha.
http://la.curbed.com/archives/2013/08/cahuenga_pass_buff_hensman_house_rebuffed_and_back_again.php#more
YoungHouseLove says
Very pretty!
xo
s
Katelyn @ evanandkatelyn.com says
Eeeeeep! This looks amazing!!! We have a huge brick fireplace and we have been toying with the idea of whitewashing, but we aren’t brave enough to bite the bullet yet since the brick actually matches our floors pretty nicely. Here’s our living room.
http://evanandkatelyn.com/2013/07/evolution-of-a-living-room/
Do you think we should pull the trigger and white wash or hold onto the natural brick a bit longer?
YoungHouseLove says
So pretty! I would hold onto it! My theory is always wait until you are SO SURE YOU’RE GOING TO EXPLODE! Haha!
xo
s
Coby says
There’s nothing I love more in life than a nice whitewashed brick. I myself have an old fireplace that’s just a bit too cold and gray….. Think this tutorial may work on stone? Thanks!
YoungHouseLove says
I would imagine it would work on stone as well. Maybe do a test spot to be sure?
xo
s
Pamela Bertone says
I love what you all do-I really do. And I love the whitewash, but the paint in that room is washing out/competing with the brick now. I feel terrible saying it and maybe it’s just that the picture isn’t doing it justice; however, you all are pretty talented at photographing your rooms well. Is it me? I disagree with Ellis, however, and look forward to seeing the painted wood trim. I think it will look fab-u-lous !
YoungHouseLove says
It totally could be the paint! We’re going to wait to paint the trim/wood and then reevaluate the walls for sure. Will keep you posted!
xo
s
Katelyn @ evanandkatelyn.com says
Thanks!! Not exploding yet so I will wait on it!!!! There are many other things I’m exploding to do first :D
Amelia@ MonogramsnMud says
It looks great Sherry. So flattered that my little tutorial was helpful. It is going to look amazing with all the trim painted white and the coffered ceiling…swoon! Still traditional colonial but updated.
XX
Amelia
YoungHouseLove says
Of course Amelia! It was so helpful!
xo,
s
Maria says
Where did you get those curtains?? The white ones with gray polka dots. I LOVE THEM!!
YoungHouseLove says
Thanks! Ikea a while back. Don’t think they sell them anymore, but maybe try ebay?
xo
s
Petra says
Normally I won’t comment because I see that you already have several hundred of them, so feel mine will be “lost” somewhere amongst them!!! But hey-ho, today I am! Good for you painting your brick – white/lime-washed is not something I would do (I prefer plain paint on brick) but it’s always SO good to try something new – that’s what I like! I would definitely paint the panels around the room white but would sand down to very light the mantel shelf. I wish I had a room like yours to try these things out!!!
Jane says
I thought I liked the wood wainscoting (is it wainscoting?), until you painted the fireplace… Now I can’t wait for you to paint it. It’s so cool, though – maybe you could paint it in the den and try to work with it in the kitchen? I would almost love to see it stained a darker tone, but stripping or sanding that would be an ordeal, I imagine, Anyway, the whitewashing looks great – things are coming right along! Can’t wait to see what you do next.
Carolyn says
stop! I implore you! do.not.paint.the.wood.beams!!! it looks good already. The natural wood with the painted brick has nice character and warmth. Painting the whole room white would erase that character. It was a great look in your first house because it was a much smaller space. I would consider replacing the rug and/or other elements in the room before painting everything white. This room has good bones. Painting everything white would be like…getting Osteoporosis (to go with the bone theme)! Anyway, that is just my unsolicited, 2 cents worth. You’re so lucky to have a beautiful home in a lovely looking neighbourhood. Just don’t be too hasty with your paintbrushes ;)
YoungHouseLove says
I promise we won’t lift a single paint brush until we’re 100% sure :)
xo
s
Carolyn says
Glad you’re listening to my unwanted advice :) just re-read my funny, little comment. That’ll teach me to write things late at night in a sleep deprived (because of a newborn) state! Hope you weren’t too weirded out by it. My husband was when I told him, haha
YoungHouseLove says
Haha, you’re so sweet Carolyn. No worries at all! There have been a lot of “paint that wood already!” cries and a bunch of “don’t you dare!” so you’re in good company. Turns out people are passionate either way, and we definitely know how hard it is to undo, so we’re not doing a thing until we’re sure.
xo
s
Brittany says
Love how this room is coming along! We whitewashed our old orange-brick fireplace last year (http://www.underthegingkotree.blogspot.com/2012/11/fireplace-makeover.html) and we couldn’t be happier with the results! It definitely brightens up the whole room and makes it feel bigger– just like yours.
I just wanted to say thanks for always being an inspiration on how to update/make your house your own— you guys helped give my husband and I the courage to buy our first fixer-upper last year. And we’re so thrilled that we did! We’re still in the awkward transition phase (just ripped up the 80s carpets to install hardwood)– and we’re knocking down a wall this fall to kick off a full kitchen reno! Keep your fingers crossed for us… :)
Looking forward to all of your projects/inspiration to come!
Thanks again,
Britt
YoungHouseLove says
Fingers firmly crossed Britt! Good luck with everything!
xo
s
Tiffany says
Does you have any plans to fix this so it looks like your inspiration photo? The inspiration was much more “brick” like and not so….white.
YoungHouseLove says
Our first coat had it looking more brick-like and closer to our inspiration pic (although we think that was just a type of brick that they used in a new construction) but it was a bit too pink/brown/red for us, so we opted for a second wash. Perhaps using lime or cement would mimic that look more if that’s what you’re going for though? If you look at the close up shot of our brick, there’s a lot less white than the far away shots show for some reason. Someday I’ll figure out how to capture that on film – or at least make a video for ya!
xo
s
Staci @ My Friend Staci says
Wow! What a controversial project. I suppose if it was me, I would have painted the trim first and left the brick for last–to see how I would like it as an accent color. But then again, I am a hardcore red brick lover. I’ve dreamed of having an exposed brick wall in my someday home for years! I look forward to seeing how the room comes together.
Monica says
We moved into a house with an already white-painted brick surround, all walls, ceiling, hearth, beams, trim, and mantel/mantle. Looks stunning. BUT I have 14 feet of mantel/mantle and so forth.
I truly do not blame the previous owners for doing the room in white. The room has no windows and all inner walls, except for the skylight they put in. Fall and winter= artificial light only in the “cave”. The bricks were originally like the house exterior, light sandy colored.
We need to get a chimney specialist in to regrout all the hearth and chimney bricks- many are very loose, some were replaced with foam instead of fireproof mortar [rolling eyes]. Hoping to get that done before winter here.
In your case, why not strip and restain the crown, trim and beams in there? Darker or just a bit lighter? Anything but white on white-washed. Look at it again on the longest day of the year, you could be blinded by the light from the windows for half the year and squinting like we do in ours the other half year.
The little wood cubby could be a nice spot for the battery-operated, remote-controlled set of candles to flicker in. no nasty drafts and no need to open the chimney damper. Would keep it useful if you or newer owners ever prefer wood over gas logs. Those without allergies, asthma and such seem to prefer wood logs.
YoungHouseLove says
We definitely are open to stripping and restaining the crown, trim and beams if we decide that’s a look we’d prefer more than painted. Right now we’re just leaning towards painting them since many rooms that we love have that look, but we won’t do anything until we’re 100% sure!
xo
s
Monica says
I do like the whitewashed brick. :) If you did paint the mantle, how do you envision decorating the mantle for everyday and holidays? That was my dilemma the first Holiday season. i solved it, finally with spray paint and thrifted finds….
At least your hunk of horizontal wood still allows for all the stocking hanging options. Ours is nearly 4 inches thick, so typical stocking holder options do not work.
YoungHouseLove says
In our first house we had a mantel like this and we used little cup hooks under the mantel to hold stockings with pretty thing on the mantel (glass hurricanes full of white candles or small ornaments, etc). I love decorating for Christmas so I can’t wait for our first one at this house!
xo
s
Amanda Hurst says
I adore the couch and ottoman! I would love to know where you got them–love, love, love!
YoungHouseLove says
Thanks Amanda! The ottoman is from jossandmain.com and the sofa’s from Ikea (their Karlstad sofa with an add on chaise in Dark Sivik Gray).
xo
s
ashley @ sunnysideshlee.com says
that looks a ton better! it actually brightens and warm the room up more!
Meaghan says
Random question, but your IKEA couch still looks great! Are you still happy with it? Would you buy it again?
YoungHouseLove says
Heck yes. So happy with it! We can only vouch for the dark sivik gray cover, but it stands up to a daily beating and still looks great.
xo
s
Kristen says
Aww, I was just reading along so happy to see you left the wood unpainted … and then I got to the end! Yet, sometimes I *kind of* understand the desire to paint wood because there are some colors you just can’t do with dark wood trim or wainscoting like my 87-year-old original stuff. Ah, but still, those beams …
But I do love, love you for spelling mantel correctly. :)
Julie says
Am looking forward to seeing the evolution of the room! In case no one else has made this comment (I didn’t see it scrolling through), you should be able to get a good texture shot using side lighting. I think the window is far enough away to light the wall directly, but if you put a lamp to the side of the wall, you should get a good texture.
YoungHouseLove says
Thanks for the tip Julie! So helpful!
xo
s
Katie S. says
Maybe it’s already been said, but do you think this is the same technique I could use on wood? I think it’s knotty pine that I’ve got in my porch, but there are some dents/knicks in it. Should I putty those up? Every time I walk into it it feels like a Northwoods cabin, which is not my style… : (
YoungHouseLove says
I think the same thing would work, but I’d use a test piece first just to be sure.
xo
s
The Art of Doing Stuff says
So I was googling the best way to whitewash my own brick wall which led me here. Which in fact is hilarious, because the whitewashing tutorial you refer to at the start of this post is from MY site, LOL. Basically it’s my idiocy that I think is so funny. ~ karen!
The Art of Doing Stuff says
O.k. apparently I lied. It’s not the link in the first paragraph. :)
YoungHouseLove says
So funny!
xo
s
Emily says
I love this idea and am planning to tackle my outdated redbrick fireplace in my dining room this weekend! Excited to try whitewashing and still being able to see some of the “texture”. Do you have any input on the best paint finish to use? Flat, satin?
YoungHouseLove says
I would go with flat I think, but satin would would too I think (semi-gloss might be a little shiny). Hope it helps!
xo
s
Kelsey says
Looks great! We are flipping our first house and the previous owners painted the fireplace straight white. I’d like tomrestore it to more of a white washed look with undertones of grey. Any tips? Perhaps paint it grey and then use a white coat over it like you did here? How do you thinknthat would look?
YoungHouseLove says
Yes, I think it’s hard to strip color so it might be easier to dab some light gray on it (I’d try to go irregular, so get a little more in some spots and a little less in some spots) so it looks natural. Good luck!
xo
s
CK says
Hi! I’m thinking about doing this for our brick fireplace as well.
Is your fireplace gas or wood burning? We have a wood burning and I’m worried that the bricks get too hot for this kind of thing. And advice? (My apologies if you’ve already answered this question.. there are too many comments to scroll through! :) )
YoungHouseLove says
Ours is a non-working fireplace but we’ll make it gas eventually. We had a gas fireplace in our first house that we painted as well as a wood burning one and they both held up well though!
xo
s
Cymbamommy says
love the look. will do that in my basement as red brick doesn’t go so well with my color scheme.
you might try adding some Stone Textured Spray paint to add some warm brown back.
I have used this stone paint on lots of things and love it.
YoungHouseLove says
That sounds fun!
xo
s
Amy @ a new old house says
I wanted to thank you for this post- it gave me the courage to mix my own whitewash for the beams in our attic (which we’re making into a media room).
http://new1790house.blogspot.com/2014/01/white-washing-beams.html
Thanks for all the step-by-step tutorials you do for projects. I know it must take a long time to prep & photograph those posts. The effort & time you put in is really appreciated.
YoungHouseLove says
SO COOL!
xo
s
Jess says
Did you paint the inside of the fireplace? It looks darker than the “before” picture.
I’m dealing with a very similar brick wall and the fireplace previously housed a pellet stove. It is now looks like a brick oven pizza with the stove removed. I have the same plank LONG boring mantel and was waffling between keeping it/painting bricks or installing an independently standing mantel around fireplace.
I love your idea of white washing. The whole rooms looks so bright and clean! Did you use a specific fire-proof paint?
Thanks!
YoungHouseLove says
Thanks Jess! We didn’t paint the inside so it just probably looks darker by comparison to the lighter paint. I don’t think you can paint a wood-burning firebox, since it might not hold up and release bad gasses (even high heat paint). Maybe ask the paint pros at your home improvement store?
xo
s
Maren says
Hi! Have you finished this room? We have a very similar sunken family room with a brick fireplace wall. We are going to paint white this weekend. Wondering if you had a pic of the finished product, with mantel and woodwork white, so I can cast some vision for my hubs. :) We are sooo nervous!
Thanks
YoungHouseLove says
We haven’t done much to this room since! Would love to get back to it since we spend so much time in there!
xo
s
Natalie says
Hey John & Sherry! I love your blog and your book! You are such an inspiration to me and my new husband. We both love designing and creating. We just got married 3 weeks ago and we are working on our house. Anyways, the fireplace is red brick and I really want to paint it white. However, my husband isn’t so sure because he thinks it decreases the value of your home. Have you guys ever ran into that when selling your previous house? Has anyone ever said it decreased the value? I personally love it and think it looks wonderful!
YoungHouseLove says
Both our houses sold super fast so I think some people like things dark/original and others like things that feel lighter and more open (which can also help a house sell faster assuming you’re not someone who dislikes painted brick or paneling :)
xo
s
Rachel says
What a difference. It looks great! Going to try this today on a much smaller fireplace. Appreciate the tips!