So yeah… our fridge is white now.
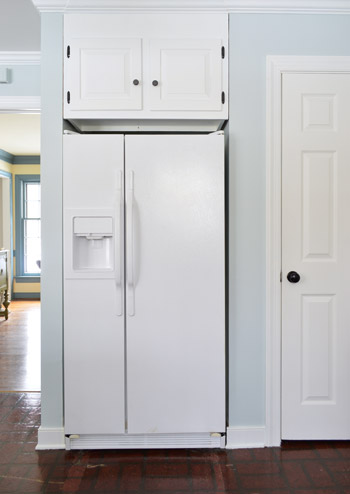
It’s not a new fridge, it’s just our old almond-colored one “freshened up” a bit with some appliance paint so that it would play along more nicely with our white cabinets. After tons of you (literally dozens) mentioned that you had great luck with appliance paint in this post, we were encouraged to give it a try.
I’ll admit that I initially had my doubts, but after hearing such rave reviews from you guys, we figured at its best, this update would help an old fridge blend in more until we save up enough money to replace it during Phase 2 of this kitchen makeover. And if it completely tanked, we could tell you guys the truth, share the awful photos, and just generally save you the trouble of doing whatever it was that we did.
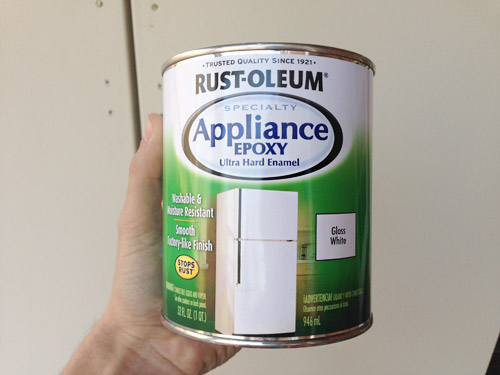
After doing a little bit of what-had-good-long-lasting-reviews research, we settled on this Specialty Appliance Epoxy that was $15 from Home Depot, which was only available in exactly the color we needed: gloss white. I know it’s not as cool or trendy as something like chalkboard paint (which Sherry had mentioned a few times) but I’m weird about chalk and all that dust near my food source gave me the heebies jeebies. Plus I knew if we craigslisted this fridge down the line we could probably ask more for a white one than a chalkboard painted one.
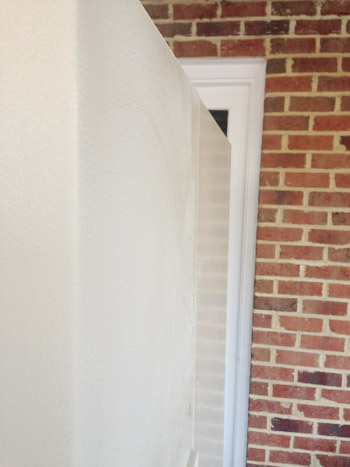
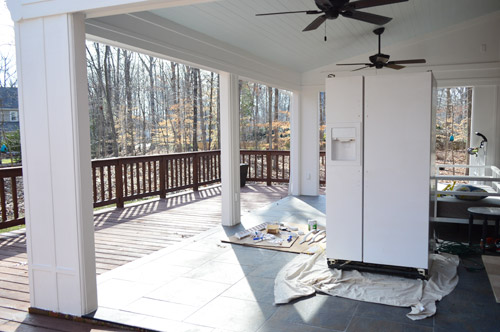
The refrigerator “refinishing” process itself was pretty darn easy. It was the prep that took some muscle – namely moving the fridge outside so that I could paint without stinking up the house (the epoxy smelled like rubber cement, so we definitely wanted to follow their “do this in well ventilated area with a mask on” instructions). After I turned off and disconnected the water line, my dad came over and with a dolly we got it ready to head out to the sunroom… until we realized the handles made it too big to fit out the doorway.
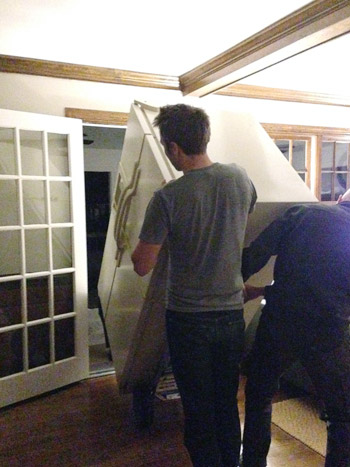
So off came the handles (well, and one of the doors too – it’s a long story) so we could bareeeely squeeze it out the door. We actually left most of the food inside (except for some especially heavy, breakable, and spillable stuff that temporarily came out during transport) to avoid the extra hassle of unloading and reloading everything. Oddly enough, it worked.
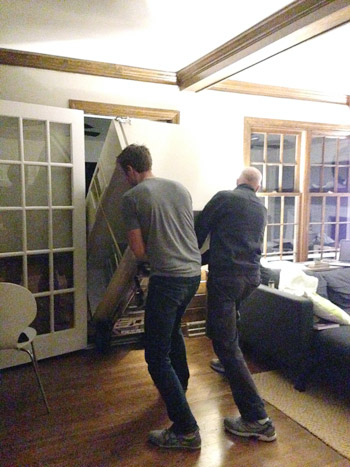
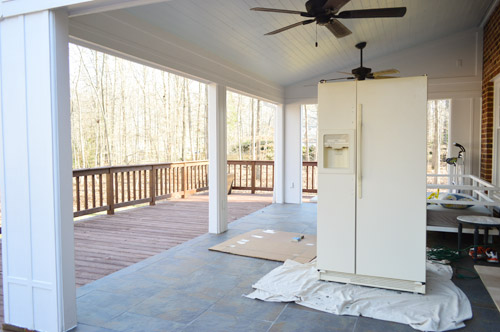
The move took place on Friday night so that we’d be ready to go on Saturday morning, since the weather forecast was nice for the weekend and the epoxy is supposed to be used in 50°+ temperatures. We weren’t the classiest neighbors for a couple of days, but at least it’s better than having it on the front porch. We even plugged it in out here so the food would keep. Nothing like going outside to get milk for your cereal in the morning.
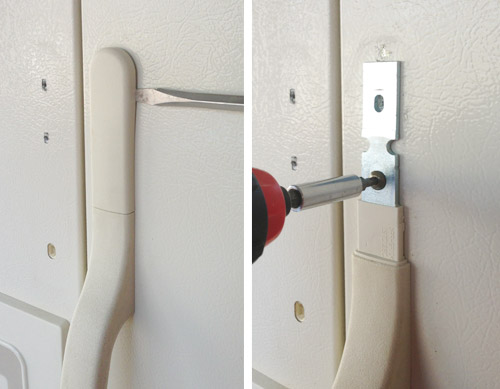
The project didn’t get going until later in the day on Saturday (once temps crept up enough to meet the can’s requirements). Obviously I had reattached the one door that we took off to keep the food cold, but Sherry decided it’d be best to have both handles off when painting for the most seamless and hopefully drip-free result. All it took was popping off a cover on either end and then unscrewing them.
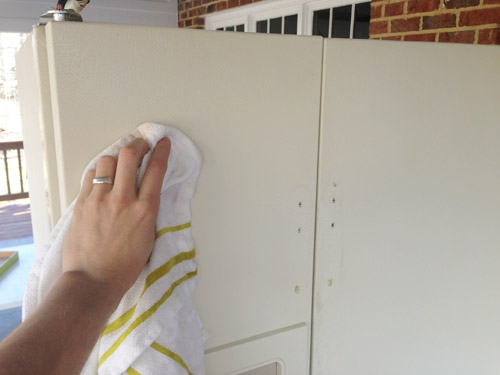
Per the directions on the can, Sherry and I started by lightly sanding the whole fridge – just enough to get the gloss off. A power sander felt like overkill, so we each used sanding blocks of 150 grit.
I did the front two doors while Sherry did the sides. You can see the difference between the door I roughed it up and the door I hadn’t done yet in this picture.
Then we went over it with a damp cloth to get all of the sanding dust off followed by a dry cloth to, um, dry it.
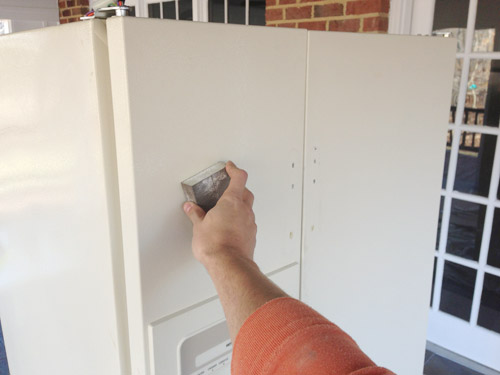
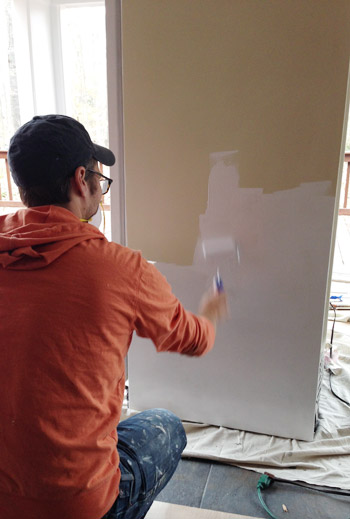
I used a foam roller to apply to epoxy while wearing a mask, just as the instructions suggested (and Sherry, Burger, and Clara went inside and steered clear, so they weren’t exposed to the stink). This stuff basically has the exact consistency of paint so the process wasn’t unfamiliar at all. It goes on a little bubbly but it quickly smooths itself out.
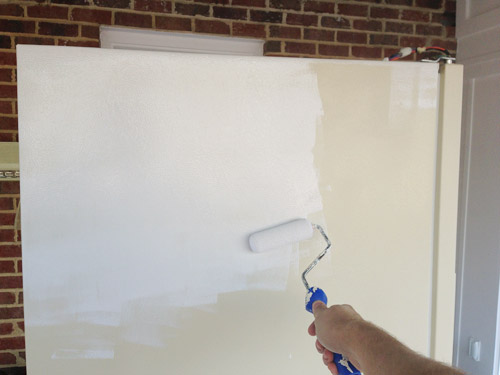
I did break out a brush to help me get into some tight spots, like some of the nooks around the doors and the ice dispenser. We chose to just paint right over that whole area too (covering up the much coveted “Hot Point” brand logo – gasp!). The paint doesn’t actually touch the water/ice dispensing apparatus (that’s tucked up under a cover) so it was nice to know that this definitely-not-food-safe product wouldn’t interfere with anything that goes into people’s mouths – but we could achieve an all-white look from the front instead of having to leave some trim parts cream or something.
I painted three sides and the top, leaving the backside unpainted. There were enough cords, tubing, and venting back there that it didn’t seem worth the hassle (in what installation scenario is that visible?). I probably didn’t need to do the top either but someone even an inch or two taller than me would get an okay view of it, so I just did it to be thorough.
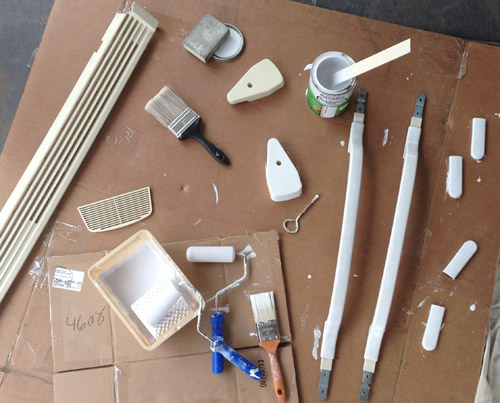
Sherry had spread out all of the little parts – the handles, door hinge covers, bottom grille, etc – on a piece of cardboard so that I could paint them separately. It was easier this way and also minimized the opportunity for drips on the main fridge.
The can said you can recoat in one hour assuming that 70° temperatures were met, so I decided to give it at least overnight before continuing since it was only around 55 degrees on Saturday. But at least the fridge was looking somewhat less offensive out there in white. I’m sure that’s exactly what the neighbors were thinking: “Oh nevermind, honey! It’s white now so no need to call the HOA anymore. I wonder if there’s any beer in that thing…”
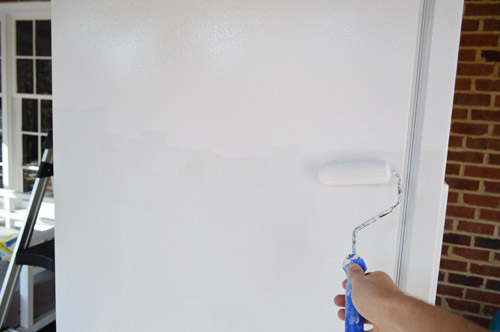
You can’t really tell in pictures, but it did need a second coat. So on Sunday morning I rolled on another one pretty quickly and let it dry in the awesome 70° day that we were suddenly having.
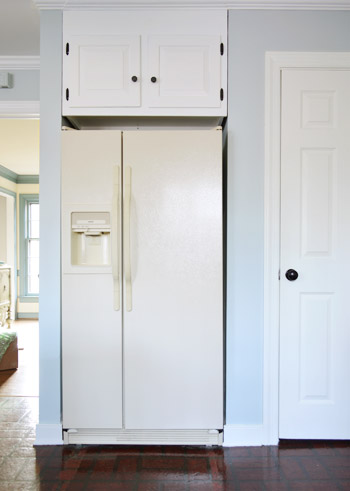
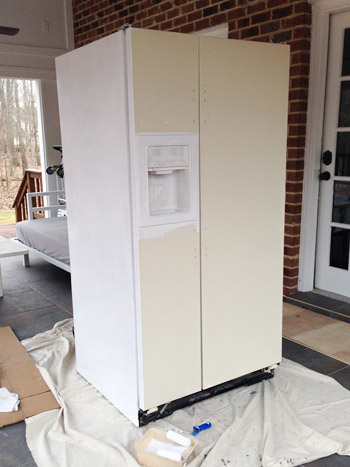
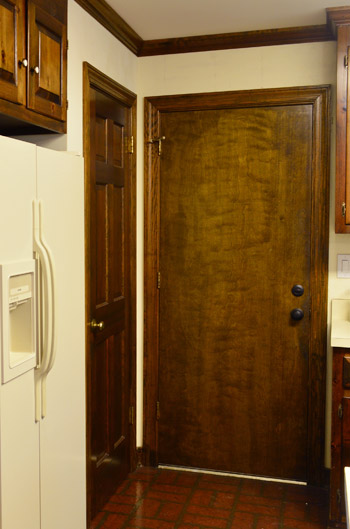
We didn’t get it rolled back inside until it was too dark to take pictures on Sunday night (which is why this post is coming to you today, and not yesterday as we originally planned) but here it is, back at home looking much more blendy with the cabinetry.
It’s not a perfect color match (the fridge is slightly whiter in color) but it’s only about a shade off instead of being a lot more noticeably clashy like it was when it was cream. Our white range hood is the same slightly whiter tone as the fridge, so we think appliances just tend to be that color when they’re “gloss white.” It’s actually a surprisingly big help in making the room feel a bit more current (I’ll admit that I didn’t think it would make as much of a difference as it does).
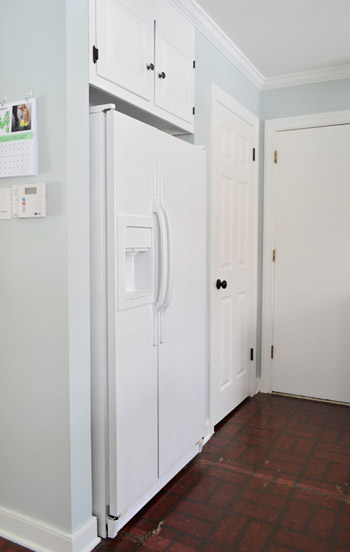
And it’s definitely a vast improvement from what this corner looked like back in the day:
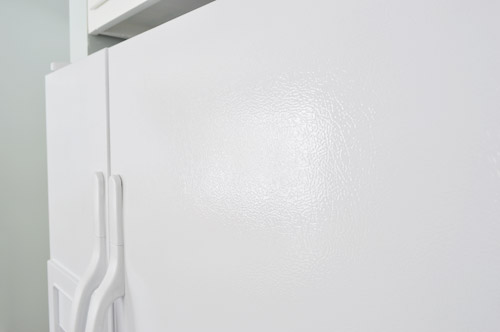
As for how the epoxy feels, it’s very smooth, very hard, and looks/feels pretty much just like the fridge was always this color. If you stare at the glint of light reflecting off the fridge in the picture below you can see how the sort of lightly marbled texture of the fridge was maintained, and it’s glossy and convincing, just like a factory finished white fridge would be. I actually don’t think you could tell that it was painted unless someone told you. And I’m not just saying that. Picture me as the negative naysayer who had to see this to believe it.
We’ll keep you posted on how it holds up over time, but from what we’ve heard from you guys and read in reviews, it seems to be good for 5+ years and we’re hoping to get to Phase 2 a good deal faster than that. So it won’t be a big loss if it nicks or chips as we go, but it’ll still be interesting to see if this stuff is as good of a cheap and easy upgrade ($15!) as it seems so far.
Has anyone else had luck with appliance paint? We hear for a stove you need to use high heat paint, which seems to only come in spray form. Or has anyone done anything different or bold with theirs? We were contemplating painting the handles an accent color (like navy or ORB) but it just didn’t feel right for our goal, which was just to let this guy blend into his surroundings and draw attention to the better stuff like our succulent art, rope chandelier, and the rough wood dining table nearby.

Angela L says
Not to be a debbie downer, but on the last picture it looks like the bottom hinge wasn’t painted? Or still looks cream. Was that on purpose? Or maybe it’s the lighting? Or maybe I’m just crazy. Haha …. Do you think this would work on dishwashers?
YoungHouseLove says
Good eye! We thought the grill on the bottom (which I removed and put on that cardboard piece) would cover those small bottom hinges, but later realized they still show once it was reinstalled. Oops! Looks like there will be two little touch ups in our future.
xo
s
Bailey says
Amazing what this change can do for that corner of the room! Who knew you could paint appliances…
Sally says
We painted our old, second hand refrigerator BLACK! It actually matches the stove now, and the dishwasher. Like you, there aren’t that many choices of colors. It has stood the test of time very well – we painted it about 5 years ago. You’ll like it.
YoungHouseLove says
So glad to hear that!
xo
s
Cindy says
Great improvement! This is a great idea especially since (in our experience) older appliances work longer than what we buy today. My in-laws had the same refrigerator for over 40 years! We recently had to replace our seven-year-old glass top stainless steel stove. Whatever part in the oven that wasn’t working would have cost almost half what a new stove cost! Who knows what other parts were close to quitting on us? If something works and you can paint it to make it work with your decor, you save a lot of money and keep it out of the landfill.
Evie says
John, I’d love your input on this: Florida humidity has really worked against my fridge which is developing rust spots all over it (not just at the hinges and handles and corners, but on the flat parts as well). I’ve been planning to paint it, but I haven’t had the first clue about how to prep it. I mean, I sanded and primed the spots with exterior primer from Sherwin Williams, but the rust just erupted again in those same spots really fast. Uhm, maybe because I didn’t paint it fast enough with appliance paint? Or maybe even if I had painted it right away the rust would have pushed up the paint??? Or maybe I didn’t sand it “heavy duty” enough? I just used a block, not a palm sander… If I need a palm sander, which one should I buy or would that Dremel tool be better? OK, thanks for this post and for any ideas on how to solve my pox on the box problem!
YoungHouseLove says
Rustoleum makes a great rust blocking primer that you can apply (we used it on John’s Granny’s bathroom with some really rusted metal ductwork) so I would use that to prep those rust spots and then follow it with the paint and it will hopefully look great!
xo
s
Evie says
Wow, OK, that’s great! Thanks! I didn’t even think to look for such a thing as rust blocking primer! You guys made my day!
YoungHouseLove says
Good luck Evie!
xo
s
Arli says
It’s amazing how that upgrade took the fridge from noticeable to non-noticeable for 15 bucks. Huge difference; it looks great.
JessicaL says
This looks great! Good job with making it look amazing. Good to know this works. I actually am wanting to try out a “for-now fix” myself that is similar. Our counter top in our upstairs bathroom is the off-white colour similar to yours. It’s fine, except I have painted everything crisp white and grey tones that make it stand out in a bad way. I found this fix: http://www.brightgreendoor.com/2013/07/how-to-spray-paint-countertops.html which I can’t wait to try! I’m hoping it turns out as well as how your fridge did! :-)
YoungHouseLove says
Whoa! Tell us how it goes!
xo
s
Julia at Home on 129 Acres says
In our first house, the door ended up rusting. Not the hinges or anything. The actual surface of the door. I sanded off all of the loose flags and then slapped on a coat of white TremClad. It worked great and was surprisingly wipeable.
YoungHouseLove says
That’s awesome Julia!
xo
s
Jane Hill says
I love love love your style and the DIY endeavors in general. BUT, honestly, I have to hand it to you two. I wouldn’t do Phase 1 and 2 unless I were running a very profitable design blog where folks come visit for cheaper/pricier makeover options.
But I get the sense you two were doing Phase 1 and 2 looooong before this blog was even a twinkle in your eyes.
Doesn’t it feel like a LOT of wasted money and time? I know you’ve sort of addressed this but…not all that realistically. I go to Home Depot to grab supplies to paint a single room and no matter how you slice/dice it, you’re talking $300 – and that’s if you don’t change out furniture at all. It seems like such a complete waste of time, energy and money to do a Phase 1. Why not live with what’cha got until you can do the REAL renovation?
Again, if it’s blog related only, totally get it.
YoungHouseLove says
Oh yes, we’ve been on Team Phase 1 & Phase 2 since way before we even started blogging! And we actually did a pretty detailed post about why we don’t think it’s a waste of time and money right here. Hope it helps!
xo
s
rachael says
Holy mercy, how are you spending $300 to paint a room?!!?!?! 2 Gallons of paint from Ben Moore (in Canada) would be around $100.00, but I already own a roller cage but that is only like $10.00 and a pack of rollers is another $10. I wash all my rollers and reuse so still, paints only $100. Are you buying scaffolding? LOL
Lauren says
Can I suggest that you start doing a 3 part side-by-side before and after shot to conclude these posts? Like this:
Part 1 – True before
Part 2 – Painted trim, walls, etc.
Part 3 – Painted fridge
I’ve wanted something like this before…I think with the grout, maybe? I think it would show your progress in stages, and also highlight how 1 “small” change can really make a huge impact! Of course you would need pictures at the right angles, but I think it would be really neat!
YoungHouseLove says
That would be awesome! We’re working on a blog redesign (working is a somewhat laughable word since it has been over a year of slowly chipping away at it, haha!) to allow for wider pics, so I hope we can do that when we have more image area. Right now three photos side by side would be really tiny (almost like thumbnails) since we only have 500 pixel horizontal shots, but I love the idea when we have more room!
xo
s
Lauren says
A blog redesign on top of everything else?!?! You people are machines!
YoungHouseLove says
Not to worry, our pace is snail-like at best. Haha! We’ll get there someday… maybe…
xo
s
Jenna Sue says
Never knew this stuff existed — awesome. I wonder if it would be a good substitute for primer & paint on cabinets, or tricky surfaces like laminate Ikea furniture? Seems like it’s less prone to chipping over time? Maybe it could even be tinted?
YoungHouseLove says
I’m not sure how it would hold up on laminate. Anyone else try that? They make laminate counter paint now, so maybe that’s better?
xo
s
JennyExplainsItAll says
When my very elderly mother FINALLY agreed to give up her 45 year old copper tone (brown!) refrigerator (“but it works great!”) she wouldn’t get a nice white one. She had to special order all almond colored appliances. She felt it would look smaller (?) and less institutional than white. I suppose when I am 90 I’ll be “funny like that”, too. When she bought that house in 1969, the oven and stove-top were aqua (!) and we used appliance paint to “brown” them. Ah, trends…
Lesli DeVito says
Back when we were still trying to buy time with our Avocado oven, we were given many suggestions and the best was to take the doors to an auto body painting place..apparently handles high heat and looks amazing! AND the color possibilities are endless!!! xoox
YoungHouseLove says
Sounds like so much fun!
xo
s
Julie says
Rustoleum High Heat paint definitely comes in a regular can with paint you brush on. I used it on my 1990s fabulous brass fireplace trim!
YoungHouseLove says
Thanks for the tip Julie! Someone else said that so now I’m on the case! It wasn’t on amazon or in Home Depot so we’d love tips if anyone comes across it!
xo
s
Melissa@TheChicDream says
It’s crazy how a simple paint job can completely change a room. It looks great! I have been painting up a storm and I am still surprised by how different a space looks when the project is complete. Viva la paint!
Sarah @ 702 Park Project says
Wow! What a difference! It looks so much cleaner and really pops with your paint choice! Do yall have any experience with painting countertops? We are doing our kitchen reno in phases also and would love to cover up our ugly, stained laminate countertops. Any suggestions?
YoungHouseLove says
We haven’t done it but we hear good things about those countertop painting kits by Rustoleum at places like Home Depot and Lowe’s. Hope it helps!
xo
s
Ginger says
It looks awesome! I have used the same thing for my fridge, only in spray can form. I had a problem with rust under the water dispenser. It was completely gross looking and the rust was eating away the front of the fridge! So as a quick fix, I scrubbed the rust off as best as I could and sprayed appliance epoxy on. I’m hoping that it seals it as well from the water the drips there. It’s been about 5 months and so far, so good.
Mindy@FindingSilverLinings says
I didn’t even know this stuff existed! My husband is gonna kill me hahah! Does this paint come in Navy blue?
YoungHouseLove says
I wish! We only saw this particular kind in gloss white, but we hear they have almond and black too, you might need to hunt it down online though.
xo
s
Heather @ What Does She Do All Day? says
You can get High Heat paint in a can. At least in black. I used it on my fireplace and I’ve been contemplating trying it out on my stove. I want to wait until the weather warms up though I so can open the windows first. http://whatdoesshedoallday.com/bye-bye-brass/
YoungHouseLove says
Thanks for the tip!
xo
s
Carrborogirl says
Hi Heather! I’ve had great success with the Rutland brand spray paint (black) for my originally almond stove…I had it for almost 4 years before I replaced with a new (black) stove!
Ethne @ Wom Mom Blog says
This is something else. Not going to HD much, myself, I’m always amazed at the things they have!
Elisa says
We painted a fridge with chalk paint – but it was in the garage! And yeah, it created a mess but the paint itself held up well. Anywho, that fridge has since died and we’ve gotten a new garage fridge, not unlike yours (although I’m sure much older.) It’s looking wonderfully biscuit-y! Hah.
steff says
So what is your opinion of a black counter depth fridge mixed in with stainless appliances? Kitchen setup requires counter depth and dont want to buy new stainless. New house.
YoungHouseLove says
Hmm, anyone else want to weigh in on this? I think it would depend if you can work the black color in (maybe with some accessories like a sweet black tea kettle on the stove and some ORB hardware? It might be something you can just layer into the mix so it blends.
xo
s
Beth A. says
We have a black oven and stove top (solid surface)along with a stainless fridge and dishwasher. We have some other black accents in the room, and I think it all works together nicely.
Sheryl says
We have a black fridge, stainless dishwasher, and stainless+black microwave and stove. The stove is the glass top kind, so it’s all black on top and stainless with black handles and trim in front (as is the microwave over it). Because of those mixed finish appliances, I think the black fridge works well. We had to replace our fridge and went for black again, but in a glossy instead of the marbled, so now I think it matches the stovetop even better, and it cleans SO much more easily than my stainless dishwasher. Hopefully buyers feel the same on resale.
Karen says
Amazeballs! Can I just say, you guys never do anything half-a$$ed. The stuff you do for Phase 1 projects *look* like they are Phase 2 projects!! Your closet stenciled floor, this, etc. I think I’m just too lazy to put that much effort into something “temporary.” Are you guys perfectionists? :-)
YoungHouseLove says
You’re so sweet Karen! I think we have varying levels of success when it comes to Phase 1 updates (it really is all just trial and error over here) – but you never know how something will go until you try, so it’s nice to have those “learning moments” on Phase 1 rather than when the stakes (and budget) is much higher on Phase 2!
xo
s
Eric @ AddSomeCharacter says
I had no idea you could paint a fridge. Looks great! I see you thought about painting it with chalkboard paint, but what about dry-erase paint?
YoungHouseLove says
That’s a fun idea! Has anyone tried that?
xo
s
Katie says
Love this! Has anyone ever tried this with the range hood? We have a lovely bisque colored one that needs an upgrade.
YoungHouseLove says
Anyone tried it on a range hood? I think someone commented that they used the spray on a range hood. Should work I think, especially because it doesn’t heat up like an oven (which would call for high heat paint).
xo
s
Elizabeth says
I have so many problems with different whites in our house. It seems our white trim doesn’t match the white in our appliances or the white trim on our new windows. I also noticed the white towels I just bought don’t match the white bead board in the bathroom. With so many white paints out there- how do you pick? I always buy Benjamin Moore paint…why can’t there be a standard “go with everything” white?
YoungHouseLove says
I know what you mean! John notices slight variations in color even more than I do, and it bugs him to no end. I think I have just decided “it’s layered” and tried to embrace that things “go but don’t match” – so as long as they don’t clash (ex: a super blue-white and a super warm white) I’m cool with a few different shades of white. The frame collage in our hallway was good therapy for that (we had a bunch of different tones of white and I feared they’d look crazy, but they all worked together nicely).
xo
s
Melissa says
Looks great! We actually used that same exact stuff on our dated tub-surround!! We figured it needed to be changed badly so if it didn’t work, we’d just replace it. 4years later, it’s holding up as good as the day we applied it and you can’t even tell it was painted over!! Best decision ever! ;)
YoungHouseLove says
No way! Good to know that it works on that too!
xo
s
Penny says
Your fridge looks great! I don’t know if this has been mentioned as I don’t want to read through 239 comment, and I don’t know if it’s just my monitor, but in the after picture it looks like the two hinges at the bottom are still almond?
I’m not criticizing this, as I think it looks amazing, but I was just curious if they look like that in real life?
YoungHouseLove says
Yup, those are still almond! D’oh! When I removed the grill along the bottom of the fridge John thought those would be covered by that so he didn’t paint them. Then we snapped it back on and realized they show. Looks like we’ll be doing a tiny touch up on those!
xo
s
Karen says
Looks great! But (and we learned this in our last house when replacing our fridge), you can always open the doors fully out to the side to make them fit through spaces where the handles might make the fit too tight/impossible. You just open the door, get the fridge part way through the opening by going a bit at an angle, close that door, open the other, angle a bit more, and you are through. You know, instead of removing handles (or the door). Just in case you need that knowledge when you sell this one.
YoungHouseLove says
Really smart! Thanks so much for the tip Karen!
xo
s
Olivia says
Ardex can be bought online. I didn’t have a vendor local to me, so I searched online. You can actually purchase it from Amazon, through different vendors. Just a tip! I just refinished our counter tops using this method and it came out great– highly recommended.
YoungHouseLove says
Thanks Olivia!
xo
s
Stephanie says
I have to tell you guys, I absolutely LOVE the fact that you don’t have affiliate links and reviews on freebies all the time on your site (in fact, I can’t remember ever seeing any). It just feels like you guys are so real and I know I can trust a recommendation coming from you as your actual, true feelings and not something you’re saying to get some free stuff! Unfortunately, I’ve stopped reading a couple of blogs because they suddenly became inundated with links and sponsored reviews, etc. It was driving me a little nuts.
This is just one of the many reasons you guys are awesome and will be around for a very, very long time! I love, love, love your site and can’t wait for book (and baby!!) #2!!!!
Julie Joy says
Wow! That is awesome! Looks great! I’ve never heard of such thing but that’s great to know!
Kristin Royalty says
It’s really inspiring to see fridge painting done right! My own experience was not nearly as clean and smooth looking. Last year when I bought my house it came with all matching chocolate brown appliances. I won’t have an appliance budget for a few more years so I just thought I would paint the fridge and the oven door white and update them a little bit. It was rainy and relatively cold outside and I live alone with no family nearby so I decided instead of lugging the thing outside that I would just build a plastic tent around it to protect everything. I also didn’t think to remove the handles or anything and instead just taped around them. Those were probably my first and second mistakes. My third, and biggest mistake was using the appliance epoxy spray paint instead of the roll-on kind. I (foolishly) thought this might be better at not getting brush marks. I did wear a mask and goggles but if you can just imagine me in a plastic tent that is filled with an epoxy cloud you can imagine that the paint ended up everywhere. When it settled on the floor it was extremely sticky and I had to take a step, peel off the plastic from the following foot, take another step and repeat. It was a nightmare…but it continues on from that. I (again foolishly) didn’t bother to rough up the doors before painting and was probably a little too eager to get multiple coats of paint on and there were a couple little tiny drips when I came back the next day to check on the thing. I sanded those little drops down and then started to spray over them and something weird happened. The paint bubbled in those spots and started to mimick crackle paint. Now I just put papers/magnets over those spots. LOL. When I “finished” with the fridge and pushed it back into place, there was a huge white square on the floor where the fridge had been sitting (not on plastic) and the where the paint overspray had settled.
The oven is another story in itself. When I was prepping the oven door, I taped off the opening so that the spray didn’t go inside the oven but in hindsight, I should have removed the oven door all together. I also taped the sides of the door thinking this would be good enough to keep paint from getting on the inside of the door…can you see where this is going yet? Anyway, the same thing happened with the paint on the outside where there was one small drip and I sanded it and painted it again and it bubbled and crackled. The real trouble came the first time I fired up the oven and almost burned my house down. The overspray had of course settled onto the inside of the oven door and when I turned it on it started to burn and smoke like you wouldn’t believe. After consulting with other DIYers that I work with when I thought I was going to have to live without an oven, we decided on trying Acetone to remove the overspray on the inside. It worked like a charm and I have never seen a cleaner oven on the inside. I just let it air out really good and also gave it a wipe down with pure water after the Acetone cleaning before using the oven again.
The floor is still ruined despite trying to use Acetone on the big white paint square which is why I have been considering alternatives like crumpled paper flooring, cork or even an pil based paint right over the linoleum til I can do something better.
Keep up the inspiring work and THANK YOU for doing things the correct way! OH, also, can’t wait to see how the countertops come out cause the Ardex Feather Finish was something I had read about a while ago and was considering for my countertops in my Phase 1 projects.
YoungHouseLove says
Oh man, that sounds like such an ordeal Kristin! Thanks for sharing what went wrong to save us (and others) from those mistakes! I love the idea of removing the oven door completely and using a roll on/brush on paint so it doesn’t get in the oven at all. I could almost smell something burning as I read your comment. That’s the worst!
xo
s
Beth A. says
I had a friend in college who painted her apartment fridge a a lilac sort of color. I remember thinking it was the coolest thing — it was an older retro, 50s looking model.
Since then, I’ve always wanted to have the nerve to paint my refrigerator a bold, fun color. Maybe some day….
YoungHouseLove says
That sounds awesome!
xo
s
Carrborogirl says
Hi guys, this looks very nice!
When I bought my condo in NC, I inherited the 80s era almond fridge, dishwasher and stove. The fridge and dishwasher promptly broke down a year or two later. We serendipitously found floor samples of each in black, however, our almond-colored stove refused to break down! It wasn’t an eyesore to us, but it did look quite out of place in our multi-colored appliance kitchen! So, we bought some high-heat appliance paint (Rutland brand) and spray painted that bad boy. People thought we were crazy…but you know, you couldn’t tell it didn’t start out being black. I still felt a bit squirmy having that paint on the cook-top so I bought some black silicone matting online (500F resistant), cut out holes for the burners, and laid it across. It was very easy to keep clean and hygienic. We kept that stove for ~4 years and then, replaced it with black stove found on Craigslist. We donated the stove to an area person who preps homes for low-income families.
YoungHouseLove says
Such a smart solution!
xo
s
DKL says
I am filing this for the future. So glad you all test drove it. My fridge and dishwasher are starting to yellow with age and I won’t be able to move it. Nice to know there is a brush on option (with all the doors and windows open of course. I am one of the dusty chalk haters (shudder). Clean white is never wrong in a kitchen (or bathroom).
Lulu Chin says
OK don’t hate me. The refrigerator looks great. It blends in much better with the kitchen. But now the bottom door hinges in all their almondy goodness are staring at me. I don’t really care, of course. I would still like you if you never changed them. I’m sorry for the insanity.
YoungHouseLove says
So funny – good eye! John didn’t paint those because since I took off that bottom grill he thought they’d somehow be covered and then realized when we snapped it back on that they showed. So it looks like we’re going to have to touch those up!
xo
s
Andrea Enright says
Love the title of this post! Can’t get over it!
Josh says
Looks so much better after the work
Amanda @ All Day Activewear says
Oh my gosh — that looks amazing! Your kitchen is beautifully bright. I can’t believe what a difference the white fridge makes — looking awesome!! :)
betty says
ahh the old fridge on the front porch. haha I had to do that when we were getting our floors refinished, since the whole downstairs was getting refinished, including the kitchen. the fridge was on the front porch for a week. it was also the first week we got those 5 degree freezing temps and the water filter exploded from being frozen, so that was fun.
such a small change makes such a big difference! I am so jealous of how light and bright your kitchen it!
Johanna says
Just an FYI…. Not sure if you guys are ok with this or not, but Clara’s one year pic is featured on this website… Right side bar…. http://www.chiccheapnursery.com
YoungHouseLove says
Thanks for the tip Johanna!
xo
s
Annie says
I remember when I bought a new fridge I was PANICKING because it was about an inch too wide to go through the kitchen door. I stressed out for nothing because the delivery guys just opened the fridge door and angled the L shape in. And that’s why they’re the pros.
YoungHouseLove says
So smart!
xo
s
Tracey Bradshaw says
Woohoo – earlier posts means an earlier night for me :-D
The fridge looks fantastic and has really put a finishing touch on the room – fridges and laundry appliances are not sold with homes here – have never really thought about how I’d feel using someone’s old fridge, but I guess we do it with dishwashers and ovens!
Rachael Seda says
I’ve never used appliance paint…honestly I never even knew it existed. The fridge looks great! Eager to learn how it works out for you all and glad to see all is well (minus the crazy weather!!)
katalina says
you make everything look easy but hauling a frig outside would make alot of people not do it… or maybe just me!
along the same lines–vent hood… do you need an electrician to disconnect it you wanted to paint it ? has anyone had luck with painting theirs or covering it with cool metal or another material?
YoungHouseLove says
I would think you can just tape off your cabinets around your vent hood and hopefully paint that in place. Or you could disconnect the wires, but it might be more complicated (I’d just turn off the power and try to disconnect it myself – and check if yours just plugs into the cabinet above it, because sometimes that’s the case too, which is super easy).
xo
s
Mary says
Hi guys, This is something I’ve always wondered about….painting appliances.
Do you know if your paint can be tinted? I would love to paint my fridge a fun color.
YoungHouseLove says
It didn’t appear that this type could be tinted, but perhaps some other types can? I’d try to go on the Rustoleum website or amazon.com to see if anything is tintable.
xo
s
Leah says
It looks great. I want to do this to our fridge. How do you think this paint would go over a rusty small scratch in the door?
YoungHouseLove says
For any rust I’d grab Rustoleum rust-blocking primer and apply that before this paint, otherwise the rust could bleed right through.
xo
s
RTBoyce says
Hi, great “new” fridge! – a few questions:
How much of the can did you use for those two coats?
How did you handle the paint where it meets the door seal? did you lift up the rubbery seal and paint underneath or just paint right up to it?
Thanks for such a cheerful, detailed, and inspiring blog!
YoungHouseLove says
I used about 2/3 of the can for those two coats on the fridge, so there’s probably enough left to do a smaller appliance (like a dishwasher) but not enough to do a second fridge. And as for the rubber seals, for some reason those were white to begin with, so I didn’t need to paint them at all.
-John
Laura says
Did you all have to paint the rubber deals on your doors? I have an almond colored fridge and want to paint it white, but the seals on my fridge are gray. It might not look too bad, but thought I’d see what you all did. Thanks!
YoungHouseLove says
Our rubber seals were white, even though the fridge was almond, so I didn’t have to paint those – but I think they’d probably take the paint ok if you applied it really thinly and let it all cure completely before closing the doors again. I’d empty the fridge and leave the doors open when you paint them so they thoroughly dry and take your time to do it really thinly so it doesn’t get tacky or gummed up.
-John