Originally Published: April 21, 2011. Updated 2019.
We wanted a weathered, rustic wood look to the top of the DIY console storage table we built, but we couldn’t just make old, reclaimed barn wood or aged shipping pallets appear out of thin air. Instead, we had to find ways to turn new store-bought whitewood from Home Depot into something that looked like it had a story to tell. So here are the easy steps we took to turn that pristine wood into the old-looking, distressed tabletop we imagined. We’ve even got a video of our process in action!

Making this new wood look old wasn’t just easy to do, it was actually kind of fun. The final look was achieved with a one-two punch of:
- A variety of distressing techniques
- Applying wood stain strategic
And spoiler, there’s almost some literal punching involved. Although it just involved some objects we had around the house, not our actual fists. Phew! So let’s get started:
Step 1: Purchase New Wood With Imperfections
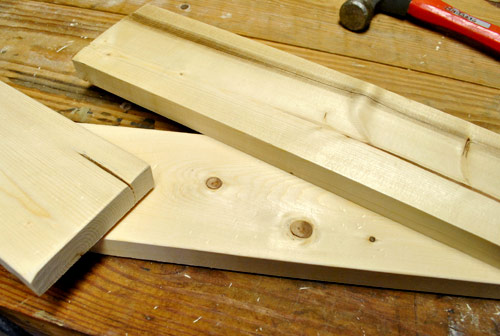
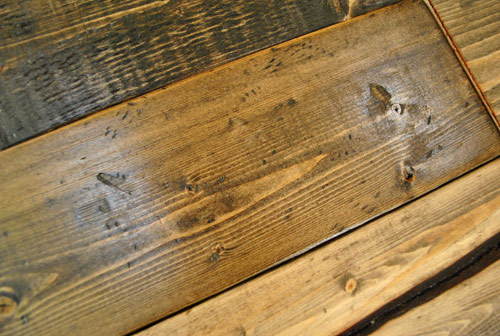
Our project called for 1×4″ boards and we purchased the cheap whitewood from Home Depot. Not only is it affordable, but it’s hardly pristine to start with. So I tried to pick out boards that already had flaws or interesting texture details like knots, chips, dark stripes, etc.
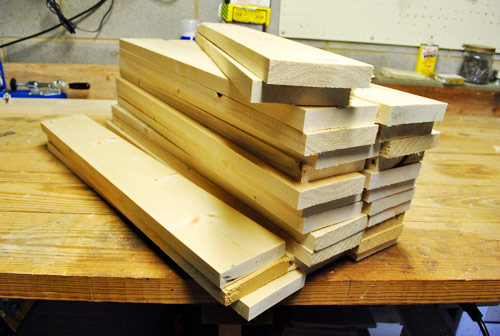
Step 2: Make Your Cuts
Before distressing our wood, we cut each 8ft board into 2ft lengths, since we wanted sort of a “patchwork” look to the top of our console. It’s best to cut your wood to length ahead of time, if possible, so that you can distress all sides of it at one time. Otherwise you may expose your new wood (literally) when you make your cuts, and have to repeat some of these steps.
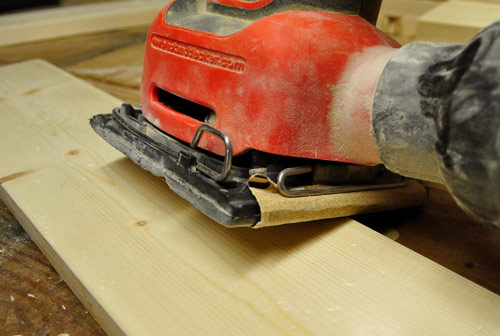
Step 3: Sand The Edges
The sharp corners and crisp edges of the store-bought wood was a dead giveaway that it was new. So before I got to beat up any of the boards, my first step was sanding the four edges on the top of each board using my palm sander. This wore down the crisp edge into a rounder and smoother one, so they looked older right off the bat.
Knowing that I had some extras, I tried a bunch of things on a spare plank before really landing on a process (well, “process” is too strong of a word in this case, since it was pretty much a random exercise in let’s-see-what-happens).
Step 4: Start Beating Up Your Boards
I tried a handful-ish of techniques to create that aged wood texture and then used them sporadically throughout my pile. That way I’d end up with a mix of weathered looks, almost as if the boards had been scavenged from a few different sources after lots of character-creating trials and tribulations. So I’m going to show you all the different things we tried, but keep in mind that you don’t have to do EACH technique on EVERY board.
Oh and if you’re someone who likes all the details, I managed to capture a lot of my weathering “process” on video (so watch this if you want the “bonus stuff” that’s not all outlined below):
Note: You can also watch this video on YouTube.
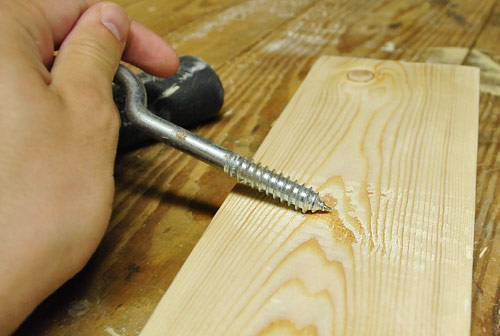
Trick #1: Smack It With A Bag of Screws
The first thing we tried was smacking each board with a Ziploc bag full of coarse screws. I actually did this to each piece and ,besides sanding, it’s the only thing I did on all of them. It gave each board some very subtle dings or divots (see below) and it was also kinda cathartic, if I’m being totally honest. Oh and I’ve heard that some people do this with metal chains, which sounds equally fun.
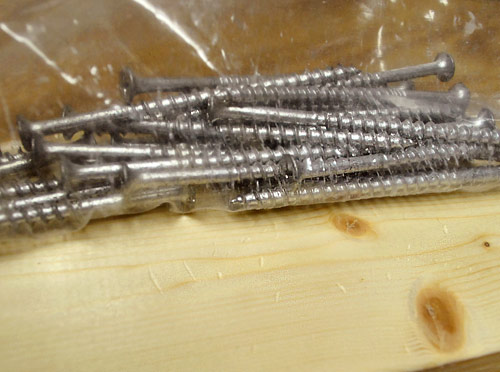
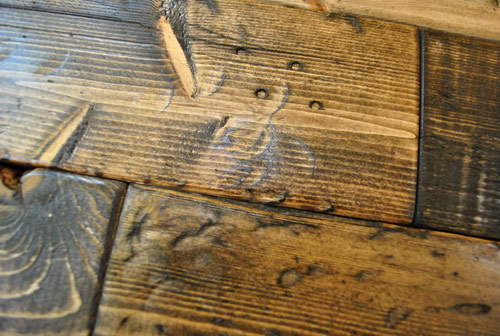
Because I know it’s a bit tough to see the dings above, you can see them a bit more clearly on the final stained board below. Since stain catches and collects in all of these dents and dings, it tends to accentuate them – which is a good thing, in this case. This is the damage inflickted by the bag of screws.
Trick #2: Hit ‘Em With A Hammer
On some boards, I also hit them with my hammer. Whitewood or pine is relatively soft, so it’s easy to leave some dents with just a few light bangs. I liked to concentrate my hits in one spot because it looked more organic than having a few evenly spaced out hammerhead impressions. I was all about the cluster.

Once stained, they looked a little something like this:
Trick #3: Break Out Your Nail Punch
In the shot above you can also see some of the “fake nail holes” that I made using an improvised nail punch (check out the video for more clarification on that method, which I couldn’t photograph since it took two hands). It almost looks like a spot that an actual nail was hit through the board, without actually having to embed nails in your wood.
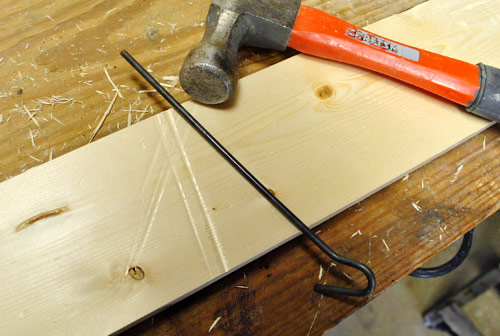
Trick #4: Make Long Impressions
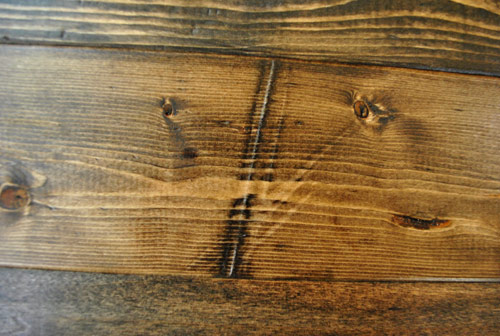
I also used the same tool to make some line impressions across the boards. I just laid it down and hammered on top of it to create a nice long ridge. You could do the same with any long, thin object that can withstand the impact of your hammer (a long nail laid on its side would work great). I though it created the effect that some hard edge had bumped into it over the years.
I especially loved this effect once it was stained because it was so distinct. Why hello character, nice to meet you.
Trick #5: Scrape & Scratch It Up
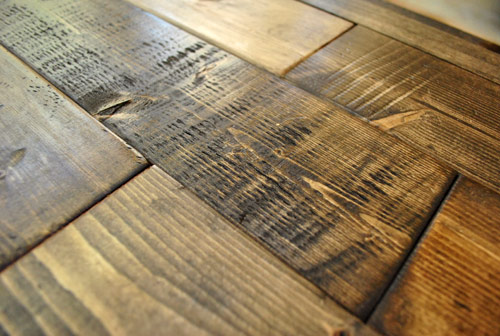
Using a big screw that I found in the basement, I dragged the thread across the board which roughed up the wood grain. After sanding it down again it really started to look like the wood was slightly rotted, just like some of the spots on the pallets that we couldn’t use (more on that here).
On a couple of boards I did this all the way up and down the length of the board, giving them a really cool and distinct look. Definitely far from the store-bought feel that they started with:
If you watched the video, you can also catch a couple of techniques that I forgot to photograph: namely dragging a paint can opener to make long smooth scrapes down the length of the board (another effect that I really liked after stain was applied) and making those nail punch holes that I mentioned earlier.
Step 5: Give It One Last, Light Sand
I’ll be the first to admit that I probably overdid it when it came to trying so many different tricks – not to the detriment of the final result, just my own time. But since this kind of thing is my idea of fun, I’d do it all over again in a heartbeat. And after I had taken out all of my aggression worked my new-to-old magic and had given everything one last light sanding (to ensure a smooth and not splintery finish), it was time for Sherry to take over for the staining portion of The Console Table Show.
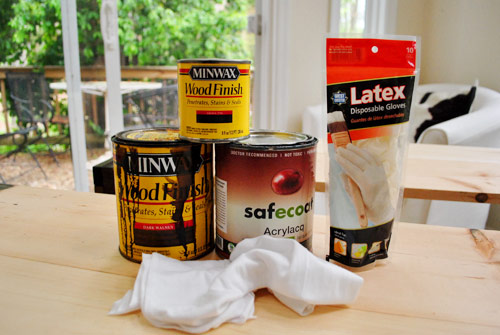
Step 6: Gather Your Staining Materials
Get yourself set-up to stain your boards and gather your materials. Here’s what we used:
- Rubber gloves (because wood stain is messy)
- A cheap $1 paintbrush or two like these (because stain is messy and tends to ruin good brushes)
- Spare rags to wipe up excess stain (because stain is… well, you know).
- Your stain, we tag-teamed the boards with two different stain colors – Ebony by Minwax, and Dark Walnut by Minwax (which we already had from staining the bottom of the console).
- Your sealer. Our favorite water-based non-toxic poly alternative, Safecoat Acrylacq, but you can also use polyurethane from your local hardware store.Just be sure to use something with a low sheen (matte is best) because anything glossy will make your wood look new again.
We made a video of this process too, in case you’d prefer to save yourself all of this pesky reading (and want all the deets instead of just the highlights). Plus Sherry’s gloves make a fart sound, which is always a crowd pleaser.
But if you can’t watch the video (or you prefer words to moving images), here’s a quick rundown.
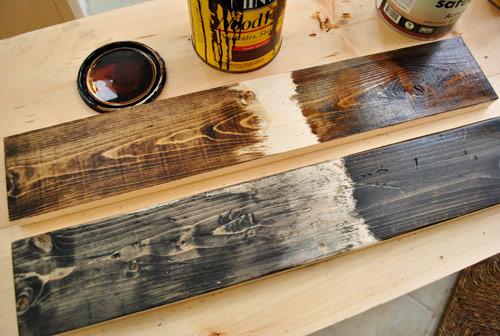
Step 7: Test Your Stain Colors
Keeping in mind that we wanted a fair amount of variation from board to board, Sherry did a few tests first to see what each of the stains looked like with a light coat of stain (wiped off quickly) and a heavy coat (which was allowed to penetrate for a bit longer). Here are the test boards with the light coats on the left and the heavy coats still soaking in on the right:
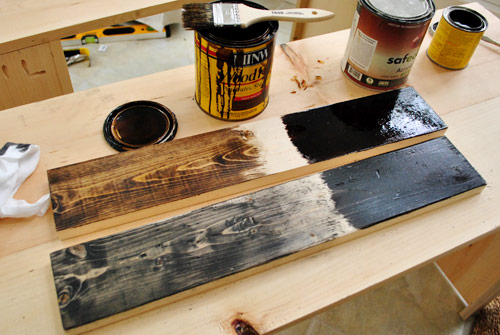
We actually ended up liking both stain colors. We thought the Dark Walnut would help it relate to the bottom of the console (as well as some of the other dark woods in the room) while the Ebony would be a closer match the the gray pallet boards that originally inspired us. In reality, on a lot of the boards Sherry actually ended up using a layer of each color to achieve a tone somewhere in the middle so nothing looked too jarring.
Step 8: Get Creative With Your Wood Stain
The only thing we didn’t like was that we wanted to get some boards even lighter than the stain seen on the above left (which was applied thinly and then wiped away immediately). So Sherry pulled some weird technique out of her you-know-what and it ended up working perfectly. Basically, she pre-washed the board with a light coat of plain water, let it soak in for a couple of seconds, and then went over the still-damp board with a light coat of stain (that way it soaked up less color thanks to the water that it absorbed first). For those who’d like more info, you can see this entire technique in action on the staining video.
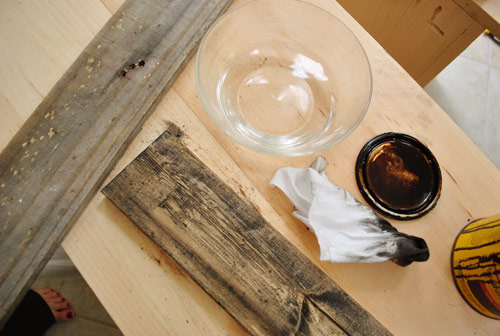
It was by far the closest that we got to replicating the look of the pallets (you can see a random pallet board on the left in the picture above for reference). But we’re glad that it wasn’t a perfect match, because we realized that the pallets were too blue-gray for our living room (since it’s already dominated by a huge gray sectional with gray walls and gray beams we wanted to add some warmth and balance). So we were thrilled with the colors and the variations that we landed on, thanks to staining some and allowing the stain to penetrate a while, wiping it down right away on other boards, and using the water technique above to get some lighter variations. In the end, those brandspankinnew boards were all looking nice and rustic.
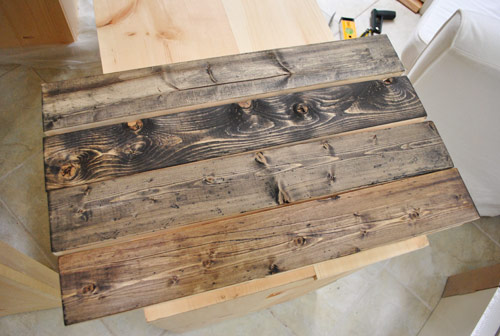
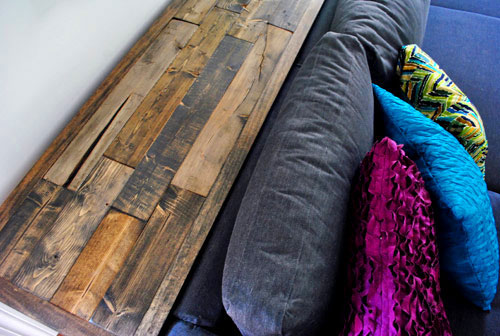
Step 9: Seal & Enjoy Your Finished Product
You can see how our finished project turned out in this post (which includes yet another video!). It also includes details about how we assembled the 2ft sections into a long tabletop.
*This post contains affiliate links*
Update – Wanna know where we got something in our house or what paint colors we used? Just click on this button:


Tracy says
Wow, thanks for the tutorial. I think that distressing wood can sometimes look contrived, but this turned out very realistic. I’m intrigued by the fact that the water made the stain not soak in as much. When my husband and I refinished our hardwood floors last year we used this technique to make the stain soak in more. It’s called water-popping, and helped us achieve the nice espresso color we were going for. Maybe it’s because when you water-pop boards, you have to let them dry before applying stain? It’s definitely not for the faint of heart though, as it raises the grain, and makes you think that all the hard work you’d put into sanding the floor for weeks was ruined. (Luckily it’s not – they turned out beautiful) Anyway, enough rambling. Great job, love the console.
YoungHouseLove says
No way that’s so interesting! I bet you’re right about it having to do with letting it dry since I went right over it with stain and then wiped it off again for a stripped and bare look.
xo,
s
Jennifer says
It looks great!
Thiara says
OMG this is amazing handy-ness! I love this blog, you guys are so sweet, where have I been?
Sarah says
Very cool! Thank you for sharing how you did this, it looks so awesome! I would love to try something like this to make a farmhouse kind of table. They can be so expensive so it’d be nice to get the look without the price! :)
Kate says
Hey guys!
Found this and instantly thought of you both: http://www.stumbleupon.com/su/2XCTCJ/artvarsity.com/35-inspiring-color-palettes-from-master-painters
Enjoy!
YoungHouseLove says
Love it! My favorite palette by far is the Sunday Afternoon on the Island of La Grande Jatte one!
xo,
s
Nancy says
I wish I could figure out how to put my neurotic, long-toenailed dog to use for everyone because my hardwood floor looks quite “distressed” with no effort!
Amanda says
Agreed. Soo agreed.
bailey says
You have NO idea how much I appreciate the fact that you recognize that people are sneakily trying to read your blog while at work!! Yours is one of my favorite blogs ever!
Amanda says
Bahaha “well hello character, nice to meet you”. For some reason that cracked me up.
Love the screws dragged across the board! Looks awesome!
kitliz @ DIYdiva says
I know not everybody has a barn full of vintage tools handy (I swear it’s one of the reasons I moved to the country.) But I found an old spoke shave and it works beautifully for making brand new 2-bys look like hand-hewn beams.
If anyone is interested in what the heck a spoke shave is or how I used it, here’s a link to my rustic window trim.
julie says
Oh you guys I LOVE when you post videos! Both of you are awesome on camera, watching John was seriously like watching hgtv. I am all for more videos! Although I have no idea what kinda time and effort goes into editing them.
Melissa says
“for flair.” haha
Bethany says
Making new wood look old really worked out well for you guys. What ever happened to making your old rocking chair look new again? I’ve been waiting for an update!
YoungHouseLove says
That. Chair. Might. Kill. Me.
Details when I actually get somewhere with it. Promise!
xo,
s
connie says
these look so great! we just bought some unfinished cheap wood dressers from Ikea that we’re about to stain. But now I think we’ll try some of your aging [and banging and bruising] techniques as well. and thanks for the videos! they really helped.
Lori says
This was an awesome post. Enough detail that I really think that I could do this! I’ve been dreaming about doing my dining room ceiling in distressed lumber for a while now…time to make a plan! Thanks so much.
Krystal says
Whenever wood is cut and whittled for the large chain stores (Lowes, Menards, Home Depot), all the rejects end up in this big warehouse near my parents home. The warehouse is kind of a wonderland for DIYers because you can pick up anything for 50 cents to a dollar: solid oak trim and baseboard, crown molding, trim blocks, spindles, etc. I remember digging through the wood as a little girl and searching for pieces with knots and defects (as long as they were straight and not warped). I never understood why my parents wanted defective wood, but my dad would always grin stupidly after hanging trim and say, “Why hello character, nice to meet you.” I nearly spit out my breakfast when I read that line in your post. It brought back so many memories of remodeling rooms with my parents.
YoungHouseLove says
Hahahaha, that’s hilarious. And that reject wood warehouse sounds like our idea of a good time!
xo,
s
Elisabeth says
I’m so impressed by your console table project–way to go! It looks so professional, and I’m bookmarking the aging wood DIY for later projects. My husband just completed a huge DIY bookshelf project to give one of our rooms the look of having builtins. I think you might be kindred spirits:). Here’s the post on them: http://www.mygrowinghome.com/2011/04/big-bookshelf-project.html. Thanks for the constant inspiration, John and Sherry!
YoungHouseLove says
Oh my gosh. THOSE ARE AMAZING! I’m drooling. Off to add your blog to my reader!!
xo,
s
Sarah says
A) Let me just say WOW! The console table is beautiful. Definitely one of your most impressive projects.
B) This post couldn’t be more timely! I just discovered this beautiful diy bench-now I can “fake” reclaimed wood! http://remodelista.com/posts/steal-this-look-diy-entryway-with-hairpin-leg-bench
Shea says
I love the console table, and the hidden nook in the middle! What a great idea! I really don’t care for the stain, although that’s just a matter of personal preference on my part. I think the two of you are a great team, and this was truly a job well done!
Mellissa says
Your console looks fantastic! Loved reading about the different techniques. We stained our headboard and dresser by using steel wool soaked overnight in Apple Cider Vinegar. It gave the wood a nice, gray barnwood sort of look.
fd says
John would make a great teacher!
Oh, and the console looks great too. :-)
Layla says
Man, a few horizontal boards, distressed and stained like that, would make the prettiest, cheapest, coolest headboard ever! Might have to attempt that!
And the console looks amazing, by the way. So solid and rustic. Not at all like you just built it. Crazy!
Kristina says
Hi. Love your blog. Just wanted to offer some clarification in case any one was confused by the term “white wood”. There is actually no such thing. It is white pine. Why is it sometimes labeled white wood?… I found this explanation:
“When I asked the same thing of a guy working in the local Big Orange Store, he said it was White Pine, Their computer won’t accept “White Pine Wood” so they just call it “White Wood” so the bean counters can tell it is wood. They call the Red Oak “Oak Wood” and Maple is “Maple Wood” so his explanation may make some sense.”
source: http://www.sawmillcreek.org/showthread.php?3886-White-Wood
YoungHouseLove says
That’s so funny! Someone else dropped in to say that whitewood is a sustainable and affordable type of wood like pine (on an earlier post). I guess either way it did the trick! Haha.
xo,
s
Ted says
What I was told years ago is that “white wood” is some generic wood that varies from region to region. Also, the same HD may get pine most of the time, but sometimes get spruce or aspen other times and rather than having to keep changing the shelf labels and computers and bar codes, etc, they just label it “white wood” so that it always sells for the same price regardless of what shipment comes in. It’s what they use for generic low cost wood product.
1916home.net says
Dont you just LOVE when you watch a video that condenses 5 hours of work into 5 minutes? :) :) :)
GREAT tips and tutorial!
Rebekah says
The console is so beautiful – I love the dark wood (and the hidden compartment)! Though in a few months that job of making new wood old could easily be taken over by your daughter. I never knew how many “worm holes” could form in one table with a 20 month old and her trusty fork. I blogged about it myself following a table revival at the lettered cottage. Now that we are a few months shy of her 3rd birthday, things have gotten a little better. And I convinced my husband we needed a newer table with a hard wood. Before we sell the old one on craig’s list I need to take pics of her handywork! Cheers, Rebekah
Post included: http://ourfamilytreeblog.com/?p=264
YoungHouseLove says
That’s too funny! We might have to institute a no forks in the living room rule to protect our console baby. Haha.
xo,
s
Katie Truelove says
Super impressive!!!! I love the resources you guys provide– bookmarking this for the day I have space to take on this sort of project!
karen says
Sherry!!! No shoes!! Wouldn’t want to hear of you having a chunk of wood fall on your nice manicure!! ;)
YoungHouseLove says
Haha, yes our shoeless lifestyle strikes again. Staining wasn’t too heavy duty (no toe damage ensued) and I didn’t want to get stain on my shoes. Haha.
xo,
s
Bethany says
You wood turned out lovely!
We’ve also had success using a meat tenderizing mallet – the kind with the little points. You have to go for the cluster effect with it, too, but it looks really nice.
I also saw a barnwood table once where the furniture maker had drilled out a few spots in the top and embedded colorful old antique marbles. It was a really neat effect.
YoungHouseLove says
Ooh that sounds like so much fun. We’ll definitely have to try that next time.
xo,
s
Donna Huebsch says
Great post – opted for the words instead of the videos, since we’re traveling and our Internet connection makes watching videos excruciating :o)
Excellent results on aging your wood – really liked all the photos!
cathy says
appreciate the play-by-play for all of us at work trying to keep it on the DL! great results! I’m already badgering my hubby into making something similar!
Matt @ Mango Furniture says
Grr, I’ve read two posts about furniture and I’m already hooked on your blog! This tutorial is simply amazing and will swiftly be put to good use on an Ikea kitchen trolley I’m using as a basin stand in my new bathroom. I think I love you guys!
Our Creative Hands says
I love your video first time I did this I was petrified, pun on words, but it seemed fun. Then I decided to see what would happened after I painted my wood even more fun. I did some sanding with either light or heavy grit sand paper depending on the look I wanted. Then I stained it gave the projects a wonderful look. Sometimes I just stained and not varnish because the stain helps perserve the look other times I spray with matte varnish…Its hard now just to paint a fresh coat of paint on wood without messing it up LOL…Sincerely Rachel
http://www.ourcreativehands.com
pearl @ dashing diva says
I’m SO happy to have found this tutorial as it’ll be great for a DIY project I have in mind! I bought some old chess seats at the markets and I’m using them to make a coat hanger but couldn’t figure out how to make my new wood pieces look “old”….so I’ve struck GOLD here! Thank you!
James says
Hi, love the look! Did you varnish the wood after it was stained or does the stain have its own glossy look?
YoungHouseLove says
I used the SafeCoat sealant that’s pictured in this write up! Love it. Hope it helps!
xo,
s
Charmaine says
Me & my man just used this post/tutorial to make the wood for a desk he’s building look old. Litterally we read the post & watched the video right before going out & buying the minwax stain & other materials.
The plan is to make the drawers out of old Coke crates, but buying the real thing would’ve ended up being way too expensive so I suggested this technique after seeing how great your table turned looked. Thanks!
YoungHouseLove says
Wahoo! Good luck and feel free to post pics on our Facebook wall when you’re all done!
xo,
s
Kate says
My husband and I used your staining technique on a desk project and I am so pleased (surprised/impressed)! What started off as vaccuming the couch turned into a trip to HD for a wall bracket ended up beiing the construction of a distressed l-shaped desk. Pictures to follow soon!
YoungHouseLove says
We’d love to see it! Maybe you can share pics on our Facebook page so everyone can check it out?
xo,
s
Haley says
Hey Sherry,
I used your staining technique for a coffee table made from wooden pallets. I linked up to this post so my friends and family could see how y’all did it. Mine ended up being a lot darker than I intended, and I might have to do something about that… later.
Thanks for sharing! I always enjoy you guys.
Haley
YoungHouseLove says
GORGEOUS! I love it. And your pasty legs!
xo,
s
LeeLee says
This is insanely cool! We’re in the process of buying our first home, and your site has made me itch to get in there and start renovating and DIYing!
Ginger says
Going to try this on a cradle I had made for my great nephew his dad is cowboy thru and thru. I made the walls in his nursery look like they are leather. Thanks for the help.
Erin says
This is really helpful, I’m a student looking for a cheap and easy way to age some wood and this certainly was the answer i was looking for :) Thanks so much.
You guys are such a charming couple by the way. :)
vickie says
Just curious… What type of surface did you apply your flooring to? and what did you use to secure it down?
YoungHouseLove says
It wasn’t wood flooring- it was for a console table. Hope it helps!
xo,
s
Serge Young says
Nice informative article. Have you ever tried using aniline dyes they are a bit prices but you can get some nice dark colors.
YoungHouseLove says
I’ve never tried them, but they sound cool!
xo,
s
Jade says
I recently distressed some wood for an old chalkboard frame and used a torch and burned in some areas as well as used a dremel tool with a wire brush type tip to wear in some grooves. Just a couple more ideas. :) But love all the ones you had here.
YoungHouseLove says
Love that! Sounds like fun!
xo,
s
Stephen says
Really great video!
At the top of your article you mentioned that you “tag teamed” some pieces of wood with both stain colours.
My question is what method did you use for that?
Did you use spread the lighter stain on the wood using the water method; let it dry and then apply the darker stain without water and then rub down with a rag? or
use some other method.
Thanks
Stephen
YoungHouseLove says
It was all done at once so there wasn’t waiting for things to dry, I just sort of dunked my brush in one and swished it around and then rinsed it in water, spread some water on other spots and then brushed on the other stain on those water spots and sort of feathered it all into each other. Then we wiped it all down with a rag. Hope it helps!
xo,
s
Cori says
Love this!! Have you ever tried the vinegar and steel wool technique? We’re trying to make an old gray wood chair rail from new cheap home depot wood for my sons nursery. Just trying to decide if that wood will work…thoughts? What wood did you guys use?
YoungHouseLove says
Oh yes, I’m sure that’ll work! We haven’t tried it personally, but we’ve seen that technique done by other folks and it’s awesome (we hear it’s very very stinky- haha)! Good luck with everything!
xo,
s
Melissa says
Hey there! I just bought some awesome legs for a desk…but need to find/make the desk part! Any suggestions for where I can get a slab of wood in the DC (even Richmond) area? Thinking of staining like you’ve done above!
YoungHouseLove says
I’d check thrift stores or places like the Habitat For Humanity ReStore. Good luck!
xo,
s
sarah says
LOVE THIS — thank you so much! gonna try out many of these tomorrow!
Danni Borchmann says
Thanks for great inspiration. :) You have some very good ideas, and solutions. I have just begun my new “old” wood long table project, testing out stains, because I cant buy the stain you use in denmark, som im testing out a mix between black ibenholt, and dark oak water stain. So far the test results have turned out really good. :)
Kind Regards
Danni Borchmann
Denmark. :)
Danni Borchmann says
1 plank fully done, 3 with 1 layer of coating, and still need to prepare 1 more plank, stain/coat it, and then the attachments need to be cut, stained/coated, and voila… an old plank table.
Thanks again for the inspiration.
Btw heres some pictures.
http://imageshack.us/photo/my-images/191/dsc7823h.jpg/
http://imageshack.us/photo/my-images/443/dsc7824.jpg/
http://imageshack.us/photo/my-images/196/dsc7825i.jpg/
http://imageshack.us/photo/my-images/802/dsc7822.jpg/
Danni Borchmann says
Lets try again.. Sorry for the bad links. :( Suddenly they where just gone. :(
http://imageshack.us/photo/my-images/854/dsc7822d.jpg/
http://imageshack.us/photo/my-images/19/dsc7825o.jpg/
http://imageshack.us/photo/my-images/15/dsc7824q.jpg/
http://imageshack.us/photo/my-images/812/dsc7823g.jpg/
YoungHouseLove says
Love it!!!
xo,
s
Theresa Musgrove says
Love it! You would love the old clock Im making as a surprise for my favoriet seesters 50th Birthday…She just finished an outside porch and is going to love the new/old clock to hang on the bricks…made out of recycled decking board…Its going to be a beautiful reminder of her Birthday… thanks to your old nut tricks…I mean nail, screws and stain :) Love the tips just what I was looking for. Thank you BERRY MUCH in advance from my favorite seester.. Happy 50th Cindy!!!! GOOGLE IS MY BEST FRIEND…next to you of course! :)
YoungHouseLove says
Haha, good luck with everything!
xo,
s
Jose says
Your work looks amazing! Thank you for all your instructions and assistance. I used some of your wood aging techniques to build a large leaning floor mirror. My wife and I love your blog and thanks again for everything y’all do. Check out the mirror if you want to.
http://joseandcharityspemberley.blogspot.com/2012/09/my-what-big-mirrors-you-have.html
YoungHouseLove says
Looks awesome! Congrats!
xo
s
Stella says
This is awesome! I have been dying to make some funky furniture out of some pine boards we have laying around in the garage and this is exactly what I was thinking. Thanks so much for the post!!