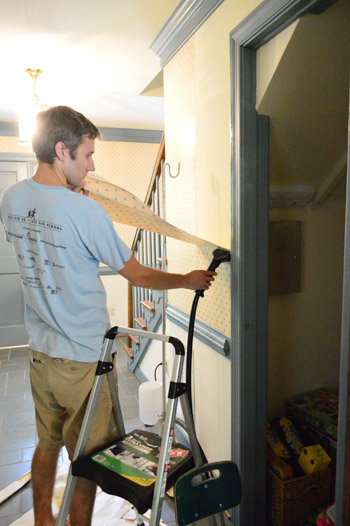
Things are getting steamy in the foyer! As a refresher, we have five rooms full of wallpaper and we’re attempting to take five different removal methods for a spin, just to see what ends up working (and what bites the big one). For our first time at the wallpaper removing rodeo we used hot water and a spray bottle, which actually worked out pretty well. And in this week’s hard-hitting Wallpaper Exposé we’ll be tackling the foyer with this guy. His name? Steamer. His game? Steaming clothes. He’s actually John’s sister’s, but it was free to borrow and we thought we’d see how it worked out for wallpaper too.
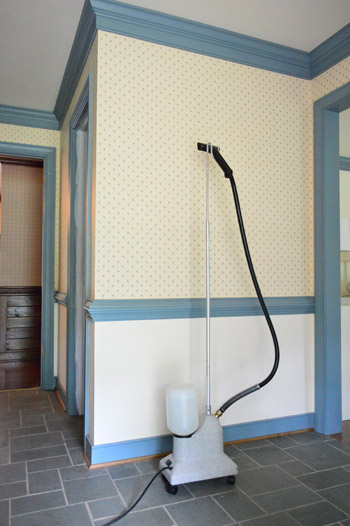
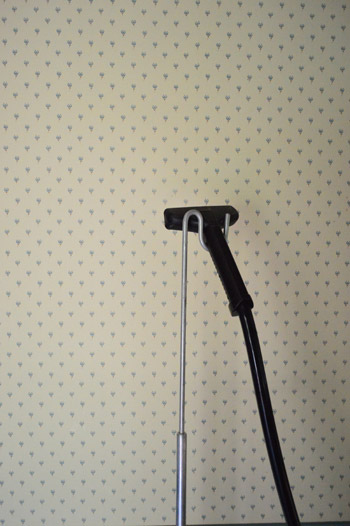
But first, a moment of silence for the small blue flowers.
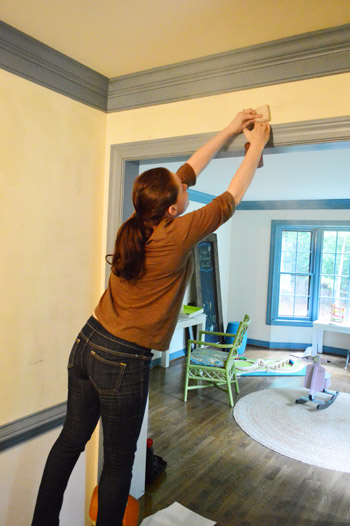
Ok, let’s get it going. This is the first area of the foyer we tackled, and our method for this area was for John to run the steamer all over that section of the wall and then I followed behind him, yanking all the way.
It worked pretty well (some areas left the backing when I peeled so they had to be resteamed and reyanked, but it wasn’t too bad. I’d score it as working a smidge better than the boiling water method simply because it was probably 10% faster/easier since around 10% more of the backing seemed to come off so it didn’t have to be removed in a second pass. But when you factor in the expense of buying or renting a steamer I’d say it was only marginally better than our first (free) method of hot water in a spray bottle. So it’s kind of a toss up. Do you want to pay $20-50 for something a little bit easier or would you need it to be a whole lot easier to spend that loot? Of course someone else might swear by a steamer and say it worked in two minutes, so the paper and how it’s applied are definitely a factor too.
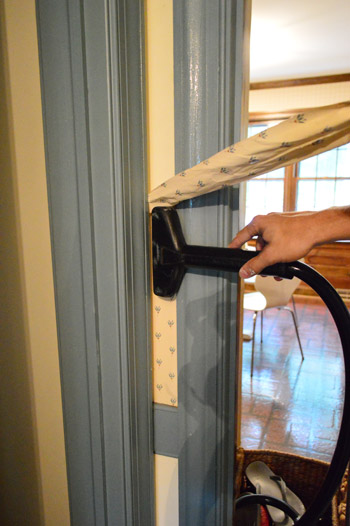
Oh but it got a little hairy when we had to get the tops of the walls.
Since we were only dealing with a clothes steamer the hose wasn’t built to stretch very far, so it wasn’t quite long enough for the steamer to rest on the floor while we did the upper areas (which we never thought about until we got to that part). It wasn’t too much of a big deal, but John did get a nice workout holding up the equivalent of a gallon of milk as he worked his way around the top part of the foyer. So that’s just something to think about (definitely rent/buy a wallpaper steamer over a clothing steamer if you’re actually going to spend money on something).
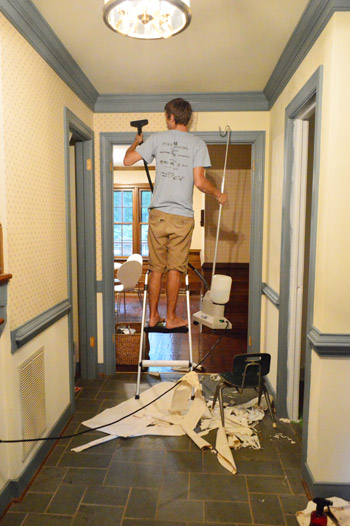
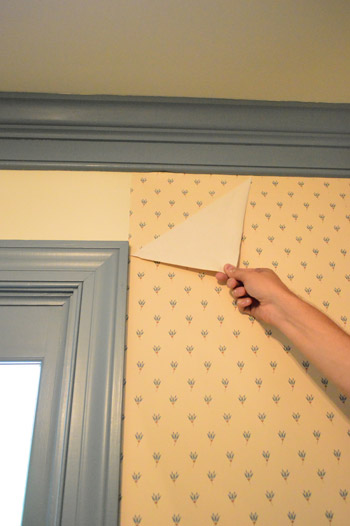
Around halfway through we decided to try another method, which was pulling the paper right along with the steamer, so instead of John doing a big area and then me following behind him peeling, I literally peeled as he went like so:
This method was awesome. In almost every case it removed both the wallpaper and the backing behind it so the wall was bare and perfect underneath. Must have been because there was more heat on the part we were actively peeling instead of pulling the paper off after it started cooling down and John had moved on to another area.
Another reason this second steamer method was awesome was because one person can do it, so if you have a solo meeting planned with a wallpapered room, don’t fret. You can do it. And you can look this sexy doing it:
So I’d rank this second faster-peeling steamer method as around 30% quicker & easier than the hot water/spray bottle method. Although we were tackling a larger area than a small bathroom, so it was still a substantially longer process for us. Especially when we hit this Amazing Race-ish Road Block. Layered wallpaper.
For some reason, there had been two layers of wallpaper applied to the entire front door side of the wall. But it wasn’t an older paper underneath, it was exactly the same stuff.
You guys. It was like GROUNDHOG DAY. Basically we had to do that wall twice and I’m not gonna lie. There was whining. But we got ‘er done. Eventually.
The funny thing is that we have no idea why it was doubled along that entire wall. Our only guess was that something didn’t match up so they redid it with a second layer of wallpaper to correct whatever got crooked or mismatched.
Oh and we did have one “incident” where we think the paper was glued a lot more in one spot for some reason, so our drywall’s top layer got peeled off. Pretty, eh?
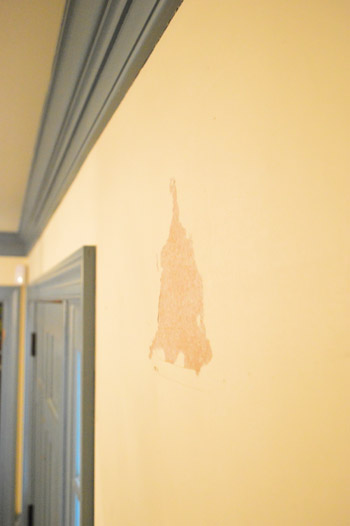
My plan is just to skim coat that with some spackle and then sand it down so it’s hopefully flush with the rest of the wall and just as smooth.
After we wrestled all of the paper down I went over the walls with a spray bottle full of half vinegar and half water (not hot, just room temperature) and used the rougher scrubby side of a sponge to make sure there wasn’t any glue residue anywhere. For the most part it had all come up with the backing so there wasn’t much to scrub, but a few tacky areas were a lot smoother after this step, so it’s definitely worth adding onto the end of your peeling project.
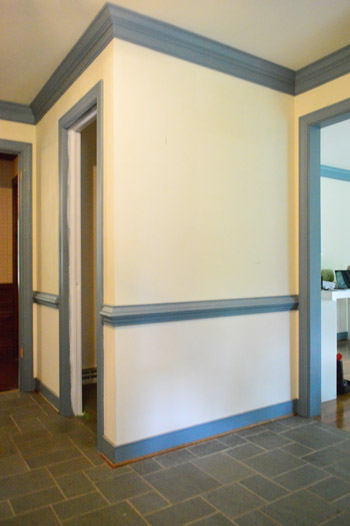
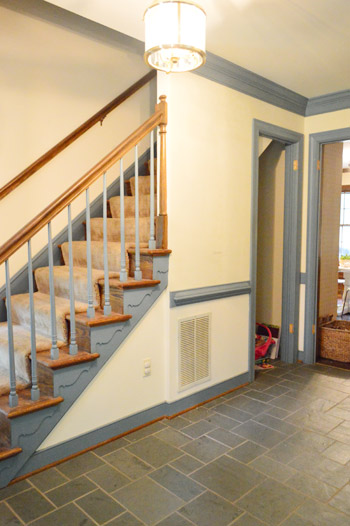
So that’s how we steamed things up, all in the name of deflowering the foyer.
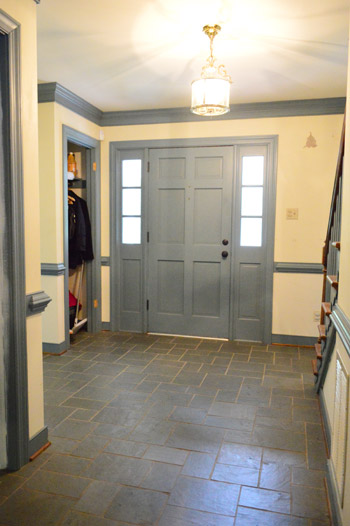
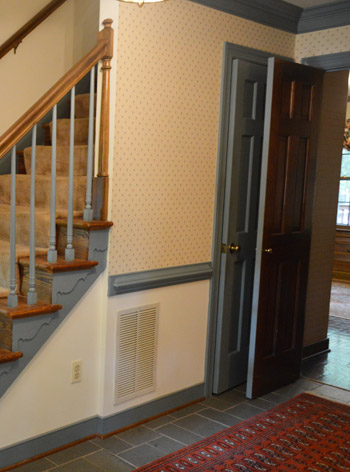
Obligatory before shot from our walk-through. You know, for closure.
Oh but you’ll notice that the closet and the bathroom doors are off in the second to last shot, since we’re actively working on taking those from blue to white. We’re also about 20% into the blue trim out there, so we can’t wait to get that done and share the photos, hopefully sometime next week (four coats = Barfville).
Has anyone else taken a steamer for a spin? Did you do the follow-right-away peeling approach, or the steam-a-section-and-then-peel method? So far we’ve loved that we’ve never had to score anything and haven’t even needed a spackle knife (hand-yanking has done the trick). So I’d definitely put that in the pro column, right along with the zero dolla (holla!) cost so far.

Alicia says
“So that’s how we steamed things up. All in the name of deflowering the foyer.” Bahahaha, you cracked me up! This is getting exciting…I love seeing y’all work magic on a house :)
Marie says
Hello! This is a question from an old post but I wasn’t sure you would see it if I responded to that one – could you share who your go-to house inspector is? You had mentioned he did a thorough job and we may be needing one soon.
Thanks in advance if this is possible!
YoungHouseLove says
I’ll shoot you an email with that info Marie!
xo
s
Sarah says
I can’t really tell (and sorry if this has been asked) but are the floors blue or grey?
YoungHouseLove says
They’re slate so it’s a blue-gray color.
xo,
s
Andy says
Is the slate floor sealed? It has a yellow cast on my computer. If it is, you might want to strip it & reseal it to get a better sense of the true color.
YoungHouseLove says
Thanks Andy!
xo,
s
Kirsten says
You are inspiring me to try this! We bought a house with ugly wallpaper in one bathroom. We were going to try just painting over it, but this method looks doable!
Stephanie says
So.much.blue.trim. I know you’re living with it, but wow! Even the stairs are blue! Are you planning on painting those? I would be interested because our house is OAK everything and it’s really getting to me.
YoungHouseLove says
Yup, eventually I hope not to have an inch of the blue paint anywhere. Might take us 5 years, but we’re totally going to throw a party.
xo,
s
Stephanie says
I can already picture how pretty your foyer’s going to be soon. Maybe a blingy chandelier up in there??
YoungHouseLove says
Could be fun!
xo,
s
Allison says
I’m a big fan of the steamer method to get rid of wallpaper. My mom received the EuroSteamer (both hand held and the standing/vaccuum-type version) and we de-wallpapered her entire house. It was easiest as a two person job the same way you guys did it.
We actually used it to de-spackle her ceilings as well, which was messy (and also a major arm workout) but it was much more effective than just sanding it down.
I’ve also used the steamer for cleaning those really awkward spaces in the kitchen and bathroom where dirt collects but you can’t get at with just my vinegar spray and cloth.
Apparently I’m very pro-steamer!
Emily says
I’ll admit I’m a little disappointed that the 2nd layer of wallpaper was the same. I was hoping for a vintage Easter egg. I’m LOVING the staircase closet, very Harry Potter!!!
YoungHouseLove says
Haha! We were joking that it could have been the bears + balloons border I had in my room as a kid.
xo,
s
heather says
I’m sure others have said this, but when I used a steamer, the steamer head was the size of a lunch tray so it steamed large portions of the wall. I used it on my kitchen because the entire thing was papered, and it was the last room in the house that I de-papered. I was conking myself in the forehead for not getting a steamer sooner — all those other walls that took me so stinkin’ long to do…aaarrgh!. And some methods (Paper Tiger, anyone?) damaged the drywall. The steamer was by far the most efficient, and did the least damage to the walls. I’d have paid them twice what they charged me to rent it; completely worth it in every way.
Megan says
Removing the wallpaper makes it look 1000 times better already. It will definitely be gorgeous once the blue is gone and there’s new paint up there. That moulding is fantastic!
I only used one method for removing wallpaper (all on top of plaster or painted ceiling tiles and trim). It was soak it all with warm water (straight from the tap) and peal. I did do it twice because the wallpaper was the textured, bumpy kind (and also painted). But it was free and easy, which was super nice.
Heather says
So I know you guys didn’t purchase this house solely to make this blog more exciting, but it totally does! I’ve followed for a loooong time and have always loved your posts, but with this new house, I literally CANNOT WAIT to see your posts pop up in my Feedly! THIS IS SO EXCITING!!!! Okay, I’ll stop geeking out now :)
Peggy McKee says
Many thanks for your experimental approach to wallpaper removal.
I have a question about the blue woodwork. If it takes 4 coats to cover the blue, might it not be just as fast to remove the existing paint? Also did you know that a steamer just like the one you are using for wallpaper removal can be used to remove paint?
Google “steam paint removal” and you’ll find lots of information. I’ve tried it in small areas are it works great! And so much nicer than chemical removal.
YoungHouseLove says
Thanks for the tip Peggy! Since the wood would be brown when it’s stripped and we like white trim we’d still have to prime and paint it white :)
xo,
s
Jing says
Just noticed the staircase still have the carpet. so will you keep that way?
YoungHouseLove says
We plan to rip that up and replace it with something for Clara and Burger. Maybe a seagrass runner?
xo,
s
Tara says
You look very glamorous while deflowering the foyer. I’d be in sweats and a t-shirt. Anyway, I had to remove a painted over border. I rented the steamer specifically for wallpaper and it did absolutely nothing. So I just resorted to a chemical spray and the scoring thingy. It’s round and has a red top…also has little wheels on the bottom with teeth.
Lorraine says
you know what’s funny? I just realized you have CROWN MOLDING! Who knew?? the flowers were hiding it.
Kristin says
We did a squirt of fabric softener and steaming and everything came off lovely. We had 7 rooms and a long hallway to do, so we tried a few methods as well. (Scoring was the worst… Made it so the paper ripped into lots of pieces) fabric softener makes the house smell great, and you can go with the super cheap stuff as well. (& it helps cover the old, yuck house smell!)
Brittany says
My family renovated my grandpas house after he passed away to get it ready for sale. The ENTIRE house was wallpapered and one room even had 2 layers. It probably took months to get it all off. We used a wallpaper steamer, which works better than a clothes steamer because the area that the steam comes out of is much larger. It was the best $30 I ever spent and it made the whole process so much faster. We tried everything else we could think of but only the steamer would work. We also had the horrible issue of all the glue sticking to the wall after the wallpaper was removed so we would have to go back and scrub the walls 2-3 times to get them clean. I never want to see wallpaper again!
Laura C says
Progress! I’m starting to think that slate floor in the foyer and bathroom might actually look nice once all the blue trim is gone and the walls are a nice, crisp white.
Christine S says
I’m going to get my steamer going RIGHT NOW!! Ugh! I have 1970ish wallpaper that has been painted over. Have you guys ever removed wallpaper that had been painted over?? Any tips??
YoungHouseLove says
We haven’t tackled that but we hear it’s hard! I think you have to score it to get beneath the paint. Anyone have tips?
xo,
s
Jenny says
I just commented separately and then saw this. Christine I’ve removed four layers of wallpaper (that had been painted between each layer) using a wallpaper scoring tool and a Home Depot steamer. And then I found raw horsehair plaster underneath. It was a really grueling job with small bits coming off at a time, and I regretted starting it. So much so that in the new house we just bought, when I removed the DR wallpaper to find painted wallpaper underneath I decided to paint over it and not go deeper. It had been spackled on all the seams already, so it’s not noticeable at all (I could see the pattern through a layer of primer). Maybe try removing a small area to see your wall condition–and if its bad–spackle the wallpaper seams smooth and paint over?
xox
ashley @ sunnysideshlee.com says
looking good already guys!!
Rheanna says
If you guys haven’t read Charlotte Perkins Gilman’s short story, The Yellow Wallpaper, you need to! I think it will help you appreciate your own wallpaper situation :)
http://www.gutenberg.org/catalog/world/readfile?fk_files=3274693
YoungHouseLove says
Off to check it out!
xo,
s
Paige @ Little Nostalgia says
That’s one of my all-time favorites!
Annie says
It really does look better already. It’s hard to believe just how soul suckingly ugly the wallpaper makes a nice space look. I think you are going to breathe a sigh of relief every time you come into the foyer.
Ashlee says
I hadn’t even thought of using a clothing steamer. I have one from Wal-Mart (only $30) that I’m going to have to try out on the wall paper in our all blue bathroom. Some of our house is quite similar to yours, only the wall paper is fishy print… it’s quite lovely…
Kristin says
You are very lucky that the previous homeowners didn’t PAINT over the wallpaper. Because that’s where we are right now. Not gonna lie- there is A LOT of whining. :)
YoungHouseLove says
Oh man, we hear that’s the pits!
xo
s
Amy @ Yellow Hammer Design Shop says
Looks great guys! It’s slow but progress!
Rhiana says
Oh my gosh you guys, I don’t know if I would have laughed or cried when I saw that second layer of wallpaper! It looks a bajillion times better without the wallpaper, I can’t wait to see what you do with the spaces!
Donna says
A quick suggestion for the ripped dry wall paper. Put some oil based primer over it if you have it. I had a similar problem after I took down a wall of mirrors and when I tried to put joint compound over it the remaining paper bubbled up at the edges because of the moisture. Now I eventually got it smooth with sanding and more coats but the next time I primer’ed it first and there was no bubbling. I don’t know if Latex primer would work because again its water based. Worth a try though.
YoungHouseLove says
Thanks Donna!
xo
s
Lindsey says
Ooh, only two layers of wallpaper? Lucky! Our 80 year old house had 5 layers in most rooms, plus some had a layer of paint buried in there as well. I don’t understand what would possess someone to do that. We got it all down with the good old hot-water-in-a-spray-bottle method…and an economy sized jug of elbow grease!
YoungHouseLove says
Holy cow! Sounds like quite the project!
xo
s
Jillian@TheHumbleGourmet says
Can we just make it a rule that odd-colored trim is not allowed? That all must be white or wood so that no one should have to go through 4 coats throughout the whole house?
Tara S says
Looks awesome! What a big difference. Cant wait to see what color you choose for the walls and get rid of the blue trim.
I am totally impressed that you only had ONE exposed wall spot. Nice skills! As far as patching it up, we used the Zinsser Gardz to seal the dryway before skimming. Not sure if anyone else recommended it. It worked great. I was amazed as what a seamless job my husband accomplished. Don’t tell him I was a littler nervous. He pulled it off and the walls looked brand new. We bought the Gardz at our local hardware store. I dont think the big guys sell it.
YoungHouseLove says
Thanks so much Tara!
xo
s
KimberJ says
I spent last summer removing 4 rooms of foil wallpaper from 1971 out of a “time capsule” house. We bought a wallpaper steamer from Home Depot (ordered the best one they carried of 2) and it didn’t work at all, even when we scored the paper. The only thing it was good for was inflicting 2nd degree burns on my arms when it dripped and yes I had heavy gloves on. We ended up using Sherwin Williams wallpaper stripper dissolvable cubes to get the foil off and then warm wet water to peel off miles of paper backing. I really hated to use a chemical but I hated the moldy wallpaper worse :P Glad your stripping processes are going better. You guys inspire and tickle me every day!
Emily says
Are you perforating first? Or just going straight to steaming? Also, how do you get ahold of it to start peeling?
We’re under contract on our first home (yikes!) and have a bit of wall paper on our hands. I’m paying close attention to your efforts :)
YoungHouseLove says
Just steaming, so we didn’t do any scoring or perforating for this method or the hot water method we did last time. The corner or bottom/top is a good spot to start yanking when it’s sprayed with hot water or steamed :)
xo
s
Paige @ Little Nostalgia says
At my parents’ house, there used to be blue and pink flowered wallpaper, floor to ceiling, in the 16-foot high family room. Mother. Of. God. (And a master bathroom with a pink toilet and jacuzzi, but that’s another story.)
Ms. Amy says
Smart idea to use the clothes steamer! We had wallpaper & a border in several of our rooms. The kitchen/ dining room peeled away with just a spray of vinegar & hot water. The living room border was apparently applied with E-6000, which required that I rent a steamer. It. was. an. ordeal. It worked, but I hope I don’t have to ever do that again. Not only did it weigh at least 40lbs, but it was missing the pad, so it spit boiling hot water everywhere – including all over my hands. The only not-so-bad part was that the steamer cost $20 to rent for the weekend.
Cat says
Loving all the progress!! Sorry if you’ve already addressed this earlier, but was there a reason you guys didn’t want to run the same hardwood throughout the foyer, half bath, and kitchen so it’s consistent all throughout the house? I saw your reply to another comment about using heated tiles if you can’t salvage the slate, and I was curious why the hardwood used for upstairs wasn’t an option.
Excited for more of these fun before and afters! Xo
YoungHouseLove says
Since we already have hardwoods down here in the living room, office and dining room we just thought it might look choppy or mildly mismatched (all of the hardwoods upstairs don’t have any transitions and are exactly the same type and color).
xo
s
Kim says
My coworkers must think I’m crazy… I just laughed out loud…. “moment of silence”, “Groundhog Day”. You guys crack me up!!
Shellie says
My favorite part about the blog since you moved is that all your post titles seem to have a naughty innuendo to them. Maybe I’m a 12 year old boy at heart, but I love it!
Julianne says
You two are going to be the consumate professionals of all things wallpapered! ;0). With our wallpapered bedroom, I just used a regular steam iron & pulled as I went, but kept the iron raised on the ironing board for height. It was perfect or our walls & gave us a little extra cord to use the same method to steam/scrape our beautifully popcorned ceilings. What fun! Can’t wait to see what you do with the space!
Jenny says
Though I’ve never used a clothes steamer to remove wallpaper, I have used a rental (many times!). The head of the rental steamer is much bigger than a clothes steamer and the steam and peel technique is super fast! It also depends on the glue, I’ve removed paper from walls that simply wouldn’t budge without a steamer, and others that just needed a little warm water and practically fell off the walls by itself. The worst was the apartment I steamed that had literally FOUR layers of wallpaper with paint between each one! It was like removing cardboard. Man was I bummed I opened that can of worms!
xox
Jenny says
Steamers are the best! I asked my husband for a steamer several years ago, and I absolutely love it. I haven’t used it for wallpaper removal, but I love cleaning with it (zero chemicals).
I do have a question though about wallpaper. I know you had mentioned that you may wallpaper your bathroom (or another room), do you think you’ll have it professionally done? I just ask because I suspect that your wallpaper removal process has been so easy because it was done correctly (most likely by professionals).
YoungHouseLove says
I think we’ll either study up a ton (ex: like when we built our deck or gutted our bathroom – we wanted to do as safe/good as a job as an expert) or leave it to the pros if we don’t think it’s in our skill set (we hire out hard electrical and structural stuff, so we don’t always DIY everything). Will keep you posted!
xo
s
Ashley C says
The steamer is a jack of many trades! We moved to Hawaii last year and they have some pretty strict laws about window tint on cars. We called around and got quotes on how much it would cost to have it removed and I just couldn’t see forking over the cash. So I took a chance to google how to remove tint at home. Low and behold you can use a steamer. We used the follow right away method and the tint came off the windows in no time. After it was all said and done I felt like I had just won some kind of saving money contest.
Sarah says
Here is what I like….you are making your way toward a clean slate. How smart.
anna kintigh says
You may have heard of this already, but works best in my opinion is using a hot water (no need to boil) and liquid fabric softener. Mix those together and rub onto your wall with a cloth. Rub and peel. It comes off like a dream.
Congrats on the house
YoungHouseLove says
I keep hearing about that method! Might be what I try next!
xo
s
Ashley says
“A moment of silence for the small blue flowers”….with that pic…I die! Lolol. Looks great guys, per usual!! ;)
AprilBryan says
So I have used the steam method, your hot water bottle method, vinegar and water method and this is the problem I keep having – the top layer will come off but the glue does not come off with it. The glue is actually ridiculously hard to get off. Any suggestions?
YoungHouseLove says
Have you tried spraying half water/half vinegar on the walls and scrubbing with the rough part of a sponge? That seems to work for us but we don’t have as much glue. Anyone else have tips for lots of remaining glue for April?
xo
s
April says
Yes we tried that too, but the glue is on good! I think they used wood glue, not sure, but its some good stuff
SuSu says
Interesting sidebar-different steamers put out varying levels of steam. A commercial one like Rowenta may cost a bit more but will generate more steam/better pressure and likely the heating element will last longer.
Sometimes a little more $$ upfront costs less than replacing a lesser product prematurely. (Says the one with personal experience :-)
YoungHouseLove says
So interesting!
xo
s
Tara says
Ahh wallpaper steaming…the memories. My husband and I bought a rental house and every. single. room. had the stuff. Even the kitchen, staircase and hallways. I was 8 months preggo and sat on a folding chair steaming and pulling during a hot July in an old house with no air conditioning. I was also working a full time retail job so this is what I did every morning or day off during the week I had off while my husband was at work.
I already owned a similar clothing steamer but we also purchased a wallpaper steamer with the large paddle. The clothing steamer was way better even though the hose was kinda short. The wallpaper steamer was not high quality so if you do buy one, spend more than $40 bucks on it.
Christie Ann says
Even though its blue, the crown molding really is beautiful. I can’t wait to see it after you have painted it!
Camilla @ Something Is Done says
“So that’s how we steamed things up, all in the name of deflowering the foyer.”
Ha! Oh Sherry.