As of today we’ve lived in our house for six whole months. And in all that time we’ve never formally introduced you to Bart. How rude of us.

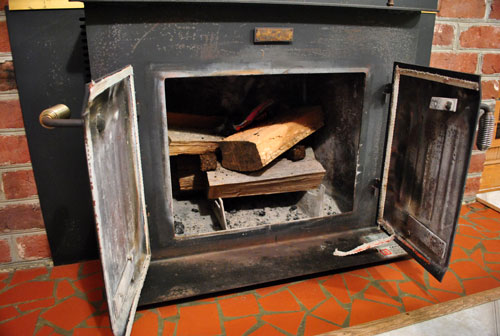
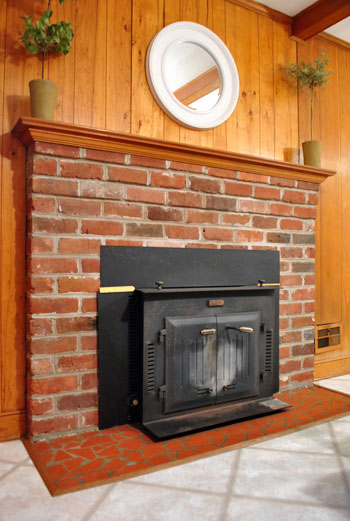
Bart, aka Black Bart the woodstove insert, is hard to miss in our kitchen. We know the previous owners got a lot of use out of him (although they did warn us that he made the house pretty smoky and coated a lot of nearby surfaces with fine black dust). We’d always planned to replace him down the road when we hopefully convert our fireplace into a double fireplace (that can be enjoyed from the living room as well as the kitchen).
But Clara spurred us into action a bit sooner. See, the bean is just too obsessed with Bart. And the potential harm to Clara thanks to a searing hot 30+ year old wood burning stove has always outweighed any potential benefits. So although we moved in the middle of winter, we didn’t fire him up once. And Clara still finds the sharp metal edges of Bart oddly fascinating, no matter how many times we say no or redirect her with toys/the dog/insane dance moves, etc.
All kidding aside, we know many folks who love wood stoves (even those with kiddos), but Bart just wasn’t working for our fam. We couldn’t keep denying that he was truly (and weirdly) a Clara magnet, and after she once managed to get the stove door open and her hand into some soot before we could pull her away, Sherry and I were officially fed up with this sharp and dirty metal monster that we weren’t even using.
Never ones to act hastily (you know us, we prefer to overanalyze while hemming and hawing), first we considered locking the doors with a kid-proof lock, adding foam pads to the pokey parts, and even blocking him off with baby gates or some sort of homemade blockade contraption. But in the end we realized that building everything short of a moat around something that we didn’t use and already planned to replace down the road seemed more than a little wacky. In other words: it was time to bid ol’ Bart adieu. So we borrowed some confidence from Layla and Kevin‘s fireplace makeover and decided to give our kitchen a Black-Bart-ectomy yesterday (don’t worry, we won’t trash him- Bart will live on, but more on that later).
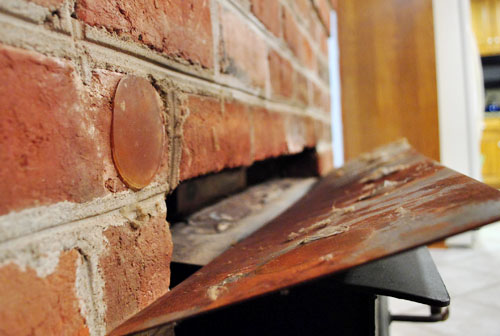
When it came to the whole wood stove removal thing, I didn’t really know where to start. And this was one of the few times in my life that google was no help. So during Clara’s afternoon nap (so as not to set a bad example slash taunt her) I just sort of started pulling at things. Lucky for me, the flashing around the sides easily pried away. So much so that I’m kinda surprised Clara hadn’t figured it out yet. Yikes.
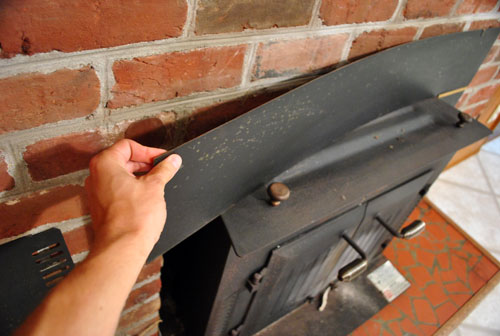
I learned there was only a little bit of glue holding the three pieces flimsily in place (which made the stove look flush on all sides).
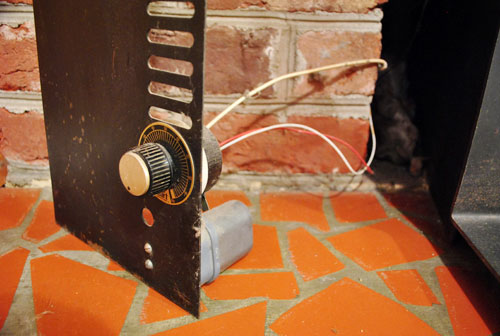
The only questionable moment was when I revealed a bunch of wires on one side and worried that some electrical work might be involved. Thankfully I soon realized that they were just connected to a fan on the back of the unit, so I didn’t have to disconnect anything after all (I just kept it all attached and removed it all together). Phew.
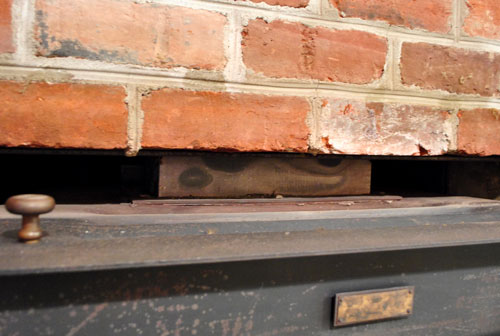
With all sides of the stove revealed, the only place I could see it attached to the house was right here at the top. It seemed to be bolted to a vent that snaked up into the chimney. So I figured I’d just attempt to take that apart and hope for the best.
The good news was that my hunch was right- those bolts were the only things holding that baby in place. The bad news was that the bolts were really friggin hard to get off. Okay, just one of the five was (the top of that bolt was so soft that my wrench had trouble gripping it). Oh and did I mention that space was tiiiight? My skinnier-armed wife tried to save the day, but she’s also shorter-armed, so alas… no dice.
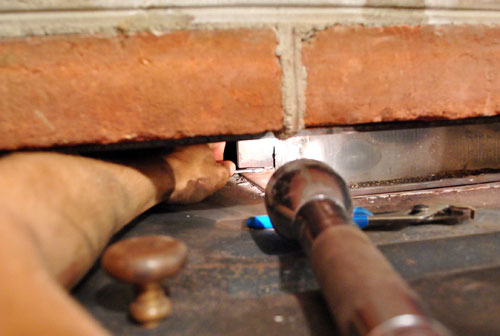
But I kept at it (and Sherry kept trying as if her arms were growing by the second). And after getting covered in ash and enduring a few knuckle scrapes we got Bart fully detached from the vent. Ta dah!
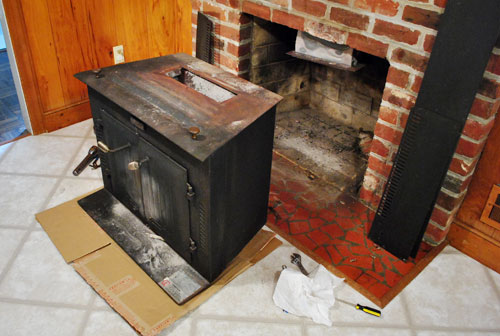
Okay, so it was less of a perky “ta-dah!” and more of a grunting “ohmygoodness” because that beast was HEAVY. But as you can see, we managed to shimmy Bart out of the fireplace and onto a piece of scrap cardboard (which helped us slide the whole darn thing out of the way). So our fireplace could go from this…
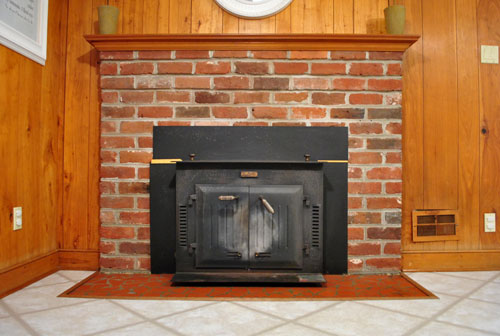
…to this:
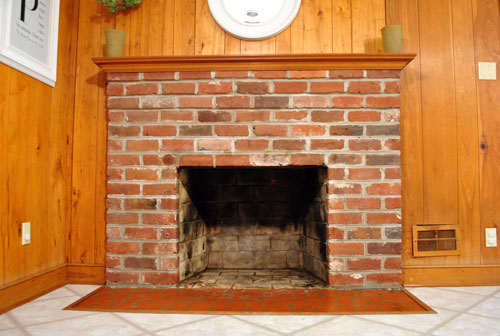
Admittedly it’s not the prettiest before & after. In fact, the after kinda looks uglier in a way… despite the fact that I got my Cinderella on and scrubbed the inside it with some warm water and mild soap:
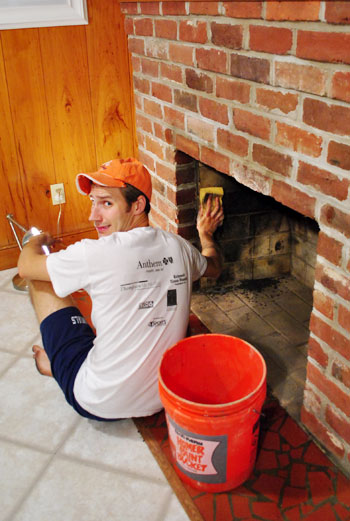
Sherry really wanted to be the one to yoink this beast out all by herself (short arms be darned) so she made me scrub things down while she sulked slash snapped embarrassing photos. I’m making that face for two reasons. 1) because the sooty clean-up job was pretty nasty, and 2) because I’m realizing that a photo of me in my high school gym shorts would end up on the Internet. Yep, still own ’em and still fit in ’em… sort of.
Short shorts aside, Bart is currently residing in our dining room (where Clara rarely goes), just waiting to be craigslisted or otherwise donated (haven’t yet figured out if a Big B is worth anything to anyone, but we’ll share the craigslist link if he ends up there).
And hopefully soon we’ll have a prettier version of our fireplace to share. Immediate plans for it include painting the firebox a dark charcoal color to even out the stained brick interior. And that’ll probably be followed quickly by painting the brick and mantel. Spoiler alert: we’re leaning towards bright glossy white (we’re planning to bring some color onto the kitchen walls, so a white fireplace should be a nice counterpart). But we’ll share all those painting details as we go.
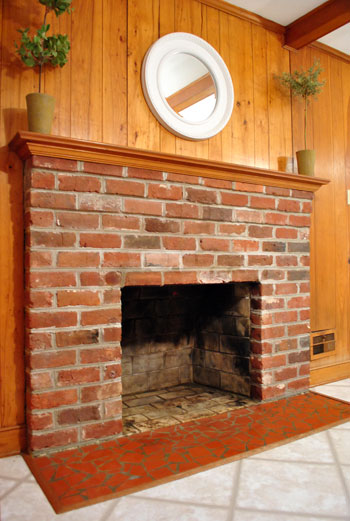
Down the road we’re also planning to take the fireplace makeover a step further – perhaps by eventually tiling it, beefing up the mantle, or even framing it out all the way up to the ceiling to give it more height. Not to mention the whole double-siding plan. But all that future fireplace stuff is TBD at this point. We’ll just have to see where we end up. Oh, and Sherry wanted me to mention that she scraped off that big circular blotch of glue that you can see just outside the upper left corner of the firebox in the photo above. Despite how easily the metal flashing peeled off, the gummy glue didn’t come off the brick as easily. So she got all ninja on that blob and ended up using an exacto knife to slice it off in pieces.
Have you guys removed a wood stove or any other fireplace insert? Was google surprisingly unhelpful? Does anyone have a kid who loves their wood stove as much as ours? Do you think Big Bart is worth craigslisting or should we donate him to the Habitat For Humanity ReStore?
Psst- We’re sharing a fun, functional, and affordable little kid-art corner over on BabyCenter today.

Christina says
My parents removed their old wood-burning fireplace. They used OxyClean to scrub the soot stains off of the brick and interior. The professional who removed the old fireplace suggested first OxyClean, and if needed oven cleaner left to sit overnight (although I’d probably try to use my cheap-o natural recipe 1 cup of baking soda, 1/2 cup of washing soda, 3 tablespoon liquid dish soap, Hot water and 1/4 cup of white vinegar). The OxyClean (and elbow grease) worked great!
YoungHouseLove says
Love it! Thanks for the tips!
xo,
s
Lizzy says
we are actually in the process of purchasing a wood burning insert for our fireplace. we have oil heat and hope to use the wood stove to supplement during the cold new england winter months. our son just turned 8 months old so i imagine it will be a challenge keeping him away from it but we plan to start early and teach him that it’s not a toy!
i grew up with cozy fires in the winter and i’m still kicking – so we aren’t too worried about the occasional fire (especially since those new inserts are so efficient and!)
our fireplace is currently raw brick – but i have been thinking about following kevin and layla’s tutorial once we get the insert installed. i love crisp, white, painted brick but i will have to work on convincing the boss to love it too! :)
this post shares a pic of how our fireplace currently looks (looking back on this pic reminds me how great it is to finally have a couch, rug, stained tv stand, etc.!) http://anexcellentadventure.blogspot.com/2011/05/week-one.html
stephanie says
Our house had a woodstove that we chose to not use for similar reasons. We listed it on Craigslist this past summer and got a really nice chunk o’ change for it! We looked up the manufacturer online to see what a new model retails for and got about 1/3 of that price. Definitely worth it!
Christie says
It always amazes me how kids are drawn to dangerous things in the home like a moth to a flame. I’m glad you guys were able to remove Big Bart without too much trouble. I think it looks better already. Just curious, what type of tile or material do you plan to use to replace the cracked brick looking stuff?
YoungHouseLove says
We have a plan for that but we need to see how it goes and then report back. Details soon!
xo,
s
Jen @ The Decor Scene says
I would definitely try to sell it first on craigslist. Then if that doesn’t work, I would donate it.
I can’t wait to see how you paint the fireplace and the kitchen. YAY! How exciting that you are getting to the kitchen project soon. I can’t wait to see your transformation. I know it’s going to be awesome. And I love how your fireplace looks now. I can see it painted and maybe some candles that you don’t light of course. It would look really nice.
Kat says
Nice! Can’t wait to see it! I love all the fireplace setups they do on Lettered Cottage. I’m sure you guys will do a great job too!
But the REAL question is, was Clara upset when she realized her friend Bart vanished?
YoungHouseLove says
She actually thought it was funny and started pointing and excitedly babbling when she saw it gone! Maybe she sensed we’d let her have more free rein now that it’s gone?
xo,
s
Sarah says
My fireplace is similar to yours. It has a weird, old, tile – hearth – I guess you would call it? I want to do some other tile, or mosaic over it. Any plans in the works for covering yours? I’d love to get an idea (and how to) on masking it.
YoungHouseLove says
We have a plan- more on that as we go!
xo,
s
TexanNewYorker says
Just a little inspiration for you, since you mentioned painting it white: http://www.designsponge.com/2011/06/sneak-peek-caitlin-of-roost.html
YoungHouseLove says
So pretty!
xo,
s
J'Ann says
Great job cinderella, cannot wait to see the final job :-)
A Girl’s Next Best Friend
Letitia says
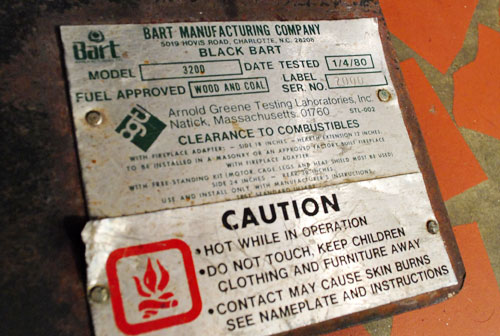
Looks like Bart was originally tested right around the corner from where I live in MA. :)
We have a double sided non-working fireplace from 1877, complete with compartments for baking and the original swinging kettle arm! It’s really cool but so ugly and Brian won’t let me paint it. :( And he also won’t let me paint the beams in the ceiling. Double frown. :( :(
http://www.flickr.com/photos/missletitia/3680412670/
http://www.flickr.com/photos/missletitia/3680410238/
http://www.flickr.com/photos/missletitia/3680410168/
YoungHouseLove says
Oh man I’d love to see it! Looks like your pics are set to private so I’m blocked.
xo,
s
Letitia says
Oh duh. http://flickr.com/gp/missletitia/mW93X3
YoungHouseLove says
Woah! You’re right, it’s really cool!
xo,
s
Niki says
We actually removed our fireplace insert earlier this year (before we placed our house on the market). My husband bought the insert about 4 years ago and we used it every year. It made everything we owned smell like smoke. I hated it. It was so warm in our finished basement though. ANYWAY, this past fall I insisted on getting our chimney cleaned prior to using the insert. We ran it continuously (in the winter) for 3 years and never had it cleaned between seasons. He agreed and we had another company (who did NOT sell us our insert) come out to clean the chimney. Well…wouldn’t you know that it never met code. Apparently (we were not aware) all inserts have to have a flue liner at least X number of feet up the chimney. We did not have that. In fact, they just shoved our insert into the firebox and we went about burning it day and night for a few months each year. They cleaned our chimney but said that they would have to “fail” us. I asked what he meant and he said that it did not meet fire safety code and that, in fact, we were risking a chimney fire each time we used it. So….we brought out another chimney company to give us another opinion. Their opinion was the same. We were risking a flue fire. If our house caught on fire, the insurance company would not have covered it b/c we were using something that was not up to code. Nice!
In the early spring we removed the insert, painted our firebox (it looks MUCH nicer) and have candles inside to make it look a little nicer. Now, if only I can convince him to pain that hideous fireplace brick white I’ll be happy.
YoungHouseLove says
OH man how scary! So glad you learned about the risk before something scary happened!
xo,
s
tk says
I doubt anyone would buy him to use as a wood stove with how efficient and affordable modern ones are, but I bet you could craigslist him as scrap metal.
Cannot wait to the end results of the project!!
lisa says
looks much better now. cute/funny video of clara. i see her scooting..is she walking yet?:)
YoungHouseLove says
Nope, pulling up like crazy and cruising around while holding things, but no real walking just yet. No rush though! Haha.
xo,
s
Tara F. says
I would try selling it on craigslist first. Those inserts are valuable for one trying to become energy efficient. My parents use one at their cabin in the mountains and it is able to heat the entire house – even when they lost power in a bad snow storm…it is atleast worth a shot, if you can’t sell it, scrap it.
Heather says
We are an almost entirely wood burning house, and I can saythere are a lot safer and more efficient stoves than that. Out of good conscience I personally wouldn’t let another family have it – for free.
On a different note – have you heard of masonry heaters? We are installing one down the road. Super efficient and though they radiate heat all day (on one to two small fires), they never get HOT. Plus you can also build in things like pizza or bread ovens. Yes please.
YoungHouseLove says
Never heard of masonry heaters – sounds like we should check them out thought!
xo,
s
heather says
There are two at the very bottom of my “Look Book” album on facebook, you can see below. Since they can get pricey we’re hiring a well known mason in New England who does these – not to built it on his own (cha-king) but to teach a class at our house on how to build him. We host it for a week, he stays with us (I think) and all we pay is for materials (and I have a class of dudes at my house every day for a week learning how to build the inner core to it). To save even more money my husband is going to lay the foundation for it himself, and then brick or stone (our choices) it in himself too. The best part is the exterior can be just about any kind of reasonable surface, it doesn’t need to be brick or stone.
http://www.facebook.com/media/set/?set=a.790453857029.2380659.5810860&l=954d122579
YoungHouseLove says
So cool!
xo,
s
heather says
They are ideally placed in the center of the house. Looks like the placement of your current one is already there. They are able to be made with a double sided firebox as well. Might not be worth the cost in Virginia for one (not sure of how severe the winters are), but the cost-benefit is there for us up here.
Katie says
My in-laws gave us a woodstove when we moved into the house we are now moving out of. Our new house doesn’t have a fireplace at all, so we sold it to our landlord for $200 and they thought that was a steal! It’s a little different than yours (one big door, no fan), but it still might be worth it to try and sell it first.
Donna Huebsch says
Nice job on evicting Black Bart – the video is funny…Clara heads straight for the exact place you don’t want her to go, and then sits there and repeatedly pats it to increase the I’m-going-to-work-my-parents-into-a-frenzy factor!
Tracy says
I grew up in a home with a wood burning stove that was exposed on all sides. In fact, my mom did daycare until I was in 6th grade and we never had problems with the kids getting burned. She must have just taught us that it was hot. My dog loved to lay behind it for warmth. It was always fun to make the fire when I was older. I loved it, but I hated stacking wood every fall!
We live in a house that has a floor furnace and our 9 month old son loves to go over and bang on it. Fortunately we don’t need the heat on now, so I let him, and I guess I’m just hoping that when we have to turn it on again in the fall, he will be old enough to understand no. If not, I guess we will be finding a way to keep him out of that room!
Leslie *Fresh Out of Lemons* says
That Layla and Kevin fireplace makeover is amaaaaazing!
Sophie says
There was a fire in our house (open to two sides like you want) when I was a baby but I started getting into a lot of mischief when I was Clara’s age so my parents ended up removing the whole thing, putting a board over the bottom of the chimney and just leaving it almost as a 5 foot long ‘tunnel’ between our living and dining rooms.
I have to say, as a kid, I appreciated it a lot more to play in and use for reading than if it were an actual fire that I would be shouted at to stay away from.
Can’t wait to see what you guys get up to in your kitchen! Who knows, it might prompt me to help my parents turn my old play tunnel into a fireplace again (:
YoungHouseLove says
We have totally talked about just making a fun little Clara tunnel and adding a double-sided insert down the line!
xo,
s
Stephanie @ A Life More Southern says
I definitely think it looks better without the wood burning stove in there – so many more decorating opportunities (candle display, anyone!?)
I do have a question though – what cleaning mixture did you use to scrub the inside of the fireplace with (and isn’t that the most disgusting job)? My husband and I did a similar project last year and I’ve found that it kind of stirred up/uncovered a gross soot-ey smell. It usually is only noticeable when our attic fan runs, some kind of pressure/airflow thing, but it bugs heck out of me. Maybe I should try cleaning it again with a different mixture? Please share!
YoungHouseLove says
We just used mild soap (Dr Bronners) with water and a big thick sponge. And by we I mean John. Haha.
xo,
s
LMN says
My husband and I bought an (OLD) house with a detached wood burning stove (now un-insurable). We are not DIYers, so a pro patched the pipes. The stove on the other hand, went in the corner on a brick platform. It was such a cool feature from the original farmhouse. Also made a great selling point. If you don’t want it, craigslist it-I’ll bet someone does!
Wendy M. says
Admittedly, I laughed when I saw that the thing is actually called “Black Bart.” Frankly, with a name like that, it kind of gives me the heeby-jeebies…
I agree with the idea of taking… Black Bart… to a scrap metal place, though… maybe he could pay for a part of another project or something? Like… painting the fireplace? Maybe?
I dunno.
I’m still recovering from the heeby-jeebies over the whole thing, haha.
Ashley @ sunnysideshlee.com says
Good for you! Safety first!! :)
Courtney says
Oh, I am excited to see what happens! We have hideous, banged up, icky brass glass doors on our fireplace and I have been too scared to pull them off and out. I’ve googled and googled, and googled and cannot find a tutorial or inspiration to beautify our living room eye sore!
Jessica says
My ex’s father bought two wood burning stoves off of craigslist…..it’s definitely worth posting it to see if there’s any takers.
I have the same set-up now in my living room, and it definitely can make the house smokey. Plus, I wasn’t cut out to haul wood….
Meggan says
Good call on updating! Before my husband and I tore out our old one, my 2 year old son was playing by it and sliced his toe (nearly off under the nail…hanging by the skin) on one of those sharp metal edges. Needless to say, it was out within the week, but too little too late! That was a week where we had 2 sets of stitches in 12 days. I thought the hospital would turn me in to child protection, but they said “He’s a 2 year old boy, we get it!” Better to keep little Clara’s digits intact!
YoungHouseLove says
Oh man that sounds painful! Glad he’s ok!
xo,
s
kristin says
We had an insert in our old fireplace too. We removed it. Scrubbed the brink with TSP, then painted it white and the inside black so it looked nice and new.
Before: http://i56.tinypic.com/2mg9gyc.jpg
After: http://i53.tinypic.com/rw8l54.jpg
YoungHouseLove says
Woah! That was so sooty! Looks great now!
xo,
s
michelle says
we removed a pellet stove insert a few years back and replaced it with a gas insert (professionals were involved). then a couple years ago we removed the gas insert and now have an empty fireplace. I laid down a couple old blankets and a fake furry throw and tossed in a bunch of old accent pillow and made my kids a hidey-hole. They love it there! (our fireplace has never not had an insert in it so it is all spic and span clean)
Katy says
I wouldn’t paint the brick… when the aesthetic changes back you’ll never be able to get it back again. Instead use cheap wood & some trim and build a surround to cover up all but a few inches immediately around the firebox. Paint the surround white- it will both be more charming and easy to change back when the time comes.
I did something similar recently– my 1940 brick cottage needed a fireplace but didn’t have one. I found a used surround at Habitat for Humanity’s ReStore for $200. It was way too big, so it took some careful work with the saw to make it fit the space. I painted it white. Then I put a plywood face in it with an electric fireplace insert. I tiled the plywood with white subway tile I found on sale. I’m sure I could have built a surround myself for much cheaper, but it wouldn’t have been so ornate or charming.
If cleaning the fireplace grosses you out and you have some concerns about asthma risks, consider replacing your wood insert with an electric one. They’re not very expensive, they have very believable and low-cost LED lighting, they do not get hot (any real fireplaces get dangerously hot, even gas inserts), and some of them even have blown-air heaters if you want extra warmth without the toddler-burning heat.
It looks like you already have electric running to the space, so it should be a VERY easy project. I chose a high-end insert for about $200 (not on sale). I bet with some plywood and trim you could build a nice surround for less than $100. You’d end up with a gorgeous, baby-safe, usable fireplace for less than $300. Also, when the time comes to sell or a zombie apocalypse means you need it to work again, it will be easy to convert back to wood burning by simply removing the insert.
Funnelcloud Rachel says
Ok, John, I too am a FCPS graduate (Woodson ’97), and I too, still wear my high school gym shorts (they’re my painting shorts!)
YoungHouseLove says
I went to TJ actually (nerd alert) but I love that we both still have our shorts!
-John
Care says
Can’t stand the suspense! Looking forward to see what you two will do!!
Maggie says
looks great! and I am totally impressed with your super strength! I am looking forward to pictures of Clara sitting and playing inside the newly cleaned fireplace as her way of taunting you :) we had to place a long, low stool in front of our wood burning fireplace because my crawling baby would head right for it every time!
Julie says
When we moved into our “new” house almost a year ago now, one of the two fireplaces had had a woodstove but had already been removed. It’s not functional either and we plan to someday add a gas insert. For now we just have candles, but I can’t wait to see what you do with yours! Our entire wall is brick and I can’t bring myself to paint it but we do plan to add white built ins to the wall at some point and just have little bits of the brick peeking through – it makes the room SO dark!
Patti says
Wow, I would’ve never thought of taking that on, it looks so much cleaner/bigger. Bart looks like he’s seen better days, I’d recycle him for scrap metal.
Cara says
My brother and cousin both have new woodburning fireplace inserts with blowers. Whatever they got does not let smoke into your house and doesn’t smell smokey at all. It puts out some major heat though. I think they cost a couple grand. We have a gas fireplace which I love for looks buts puts off very little heat.
Gina @ Running to the Kitchen says
Can’t wait to see how you guys make this a 2 sided fireplace. Looks great so far. I really dislike wooden stove inserts. Great for heat, so ugly though!
Jill C. says
we have been wanting to add a woodstove insert to our living room fireplace! i wonder if bart would fit in our space? we are in RVA too, so will be keeping eyes peeled for the potential CL posting! :-D
Cathy says
We have a double fireplace that the previous owners ‘made’ by knocking out the back side to the addition and didn’t do it properly. We had the experts in and we can either tear down the chimney and rebuild it with a wider or double ‘flue’ or put a thick heavy glass/plexi on one side so you can still see the fire, but it’s not sucking in air. While we love having it, it’s just not functional right now. I have plans to paint the trim, beef up the mantel on the other side, put trim up to the ceiling in the living room and eventually mount the TV up there (although keeping that from getting too hot? Haven’t figured that out yet). I hope you do this project next…I can’t wait to see what you do (and try a few things so I know what to do on mine!)
Kristen @ Popcorn on the Stove says
So this is random, but I was browsing online and found a greyhound statue…
http://www.modernchichome.com/p1159/Greyhound-Dog-Statue-NEW/product_info.html
Thought I’d pass on the information in case you can’t locate one at HomeGoods!
YoungHouseLove says
He’s a handsome little guy!
xo,
s
Kirby says
Clara will thank you! When I was little, I burned both of my hands on ours trying to look at potpourri! Spent all of Thanksgiving in the hospital and weeks in bandages. It wasn’t very long after that we got rid of our “Bart”! You can read about my experience here http://kirbyathome.blogspot.com/2011/01/fire-hazard.html
Love you guys!
YoungHouseLove says
Oh man that looks like it hurt! So glad you were ok.
xo,
s
jessica says
FYI…Oven cleaner works wonders in getting fire place suit off
YoungHouseLove says
Thanks for the tip!
xo,
s
katie says
i actually just finished a fireplace makeover of my own: http://five2eight.blogspot.com/2011/05/fireplace-complete.html
ours was old crumbling brick so we decided to just tile over it. it’s made a huge difference in the room, and didn’t end up costing us all that much in the end. can’t wait to see what you do with your fireplace!
YoungHouseLove says
Woah- that’s gorgeous!
xo,
s
Amanda- Hip House Girl says
Katie, that is soooo awesome! It looks modern and clean, but at the same time like it’s been in the house all along. Fantastic work.
Amanda says
I say take him over to the scrape metal place over by Legend on Hull street. There are tow of them by the Mayo Bridge. You could get a bit of money to put into a project fund.
Cindy @ The Flipping Couple says
I think it could be worth craigslisting. Fireplace inserts are really expensive if you get them new!
Blair says
So many options! Can’t wait to see what you do! I vote paint the brick so I can live vicariously through you!
~Blair
Laurie says
Looks SO much better without the stove,guys. It’s ok that it’s sooty – that means it’s been used. Hate seeing perfect fireplaces that never get use.
We have a hearth fireplace in our family room, and the entire wall was exposed brick until our last reno. Over the last 18 years we went from “natural” brick, to whitewashed brick with the “natural” peaking through for a while (this definitely lightened up the room), finally to a black, unpolished granite surround. It looks amazing, if you want to see it I’ll send some pics.
Laurie
Andrea says
That looks HEAPS better :)
Jane N. says
Nice work! The fireplace looks much friendlier now. My parents recently got rid of their HUGE and horrible wood stove. They were going to just send it to the dump, but I suggested Craigslist, and believe or not they got $500 for that piece of (what I considered) junk. So you might at least try it on Craigslist to see if you get any bites. And if not, then you can send it to the Restore. Good luck!
Liz says
So funny! We had one of these in our old house too! Once we removed it, it lived in our carport for 2 years (until we moved again). Even funnier, the neighbors cat had kittens in it and they lived in it until they were old enough to walk across the street back to their real home. Shame on us that we left the door open! Looking good guys!