Don’t eat while you read this.
Seriously, don’t.
This is the story of removing the sliding shower doors in our bathroom. It was one of those can’t-do-this-soon-enough tasks that was at the top of our list.
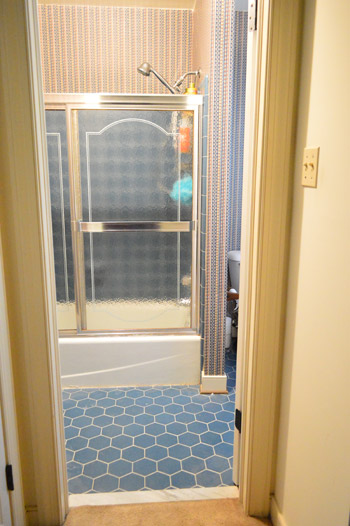
Not only did they enclose the tub in a way that a soft white fabric curtain wouldn’t, they had seen better days. So there were lines of rust around them…
… and pretty impressive amounts of caulk that seemed to be holding them together.

Plus their height was oddly low, so John hit his head (not once but twice) while climbing in. Fool him once, shame on the shower doors – fool him twice, shame on John. Here’s a good ol’ fashioned fully-clothed reenactment for you.
Apparently he likes those (exhibit A, exhibit B, exhibit C)
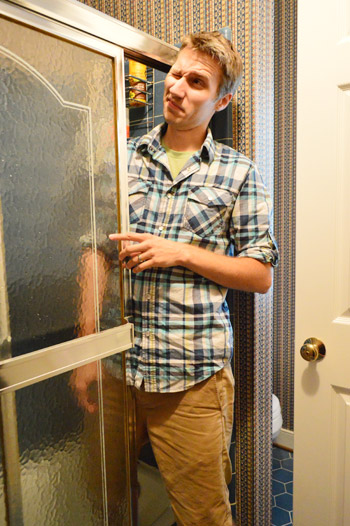
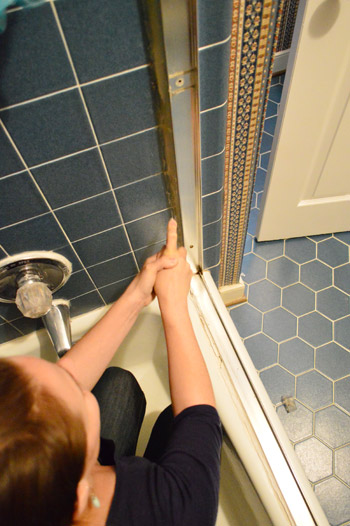
Anyway, the first scene to Get Those Dastardly Doors Down (the movie) involved swinging them out at the bottom so they could be lifted away from the track that held them in place at the top.
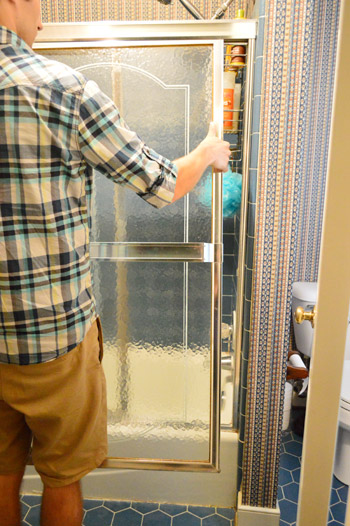
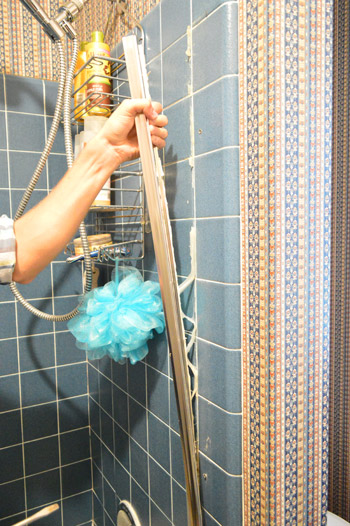
The top frame actually lifted right off after we did that, and then it came down to removing a few screws on each of the side frames to free them from the wall.

At least that’s what we thought. And then we remembered all that caulk. So we needed to score (and score and score) those wads of silicone to get those frames free.
When they came off it kind of looked like they were coated with icing. Except substantially less appetizing.
Here’s the gross part. WARNING. Stop eating. Or stop reading this entirely if you’re especially squeamish.
*********
*******
Second warning. Seriously, stop it with the pop tart. Put it down.
*****
***
Last warning. There’s no button to un-see this.
**
*
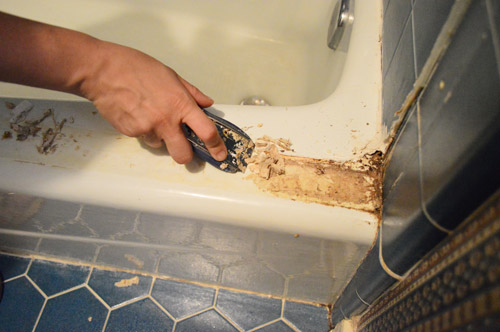
We then discovered this thick layer of scum that was living under the frame on the bottom of the tub, which wasn’t screwed in. So it just lifted off to reveal this tasty sight of 3D mildew and general nastiness. I used a flat razor to scrape the scum (check out my veiny hands – I think they bulge when I’m trying not to gag).
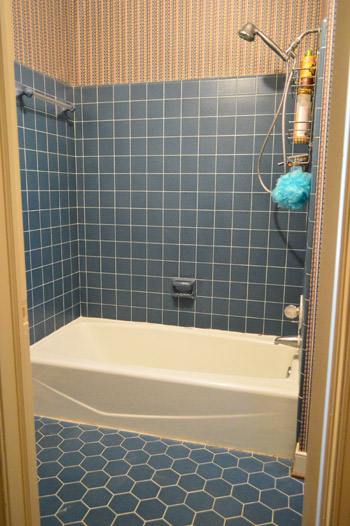
Then the tub looked like this, which is nice and open from afar.
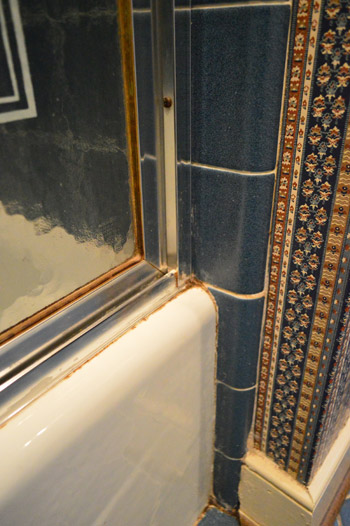
Even the spots where the frame was screwed in were pretty small (so a dab of silicone caulk in each one sealed them off, and once we hung the shower curtain we knew they’d be obscured even more).
But if you got a little closer, the issue was the caulk around the tub.
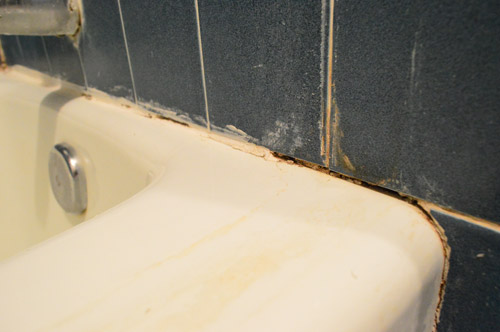
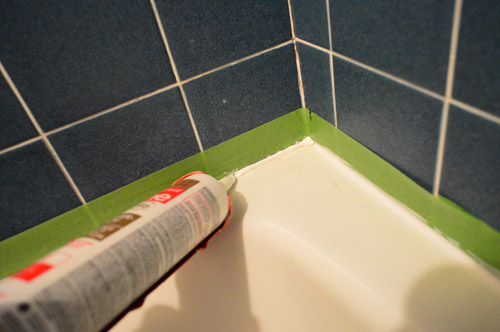
Many areas were missing caulk completely, and some had pink-ish mildew or even old rotted brown spots (don’t even know what caused those) but one thing was clear: we needed to strip off the old caulk and re-caulk the entire perimeter of the tub and even down the sides and along the base at the floor. So we used a combination of a box cutter and this little plastic tool that we grabbed at Home Depot for a few bucks (it has a razor in the middle of the V to help slice while it pulls the caulk away from the wall).
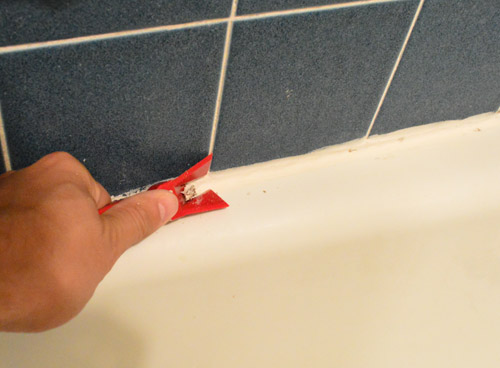
That tool didn’t work along the bottom of the tub (couldn’t really grab the caulk there along the floor) so out came the box cutter again.
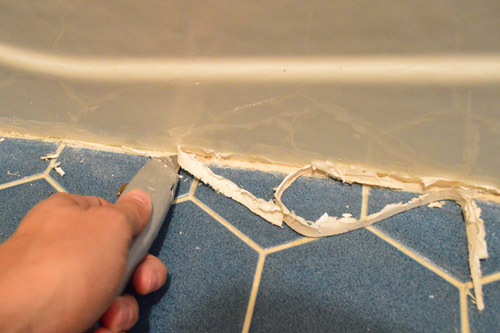
About an hour later (took a while, but it was pretty satisfying work) we had this caulk collection going on.

Then it was time to get some fresh stuff down. Be sure to use something silicone that’s meant for a tub/shower (we like the white colored stuff over clear caulk since it blends with the tub). Oh and we taped off the top edge so all we had to do was smooth it with our finger and then peel off the tape while it was still wet for a nice clean line against that dark tile.
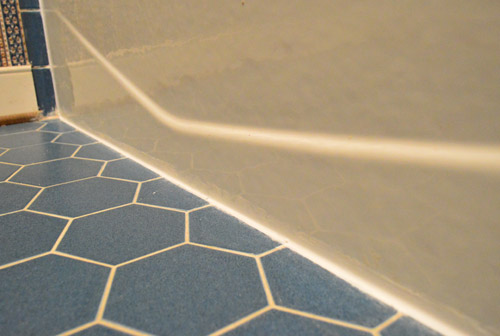
Much better, eh?
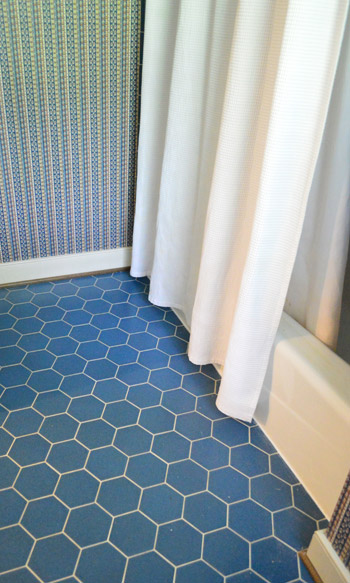
Then after it all dried we hung our extra long shower curtain with a tension rod from Home Depot and it finally felt clean and airy. The to-the-ceiling-height always adds some nice “head-room” so it feels a lot less cramped to us (and it’s never dark in there since light passes through white fabric really easily).
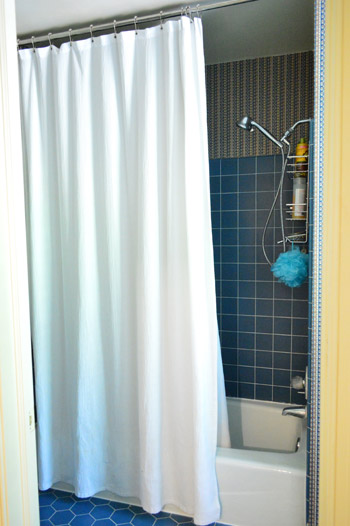
Our 95″ waffle weave curtain originally came from amazon (but we hear target.com occasionally sells them too). We got it years ago at our first house and it has held up nicely since it’s 100% cotton and can be tossed in the wash (we have an extra long white fabric liner from Bed Bath & Beyond that hangs on the inside of the tub to block spray). As for why it came with us, shower curtains don’t stay like regular curtains when a house sells down here – probably because they can be pretty decor-specific and are universal in size – so they work in your next house in a way that certain height curtains or certain width blinds wouldn’t.
One thing’s for sure: a little caulk and a new curtain can definitely made a big difference.
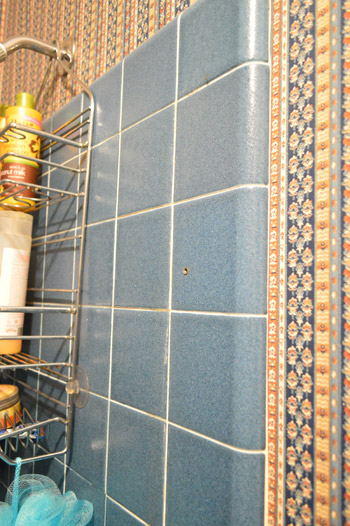
As for the fate of this bathroom, there’s some tile damage around the toilet and sink as well as at the top corners of the shower and of course that wallpaper’s days are numbered, but we plan to live with the tile for a while and then eventually expand the bathroom’s footprint into the sink nook area so we have one big space instead of two smaller choppy ones (having one sink in the bathroom and one right outside of it instead of one big bathroom with a double sink just isn’t our preference). This post with a floor plan might help you visualize things.
So it should be fun to reconfigure this room down the line and retile/add a double sink/etc. But we like living with a space for a nice long time before doing dramatic reno (who knows, we might completely change our mind and go a different direction after thinking it through). In the meantime, I sort of love the blue hex tile, so we’re going steady for now. I’d insert some joke about how it sees me naked all the time, but my mom might text me about it (yes, she texts now, which is hilarious and awesome).

Katie K. says
Thank you for the warning!! …I was eating. Glad I stopped.
Ashley says
Hello! How long do you guys recommend living in a house before doing any major renovations? My husband and I are closing on an old home (1962) and we want to do some MAJOR renovations (e.g. re-configuring the kitchen/dining area, taking down walls, etc). However feel as if we should live in the house for a bit prior to making any major decisions. Just curious as to whether you two have a minimum amount of time you live with the current house prior to making any BIG changes?
Thanks! Ashley
YoungHouseLove says
We don’t have a hard and fast minimum time, but we definitely like to clock several months before diving into something big and structural. For instance, we lived in our last house nearly a year before doing anything to the kitchen (which included opening up a wall) because – as much as we didn’t like the old kitchen – we really wanted to learn how we used that house and what changes would be right. So we didn’t really get started until we felt confident about our design direction. In the end it’s kind of a gut feeling, I guess.
-John
Melissa Arnold says
Sherry,
Is your extra long shower curtain 72″ wide? I am having difficulty finding an extra long shower curtain or liner that is extra long and NOT stall shower width. If yours is regular width but extra long, can you give me a resource for it? Thanks
YoungHouseLove says
Yep, ours is 72″ wide. I don’t recall the exact link for the one shown here, but this one on Amazon looks to be similar: http://www.amazon.com/InterDesign-96-Inch-Carlton-Shower-Curtain/dp/B002EVOAOA/ref=pd_sim_sbs_hg_1
-John
Stephanie says
Hi, just wondering what type of shower curtain rod you use, a tension rod or one you screw in? I’ve tried mounting my curtain higher with a tension rod, but it doesn’t seem to stay up there.
Thanks
YoungHouseLove says
It’s a tension rod from Home Depot. We have used them in all of our houses and they seem to stay up for us (we really twist the end against the wall to get it really tight). Hope it helps!
xo
s
Kandace says
I can NOT get my husband on board with removing the sliding doors from our new master bath. Its SO gross to me. SO much easier to wash a curtain than all the crevices in those…plus the people that used to live here were hoarders…like seriously. I can ONLY imagine the grossness in them. UGH…gag puke…
Katelyn @ evanandkatelyn.com says
Omg, having bad flashbacks of scraping and scraping and scraping old caulk. Ours was really stuck in with the grout and took DAYS of hanging out in the shower to get off like a 3rd of it. But you guys win in the nasty-department!
Keely says
New to your blog…just bought your book too! This is literally my first project when we close on our house in July! I’ve been looking for a good tutorial, thanks!
YoungHouseLove says
Aw thanks Keely! Good luck with everything!
xo
s
Layla says
Ugh, I have that job coming up, minus the glass doors. Just getting rid of gross caulk and recaulking. Can you guys give me some kind of idea of how long that part of the job took you? I’m hoping you’ll say not very long, that way I can stop dreading it quite as much, haha!
YoungHouseLove says
It might have taken about 4 hours total? Probably less than that. Taking the doors off was pretty fast, so it was just the caulk scraping that kept us busy for a while!
xo
s
Nancy says
This may be a dumb question but how does the razor not scratch the tub? We have that same gross scum but to top it off it is sticky and I can’t get it off for the life of me. It wasn’t from under a shower door just some grossness on the top of the tub.
YoungHouseLove says
If your tub is ceramic or cast iron the razor shouldn’t scratch it (if it’s painted/reglazed/plastic it will though). Hope it helps!
xo
s
Sarah M says
Random question! Did y’all have any stains left on the tub after removing the doors?? I’ve removed two (lovely 30yr old gold) sets and the tile and tub have stains that will not let go! Bleach hasn’t removed them! Suggestions?
Thanks!!
YoungHouseLove says
Maybe try a pumice stone or a magic eraser? Or a scrub-cleaner like Barkeeper’s Friend?
xo
s
Holly says
Thank you for documenting! I even handled seeing the gross part, which is a good thing because this is at the top my fiance and I’s list of things to tackle in our first home! A 1950’s ranch!
Laura says
Quick question: do you guys live shower-mat-less? I know you like a bare floor for pictures….but you don’t slip around on there in real life, right?! Right?!
YoungHouseLove says
Haha! We actually have been living without a mat since moving in a few weeks ago and there’s not any slippage (the tile is a really matte finish) but if the tile is super glossy (think marble instead of old ceramic) it’s probably a good idea to have a mat.
xo
s
Jana says
Because I am a bio dork and it was my unknown sample for Micro Bio, that pink junk around the tub is called Serratia Marcescens. Its an airborne bacteria. Now you know and can whip that little piece of info out at cocktail parties hahahahaha!
YoungHouseLove says
Ewwwwwwwwwww! Also, good party trivia.
xo
s
Erin @ E So Sweet says
I haven’t read all six pages of comments, just the first, but I had pink caulk (that I couldn’t get to go away permanently) and grout in my apartments. (They were in the same complex, built in apx, the 1970s.) In the second one we had some trouble with the shower on handle thing (no technical terms here) and the repair guys told us that the pink was caused by water being in the walls. When they fixed our shower the ended up tearing everything out and retiling, etc.
Not to scare you, but there are lots of things that can apparently cause it. We have it now, but haven’t bothered to fix it.
YoungHouseLove says
Eeks! Thanks for the tip! We’ll eventually be retiling down the line so it’ll be interesting to see what’s behind those walls…
xo
s
Danielle says
I happen to LOVE that wallpaper–I hope you cut out a section and frame it! :)
YoungHouseLove says
Oh yes, that’s in the bottom of the post :)
xo
s
Amy says
I just removed shower doors in 2 of my bathrooms but can’t get that line of gunk off the top edge of the tubs, any suggestions?
YoungHouseLove says
Maybe scrub it with a pumice stone or a magic eraser?
xo
s
Jackie Toye says
I remember wanting those brass trimmed doors in my bathroom. I’m sooo glad I never installed them. My neighbor had them and when they sold their house, the doors were the first items I saw at the trashpile when the new owners took possession.
sonja lemay says
When we bought our first house one if the first things I did was take the shower doors down. Not easy to try and was a squirming kid who’s figured out….if I go to the way back corner mommy can’t reach me to wash me…not fun, lol!
Jenn says
Random question…what did you do with the doors once you took them off? We took down those dreadful things when we moved in and pitched the gross tracks, but I hate just to throw away the doors, you know trying to be green and all. But, here it is years later and they are still in my garage…here. Thanks!
YoungHouseLove says
I’d try donating them. Someone like the ResStore or a local thrift shop might even come pick them up for you!
xo
s
Skittle says
I have been after my husband to take down the glass doors in 2 of our bathrooms forever. I’ve had shower rods & curtains ready to go, whilst I just waited (and nagged). All it took to get him moving was one look at the pictures of what was living under your frame. Considering our doors have been here since 1967, we knew that ours likely looked the same or worse. Sure enough, same yuck, just different colored tubs. He was sufficiently grossed out to get busy on the other bathroom (where the kids shower) as well. Now, our issue is the caulk. It seems that the last people to re-caulk used a latex caulk instead of silicone, so it’s hard as a rock. I know you can buy a caulk remover, but have also seen suggestions online of heating it with a hair dryer/heat gun. Have you had any experience with removing latex caulk?
YoungHouseLove says
Hmm, we’ve never tried that but we like to cut it out with a knife when we can, so maybe softening it with heat and then cutting/peeling it out will work. Good luck!
xo
s
Idella H. Rivers says
I’m impressed! The bathroom now looks squeaky clean compared to how it was. What a transformation! The curtains look better than the sliding shower doors you had. We have curtains as shower doors but i’m thinking of replacing it with glass doors.
Carla says
Love the floor tile !I think its a keeper but the wallpaper and not really a fan of the shower tile but its covered so it doesn’t really matter. I know this is late but I am trying to catch up.
Jessica says
Can you tell me what kind of caulking you used? I just redid my bathtub this last week. I did it all and it looked amazing, then while giving my daughter a bath 2 days later (well past the required amount of time to keep it dry!), she poured a cup of water on the edge, and the caulking under it just began disintegrating! The stuff I used said it was for tubs and showers and was waterproof! I can’t figure out what happened! I am dreading ripping it all out and redoing it.. I was so proud of myself for the job I did the first time.
YoungHouseLove says
Oh no! For a bathtub you’ll want to use silicone caulk (we like the white stuff by Dap called silicone tub and tile I think). Good luck!
xo
s
colleen says
Every time I’m ready to do a home project I search your blog and always find a super helpful post! I’m a little nervous to find out what’s lurking under our frame…can’t be that much grosser than what it already looks like! A simple white ruffled shower curtain I found at Marshall’s for $16.99 will be going in it’s place!
Thanks so much for all of your helpful info (& color commentary!) You guys are great!
YoungHouseLove says
You’re welcome Colleen! Good luck!
xo
s
Stacy says
This post inspired me to FINALLY remove the moldy caulk in our own bathroom and redo it. Following your easy instructions, our “new” bathroom looks great! It feels like someone else’s bathroom and was a really inexpensive way to freshen things up and make it feel new again. Thanks for posting.
YoungHouseLove says
So glad!
xo
s
Lasso the Moon says
I did this in our current house, and you are right–barf! The smell of vintage mildew is bad enough without age-old soap scum mixing in. But like you, I knew it had to be done, asap. And I was so glad when it was gone!
Anna
Gina, book dragon says
Our master bath has double sinks between the closet door (walk-in) and the toilet/shower area. No more foggy mirrors or waiting for him to get out of the shower so I can dry my hair
sarah says
i will own that i didn’t read through all 430+ comments on this post, so you may have answered this already, but how did you get all the caulk off so beautifully? i removed shower doors and that silicone caulk was a bear to (partially) remove and still haunts my dreams.
YoungHouseLove says
Using a razor seemed to help shave it off but I bet it also has to do with how it was applied and what kind of caulk it was. Since ours seemed to be silicone based we could pick and yank and slice it off for the most part.
xo
s
Anita says
Hi, Sherry! We just took glass shower doors off a tub in the house we just moved into. Unfortunately, after scraping off all the crud/caulk that had accumulated along the bottom, we were left with some residue along the edge of the tub that won’t come off (looks like the area under your hand in the picture where you’re scraping the edge of the tub). Any thoughts for removing this?
YoungHouseLove says
Hmm, maybe try Barkeeper’s Friend? Or a pumice stone? Or a magic eraser?
xo
s
Sherry says
I am supposed to be cleaning my house for company coming tomorrow, but find myself removing the shower door track. Ick!
My husband is going to laugh out loud when he gets home. I blame it on you :)
T Ferguson says
I’ve never understood why anyone prefers the curtain to doors. With doors you NEVER have dreaded curtain attacks that basically decrease the size of your shower.
Elle Russell says
What would you recommend for a shower that has sliding doors but no tub? The doors must go … but that leaves me wondering what can be done since removing the door will leave us without much of a lip on the bottom of the shower.
YoungHouseLove says
Hmm, can you build up a lip with some sort of stone framework? I’d go to a tile shop or home improvement store with photos and see if they have any products or simple methods to make a lip. Good luck!
xo
s
Amelia says
I finally did it! I ripped out my moldy caulk and re-caulked the tub tonight. I remembered this post and used it for instruction. Thanks for the advice.
YoungHouseLove says
Wahoo! Congrats Amelia!
xo
s
Jenny says
Hi guys! Just wanted to say thanks for giving us the motivation to finally get our shiza together and take our sliding doors off too! 50,000 times better! :)
http://eatdrinkanddiy.com/2014/01/29/painting-tiles-what-i-learned-the-second-time-around/
Love love love your blog (and book!) Keep it up xx
YoungHouseLove says
Ahh, I love that post! Thanks for the tile painting tips! So good to hear what works in those situations. It’s looking so DIFFERENT in there. In the best way possible!
xo
s
Michelle says
Thinking about doing this too, can you show me what the holes looked like in the tile after you took off the doors?
YoungHouseLove says
They just look like small nail holes in a tile (smaller than the size of the eraser on a pencil), and you can fill them with caulk (either white, clear, paintable, etc) to try to blend them in. With the shower curtain hanging right in front of them they’re pretty invisible for the most part!
xo
s
alison l says
Hiya! Great tutorial on shower door removal! Couple questions: do you have discoloration on the tub where the door used to be? Did you do anything about it? Or just leave it be? We removed the doors on our tub & there’s significant discoloration and we’re not sure what/ how to improve it? Thanks in advance.
YoungHouseLove says
We could just razor and scrub most of ours, but maybe try a pumice stone to gently sand it down if you have a stained look? I would just test it in a small area to be sure it wasn’t scratching or something first.
xo
s
Cyndi says
I am thinking about removing the framed double sliding door from my guest bath. It’s been installed about 8 years, but like new because that bathroom is rarely used. My husband thinks I will be very disappointed in the look where the caulk came in contact with each of the grout lines going up the tiled wall. The caulk is clear & the grout is whitish grey. Do you think this will be an issue? I’m thinking that even if there is discoloration like he says there will be I can conceal it with the shower curtain.
YoungHouseLove says
I’m not sure without seeing it in person. Maybe try it and if you don’t like it just let it dry and cut it out? Caulk is removable so it’s not permanent :)
xo
s
Andrea says
Very late to this party, but THANK YOU for the inspiration. Just took off my own set of shower doors, following your extremely helpful pics and instructions!!!
Leigh says
I am doing this same GROSS Project! I got the doors off and most of the caulk, but I have this hard crusty cement stuff,maybe its just scum? How did you get it off? Did you straight razor the whole thing?
YoungHouseLove says
Yes, I razored it off, but maybe try a pumice stone to scrub it? Test it to make sure it doesn’t scratch.
xo
s
Temple says
Thank you thank you for this! I pinned this just last night during my sleeplessness and woke up this morning and did this to my bathroom. The layer of scum on my was equally disgusting but im excited about fixing my water damaged walls and flooring now. I thought I would have to g it the entire bathroom to fix the problem and do not know why this never occurred to me. Thank you again for sharing!