First things first. Thanks for being such great sports about our little April Fool’s Day prank (seen here).

Sherry was giggling the entire time she made that crazy nautical themed doggie mood board (at one point Katie Bower called and I actually heard a laugh-snort or two as she shared her little “project”). And it’s safe to say that every single comment – ranging from those of you who fell for it and those of you who knew it was a joke from the first sentence – made her day. Which made mine. Happy wife = happy life. In fact things were so copacetic around here that I was inspired to start my next big build.
I couldn’t dodge it anymore. The time had finally come get started on a behind-the-sofa-Karl console table for our living room. Having more than a padded ottoman in the room will be a big help, but it promises to be a big task. 140 inches big (er, long), to be exact.
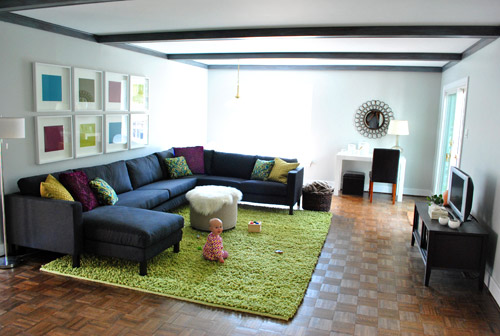
Let me back up for a moment. From the second that Karl arrived, we both agreed that putting a big not-Clara-friendly coffee table (even a round one) would probably be too heavy for the room and might result in more baby bumps and bruises than we were prepared for. And we’ve enjoyed being able to move the ottoman easily to make more room for playing, hosting, and vacuuming – so for us it was definitely the way to go. But we quickly decided that we needed a nice long console table behind the sectional (between it and the wall), to create a solid (and super functional) surface for two table lamps for reading, a spot to drop drinks, a box or basket to stash things like remotes, and more storage and display space for various other living area must-haves (that weren’t exactly hanging out on the non-existent coffee table).
But where does one find a nearly 12 foot long console table (!) to span the entire length of Karl? Um, yeah, nowhere. Unless you want to pay 3K to commission a custom build.
So I spent the last couple of months mustering the energy/confidence/game plan to create a customized DIY solution. We considered just putting a couple of floating shelves up to act as a long “floating console” behind Karl, but figured that left too much unused space underneath (and might not have the homemade weathered look that we wanted in hopes of balancing out more modern things like the green rug and the sleek sectional). So we decided I should build something customized to fit our giant sectional. Something that takes advantage of as much of the space as possible. And that’s when this plan from Wood Wonder Woman (aka: Ana White) caught our eye.
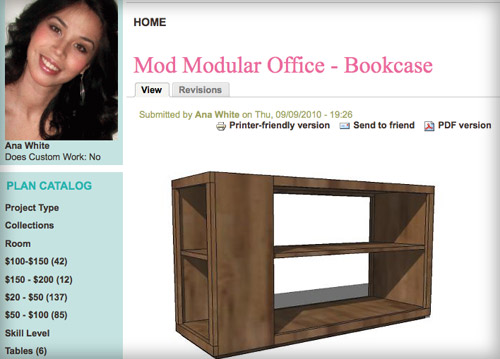
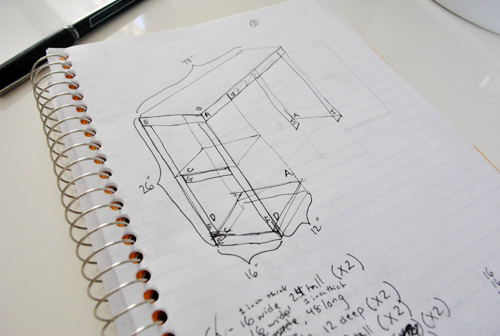
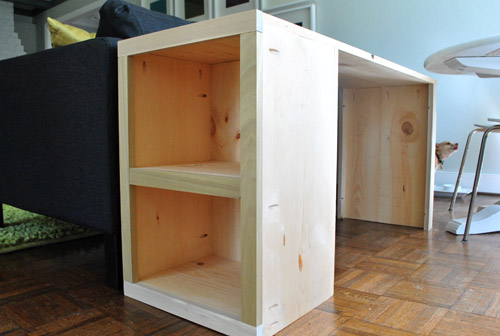
I knew I’d have to build this 140-inch behemoth in multiple pieces since maneuvering 12-ish feet of bookshelf just didn’t sound like a good time. So I hatched a plan to build three 4-foot sections that would be covered by one long “tabletop” for a nice seamless look. And the two end sections could take some serious inspiration from Ana’s bookcase above. Each of my two console table “end pieces” could have those two open shelves on one side (hello bonus storage!) but they wouldn’t need that interior shelf cutting through the entire middle since that wouldn’t be accessible (so we could save some wood, money, and effort by altering the plan a little). My version definitely looked a bit lot rougher when I sketched it out.
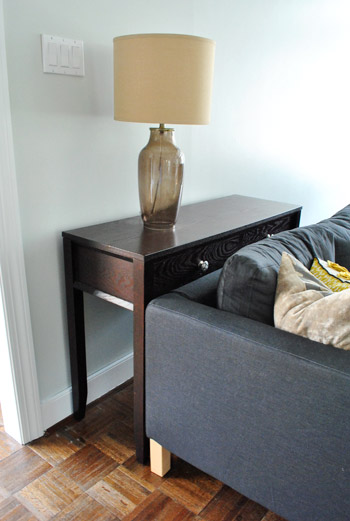
We figured out our measurements by doing a test with our existing console table from the hallway several weeks ago (I originally planned to start this in February… oops). We tucked it behind Karl to see if it was wide enough for a table lamp (it was just barely deep enough with the large sized lamp shade, so we decided to make my version wider – don’t want any head-into-shade issues). We also used the hallway console to see what height would look best (clearly our “test model” was too tall). The new one will sit somewhere slightly above the back edge of the sofa but below the back cushions for a hopefully balanced look with lots of easy-access function.
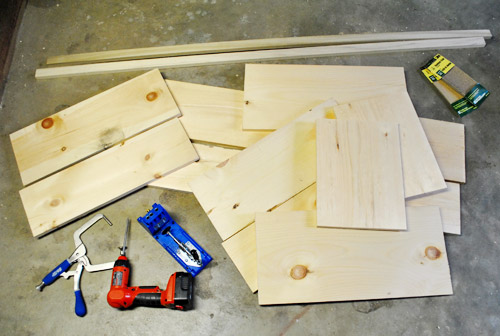
With measurements made and plans sketchily sketched out, we hit up the Home Depot for a bunch of wood – most of which we had them cut to size for us right in the store (for free). It saved us time and enabled us to squeeze everything into the Altima (which definitely wouldn’t have been able to accommodate planks that weren’t cut down). As usual, the happy baby of the group had a blast.

To keep costs down we bought basic white wood for everything except for the 1 x 2″ poplar pieces that we used to trim out the “end” bookshelves that would be seen on each side (no sense using the good wood on parts that would be hidden in the end- and the white wood provided more than enough support/strength/sturdiness). If I were a pro furniture builder I probably would’ve splurged on better wood, but who are we kidding – I’m cheap and this amateur didn’t want the pressure of screwing up the “expensive stuff.”
So here was my supply pile for one of the two end pieces. I’ll spare you an exact breakdown because this piece is so specific to our space. And if my drawing above is any indication, I should not go into the business of posting furniture plans. Like ever.
Notice those two semi-thick boards on the far left? Those are a 1 x 8″ and a 1 x 10″ piece that we had them cut to the same length right in the store. We wanted the console to end up about 16″ deep, but the widest board they sold was 12″. So putting two shorter boards side-by-side was our solution, since the boards are actually 7.25″ and 9.25″ wide (so they add up to about 16.5″ when put together – which was pretty much exactly what we were going for). So there’s a tip, even if the sign says that boards are 8″ wide and 10″ wide, they can definitely be substantially smaller.
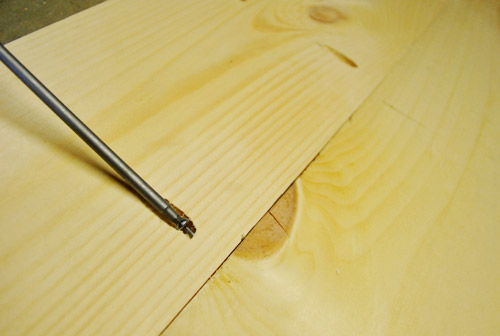
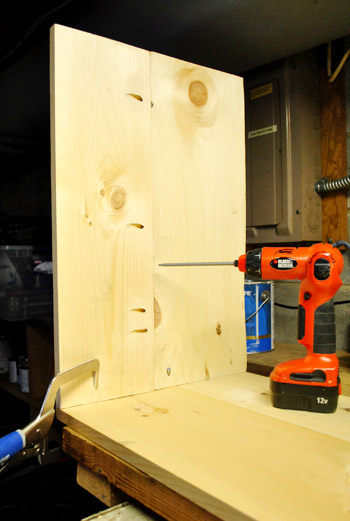
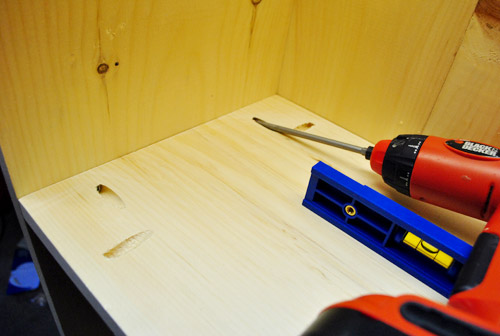
Anyway, when I got home I rekindled my ongoing love affair with my Kreg Jig for the task of joining the boards.

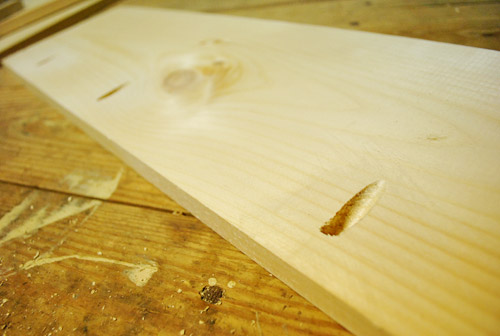
You can read more about what my main man Kreg does in this post, but basically he helps create perfect pocket holes to connect pieces of wood like a pro. They look a little something like this mid-job:
Then I lined everything up and screwed the two pieces together for a super tight hold like this:
That’s how I ended up with three 1 x 16.5″ planks to form the top and the two sides (aka: wide legs) of the console:
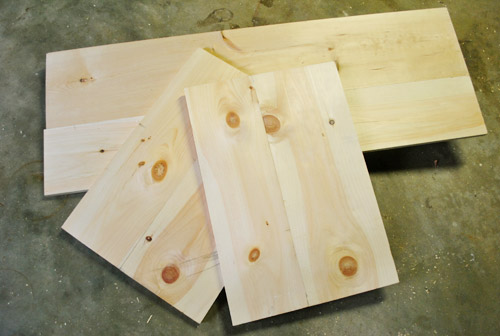
And yes, the top isn’t exactly flush on the left side. But since the whole thing will be covered by a long, separate tabletop in the end, it was only important that things were lined up perfectly on the exposed parts. Actually, since most of this piece will be unseen behind Karl and thanks to the new top that we’ll be adding, it really only had to look pretty on the open shelf end of each end piece that I was building (remember I’m making two end pieces and one middle piece to put together under one long 140″ top for the look of one long 140″ console in the end).
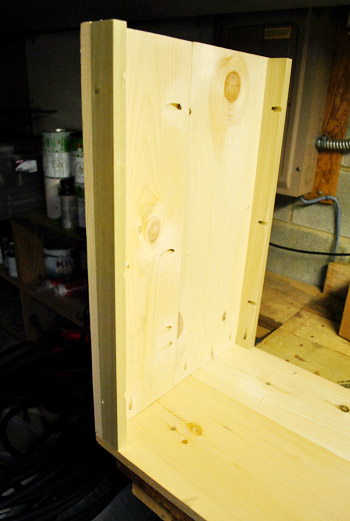
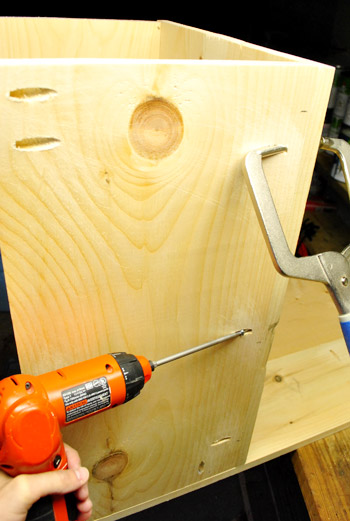
A few more Kreg holes and some meticulous clamping later, I was on to screwing in my first leg (the one that would be hidden on the interior side of this section)…
…and adding some 1 x 2″ rails for extra support.
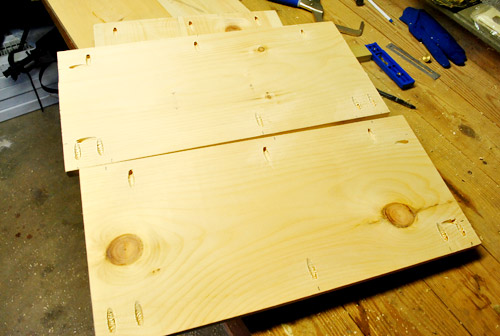
Next up was the bookshelf side. I started with the two sides of the shelf, comprised of two 1 x 12″ boards. Between attaching these to the top and the other leg, plus securing the finishing trim to them at the end, I realized I’d be doing a lot of screwing (that’s what she said). So I had myself a little pilot hole drilling party before attaching anything, just to get that step completely out of the way all at once.
Then my drilling party turned into a screwing party. Um that sounds even worse. But you know what I mean. On went the sides…
…then the back. Typically I’d put all of these ugly holes on the inside of the shelf, but since Karl will be blocking the entire side off the piece (since it’ll be snugly placed between the back of the sectional and the back wall) I kept the inside of the shelf, pristine (since it’ll be seen). Meanwhile the outside can be all busted up and hole-y, since that will be the hidden part (sandwiched between the sofa and the wall).
Next up were the two shelves (keep in mind this is all upside for now, so all of these holes will be hidden):
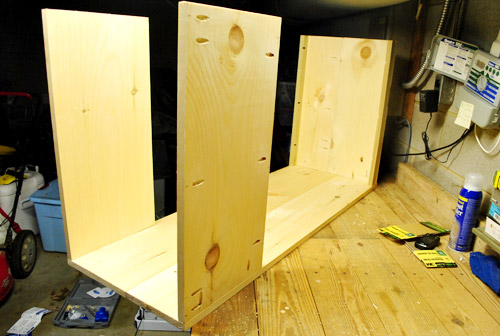
And last up was the trim on the outside to finish things off nicely. I used my miter saw to cut the 1 x 2″ to size and attached them using the holes that I pre-drilled in the sides and shelves. Now is it coming together for ya? I know it’s really confusing to read this step by step play by play, but hopefully now it’s starting to look like my sketch (it’s just upside down in this shot).
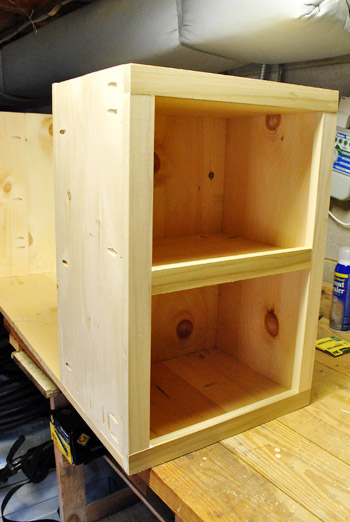
All-in-all, it took me about 1.5 Clara naps (that’s around 2 hours) to get ‘er done. Not all three, just one of my three pieces without the top. She’s not the prettiest thing yet, but I was surprisingly proud about how it turned out and how much less difficult it was than I expected.
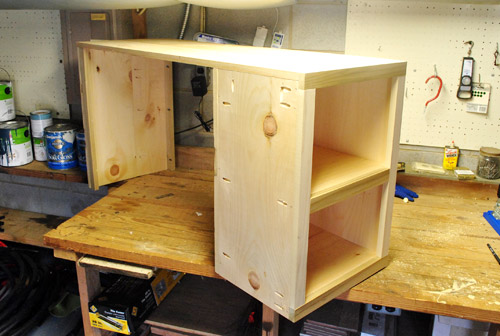
I’ll fess up that the console section that I photographed above was actually the second one that I made (since I need one for each end). I was so focused on not screwing up the first one that I forgot to take pictures. But that one came out really well, as did the second one (and the good news to anyone else who needs to build a console table in three parts is that you get faster as you go).
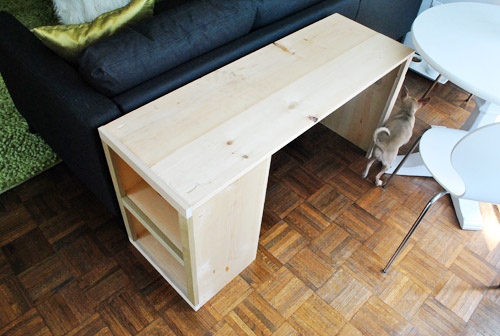
So since you’ve already seen my second one in the shot above, here’s the first one making its appearance during a test run behind Karl. Oh yeah but in this shot you can see my one “mistake” with my first console creation. Notice how I didn’t think to put all of my holes on the outside of the interior bookcases (which will be seen) my first time arond? Boo. Thank goodness for wood putty.
Of course this isn’t the side of Karl that it’ll sit behind eventually (it will go between the back wall with the frames and Karl’s backside), but I was just too lazy to move him out from the wall (he’s a big boy) for this quick test. I mainly just wanted to make sure the height felt right (which it did). When we add the new top it’ll sit just slightly above the sofa back, but below the back cushions just as planned.
And yes, Burger decided this was the perfect moment to eat lunch (despite the traffic jam of furniture going on). He’s not howling in the picture above, just chewing and looking out the window.
The third / middle piece of the console is actually already mostly built too, I just haven’t finished a few last minute details and snapped any pics yet (and let’s face it, this post is already long enough as it is). But we actually incorporated some storage into it even though it’s going to sit between the two side console pieces that I built. That’s right, it’s top-entry storage. More details soon. I still have the entire “countertop” to tackle as well, but we’ve decided to use some reclaimed wood (aka: slats from the old shipping pallets left in our yard) to inject some rustic beat-up style into this a-bit-too-modern-for-us-at-the-moment living room. As for the rest of the piece, we’re planning to stain it a dark wood tone so it sort of blends/disappears behind Karl. You know, so the more weathered and varied looking top can – in the words of my wife – be the star.
And as for the cost, for the two end pieces and the almost-done middle piece we’ve spent around $65, which doesn’t include the top that we’ll add (but since we’re planning to “recycle” the pallets that we have, we shouldn’t spend much more on this build). We’ll share a full budget breakdown (including stain and all that good stuff) when we’re done.
We’ll post more about the console as our work continues, but for now lets talk shop. Have you guys built anything yourself lately? Did you put some Ana White plans to good use while you were at it? Seriously, that girl can build anything.

Kristen says
Your posts are what I look forward to every day, because they’re my HALFWAY TO LUNCH reads. Then later in the day, I come back and read the comments! So basically, you guys give me a great diversion from work every day of the week!
Lindsay @ A Walk in the Closet says
What a handy hubby you are! ;) This is a great project and the desk looks beautiful.
Lori J says
I love reading your blog and watching the progress in your new home! Just a word of caution about using the pallets in your home. I have read different reports on the safety of the wooden pallets. They can harbor pests, bacteria, and some even are treated with formaldehyde!
Just be careful and do some research before you expose yourselves and that beautiful Clara (and Burger) to anything toxic or harmful!
http://www.pallettruth.com/
YoungHouseLove says
Thanks for the warning! We’ve heard that too, which is why we plan to use Safecoat products (probably Safecoat Acrylaqc) to seal them so any nasty outdoor treatment or chemicals that they have absorbed will be 100% blocked by the time we bring it into our living room (you can paint over lead paint with Safecoat and “seal” that and make it 100% safe as well).
xo,
s
Erin says
I’ve only built things with preset instructions, and the sense of satisfaction I get from that is slightly pathetic. I can only imagine actually building something… way to go John! I am just starting with DIY projects… I finally have my own space! I am excited to use your old tutorial find to recover an old piano bench :)
Barb says
Great job so far, John and Sherry..Brilliant and I think it will be perfect.
Have you ever used BISCUITS and a biscuit joiner to connect the two pieces of wood together?
That is what we use on all DIY projects and it is wonderful and very strong. A bit of biscuit and glue and presto!! The wood is joined.
Like the idea of recycling the lumber of the pallets. We did that once and made a bed headboard. Believe it or not…the planks on these pallets were OAK. Beautiful wood.
Done any DIY projects lately? Renovated our entire house and my daughter’s house too. Lots of blood, sweat and tears but we are finally done.
Sherry….hope your allergies are better. I am a CLARETIN girl when I need to be. Am only allergic to the corn tasseling in the late summer, but when it happens….I am miserable. Pop a claretin and I am a happy girl. Feel better soon.
Bravo to John!!!
YoungHouseLove says
We’ve actually never used biscuits but we’ll have to give them a try sometime!
xo,
s
Lara says
Ditto to biscuits… makes a better finished looking product too. No wood filler!
Kristin says
SO impressed. I love these kinds of posts–they seriously inspire me.
Well done–I’m dying to see the finished product.
Also, have you guys finished your other gallery walls yet?
YoungHouseLove says
Nope, we still have newspaper hanging on those other two walls. Haha. Someday though!
xo,
s
lana @ make a house a home says
very very cool! my husband made a console table for the entry way, and we loved it so much, he’s making one for behind the couch.
It cost us $40 and was made totally of two pieces of reclaimed wood and some DIY hardware.
http://joeyandlana.com/joey-and-lana-home/2010/11/1/table-flipping-at-its-finest.html
Thanks for the great post. Can’t wait to see it all together!
Lisa says
I can’t wait to see your finished product! Looks great so far, and I love the idea of using the reclaimed wood for the surface. As usual, you’re hitting it out of the park.
Recently we built a bar in our basement (link below), kind of flying by the seats of our pants. Great to know about Ana’s site, which we’ll definitely be visiting in the future!
http://lisamanderson.tumblr.com/post/3566921047/basement
Lonely Wife Project says
Amazing job so far! Can’t wait to see the final after shot.
Hillary says
Holy cow! I’m so impressed that you attached the poplar face frame using the Kreg jig! Whenever I do face frames, I glue and nail them on with my pneumatic nailer (yes, I’m lucky to have one) — I can’t imagine pocket-holing them. Very impressive! Can’t wait to see the finished product.
Kate says
Looking great so far!
I’ve been loving Anna’s plans for quite a while now, but have yet to build one. We’re currently in the process of buying a house, and my husband has expressed the desire to have a bed with a footboard once we move. I’m definitely looking forward to building the farmhouse bed, and I’m hoping to do a few other projects as well (I think we’ll have need for some bookshelves!).
Megan @ reFind says
My husband might have John beat with the love affair with the Kreg… He uses it way more than he needs to, just because he loves it! You guys are lucky that your HD cuts the boards so nicely, ours never got them close enough, so we broke down and bought out own table saw.
Love your finished product… well almost finished!
Liz says
It looks awesome! I love Ana White. I’m in the process of building the kid’s kitchen from her website for my daughter’s 2nd birthday. I’m loving it! I can’t wait to build more stuff!
Dawn K. says
Looking good! This is perfect timing! We’re looking to do a custom desk/craft table similar to your DIY desk. However, since we’re thinking about making it almost the entire length of the room (120 in), we’ve run into issues with finding a wood top that long. I’ll be excited to see your finished product here so we can have other reference points as we continue to brainstorm how we want our desk to look.
Ashley says
I totally fell for the Burger room… until just now? Hello, is there anybody in here?
I even emailed a friend about it. I’m seriously gullible. And calendarless apparently.
karen @ our slo house says
I forgot to mention…
Every time I see your Ikea pendant lamp in a house tour, I think of you guys. Here it is in another feature. (3rd photo down)
http://www.desiretoinspire.net/blog/2011/4/2/readers-home-in-catalonia.html
YoungHouseLove says
Ooh so pretty. Love that light!
xo,
s
Margaret says
Ummm love Ana White. My husband made the modern farmhouse table for our patio and is currently making us a console/dresser. It might end up as our bedroom dresser (we’re currently dealing with the birch version of the three-drawer malm = not enough room for anything) or as a buffet in the dining room.
Miranda says
Well my husband and I just bought our very first house on Thursday 3/31 (a 1950’s ranch) and so far we’ve rebuilt our bathroom all by ourselves, haha! It was quite the experience!
We’re also planning on building the bed frame and headboard combination that will be going into our upstairs guest bedroom. We’re also getting the plans from Ana White (she’s brilliant!!!) and modifying them to our tastes.
Boy, no one told me how GREAT it feels to get down and dirty with your own home :)
Nesting Newbies says
Wow!!! Great job guys!!!!
Giulia says
Wow, good job. This is really coming together nicely. Can’t wait to see the finished product.
We just finished a kitchen built in. We did not use a Kreg Jig, but rather a ‘puzzle’ system where we sandwiched different widths of wood together which then lock into place, kind of like IKEA furniture does. Our main goals was to have extra seating, storage and best use of an otherwise empty kitchen corner.
http://fishly-fishly.blogspot.com/2011/02/kitchen-custom-bench-part-i.html
We also made a very weathered/rough table to go in that space as well.
http://fishly-fishly.blogspot.com/2011/03/custom-bench-part-ii.html
Kara says
Looking good! Way to go, John!!! :)
Lara says
Looks like a great start! Can’t wait to see the finished product!
I love Ana White (but have only admired her as a wanna-be builder so far)–Her site is actually how I found you guys–yeah, for me…:)
We were thinking building a daybed for our daughter with lots of storage, but we ended up buying a whole bedroom set on craigslist for cheap. I know–matchy, matchy–tacky, tacky…but it was tons of real wood storage for not much moolah. I hope to mix it up a bit with paint.
My own father made some of the furniture in our house, & those pieces are treasured in our family (esp. since a stroke has taken his ability to make more.)
What a wonderful gift for Sherry & Clara! Great job, John!
Alayne says
I am so excited to see your console table. What a fun build!
We love Ana White in our house! So far we have built 2 farmhouse twin beds, a trundle bed,a bench, and are working on a console table for our front entry. That woman is just plain AWESOME!
I can’t wait to see your finished console.
Robin says
I could write a paragraph about everything you’ve done but I’ll condense it to say this is an awesome project and an awesome post. You two are rock stars.
Leah Z says
Awesome build!
I know your ongoing love affair with your kreg jig probably took preference in how you got a 1×16, but Ana White has addressed that problem by ripping plywood. 1 piece = 3 1x16s.
I just built myself a potting/workbench from Ana’s plans. They really are great, aren’t they?
Mindy M. says
We LOVE Ana White at our house. I have built a bench with a flip up top, and have the plans printed & waiting for an entryway locker (since we don’t really have a defined entryway or a coat closet in our house).
It wasn’t Ana inspired, but my husband & I did a little demo yesterday on our 30+ year old shed & put up new siding & a new door on one side (3 more sides to go to have a newish shed).
The bench I built: (http://www.ana-white.com/2010/02/storage-bench-coffee-table-save-300-or_1224.html)
The entryway locker: http://www.ana-white.com/2011/03/my-first-build
Michelle @ Dream Home DIY says
Oh we so love to build our own furniture too!! There is this huge amount of pride when its all said and done. You guys are coming along so super with this, and the reclaimed lumber top has me all giddy (I have a huge weak spot for old wood). We built a hutch for our dining room out of old lumber not too long ago and LOVE it
DanielleR says
Sorry John but Clara stole the show on your whole post. She is just too cute for words, with her toothy little grin I couldn’t even focus on your console lol. I <3 Clara!
Mercedes says
It’s decided I am officially getting myself a Kreg! Those things are just too awesome not to have as a part of your tool arsenal!
Looks like this is going to turn out great btw! I kept waffling back and forth on a console table, and although I like the extra surface area, for where mine would have to located it just doesn’t help my small space.
laxsupermom says
The new console table is looking fantastic! Can’t wait to see it all done and in place. I love Ana White’s building plans, and almost went with her design for picture ledges, but ended up going with my own.
Your building plan is definitely way more professional looking than the one I drew up for my hubs for the picture ledges I had him build. I labeled everything really well, but it was definitely not drawn with a slide rule so nothing is proportionate on the drawing. I’m painting my shelves a deep brown. What color are you going with for the table? Thanks for sharing.
YoungHouseLove says
We’re thinking about doing a dark rich brown stain on everything but the top, which will hopefully look more weathered and varied and rustic. Pics and more details to come!
xo,
s
Beth says
Nice Console!!
And Sing a Ma Jigs are on sale:
http://www.fisher-price.com/fp.aspx?st=900000&e=storethumb&pcat=fps_popBrand_singamajigs
Erin says
What the heck is white wood? Never heard of it before, looks kinda like pine to me :)
A tidbit about wood widths – the width they use at the reno store or lumber yard is based on the width (and thickness) of the piece before it is “dressed” (planed down to remove bark, etc. and make it all smooth). Thos 1x8s were actually a full 1×8 in the past :)
YoungHouseLove says
Yeah, we’re so not on top of things like that, but we think it might be the same thing. They were the cheapest boards that still felt solid and dense enough for the job, but were labeled as “whitewood” instead of pine. Maybe it’s just another term for it?
xo,
s
Amanda M. says
Yay… you have the Kreg! And since you did a post using it, I know that you must like the Kreg! Got it for the hubby last month for his birthday hoping it was a wise investment, and now I’m assuming it is!
Notice how he’s yet to build us anything, lol! Ana’s farmhouse bed is in our future and I can’t wait!
Megan says
Very nice! I would break/loose fingers if I tried to build something like that.
Sarah says
Wow looks awesome! And I had been considering making a console table from Ana White’s plans but didn’t know if the store would cut the wood down to size for us since I didn’t want to invest the money into the tools to do it ourselves right now… So glad to have that piece of information!
Felicity @ Our Little Beehive says
Looks great! We’ll be working on built-ins in our dining room. I’m sick of seeing our shoes by our table…yes, we use the kitchen entry and have our shoe trays in the dining room. We’ll hide our shoes in the built-ins like they’re expensive china…or stinky leather.
Karen says
I was lucky enough to be given a sewing machine from my mom and so were suddenly in need of a sewing table. Unfortunately, we needed to fit it in a rather small space in our guest room and couldn’t find a table of that size to buy. So, we drew up some plans and headed to Lowe’s to buy our wood. It’s all cut up and ready to be sanded and put together. Hope it comes out the way we picture it! By the way, we did something similar along the lines of staying cheap for most of the parts and then spent a little more for the table top part that will be seen more often. Total cost came just under $30…not bad considering I was looking at tables for closer to $100!
Hilary @ My So-Called Home says
Lookin good can’t wait to see it all together! And top-accessable storage? Hmm that’ll be cool to see.
Plein Jane says
I love your rug, too, but when I showed my husband something similar over the weekend, he said it looked like a place “where dinner goes to die.”
Men can be a buzzkill! But, John, you seem amazingly open-minded. Or maybe we’re just not privy to the disagreements. :^)
LauraC says
hahaha!
Kristen says
Great start on the console table!! Can’t wait to see how it turns out!!! LOVE Ana’s website … we just built the king farmhouse bed a couple months back and LOVE it!! I will post a pic!! :-)
Cassidy says
Loving how you picked a design that incorporated storage! Looking forward to the finished project.
Jodi says
My husband and I love Ana White! We are planning on building the outdoor sectional and the upholstered bed. I kinda want to build everything she has on her website even though I’ve never built anything! The consoles look great! Can’t wait to see the finished product!
Krystle says
Nice job!
We have actually used an Ann White plan. We built our dining room table, tweaking the modern farm house table plan. We love our table and it only cost about $100 to build (that sure beats the $700 price tag of a basic pottery barn table). Now we just have to find the perfect chairs!
heather says
I’d never heard of Ana, very interesting! I’ll need to go check it out. So, re: pallet top – are you going to face nail it to give it the uber rustic look? I originally thought you’d have rails and inlay the pallet boards flush to the top (fastening through the side rails but with the white pine (or at least that’s what it looks like) top on it I was trying to figure that out from the pictures how the you were going to secure the pallets on top? Maybe kreg through the bottom to secure?
heather says
Or maybe I could learn to form sentences. Holy smokes. Fast fingers & slow brain kind of day.
YoungHouseLove says
John’s planning to Kreg Jig to secure them from the side so they’re very dense and level (like he did with the sides and top in this post). More pics when we get there! We just didn’t want it to be bumpy do things like our lamps were crooked and rickety.
xo,
s
Claire says
I’ve been really looking forward to this post. Though, it makes me miss having space to build so very much! I think you’ve done an amazing job so far and it is going to be so awesome behind Karl.
I built my own coffee table in my 900 square foot apartment a couple of months ago. It was right after you guys painted the back of your built-in bookshelves (hence the sorta copycat hue of the table). Since I live in a fairly quiet condo community I knew I would have to be careful with the amount of noise I made while building. Imagine me carefully and slowly sanding the wood putty on my balcony so my project didn’t echo too much around the courtyard we face. My finish job wasn’t the greatest but it has really grown on me. The best part is that its so rough looking to start (shabby chic, perhaps??) that I don’t care about moisture rings from cups, my cats’ claws, dragging something rough across the top. It is a very low stress coffee table!
Details in this post (with a ton of other DIY apartment decor).
http://livetastereach.wordpress.com/2011/03/02/a-little-diy-apartment-decor/
Andrea says
My husband I built my desk, it is modular and has 2 bookcases on each end, a 3’x8′ top and a hutch thats over 6′ when on the desk part. Its great because it allows me to keep everything for my office right there. We use to have a desktop cpu and had a storage cabinet for that, but when it died we were able to swap out a bookcase! Its the perfect solution! We priced ones in the stores that were around $2000 and we spent maybe $300 on all the wood!
Also you mentioned in your post that your wood wasn’t 8″ or whatever, thats all wood, if its a 2″x4″ it will actually only be 1 3/4″x3 3/4″. I’ve asked my Dad (he’s a contract and been in construction his entire life) about this and he thinks its silly too but the way it goes! So don’t forget to account that for when measuring!
Jessica says
Looks great! Might have to tackle a little console table myself here shortly….we’ve been looking for a piece for our living room as well. BTW….My little peanut has the same elephant outfit from Old Navy that Clara is wearing….it’s my FAVORITE!!! Seriously, could Old Navy have cuter baby clothes???
Krysta @ Domestic for Dummies says
I love Ana White and wish I had the motivation you do to actually do one of the projects on her site. But you did a great job John, it looks awesome! Can’t wait to see the final product!
Krystle says
We love Ana White’s plans. This is our most recent Ana inspired build.
http://alwaysanotherproject.blogspot.com/2011/01/look-what-i-can-do.html
YoungHouseLove says
Wow- that looks awesome!
xo,
s
Adam says
Your use of DIY terms is great, aka ‘white wood.’ Also, I have to give you major points for how you assembled this entire piece using the Kreg pocket jig. Thanks for introducing me to Ana’s site, I will spent way too much time there this week looking at furniture plans!