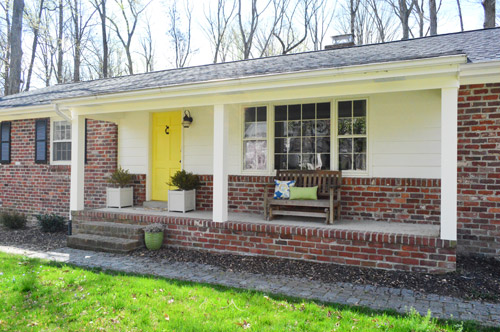
And I’m calling this bad boy done. Commence the rejoicing! And to recap why we wanted to box those columns in:
- the carport has 4 columns that are already chunky and square, so up until this point the house had a split personality with 3 curvy columns in the mix
- boxed in square columns are more true to a mid-century ranch, so we wanted to get back to that (many other ranches in our neighborhood have ’em already)

Back to finishing things up. After getting this far within one afternoon we had high expectations for how quickly the finishing touches would go. I mean, how long could finishing one column, caulking the seams, and painting take?
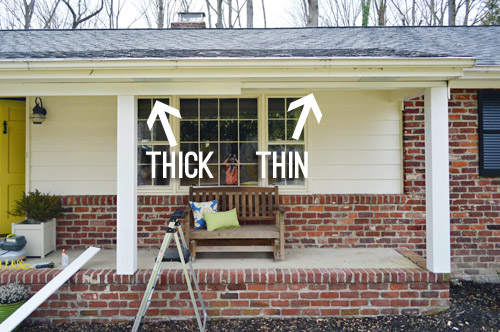
Well, it didn’t help that we got derailed before even unholstering our caulk gun. When all three columns were done we stepped back and thought the de-scalloped header looked good, but a bit unsubstantial in comparison to our beefed up columns. So we picked up three more 1 x 6″ boards at Home Depot and attached them right over top the original 1 x 3″ header that we added with some wood glue, nails, and screws in a few places. You can see how it looked while it was in progress here:
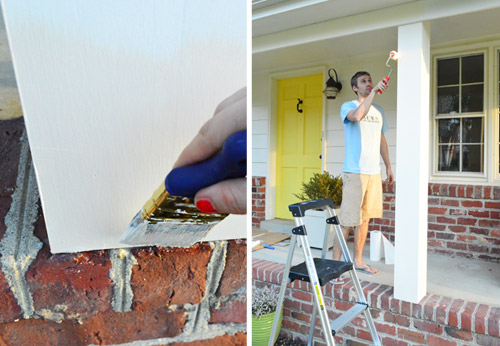
But even that detour didn’t take too much longer. What did take forever? Caulking. There were so. many. seams. But we didn’t want to be anything less than thorough, since getting rain or other moisture behind the wood = bad news bears. We used this exact same method in our first house when we rebuilt the header five years ago (primed wood + paint and caulk to keep it all sealed) and it worked out great without any rotting or warping – so we wanted to make sure we were just as thorough this time around.
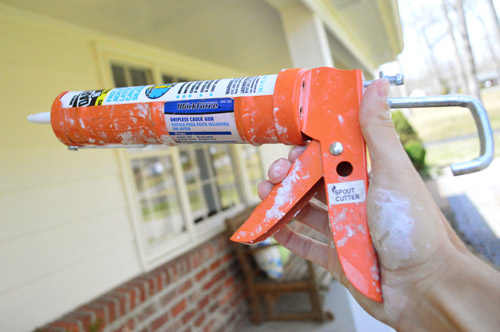
And since everyone asks what kind of caulk we use (that wall full of 10,000 caulk tubes can be intimidating) we like Dap window and door caulk, in the white, paintable finish (paintable is key).
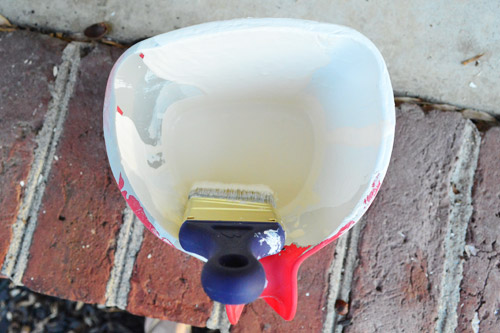
Once the caulk dried, it was time to paint. Since the boards came pre-primed, all we had to do was match them to rest of the porch – and because the previous owners left us a couple gallons of house paint, there was happily no cost here. The labeled said it was “Creamy Color,” which is about the laziest paint color name I’ve ever seen, so I’m happy to discover that it’s no longer in the system.
We debated using this as an excuse to repaint all of our trim from “creamy” to white, but we weren’t ready to tackle that big of a project quite yet (there’s trim all around the house, and the back of our house is two stories high at some points).
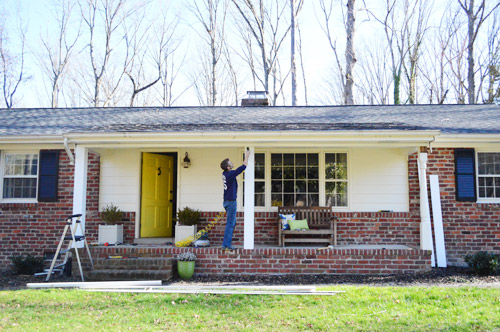
Predictably, Sherry did the cutting in (look at her brazenly painting the bottom of that column without taping it off) and I was Roller Man.
After one coat plus some touch-ups, we were done. And as you may remember from the start of this post, there was some rejoicing.
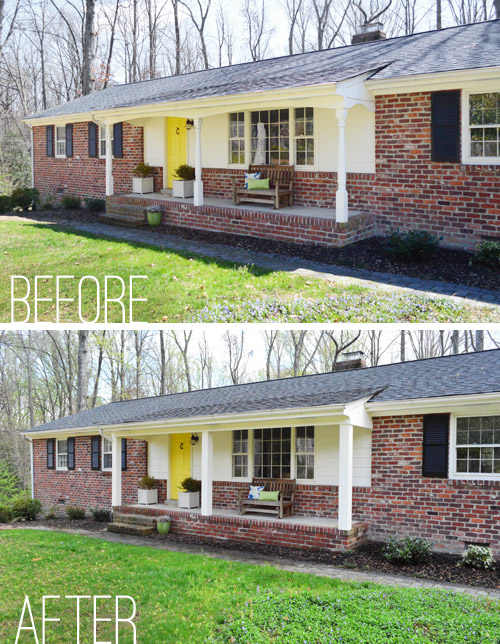
Now when we roll up to our house, the outside looks a little more like us.
Getting rid of (well, concealing) the more ornate and traditional columns just makes our exterior feel crisper and more updated (not to mention it’s much more true to the columns that a mid-century ranch would actually sport). Plus those three curvy columns no longer fight with the four square ones in the carport. Hurrah.
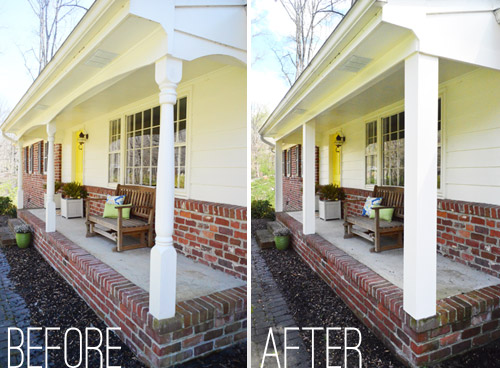
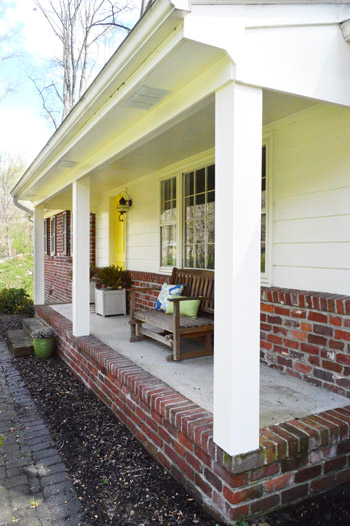
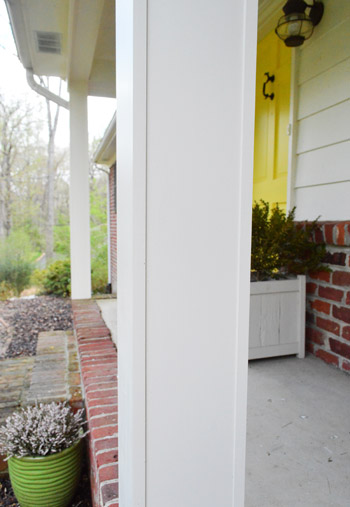
And here’s a close-up so you can see the slight detail on each of the posts where the 1 x 8″ boards (on the front and back of the column) meet the 1 x 6″ boards that we nailed to the sides. Note: there’s a handy sketch of why square columns call for two 8″ boards and two 6″ boards in this first porch post here.
Budget-wise, our entire cost was in primed boards since we already had house paint and a tube of caulk. Here was the breakdown:
- Four 1 x 3″ boards for original (thin) header: $20.50
- Four 1 x 6″ boards for thicker header: $41.33
- Six 1 x 6″ boards for sides of posts: $62.08
- Six 1 x 8″ boards for front & back of posts: $74.12
- TOTAL: $198.03
If we had known the 1 x 3s were going to be too small we wouldn’t have bought them (which means you could probably recreate this for $20 less). We could’ve bought cheaper boards for the rest of the project too – like basic whitewood – but I like working with pine because it’s noticeably smoother and straighter than the cheapest stuff. Plus, we liked skipping the priming step and this is the same stuff we used for our first house’s porch makeover five years ago (we like knowing that’s holding up well half a decade later).
Now that this project is done, we’re in the mood for more outdoor projects, so thank goodness spring has finally hit Richmond.
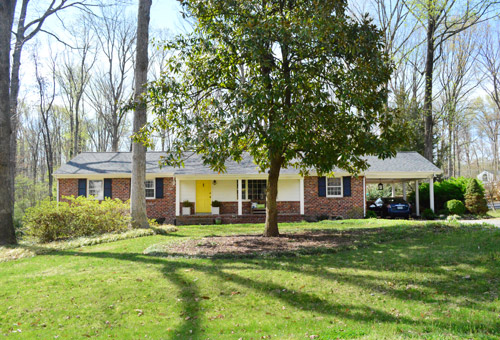
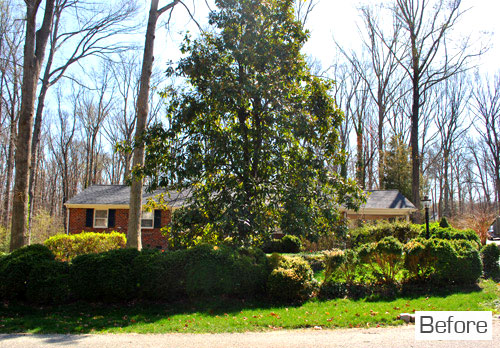
And we’re pretty excited that in the three springs since we moved in, the house has evolved quite a bit in the curb appeal department…
What’s on your spring to-do list? Any big projects that you’re hoping will get the ball rolling? Or are you just excited to down some lemonade and call it a day?
PS: I was this close to naming this post “Porch-a de Rossi” because it was the only porch pun I could think of. I blame my excitement for the new season of Arrested Development.

Tori G @ Styled Like A Rockstar says
Love the way your porch turned out!
Stop by http://styledlikearockstar.blogspot.com/2013/03/kitchen-remodel.html
and check out the kitchen redo my husband and I did after hurricane Sandy.
YoungHouseLove says
Looks great Tori!
xo
s
SarahN says
I thought I’d love the boxed out columns, but something doesn’t look ‘right’ to me. Maybe it’s change – I’m horrible with some changes (namely haircuts – mine and others) I definitely think the curvy ones weren’t you style, but there’s something out of proportion to my eye now.
Jessica says
It’s not just you. I was very much looking forward to this update, but the scale is off. I think the columns are too big for the space. Also, I was picturing some trim running vertically up the corners, creating a little bit of an upgraded look and to add interest while still maintaining the clean modern lines.
ces says
Good job! The columns are looking great.
Mary | lemongroveblog says
Much less country-chic. :) Love the new look!
Abby @ Just a Girl and Her Blog says
Love the new look! It really streamlines the front of the house! Hope you guys are having a great week!
~Abby =)
Angel says
Soooooo, excited about the new Arrested Development. My family is already planning a full day of viewing festivities.
Also, what kind of paint do you recommend for a porch. I am in the deep South and have a problem with mildew. Do you seal it?
YoungHouseLove says
We just use exterior paint since it’s made to hold up to the elements without any added sealer :)
xo
s
Ali says
Looks great! I didn’t know that the boxier columns were more typical for mid-century brick ranchers. Our house “came with” boxier ones and I do like them except for the ugly whatever-you-call-it atop our banisters. :)
Jessica says
LOVE the new mobile site. It looks fantastic. I had a little trouble commenting, it kept redirecting me. Could be me/my phone… But wanted to let you know and totally compliment you on it. Today was the first day it’s shown up for me. Again, my phone hates me so if this old, sorry!
YoungHouseLove says
Aw thanks Jessica! So sorry about the commenting thing, the mobile app isn’t set up for comments just yet, so it’ll just redirect you to the main site until we can figure that out :)
xo
s
Linda says
Hi guys – off topic comment here – today I’ve tried visiting your blog on both the iPad and the iPhone. It seems like you’ve got a new mobile format and I’ve had an awful time with it and had to switch over to the desktop version. I couldn’t comment while on the iPhone and on the iPad couldn’t view the full version of either of today’s posts. Probably just user error but in case not, thought you’d want to know if things aren’t working as planned.
YoungHouseLove says
Thanks Linda! Today’s the first day we have it up, and we are still working out the kinks. You can always choose to view the site in the old version (where you should be able to comment and read as usual) and if you’re in the mobile format, we haven’t worked out comments yet, so it will redirect you to the old version if you’re trying to comment. Hope that helps! :)
xo
s
Alexandra says
We have columns in our new townhouse. Do you think this system will work ok indoors? Would you change the process at all?
YoungHouseLove says
Oh yes I bet it would work inside too! Only thing I’d change is that inside I’d use no-VOC paint :)
xo
s
Anita@acomfyhaven says
wow, great work, the new columns look more modern . My spring project is reupholstering my sofa but I keep putting if off , I know I need to move from ‘shades of white’ because with baby it is difficult to maintain but not sure if I can still live with another color. :)
karen says
i think some new planter’s are needed now…maybe something navy blue with more curve to it?
Autumn Beach says
LOVE the new look! We have had the same columns with the same fix on the SAME to-do list since last summer. Ugh. We need to dude-get-on-that! Thanks for lighting a fire. And thanks for mentioning how important the caulking step is. I hadn’t thought of that!
Charlotta says
There are tons of projects on my spring to-do-list, although most of them are garden-related and therefore have to wait, since the ground is still frozen here (just north of Stockholm). The first project is to plant all the hellebores I’ve bought (as well as a cherry tree and a flowering quince). When it comes to gardening I envy your climate (but not when it comes to skiing :) ).
Jules Klimek says
The impact of changing the columns is huge. Before and after really show it. Really nice! But now I’m looking at my front porch with a critical eye – which doesn’t bode well for my poor hubby! Have a great week!
YoungHouseLove says
Aw thanks Jules! You too!
xo
s
Christina P (NS) says
The porch looks great but I am blinded by my jealousy of John painting, outside, in shorts and flip flops!!
YoungHouseLove says
Haha, spring has finally come! Hope it heads your way soon!
xo
s
sobeida says
Is amazing what $200 can do. Love the “new” front porch!
Ian Anderson says
Suberb idea to thicken out the head too, pulls the columns together nicely.
Our spring project is to reshape our (abandoned for 27 years) garden using 20-30 tons of topsoil.
It’s taken two summers just to clear it and get a feel for the shape. The top few inches of soil is so tangled with roots from all the jungle like growth that was here, we’re just going to cover it with new topsoil, reshaping as we go. Then it’s grass and mow till everything bit the grass is dead!
Wish it was flatter like yours!
Cheers
Hardwood Hugh says
Were the original columns made of thick wood?
YoungHouseLove says
Yes, they were solid turned wood columns :)
xo
s
Susan says
On my monitor, in the second photo your shutters look deep blue instead of black, and I really like it with the yellow door! You don’t really have much black in your color scheme, so I was wondering if you’ve considered repainting your shutters to something like a cobalt or navy blue, or even a charcoal gray?
YoungHouseLove says
Oh yes, charcoal gray has always been my dream! Maybe someday I’ll tackle that!
xo
s
Susann says
Such a small change but it really made your place look updated and modern! Congratulations!
Jennifer says
Love the new columns, and I’m really impressed at how low you kept the costs!
YoungHouseLove says
Thanks Jennifer :)
xo
s
YoMomma says
Looked better before.
Lisa says
delightful post title. gave me the giggs :)
Kacey says
NICE!!! My boyfriend and I are doing some landscaping and curb appeal this spring! So excited! We have removed all the huge bushes, next we will plant smaller ones and some flowers! May blog about it ; )
YoungHouseLove says
Sounds like fun Kacey! Would love to see pics when you tackle that :)
xo
s
Erika says
Looks fantastic! Great job!
(And how is it that trees in the south are less leafy than the Pacific Northwest? Eh? Was there a delay from project to posting?)
YoungHouseLove says
We’ve had quite the delayed spring this year! We just shot these pictures last week and over the weekend. But things are already looking quite different already. Thanks goodness!
-John
Sassafras says
Spring to dos? Painting the boring contractor tan out of our new house. Fall was soooooo depressing with the poor lighting and drab walls. I need me some COLOR and some full spectrum lighting before fall rolls around again!!!! We’ve also been doing some landscaping and getting in a food and flower gardens. Adding hostas and azaleas under the pines, creating flower beds where there are none, adding lily of the valley by the front steps so that there’s a delightful smell in years to come as we and guests come and go!
The column job looks fantastic and such a small thing to make such a drastic change. The ol’ gal has had a beautifully done facelift! Huzza! And besides John got to bring out his nailgun. A winner all round.
YoungHouseLove says
Haha, thanks Sassafras! Good luck with all of your spring to-dos!
xo
s
Becky Bernard says
this is MY house, except I have garage where carport is. My pillars are round. I want to cover or paint cement porch any recommendations for color?
YoungHouseLove says
Hmm, maybe a soft gray/brown tone? I’d bring home swatches and hold them there and see what you like. Good luck!
xo
s