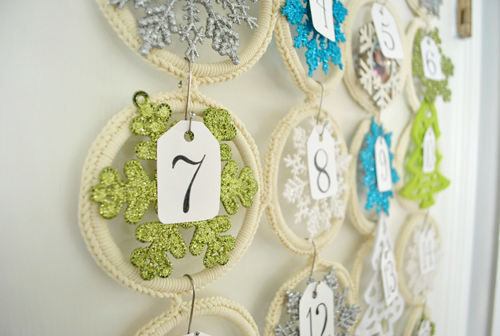
We’re still working away on the kitchen, so we’ll have update post #561 for you soon (kidding, it’s probably more like #19 or something – but still). This week we’re hoping to share lots of major progress (new counters and a working sink again – finally!). In the meantime, it’s about time we got into the holiday spirit. There’s just something special about spending our first real Christmas in our new house that makes us want to go all out. We moved on the 13th of December last year, so we were technically here for last year’s holiday season, but we were living out of boxes and Clara was too young to really get excited about all of the magic that makes the season so special. But this year it’s on! So I kicked things off by making a little advent calendar to enjoy with Clara:
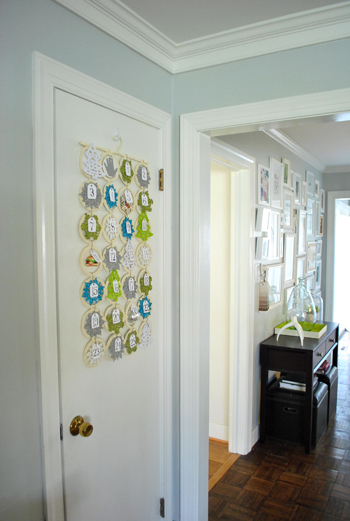
Oh but here’s how it looks from her point of view (gotta soak up the days that she’s shorter than me, because I’m sure they’re numbered):
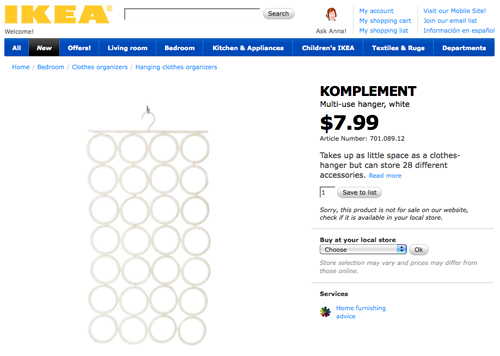
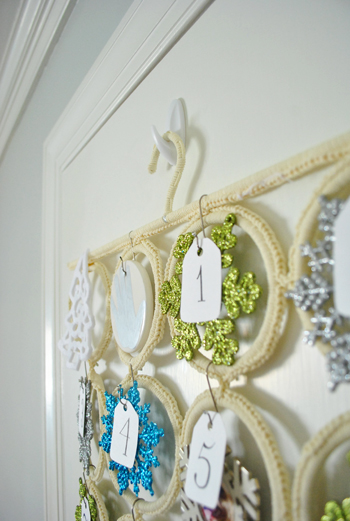
This little holiday project was only $7.99 because I used things that we already had and only purchased one thing: this scarf hanger from Ikea:
Allow me to paint you a picture of me at Ikea when the idea slowly hit:
- I walked by said scarf hanger.
- I thought to myself “self, there has got to be some other fun use for that.”
- I stood there with my mouth half open staring at it for a good three minutes.
- Then realized that it had 28 openings, which is pretty close to 25…
- … which brought me to the idea of an advent calendar, which I had been meaning to make for the bean.
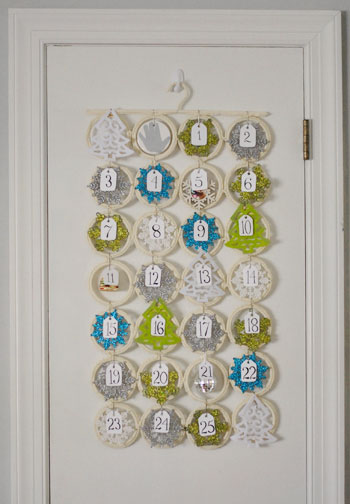
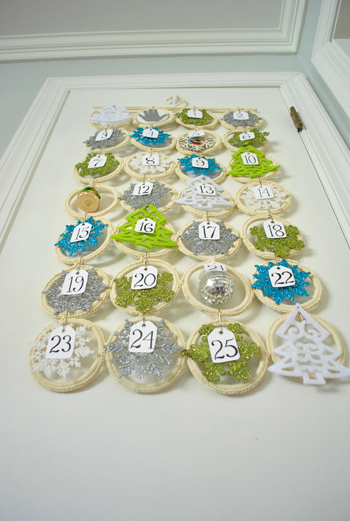
I decided the three extra circles could be “free spaces” and the rest of them could sport numbered tags and ornaments. Bam: instant advent calendar. It’ll be a fun daily activity to do with Clara (we’ll hang an ornament a day on the tree together as we work our way through the calendar).
I actually whipped it up on December 2nd (procrastinate much?) but alas, we have yet to set up our tree (another sure sign of procrastination). So we’ve been admiring the ornaments as each day ticks by… hoping to get the tree up within the next few days so we can “catch up” and hang five or six ornaments on the tree all at once. Then we can go day by day from then out…
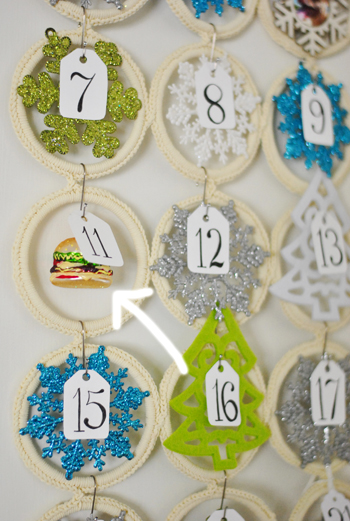
As for how I made it, I just took metal ornament hooks that we already had on hand and stuck various ornaments through them (if they didn’t have hooks already). Then I looped each hook over the circle or bar above each circle (all of them had circles above them except for the top row which had that bar). That way each ornament hung into the circle under that and was sort of framed that way. And of course we worked in some quirky ornaments in honor of our other kiddo (Burger). There’s the hamburger ornament that we found on clearance after Christmas last year at Michael’s for 50 cents:
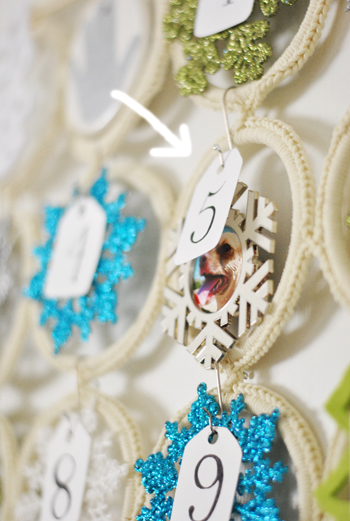
And the snowflake frame with his cute mug in it from a few years back:
And of course there’s a disco ball since we love to dance (that one doesn’t have anything to do with Burger, except he might get picked up and swirled around the room in celebration after we hang it).

As for the tags, I just cut a tag-ish shapes out of cardstock 25 times (using the first one as a guide and cutting around it like a template to make the other 24). Then I used a hole puncher to allow them to slip over the ornament hooks. But before adding one to each ornament’s hook I googled around for a nice font online (and found this one). So I glanced at it while sketching each number onto my cardstock tag with a pencil (it’s nice to have type inspiration nearby when you’re free-handing something – just for reference):
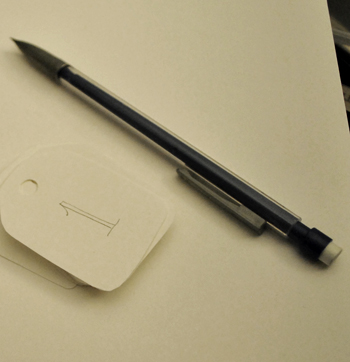
Then I just traced over each sketched out number with a pen once I liked the shape.
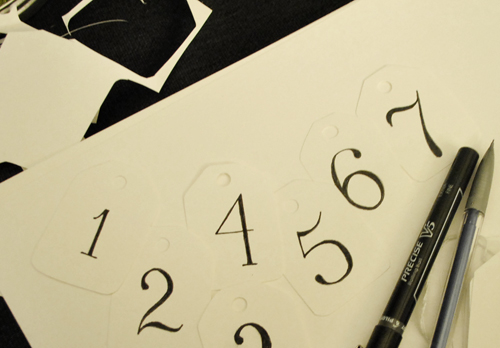
They’re definitely not perfect, but they’re pretty cute:
Oh and I hung it with a removable 3M hook thing, so I wouldn’t have to make a nail hole in the front of our coat closet door:
So we hope to have a bunch of fun holiday stuff going on for the next few weeks among kitchen updates and other projects. Count on posts about tree decorating (we’re doing a tabletop one and a full sized one) and even some outdoor stuff (we’re bound and determined to hang lights and really get festive). Oh and not to mention that Mrs. Limestone sweetly invited me to partake in her fun little Secret Santa thing with some awesome fellow bloggers…
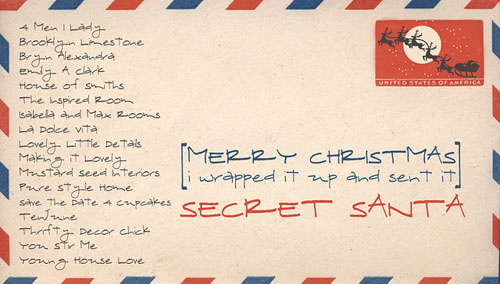
… which means I have to make a few gifty goodies and secretly mail them to someone (can’t tell you who) and see what turns up from another mystery blogger. Here’s everyone that’s in on it:
-
Mrs. Limestone at Brooklyn Limestone (the mastermind)
-
Michelle at 4 Men 1 Lady
-
Bryn at Bryn Alexandra
-
Emily at Emily A. Clark
-
Shelley at House of Smiths
-
Melissa at The Inspired Room
-
Janell at Isabella and Max Rooms
-
Paloma at La Dolce Vita
-
Jacin at Lovely Little Details
-
Nicole at Making it Lovely
-
Marian at Mustard Seed Interiors
-
Lauren at Pure Style Home
-
Tanya at Save the Date for Cupcakes
-
Michelle at TenJune
-
Sarah at Thrifty Decor Chick
-
Laura at You Stir Me
Should be fun, except that I have total stage fright and can’t think of anything creative to send. Here’s hoping a few days of advent-calendar-ing get my juices flowing. I wonder who has me. Any guesses? We’ll have to try to figure it out together when something shows up!
Oh and speaking of holiday stuff, West Elm asked us to round up a few of our favorite items over on their site (we weren’t paid or perked, it was just for fun). So you can check out our picks here and then click the arrow to scroll through all of our dorky quotes.

But enough about us. Have you started decorating for the holidays? Are you totally done already? Are you advent-calendar-ing? Have you ever used something from Ikea in an unusual way? How about Secret Santa experiences? Did you manage to give the perfect thing? I’m just hoping I don’t totally choke.
Update: You can check out all of our favorite holiday decor finds here – many of which are under $15!

Leave a Reply