We painted the back of our built-in bookcases last night! Which is totally our idea of a good time by the way. It’s the equivalent of a “Date Night” for us, if you will. So we figured we should post about the pre-planning process that went on so we can share the “after” pics as closely to real-time as possible (once the paint dries and we can put the shelves back up to snap some final photos for ya). So here you go:
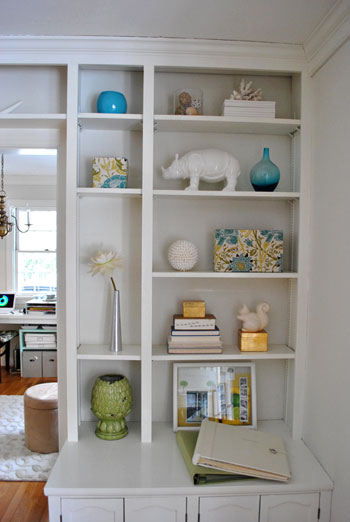
We decided we needed to roughly layout the objects on the built-in bookcases before painting the backs of them (we’ll explain more about that in a minute). We were planning to put a lot of hardcover books along with other breakables (like my ceramic animal menagerie) up there on display since they’ll be away from little hands for a while (making the built-ins one of the only spots for breakable items that will still work with a mobile bambino). But it turns out the shelves are a bit too narrow for a lot of our books which ended up hanging over the edge like toes in too-small sandals.
Not to be deterred, I stashed a bunch of the offending overhanging books in the storage cabinets under the bookcases (along with my not-in-use decor store items). We figure we’ll add some kidproof locking devices to those cabinets so they won’t get raided by tiny hands when Clara is in that getting-into-everything stage. Anyway, after solving the too-big book crisis that nearly brought me to my knees (ok, that’s a little dramatic), I got to work trying to arrange a few of our favorite breakables… only to step back and realize that things were looking a bit too cluttered for my tastes. Yikes.
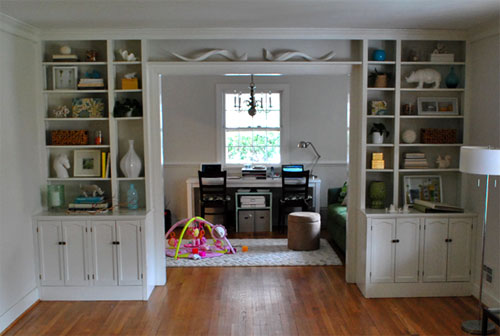
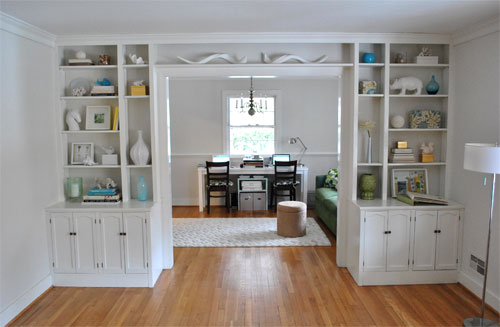
Forgive the bad picture – John is clearly superior when it comes to sweet talking the Nikon. And speaking of the hubby (who I’ve mentioned before is definitely the brains of this operation), as soon as he heard me moaning about things looking too crowded he walked up behind me, said “hmm” and then came up with the genius idea of eliminating one shelf in each of the four vertical rows for an airier look. This suggestion took him about .05 seconds. Don’t you just hate know-it-alls? Kidding. I loved it. And sure enough, with things a bit more spaced out, we were both a lot more enamored with the new arrangement.
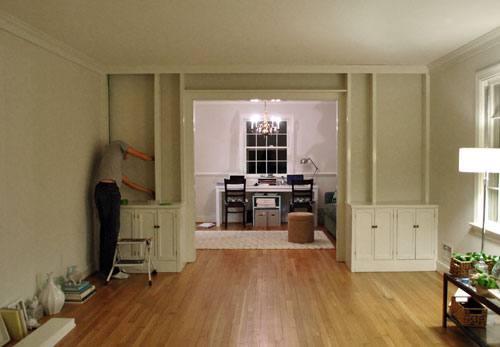
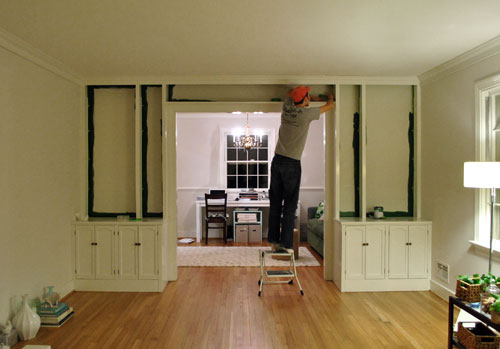
Once we had landed on the right shelf spacing and had a rough idea of what we’ll be displaying, we were ready to unload everything to paint the backs of the built-ins. Why figure out shelf placement first, only to take everything down again? We learned that every time we moved the shelves around they scraped the back wall a bit, so we didn’t want to be playing with their placement a lot after giving the back of the bookcase a fresh coat of paint. So we snapped a few photos to remember where things went and unloaded everything to get ready to add some serious color.
We decided to go with a deep inky blue called Dragonfly from Benjamin Moore’s Affinity line so all of my beloved ceramic animals will pop and the room will hopefully come alive with some high contrast drama and fun. Besides, it’s only paint. So far we love it even though it’s way outside of our usual comfort zone (taking a chance = so worth it). And if we put the shelves back up and load all of our items on them only to learn that we hate it we can always give it another try. It’s just paint. But we’re thinking it’ll all look awesome once the rest of the room (and the adjoined office) get a nice coat of soft silvery gray paint, while the trim and the not-backs (sides, faces, cabinetry, etc) of the built-ins remain the same white tone that they’re already painted. Until we can stop in with those all-done bolder bookcase pics once everything dries, we’ll share these terribly lit shots from last night of the taping process…
… and the cutting in process…
That looks pretty darn dark at night, huh? Wait til you see it in the daylight though. Woot!
Oh and can you tell I’m the cutter-inner while John is the designated taper and roller? See how the painted borders stop a foot away from the top on the right? That’s because I was waiting for the stool that John was using to tape off the top portion. So I snapped this pic in the meantime…
Update: See how our built-in transformation turned out right here.

Lonely Wife Project says
What a GENIUS idea to remove one of the shelves. It made a world of difference. Also, how can you tease us so?? We need an after picture stat!
Lyndsey says
I can’t wait to see the final picture! It looks gorgeous white, but I’m sure the end result will be much better. This was a tease post!! Can’t wait!!
amy good house says
Can I recommend HORIZON by Benjamin Moore as a grey color?
It is a light grey and I feel it is neither to pink nor too blue nor too green, etc. Apparently someone over at House Beautiful thinks so too – I’ve seen it mentioned in their magazine as the perfect grey. If it is too light, maybe you can look at the same card for different values.
Anna says
These look great – so beautifully arranged. I am so enjoying watching your progress on this new pad – you are unstoppable!
We have just finished painting 40 built in shelves in our playroom….it really was a labour of love. Took an entire weekend (2 coats undercoat, one final coat gloss). We were boring and went for white shelves and white backs. Wish toys could look as arty as your lovely things you have displayed!
Jane says
Love the built-ins with the dark blue backs. I was looking at the first few pictures and thought- a rich blue would look great. And then saw you guys did it! If only I had such great built-ins…
Breeanna says
The white background looks nice, but I can’t wait to see what it looks like :)
Yulia says
I noticed that the “after” photo with the shelves removed, looks a bit more polished than the first photo. What’s your secret? Both photos look like they were taken during the day, so is it all photoshop magic?
YoungHouseLove says
Hey Yulia,
As I mention in the post, I took the before pic and John took the next one. Both were taken during the day, but John just knows how to work our manual camera better so he gets a better shot. There actually wasn’t any photoshop involved, he just let more light into the lens for a better pic!
xo,
s
suki @ [Super Duper Fantastic] says
i love what you did with the shelving, in terms of spacing it out! such a minor thing can change so much about the way it looks. can’t wait to see the back! :)
Kristin says
I’ve been following you guys a while now but hadn’t looked at your mood boards yet for the new house. Great minds must think alike! The color I’m going for in my DR is BM Newburyport Blue and I too worried about it being too dark. Hubby says go for it though as we went more neutral in other rooms than we normally do and he feels we need pop of dramatic color. Planning on doing a soft grey in the LR that adjoins, w/ accent colors of cream, yellow and green, and of course, blue.
Elizabeth Mackey says
What a difference visually with one less shelf! I’m such a “white” paint person, that it looked great soon as you took the extra shelf off. I’m sure thought that it will look really nice with the bold color. Most of us are too afraid of color on walls.
Laura @ Starting Out Fit says
What a great colour choice! Look forward to seeing the finished product! :)
Sara @ House Bella says
We’re doing hints of a dark blue with our white/gray combo living room as well. Wee!
Dana @ House*Tweaking says
I love the idea of the inky blue…can’t wait to see the finished product. It will frame the view into your office nicely! And gray walls??!! You are speaking my language, Sherry.
Kelly says
Love that you are going with a dark blue- I am super excited to seeing your house transformation over the next few months and give you props for stepping outside your comfort zone in the design route. Keep the pics rolling!
Tovah says
That is crazy how adjusting the shelves made such a huge difference! our built ins are attached, that is nice that you can move yours around. Looking forward to seeing your ceramic animals pop!:)
Natalie says
Ooooh I’m sure that the dark blue looks fabulous!
I love that you guys are venturing out into different color schemes. Don’t get me wrong: neutrals can be fab, but I’m excited to see what unique colors you bring to your new place!
And be sure to enter my giveaway: http://lovelylittlenest.blogspot.com/2011/01/csn-giveaway-happy-new-year.html
Happy New Year! :)
Alyssa says
Such a pretty color (from what i can tell so far!!) are you going to do anything on the shelves for fun? Mod podge them with cute scrapbook paper? Paint them a different fun color? Lookin’ good so far, you are some paintin’ fools!!
YoungHouseLove says
Hey Alyssa,
For now we’re planning to leave them white so the bold color in the background pops. Who knows what we’ll do down the road though!
xo,
s
Kelley says
You guys are TEASES!!! I can’t wait to see the finished product. I think the white shelves with the dark background is going to be awesome.
Sarah says
Sherry, This white porcelain chihuahua head had your name written alllllll over it!!!!!! lol
http://www.etsy.com/listing/60261303/porcelain-chihuahua-head (sorry, very off topic!) white porcelain chihuahua head
YoungHouseLove says
Love it!
xo,
s
Monika says
Hey guys!
The built-ins look really great so far! Another commenter mentioned possibly changing out the cabinet doors, had you given any thought to changing out the cabinet hardware? Perhaps some fun decorative knobs?
Really looking forward to seeing the french doors to the office go up.
Monika
YoungHouseLove says
Oh yes that’s definitely on our list!
xo,
s
Ashley @ sunnysideshlee.com says
lookin good guys!! Cant wait to see the final product with the paint!
Leslie says
Nice! but wow, does it look dark… wonder how it’ll be in the day or even at night :) always nice to see how a project develops.
carolinaheartstrings says
I’m jealous, I would love to have some built ins. Cannot wait to see the finished product.
Melissa @ Sassy Mommy says
They look great- cannot wait to see them done. You really have a gift for picking good/simple accents in a room and displaying them well!
I have to ask bc I am paint challenged. I am good a picking colors and painting walls but I have never ventured beyond that. Help from anyone. I have dark bookshelves we got from IKEA a few years ago. Was good at the time- now just too darn dark. I already planned to paint our back room (family/kitchen combo) a green color. And I really want to paint our bookshelves white to contrast and freshen things up. Any tips? I know I would have to sand the heck out of the cabinets first so the paint sticks. Or should I use a special primer? Any help is really appreciated. I really do like our shelves- they have good bones- good shape and molding to them so I don’t want (nor can afford) a replacement option right now.
YoungHouseLove says
Hey Melissa,
On our Projects page (see the tab under our header) we have a Painting category with tips on how to paint almost any piece of furniture. Definitely sanding followed by the primer we mention in that post would be what we recommend!
xo,
s
Ana Silva says
I am going to do this on my kitchen cabinets. I have been wanting to do since I saw it on your kitchen reno blog. It is such a cool idea! I just dont know what color to use. I dont want to go thru all the work of painting the inside and it not pop or match with the rest of the kitchen…which by the way I havent decided on a color either.
Felicity says
That’s on this month’s to-do list for the built-ins in our “little room” (currently the dog’s bedroom). I’m thinking teal – something along the lines of 2010’s pantone color of the year. So fun to be working on similar projects as you guys. I love that you’re going back to the in-progress posts, it feels more “real” ;)
Tiffany says
If you don’t have one of these work platforms, I highly recommend your getting one! They are invaluable when painting, taping, mudding, etc. Much better than a step ladder. Lowe’s runs sales on them every now and then where you can get one for about $20 or so and worth every penny and more! Also, love the bookcases!
http://www.lowes.com/pd_146404-287-AP-20-MP6_0__?productId=1017889&Ntt=werner+platform&pl=1¤tURL=/pl__0__s%3FNtt%3Dwerner%2Bplatform
Christina says
Looks great! Since you will be doing some major painting over the new few months (er, years), could you please please please do a short video tutorial on cutting in? I have looked online for tips and videos and just haven’t found anything really that helpful.
Thank you!
YoungHouseLove says
Hey Christina,
We have a nice little post about it on our Projects page (see that tab under our header) in the Painting category. We have a secret weapon that works every time! And in this case we used tape on top of it… just for extra protection (since we don’t have the exact white paint that’s already on the built-ins around for touch ups). Good luck!
xo,
s
Andrew says
I think your blog is SHEER perfection in content, ideas, tone & humor! So when I read earlier about your resolution to not take every single reader comment to heart, I thought “good for you!”.
Then I get to this post and see the already tall-in-stature John on his tippy-toes on the top rung of a mini-stepladder! So I simply had to offer my unsolicited observation regarding any home improvement project – SAFETY first. Afterall, it only takes a milli-second for something to happen and we wouldn’t want John to needlessly injure himself in the ultimate pursuit of fabulous décor! Your readers value BOTH of your ideas!
Stacey at http://staceyembracingchange.blogspot.com/ says
I was noticing that you called painting together a “date night” – how cool is that! That sounds like my kind of date, but for my husband, he would call that a nightmare. He does not have the drive and motivation I have to work on the house, fix things, etc…He just would rather not. He is more of an athlete and is actually an ultra marathon runner – I am always saying to him that if can run 100 miles then surely he can paint, fix, assist with something etc…! I was wondering if you have an tips to increase his desire and motivation to WANT to work on the house as it simply doesn’t come naturally to him…I wish he loved it as much as I do! I think your “date night idea” rocks!!!
I also wondered what camera you use for your blog as I am considering buying a Digital Nikon Coolpix 5700 with 5 MP and a 8x zoom and wondered if this was a good choice and if you had any suggestions. I desire good family photos and photos for my blog…thanks and good luck with the move – love the new place. So glad you feature ideas for your ranch home which is what we own despite longing for a 2 story! Love the blog – thanks again!
Stacey’
http://staceyembracingchange.blogspot.com/
YoungHouseLove says
Hey Stacey,
Here’s a post that will hopefully help with the hubby. And as for the camera we use, we have a Nikon D3000 (it’s a DSLR that we’re still learning how to use). Love it though!
xo,
s
Minda says
so maybe i am jumping the gun on a future post, but if many of your books didn’t fit in these built-ins, where shall they reside? i am in a similar situation and want to hear from the pros (…that’s you guys)
YoungHouseLove says
Hey Minda,
Right now we stored them in the cabinets below the shelves, but when we add more furniture (slowly) and figure out what our rooms will evolve into and all that- we’re sure we can bring in more of our hardcover books!
xo,
s
danielle says
I can attest that the “magic trick” paintbrush can make you a cutting-in pro in no time! I was actually wondering why you guys taped off this time, but I agree, with the super dark color and not having the extra paint…better safe than sorry! I’ll be trying a similar dark blue in our bedroom and might have to tape up too – just in case!
Ashley says
The first two pictures of the built ins in this post look like they could be in one of those picture puzzle books where you have to spy what’s different between two pics! I actually started to play! So pretty, guys!
Megan says
I LOVE the bookshelves! What a gorgeous color idea!
As one mom to another, I have to let you know that rubber bands wound tightly around the hardware worked way better for me than any of the baby-proofing gear. (wound tightly so the baby can’t get them off and eat them) My boys both wiggled the screws off the cabinet locks.
Keri says
I have to tell you guys that I’m dying over the colors you’re choosing in your new house. My husband and I are on the verge of house hunting for our first home, and I’m already creating mood boards for my future space. I decided months ago that I wanted to use apple green and rich blues with white and yellow accents, so when you revealed your intentions with your new house, I almost keeled over. I love, love, love your built-ins. I can’t wait to see how you incorporate the bold colors into your decor.
Lorna says
PLEASE could you do a VIDEO of cutting in with the magic miniature paintbrush. With textured walls and ceilings, using tape isn’t an option, and I find cutting in in a STRAIGHT line pretty much impossible. I must be doing it wrong! Could you show how you hold the brush, and how you move it along the corner, or the edge of the trim, in order to get those amazingly crisp straight lines? Your projects get me itching to try things, but I know I’ll just make a royal mess of it if it involves any cutting in. Thanks!
YoungHouseLove says
Hey Lorna,
Here’s a video about cutting in that’s pretty much our method to the letter (except he doesn’t have our magic brush). We also used tape this time since we don’t have the exact paint to match the built-ins so we wanted to be extra care that we didn’t get any paint on it. We recommend Frog Tape, which we have found to be a lot better than blue painters tape. Hope it helps!
xo,
s
Barbara says
Love the bookshelves guys – hats off to you for taking on these projects at lightning speed! Also, the P Diddy reference was genius (and hilarious). Thanks for sharing!
Michelle Kersey says
LOL, you guys are cute as always!
Don’t know if this has ever been mentioned to you, but I have a set of adhesive, magnetic locks that I use on my cabinets. No drilling… no hardware showing… I love them. I didn’t use the double stick tape they came with though, I got a stronger tape, just to be safe. :)
The ones I have are made by Kidco… on there 2+yrs and still going strong with daily use.
YoungHouseLove says
Ooh, I love that idea- especially the extra strong tape to keep things safe!
xo,
s
tricia says
These look great! I believe you said your new house is mid-century, so I’m assuming the built-ins are about that age too. Any idea how to handle older built-ins? My house, built in 1936, has lovely built-in wood shelves next to the fireplace, but for the life of me i cannot figure out how to get the shelves out so i can repaint the back wall. I noticed your shelves appear to have brackets underneath to hold them in place. . . mine do not. I can’t see any hardware at all, as a matter of fact. Any resources or suggestions ?
YoungHouseLove says
Hey Tricia,
If your shelves don’t easily lift out when you apply pressure from below we would bet they’re not meant to be removable. We’d just recommend taping off the back wall so you can paint it with the shelves in place. Good luck!
xo,
s
Jan says
WOW. LOVE IT!! A brilliant mix of color, shapes, and arrangement. You guys are wicked good at this stuff. :)
April says
Hey guys! Saw you mentioned child proofing so I wanted to drop this idea by you. We rent and I didn’t want to attach anything to the cabinets inside (though really who would care?) and those other options that lock on the outside are so ugly. Then I noticed at a friends house that she used elastic hair bands to hold the knobs together. It’s worked for me through two babies so maybe it will keep your little one out. Make sure to get hair bands that match either the knobs or the cabinet paint. They’re hardly noticible and easy to remove. Love that color blue by the way!
YoungHouseLove says
Hey April,
You’re not the first one to recommend that! We’ll have to try a bunch of things out and see what works the best for us! And of course we’ll report back to you guys when we see what we like.
xo,
s
Lauren says
I was wondering if you guys ever watch Secrets of a Stylist on HGTV. Your built-ins totally reminded me of something I saw on there, except that your shelves are around a doorway and on the show they were around a window. But they started out with the white in back and then painted a dark color.
YoungHouseLove says
Hey Lauren,
We saw a special with Emily in it once, but we didn’t know her show was on yet! We’ll have to look for it. We really like her aesthetic!
xo,
s
Mandy says
WOW removing those shelves really made a huge difference. Who knew something so simple would make such a dramatic difference.
Misty says
Hi Sherry! I found this fabric since Im on a major fabric hunt right now..and I thought it would look so amazing in your room with your new built-in colors..
http://www.fabric.com/ProductDetail.aspx?ProductID=687e469a-3c7b-488f-840e-a873f9f08aaf&CategoryID=849d4fe1-9d03-4f3a-9b02-423d39c6b9b3
I love that it brings a little contemporary in with your rugged table and your traditional built-ins! Of course, you may hate them…lol..
YoungHouseLove says
Love a good chevron! Definitely a possibility!
xo,
s
Leah says
Do people ever send you ceramic animals? I have an elephant. We named him Leroy! However- he looks out of place because he has no ceramic friends.
YoungHouseLove says
Haha, well we have a no swag policy so no (we like to keep it real so we turn down freebies). But it does pain me to say no to little Leroy. Maybe the answer is to troll Goodwill and get him some friends (you can spray paint anything, so the uglier the paint the better).
xo,
s
rebecca says
your shelves look great! We have a wall of white built-ins with a white-painted fireplace in the middle. We are planning on painting both the fireplace, and now looking at your pics, the back of the bookcases a dark gray. Did you prime the bookcases before paining.
YoungHouseLove says
Nah, we didn’t need to. Just made sure they were clean and applied two coats. Did the trick, and we used less than a quart of paint!
xo
s