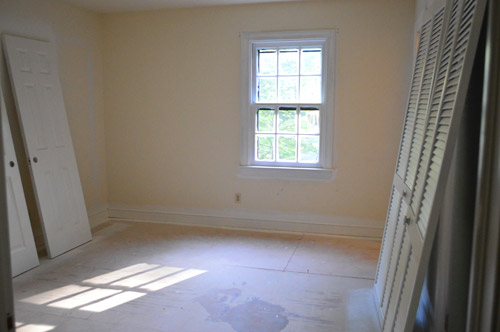
If we’ve made one thing clear about our new house, it’s that we’re not crazy about the trim colors…
Somewhere between the Williamsburg Blue and the Muddy Mauve, our painting hands began to quiver with excitement. Or was that dread? Not sure.
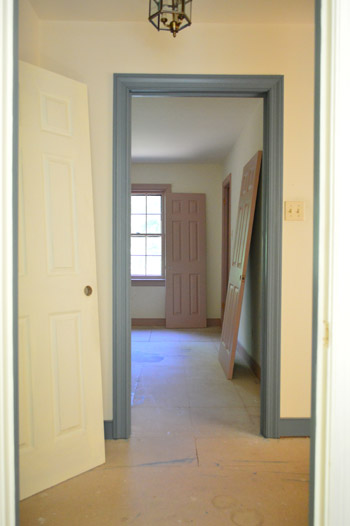
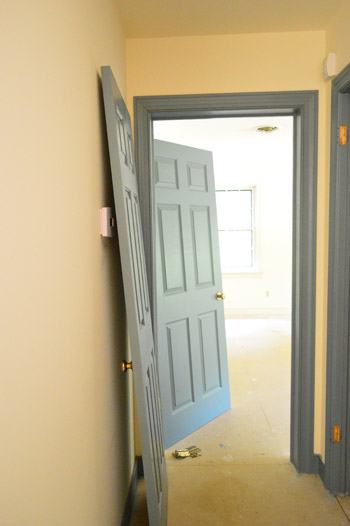
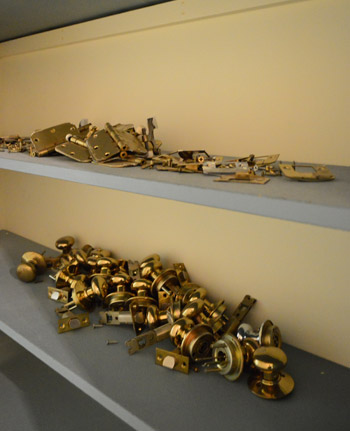
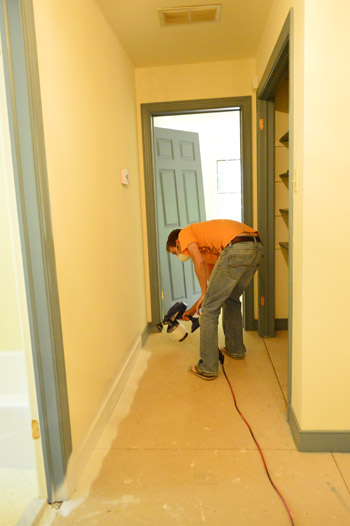
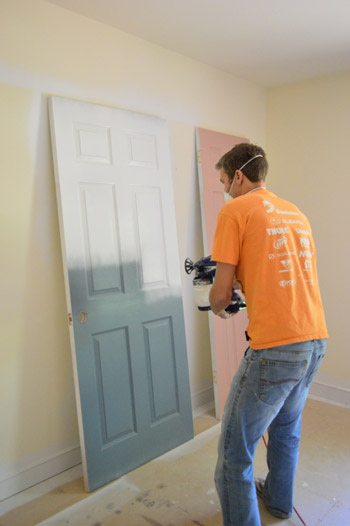
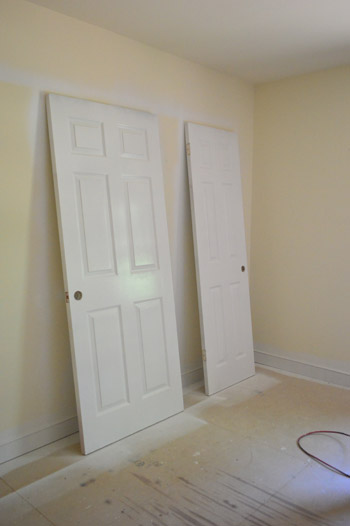
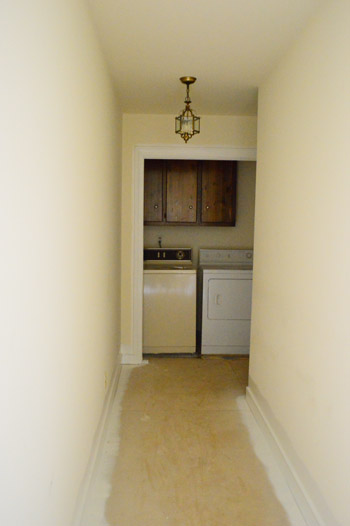
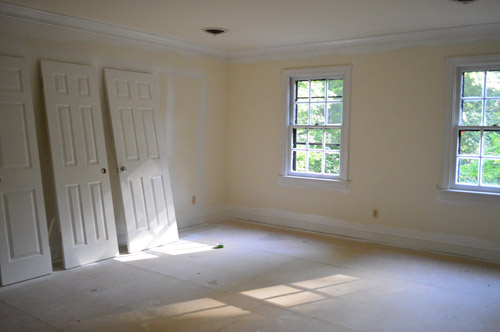
We reasoned that while all of the carpet was up and before the new hardwoods went down, we should take advantage of the can-get-painted subfloor and go ahead and tackle the upstairs trim. Correction: trim and doors. Sixteen doors to be exact… which we removed and de-hardwared first for easy painting.
Attempting to quickly paint four bedrooms and closets worth of trim along with a long hallway plus nine windows (with tons o’ mullions) and the aforementioned sixteen doors seemed like a job that warranted a paint sprayer. So we decided it was finally time to get one. And thanks to a suggestion from the Bowers, we picked up this Graco TrueCoat II which was on sale for $180 at Lowe’s (update: we’ve since switched to using this Wagner model with more success). We opted to buy one instead of renting it because there’s still plenty of stuff to paint in this house beyond just these things – so we’d like to have one that we can use a bunch of times as we move from room to room (did we mention there’s still a ton of blue trim downstairs?).
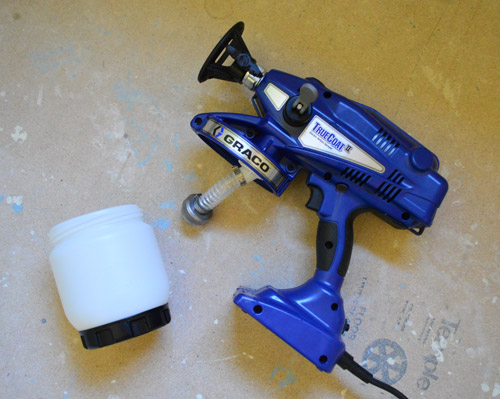
The sprayer is a lot simpler than I expected. It’s pretty much just a plastic cup attached to the gun, which just plugs in. So there wasn’t much in the means of set-up (although we definitely read the directions twice just to make sure we didn’t screw it up). Then we dove into our primer coat.
We’ve heard that the biggest pain of owning a paint sprayer is clean up, so we opted to use a provided bag in the paint cup to keep it clean and hopefully eliminate one step afterwards.
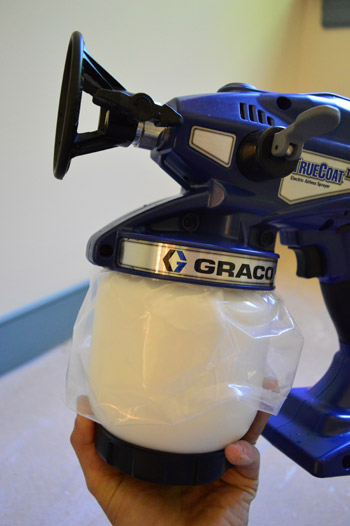
We don’t have a ton of pictures of the process because one of us was downstairs with Clara while the other sprayed. And also, the process was pretty darn fast. We could zip along the baseboards of one room in about 10 to 15 minutes, and the majority of that time was usually spent refilling the paint cup.
So I definitely agree with what everyone had told me about spraying: it’s MUCH faster, but you use a lot more paint. I could only get through about two door sides before having to refill my paint cup. But boy was it satisfying to watch that blue paint disappear with each swipe. And it’s not that you’re wasting paint, it’s just that you’re getting more coverage (spraying the front of a door once might take twice as much paint, but it’s akin to two coats applied with a brush).
Once we feel a bit more seasoned with the sprayer we’ll do a deeper post about using it, but for now I feel like we’re still getting the hang of it. Our biggest challenge is fighting the urge to go back and “touch up” a spot we missed because we found it’s very easy to apply too much paint and create drips.
But if you go slowly and resist the urge to double spray, the smooth factory-like finish is amazing.
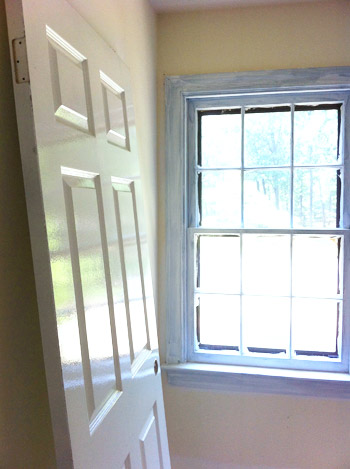
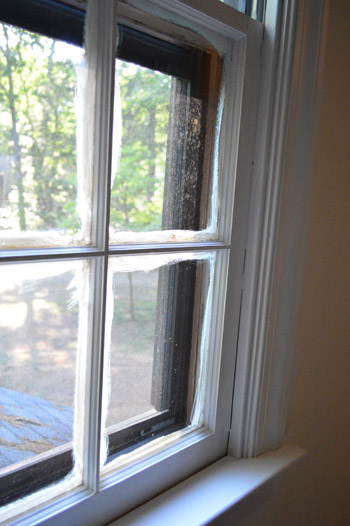
We made the call to paint the windows by hand rather than attempt to get every nook and cranny of it sprayed (we pictured a ton of rogue drips and a bunch of overspray covering all of the glass panes). After the fact, we’re not so sure it was the right call since our hand technique will still require some glass scraping with a razor and all of the blue/mauve windows took one coat of primer plus 3 coats of paint each since we were doing them by hand. Woof.
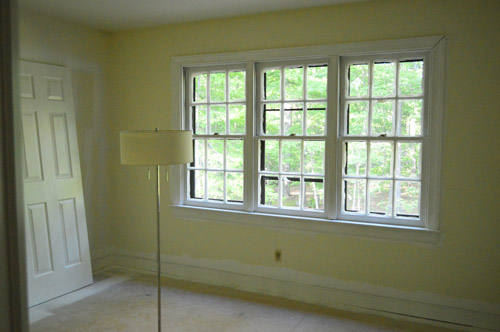
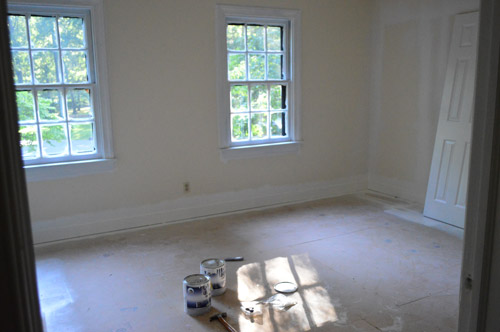
So yeah, this has pretty much been keeping us busy for the last few days. Spraying only occupied two mornings (priming one, painting the next) but we’ve made several trips to hand paint the windows and other areas that we couldn’t spray easily. I’ve lost track of which trip these photos were taken, but you can see what a difference it’s making.
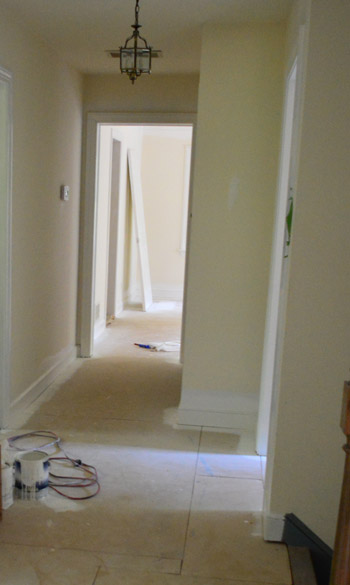
We didn’t bother to tape off the walls or floors or anything around the sprayed areas (except for some too-close-for-comfort outlets and vents). So it means the walls are in desperate need of painting now too, but that’s a project for another day.
Some rooms, like the guest room and our master, only had cream trim/doors so they didn’t require any primer. Which meant this whole paint job only took 2 gallons of primer. Not bad for four rooms, four closets, nine windows, sixteen doors, and a giant hallway (about 30% of those had cream paint).
But we needed 4.5 gallons of white paint. Had we been able to predict that we’d have bought one of those five gallon buckets at the start, rather than making the multiple trips to the store we’ve been making. Live and learn, right?
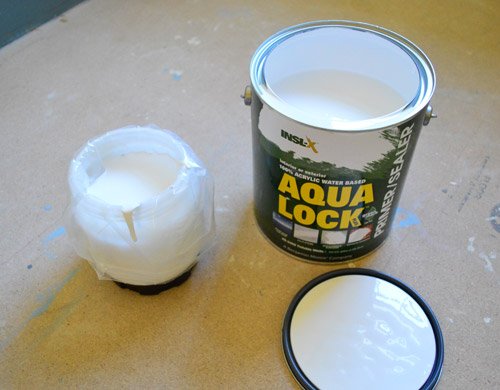
The paint we’re using is Benjamin Moore’s Ultra Spec in Simply White (in a semi-gloss finish) based on a few recommendations for that type of paint from you guys (and knowing it’s one of the best white paint colors out there). It’s No-VOC contractor-grade paint that’s more affordable than BM’s Natura paint that we usually use and so far we’re really happy with it. Instead of being over $50 per gallon, it’s just $36 through our local paint store (I’m sure it varies by location, but it should be in that range), which has certainly made buying five gallons of it a little less painful.
Oh and as for choosing the color, we brought home about ten swatches of white and just picked the one that looked the best when we taped it up next to all of the others (some were too yellow, some were too blue, but Simply White looked clear and crisp without feeling too warm or too cool). Of course it’ll look a whole lot better after we paint those yellowed walls and ceilings…
Our total budget for four rooms and four closets worth of trim/baseboards plus nine windows, sixteen doors, and a giant hallway has been:
- Paint sprayer: $180
- Primer, 2 gallons: $36 (on sale)
- Paint, 5 gallons: $180 (we still have half a gallon leftover for a future project)
- TOTAL: $396
It’s certainly more than we envisioned spending, but because we’re on a time crunch to get the new floors in before we move, we’re counting our lucky stars that painting so many things went as quickly as it did. And now that we own the paint sprayer it’ll probably will work out to around ten cents per use by the time we’re done painting this house (so. much. blue. trim.).
Next step is to rehang all of the doors (after we replace some of the old pitted brass hardware) and then we can get to laying those hardwoods. We contemplated getting some other painting done while the subfloor is still exposed – walls, ceilings, closet interiors – but we’re starting to feel that move date creep up on us (T minus 2 weeks!). We figure we can move in with unpainted walls and ceilings more easily than moving in without completed floors – and thankfully we’re no strangers to painting walls and ceilings with hardwoods that are already in place.
So that’s what we’ve been up to. How about you?

Monica says
We are in the process of building a house and our contractor was pushing for Decorator’s White, but it just looked too blah for us. Our friends had used Super White on their home and that was waaaay too white. So, we went with Simply White and it is simply perfect. We have TONS of molding, trim and wainscoting everywhere and simply white has been a great choice. We are patting ourselves on the back for that one (ha ha) and I think you guys made a good choice too. Can’t wait to see how your house turns out! We used many of your paint
color recs for our walls. :)
ana says
Le Lightbulb! We are renovating our 1964 ranch in Charleston,SC – putting this sprayer on my list!! This weekend we are ripping out the old kitchen, new beam for load-bearing wall and pulling up the old floor. Happy painting to ya’ll!
Jennifer says
The house I grew up in had that same Williamsburg blue trim in the family room. It was so very “in” in the 80s. I was a little nostalgic looking at the pictures of yours! Of course, if my current house was sporting that lovely shade, I would totally be asking to borrow your paint sprayer =)
Marina says
Wowzers! What a difference just painting the trim can make. Very wise investing in a sprayer… hand painting all of those would have taken decades! Or at least it would have felt like decades. Looking forward to following you guys on this new house journey.
Angela says
Oh my, the speed at which you do things would make me keel over. Scratch that. It would make my boyfriend, who does all the real work, keel over.
This might be a silly question, but how does using the plastic bag inside the cup help with clean up? I am baffled… I thought the hard part of clean up would be the little trigger thing and not the cup? Maybe I’m missing something?
YoungHouseLove says
You just run some cleansing stuff through the gun to clean the sprayer (you shoot it through to clean it) so one less step of cleaning the cup is nice :)
xo
s
Angela says
Also, I am totally envious of the smooth finish on your doors!! Would you say using the sprayer is better, or would going with something like BM advance self-leveling paint like you did with your kitchen remodel be better?
YoungHouseLove says
Sprayer = the best. Self leveling paint is awesome if you don’t have a sprayer though :)
xo
s
Angela says
Thanks so much for the replies! :D
YoungHouseLove says
Of course!
xo
s
Tara G. says
Maybe this tip is too late, or perhaps it’ll come in handy for the downstairs- we just had all of our doors painted (20) and the painters set up the garage for spraying, then they took all the doors down and set the up in groups of three (a cubicle sans thd 4th wall) by nailing a little board into the top of each door to hold them together and keep them standing upright. They were able to stay out there and cure for some days before bringing them back in. They also numbered the top of the door with pencil and on the wood where they took off the hinges.
Your trim looks great- amazing how something so simple immediately changes the look! We’re still knocking ours out one room at a time. :)
YoungHouseLove says
Great tip!
xo
s
JMK says
BTW – when all the floors are exposed, check for any squeaks and add some screws while you can. I don’t recall how old your home is, and have no idea what the building code there required when it was built, but all that subflooring may have been installed with nails rather than screws. I know screwing down the subfloor was a relatively new requirement here when we built 20yrs ago.
Since you plan to add more lights to the LR at some point will you be fishing the wiring in from down on the main floor, or should you consider doing the wiring rough-in now from above while you can cut into that subfloor to access the joist cavities? Might be much easier to patch the subfloor in the bedroom than try to fish wires from below later. Just a thought.
YoungHouseLove says
Oh yes, those are great tips!
xo
s
heyruthie says
I’m sorry if people already asked this, but did you have to use any additives for the paint to be the right consistency? Or can you use it right out of the can? Also, can you buy a bigger “jar” to hold the paint on the sprayer?
YoungHouseLove says
Thankfully we don’t have to add anything or water it down, but some sprayers do have you water things down. Oh and a bigger jar would make it harder to use I think (it would be heavy since you’re constantly holding up the equivalent of a quart of paint).
xo
s
heyruthie says
Thank you! That was one thing that kept me from using a sprayer. The last time I asked the guy at Home Depot he told me (probably incorrectly) that I would have to use oil based paint WITH an additive, like Floetrol or something like that. NOT what i had in mind! Also, it’s so hard to tell the scale of things in pictures! I didn’t realize the jar is already quart sized! It must really eat up paint–but if you’re getting even, quick coverage, that’s what you want! Why spend an hour applying a quart, if you can do it in 10 mintues, and get the same coverage! Thank you for chiming in!
YoungHouseLove says
You’re welcome! Good luck with everything!
xo
s
Antonella Guidi says
Nice job! I love paint sprayer, I have one and I used sometime but someone in my family hate the smell of the paint.. sigh…
No sanded before primer?
Kiss from Italy
Baci dall’Italia
Antonella
p.s. and, like any comments: sorry for my english ^^;
YoungHouseLove says
If it was glossy (trim, doors, etc) I definitely would have sanded and deglossed, but it was a chalky matte finish so primer + paint was great :)
xo
s
Erin @ Dwell & Tell says
Way to go guys!
Would you consider using the sprayer for cabinets? I’m going to tackle that project fairly soon and know you have experience!
Erin
YoungHouseLove says
Oh yes, I think it would be awesome for that! It did such great things for the doors!
xo
s
Amber says
Here’s a tip I learned from painting windows with all the wood trim separating the glass: use a wide drywall knife and it helps avoid getting as much paint on the glass! Lifesaver!
YoungHouseLove says
So smart!
xo
s
Carolyn says
You inspire me each day! We moved into a house that needs lots of TLC just two streets down from your new house. It is so hard not to feel overwhelmed with everything, but I just remind myself that step by step I’m making it mine. Maybe I’ll see you at Lowe’s where I am so getting that paint sprayer for our shutters and exterior doors. So much black….
YoungHouseLove says
Haha, I bet we’ll bump into you Carolyn! Good luck with everything!
xo
s
Kacie says
Oh my god. That crisp white trim makes an amazing difference, even with the subfloor and walls in need of paint. Huge difference!
Stephanie says
Wow! What a huge difference that made already! Now I want to buy a sprayer… just to have.
Kristen @ LoveK Blog says
The new white trim looks awesome! It never fails to surprise me what a big difference white trim can make in a space. I’m completely jealous of your sprayer…I’m definitely getting one when we move again!
Aimee says
Congrats on the new house! New white trim looks great!
You need that stuff that Nicole on Rehab Addict uses on the window panes when she paints. It’s a roll on product that dries and then peels off after painting the window trim. I guess it reduces the need to razor scrape after painting.
YoungHouseLove says
Oh yes, a bunch of people have linked to that! So helpful :)
xo
s
mel says
Can I ask about the over spray on the walls, will your wall paint go over the top of that? Just as it is a semi gloss and I presume the wall paint is flat or do you use semi on the walls as well.
The white looks wonderful :)
YoungHouseLove says
We use eggshell on the walls with semi-gloss trim. Thankfully the overspray is just a small dusting which is akin the the over-painted areas we get when we paint trim and then paint the walls by hand, so we hope that eggshell BM paint will cover just as well in this case as it has in the past (we’ve never had an issue with it). We’ll definitely keep you posted!
xo
s
Stephen says
Ok, devils advocate. What is the plan to buy new hinges? We just spray painted ours with metallic paint. Beats paying at least $10 a door with 16 doors. We did have to throw down on some nice new handles though.
Stephen – Amature Door and Hinge Painter
YoungHouseLove says
We worry that over time of them grinding they won’t hold up and will flake and chip at the parts where they rub. Have yours lasted years or did you just spray them?
xo
s
Stephen says
Ours have lasted three years so far, but our hinges could be different from yours. Probably did 3 coats. Still going strong. Lol I even painted the screws. We’re looking to purchase and I would do it again.
One of the best things I ever did was buy some Du Pont Teflon lubricant to stop the hinges from squeaking. No more waking up to that. Then it got a little out of hand, even lubricated the garage door spring and hinges so it wasn’t as loud.
YoungHouseLove says
Haha, I love the tips Stephen!
xo
s
Meleah says
It looks so different with the newly painted trim!
Emily says
Just curious, is there any particular reason that you guys seem to be using BM paint exclusively now? Have you found it to be better paint, or do you tend to use BM because they sponsor you?
YoungHouseLove says
We’ve tried lots of paint throughout the course of this blog (Glidden, Olympic, Behr, Benjamin Moore) and there’s no doubt in our minds that Benjamin Moore is the best. We first used it on our built-in desk in the office (back in 2011) and that’s when we realized how great the coverage/durability is and then we used it again on our cabinets, which have held up so well. Then we tried using it on walls as well (we painted a brick wall in our first house and it took 5 coats of Glidden and the brick wall in this house only called for 2 coats of BM) so it’s just worth the money to us. We don’t accept freebies and we always pay for our paint, no matter what we buy, so it has nothing to do with a sponsorship :)
xo
s
Brooke says
I wondered the same thing. I’m a Sherwin Williams junkie & haven’t used BM. Love their Super Paint.
K says
I pretty much always use Behr paint (it is always rated very well in Consumer Reports) but I am mostly painting walls and not anything like cabinets. I used some Sherwin Williams paint on the one set of cabinets I painted and it has not held up well, but I am guessing that was my fault and not the paint.
Erin says
Do you remove your hardware from your windows before you paint them? I’ve been painting our windows (mostly casements and some awning style) and try to work with taping the hardware off (because the hardware isn’t moving – we’ve tried!). The paint still seems to seep under the tape and it looks so sloppy. Wondering if you have tips!
YoungHouseLove says
Oh yes, we just removed the little latches on the top of the windows (only took a second and seemed easier than taping them off).
xo
s
Danielle says
Word of caution. I work for a large general contractor and we just finished a 54 unit condo. The painters lined up the doors in each of the living rooms and sprayed them with semi-gloss, then painted the walls with eggshell. The gloss from the door paint “flashed” through the wall paint and it never looked good. If you looked at it from an angle, you could see shiny patches. You may want to think about sanding the paint, or maybe priming over it to save you some headaches down the line.
YoungHouseLove says
Thanks for the tip Danielle!
xo
s
Melissa says
I lived in my house for three years without flooring. We just tossed throw rugs on the subfloor while we painted and saved money for flooring. It really wasn’t too bad. I’d rather do that then tape off floors before painting with the spray gun.
YoungHouseLove says
I think it’s just what you’re used to. In our case we’ve painted two house’s worth of rooms (walls and ceilings) with the flooring already in, so we’re old pros at it :)
xo
s
Bryna says
Still waiting sooooo anxiously for your post about staging your house!!! Love you guys!!
YoungHouseLove says
So sorry Bryna! We have an idea for a full week full of current house details (staging it, how much we made vs. how much we spent, etc) once it actually is sold (our closing date is coming in a few weeks). Just don’t want to jinx ourselves before that :)
xo
s
Autumn Beach says
Oh wow…awesome progress. Things will look nearly new up there after the floors are laid! Listy will definitely need an update on percentage complete. And I know you spent a little more than you thought you would, but you guys saved yourselves THOUSANDS of dollars by DIYing it! What a great feeling.
Fahlon says
I am so excited about your new house sans blue and mauve trim! You reminded me that GooGone works wonders for removing newly dried paint from hard surfaces like windows. (I know because I ran over a black spray paint can in my white car, not pretty!)
YoungHouseLove says
Great tip!
xo
s
Jenny Ellen says
My heart is lighter just seeing the transformation. What a difference! You guys must smile in your sleep with all you get accomplished each week.
Ginny says
I’m sorry if this question has already been asked (I skimmed through the comments but didn’t see it).
Did you guys consider painting the doors black? I’ve seen this all over Pinterest but don’t know anyone that has actually done it. Curious on your thoughts…
P.s I’m so happy for you guys!! You’re so humble and work so hard and totally deserve all great things!! And I’m totally with you on replacing what needs to be replaced, not just putting a bandaid on it!!
Cheers!
YoungHouseLove says
Thanks so much Ginny! While I love the look of charcoal doors (I’ve totally pinned that look too!) I think for now the house feels so dark to us from all of the blue trim and wood and brick and crazy wallpaper so we’re trying to lighten things up first. Maybe once things all come together and we’ve painted every room a few years down the line it’ll make sense to go darker with some/all of the doors, so I think we’ll have to see how things evolve- but for now a nice blank slate is a nice place to start :)
xo
s
Kate says
Phew! I can breathe again… glad you got onto that one quick-smart! It’s already made a huge difference!
Heather Scott says
Wow!! We need to get one of those paint sprayer things! That’s fantastic!! :)
Katherine says
I am so excited because we are closing on our new home next Friday and it looks just like yours!! So we are very excited to get some inspiration from you. :)
The brick on our house is a little more orange than yours. Black shutters. Having the hardest time deciding what color to paint the front door. Yellow? Stick with black?
YoungHouseLove says
I think lipstick red looks awesome (we had orange-y brick in our first house and black shutters and a glossy red door). LOVED it!
xo
s
CJ Rae says
Maybe for the windows downstairs you could try a hack of your picture frame placement idea? Cut out a piece of cardboard or paper that’s almost the exact size of each piece of glass and use painter’s tape to finish the edge and adhere the square to the glass – then go to town with the sprayer. It might be a bit more prep on the front end, but it also might make doing all the trim on the downstairs windows a bit easier.
YoungHouseLove says
That could work!
xo
s
Michele Jacobs says
I so wish I had though of getting a paint sprayer when we bought our house 8 years ago. All of our trim & doors (and stairwell!) was painted black, and not a nicely done black. It started out as a glossy black and was touched up over the years in flat black (yuck!). Congrats on the new house!
Brooke says
I’m curious as to why you didn’t paint the ceilings first, then the trim & doors?
YoungHouseLove says
Just don’t have time. We have to lay four rooms and a long hallway’s worth of trim in 1.5 weeks, so we thought the blue trim would take more coats and be harder than just rolling the ceilings after the floors are in (which we’ve done in two houses by now, so we’re used to it).
xo
s
Elizabeth says
Looking much better already! Also, you guys have inspired me to add two things to my ever growing “to-do” list:
1. Buy a paint sprayer (I want to repaint just about every square inch of wall, ceiling and trim in our new house!).
2. Paint the interior doors in the house (I don’t care for the way they look right now, very 70’s wood-ish).
Question: I’m a little concerned about painted doors + painted trim. Will that cause any weird sticking/rubbing issues? Is there a certain type of paint that works best? If anyone can shed some light I’d be ever so grateful.
YoungHouseLove says
I would use a good primer and then a nice quality paint. Let them fully dry before hanging/closing doors and you should be all set :)
xo
s
Lauren says
So much better!! We did the same thing, when painting our cabinets, we ended up buying 5 gallons in gallon increments. But one thing to note, the place we bought the Benjamin Moore paint from gave us a discount on the last 5th gallon, to give us the same cost (total) that a 5 gallon bucket would have cost, so it never hurts to ask!!!
So excited for the new DIY adventures in store for this new house! Can’t wait :)
YoungHouseLove says
I love that tip! Thanks so much for the idea!
xo
s
Christy Niebaum says
Do you guys ever watch “Rehab Addict” with Nicole Curtis on the DIY Network? She uses this product to protect windows while painting. I forget what it’s called, but you roll it on the windows and it peels right off when you’re done. That way you can paint quickly without having to worry about razor blading your windows afterward. Might be worth investigating.
Glad the paint sprayer worked out! We replaced all the trim, baseboards and doors in our house a couple of years ago and the sprayer made the process a lot faster.
YoungHouseLove says
Oh yes, lots of people told me about that! So helpful!
xo
s
Gabby Bladdick says
Chiming in here with the other commenters about using the “Rehab Addict’s” liquid masking tape. Heard it’s awesome! Looks GREAT!!
Brittney S says
I don’t know if someone has already mentioned doing the ceilings as well. I use a paint sprayer for all my rooms, I have a wagner paint crew airless sprayer, I spray my ceilings as well as the trim partially because I have popcorn ceilings and it’s a pain to roll but it’s sooo much faster to only have to hand paint your walls and not have to worry about ceiling paint splatter.
YoungHouseLove says
Wish we had time to tackle that! It’s onto the flooring for now or we’ll miss our moving date!
xo
s
MizLottie says
What’s with all the blue trim? And it’s such a horrid shade of blue, reminds me of the tired, sad blue trim on the exterior of my house before I had it painted. Lovely new house, congratulations but the previous owners really had no color sense at all. I can’t wait to see what you guys do to it, it will look fantastic! And cheery! Hi to Burger and Clara, xoxo!
Kate C says
Do the previous home owners know that you guys blog your house renovations on the internet? Is there any chance they’re watching as you transform their old house? I can just picture a lady somewhere getting ticked that you didn’t love all of her blue trim!
YoungHouseLove says
We don’t think these homeowners will follow the blog (without revealing too many personal things about them, it doesn’t appear that they follow blogs at all) but we’ve heard from the original owners of our first house and the previous owners of our current house and they love watching us make things over! Whew! I too worried they might take offense, but they seem to enjoy watching us “do all the work” and popping in to see how the house evolves. Especially when we knock down walls, that seems to be a favorite among previous owners :)
xo
s
Kate C says
I agree that it would be fun to watch a former house be transformed!
Linette says
Hi! I love your blog and look forward to reading it every day on my lunch break at work. :-) Q4U: will you be putting the original (brass) hardware back on the doors or replacing it all? Thanks!
YoungHouseLove says
Sadly a lot of it’s too damaged (rusted, pitted, won’t lock) so we’ll be investing in some new hardware for our freshly painted doors :)
xo
s
Dani says
How do you guys go with rehanging doors once they’ve come down? We’ve recently totally renovated (ie, gutted the house back to the frame and redid it all) and the doors have come on and off a couple of times during the process. At the moment none of the three bedroom doors will close but I haven’t bothered paying them too much attention because they need to come off one more time for painting.
I’m confused about how they can -not- close now even though they were screwed back into the exact same holes with the same hinges and everything… Do you have any tips on how to keep doors working properly after they’ve come on and off, or how to rehang them with new hinges in new spots?
(I’m eagerly waiting your next post to see if you mention hanging the doors lol! We’ll be doing ours within the next couple of weeks and I’m scared…) Thanks!
YoungHouseLove says
Hmm, could you have hung them upside down? Or backwards? I’m not sure why they wouldn’t line up if it’s the same holes. Anyone have ideas for Dani?
xo
s
Dani says
Nope, they were all the right way around/right doors in right doorwars/all that jazz – they were just sliiiiightly out of alignment (by like 1 or 2 mm!) so they wouldnt shut. Bugger, I was hoping it was a common problem!
YoungHouseLove says
Aw man, good luck Dani!
xo
s
Erin says
We had this problem after we took our doors and hinges off to paint, too. :( It’s a little because of the extra thickness of the paint and also because the door has to be hung EXACTLY right. Try hanging the door starting at the top and overtighten the screws for that hinge or possibly use longer screws to drill in further – sand any paint off that might be behind the place where your hinges hang. It’s such a pain, it makes me not want to finish our other doors!
Dani says
Thanks Erin, I’ll try that :)
Maria says
Looks great, thank you for a great post! I have also hand-primed and painted most of the trim in our house, after we got 2 quotes on the work that were right about $2,000. The work was very tedious and time consuming- I would love to see if/how the spraying could be done if you have floors/walls you want to protect.
YoungHouseLove says
Woah! Two thousand bucks in savings is awesome!
xo
s
Bailey says
That paint sprayer seems like a life saver!! Painting the blue trims white really made the whole place look newer!
xox
Bailey
http://akabailey.blogspot.com
Hector says
I can see the difference! The blue is a nice color but not for trim especially on the windows.
jeannette says
i love it when you all work out the costs of DIY vs. professional. not coincidentally, ana white, whose talents as cheap charlie doing fantastic work in sub zero temps is heroic, has just published a post about contracting a job out because it would cost her just as much to buy the suitable mudding/taping equipment.
http://ana-white.com/2013/05/momplex/get-out-jail-free-card
y’all are really good at explaining those occasions too, and this post reminded me of that. so thanks.
jeannette says
ooops. talents ARE heroic.
YoungHouseLove says
Aw thanks for the link! LOVE that post!
xo
s
Elise says
I can’t believe how much of a difference painting the trim made. The house looks COMPLETELY different now. Can’t wait to see more!
Sassafras says
After stopping for a nice weeklong vacation we’re back to painting the living room and hallway a nice happy blue “YOLO’s Water .07”, and the kitchen and utility room a sunny “Benjamin Moore’s Butter” in a pearl finish. We’re almost done. Hubs has to do the ceiling line (I’m height challenged) in all areas but the rest is fini! Then I’m off to pick a nice blue for the utility room ceiling…something like Sherwin Williams “Tidewater”.
So exciting to see you use the sprayer and a big pat on the back for showing that Williamsburg blue & burpy mauve to the curb!! The upstairs looks so much better already!!!
Can’t wait to see the flooring go down. That moving, it’s a work (a four-letter word if ever there was one). Take time to rest and relax where you can and keep the pizza delivery boy on the speed dial.