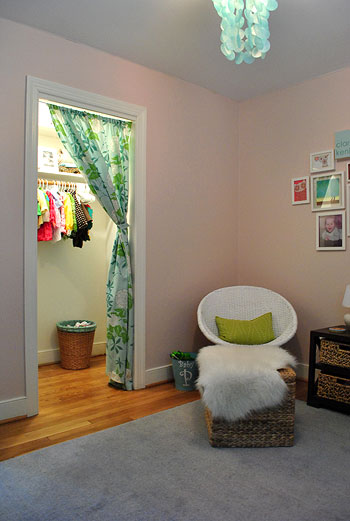
After admiring various ribbon chandeliers in baby stores, catalogs, magazines, and even over on Pintrest, I decided to try my hand at one for Clara’s closet. Her closet is actually big enough to become a little reading nook when she’s a little older (I have visions of making her a beanbag for chillaxing on the floor with a book). And I love that the closet has its own light but it’s one of those fugly bare bulb ones that you tug on a piece of string to turn on and off. So I thought a happy little ribbon chandy could pretty things up.
So I spent $2 for an embroidery hoop (with a 10″ diameter from Ben Franklin) and used some white spray paint and a box full of old ribbons that I already had (I save them like gift bags to recycle them ’cause I’m cool cheap like that).
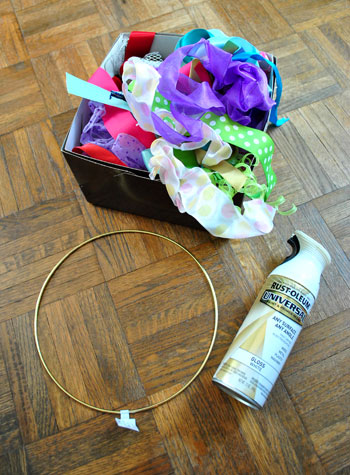
So the total project cost was just two dolla. Holla. (Yup, that’s the second holla I’ve used today- and yup, I’m counting).
Anyway, first I went outside and spray painted my big metal embroidery ring thing with white paint on a piece of cardboard. While it was drying I went through all of the old ribbon scraps that I have and picked out the ones I wanted to use. Then I popped back outside to flip my ring over with a stick so I could spray the other side.
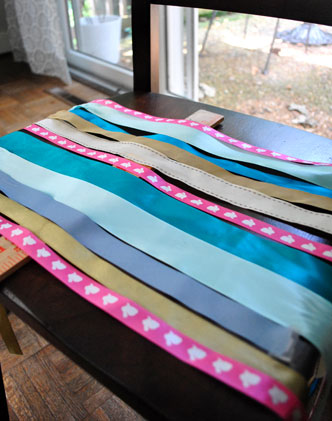
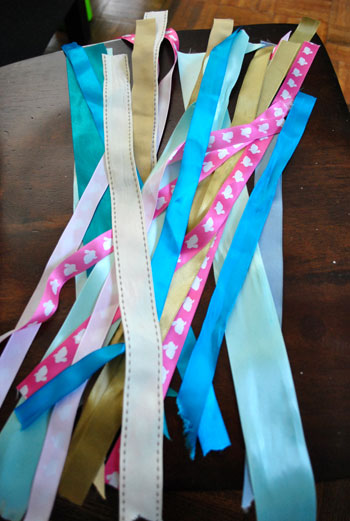
Then it was back inside while it dried to cut 16″ lengths of ribbon from all of the ones I picked to use. Here are most of them cut and ready to glue to my drying ring (I still had a few more hot pink ones to be added to the mix). Oh and I should note that I wasn’t exact about my cutting at all. If I wanted to use a strand of ribbon that I could almost get two lengths out of, I’d cut it in half (even if each piece was only 14″ instead of 16″). Yeah, call me Loosey Goosey. Wait, that sounds bad. Don’t.
Here’s where I’d show you a few photos of me and my handy glue gun as I glued each ribbon to the now-white-and-dry metal embroidery hoop. I just curled it over the top and glued the ribbon to itself in the inside of the hoop and worked my way around the top, just gluing each ribbon in place next to the other one with about an eight of an inch of space between them so they didn’t get all up in each other’s area. And I burned my fingers approximately fifteen times, which might be why there are no photos. But it was worth it. No pain, no gain. Sidenote: I accidentally typed “no paint, no gain” at first, but upon thinking about it, I also believe that’s true.
Here’s the bare bulb we’re dealing with in Clara’s closet. And I only realized as I took this photo that we never switched it out for a CFL. Probably because we never actually turn it on, but still – shame on us. It has been rectified. And the old bulb betta recognize. I’m in a weird mood today, huh?
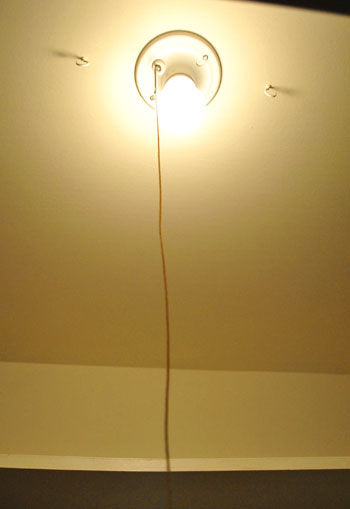
See those hooks on either side of it? We had those in the ol’ tool drawer, and I thought they’d come in handy for stringing up my ribbon chandy. I was going to use fishing wire but I couldn’t find it so I went with white string (you know, sewing machine string?). Wait I mean thread. Anyway, it worked like a charm.
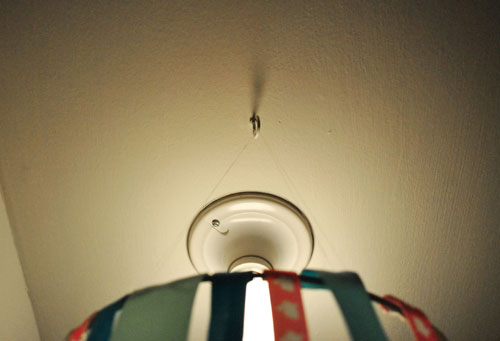
I just made four loops of white thread at four even intervals around the ring and looped them up over the two hooks so they sort of pulled from four points and stabilized the hoop o’ ribbon. Here’s what I was left with:

Cute, right? When Clara woke up from her nap I couldn’t wait to hang it slash show it to her. She loves it. And that my friends (as Martha would say) is a good thing. Oh and I totally should have ironed the ribbons before gluing but I was feeling lazy. I figured I can always take it down (it’s just hanging on those little hooks) and iron it if the urge ever strikes. Not that I’m counting on it. For now I look at it like wavy hair. There’s a place for it.
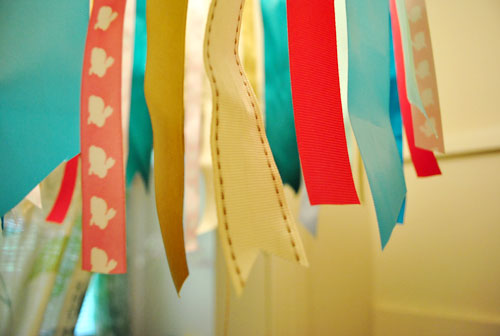
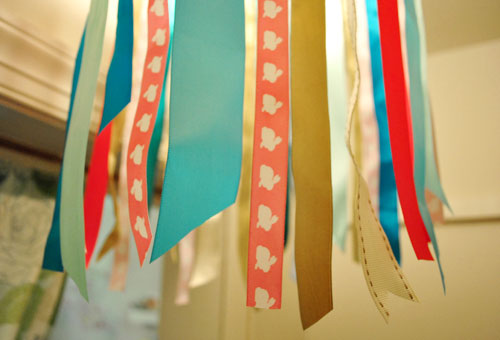
See that cute pink ribbon with the bunnies on it? It’s from this Easter basket we made her a while back. Memories. Oh and note that the bottom of the ribbons are random and staggered and some are cut at an angle or dove-tailed (is that what it’s called or did I make that up?). I went with the keep-it-casual approach.
As for how it looks from the rest of the room, I love how it just sort of peeks out from behind the curtain like her bright little dresses. So you don’t really know what’s going on until you get closer…
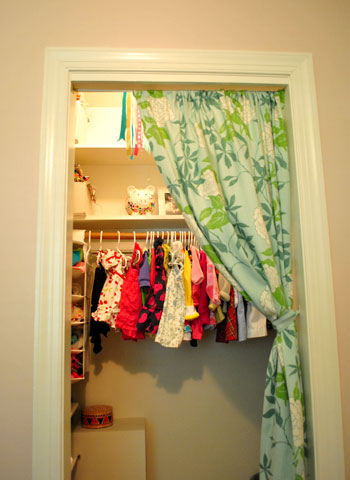
… and peer up to see those fun little ribbons.
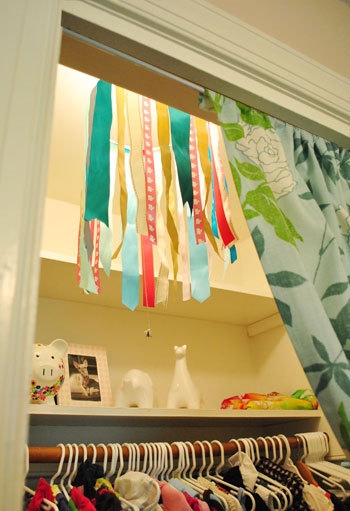
So there you have it. A $2 project that the ceramic animals in Clara’s closet get to enjoy (they’re up there because they’re breakable and now that Clara is toddling around they were in constant peril on her dresser and side table- so up they went. And yes, that’s a framed photo of Burger. Clara’s quite fond of him.
Oh and when I showed John he said “how’s it hanging?” and I said “har-har very funny” and he said “no, I’m asking you a question- how is it hanging from the ceiling?” and I explained it while trying not to wet myself. Maybe you had to be there though.
Anyone else making things out of ribbon? Or dressing up a bare bulb in another way? Tell $herdog all about it.
Psst- Don’t burn your house down! Many lamp shades are made from fabric and paper, so ribbon is cool. Just make sure it’s not even close to the bulb (and definitely not pressing against it). Our 10″ hoop offered lots of space for the heat to escape, and using CFLs helps too since they burn cooler than the regular guys. In some places exposed bulbs in closets aren’t even to code (glass domes are recommended, which could still be covered with a fun little ribbon chandy to dress them up).

Sarah B. says
Hey! My favorite ironing tip for small jobs is to use my flat iron! Hook that baby up to an extension cord and zap those ribbons real quick like!
Hooked on Hickory says
i have seen this around, especially on pinterest! looks so feminine! trying to figure out how i can add one to my adult closet without looking nuts. ;)
rachael says
that is adorable. these are the reasons i should have another kid someday. boy stuff is never this cute!
Brooke says
This is SUCH a cute idea! Were working on the nursery for the little girl we’re adopting and I am LOVING your ideas!
Brooke Annessa
http://www.TheAnnessaFamily.blogspot.com
YoungHouseLove says
Aw that’s so sweet! We’d love to see pics of the room (and your sweet girl) someday!
xoxo,
s
Shara says
Forgive me if you’ve already answered this. Where did you get the ceramic animals from? I saw you got the elephant at the PB outlet. What about the giraffe? I love them!
YoungHouseLove says
He’s also from PB Outlet (my friend gave me both of them at my shower). So in love. Maybe try ebay if they’re not in PB Outlet anymore?
xo,
s
Marla says
haha. How about “frugly”? It’s a few notches above fugly. Everyone should know you didn’t mean the naughty version then :)
YoungHouseLove says
Haha- perfect. Frugly.
xo,
s
Diana says
It’s amazing….we leave for vacation and return two weeks later and you have done soooo much!
I also love that you are continuing Clara’s weekly photo shoots (now monthly). After admiring the current photo, I always run through to the beginning because I love Clara’s expressions so much. (Week 24 is one of my favorites because I love how the perfect ballerina points her toes! :) )
YoungHouseLove says
You’re so sweet Diana! It’s so hard for me not to run back through all the photos every time too! I think my favorite ever is the ballerina one too. Only rivaled by the latest one of her walking!!
xo,
s
Mel says
SO cute! I especially love that you left it un-ironed. It makes it REAL! You go girl!
Allison says
Something that I’ve been wondering for a while… Is the chair that you have in Clara’s room comfortable for all it’s baby needs? I’m in search of a fun and comfy chair for my nursery and don’t want a typical glider!!
YoungHouseLove says
Oh yes, I nursed for 14 months in that chair. Haha. And John reads her books in it too. Especially with an ottoman pulled up, it’s great!
xo,
s
Ellen says
Loved all those little jokes in that post! I recently got new curtains (cheap from Ikea, of course) and a little hook to kind of casually swag them over to one side during the day. But because of the Midwest heatwave (boo, Illinois) going on right now, my ceiling fan has been on high 24/7 and my casually swagged curtains had been blowing out from behind the hook! Not what I was going for. So tonight I took a little black ribbon to match my black curtains and tied them together and hid it behind the hook! No more flying all over the place! I plan to get a large, pink (maybe with bunnies?) ribbon to tie them and use it as a decoration piece instead of just hiding it, but the little black ribbon was all I had! Thanks for the great ribbon shandy idea– I think I’ll do that in my closet too! :)
Kristen says
hahaha you are cracking me up over here! I love the “No paint, no gain… which I also believe is true” LOL too funny! I have like 10 ribbon chandys on my pinterest (http://pinterest.com/kristenkelley), a recent obsession and I’m so glad you posted about them! Love your ideas, always!!!
debbie c says
What a cute idea…good for moms with lots of ribbon and little time, like me! You could even add a few strands of beads here and there between the ribbons, for some extra fun girly sparkle.
Yulia says
Very cute project! I don’t know if anyone shared this yet, but apparently CFL’s don’t last as long if they’re turned on/off frequently.
I was all about replacing all the bulbs in my house with CFL’s until I read this from consumer reports: “For years we’ve reported that our tests found that CFLs last longer and perform better if they’re cycled less often and left on for 15 minutes or more—so they’re not ideal for bathrooms.”
YoungHouseLove says
So interesting! Maybe we’ll have to do a little test with a CFL in one closet and a reg bulb in another closet. Just to see how it goes!
xo,
s
Kris says
I mean this in the best way possible… Girl, were you a little drunk when you wrote this? You are seriously too funny!
YoungHouseLove says
Haha, maybe it was those glue gun fumes. Haha. Or Oreos. I ate a lot of those beforehand. You know, for fuel.
xo,
s
amy lovin says
… you don’t have to take it down … use a hair straightener to straighten out the ribbon! “)
Charlotte | Living Well on the Cheap says
Totally dope, $herdog. I’m thinking I may steal this Idea to replace a boob light at the top of my stairs! Thanks for the inspiration!
Claudia says
Not sure if so someone already mentioned, but in case no one did…next time, to prevent yourself from getting burnt by your glue gun (I totally understand as that happened to me a million times this month as I was “crafting” away for my daughter Eleanor’s 1st birthday party), just make a hoop wit the ribbons a bit longer and folded into half, loop around the ring, then run the ends through the opening of the folders other end, and pull tight (that’s the best way I can describe without drawing a diagram, but I’m sure you get it…?). Any who, I’ll be sterling this idea, so thanks for sharing! :)
YoungHouseLove says
Thanks for the tip!
xo,
s
Ashley Bird says
I love this! SO super easy and looks so cute!
Meredith says
These can also work as wind-socks. We hung ours on a tree branch over our deck. It has bright jewel tones and looks lovely on a nice breezy day.
Gwenalyn says
LoL $herdog! Holla! My kids and I were listening to the Glee soundtrack while I was organizing the garage and “Push It” came on… One of the lines was, “Get out there and dance, dance I said! Holla!” Of course I had to sing along with it. Awesome mom moment on my part. My 13 month old continued dancing but my nine year old stopped, gave me a serious fish eye and said, “Mommy… holla?” He was disappointed with my total lameness. I’m only sharing the sad story because one of the very few times in my life when I’ve said that – you posted about it. Too funny! Thanks for the laugh! :)
YoungHouseLove says
Bwahahahaha. Thanks for the laugh right back. Clara gives me the serious fish eye about twenty times a day.
xo,
s
Jaci says
I was trying to read through the other comments to make sure I wasn’t repeating someone else, but I got exhausted (how do you do it?) but now that you have this super cute ribbon chandi, I think a dressier pull may be in order? Maybe just a fun bead on the bottom?
Sofie says
I think that would be an awesome idea!
Kacie says
Oh Sherry! It’s gorgeous! I love that idea! Well done.
Kacie
http://www.acollectionofpassions.blogspot.com/
denise says
Very cute. I can appreciate your situation because many of the lights in my house are fugly bulbs hanging from the ceiling with a chain (of course, having a light in a closet would be a welcome change). I did discover a wireless switch you can hook up (and still use your awesome ribbons):
http://madmaison.com/?p=194
my honest answer says
Sorry Sherry, I’m not a fan. To be honest, it looks like it cost $2.
That said, I still love your post because it gave me a laugh. Especially the ‘how’s it hanging’.
I’d probably just lie and tell people Clara ‘made’ it.
Emily says
That is a really cute idea and in the closet what fun.
Ashley DeMazza says
Hi my name is Ashley DeMazza. I am proud to be the wife of Mike DeMazza and mom to Kate DeMazza and Emily DeMazza. We live in rural Falls Village, CT. I love this decorating idea and can’t wait to share it with my family!
Esther says
Hi Sherry,
This is so cute and such a funky idea!
I made a comfort blanket at Christmas for my niece with ribbons attached to all four sides of the blanket, as little tags. They are great for teething babies, like my niece and are very colourful!
like this one: http://diy-monday.blogspot.com/2009/05/make-baby-tag-blanket.html
YoungHouseLove says
Cute! Clara loves tags. Seriously, they keep her busy for hours.
xo,
s
Sofie says
So pretty!
toni from says
Wow Sherry you are reading my mind today. I have been busy organizing all of my scrapbook stuff and crafts and came across a lot of extra ribbons that I don’t need, but I hate to part with, I too am cheap and I save them. lol. For only $2 I can make my little girl a ribbon chandelier that I know she will love. She is 7 and loves things like that. Thank you for your great idea. Also, I get your sense of humor, I think it is hilarious, and I agree- Loosey Goosey is not the best nickname. lol. Lately I have been thinking of a new nickname for you: Sher-blogs-a-lot….catchy or just pathetic?
YoungHouseLove says
Haha, I’ll take it! I grew up with zero nicknames that stuck. So whatever catches on is my jam. And I do… LIKE. BIG. POSTS AND I CANNOT LIE.
xo,
s
Amy says
For others less crafty you don’t even need a hot glue gun to do this project. You can cut the ribbon a little bit longer and do a simple slip knot over the hoop. Easy peasy!
I did this slip knot version for my sister’s baby shower. I made a ribbon doorway garland and also looped ribbon all over my dining room chandelier to add some luscious color to the event. Then recycled the projects into a hoop hanger that can go over a crib/changer/bulb.
I also like the idea of modifying/trying this using funky old neckties (thrift stores usually have tons) for a boy’s room. That one will problem need a glue gun though.
YoungHouseLove says
I LOVE THE NECKTIE IDEA FOR A BOY’S ROOM. So cute.
xo,
s
Rachel @ My Naturally Frugal Family says
Way to go Sherdog…give it sometime we will all eventually catch on to the nickname.
The chandy is fab!!!
Laura says
Question, do you still use the chain to turn the closet light on and off? I can’t see it in the after pictures, so I didn’t know if you arranged something different.
YoungHouseLove says
Oh yeah, it’s still there hanging in the middle of the ribbons. I think I’ll switch it out for one of those cute little silver ball chains with a round glass-like pull at the end.
xo,
s
Aryn@LivingonADimeorLess says
Sherry, it’s absolutely adorable! I love how you and John have a serious knack for taking the average and making it spectacular! Well done! :)
Jennifer says
I love this idea. We are in the middle of trying to re-do our dining room. Scored some great furniture courtesy of Craigslist, but we are still stuck with an ugly gold chandelier. I’m planning to hit it up with some shiny metallic silver spray paint (I have a spray paint addiction too!)but I was wondering if you had any other ideas for how to dress it up? My plan is to have shiny silver/ chrome and turquoise accents in the room with more neutral “coffee with milk” colored walls. All of our china is a simple white basket weave pattern and our glassware is very simple as well. Any suggestions on making the chandelier un-ugly would be awesome!
YoungHouseLove says
How about tossing strands of beads around it so it’s all drapey and then spraying the whole thing (beads and all) so it looks like a big glittery chandy with beading? Anyone else have ideas for Jennifer?
xo,
s
Jennifer says
Thanks for the idea! Will be sure to update you on what we wind up with…
YoungHouseLove says
Wahoo. We’d love to hear about whatever you decide! Good luck.
xo,
s
Hesper says
I made these for my little guy’s first birthday. Among the ribbons I also hung little 1’s that I had cut out of coordinating scrapbook paper. They were SO cute! Great for hanging over tables, too.
Patti says
I Like.Big.Posts.And I Cannot Lie LOL!
Lovin’ this for lil Clara’s closet $herdog. I think it would also be cute to hang some cheap costume jewelry necklaces in between the ribbons for some bling. Love it!
Angela says
Love it! I have a very fugly bare light in my laundry room. I have been in need of something fun like this! Thanks for the inspiration!
Melissa says
It’s so cute! I love the waviness of the ribbons. It makes it look very beachy/coastal!
Kitty says
“I figured I can always take it down (it’s just hanging on those little hooks) and iron it if the urge strikes.”
Or strike while the iron is hot!
Wonder if you misted the ribbons, put the ol’ incandescent bulb back for an hour or two, would it steam them straight?
YoungHouseLove says
Haha- it might. But I’m neurotic enough to sit there and watch it the whole time. So the ol’ flat iron might be a lot faster….
xo,
s
Kelly @ hello design, meet life says
Super cute idea, which I think would be great for transforming/hiding a simple and boring glass covered fixture.
I just wanted to share that while CFLs are cooler than incandescents, code still requires that for lighting in closets, the bulb needs to be protected by a non-combustible surface like glass. Its not just about heat escape, but offering a barrier to absolutely keep a combustible material like clothing, paper, or ribbon from coming into contact with a heat source! Here is an easy to ready link about closet lighting and the code requirements code: http://electrical.about.com/od/electricalsafety/qt/Clothes-Closet-Lighting-Dos-And-Do-Nots.htm
I feel a little hypocritical because I am totally a culprit of bare bulbs in my home! (I am slowly trying to rectify that…) But since you guys have a HUGE audience, and you have that note at the bottom of the post about safety, I thought I’d pass the information along.
Again, super cute!
YoungHouseLove says
Thanks so much for the info! We edited the little warning on the bottom to include it. I think that code pertains to closed clothing closets (with doors that block off the space) but since ours is more like a nook maybe it’s safer since there’s more flow of air? Either way we’d love to upgrade to a glass-bulb-enclosed fixture whenever we can. Safety first! Thanks again for the tip.
xo,
s
Kristin says
Definitely laughed @ the how’s it hanging exchange btwn u two. Something that would’ve happened to me & my hubs!!
Ashley @ DesignBuildLove.co says
gorgeous little light solution! The ribbons are so fun and playful for Clara!!!
amanda says
Oh cool, I thought about doing one like this after seeing it on PBTeen or kids but I wasn’t sure how to get a cheap hoop. It doesn’t look like a regular embroidery hoop, what store did you get it from?
YoungHouseLove says
It was from Ben Franklin and sold in the “embroidery hoop” section. It was all metal though and didn’t open or close or clasp- just one big loop for $2!
xo,
s
Amy says
I’m sure you’ve already gotten this suggestion, but if you want to quickly iron the ribbons without the hassle of pulling out your ironing board and iron, use a hair flatiron, if you have one. I use it all the time to straigten ruffles and hems on skirts and blouses. Works like a charm!
YoungHouseLove says
Love that idea- you guys are much smarter than me!
xo,
s
Carly says
Wowza. So pretty. Pinterest that thang, woman! Get it on there!
P.S. thanks for using the word “fugly”
-Carly (http://www.createliveblog.com)
Meg says
This is super adorable! I love the idea!
Chaela de Gouveia says
Hey!!!
This is a great idea. I’ve been thinking of doing it my room for a while. I totally noticed the pink bunny ribbon though in the first picture from the previous project, thought that was pretty funny!
Jill @ Mission Decorate says
So easy and brilliant! I love this idea and I am going to steal it… but of course credit you for it when anyone asks :)
YoungHouseLove says
I would credit Pinterest or Martha! Haha. They’re the real ribbon heroes! I’m just a crazy girl with a glue gun and a dream.
xo,
s
Jamie M says
I have a question that I don’t know if it has been answered…
I’m confused about where you got the metal embroidery hoop?
All i can find online are wood ones, and I DESPERATELY want to make one of these for my daughters room! I’m also wondering if they make the rings any bigger?
We have the horrible “boob” lights in every room of our cookie-cutter home, but if I take it down, I can see that the painters didn’t paint until after the fixtures were up! (BLECK!) So I’m thinking about hanging this around the existing “boob”?
tips? ideas? think i can find a metal ring at Michaels or Joanns?
YoungHouseLove says
It was from Ben Franklin (that’s a craft store here). Maybe Michael’s or JoAnn will have them too if you check there? I think they went up to 18″ or so? We got the 10″ one but there were definitely larger ones too.
xo,
s
Stacey says
I made one of those for our nursery and hung it over her diaper changing pad. it was her little mobile for her to look at. Her room is black/white damask and pink, and I had lots of ribbon left (that matched) from diaper cakes, etc from showers that I was able to use! My project cost next to nothing too! Love the idea of hanging it over a bulb – cute!
ps… Hanging in the room allows the air circulating (from a/c or fan) to move the ribbons – very pretty!