Who’s ready for the big bathroom reveal?
As we mentioned in Monday’s post, there are almost always three main steps to room makeovers (some of which take forever and a day, and some that are done fast and furiously, like this bathroom blitz):
- prep/planning (brainstorming, picking a color palette, going shopping, priming, sanding, spackling)
- bigger upgrades (painting walls, refinishing or painting cabinets, laying new flooring, etc)
- finishing touches (curtains, new hardware, art, accessories – all the things that add “you” to the space)
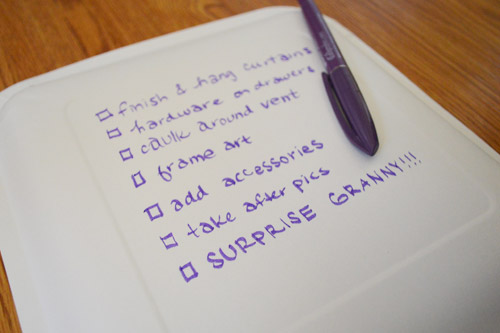
So Day Three (see Day One and Day two here and here) was all about those finishing touches. Here’s how it all went down (and yes, I was writing on the back of a paper plate with a calligraphy marker – gotta use whatcha got, haha).
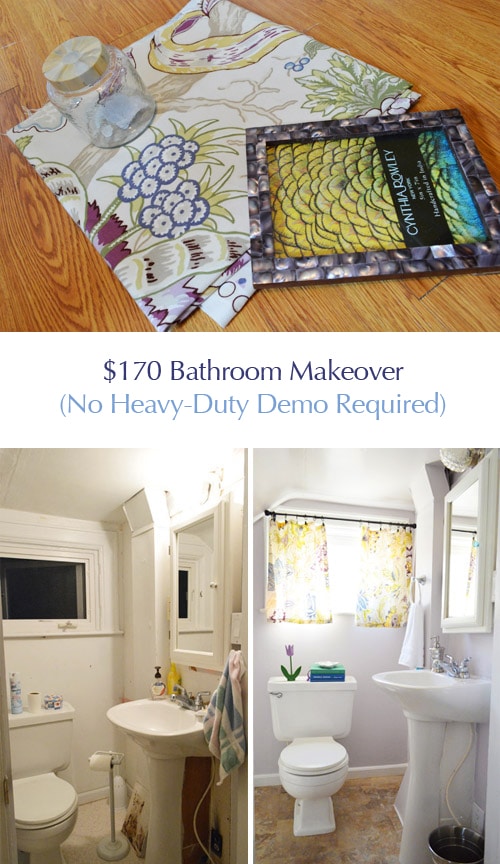
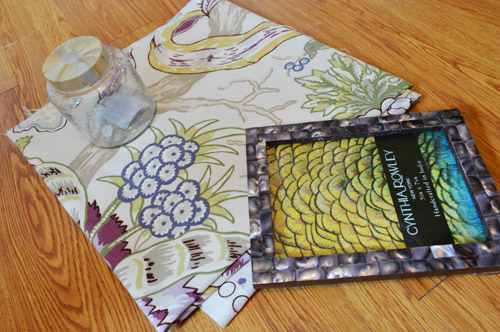
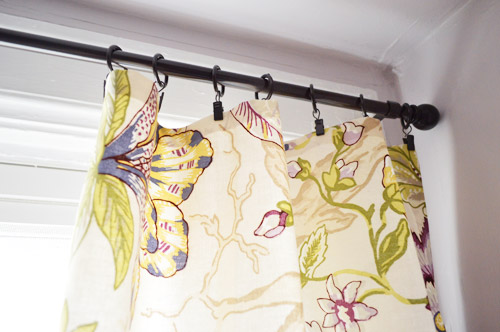
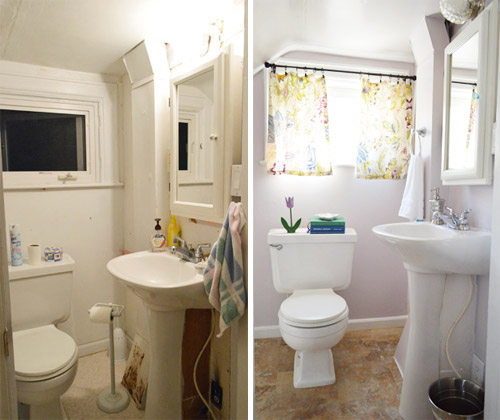
Ta-daaa! It took about an hour to make some custom curtains for Granny’s window thanks to some designer fabric (made by Braemore, if that helps) that we scored at a deep discount (at U-Fab in Richmond on our way out of town) and some no-sew hem tape.
I just measured the window to see how long I wanted them (a few inches below the bottom of the window trim felt best) so I cut two rectangles of fabric that were 29″ long (the length that I just measured plus two inches to allow for hemming) and 31″ wide (to give them enough fabric to feel drapey and full when they were hanging up there). Here’s a better shot of the fabric to jog your memory (it’s hard to photograph it in front of the window).
Once they were hemmed on all sides (using this method), they were 27″ x 29″ (my target size after accounting for those extra 2″ in each direction that would be used by the hem). Then it was as simple as hanging a curtain rod from Target and using some ring-clips (also from Target) to hold up my little fabric rectangles.
Here’s a close up of the pretty fabric. Something about it just screamed “Granny” to us. It’s so happy and sweet.
Oh and just when we thought we were done with the caulk on Day 1, we decided that one seam (where the front of the vent met the new flooring) could look a lot more polished with a smidge of caulk) so I made a video for you guys that might help you get a nice clean caulk line:
Then came the fun part: accessorizing tiiiime, baby. In came a lot of items that Granny already had (in colors that we pulled from the curtains like emerald, navy, and violet).
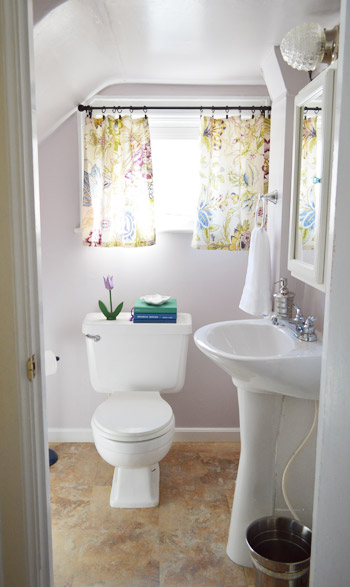
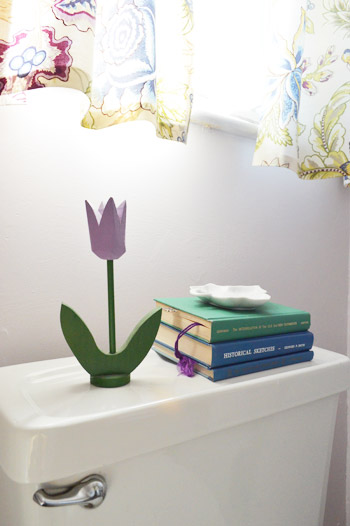
We even grabbed some fresh flowers from the nearby grocery store and plopped them into a vase that Granny already had. And see that wooden tulip on the toilet? Papa actually made that for Granny years ago, so we loved working it into our little room reveal. It’s the simple things, right? Speaking of those, how is it that a once-white-now-navy toilet paper holder can be so cute? It’s just one of those little upgrades that makes something feel a lot more fun than just going with a basic store-bought version. Note: For some reason the floor looks Snooki-tan orange in some of these shots, so the one below is the most accurate.
Here’s a straight shot of the cabinets with their navy hardware on them (we wish we had enough time to make a false-drawer on the top right – maybe next time we’re in town…).
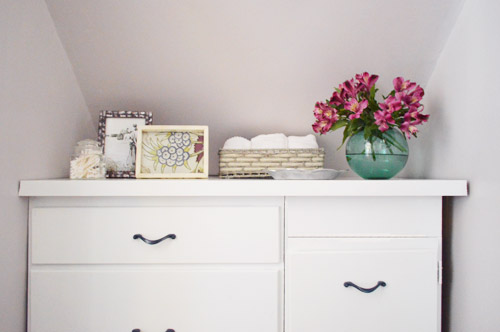
We mentioned that we wanted to bring in some meaningful art, so this is actually a picture of Granny and Papa when they were younger that we shared back in this post. We loved it so much that we got it printed as a 5 x 7 for our new purple frame from HomeGoods. Next to it, I also framed a scrap of extra fabric. Printed or patterned fabric behind glass = free art (and Granny can always switch it out for a picture if the mood strikes).
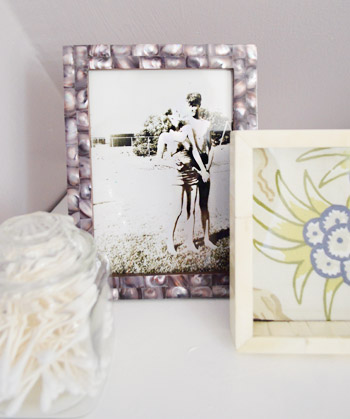
This pretty silver tray was already Granny’s, just like the sweet green vase. She has so many awesome things around the house that it was fun getting to showcase some of them in the room reveal – especially since she really seemed to love seeing them in there among some new things like a basket of extra hand towels, the flowers, and the frames.

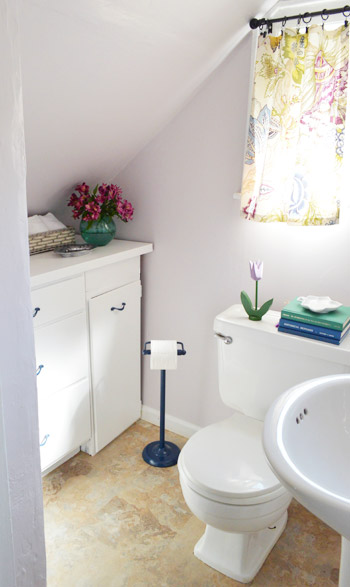
In such a tiny room, we really wanted it to feel cheerful, so while some folks might think it’s crazy to stack bold green and blue hardcover books on the back of the toilet, we really wanted to add color and use things Granny already had around.

The funny thing is that the colorful books were probably her favorite part along with that meaningful little wooden flower that was made for her by her husband so many years ago. Aww.
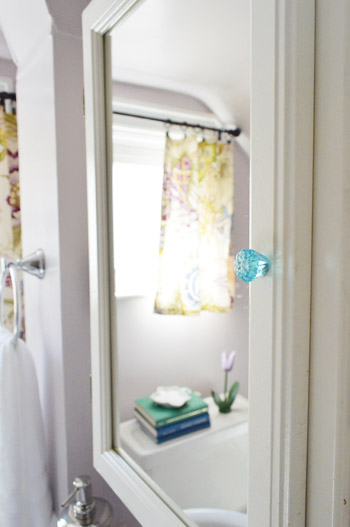
She even noticed the little things, like the small blue knob that we added to her medicine cabinet.
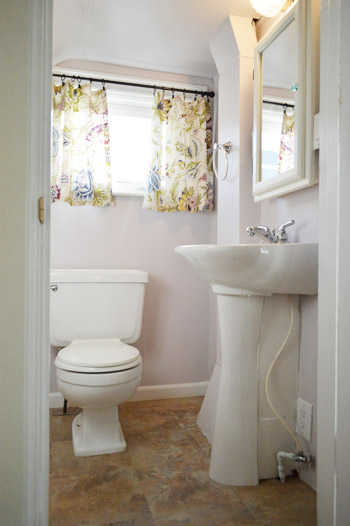
And we can’t forget how rough things were looking when we arrived, so here’s a flash back to the sink area before… and after we worked a little magic.
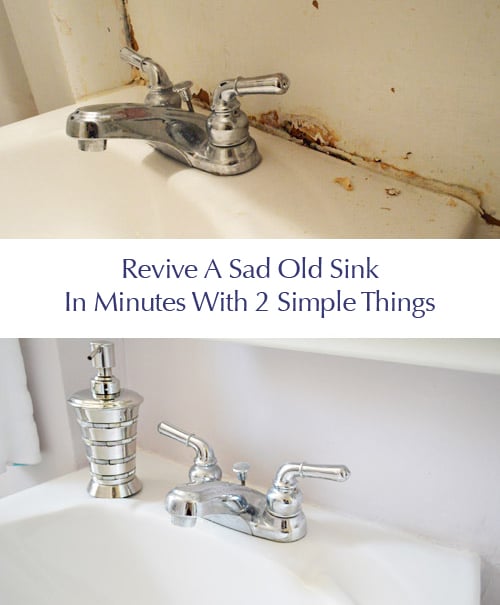
It was a really simple update. We just cut out that old caulk, re-caulked, and painted the wall behind it. Is caulk not the MVP of DIY, or what?
And here’s that shot of a few of the other more challenging issues in the room next to a final shot of the space. It’s amazing what a few days of work can do, huh?

It was pretty darn satisfying to see our to-do list all crossed off:
Brainstorm colors & go shopping for accessories (Day 1)Spackle/sand/caulk everything to prep the room for paint (Day 1)Rebuild the cabinets a bit so they look more balanced (Day 1)Prime and paint the cabinets for a more updated and open look (Day 1 & 2)Paint the entire room, including the ceiling (Day 2)Fix a few issues, like a rusted duct and an old dingy corner below the sink (Day 2)Redo the floors, which were that old sheet laminate stuff (Day 2)Revive some hardware/accessories with a fresh finish (Day 2)Make & hang curtains to add some charm (Day 3)Bring in some meaningful art (Day 3)Add some functional/meaningful accessories to finish things off (Day 3)- Reveal the whole shebang for Granny (Day 3)
So that’s the story of jumping at the chance to redo Granny’s bathroom in three days and on a nice modest budget. Is it weird that we’re in love with this tiny room now? As in, we joked about bringing an air mattress in the next time we came to visit and sleeping in there. Yup, weird.
Oh and we did happen to capture the big reveal on tape, but before we get to that, here’s a little budget breakdown for ya:
- 2 quarts of paint, “Hint of Violet” in Benjmain Moore’s Aura in Satin (a gallon would have been too much/pricier, so we went for two quarts): $40
- Zinsser’s Smart Prime & Benjamin Moore’s Advance Paint in Decorators White for the cabinet: $0 (already owned from this project)
- 30 vinyl stick tiles from Home Depot: $30
- 1 yard of fabric for curtains from U-fab: $15
- Curtain rod and ring hooks from Target: $18
- Wood for cabinet, new outlets, and outlet covers from Home Depot: $10
- Valspar Indigo Stream spray paint from Lowe’s: $4
- Trash can, towel bar, soap pump, frames, basket, and hand towels from HomeGoods: $45
- Blue knob for medicine cabinet: $1.50
- Flowers from Kroger: $6
- Books, wood flower, green vase, toilet paper holder, tray, glass jar for cotton swabs: $0 (these were already Granny’s)
- Spackle, caulk, paint supplies, hem tape: $0 (already owned, and carted with us so we had them on hand)
- TOTAL: $169.50
Not bad for a new floor, upgraded cabinets, freshly painted walls, new curtains, fresh-looking hardware, and getting to say good riddance to rust and peeling caulk, right? But enough money chit-chat, let’s move on to something priceless. Here’s Granny’s awesome reaction:
The funniest part is that we didn’t coerce her to wear that sweater to match the room, she just happened to have it on! We loved that. And we loved that she loved the room even more.
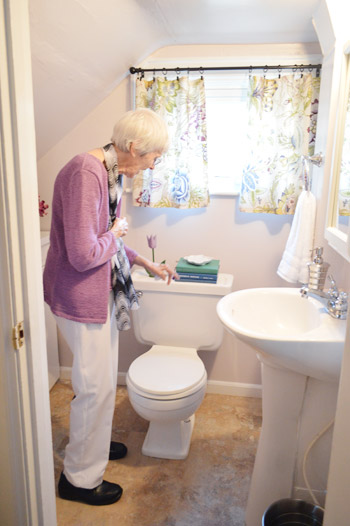
We were so happy to get to do something so fun for one of the sweetest women on the planet.
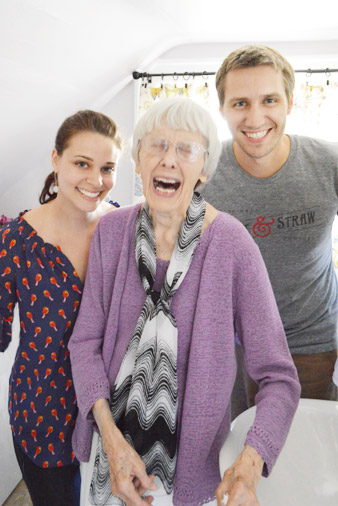
Then we hopped back in the car, and drove home with smiles on our faces.

What about you guys? Have you ever gotten an opportunity to help someone else with their space? Did they promise not to peek or were they in on the action with you? We actually loved that Granny gave us free reign and avoided that hallway so she wouldn’t see what was going on. And we’re so glad that she liked the result.

Ellie says
Great Job you guys! Couldn’t have done a nicer thing. This is one of my favorites by you guys because it’s for someone that clearly deserves it.
Vel says
Beautiful bathroom. Granny must be thrilled!
I have a question regarding the caulk. I loved the video. Did you put the painters tape down right where the wall and floor meet or did you leave a little gap–maybe 1/4 inch–so the caulk would still adhere to the floor when you pulled off the tape? Would you use the same method to caulk around a tub? Thanks!
YoungHouseLove says
Yes, we’ve used it around the tub! It’s a great method. It’s a tiny 1/4″ gap, so it has a little adhesion to the floor and the side.
xo
s
Steph says
I usually just lurk but, this brought me out. I’ve actually been waiting for this reveal! It’s absolutely wonderful that you could did such a special thing for someone that you love. I lost my grandmothers young and recently lost my mom. I love that it is important to you, to cherish and appreciate the elders in family. This was wonderfully done.
YoungHouseLove says
Oh Steph, I’m so sorry for your loss.
xo
s
charlotte says
Very cute. It turned out great and you guys did a beautiful job. Your granny is so sweet.
snosie says
Oh you Americans, with stuff on the top of your toilets! We always have our flushers there in Australia, so it always surprises me and makes me chuckle to see decorations on the top of a toilet!
YoungHouseLove says
Haha!
xo
s
Manda says
This is by far one of my favorite posts! Beautiful bathroom that is PERFECT for your sweet Granny!! LOVE IT!!!
Keri says
How sweet of you to do this for her! I bet she smiles every time she walks in there. My mom is looking at some older homes in North Carolina and I told her I’d come visit and help her spruce up the place when she moves. I’m not the super DIY-er that you guys are, but I’m pretty good at finding deals at Home Goods and on craigslist!
melrose says
What a darling Granny you have! So sweet, her reaction. What a wonderful thing to do for her.
Lesley says
That was so sweet! Grandmas are so special, and you can just tell she loved it.
Aimee says
You guys are so dangerous! My husband’s going out of town tomorrow morning for four+ days, and I think I just decided to refresh our master bathroom while he’s gone…yikes!
Congrats – the makeover is beautiful! (And Granny is awesome!)
Tania @ Carnoustie Lane says
Best. Post. Ever. Love granny’s face in the photo of the three of you! Great shot!
Sarah S. says
Grannies are the best! Your Granny’s reaction was the best. :)
Tiffany says
Granny just made my day! Her reaction and her smile are so infectious. Makes me miss my Granny who lives far away! Horray for Grannies and Bathrooms!! : )
Judy says
I am crying for happiness for your Granny. So many people forget to help the elderly and it makes me so happy to see someone remember. So much love. So important. God Bless you all.
Liz R. says
I just read your response to my question about how to spiff up my moms wood vanity. You mention shining the wood. This may be a dumb question but what does that mean?
YoungHouseLove says
Maybe just get some wood furnisher polish or some sort of wood wax at a home improvement store and give it a fresh look? Hope it helps!
xo
s
Stephanie Martin says
Loved seeing what you did for your sweet Granny! It looks wonderful!
Tanya says
That was FUN! Good job, guys!
Tanya.
Hannah says
Wow!! Nice work!!! And you’ll certainly treasure that picture of the three of you following the reveal for many years to come =)
Alison says
I LOVE this series of posts. I hope you do more of the “quick makeover” type projects for other people. It gave me some ideas for my own bathroom. And granny is so sweet! She is about the same age as mine!! I got teary-eyed over her reaction!!
Kindra says
This is adorable and awesome all at the same time. Granny’s are the best!
GreenInOC says
I am so confused about the vent!
There is no grate on it – how does it work?
I am in LOVE with the tulip and it’s almost as if the entire bathroom was redone to showcase that sweet show of love!
YoungHouseLove says
Oddly enough it just brings air up to the second floor, but doesn’t open to the bathroom. It was just there before the room was converted so John’s grandpa left it alone. Haha.
xo
s
Christina says
awwww… so sweet! Love her reaction! I hope to do a room or two for some family members. Good idea to capture it all and film it :)
I hope you do more rooms for family/others – this has been a fun mini-series to follow along with.
pendy says
As busy as you are, to take the time to do this speaks volumes about the kind of woman Granny is…what a precious thing to do for her.
Rosanne says
She is the cutest thing ever! Glad to read I am not the only one tearing up. (and LOVE the pic of you 3 together…that’s my favorite part)
Georgia says
I loved, loved, loved the video! You did a fabulous job with the little powder room, but the reaction from your Granny was the cherry on top!
Christine says
I don’t comment very often, but this post made me cry. Granny reminds me so much of my Nene who passed away 2 years ago this month. She even wore scarves just like that. This is one of my favorite things y’all have done. You will always treasure this memory of making her so happy. Thanks for sharing.
YoungHouseLove says
Aw, I’m so sorry for your loss Christine.
xo
s
TJ says
This was an awesome project, and the reveal video melted my heart. It definitely appears that your Granny is a very special person. And I’d bet she’s honored to have a redesigned bathroom by some very important people in her life, too! Way to go!
Kendra says
This is seriously one of my favorite projects of yours to date! I just love all the simple but dramatic changes you made to the bathroom, and you made it seem so easy! I didn’t know you could put those tiles right over linoleum like that, and I am already planning on making some curtains just like you did! (PS I LOVE all your fabric choices). Thanks so much for all the detailed tutorials on your projects. Makes amateurs like me feel like I have a chance ;)
Courtney says
What a lovely post.
Erika says
Granny’s reaction was so sweet! You guys did an amazing job. I think this is a great idea for future projects… redo a room for someone special and let us all be a part of the process/big reveal!
Valerie says
it’s lovely just like granny. have you guys ever thought about taking on clients?!
YoungHouseLove says
We have thought about that, and we’d love to someday. Maybe after the book is out and the tour is over and things calm down a little !
xo
s
Ali says
Love this. :)
Jessica says
this is my favorite makeover yet! I love grandmas :-)
Jessica says
I always wondered how come Clara talk’s so much and my 2 yr old niece hardly talks ..after seeing this video I know why.. Sherry is constantly saying something.. way to keep life fun Sherry!
YoungHouseLove says
Ha! And Sherry’s dad always says Sherry was a very early talker. So I think we know what Clara will be like when she grows up! :)
-John
Lisa says
Looks SO wonderful! How bright and cheery! From your de-caulking on day 1, I have a question. How would you de-caulk around a metal frame for a glass door tub/shower? There are tons of nooks and crannies and I don’t think my utility knife can physically reach each spot? Also, what do you prefer for getting out stains where water has sat in a shower? (ie, mold, limescale). We are in a rental and we loved everything about this apartment but the bathroom. Cleaning isn’t cutting it, it needs some new caulk! Thanks for any suggestions you have!
YoungHouseLove says
I would just try to cut out as much loose or reachable caulk as you can- that way the fresh stuff can go over it and look nice and new. As for mold and limescale, I think white vinegar is good for getting that out. Anyone else have tips?
xo
s
Christina says
I too have a wooden tulip. This one happened to come from my husband’s grandfather. Isn’t it funny to think of what in your house your grandkids (no pressure, of course) might hang on to? In looking at this reno, I noticed that you didn’t replace the light fixture and and that got me thinking about the light fixtures I like–my problem is that most of the hip fixtures these days have exposed bulbs and I like to use the energy efficient bulbs. I’d love to hear (see a post) on what light bulbs y’all use and why. Hopefully there’s a bulb out there that’s friendly to the earth and gives great light, but I haven’t yet found it!
Erin says
Probably the sweetest thing I have ever seen/read. What you did has really inspired me to do something nice for my grandpa. Thank you for such an uplifting post!
BreeAnn says
This might be my favorite thing you’ve ever done. The room looks great, especially for $170 and 3 days, but mostly just that it was a sweet thig to do for your very appreciative Granny. I loved her reaction!
Kathy says
You guys are the best! Love the happy look on your Granny’s face. She’s just lovely!
Kerrilynrn says
Awesome job! Luvs it.
You didn’t mention where you got the blue knob for the medicine cabinet thought. I’d love to try some of those on my dresser redo. Where could I find some similar?
Thanks
YoungHouseLove says
Oh that was from Hobby Lobby (they run 50% off sales all the time). Hope it helps!
xo
s
Lynne says
I’ve been a loyal reader for about a year, have pre-ordered your book, and don’t miss a day of your posts, but this is the first time I have commented. Loved this series! How awesomely satisfying to do this makeover… thanks for including the video of Granny’s reaction, it is so precious. LOVE!
Annie says
We see, what, 62 seconds of Granny and immediately love her to pieces? I want to be like that!
Judy says
Snooki-tan orange! Too hilarious!
Great job! I loved her reaction :)
Andrea B says
Loved the makeover! Amazing what you guys can accomplish with a small budget if you DIY. You should do these more often. I loved seeing the progress and I can’t wait to try some of your makeover tips on my bathroom!
Meghan says
Loooove that barely-lavender wall color! On an unrelated note, I spotted this and thought of you guys!
http://www.target.com/p/figural-greyhound/-/A-14089389?reco=Rec|pdp|14089389|RecentHistoricalItems|cart_page.cross_sell_2&lnk=Rec|pdp|RecentHistoricalItems|cart_page.cross_sell_2
YoungHouseLove says
Love that guys!
xo,
s
Brenda says
Really, I think my favorite thing is the wooden flower. It’s my favorite color, it’s handmade, and it’s so special. I think it’s the perfect touch. It just looks so pretty and beautiful, and I can’t believe you did this all in just a few days!
Rachel M. says
LOVE this project!! Such an inspiration that you could actually completely transform that one room in under $200!!
Sarah K says
Gorgeous! So glad Granny liked it! Her reaction is so special – makes me want to find someone I can surprise with a make-over! Thanks for sharing guys.
Molly says
Thanks Sherry and John! This little bathroom refresh gave me such hope and inspiration to do the same thing. Granny is just adorable, and the bathroom looks beautiful!
Annie says
This is the cutest post ever. Your granny is so cute and I’m so happy she loved it!! That pic of you three is priceless. I say that goes in YOUR bathroom somewhere…or at least your hall collage! Good job guys!