Who’s ready for the big bathroom reveal?

As we mentioned in Monday’s post, there are almost always three main steps to room makeovers (some of which take forever and a day, and some that are done fast and furiously, like this bathroom blitz):
- prep/planning (brainstorming, picking a color palette, going shopping, priming, sanding, spackling)
- bigger upgrades (painting walls, refinishing or painting cabinets, laying new flooring, etc)
- finishing touches (curtains, new hardware, art, accessories – all the things that add “you” to the space)
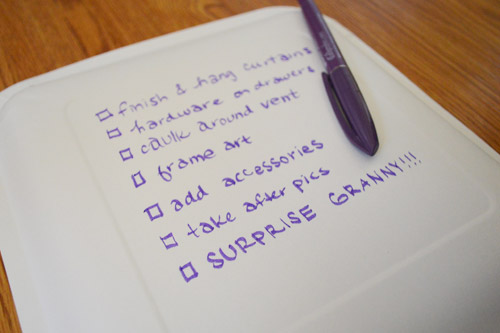
So Day Three (see Day One and Day two here and here) was all about those finishing touches. Here’s how it all went down (and yes, I was writing on the back of a paper plate with a calligraphy marker – gotta use whatcha got, haha).
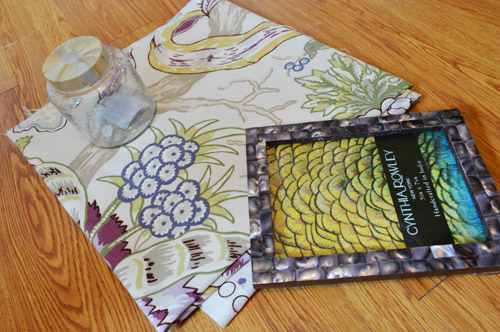
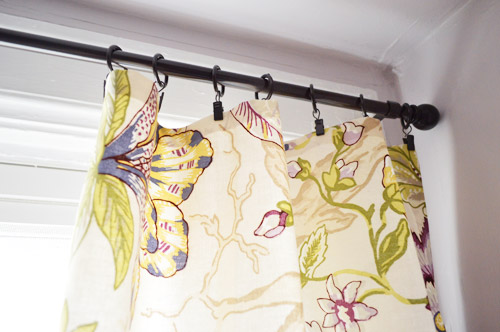
Ta-daaa! It took about an hour to make some custom curtains for Granny’s window thanks to some designer fabric (made by Braemore, if that helps) that we scored at a deep discount (at U-Fab in Richmond on our way out of town) and some no-sew hem tape.
I just measured the window to see how long I wanted them (a few inches below the bottom of the window trim felt best) so I cut two rectangles of fabric that were 29″ long (the length that I just measured plus two inches to allow for hemming) and 31″ wide (to give them enough fabric to feel drapey and full when they were hanging up there). Here’s a better shot of the fabric to jog your memory (it’s hard to photograph it in front of the window).
Once they were hemmed on all sides (using this method), they were 27″ x 29″ (my target size after accounting for those extra 2″ in each direction that would be used by the hem). Then it was as simple as hanging a curtain rod from Target and using some ring-clips (also from Target) to hold up my little fabric rectangles.
Here’s a close up of the pretty fabric. Something about it just screamed “Granny” to us. It’s so happy and sweet.
Oh and just when we thought we were done with the caulk on Day 1, we decided that one seam (where the front of the vent met the new flooring) could look a lot more polished with a smidge of caulk) so I made a video for you guys that might help you get a nice clean caulk line:
Then came the fun part: accessorizing tiiiime, baby. In came a lot of items that Granny already had (in colors that we pulled from the curtains like emerald, navy, and violet).
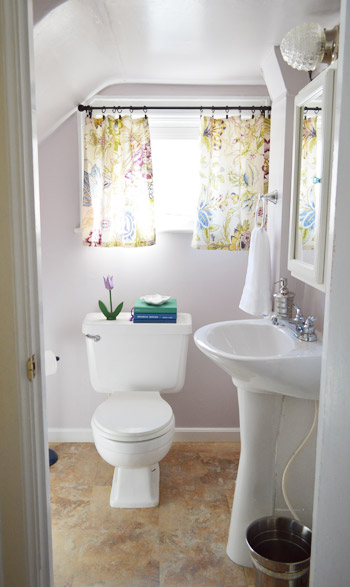
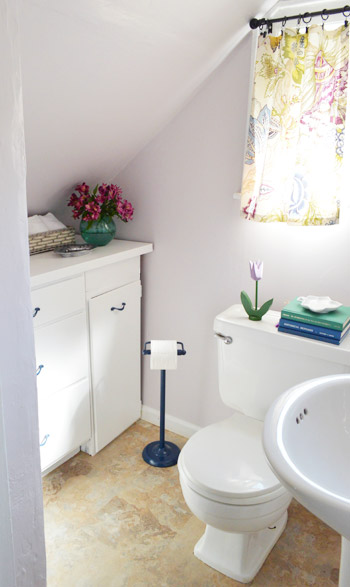
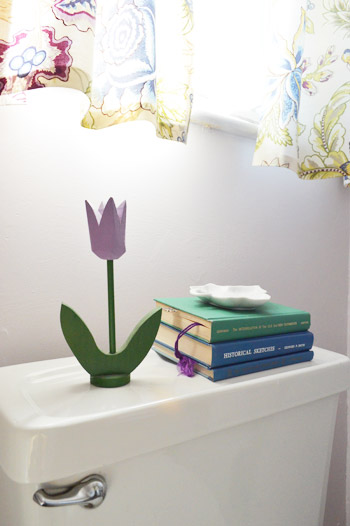
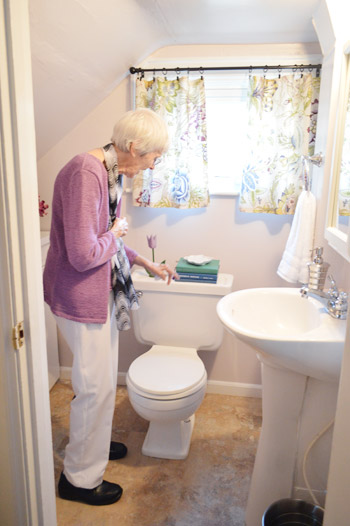
We even grabbed some fresh flowers from the nearby grocery store and plopped them into a vase that Granny already had. And see that wooden tulip on the toilet? Papa actually made that for Granny years ago, so we loved working it into our little room reveal. It’s the simple things, right? Speaking of those, how is it that a once-white-now-navy toilet paper holder can be so cute? It’s just one of those little upgrades that makes something feel a lot more fun than just going with a basic store-bought version. Note: For some reason the floor looks Snooki-tan orange in some of these shots, so the one below is the most accurate.
Here’s a straight shot of the cabinets with their navy hardware on them (we wish we had enough time to make a false-drawer on the top right – maybe next time we’re in town…).
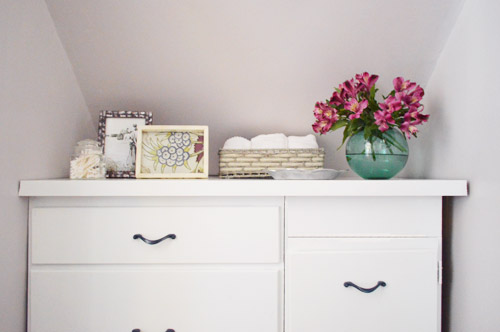
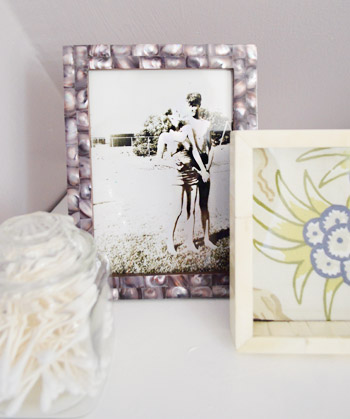
We mentioned that we wanted to bring in some meaningful art, so this is actually a picture of Granny and Papa when they were younger that we shared back in this post. We loved it so much that we got it printed as a 5 x 7 for our new purple frame from HomeGoods. Next to it, I also framed a scrap of extra fabric. Printed or patterned fabric behind glass = free art (and Granny can always switch it out for a picture if the mood strikes).
This pretty silver tray was already Granny’s, just like the sweet green vase. She has so many awesome things around the house that it was fun getting to showcase some of them in the room reveal – especially since she really seemed to love seeing them in there among some new things like a basket of extra hand towels, the flowers, and the frames.

In such a tiny room, we really wanted it to feel cheerful, so while some folks might think it’s crazy to stack bold green and blue hardcover books on the back of the toilet, we really wanted to add color and use things Granny already had around.

The funny thing is that the colorful books were probably her favorite part along with that meaningful little wooden flower that was made for her by her husband so many years ago. Aww.
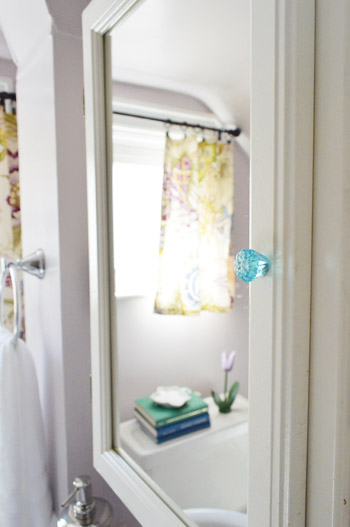
She even noticed the little things, like the small blue knob that we added to her medicine cabinet.
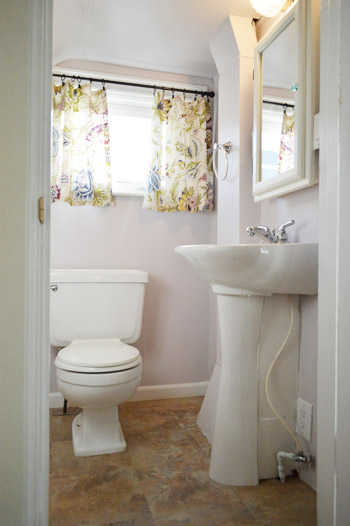
And we can’t forget how rough things were looking when we arrived, so here’s a flash back to the sink area before… and after we worked a little magic.
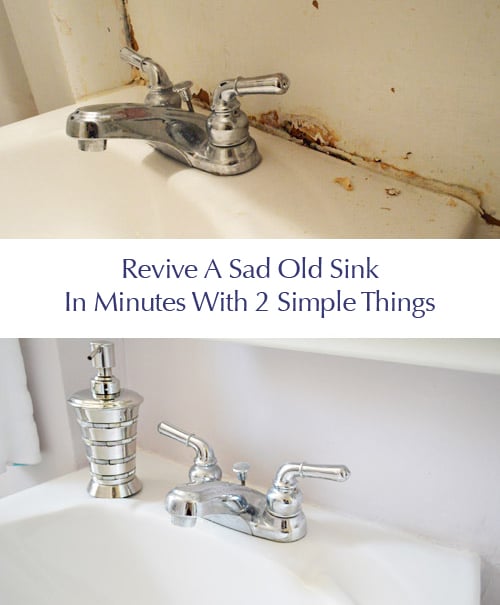
It was a really simple update. We just cut out that old caulk, re-caulked, and painted the wall behind it. Is caulk not the MVP of DIY, or what?
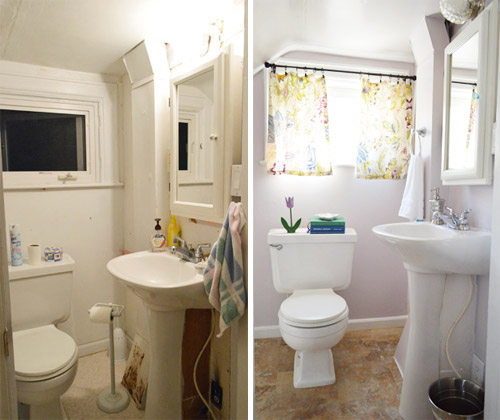
And here’s that shot of a few of the other more challenging issues in the room next to a final shot of the space. It’s amazing what a few days of work can do, huh?

It was pretty darn satisfying to see our to-do list all crossed off:
Brainstorm colors & go shopping for accessories (Day 1)Spackle/sand/caulk everything to prep the room for paint (Day 1)Rebuild the cabinets a bit so they look more balanced (Day 1)Prime and paint the cabinets for a more updated and open look (Day 1 & 2)Paint the entire room, including the ceiling (Day 2)Fix a few issues, like a rusted duct and an old dingy corner below the sink (Day 2)Redo the floors, which were that old sheet laminate stuff (Day 2)Revive some hardware/accessories with a fresh finish (Day 2)Make & hang curtains to add some charm (Day 3)Bring in some meaningful art (Day 3)Add some functional/meaningful accessories to finish things off (Day 3)- Reveal the whole shebang for Granny (Day 3)
So that’s the story of jumping at the chance to redo Granny’s bathroom in three days and on a nice modest budget. Is it weird that we’re in love with this tiny room now? As in, we joked about bringing an air mattress in the next time we came to visit and sleeping in there. Yup, weird.
Oh and we did happen to capture the big reveal on tape, but before we get to that, here’s a little budget breakdown for ya:
- 2 quarts of paint, “Hint of Violet” in Benjmain Moore’s Aura in Satin (a gallon would have been too much/pricier, so we went for two quarts): $40
- Zinsser’s Smart Prime & Benjamin Moore’s Advance Paint in Decorators White for the cabinet: $0 (already owned from this project)
- 30 vinyl stick tiles from Home Depot: $30
- 1 yard of fabric for curtains from U-fab: $15
- Curtain rod and ring hooks from Target: $18
- Wood for cabinet, new outlets, and outlet covers from Home Depot: $10
- Valspar Indigo Stream spray paint from Lowe’s: $4
- Trash can, towel bar, soap pump, frames, basket, and hand towels from HomeGoods: $45
- Blue knob for medicine cabinet: $1.50
- Flowers from Kroger: $6
- Books, wood flower, green vase, toilet paper holder, tray, glass jar for cotton swabs: $0 (these were already Granny’s)
- Spackle, caulk, paint supplies, hem tape: $0 (already owned, and carted with us so we had them on hand)
- TOTAL: $169.50
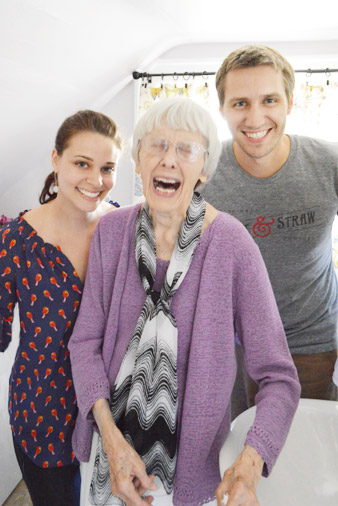
Not bad for a new floor, upgraded cabinets, freshly painted walls, new curtains, fresh-looking hardware, and getting to say good riddance to rust and peeling caulk, right? But enough money chit-chat, let’s move on to something priceless. Here’s Granny’s awesome reaction:
The funniest part is that we didn’t coerce her to wear that sweater to match the room, she just happened to have it on! We loved that. And we loved that she loved the room even more.
We were so happy to get to do something so fun for one of the sweetest women on the planet.
Then we hopped back in the car, and drove home with smiles on our faces.

What about you guys? Have you ever gotten an opportunity to help someone else with their space? Did they promise not to peek or were they in on the action with you? We actually loved that Granny gave us free reign and avoided that hallway so she wouldn’t see what was going on. And we’re so glad that she liked the result.

Kate says
Someone must have been slicing onions near me when I saw that last photo of the three of you–Granny looks SO happy! What a wonderful project for a clearly-wonderful lady.
Lynette says
It’s beautiful, the reveal brought tears to my eyes! I helped a friend gut and re-do her entire bathroom, complete with re-building the floor framing that the previous owners had compromised with uneducated use of a saw! It felt so good to be able to help someone get the beautiful bathroom they deserved for much less than it could have cost them if they paid a professional!
Amelia Davis says
You guys have got to stop being so sweet! I’m sure my workmates think I’m insane – your reveal made me get all choked up in front of my computer. The bathroom is beautiful!
Echo says
Add me to the list of criers! I have tears rolling down my cheeks at work. I miss my grandma (also named Grannie!) and now I want to visit and redo her bathroom. lol. Great job!
Ted says
Love the end bathroom…so fresh and clean! I can see why your granny was so thrilled with the results.
Just a tip to add to your caulking tutorial: before you run your finger down the caulk, it helps to wet your finger (water for latex caulk, alcohol for silicone caulk). If your finger is too dry, the caulk may stick to your finger and come up uneven causing you to have to run it over several times to get that smooth concave look. If you wet your finger, it keeps the caulk smoother in fewer passes. When done, the water will even make the caulk glisten until it dries, but it should have a very smooth look.
YoungHouseLove says
Oh yes, John loves that tip!
xo
s
Mandy S says
Awww, Granny is adorable! Makes me miss my own Grandma. Love what you guys did!
Laurabeth says
The videos aren’t cooperating. Would love to see Granny’s reaction. :(
YoungHouseLove says
So sorry Laurabeth, could you be at work? Sometimes they’re blocked by corporations. Seems like others are watching them. Anyone else have any issues? Maybe try another browser?
xo
s
Liz says
It really looks great. Wallpaper is my nemesis. It was awesome-town that it came off easily and that someone else took care of it.
I love the old photo. My grandfather passed away before I was born. When my grandma passed away at a ripe old age, the extended family met at my uncle’s house and we were all looking at old photos and reminiscing. There was this great photo of my grandma sitting on a tractor holding a chicken. So random. But she was just glowing. My mom’s cousin walked past me as I was looking at it. She said my grandpa had taken the photo, and then said “she was crazy about him.” I love that. Sniff.
Sorry about uncomfortably over sharing on the Internet. That photo just brought that back for me.
YoungHouseLove says
Aw, that’s sweet! Thanks for all the love everyone! Granny must feel ready to burst with so many sweet folks out there wishing her well.
xo
s
Marissa says
This is awesome!!! I think it came out beautifully! Bravo!
You should do more of these quick weekend DIYS! Very inspirational!
annabelvita says
Your granny always has the biggest smile on her face, she seems like a really lovely lady.
Kristen says
This sounds weird to say about people you don’t know lol but in the picture of you both with granny she reminds me of Clara, they both seem to have the same sweet, happy spirit. Beautiful job on the bathroom and what a sweet thing to do!
Stephanie says
The bathroom looks GREAT. I can’t watch the video at work but based on the pictures it looks like Granny really loved it. She looks SO happy.
Reenie says
Great job….and how sweet of you to do it for Granny.
(I couldn’t get 2nd video to work)
YoungHouseLove says
So sorry Reenie! Could it be that your office is blocking the video? Seems like other folks can see them, but we did hear about someone else who couldn’t see it. So sorry! Maybe try another browser?
xo
s
Cora says
Awesome bathroom (can I come over and stay in there as well?), awesome grandchildren and awesome Granny. Can we be real BFF’s instead of in my head? ::sigh:: (I promise I’m not stalking you or anything!!!)
YoungHouseLove says
Haha, done. Real BFF-dom is hereby granted.
xo
s
Andie says
Love, love, love this project! It was such a heartwarming read. So happy for Granny!
Joanne says
Yep, the video made me cry! What an amazing job you did!
Brittany says
That was so sweet and the bathroom looks great! You two are awesome!
Taya says
Oh. Em. Gee! Granny is the cutest thing ever! I love love love the bathroom upgrade!
Morgan says
You guys did such a wonderful job in a short amount of time. And the reveal video almost brought a tear to my eye, it was so sweet to see your Granny’s reaction!
sara v says
Aww watching her reaction made me all teary! She seems so sweet! I love everything about the bathroom. Good job!
Ginny @ goofymonkeys says
I have never done a makeover for someone else – but I know of a few people whose spaces could use a makeover. How did you bring it up? “Hey Granny, your bathroom is pretty gross, can we fix it?” LOL
YoungHouseLove says
John’s parents actually asked us what we thought about helping Granny with her bathroom and we jumped at the chance! Thankfully Granny loves DIY and is really good about change (she moves her own furniture around every time we come to visit! Haha) so she was ready to pull that old wallpaper down herself!
xo
s
Reenie says
I think you need the first before (before wallpaper removed) photo in the side-by-side before and after ;)
YoungHouseLove says
Oh yeah, that’s a good comparison. Those pics are in the video of the reveal if you get a chance to watch that.
xo
s
Candy from Candied Fabrics says
Awww, awesome job guys! Everybody is happy, and all it took was some hard work and a wee bit of moolah! BRAVO!
Jenn says
heart. I lost my grandma a few months ago, so I’m SO SO SO glad that you are showing your appreciation to yours. so much love in that tiny room.
work tears commencing.
YoungHouseLove says
Oh Jenn, I’m so sorry for your loss.
xo
s
nancyo says
I definitely had tears in my eyes too. It was such a genuine reaction!
Catherine @ DCCL says
Happy tears! What a wonderful project!
Lauren says
You guys did an amazing job!
Jenn M. says
a very endearing post from day 1 to the end. i love everything about it! granny is such a lucky and sweet lady. i could only wish my grandchildren would be that nice to me when and IF my times comes … gah!
linda says
Wonderful posts. It was beautiful how you took care to include Granny’s likes and possesions in the makeover. My favority is the framed photo of her and her husband. Lovely.
Auntie LIz says
Ahhh. . . I’ve been waiting for the big reveal. Mom (Granny) was so excited about you guys redoing her bathroom! It looks wonderful! The best it has ever looked! Not only did you make sweet Granny happy but you made all the family happy! Thanks so much!
ps. Come to CA! I have some rooms you can play with! :)
YoungHouseLove says
Aw, thanks Aunt Liz!! We’d love to do a little CA makeover sometime ;)
xo
s
Bess says
Without question, my favorite project you have done!! Granny is awesome!
mimi says
Oh my gosh you guys are SO flipping cute!!! All of you…I think my fave thing in the room is the curtains! So fresh!
Tina says
Seeing Granny’s reaction in the video made me cry and miss my Grannie, too. I can see that you both truly realize what a blessing you have in her. Please give her extra love and hugs whenever you can. I bet she gets a huge kick out of little Clara! The bathroom is so pretty. You have sold me on the wonders of caulk now.
Tina
kara says
this made my morning :)
jen says
So cute!! What a great job and such a wonderful thing to do! I agree with someone above, it makes me miss my Grandma!
LaTonya says
This is an amazing makeover!! My husband and I tried to fix up the bathroom in my mother-in-law’s house as well. We spend most of the time removing 30-year-old wallpaper that was applied right on top of the bare drywall with no primer. Not exciting AT ALL. In addition, didn’t have free reign with the paint color. After she approved the color (with much back and forth) and we repainted the space, now she says she doesn’t like it. Oh well, you can’t win them all.
YoungHouseLove says
Aw man, that’s a bummer.
xo
s
Rebecca says
I love your Granny! I really hate to be the word police, but I. can’t. help. it… http://grammarist.com/spelling/free-rein-free-reign/ I think you also want a question mark at “What about you guys?” Please consider this some light housekeeping. I’m helping! Ha!
YoungHouseLove says
Thanks Rebecca! All fixed.
xo
s
Rebecca says
Whoops! Don’t forget about the “free rein” not “free reign.”
Erin @ One Project at a Time says
This is quite possibly my fav post/series you’ve ever done. Not only did you show how a little bit of time and money can go a LONG way in a room, but it was all for someone else. We don’t often consider “giving the gift of DIY,” but its amazing how much it can mean to someone. I’m feeling inspired to give! :)
Kaitlyn K. says
how awesome this was is exactly why you guys need a TV show. :)
Kim says
I really loved this series. I hope y’all find opportunities to do more series like this in the future! I think I liked it so much because it was someone else’s house so it gave y’all the freedom to do something a little different than what you might do in your house. Even though I never get tired of seeing what y’all do with your house, I guess the variety was nice. And since it was 3 days each of the upgrades seemed so simple but had a huge impact – I loved that about this series too.
Quick question – and you may have already answered this or it may be in the video but I am at work – did y’all caulk around the bottom of the toilet or were the new tiles snug enough around the toilet to where you didn’t have to caulk?
YoungHouseLove says
The new tiles were snug so we didn’t caulk at all. It’s nice to leave the bottom of a toilet uncaulked if you can so if it leaks you can see it (the water comes out, instead of hiding under the toilet until the floor rots and the toilet falls through the floor). Hope it helps!
xo
s
Whitney Sharpe says
Aw, this makes me miss my grandma SO much. Love the bathroom!
Jess @ Little House. Big Heart. says
That is the sweetest thing ever! It makes me want to gift someone deserving a makeover!
Wouldn’t it be fun to do makeovers for charity??
YoungHouseLove says
Totally! We’d love to do that!
xo
s
Ariane says
Centsational Girl does that with the “Alma project” !
Johanna says
You guys did an amazing job, what a transformation in just 3 days!!! And how awesome of you guys to do that for Granny, she was just beaming at the reveal! So so sweet.
Torey says
This might be my most favorite post you have ever done. Seriously so, so sweet.
Linsey says
Oh my goodness, this is the sweetest post! Thanks so much for sharing. You guys are fantastic!!!!!
Jenny says
Love it! So incredibly sweet of you guys to do this for her. It’s an amazing transformation! xox
Melissa Sharp says
Aw! I’m all teary eyed seeing sweet Granny!
The room looks so fresh and lovely now! Good job, guys!
Small typo alert: You wrote “here’s a flash back to the sink are before” – you meant “area”, I’m sure. :)
YoungHouseLove says
Oh yes, thanks! All fixed!
xo
s
Becky says
WOW! The hard work paid off…you guys did an awesome job! I think it is great that you did this for Granny; I can tell she is such a sweetheart. She’s so cute!! Her reaction made me teary eyed…you can just tell how much it means to her! My favorite is the wall color and that lovely photo of Granny and Papa.
beth says
The bathroom looks great! And Granny made me miss my Gram.
Tiffany says
Pure sweetness. And that is using your powers for good!
Jimmy says
I like that caulking tip video. I’m usually a mess with it. Tape makes total sense. In hopes of helping me out I bought a little trio of caulking scrapers that seemed to work a little better than my finger. They are really just rubber sticks with rounded triangles on the end of them. Not a huge improvement, but every little bit helps for me in this area. They helped me with this project: http://www.thebookofjimmy.com/patching-the-hull/
Nice work on the bathroom. A finished project is so satisfying.
YoungHouseLove says
Love that tip!
xo
s