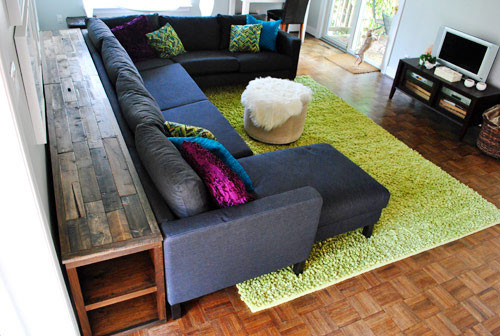
Well, it took us 3+ weeks, but our 12 foot long DIYed living room console table is officially finished!
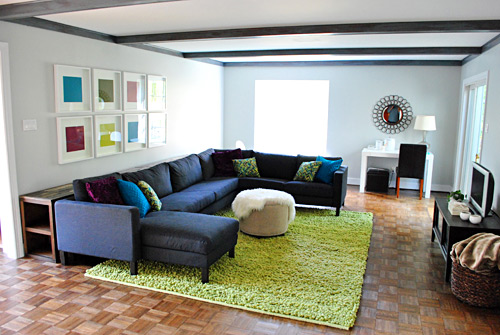
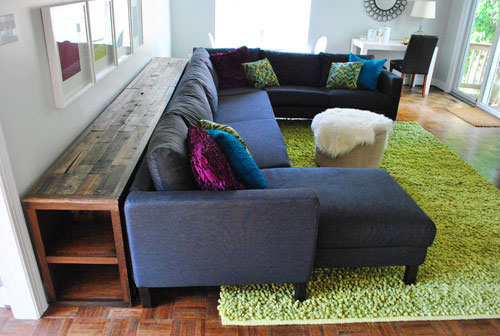
Before I get into any more pics of the final piece in place, let me back up a bit and recap some of the most recent constructions steps that got us there (since the last time you saw our console table it was stained but still topless). As you know, we had to turn to Plan B for the top since the pallets didn’t play nice (more on that here) so after lots of driving around town in search or something reclaimed that we could use (where sadly nothing was the right width or available in enough bulk) Plan B ended up being “buy new wood and make it look old.” Hence this pile in my basement:
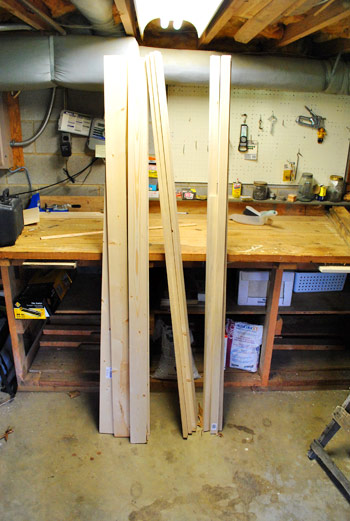
After trying out a few different combinations of boards on the floor of Home Depot, I discovered that I could achieve a near-perfect width by placing four 1 x 4″ boards (in plain whitewood) sandwiched between two 1 x 2″ boards (in poplar). This arrangement, by total accident, ended up looking great since the poplar 1 x 2″s around the perimeter inadvertently added a nice border that would match the 1 x 2″ poplar framing that I used on the front of the bookshelves. Score.
Since we wanted to lay the boards on top in a staggered almost brick-like pattern, I cut all of my 1 x 4″ boards into two-foot lengths to start.
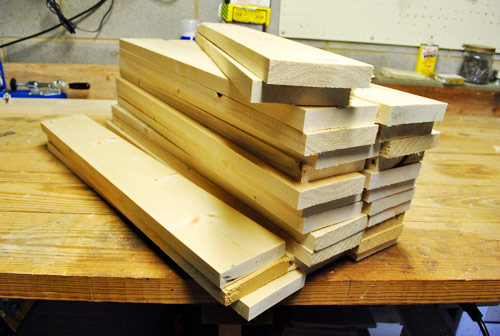
The next step was to distress each of the boards to make them look more aged and less straight-from-Home-Depot. This process, as well as staining them, is a whole story in itself so we’re going to do a follow-up post with an avalanche of details (it’ll have some video, which I have yet to edit – so that’s why you’re getting this reveal post first). But here’s a glimpse of the whole distressing process to tide you over (it involved a variety of things from hammering dents and dropping a bag of screws to making line imprints and roughing things up with pointy objects).
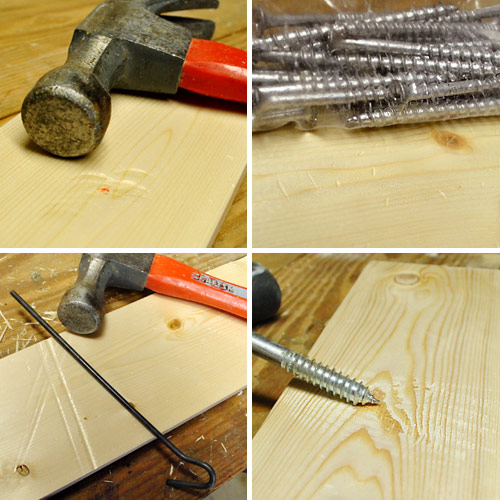
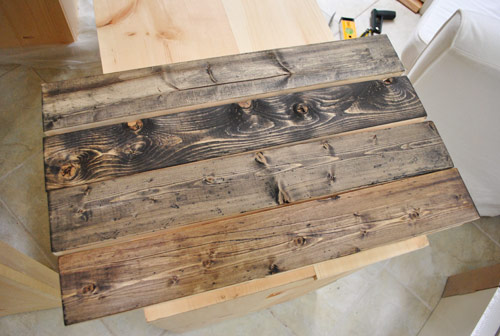
Once I had distressed all 27 pieces of wood (yep, over two dozen) Sherry worked her stain magic on them. Again, we’ll get into this more in a follow up post full of details (yup, there’s some staining video to edit too) but it basically involved doing a variation of applications using Minwax’s Dark Walnut and Ebony stains (some light, some dark, some mixed, etc). We ended up with a bunch of boards that looked aged and kinda beat up, like they were collected from a few different sources – instead of just purchased at the home improvement store a week ago looking all shiny and new.
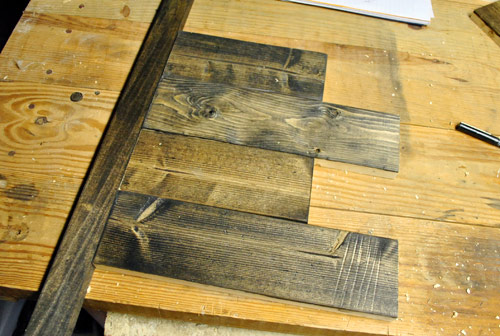
Then it was time to attach them together to create one big solid tabletop – well, actually three tabletop pieces (two long ends and one small “puzzle” piece that would cover our hidden storage compartment in the middle, which can be lifted out). After doing some math, we decided to stagger the boards by four inches so that when it came to the open part in the middle there would be a small lip on each edge for the puzzle piece to rest on when it’s closed so it all looks flush (I promise this will make more sense once you see the final pics at the bottom of the post). The point is, my first few cuts looked something like this.
To attach the boards, I again used my beloved Kreg Jig to screw holes that would tightly join each piece to the one beside it.
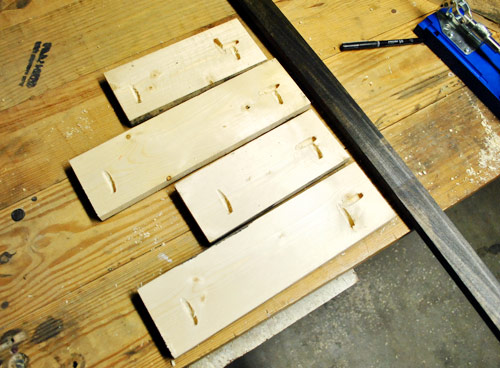
After joining the end boards, I drilled the rest of the holes and continued screwing them together, one-by-one. It probably took me about 40 minutes to create each of the two long sides of the wood countertop (and then about twenty to build the smaller “puzzle piece” cover for the storage space in the middle).
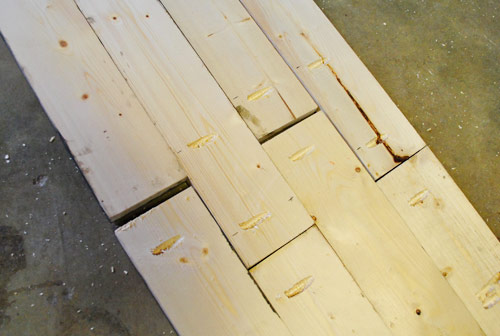
Here’s what one side looked like when it was mostly complete (it was still missing the 1 x 2″ poplar border around the edge). You can see how I tried to vary the color on adjacent boards so the change in tone looked intentional and added lots of nice texture and character.
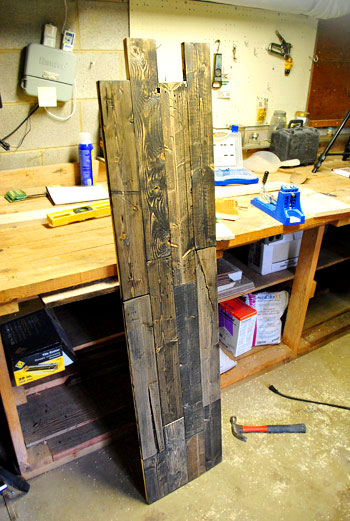
Once the second side was done I double checked everything by placing the tabletops on the console bases – making sure that my measurements were still accurate and I didn’t need to make any adjustments before attaching the poplar 1 x 2″s around the perimeter. Luckily, all was good. Big phew.
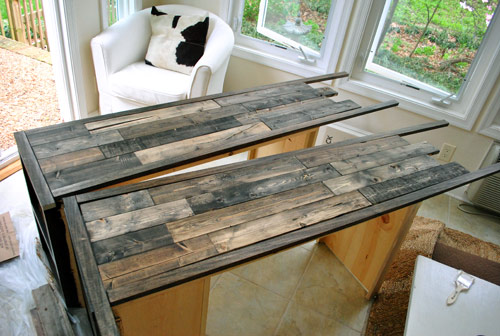
Let’s fast forward (past attaching side borders and screwing four staggered boards together to create the middle puzzle piece) and show you our final step before putting the whole darn thing together: touch-up staining and poly-ing. We realized that it would help to stain some of the cut ends and part of the middle storage piece so that no raw wood would be seen. Once dried, Sherry applied a coat of Safecoat Acrlacq polyurethane over everything that was stained to seal it all in and protect our beloved console baby (and our beloved real baby since Safecoat is non-toxic and water-based so it doesn’t off gas like regular oil-based poly does (read more about staining and sealing the consoles here).
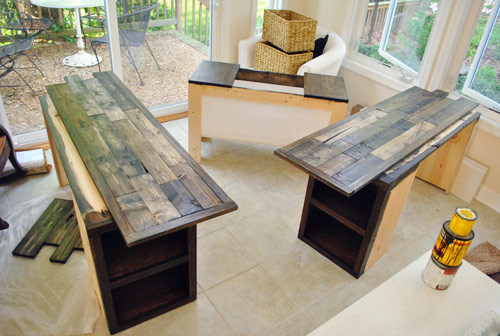
Oh and before I forget, do you see the white fabric around the middle console piece in the pic above? That was just an extra sheet that we had which Sherry stapled neatly around the entire wooden frame to create a nice little fabric compartment so nothing that we attempt to store can slyly slip behind the sofa. Then those two baskets that you see stacked on the chair (that we also already owned) can be contained inside the fabric “box” for storing everything from board games and books to remotes and other stuff that you might want to put on a coffee table (since we have an ottoman instead). More pics of that in a minute.
After that last bit of staining and sealing (and a few days of drying) everything was finally ready to come back into the living room. We brought things in one-by-one (bases first, then the tops) and after we had everything lined up the way we wanted it, I drilled a few screws up through the bottom of the two bases on the ends to secure the wood tops in place. And with that, our nearly 12 foot console (with a hidden middle storage compartment and some sweet bookcase-sides for even more stash space) was officially complete.

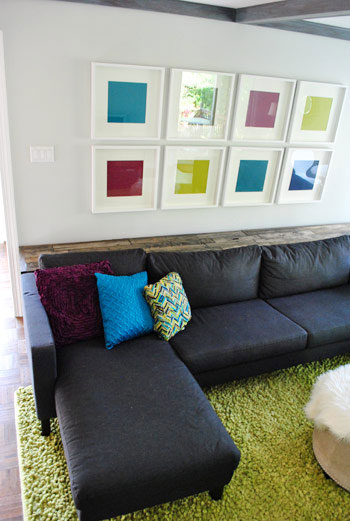
Maybe we’re biased because it’s our creation, but we’re both convinced that it came out even better than we had imagined. In fact, we think the DIY distressed wood top looks way better in the space than the grey-ish pallets would have (we’re the first to admit that the room has enough gray going on already). Hallelujah for happy accidents.
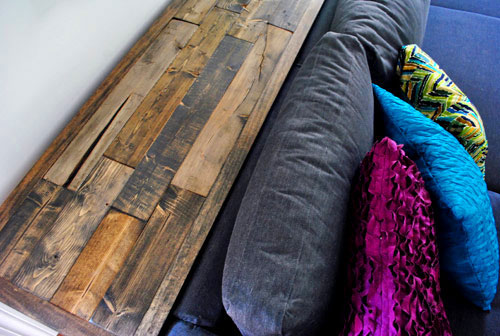
It also made us really happy that we opted for a rustic warm wood look with lots of imperfections and character (since the room was beginning to skew a little more modern than we had intended). It definitely brings some much needed balance to the overall vibe (especially once we add a heftier TV stand and some table lamps to finish things off).
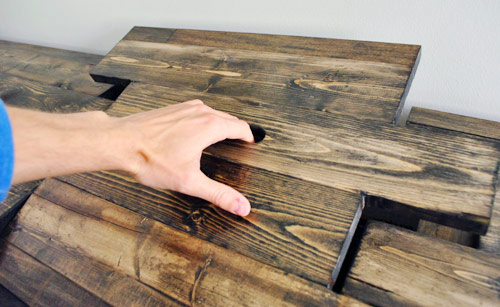
Oh, but I can’t forget to show you how the hidden storage compartment turned out in the middle. It’s my favorite feature, probably because it makes me feel like James Bond. Can you spot the removable puzzle piece there in the pic below?
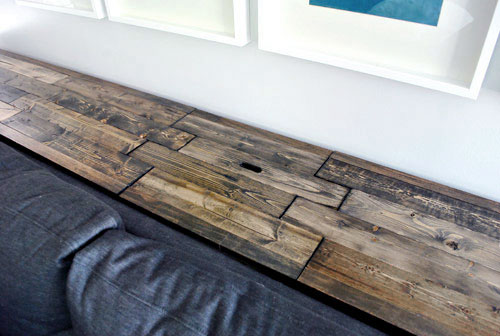
Clearly it’s not 100% disguised, but when you’re looking at the console as a whole it doesn’t scream at you (just scroll a few up a few photos to see what I mean) since it’s flush and the ends are still staggered instead of being cut into a big obvious removable rectangle. Once we’ve actually got some stuff on the table (lamps, a lacquer box or two, some books, etc) we think it’ll call even less attention to itself. We were just proud to get such a snug fit without making it difficult to remove (miraculously it slides right out and drops easily back in).
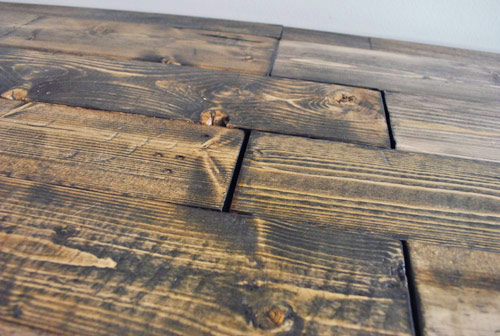
Speaking of which, I did end up drilling a small oblong hole (about 4 John fingers / 5 Sherry fingers wide) to make lifting it out as simple as possible. Three cheers for the sanding bits on my Dremel (Sherry got me a Dremel Trio for Father’s Day last year) which helped me make the hole even and smooth. I was nervous to puncture my took-three-weeks-to-make-it creation, but it all worked out in the end.
When lifted out completely, we gain access to those two storage baskets that I mentioned a while back (we’ll eventually fill them with more games, maybe some DVDs, not-often-used remotes, and who knows what else). Oh and you can see below what I meant by staggering the boards to leave a lip for the puzzle piece to rest on for a nice flush look:
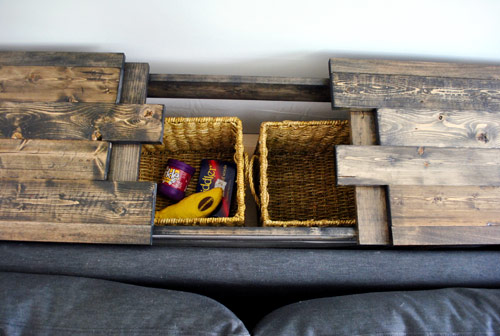
We don’t expect to use that storage on a daily basis, so for the most part it’ll maintain its secret identity as one solid piece except once or twice a week when we dig in there for a movie or a game or something.
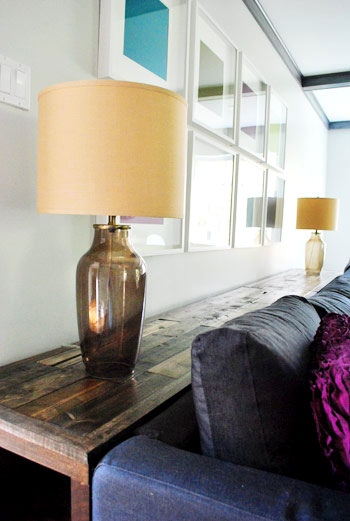
Of course we still have to put the darn thing to use – aka add some table lamps to the top, store some items on the shelves on each side, and generally load that baby up with function and a little form (maybe a ceramic animal for the wife). But to give you a sense of what it might look like, here are our two bedside lamps playing stand-in for a minute. It reminds us why the 16.5″ width is perfect for us – it’s wide enough to fit a chunky table lamp without having to worry about knocking our heads into them (since we’re both guilty of over-exaggerated laughing spells during particularly funny moments of Modern Family).
And no reveal post is complete without – say it with me – a budget breakdown. So here it is:
- Wood (white wood & poplar from Home Depot) – $98
- Screws & Tools – $0 (already owned everything)
- White sheet – $0 (already owned)
- 2 storage baskets for middle compartment – $0 (already owned)
- Minwax Ebony Stain – $4
- Minwax Dark Walnut Stain – $0 (already owned)
- Safecoat Acrylacq Sealant – $0 (already owned)
- Cheap paintbrushes for staining – $2
- TOTAL: $104
Clearly wood was our biggest budget hog, but for a nearly 12 foot piece of furniture made from solid wood, we can’t really complain about the just over $100 price tag. Especially since this extremely similar piece from West Elm goes for $379 – and we would’ve needed to buy THREE of them, to the tune of $1,137. Yowsa.

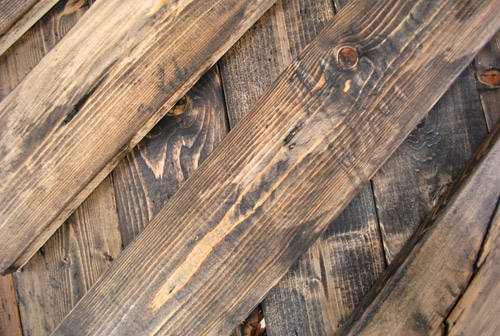
So another big thanks to Ana White for inspiring the design and giving me the confidence to tackle it myself (with the help of my stain slingin’ wifey). Did anyone else out there complete any builds this week? Who’s still in the basement/garage/shed/workroom finishing something up? Speaking of finishing up, I have some videos to edit and a big post to write about our wood distressing technique, so here’s hoping I can get that up in a day or two. In the meantime I’ll leave you with this shot of our new “old” boards before we screwed them all together to make the console top. Is it weird that it gets me all hot and bothered? Whatever, my wife likes leopard heels and I like distressed lumber.
Psst- Wanna see all the past steps that went into building this beast of a console table? Here’s the first post, the second one, and the third one.
UPDATE: CHECK OUT THE ACCESSORIZED CONSOLE TABLE HERE.

Ashley says
Wow. Sherry, you are SOOOO lucky to have such a handy hubby! I’m having the hardest time finding the right console to put behind our sofa that can be used for toy storage for our baby without looking like it’s intended for toy storage IYKWIM. If only my husband could whip something together like that! It looks great.
Sally says
This is truly amazing! I love it so much, and especially love the secret compartment. Brilliant.
Caity says
*claps, cheers, woo-hoos!*
Ali says
Love the stain, and the secret storage compartment. Great job!
Christa M says
Turned out great! Good job John & Sherry! Can’t wait to see it all stylized! The room is coming together nicely! If I lived closer I would love to spend some time helping you overcome your fear of the sewing machine so that you could sew up those napkins into real pillowcases!
PS – I purchased the same TV stand last year at a garage sale for $40, you know just in case you have a hard time trying to figure out how much to let that bad boy go for when you finally find/build the right piece for your space. It seemed like a very fair deal to me. Though my best score to date was last week when I purchased 2 Crate & Barrel Night stands at $15 a piece!!! They originally wanted $75 for the set. WOOOOT! anyway, I needed to get that out…thanks!
Cheryl says
Man, you guys have been busy this week! Good work! Enjoy sipping beverages from your new console table… and for some gratuitous Phil Dunfey… “Or you could just be nice and pay it forward. They don’t make movies out of bad ideas.”
YoungHouseLove says
Haha, another great one. You guys are on it today.
xo,
s
Catharine @ Your Modern Couple says
I love it!! I just see lots of ceramic animals parading down it in the near future no? :)
YoungHouseLove says
Haha, it’s basically a ceramic animal runway of sorts. Fashion show, fashion show!
xo,
s
Ashley @ sunnysideshlee.com says
Looks great guys!
Ashlyn says
Wow that turned out great! It looks very rustic and cool. I have been reading your blog forever, but this is my first comment. You do so many great home improvements….I look forward to checking our all the changes you will make in this house. Of course I always want to see what Clara and Burger are up to too.
Ashlyn
Rose says
Just recently started following your blog and I just love it! Some many cool projects! I’m not much of a DIY-er, but you guys make it seem so easy!
Great job with the console table. Looks great and has tons of character.
Jnbean says
Wow, that’s awesome! Love the finish and clever design. You guys are good!
Sarah Mc says
What’s Burger so excited about that he’s jumping at the slider? Love the table by the way, good job!
YoungHouseLove says
Isn’t that funny? He’s actually stretching. Such a weirdo.
xo,
s
Renee says
Cool table!!! We have a family room with similar layout as yours…(but a bit smaller), this is good inspiration!!!
Karen says
Finished building my small sewing table (for under $30!) and stained it ebony (love how black stain looks!) and am on my second coat of poly! AND my boyfriend just finished our cedar garden box (modified Ana White using $2 cedar fence pickets). Gotta love DIY!
Blair says
That is quite amazing! One day I will have enough power tools to attempt something like that! For now, I am just happy with my electric staple gun.
~Blair
Rocky B says
You guys did a great job. I love custom furniture, it really makes a room! Most people think you can’t afford to make custom pieces unless you are wealthy, this project and Ana-White’s website are proof that you can. I recently finished a walnut media console for under our TV, I am so happy with it :) I recently added it to my blog:
http://thewall-nuts.com/?page_id=212
Can’t wait to see more DIY furniture to come!
YoungHouseLove says
HOLY AMAZINGNESS! That is gorgeous.
xo,
s
Jen @ The Decor Scene says
So is John thinking about making his own media center now?
YoungHouseLove says
It’s definitely one possibility! Depends what we find on craigslist and at thrift stores.
xo,
s
Wendy says
Amazing, stunning – truly a work of art. You guys continue to thrill and surprise me every day.
Anna says
This is GORGEOUS! I have to say, this is probably one of my favorite projects of your. And the way you can take off the top to find hidden storage inside. AMAZING. I love love LOVE it.
Girl... says
You two are such over achievers.
I can’t stand it!
You’ve done more work in the last month than I’ve done in 5.
Thanks for making me feel bad about myself! :)
Seriously – it looks great! Kudos.
Callie says
Wow, I love it sooo much! Great job!!! I just have to repeat what others have said…this is a gorgeous piece of furniture that looks way better than store-bought furniture, even better than the piece from West Elm! The wood turned out SO well, and the chunky/authentic look really helps balance out the mod vibe of the rest of the room. I’m totally inspired and can hardly wait to see the wood-distressing post.
I know it would be a lot of work, but a coordinating chunky TV stand would look soo great…I love seeing the rooms progressing along! :)
Jenna says
I think this is by far you’re most impressive DIY creation! This is art.
Harinee says
I have nothing to add that hasnt been said already, but OH MY GOD! That is probably the most impressive thing I have seen you do. Gorgeous!
laurajane says
Looks soooooo good. I think the long console + long sectional looks amazing. Anything smaller behind the table would look weird, in my opinion.
Btw, I love the hidden compartments for “not needed everyday stuff”. Are you going to store “barely ever need it” stuff behind the sectional? So it’s hidden completely from view/access? Might be useful for baby stuff Clara out grows (big toys/swings/etc.) you you don’t need to access to for another couple years? Just a thought. :)
YoungHouseLove says
Yup, that’s always a possibility. Since we have a lot of storage space in our attic, basement, and closets we’re good for now. But if we ever need extra room (and can manage to remember what we shove back there) it’s definitely another place to stash things!
xo,
s
Ashley A says
Love it! Have you thought of floating Karl away from it a couple inches?
YoungHouseLove says
Yup, we tried a few things and like this configuration the best for now. But the whole room is definitely a work in progress, so adding a new media cabinet and lamps and curtains and all that other stuff could be a game changer for sure! We never know where we’ll end up…
xo,
s
Ana Silva says
WOWZA! A-M-A-Z-I-N-G! So talented. It looks so good. I can’t believe how much it cost. Seriously, you can’t get something that big and all wood for that kind of money. When will you start taking orders? LOL J/K…no really?
Ericka says
WOW! Kudos!!!
Katrina says
Looks great, loving the distressed wood look :)
Lauren says
You should be so proud of yourselves! AWESOME!!!
Lisa says
I love the console table! It looks fantastic in your room. My husband is furiously working away building our baby’s crib. I’m talking, found woodworking plans and bought the wood. I am so excited to see how it looks! We don’t have any progress pictures because he is building it at a woodshop away from our house, but I will certainly be sharing the finished product!
Kyley says
great work!
My husband has been in the basement for the past 4 MONTHS! Building the most elaborate “work bench” set-up I have ever seen. Built in shelves, peg board, massive table space….the works.
We have to laugh because he’s put in so much time/effort into it, that he’s not gonna want to build anything else after it!
It is pretty impressive though, considering he has no previous building experience himself – and taught himself how to use google sketch up to design the whole thing.
I’m hoping as soon as he’s done I can get him to use his super cool work room & new skills to build me lots of things. :)
Rachael says
This turned out gorgeous! I LOVE the secret hiding space under the few boards in the middle – so cool and no one would even know it’s there (unless, of course, they read this blog)!
Great job!
Anna says
Fantastic. Congratulations!
Anne G. says
This is so awesome! It looks so cozy. I can just imagine stretching out on Karl, a nice big stack of books within easy reach on the console, and a lamp shining warm light down on me. If you guys ever want to come back to Alaska, maybe you’d consider a home exchange with me? :) Love, love, love it!
YoungHouseLove says
Deal! We hope to visit AK again someday. It’s such a fantastic place and we’d love to show it to Clara!
xo,
s
Lindsay says
Love it. Seriously. LOVE. :)
The top especially is just gorgeous!!
And is it weird that skimming through the comments I’m getting offended on your behalf by a couple of them? I mean really, “that is the ugliest console table I’ve ever seen”? Seriously? I get that everyone has different opinions and everyone is (obviously) allowed to hate whatever they want and leave comments, but MAN! You would never phrase something like that to an actual person (even someone you disliked) – you’d say, “eh, it’s not for me. Glad you like it”. It just seems like people forget that there are HUMAN BEINGS at the other end of the internet. (sigh)
And I get that it doesn’t bug you two, and I’m SOOO very glad for that! But still. People are just… “icky” sometimes.
Kate B says
OMG I totally thought the same thing! Why even bother posting? I’d be all “get the freak off my blog then, beyotch!”
Sophia says
Some people are hopelessly negative. I don’t get it either. I think this is my favorite of your projects sofar, FWIW…
Allison says
I thought the same thing! If you don’t have anything nice to say, then don’t say anything at all. Didn’t we all learn that on the playground in elementary school?
Jamie says
I think the calm responses that Sherry always gives to comments like that proves that she wins at the Internet. I would flip out! If you don’t like something, don’t comment! It’s amazing what people will say when it’s their fingers and not their mouth talking.
Noel says
I totally agree! They are probably just bitter and jealous of John and Sherry’s awesomeness. People can be so rude, but I really admire Sherry’s calm and polite responses.
Sarah says
The top looks amazing! I love it!
Renee S says
I love it! I’m now envisioning one of the peaked walls in my attic bedroom covered in wood like this…as sort of a headboard wall…!
Janet says
I thought I liked the console…and then to see the hidden compartment in action..LOVE! :)
LARY says
Great Job! It looks incredible! :) Looking forward to see how you decorate it.
Ted says
So, I’m old (or at least I remember old TV from the 70’s). When I think “Karl” spelled that way, I think Karl Malden and “Streets of San Francisco” so the console should be named Michael…but that’s before your time.
Jennie says
Lovely! I can’t wait to see it all dressed up.
jill says
Holy moly! I was already impressed by the stuff you two do, but now you are officially furniture gods. This is AMAZING. Nicely done!
doahleigh says
Wow I am so impressed. I really wish I had such mad skills. Seriously, love it.
Morgan says
You guys, this looks awesome!!!!! I’m so impressed.
Kate B says
Ok I’ll admit- I was a but skeptical of how this would look at then end. Maybe because I couldn’t picture it in use?
ANYWAY- it looks fabulous! I love it!
Cindy says
Oooo! Me! Me! My hubby and I just finished the cubby storage system wall for our son’s bedroom and put it all together in there on Monday night. I hope to take photos and post on Ana’s Brag Board soon.
John, the way you figured out all the pieces *just right* is very impressive. What a great feeling to have that done, huh?! :)
Noel says
Wow, it looks awesome! I love how you’re mixing “rustic/old” (can’t think of a good word to describe it, I’m such a decorating newbie) with modern. The room already looks great, but it’s going to be amazing as it continues to evolve. So much fun to watch the progress! Thanks for the continual inspiration!
Kkatmpls says
Wow, I am in awe. Looks terrific, love the functionality and the aesthetic. I have to get a Kreg jig!
Robin @ Our Semi Organic Life says
Phil: Forgive me for thinking your zesty performance deserves some praise!
YoungHouseLove says
Bwahahaha. Amazing. We’re dying.
xo,
s
Aly says
It came out amazing! You keep mentioning how the room is a little too modern – do you have any other plans to bring it back to your usual style? The room is beautiful so far!
YoungHouseLove says
Well our style is always evolving, so we’re already noticing that we’re taking more risks and embracing more color in this house for sure. But since this room is full of color and risk already, adding some breezy curtains and better lighting will probably soften things up and make it more airy. Just have to find the perfect fabric and lamps…
xo,
s
Paula/adhocmom says
My god. You could practically start your own Ikea. Except smaller. And way better. Meatballs optional.