See “Aloha” means both “Goodbye” and “Hello,” so… yeah… buh bye Hawaii and hello half-done cork floors. We’re back in Richmond (insert forced enthusiasm here – woot?) and we’re eager to tell you more about our trip. But we’re more eager to dive back into DIY and spill all the details about our big cork floor project that we started right before we left (about twenty four hours before we hopped on the plane actually). Oh and for those who didn’t drop in on us last week since our little vacation announcement, we actually did share two posts (along with a giveaway) while we were gone, so you can find those here and here.
We’re still recovering from jet lag (and from flying home on a red-eye with a toddler, haha – we’ll share more on that over on Young House Life at some point) but we’re very grateful for our little break to unplug and enjoy some sun and sand. So we’ll just update you on as much of the flooring as we’ve laid (and keep working the nights away until it’s done and we can do a full reveal post for ya!). Oh and we’ll write all about our HI adventures when we have time to sort through about two thousand photos and write all about it – hopefully by the end of this week. But back to the floors. We had originally hoped to completely finish the floors before we left. That was the plan…
We knew the photo crew would finish up on Friday the 17th after three full weeks of shooting in our house (we knew better than to try juggling book shoots + toddler + new floors, so we thought waiting until the book shooting wrapped was the best idea). So since we didn’t leave for Portland until early on Tuesday morning (the 21st) that meant we’d have Saturday and Sunday to install the floors while Clara napped/was in bed for the night. Then on Monday we’d pack, finish up/proofread all the posts for the following week that we’d share while in Portland, and get ready to leave on Tuesday am. Seemed perfect… ’til we realized on Friday night that we hadn’t let the cork boards acclimate OUT of their boxes for the recommended 48 hours. Cue the sound of a balloon deflating.
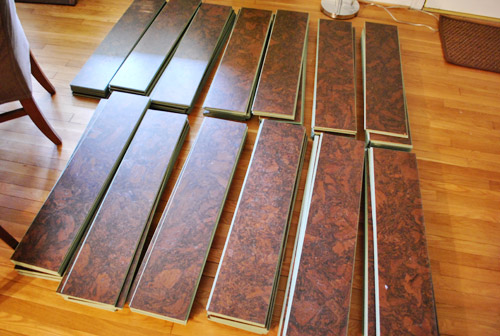
Yup, they had sat in the corner of our bedroom in their boxes for months (months!) since we purchased them in October from Lumber Liquidators on clearance. But we hadn’t taken them out to acclimate in all of that time. So sad. We just didn’t even think about it. So the above photo depicts the scene in our house on Saturday and Sunday while we literally waited for those guys to acclimate with bated breath. Nothing got installed over the entire weekend. It just sat there… acclimating (i.e. adjusting to the temperature of the house so any expansion or contracting would happen before putting them in place instead of after- which can make them buckle and warp).
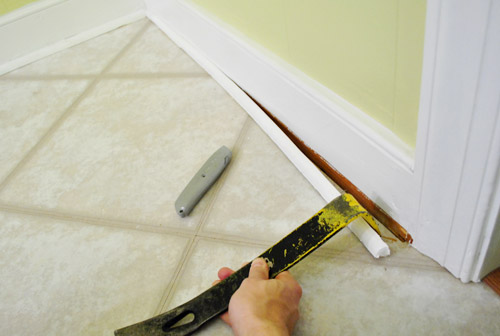
The last minute wait-time did give us a couple of days to read up on the process, though. We’ve never installed a floor like this, so we referenced how-tos like this and this to get our heads in floor mode. Oh, and we were able to get some of the floor prepped in the meantime, like prying off all of the shoe molding around the room. Since ours is painted over, we used a razor to slice the paint so it would come off cleanly without peeling. With a floating floor you actually have to leave a gap around the edges (our cork packaging recommended a 5/16″ of an inch space) to give it room to expand or contract with changes in temperature. But when the shoe is reinstalled after the cork goes down it’ll cover that gap.
Another thing we had to do was trim the door molding to accommodate the new cork flooring. Since it’d be a pain in the behind to cut the floors perfectly around every groove in the molding, I learned how to cut a sliver out of the molding instead (so the cork floor could slide right under it for a seamless look). I used one of the techniques that I read about where you lay a hand saw flat against a piece of floor (and underlayment) as your guide and just saw away. Seemed kinda crazy…
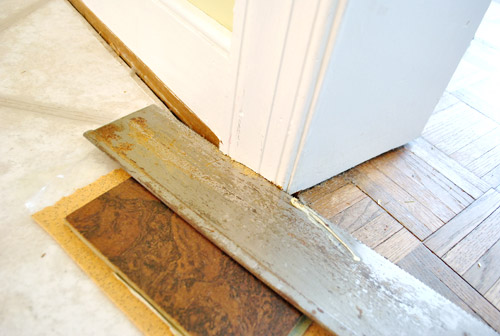
…but it worked!

Once we had all of the shoe removed, the door moldings cut to accommodate the cork that will run under them, and all of the transitions pried up in the doorways, the floor was officially prepped. Oh yeah, and we gave it a good sweep too.

Then once the 48 hour acclimation time was up and the floors were cleaned, the next step was putting down the underlayment. This is the stuff that Lumber Liquidator’s recommended:
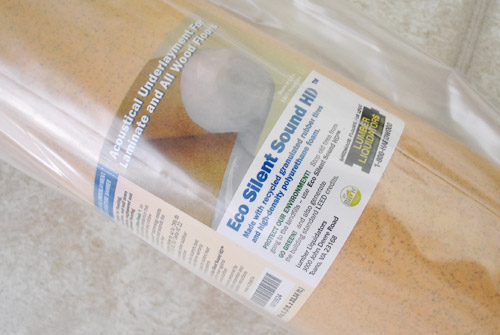
There was a slightly cheaper option, but that one wasn’t made from recycled material (boo) and it was slightly thicker (and we wanted the added floor height to be as minimal as possible since we had to float it over our existing flooring instead of removing the old vinyl due to the presence of an asbestos liner under it). Thankfully the cork is thin too, so when it’s all said and done the cork floor should only be able a quarter of an inch higher than the hardwoods around it, and with some nice smooth low-lying transitions it shouldn’t make for any annoying toe-stubbing or baby-tripping. We’ll keep you posted on dealing with those transitions as we get there.
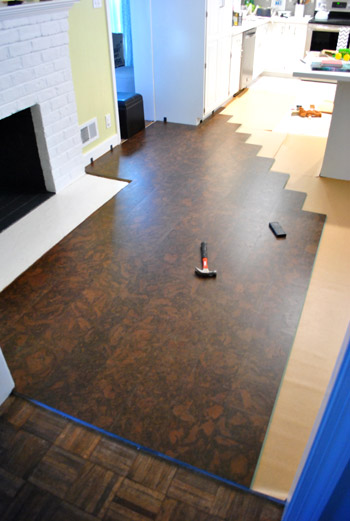
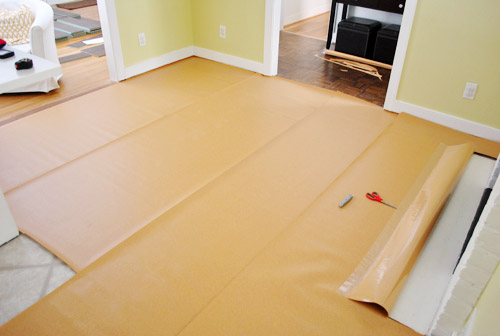
Ok, so being that it was now Monday morning (i.e. less than 24 hours before we left on an 11 day business / pleasure trip), we were scrambling a bit – so our pictures aren’t as thorough as we’d like. We’ll do better as we finish up the floors this week (by taking a ton more photos) since we won’t be distracted by book photoshoots, cleaning, packing, and Portland-presentation-practicing. But here’s a pic that I snapped once we got the underlayment mostly down in one side of the room (it had a sticky strip on the back of it keep it in place). The underlayment doesn’t overlap itself, it is just laid in strips right next to each other and stuck to the floor with that sticky strip that runs down the side of it. Oh and you can see how I just used a regular scissors (not Sherry’s good scissors because I know what’s good for me) to cut out the underlayment that overlapped the stone fireplace surround (a box cutter also worked well).
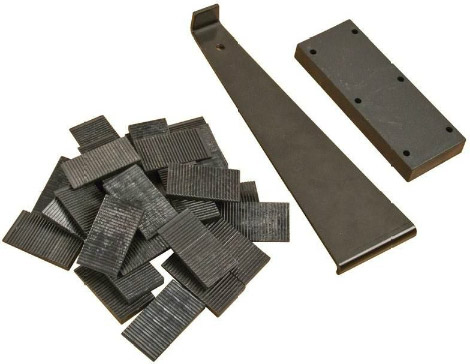
To help with the actual floor installation, we bought this $16 kit from Home Depot. It came with spacers (to keep that recommended 5/16″ gap around the edge), as well as a pull bar and a tapping block. Those are both to help hammer the boards into place, but since you don’t want to hammer the board directly you use the block as a buffer (you hammer the block which slightly shifts the board so there’s not a big gap/seam). And the pull bar helps with the boards closest to the wall. I’ll take pics of these in action next time so this makes more sense. Promise.
The process was pretty slow going at first, mainly because almost all of our first few pieces required cuts. But at least it was good to get them out of the way.
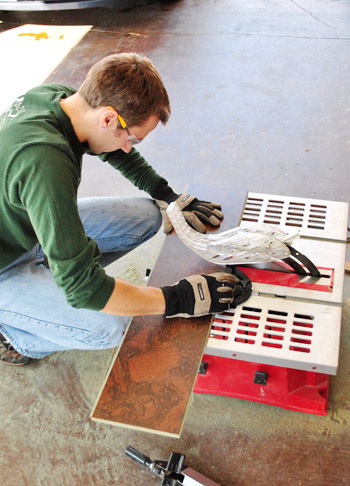
Some of the instructions I read suggested cutting with a jigsaw, but I figured my table saw would make straighter cuts so I lugged it up to the carport to make my many (many) cuts more convenient. It worked really well.
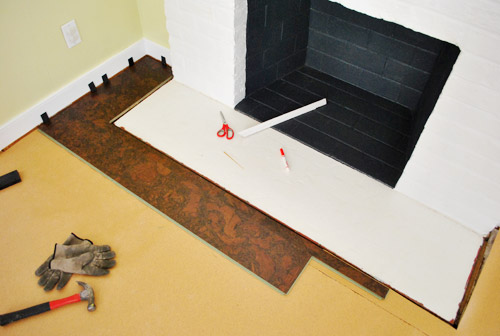
Even after we got around the fireplace, we still had to cut the board at the start of each row (or “course” to use flooring lingo). We staggered each row/course because (1) it makes the whole floating floor stronger by offsetting the joints and (2) it makes it look more like a traditional hardwood floor. My boards were 36″ long, so we offset the courses by 12″ each. See the staggered edge below?
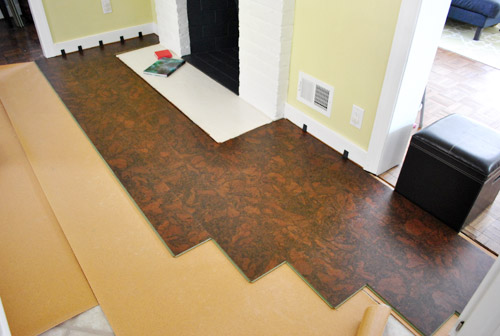
Even with those initial staggered cuts, it was pretty fast snapping in a whole row of whole pieces. In other words: cuts took a lot longer, and snapping whole pieces in was a breeze. I think all-in-all this whole section took us about five hours to do. We hoped to get more done in that time (our initial goal had been to finish the whole behind-the-peninsula section of the kitchen before leaving) but we got distracted by a morning snowstorm, a lunchtime wrap-up meeting with the book photographer, and eventually got caught up trying to pack for Portland and Hawaii (packing for ourselves took ten minutes, but packing for Clara took a little longer – and our flight was so early on Tuesday we couldn’t leave anything for that morning).
But as Sherry mentioned on Friday, having the floor started only makes it easier to get it finished this week. So our new goal is to have pictures of a completed floor by the end of the week (we’re actually gunning for finishing Wednesday night or very early Thursday morning so we can have the pics up on time for a Thursday morning post). We’ll be sure to take some time to snap better photos of the actual process too (imagine that!). Now that we’ve done around 30% of the floor (we’re doing the laundry room too) it shouldn’t be too hard. Wait, were those famous last words? We’ll just leave it at: we’re cautiously optimistic that we’ll get ‘er done!
What have you guys been up to lately? I’m not one to get all mushy, but we missed you guys last week. Any flooring projects going on? Do you like to leave the house perfectly clean before embarking on a big trip or start something and leave it half-done to greet you when you return?

Michelle says
Call me crazy, but this looks like a fun project. Your floors are going to look great!
Christie says
Guys, you are a wonderful team! How can you be so skillful? I just don’t get it. Concerning sustainable floor materials, cork is probably the best choice you could have made. Actually, the greenest choice. Plus, it has water-resisting and insulating qualities. Very wise of you. That’s the reason I appreciate what you do even more.
Jackie says
I am trying to learn as much as I can about asbestos-laden floors since our new house (not moved in yet) is certain to have some under the old vinyl and 2 types of lino. can you direct me to some posts discussing this, if they exist? So glad you’re doing a book because I would need ages to read your whole blog, which seems like time well spent, but also a lot harder than reading a book;)
THANKS!!!
YoungHouseLove says
We learned that many homes from our era (50s/60s) have a black liner paper under vinyl flooring, so if you move a fridge or cabinet and see black paper (it’s sort of matte) it usually contains asbestos. So don’t rip it up or attempt to remove the vinyl flooring since it can release asbestos particles into the air. Experts recommend adding a floating floor over it or hiring an expert to remove it safely. Hope it helps!
xo,
s
Jackie says
Forgot to subscribe to the comments.
Nicole says
when it says that you offset the courses by 12″, um does that mean that you cut the boards into 12 inch segments? sorry I’m just not understanding that 1 step.
YoungHouseLove says
It just means we didn’t want all the cracks to line up in the flooring, so we offset the boards by 12″ so the cracks were staggered instead of all lined up. Hope you can see that in the pics too!
xo
s
Nicole says
Sorry, another question:
Did you install the new floor under your fridge, washing machine/dryer, dishwasher, etc?
would you recommend cork through your whole house?
YoungHouseLove says
We just went a bit under each appliance and used an extra strip of it for the back of each appliance (so it would sit level on it). We had a really small amount of it and it was sold out (so we couldn’t order more) so we actually would have run out if we ran it under every appliance, but it still has a nice seamless appearance. As for if you should do it through your whole house, we hear it’s not a great choice for bathrooms or basements where there’s excessive moisture (but kitchens and laundry rooms are ok since there’s less splashing/dripping/etc). Hope it helps!
xo
s