Woo to the hoo. We did it. We met our self-imposed Tuesday morning deadline and finished our clothespin chandelier as part of our little (completely unofficial) Pinterest Challenge (not sponsored by Pinterest or anyone else, just dreamed up by Katie B to make us stop pinning and start doing stuff that we’ve already pinned).
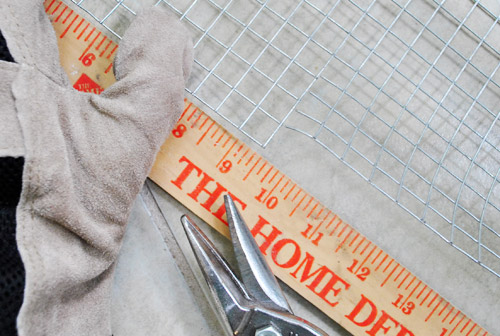
Here’s how it all went down. We already explained the whole Pinterest Challenge thing here, which is where we snuck in a few photos of our supplies, like this one below:
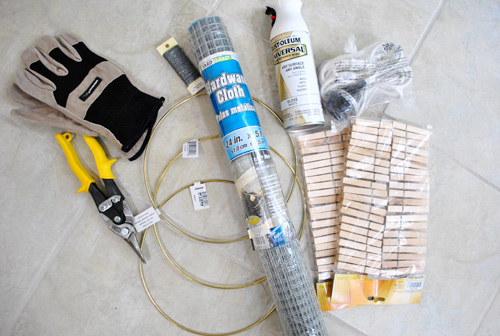
We actually didn’t end up using those three 10″ metal rings from Ben Franklin, but the rest of the stuff came in handy. So for those who can’t quite make everything out, “the rest of the stuff” is: a $4 light kit from Ikea, part of a roll of hardware cloth (aka: wire fencing) from Lowe’s, white gloss spray paint, some old wire from our craft drawer, gloves & metal snips for handling/cutting the wire fencing, and two bags of clothespins (we actually ended up needing eight bags of them in the end).
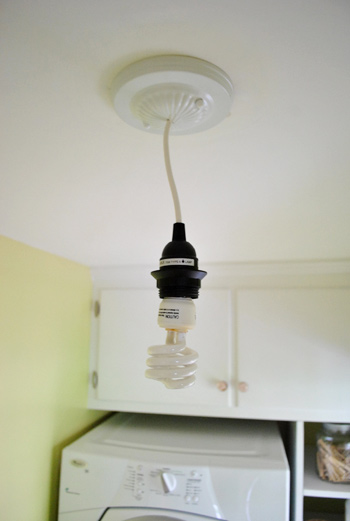
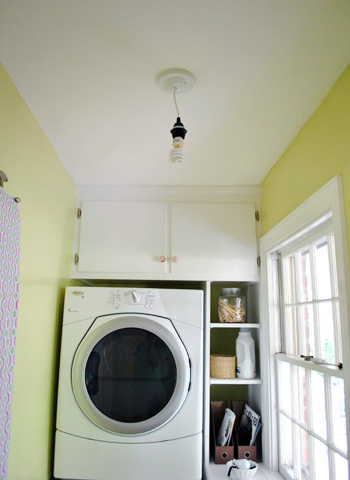
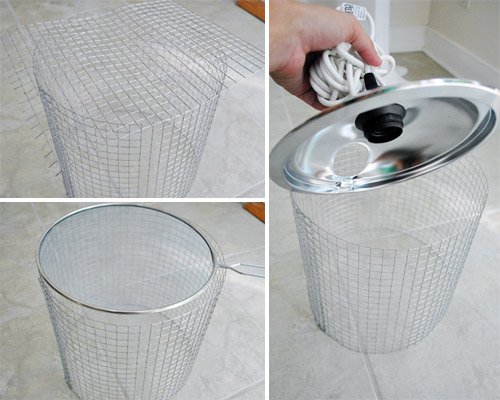
As for the $4 light kit from Ikea, it’s a plug in light kit (meant to be swagged) but an electrician friend of ours taught us that it can also be converted into a hardwired fixture by clipping off the plug part, exposing the wires within the cord, and connecting them to the wires in your overhead junction box (with the power off of course!). Then we just added a $5 ceiling canopy from Lowe’s (that white medallion looking thing that finishes things off).
Of course that dangling light kit is nothing pretty, so we got to work constructing a drum shade-ish thing out of wire fencing. First I donned my gloves and used the metal snips…
… to cut out a strip of wire fencing that was approximately 9.5″ tall (since we wanted our shade to be about 10-11″ tall when completed and we had to allow for some dangling clothespins to make it a little longer than the frame).
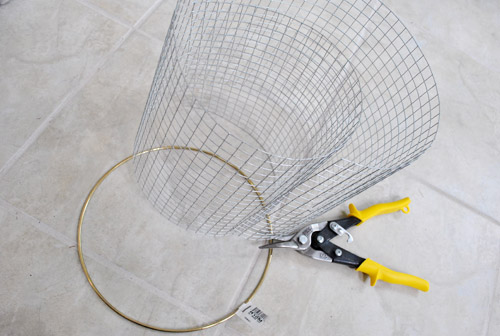
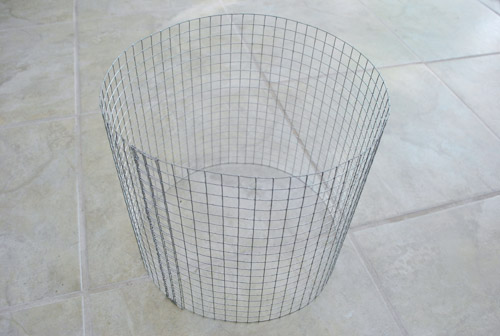
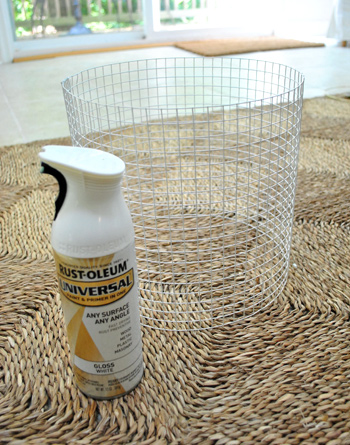
Then since the ring was 10″ wide, we just made a loop of wire fencing with a 10″ diameter and used craft store wire that we had on hand to bind the fencing to itself to create a nice drum shade-ish loop o’ metal squares. It was at this point that we realized we didn’t need the 10″ ring at all since the wire fencing held its shape really well (we worried it would be all floppy and wonky).
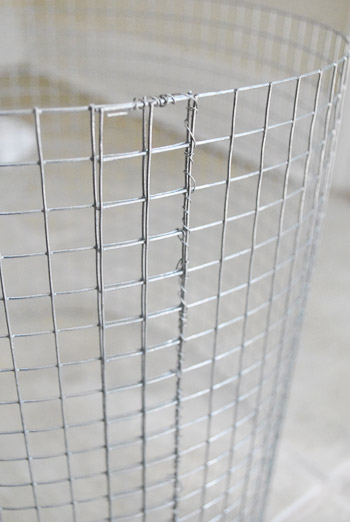
Oh and as for some details on the wire that we used to secure it, it was 22-gauge stuff. It’s actually thinner than the wire that we pictured in the supply photo up top (thank goodness for having lots of spare wire around!) because it ended up being easier to twist while still being rigid enough for a good hold.
The next obstacle was figuring out how we’d affix the ceiling mounted light kit to the wire “shade” that we were making. We contemplated a few things – like cutting a piece of scrap wire fencing in a circle to bind to the top (and then cutting a circle in the middle for the light to drop into). We even scavenged for some items to repurpose, like a kitchen splatter guard and a stove burner drip pan (the last of which almost won, since the light kit perfectly screwed through the existing hole in the bottom). But ultimately it got vetoed because it would’ve blocked too much light – and the extra hole in the top would have cast a weird ray of light onto the ceiling. So you’ll see our eventual solution in the “after” pics. Oooh, the suspense.
Next I sprayed the wire fencing with white gloss spay paint that we already had in our little basement spray paint collection. I did this for two reasons:
- we thought glossy white would work with the ceiling canopy that we added and look a little more polished (although some folks might love the industrial look of unsprayed wire)
- some metal fencing like this can have traces of lead in it, so although we weren’t sure ours did, we handled it only with gloves on waaay away from Clara (on the tile floor of our sealed-off-from-the-rest-of-the-house sunroom). Layering on a few thorough coats of spray paint is like sealing old lead-painted walls with fresh new coats of non-lead paint (which is the recommended method, as long as the old paint isn’t flaking or peeling).
Here she is all sealed/sprayed:
Then it was time to play with clothespins. Which may or may not have been harder than we expected to track down in the right size for our wire fencing.

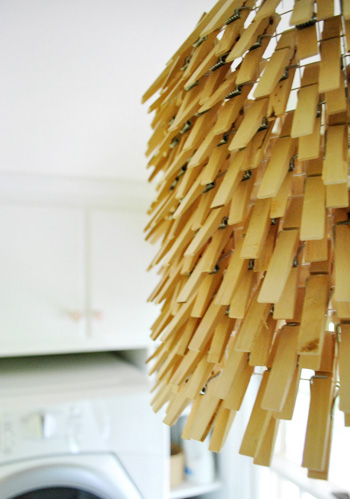
We used eight bags of “medium” sized clothespins from Ben Franklin (snagged at $1.99 for each pack of 40) to play around with a few different “patterns” for our light fixture.
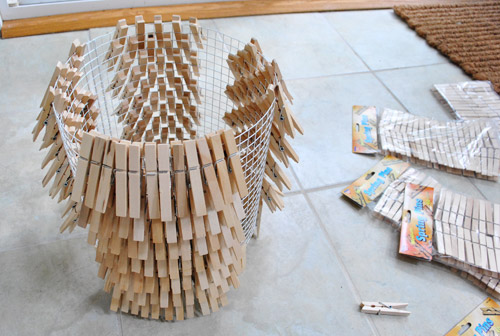
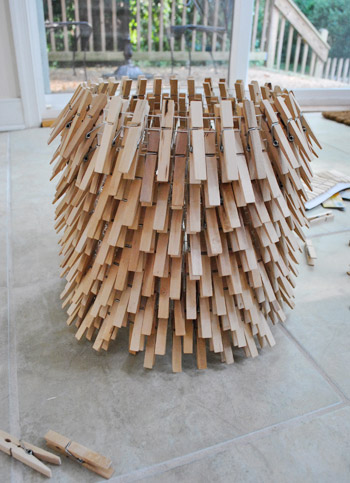
The first pattern was a straightforward row by row effect. We just clipped pins in a horizontal row and then skipped two rows below that and then pinned another row beneath that.
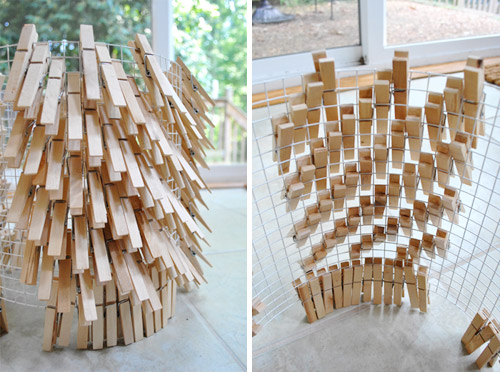
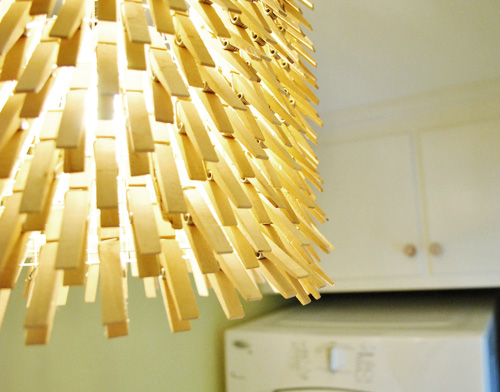
We also tried a more random pattern that you can see better from the inside shown on the right (we basically alternated squares for a zig-zag-ish effect):

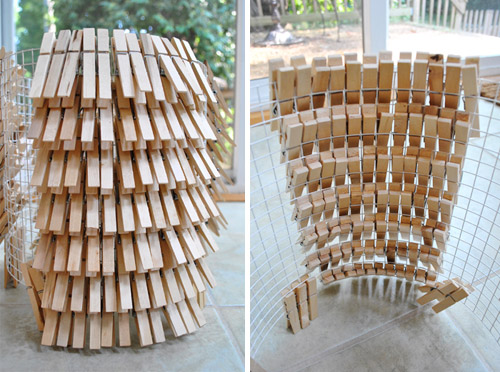
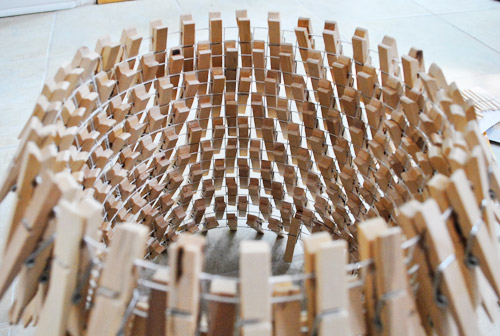
We also tried playing around with a diagonal design, which was fun but hard to deal with at the top and bottom of the shade since there were lots of empty squares that looked kind of odd:
I call this design “The Space Invader” after the old school video game. See the shot on the right below? There are totally two space invader guys hiding in there.

Pretty much right away we narrowed it down to two favorites. The row by row pattern that we did first, and the zig-zag-ish pattern that we tried out second. So John held the shade up with the light on and both patterns facing out so we could take photos of each one and look at them together and decide. Going into it I was all about the row by row thing and John liked the zig-zag better.

Guess who won again? John. Seeing it even for a second I knew he was right about the row by row pattern blocking way more light than the zig-zag configuration. And it felt airier and less heavy so we were both gung-ho as soon as we saw it in fake action (just look at John’s excited face above). But really, we were giddy pretty much from this point of the project on. So then we just (giddily) removed the other clothespin patterns and clipped them all around the shade in our finalized zig-zag design.
We just got lucky that we had secured the wire fencing in a way that created an even number of squares around the top so our pattern could “loop” without getting awkward and having a seam. So if anyone at home is going to try this, we’d definitely recommend having an even number of squares when it comes to the perimeter of the shade.
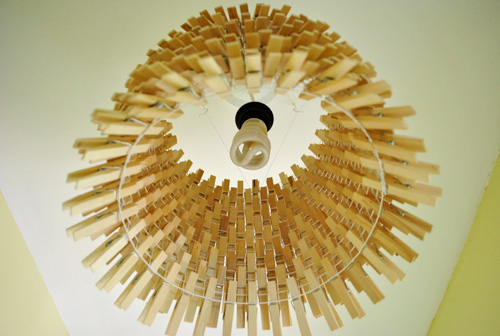
And now for our hanging solution:
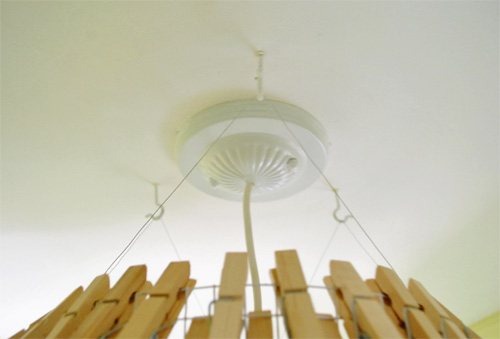
Yup, it was just more of the wire that we used to bind the wire fencing into a drum and three heavy duty ceiling hooks that we screwed nice and securely into the ceiling with heavy duty anchors (don’t want to get clothespinned to death).
Then we stepped back and high-fived for five straight minutes. We’re in love.
I bet you’re surprised we didn’t spray paint that sucker white (or ORB), huh? We even debated staining or dying the wood pins, but in the end we actually really liked the au naturale look because:
- it ties into a few baskets in those built-ins
- it makes it more obvious that it’s a light made of clothespins, which we think is part of the fun
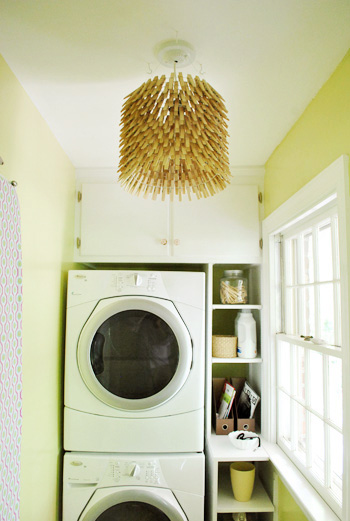
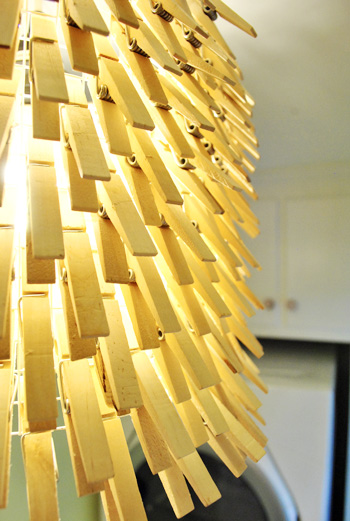
- it glows in a sunny yellowy-tan tone whenever the light is on, which is nice and warm – and works great with the grellow walls
Isn’t it fun?
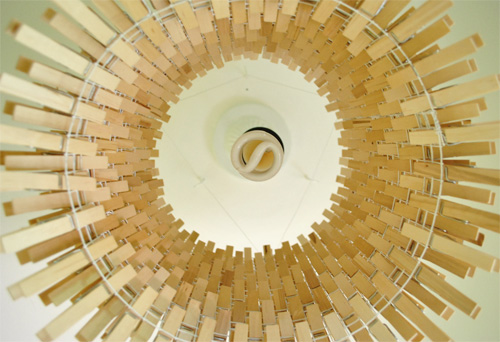
This shot from below reminds us of a sunburst mirror:
Oh and when it comes to safety, lots of lamp shades are made of flammable things like paper or fabric (or even driftwood, etc) but the key is to keep that stuff well away from the bulb (and to use cooler burning bulbs like CFLs or LEDs to be even more on the safe side). You also want to give the heat plenty of room to escape (ideally around the top and bottom of the shade if possible).
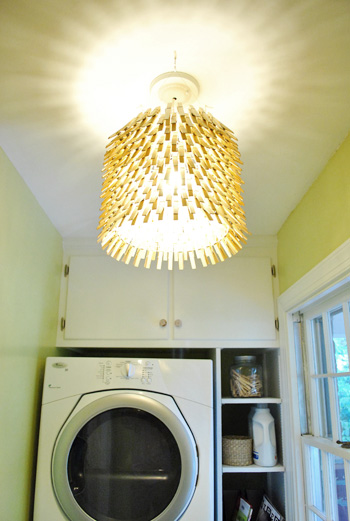
Here she is all lit up:
We think it’s one of the coolest things we’ve made to date, just because it’s so quirky and sculptural. And it’s all thanks to Katie Bower’s big Pinterest Challenge idea and two projects that inspired the heck out of me over on the eye candy capital that is Pinterest. Specifically, this project (originally from here) and this project (originally from here.
Check out the pretty starburst pattern that it casts on the ceiling:
Now for some stats (because we’re mathy like that): we used 320 clothespins (exactly eight packs) and our clothespin shade weighs four pounds.
And here’s the whole budget breakdown thang ($herdog just got twangy on ya):
- 8 packs of 40 medium-sized clothespins (from Ben Franklin): $16
- Pack of hooks for the ceiling (from Home Depot): $1
- Roll of hardware cloth (aka, wire fencing) from Lowe’s: $8
- Hemma light kit (from Ikea): $4
- Ceiling canopy for light kit (from Lowe’s): $5
- Wire for securing / hanging wire frame (already owned): $0
- White spray paint (already owned): $0
- TOTAL: $34
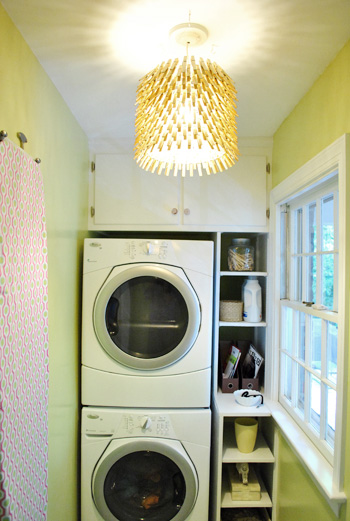
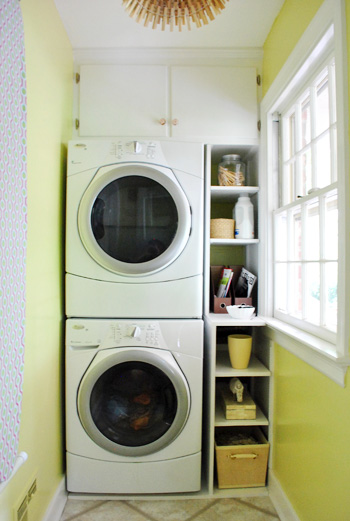
As for if it interferes with heads or flailing arms while switching laundry, this picture shows how high it actually is in the room (and thanks to it being centered in the space, it’s not right above the washer and dryer, it’s a few feet behind it in the middle of the room). We have 8 foot ceilings and the bottom of it is 16″ from the ceiling, so even 6′ tall John doesn’t have any issues with it (since the bottom of it is almost 7 feet from the ground). He even washed a load of diapers and a load of clothes just to be sure.
Can you tell we added our new shoe caddies after we shot this pic? Oops. But anyway, there you have it. A whole bunch of pictures and words about our Pinterest Challenge. And a whole bunch of clothespins.

Oh and don’t forget to check in on Katie, Emily, and Lana to see what amaaaaazing projects they whipped up (they’ll be sharing theirs sometime today as well)! A few hints: one has to do with a mirror and one has to do with a fridge…
And now here’s the part where we invite you to share all of the fun Pinterest Challenge projects that you guys have tackled in the last week (right along with us, well at least virtually with us). If you’ve already blogged about it, just:
- click on the blue “Add Your Link” button with the odd cartoon head at the bottom of this post (you might have to do some scrolling, depending how many projects are added)
- add a link to your specific blog post about your project in the url field (not your home page)
- where it says “name” write a descriptive name for your project (ex: “Clothespin Light Fixture”) as opposed to your actual name
- we’d also love if you could quickly link back over to our project posts within your own (here’s Katie’s, Emily’s, Lana’s, and ours) – it’s also nice to link to your inspiration project on Pinterest as well as to directly link to the original project/site, just so they get some love too.
And if you’d rather just link over to your project in the comment section, feel free to do that – or even add a link to a free photo sharing site like Flickr with your pics if you don’t have a blog (remember to set the gallery to public so we can all see it). We can’t wait to see what you’ve been up to! Geeked out and excited doesn’t even begin to describe it.

Jen @ Domesticated Nomad says
Your light is way cooler than your pinterest inspiration! Kudos. This has been a fun way to show off (and see what others are showing off!). Thanks for hosting it. :)
Amy @ this DIY life says
Can I tell you how many times I’ve hit refresh today so I can keep checking the projects people are adding? Today has been my own little version of (DIY) Christmas! I can tell I will be up late tonight clicking and commenting :)
Megan says
Why can’t we do this weekly or monthly?? :) I didn’t submit a project. Although I just noticed that I can still submit one for the next six days right? I guess I will have to scour my pinterest boards and make the hard decision of choosing one project! By the way I love your clothes pin light I want to do one myself but I don’t have a light in the laundry room. I also loved what Katie Bower did!!
Maria says
This is very cool, it would be really fun if you guys did a re-cap post of some of your favorite projects that were linked.
YoungHouseLove says
Oh yeah that could be fun! So hard to pick just a few though. There are also awesome comment and Facebook ones too. Still so blown away by all the projects!
xo,
s
Vicki says
Yay! Your light turned out SO GREAT! I can’t think of a more perfect fixture for a laundry room.
Thanks so much for hosting the challenge! It was tons of fun!
Jillian says
This was so fun. I will have to jump on the bandwagon next time. I loved visiting your ‘partners in crime’ and seeing what they did, too. Did you see that ANA WHITE participated and posted a project?! That is so cool. Now both of you guys are double famous. ;)
YoungHouseLove says
Wahoo! We love Ana! That’s so cool of her!
xo,
s
Rachel says
I just scrolled through all your responses (it’s great that they are highlighted) to make sure you didn’t already address this — and I didn’t see a mention. I love the idea of doing a version of this in my laundry room, but I worry about whether it would provide enough light. Our laundry room is about the same size, but I’d be replacing one of those florescent tube fixtures that uses 2 long tubes. Ugly as it is, it does provide plenty of light (no window for us, alas.) How is it in there at night? Does it cast bothersome shadows? Is it bright enough? What wattage equivalent cf did you use? Thanks and great job! Love it!
YoungHouseLove says
I think it all depends on the wattage your light kit can take. The Ikea one we got can go up to 75 watts (we used a 60 watt equivalent bulb and were good). We actually don’t get a ton of light from the window since it looks out into a carport, so maybe you’ll be ok in a small room with 75 watts? Oh and we don’t have issues with ugly shadows or anything (just the pretty starburst shape cast on the ceiling and that’s it). Hope it helps!
xo,
s
Jessica K. says
I don’t have a picture of my projects or a blog, but I made two things off Pinterest too! I made the cloth napkin kitchen curtains and the framed picture of my sons’s name, birthday, time he was born, etc.
Tamsyn says
Yay! I love it! Beforehand I wasn’t sure if I would, but as per usual you guys have blown me out of the water!
Sarah says
Wow this looks really good! Awesome job you guys. :]
Shannon C. says
I did the pinterest challenge, but I haven’t blogged about it yet. I thought it was such a great idea, there are so many things on my “to try when I have time” board, I thought it was fun to finally do one. I decided to paint an old bookcase for my craft room- I’ve had your dining room bookcases pinned for ages, and this weekend I did my very own-inspired by. I painted the bookcase pale grey (since the walls are white) and the background a deep saturated popping pink color. So far it looks great, but no pictures yet since I’m waiting for everything to really dry good before putting the shelves back in. Hooray for you guys and the great ideas!
Shannon C. says
Finally got my pinterest challenge pictures up on the blog! I’m glad to get the projects all finished! Hooray for the challenge.
Stephanie says
This came out looking really cool, I love it! Makes me wish I had a laundry room :) I was wondering though, how did you install the light kit? I noticed on the ikea website that it’s a plug in, did you plug it into the attic or did you cut open the end and attach the wiring together? I’m looking to do something similar in my kitchen with a drum shade, but I have yet to find the perfect light kit!
YoungHouseLove says
It’s a plug-in light kit (that’s meant to be swagged) from Ikea, but an electrician friend of ours taught us that it can also be converted into a hardwired fixture by clipping off the plug part, exposing the wires within the cord, and connecting them to the wires in your overhead junction box (with the power off of course!). Then we just added a $5 ceiling canopy from Lowe’s (that white medallion looking thing that finishes things off). Hope it helps!
xo,
s
Sydney says
Love it guys! It looks great…and I totally (once again) agreed with John’s way…and I’m secretly pleased to see that John won the ironing board debate! Sorry $herdog (that should make up for it!)
Jennifer says
It looks beautiful! Even better than the inspiration lights! I LOVE it.
Jackie says
love love love the 320 pegs! it looks great! that might be my next pinterest project, who knows! hehe. i will be sharing mine soon, just trying to post it on my blog. should be up soon! must do this at least once a month, what d’ya think?? xo
YoungHouseLove says
Haha- once a season is just right for Katie and I (since we have so many other house things on our to-do list)! But we definitely wouldn’t mind seeing other people’s projects more often!
xo,
s
Rachael@LovelyCraftyHome says
Love how the chandy turned out! Thanks for hosting this challenge!
Sandra says
Yay!! Great job all the way around! Clothespin-brown is nice, but I keep thinking…what about painting it grellow?? Also, what did you guys think of the other “contestant’s” projects?? I’m excited about checking out all the stuff other people submitted too, and you guys got so many! This is gonna take awhile.
YoungHouseLove says
Aw thanks. We love it au naturale for now- but who knows what we’ll do down the line! As for everyone else’s projects, we’re blown away by how many people got in on the whole thing with us over the weekend. So amazing! We love clicking all the links (there are more over on Facebook and Twitter!).
xo,
s
Rebecca @This Nest is Best says
I’m loving this project! Wish I had a real laundry room and not just a basement space :)
I think the Pinterest challenge should up the ante and be a monthly feature! I absolutely love it!
Nevin says
I loved the challenge!!! Sorry – I read your directions, yet I named it incorrectly when I added my pic. :( I had a lot of fun making this desk for my 16 yr old son! He loves the space ~ he has now to work and play!
YoungHouseLove says
No worries! We’re still leaning how to use that link software too!
xo,
s
Kimberly M. says
I’ve been trying to get on Pinterest for over a month now. Can you please send me an invite?
YoungHouseLove says
If you ask over on our Facebook page someone will usually send you one super fast! Hope it helps!
xo,
s
Kelly says
$herdog (can I call you that? I feel like we’re “close.” Sorry),
The shade looks fantastic! It totally reminds me of Clara’s pull-apart pinata. I knew exactly which design you were going to pick because of that. lol. Did you notice that?
YoungHouseLove says
Haha- that’s so funny! Didn’t even notice that!
xo,
s
Trude says
Wow that turned out SO COOL! Congrats!
Jodie says
OMG – fantastic!
Wrenaria says
Your light fixture is way fun! Great step by step notes, per usual. I thought about showing my process but got lazy, haha.
And I technically didn’t finish my project entirely but that because I opted to save some $$ by waiting a few days to pick up the final needed piece (coupon with time restraints).
Mine so far: http://wrenariantroves.blogspot.com/2011/08/pinterest-challenge.html
Ashley says
i know this post is about the light fixture, but that clara is just too darn cute!
Neal says
Your light came out awesome!
I made two things, a chalkboard countdown and adult-sized hula hoops. I guess I technically made four things since I made three hula hoops.
Here are some photos:
http://tinyurl.com/3q9cxap
angie says
love it! i just finished a ribbon chandy inspired by you! I still have yet to upload photos but I’ll give you a shout out when I do on the FB page.
Jackie says
Once a season sounds good actually. I do have twin toddlers that keep me busy, hehe, plus two older boys who love to pretend they’re also toddlers…that’s including my hubby btw, hehehe. Just letting you know that I’ve posted it up! Check it out when you get the time xo
K Johnson says
I have been wanting to buy a light kit for awhile and your mention of this $4 kit convinced me to go buy one at Ikea today. Now I’m looking online for instructions for converting it to hardwire, and a bunch of boards say that doing this is illegal! I know you wrote that an electrician friend told you this could be done, but now I’m pretty sure the fire inspector is going to bust down my door and yell at me. Any words of reassurance for a nervous Nellie?
YoungHouseLove says
Hmm, that’s so strange, we’ve never heard that. Maybe it varies by state or county? I’ve also heard from West Elm that many of the plug-in fixtures they sell that can be “self-converted” by cutting the cord and wiring it. Perhaps it has to do with adding the metal ceiling canopy that we purchase separately? You definitely won’t meet code with just the Ikea light kit- you have to seal off the junction box securely with metal which is where the Lowe’s or Home Depot metal canopy comes in. Hope it helps!
xo,
s
Melissa says
These all came out awesome! I just found pinterest last week, I can’t wait for your next challenge! I already started a couple projects found off there.
Braelin says
Wow- what inspiration! Of course, I didn’t participate, but I’m totally committed NOW to doing something… anything for my own lil’ Pintrest challenge!
Angela Starosta says
http://livingfromscratch1.blogspot.com/2011/08/pinterest-challenge-summer-edition.html
I covered a seriously ugly pillow that was holding the place of a future pretty one in my newly redone livingroom. It was free, and now i don’t feel like that one needs to be replaced. Maybe i’ll just cover ALL the ugly ones.
Meghan says
Would LOVE to see a picture of it lit up at night!!!! Thanks!!!!
YoungHouseLove says
We’ll have to try to remember to grab a shot and share it in a future laundry room post for ya!
xo,
s
James says
OK guys, this is the first time I have been so impressed that I had to let y’all know, that light fixture is the coolest thing I have seen you do by far……you both amaze me …I LOve Love Love it !!!!!
jessica says
womp womp: you have to add gas cost into your project cost :)
really, though, great project!!
YoungHouseLove says
Haha- we should have! The only saving grace is that we have a small car (just one) and we work from home so we don’t drive around much during the week. And after that crazy long trip I think we’ll stay in for a while. Haha.
xo,
s
Jackie says
OMG! This post is a bigger time-suck than Pinterest itself! I love it.
Leslie says
Okay guys, I have to admit that I was feeling a bit apprehensive about this project at the beginning. But as your ideas started to unfold, I was on (clothes) pins and needles (har!) and I couldn’t wait to see the end result. My last impression? Amazing!!
I love your can do attitude and I love how you keep on keepin’ on….your projects are always chronicled with the good and the bad….and frankly, that inspires me to keep going too!
Traci says
I love-love how this turned out. They say that copying is the best form of flattery. Well, in the next couple of weeks, I’ll be a-copying your light exactly thanks to the great post. Love it!
Brandan WH says
Soo impresed. It looks great!
Meredith says
OK guys. You have to stop. Seriously. I mean, if you keep being so freaking inspiring (and inviting all of your creative readers to do the same), I’m going to be in trouble. It’s a big enough challenge to hide my YHL addiction at work, but now I have a dozen other links open, and pretty soon, I’m not going to Alt-Tab fast enough and my boss will see my screen. How am I going to explain that reading about clothespin light fixtures, spray painted wine bottles, and windows used as jewelry holders is indeed related to my work in biotechnology?!
;)
YoungHouseLove says
Haha- pretty surroundings make people happy. And better at biotechnology. Haha. Does that work for a thesis?
xo,
s
Meredith says
Good point! I’ll tell him that pretty things not only make me happy, but that a little internet surfing is way cheaper than a raise. Therefore, he should actually encourage the outside reading! ;) haha
YoungHouseLove says
Haha, I like it.
xo
s
Catharine @ Your Modern Couple says
I seriously love how this turned out! I really want to go on a clothespin hunting spree myself to make one for my laundry room and say goodbye to the boob light that is currently being an eyesore in there.
Also, I think it’s great that you’re allowing readers to link up their Pinterest projects! There are some crazy crafty people out there, it’s so inspiring! Now I need to stop pinning and start creating! :) Thanks for the inspiration guys!
Janet says
Love the light! I actually want to try this the next time I move.
I sort of did the challenge but I had a major fail. I tried to silver leaf a nightstand. It didn’t work out for me…I’ll leave out the yelling, throwing and cursing details. ;)
Christa M says
You guys did a great job on that clothes pin fixture! But tell John that the ironing board is upside down! It’s too top heavy!
So am I the only one who did a DIY Alcohol related project? I promise next time it will be home related!
YoungHouseLove says
Haha, I agree! We have ironing board wars every day (flipping it back and forth all the time).
xo,
s
traci says
love it! If i have a designated laundry room in the future i would love to have something like this…so fitting and still decorative…you guys rock
Fatimata says
Great lamp! lovely!
Kristi @ Addicted 2 Decorating says
What a fun challenge! Your clothespin pendant light turned out fantastic! These were really fun to look through. I hope y’all will make this a regular feature!
andrea worley says
that’s pretty awesome I just love it!!
Kay says
Just wanted to share that your clothespin lamp made it to the icanhazcheezeburger sites (you know… lol cats).
http://stuff.icanhascheezburger.com/2011/08/03/cute-kawaii-stuff-clothespin-chandelier/
YoungHouseLove says
No way?!!! Thanks for the heads up.
xo,
s
Trish says
Hi guys,
First time I’ve commented, though I’ve been following your blog for months. You’ve actually inspired me to finally start my own blog. I’ve been thinking about it for ages. I know I’m a couple of days late on the challenge, but I thought I’d clue you in to the dresser I’m refinishing, inspired by a post on Pinterest. I even gave a shout-out to YHL on my blog today, with a post on my project. Check it out if you have the time. wishfit.wordpress.com
btw, my boys LOVE the Clara and Burger videos and pictures!
YoungHouseLove says
Oooh that’s gonna look so good! Can’t wait to see it. And thanks for the shout out!
xo,
s