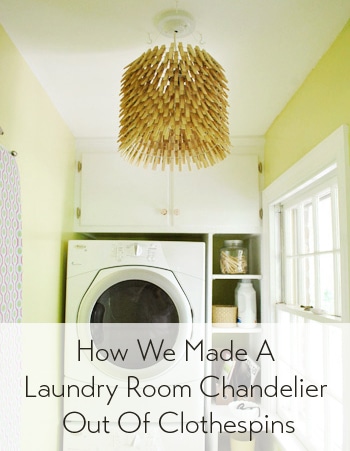
Woo to the hoo. We did it. We met our self-imposed Tuesday morning deadline and finished our clothespin chandelier as part of our little (completely unofficial) Pinterest Challenge (not sponsored by Pinterest or anyone else, just dreamed up by Katie B to make us stop pinning and start doing stuff that we’ve already pinned).
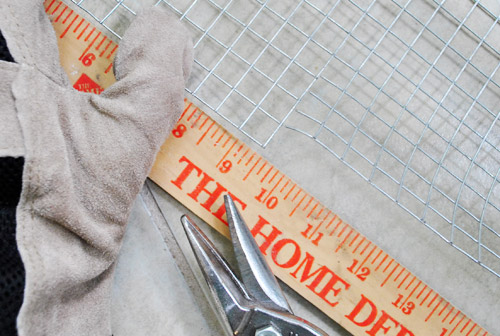
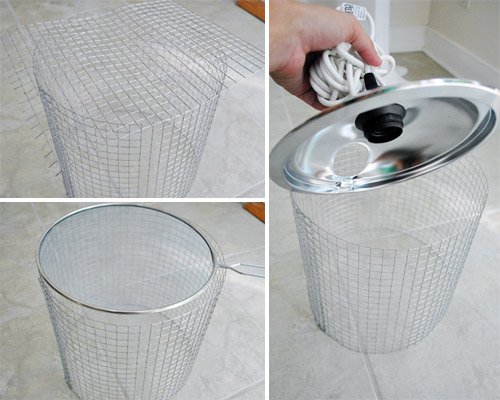
Here’s how it all went down. We already explained the whole Pinterest Challenge thing here, which is where we snuck in a few photos of our supplies, like this one below:
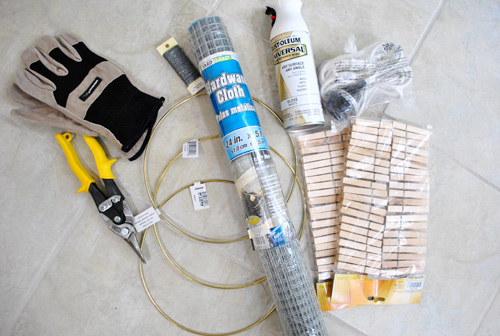
We actually didn’t end up using those three 10″ metal rings from Ben Franklin, but the rest of the stuff came in handy. So for those who can’t quite make everything out, “the rest of the stuff” is: a $4 light kit from Ikea, part of a roll of hardware cloth (aka: wire fencing) from Lowe’s, white gloss spray paint, some old wire from our craft drawer, gloves & metal snips for handling/cutting the wire fencing, and two bags of clothespins (we actually ended up needing eight bags of them in the end).
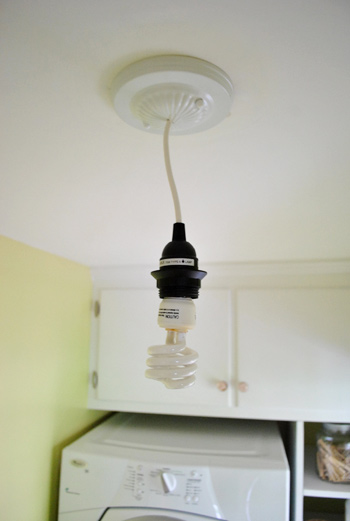
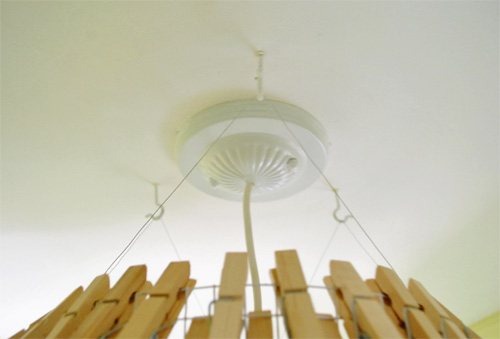
As for the $4 light kit from Ikea, it’s a plug in light kit (meant to be swagged) but an electrician friend of ours taught us that it can also be converted into a hardwired fixture by clipping off the plug part, exposing the wires within the cord, and connecting them to the wires in your overhead junction box (with the power off of course!). Then we just added a $5 ceiling canopy from Lowe’s (that white medallion looking thing that finishes things off).
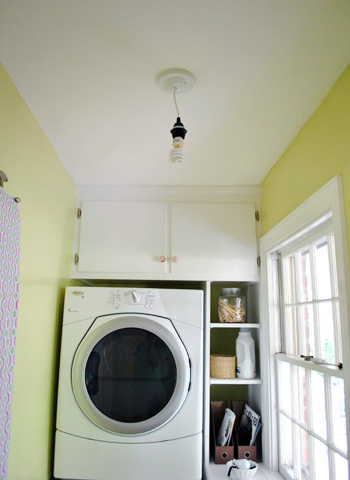
Of course that dangling light kit is nothing pretty, so we got to work constructing a drum shade-ish thing out of wire fencing. First I donned my gloves and used the metal snips…
… to cut out a strip of wire fencing that was approximately 9.5″ tall (since we wanted our shade to be about 10-11″ tall when completed and we had to allow for some dangling clothespins to make it a little longer than the frame).
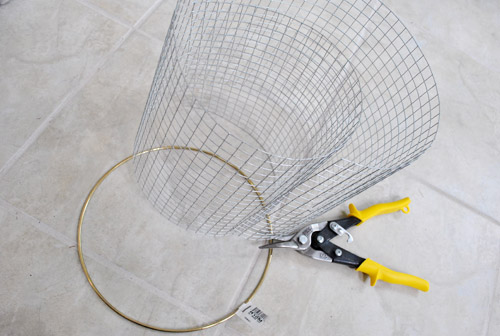
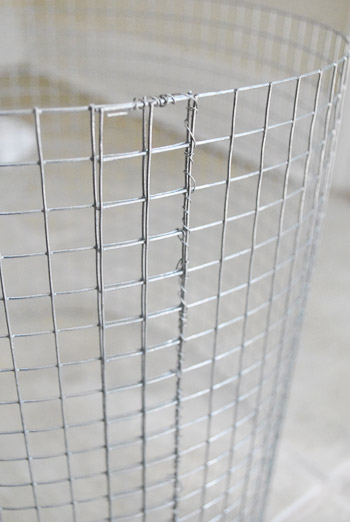
Then since the ring was 10″ wide, we just made a loop of wire fencing with a 10″ diameter and used craft store wire that we had on hand to bind the fencing to itself to create a nice drum shade-ish loop o’ metal squares. It was at this point that we realized we didn’t need the 10″ ring at all since the wire fencing held its shape really well (we worried it would be all floppy and wonky).
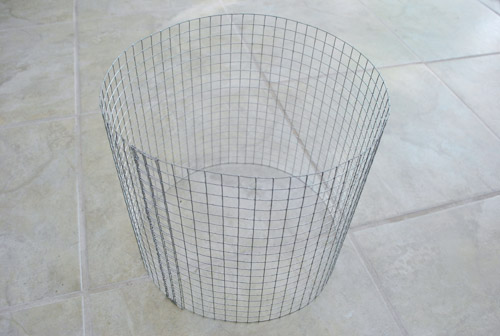
Oh and as for some details on the wire that we used to secure it, it was 22-gauge stuff. It’s actually thinner than the wire that we pictured in the supply photo up top (thank goodness for having lots of spare wire around!) because it ended up being easier to twist while still being rigid enough for a good hold.
The next obstacle was figuring out how we’d affix the ceiling mounted light kit to the wire “shade” that we were making. We contemplated a few things – like cutting a piece of scrap wire fencing in a circle to bind to the top (and then cutting a circle in the middle for the light to drop into). We even scavenged for some items to repurpose, like a kitchen splatter guard and a stove burner drip pan (the last of which almost won, since the light kit perfectly screwed through the existing hole in the bottom). But ultimately it got vetoed because it would’ve blocked too much light – and the extra hole in the top would have cast a weird ray of light onto the ceiling. So you’ll see our eventual solution in the “after” pics. Oooh, the suspense.
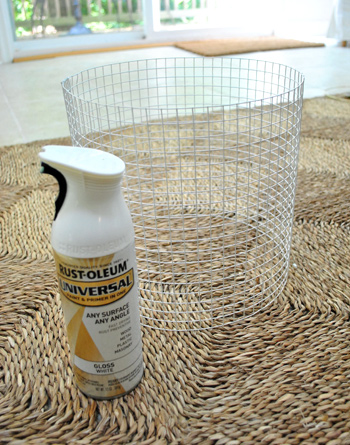
Next I sprayed the wire fencing with white gloss spay paint that we already had in our little basement spray paint collection. I did this for two reasons:
- we thought glossy white would work with the ceiling canopy that we added and look a little more polished (although some folks might love the industrial look of unsprayed wire)
- some metal fencing like this can have traces of lead in it, so although we weren’t sure ours did, we handled it only with gloves on waaay away from Clara (on the tile floor of our sealed-off-from-the-rest-of-the-house sunroom). Layering on a few thorough coats of spray paint is like sealing old lead-painted walls with fresh new coats of non-lead paint (which is the recommended method, as long as the old paint isn’t flaking or peeling).
Here she is all sealed/sprayed:
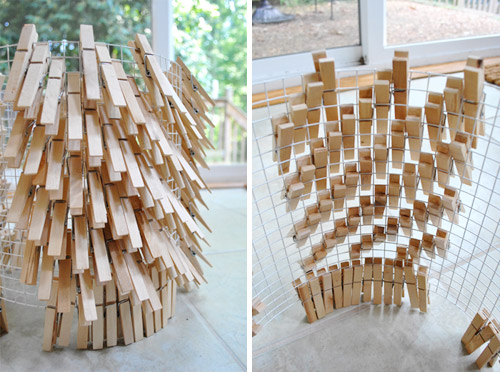
Then it was time to play with clothespins. Which may or may not have been harder than we expected to track down in the right size for our wire fencing.

We used eight bags of “medium” sized clothespins from Ben Franklin (snagged at $1.99 for each pack of 40) to play around with a few different “patterns” for our light fixture.
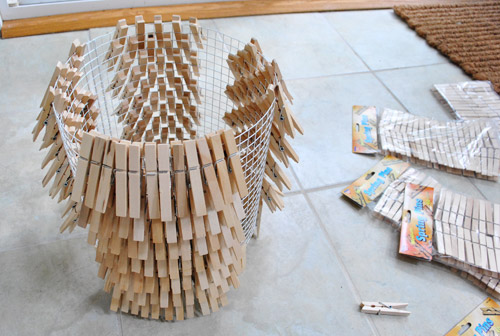
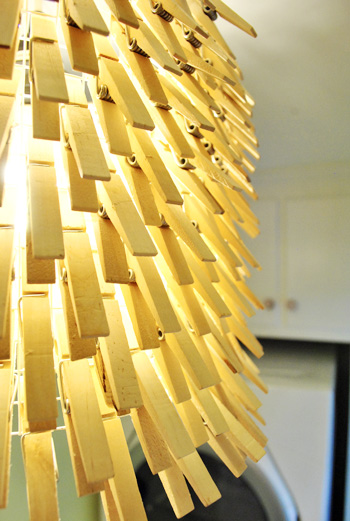
The first pattern was a straightforward row by row effect. We just clipped pins in a horizontal row and then skipped two rows below that and then pinned another row beneath that.
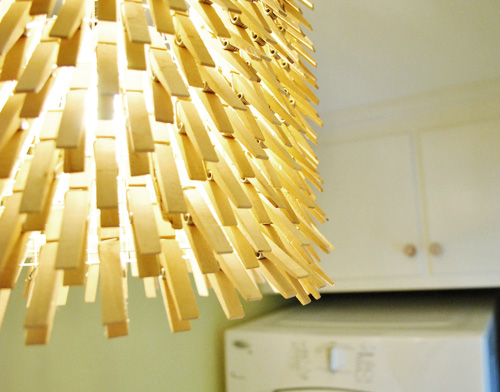
We also tried a more random pattern that you can see better from the inside shown on the right (we basically alternated squares for a zig-zag-ish effect):

We also tried playing around with a diagonal design, which was fun but hard to deal with at the top and bottom of the shade since there were lots of empty squares that looked kind of odd:
I call this design “The Space Invader” after the old school video game. See the shot on the right below? There are totally two space invader guys hiding in there.

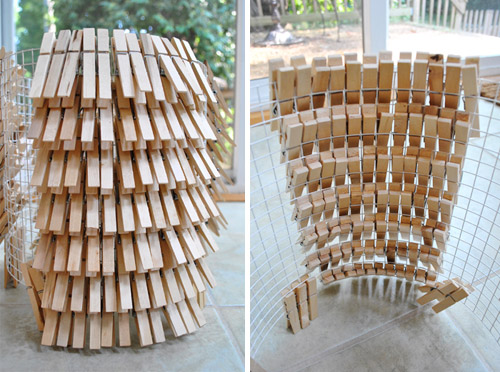
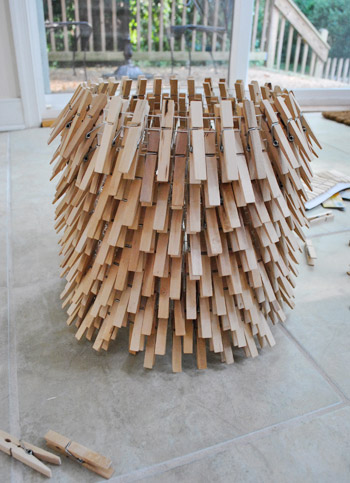
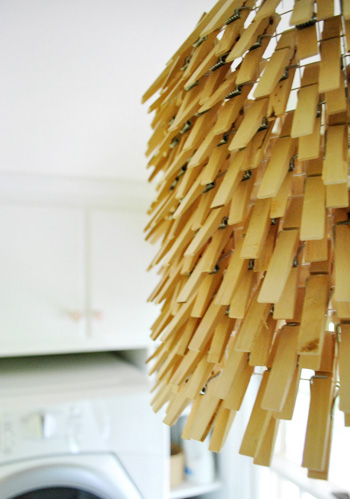
Pretty much right away we narrowed it down to two favorites. The row by row pattern that we did first, and the zig-zag-ish pattern that we tried out second. So John held the shade up with the light on and both patterns facing out so we could take photos of each one and look at them together and decide. Going into it I was all about the row by row thing and John liked the zig-zag better.

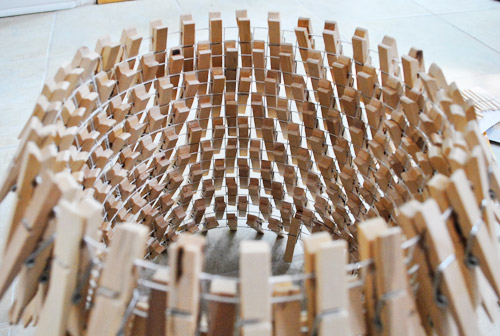
Guess who won again? John. Seeing it even for a second I knew he was right about the row by row pattern blocking way more light than the zig-zag configuration. And it felt airier and less heavy so we were both gung-ho as soon as we saw it in fake action (just look at John’s excited face above). But really, we were giddy pretty much from this point of the project on. So then we just (giddily) removed the other clothespin patterns and clipped them all around the shade in our finalized zig-zag design.
We just got lucky that we had secured the wire fencing in a way that created an even number of squares around the top so our pattern could “loop” without getting awkward and having a seam. So if anyone at home is going to try this, we’d definitely recommend having an even number of squares when it comes to the perimeter of the shade.
And now for our hanging solution:
Yup, it was just more of the wire that we used to bind the wire fencing into a drum and three heavy duty ceiling hooks that we screwed nice and securely into the ceiling with heavy duty anchors (don’t want to get clothespinned to death).
Then we stepped back and high-fived for five straight minutes. We’re in love.
I bet you’re surprised we didn’t spray paint that sucker white (or ORB), huh? We even debated staining or dying the wood pins, but in the end we actually really liked the au naturale look because:
- it ties into a few baskets in those built-ins
- it makes it more obvious that it’s a light made of clothespins, which we think is part of the fun
- it glows in a sunny yellowy-tan tone whenever the light is on, which is nice and warm – and works great with the grellow walls
Isn’t it fun?
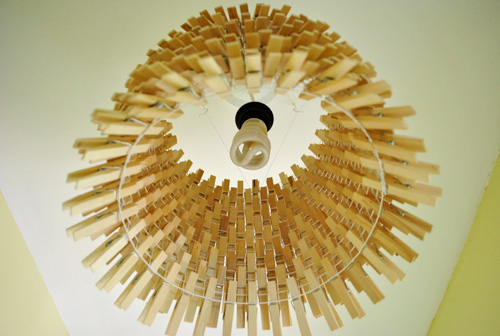
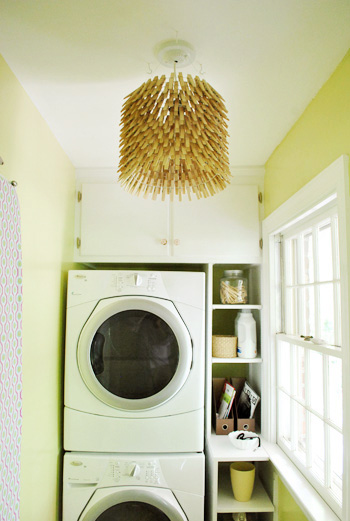
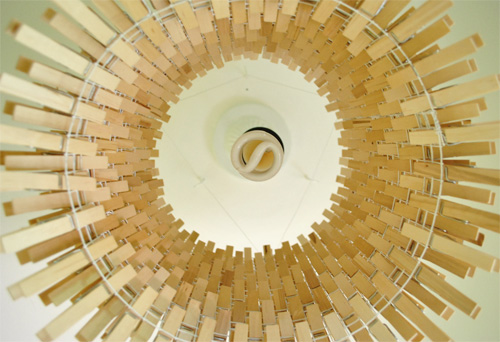
This shot from below reminds us of a sunburst mirror:
Oh and when it comes to safety, lots of lamp shades are made of flammable things like paper or fabric (or even driftwood, etc) but the key is to keep that stuff well away from the bulb (and to use cooler burning bulbs like CFLs or LEDs to be even more on the safe side). You also want to give the heat plenty of room to escape (ideally around the top and bottom of the shade if possible).
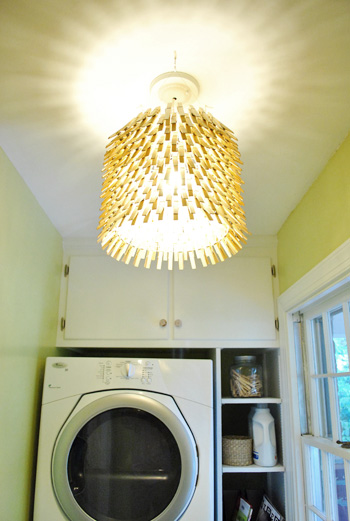
Here she is all lit up:
We think it’s one of the coolest things we’ve made to date, just because it’s so quirky and sculptural. And it’s all thanks to Katie Bower’s big Pinterest Challenge idea and two projects that inspired the heck out of me over on the eye candy capital that is Pinterest. Specifically, this project (originally from here) and this project (originally from here.
Check out the pretty starburst pattern that it casts on the ceiling:
Now for some stats (because we’re mathy like that): we used 320 clothespins (exactly eight packs) and our clothespin shade weighs four pounds.
And here’s the whole budget breakdown thang ($herdog just got twangy on ya):
- 8 packs of 40 medium-sized clothespins (from Ben Franklin): $16
- Pack of hooks for the ceiling (from Home Depot): $1
- Roll of hardware cloth (aka, wire fencing) from Lowe’s: $8
- Hemma light kit (from Ikea): $4
- Ceiling canopy for light kit (from Lowe’s): $5
- Wire for securing / hanging wire frame (already owned): $0
- White spray paint (already owned): $0
- TOTAL: $34
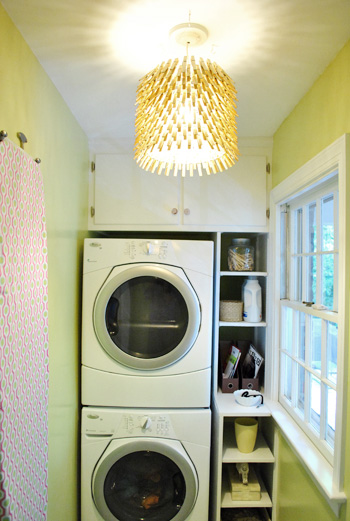
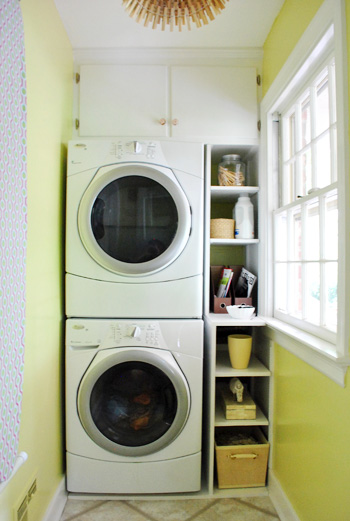
As for if it interferes with heads or flailing arms while switching laundry, this picture shows how high it actually is in the room (and thanks to it being centered in the space, it’s not right above the washer and dryer, it’s a few feet behind it in the middle of the room). We have 8 foot ceilings and the bottom of it is 16″ from the ceiling, so even 6′ tall John doesn’t have any issues with it (since the bottom of it is almost 7 feet from the ground). He even washed a load of diapers and a load of clothes just to be sure.
Can you tell we added our new shoe caddies after we shot this pic? Oops. But anyway, there you have it. A whole bunch of pictures and words about our Pinterest Challenge. And a whole bunch of clothespins.

Oh and don’t forget to check in on Katie, Emily, and Lana to see what amaaaaazing projects they whipped up (they’ll be sharing theirs sometime today as well)! A few hints: one has to do with a mirror and one has to do with a fridge…
And now here’s the part where we invite you to share all of the fun Pinterest Challenge projects that you guys have tackled in the last week (right along with us, well at least virtually with us). If you’ve already blogged about it, just:
- click on the blue “Add Your Link” button with the odd cartoon head at the bottom of this post (you might have to do some scrolling, depending how many projects are added)
- add a link to your specific blog post about your project in the url field (not your home page)
- where it says “name” write a descriptive name for your project (ex: “Clothespin Light Fixture”) as opposed to your actual name
- we’d also love if you could quickly link back over to our project posts within your own (here’s Katie’s, Emily’s, Lana’s, and ours) – it’s also nice to link to your inspiration project on Pinterest as well as to directly link to the original project/site, just so they get some love too.
And if you’d rather just link over to your project in the comment section, feel free to do that – or even add a link to a free photo sharing site like Flickr with your pics if you don’t have a blog (remember to set the gallery to public so we can all see it). We can’t wait to see what you’ve been up to! Geeked out and excited doesn’t even begin to describe it.

Stephanie Handy says
This whole Pinterest challenge had perfect timing! Not three days before you all announced it, I had bought the materials to make an ironing board cover based on a mix of a couple tutorials I found on Pinterest (I got the ironing board itself on Freecycle and fixed it up).
The Pinspiration:
http://pinterest.com/pin/80486205/
http://pinterest.com/pin/80486048/
The Results!:
http://www.thehandylife.net/2011/08/tutorial-ironing-board-cover/
Laura@JourneyChic says
You guys are seriously amazing! That’s the coolest little laundry room ever!
Nette @ This Dusty House says
When I first started reading this post I thought, “Really? A chandelier made out of clothespins? How on earth…” By the end, I’m totally sold. Amazing how such a simply concept can have such a huge impact! I love it!
Lacey says
I have requested a pinterest invite a few times and haven’t received anything yet. What gives? Has anyone else had a problem getting in? Until then, I will live vicariously through your pinterest posts!
YoungHouseLove says
So sorry! It’s still a small start up company, so there seem to be some glitches. Maybe try asking for one on our Facebook page. Folks like to share instant invites with each other there.
xo,
s
Emily @ Our Waldo Bungie says
Here’s my Pintrest Challenge submission…
http://waldobungie.wordpress.com/2011/08/02/the-2011-pintrest-challenge/
sarah (sarah learns) says
i love the chandelier and i loved clara’s reaction to it! :) so cute!
Elizabeth says
Wahoo!! Looks great!!!
QuatroMama says
Can I tell you how much I LOVE this idea? Genius.
So great to see Pinterest in real life. Thanks for hosting!
michelle says
Totally surprised by how modern a pendant light made from clothespins can look, bravo!
Jaclyn says
Your clothespin shade looks fantastic! Now I want to do something like that in my laundry room… someday. Thanks for the challenge – this was so much fun! I added my project above – http://messybaker.wordpress.com/2011/08/02/the-pinterest-challenge/
I’ll go back into my post tonight and link to yours and the other three challengers. =)
Arlene says
I. AM. IN. LOVE.
Krysta @ Domestic for Dummies says
Wow! It looks so fabulous! I also took on the Pinterest Challenge…wasn’t as easy as I was hoping but I think it turned out pretty swell!
http://domesticfordummies.com/2011/08/pinterest-challenge.html
Amy says
It looks amazing!! I’m pinning this as we speak :)
By the way, Clara looked like an angel in the glow from the light!
Reenie says
That is so cute…..BUT how cute is lil Clara looking at the light ~ then looking at her Daddy all serious telling him y’all did a great job!!! She is just too cute.
Holly says
Clara, your little diy-er in training, obviously approves! She is so cute and I love how mesmerized she is by the light! Good job to y’all! This is especially beautiful with the light turned on.
Suzanne Supplee says
Love it! And don’t forget texture! It adds such great texture. I love the shoe bin, too, but taking that wicker basket out also removed texture from the room. Now it’s back! Good job:-)
Sarah says
AHH I love the light!! So cool! Ha… I only succeeded in making lame-o coasters but I am glad I finally found the motivation! : ) Can you make more of these challenges for like, getting things done at work??! : )
YoungHouseLove says
Haha- sure. Everyone do one work project that needs to be done. Go! Good luck! Haha.
xo,
s
Laura T says
Zomg!! I love it so much!!!!1!1!! If I had a laundry room I would so do that!! :-)
Jen says
Great job!!!! You two never cease to amaze me.
Kim S says
I participated but didn’t take any pictures…my “challenge” was food-related. I pinned a recipe for sweet potato fries and copycat Outback Bloomin’ Onion sauce quite a while ago, and I decided that this weekend during the Pinterest Challenge I would finally make them. They were delicious, by the way. :o)
YoungHouseLove says
Mmm- that sounds awesome! Making food inspired by pinterest totally counts!
xo,
s
Kelly (Kelly is Inspired) says
This is awesome!! You done good :)
Lisa | Life in Green says
Love it! I just might have to pin to my board now!
Definitely inspiring to go for some of those projects I’ve been thinking about here and there.
Good job…as always.
Lauren says
Absolutely love it! May have to copy you. I’m already trying to figure out how I would execute it in my space…maybe metallic spraypaint. Let us know whether it collects tons of dust and is easy to clean.
YoungHouseLove says
Will do! We figure we’ll just use a feather duster or shoot it with one of those canned air things if it gets super dusty (although I’m embarrassed to admit that we haven’t dusted any other fixtures in our house since we moved in and none of them look that furry yet- haha).
xo,
s
Meredith says
You guys are amazing, I LOVE it. (Also, I notice in the photos that John is currently winning the great ironing board debate). :)
YoungHouseLove says
I know right? He seems to be spending more time sneaking around and switching it. Haha.
xo,
s
Shelley says
Great job! I love your version and the scale is perfect for your laundry room!
Jennifer says
I love the clothespin shade, but I have to say, my favorite part of this post was Clara’s jibberish. That was too cute! :)
Lauren says
How difficult do you think that would have been to spraypaint? would you have spraypainted after it was all put together or before?
YoungHouseLove says
Hmm, good question. I probably would have laid all the clothespins out on a piece of cardboard and sprayed them all (so the tops and sides would have a good coat of color) and then flipped them (so the backs would get coated too. Then I might assemble it and take the whole shade outside and give it another thin coat of color to hopefully get good even coverage that looks consistent and glossy. Hope it helps!
xo,
s
Sharmin says
I was SO excited by this challenge–I went and did a complete overhaul of my pantry!
It took a couple of posts, but here it is: http://sharmed.tumblr.com/
Jess @ Little House. Big Heart. says
I made two projects… but I’m so busy at work this morning I don’t have time to post them until lunch :(
Love the chandy! Can’t wait to show off mine!
carolinaheartstrings says
Oh yeah. Woo to the hoo. That is just fantastic. Love everything about it. Perfect for your laundry area. Just perfect. I want it bad!
Emily says
Ok this is bananas! Can you guys believe all the links you’re getting? Sooo cool. Clara’s face when she was talking to John is hysterical, she was so serious. Can’t wait ’til she can host some of your videos, that’ll be a trip.
The chandelier is gorgeous, amazing job.
YoungHouseLove says
It’s seriously amazing. We were so excited to see if anyone did any weekend projects and are completely blown away by them all!
xo,
s
simplyblythe says
it turned out so well!
Gina @ Running to the Kitchen says
This looks so awesome! I’m inspired to do something similar now ;)
Amanda says
This is fun! I can actually tell from some of the thumbnails which project from Pinterest they worked on!
Kate says
Oh that is just too cool!
I am defo guilty of pinning too much without doing enough. Can’t wait to stop pinning and start doing!
http://www.saffakate.blogspot.com
Tara says
Oh my gosh – that looks pretty darn amazing! But then I always knew you guys would whip up something stunning. And the video is hilarious – Clara is actually saying whole sentences now. Is that her stuffed giraffe that she dropped. I’ve been looking for a stuffed giraffe that doesnt squeak to use as a bedtime lovey for my 22 month old – where did you get Clara’s from?
YoungHouseLove says
That’s a JellyCat giraffe that we got from a gift store in West Virginia (that she named Gee- she loves him so much). I’ve also seen them on amazon.com. Hope it helps!
xo,
s
Anita says
Love it! I didn’t think I would – the pinterest version doesn’t have me so enamored. It looked too stark and cold, to me.. but this version is lovely. I’m inspired to actually try something similar now – but instead of clothespins, maybe ribbon? I wonder if I could do a weave through the metal grid to make a basketweave effect..? Might be a good DIY and cheap light solution for our spare bedroom.
Thanks for the inspiration!
YoungHouseLove says
Ooh that would be so pretty! We’d love to see pics if you tackle it!
xo,
s
Claudinha says
It looks so beautiful!!!I really really love it and I will copy your idea xD
ktmade says
I have to admit that I was a little skeptical – I didn’t actually like the pinterest ones all that much, but I love yours! And it looks so lovely all lit up!
Tash says
I LOVE how this room came together. Love the chandelier. Works so perfectly in a laundry room.
Hi CLARA!!!!!!!
Jenny A. says
Love it!! Lurve, luv, looooooove it!! Have to make one of these for my laundry room when I finally get around to renovating the laundry room…
Rachel Tatem says
Looks fantastic!
shereen says
Ooooo this is so fun! I have 2 things to post later tonight when I am home :) A door makeover and a love seat makeover. A great way to get us all motivated, I love this challenge!
Lynn @ SafeBeauty says
I didn’t do anything for this particular go round but hopefully I’ll be all in on the next one. I just wanted to let you know that the words “Pinterest Challenge” kept floating around in my dreams last night and I wasn’t watching myself but I’m pretty sure my fingers were twitching as if I was sewing, stapling, and hammering something. So….that’s not weird right?
My best, Lynn
YoungHouseLove says
Haha- totally not weird at all. I may or may not have had a Pinterest Challenge related dream (well, nightmare- our site crashed and we lost the whole post and the pics of our clothespin chandelier). Haha.
xo,
s
R. Pyper says
Woo! Love the shaggy look of the chandy — and how appropriate to have a clothespin light fixture in the laundry room. :) Love it!
Nicole says
I know you guys probably aren’t going to agree with me because you want to have Emily’s support, but I was really disappointed with Emily Henderson’s participation in this challenge. Her project was cool, but she had her interns and assistants complete it instead?? I just found it a bit pretentious/off-putting. Why say you will participate if you don’t think you have the time? She totally lost any appeal she had to me.
Kem Horton says
yay! It looks great!
Shari @ Chicago Cuisine Critique says
Very cool project! :)
brandi says
I love the way your light fixture turned out! It’s so unique. Thanks for hosting this challenge.
Jason says
It is perfect!!!! I can’t even stand it! You guys are too much.
I am glad though that you hung it from hooks and not from the actual bulb and wire, I was getting scared it was going to be hanging from the light wire and wire nuts on other wires.
YoungHouseLove says
Yeah- we realized it probably would have ended verrrry badly if we tried to get 4 lbs of wood dangling from that wire… haha.
xo,
s