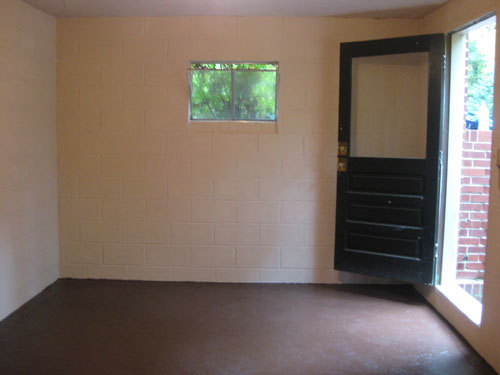
We recently shared how we Dryloked every surface of the basement to completely waterproof it (days of monsoon-ish rain have proved to be no match for our newly sealed basement- there’s not an ounce of moisture down there!) and painted the floor a nice rich chocolate color…

… and now we’re back to get to the fun stuff: floor planning and picking the right storage pieces. Of course we still have some small logistical projects to complete (cleaning up the hatch door that leads to the crawl space, rewrapping the water heater more neatly, building a divider to block the view of the water heater from the door, snagging a dehumidifier to keep moisture in check down there, etc) but we’ll get to those a bit later.
And for our floor planning sesh, we even got a little matherrific and whipped out some old school graph paper to create a to-scale drawing of the space, which really helped us pin down what we needed (and definitely helped us eliminate a bunch of things that we didn’t). In fact, John’s hands were cast in the starring role of “graph paper method explainer” in this video (watch it below or check it out on YouTube):
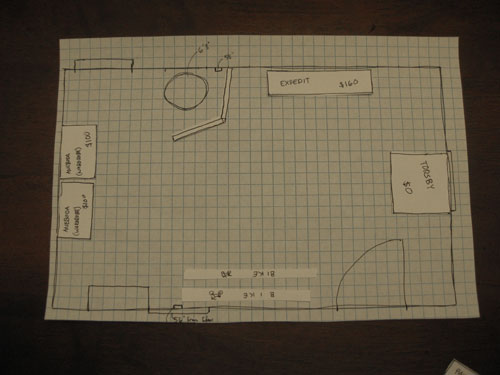
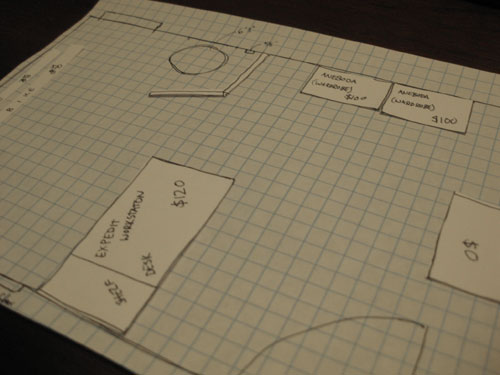
But for those of you at work who can’t exactly sit back and watch a quick flick about how we did all of our floor planning/storage-piece evaluating right now, we also remembered to snap a few photos of the process to detail how it all went down. First we descended into the basement with a measuring tape to take down the dimensions of the space (being careful to note exactly how far from the left wall the water heater is, where the windows are placed, etc). Then to whip up a little to-scale drawing all we did was decide that one square on the graph paper would be equal to 6″ and before we knew it we had a little sketch of the space that was completely accurate (just a lot smaller for obvious reasons). Then we used the same one-square-equals-a-half-foot method to sketch out little rectangles and squares to represent all of the Ikea storage systems that we were considering (their measurements were easily found online) which left us with a pile of confetti-esque shapes that looked a little something like this:
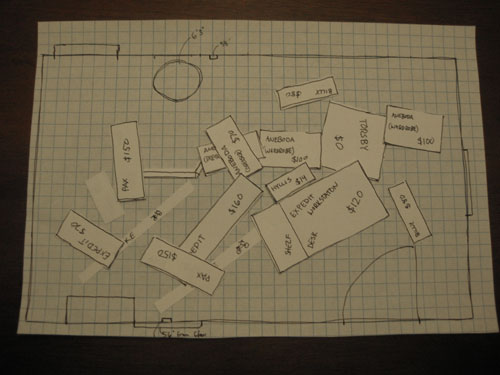
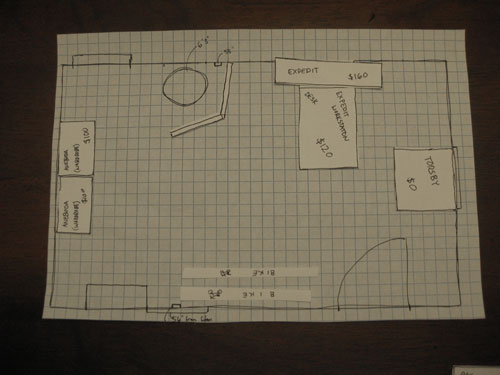
You might notice that we labeled each piece with its quirky Swedish name (for identification purposes) and the price (which also helped us evaluate which items would give us more bang for our buck and which were too rich for our blood). It was amazing how a slew of storage options that had our brains spinning suddenly became a lot easier to evaluate once we could compare their footprints and truly experiment with where we could put what. In fact, to knock a bunch of options out right away we quickly made a list of the items we hoped to store down there (seasonal decorations, bikes, sporting stuff, extra cords, wires, hoses, old yearbooks, etc) and then opted to sort our storage options ruthlessly to see which ones would accomplish that (and which ones wouldn’t really help the cause). On the left side we put the pieces that we thought would offer the most function, and on the right side we put pieces that certainly wouldn’t hurt, but might not be as fabulously efficient. Here’s how the split-em-up method worked out:
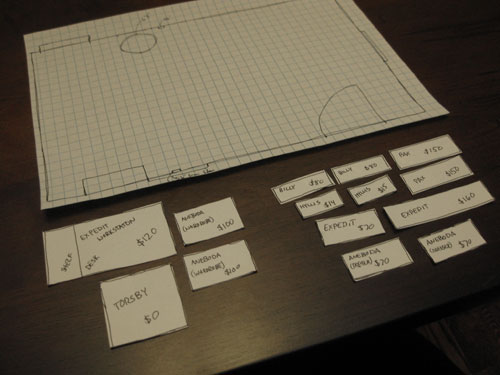
We easily identified that the Aneboda wardrobe was cheaper than the comparable Pax wardrobe but would still afford us the same amount of concealed storage (and we could snag two of them for $100 less than the cost of two Pax wardrobes). Then the decision was easy: Aneboda in, Pax out. We also decided that the Expedit Workstation would work overtime since it’s just $120 for a desk and an eight-slotted shelf that we can kit out with baskets and bins to store smaller objects in a somewhat organized way (thanks to all the compartments). It was definitely more of a plus for our space than the larger Expedit shelf without the desk (which was more expensive at $160 and didn’t provide a surface to set things down and sort through boxes like the Workstation did). We also realized that Billy bookcases wouldn’t be of much use to us because seeing them all sketched out to scale, we realized how little depth they offered (so we quickly deduced that we could store way less on such shallow shelves).
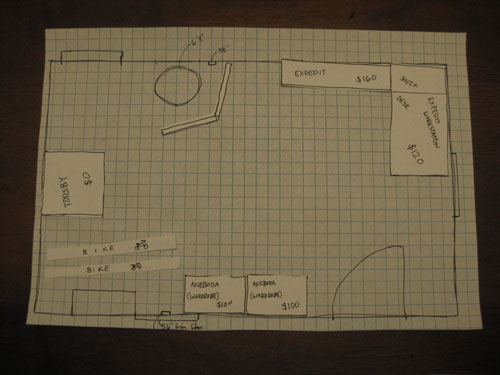
In short, evaluating things when they were all drawn out and comparing prices & shapes really helped our brain go from scrambled and uncertain to “hmm, we might just have a plan here.” Then we got to move our best contenders around on the actual floor plan to see what felt best where. Here’s the winning floor plan:
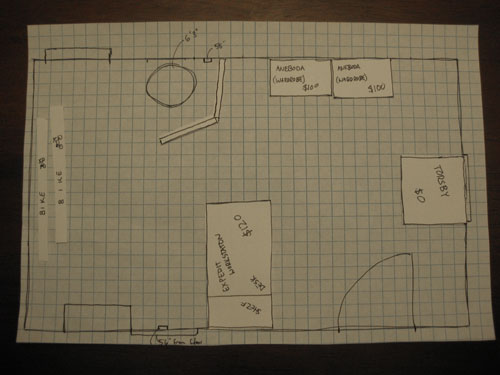
We love that it’s a combination of surfaces where we can set things down when we’re sifting through boxes to locate something, but there’s also tons of open and concealed storage that we can maximize without blowing the budget (since we already own the Torsby table we only need to purchase three large pieces from Ikea and we’re set!). We also really liked the dimension and visual separation that the Expedit Workstation’s peninsula created (which still allows for a 30″ wide passageway between the divider that we’ll be building to obscure the water heater).
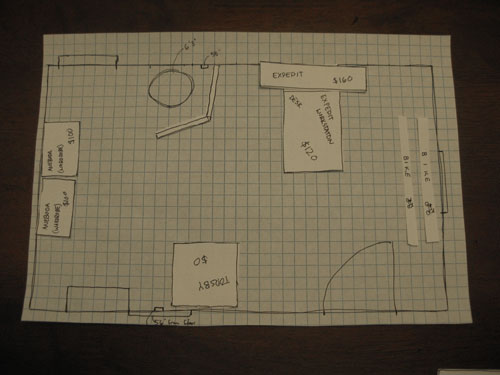
But let’s back up. We definitely landed on a few less functional (and more spendy) floor plans first. Like this one which didn’t offer the added desk space of the Expedit Workstation but actually would have cost us more in the end. We also thought it looked really basic and bare (like someone with a gun told all the furniture to get up against the wall). It’s a perfect example of how spending more money doesn’t always mean you get a more complete look in the end…
We also tried this plan, but again it would have been substantially more money and we liked placing our bikes on the left wall because we actually have an artsy little idea that we’d like to implement behind them (and if the larger wardrobes are on that wall instead, we’ll lose the opportunity to create a focal point that can be seen upon entry)…
We also tried this arrangement but again liked the bikes on the opposite wall (this layout would also have been substantially more moolah than our winning floor plan):
And lastly we tried this floor plan but everything felt a bit crowded (especially with the bikes shoved in between everything) and it was the most expensive solution yet. By a long shot.
So that’s how we played around with little paper squares for about 30 minutes…
… to suss out the right combination of storage pieces for our little basement makeover (here’s the winning floor plan again to save you from all that scrolling):
Now our shopping list is pretty straightforward:
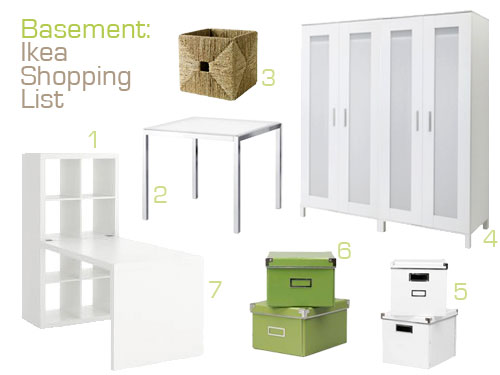
- Expedit shelf (included in the total Expedit Workstation) -$120
- Torsby table (already owned, so it’s free!)
- A woven basket or two – $17 each
- Two Aneboda wardrobes – $100 a pop
- A few white storage boxes – $12 for two
- And a few green storage boxes to keep things interesting – $12 for two
- Expedit desk (included in the Expedit Workstation) accounted for above
Grand total: Somewhere around $361. Not bad for a large 19′ x 13′ room full of storage (that was previously a bug graveyard). Especially when you consider that one armoire is usually around $500-$1000. And of course the floor plan could change once we have everything in the space, but it’s great to have that well-researched confident feeling that we’ve gained from our little graph paper experiment. You know how stepping into Ikea can be a bit overwhelming if you don’t have a serious plan? Now we have one. Oh and it bears mentioning that the above image isn’t a complete mood board as we plan to introduce art, lighting, other accessories, and DIY projects to round out the look. But it’s a great start for taking an utterly useless room that used to look like this…

… and turning it into something totally efficient and polished. Stay tuned for more updates after we snag (and build- ugh!) all of our Ikea furniture. Fingers crossed we survive hours of allen wrenching! And while we’re on the subject of building Ikea furniture, do you guys have any favorite Ikea systems or pieces in your home (the Malm bed? the Lack shelf? the Expedit bookcase?). Do tell.
Want more floor planning fun? Check out the graph paper madness here and here over on All Things G&D.

Kendall says
My boyfriend and I have the (very) large expedit bookcase. We’ve had it for years and we love it. It doesn’t hold all my books, but to be honest, no bookshelf ever would, however it looks amazing. Once we move into a larger space, I plan on purchasing another one so I can finally get some more books out of storage!
BTW, the floor looks amazing! It looks very similar to a porcelain tile that my company carries. Kudos to you! Can’t wait to see the finished product!
lms52 says
I wish I had been as organized when we were doing our basement…. Maybe it’s time for a change down there!
Chelsea says
Under $400 isn’t bad! That’s great! Don’t you love Ikea?!?!? I really like the Aneboda wardrobes for $100, that’s an awesome deal. Now I need to talk the Honey onto a trip to Ikea. …..”Honey I need to go to Ikea, they serve Swedish Meatballs, which better than the popcorn in Target, and I promise not to walk to fast that I lose you again”….
Becca says
I had to rewind and re-listen at one point to make sure that John really said “fugly”. Very funny.
YoungHouseLove says
Oh yeah, John’s a fan of the word “fugly” – and it makes me laugh every time too. In fact my snickering ruined the first take.
xo,
s
Rosa says
I thought this space was just going to be for storage, will you be working down there to? (I see a desk) is it heated?
YoungHouseLove says
Hey Rosa,
Nope, it’s not heated and cooled down there, and we do just plan to use it as a souped up storage space. Those desktop surfaces will just come in handy when it comes to sorting through boxes and storing things off the floor in an organized way with some desktop solutions, so that’s the plan. Hope it helps!
xo,
s
Melissa S. says
Wow, your basement is really coming along! I’m jealous of all the extra storage you’ll have. :)
I have two of the monstrous Expedits in my house. We’re not lucky enough to have an IKEA nearby, so one day my husband and I made the 8 hour round trip to purchase them. I knew I wanted one for my scrapbooking room (it is seriously the only thing that stores 12×12 scrapbooking paper easily) and the one in the living room is actually the one that is supposed to hold a flat panel television, but instead we use it to hold the turtle’s tank (box turtle = not much water = not too heavy). We have a projector instead of a large television, so when we want to watch something we just pull the ceiling-mounted screen down in front of the Expedit. It rolls up and out of the way when we’re not using it, and most people don’t even realize we have it until we point it out. Did I mention we did all this in a tiny 1238 sf house? :)
CarMaj says
OOH this is going to look so great!!! Can’t wait to see this all come together!
Jennae @ Green Your Decor says
We have two of those Aneboda wardrobes in our “stoffice” (my office/my husband’s music studio) and they are great. One houses my husband’s clothes. (yes, I kicked him out of the closet in the master. But in my defense, it is a small closet) We use the other wardrobe as a linen closet with the help of some hanging storage compartments, because our apartment has almost no storage. They worked out great for us and we always have people asking us where we got them — after they look past the mess that is the rest of the room :) At $100 bucks a piece, I’d say that’s a whole lot of bang for our buck!
Melissa S. says
Oh, and in case anyone was wondering, the boxes for two IKEA Expedits will just fit into the back of a Honda Civic hatchback…
YoungHouseLove says
Haha, good to know Melissa!
xo,
s
Kate says
I love the different space plans you went through to find one that you liked the best. I can’t wait to see how this all turns out.
Jason says
This is so great! Everything you’ve done up till now is awesome. Now you are showing us how to plan layouts and do storage that looks nice enough to be on our main floor let alone our previously buggy zones.
My dank crawl space may not afford me the room for IKEA wardrobes, but on my IKEA must have list is the Kvartal Curtain Rod system, it’s the only truly functional(curtains don’t hit the bracket when you move them) way I can figure to deck out my really mind boggling living room corner windows without using hospital track on the ceiling. I have to drywall first, but you know…
Delaware – J
Jamie says
do you guys ever consider scouring craigslist for IKEA stuff before buying it new from the store? Not sure how it is in Richmond, but here in the SF area you can find almost anything from IKEA on CL, you just might have to be willing to drive a little ways to get it.
YoungHouseLove says
Hey Jamie,
Yup, we definitely love to find Craigslist deals and even buy Ikea stuff from thrift stores (that’s where we found our Ikea armchair in the den for $25!) but we did a quick search yesterday night after out planning and only could come up with the larger Expedit shelf (no Workstation) and no Anebodas to be found. We certainly will look again a few more times and will happily report any deals we snag along the way. Plus it’s good to know that we won’t have to wait indefinitely to find them for sale since Ikea prices aren’t half bad in the end. Hope it helps!
xo,
s
Alicia says
I love it! I use the graph paper to arrange my room too :) It’s so helpful!
Jamie is right about using craigslist. I’ve gotten a TON of IKEA stuff from there! Almost half off too!
Wendy says
Love it! Can’t wait to see the finished product!! :)
P.S. G&D did a whole post about using graph paper to design a room. You should give the mommy-to-be a little shout out. :)
YoungHouseLove says
Hey Wendy,
Great idea! We’ll go over there and find it and link to it at the bottom of our post!
xo,
s
Tracie@ Gurtler + Home says
That screen to cover up water heater is a great idea! I’ve been trying to come up with a solution to cover up ours that would make our laundry room a little bit more than just a utility room, and that would definately help. Thanks for the idea!
Jason says
Oh I forgot the point…
The IKEA Kvartal “panels” would work great as a movable way to conceal something in or partition a storage area.
Megan S says
Looking good! We used Ikea’s Stolmen closet pieces to construct our his and hers closet space. Even though our closets have doors, there’s no wall in between my side and his. The Stolmen pieces helped us maximize the through space. Plus, Stolmen pieces are modern looking and versatile- if our needs change, we can just take away or add. I bought most of our pieces from Craigslist so the project was fairly cost effective. Best of luck as you bring your project to completion!
Emily says
ha! I used the same method in our office. I measured. Drew it out to scale. Measured the furniture. Drew the furniture to scale. Cut the furniture out and moved it around the drawing. Great minds think alike, I guess!
Chelsea says
I love the idea for using a desktop to rumage through boxes and organize. Thats better than sitting on the basement floor, or trucking in loads of stuff you dont need. Good thinking you two!
Jenni says
It’s going to be sooo pretty! Can’t wait to see the after!!!
Megan says
1. Love the graph paper! Before moving in to our current apartment I downloaded the floor plan and made scale drawing of our furniture in InDesign. Now I have a digital floor plan that I can play around with any time we decide to move/buy stuff. It also came in handy when trying to figure out the placement of our HUGE Christmas tree.
2. We used to live close to a gorgeous IKEA in Chicago. Newlyweds + IKEA = way too much furniture shopping. We have 4 malm dressers (2 short, 2 tall to make a cool wall-o-dressers), Bjursta table and sideboard, a kitchen cart, pot rack, glassware/bar shelves, 2 desks, 1 desk chair, a pull-out sofa and a few random lamps all from IKEA. The closest IKEA is now 1.5 hours away, which is probably better for my checking account and my husband’s sanity.
sarah says
LOVE this! I actually just asked my husband to create a to-scale layout of our guest room (that we’re turning into a nursery) so I can start planning design and furniture placement. Maybe I can tackle this myself thanks to your video!
Lisa says
Just in case anyone wanted both the larger Expedit bookcase and a horizontal worksurface, you can get the Expedit desk ($50, http://bit.ly/49qulY) which attaches to any of the Expedit bookcases and turns them into a workstation.
YoungHouseLove says
Hey Lisa,
We spotted that option (even debated cutting it out for our graph paper floor plan) but ended up at the Workstation option because it was less expensive and we’re not convinced we need all those extra shelves. But good to know we have an easy upgrade if we decide we do need it after all!
-John
Allison says
Sherry–I know how much you love to add a little custom details to a piece to make it your own. I own a white Aneboda piece (large, 3 drawer chest) and swapped out the plain, white handles that came with it for modern, stainless steel ones at Home Depot for a small price. The stainless steel handles look so nice against the white and are easier to grip than the IKEA ones! I have pics of ‘before’ new handles, and ‘after’ if you want a visual.
YoungHouseLove says
Ooh great idea Allison! You know we’re suckers for custom details like that!
xo,
s
Maria says
Love the plan! I have a question – do you think the expedit workstation is appropriate for a non-basement-like area such as a normal home office area? I LOVE the Parsons desk from West Elm that you guys have, and have had my eye on it for awhile, but we have more of an Ikea budget, and my husband is concerned with the amount of storage with that one. Since he works from home, I should probably consider that :). How would you recommend using the storage in the Expedit workstation for function but also as decor??
YoungHouseLove says
Totally! In fact we included it in a room off of a kitchen for storage and homework in a recent mood board. If you scroll back a few pages you’ll see it. Hope it helps!
xo,
s
Kasey at Thrifty Little Blog says
Great post! It was really interesting to see exactly how your thought process works when you plan a room’s layout.
Ryan says
Before you spend all day with those little allen wrenches, check for similar star and square bits in your drill bit/screw gun tip collection. I have a few different sets and one even allows me to attach the bits to a manual screwdriver for a little better control. On tight spaces you’ll probably still have to use the allen wrench but battery power can make it go a lot faster.
YoungHouseLove says
Great tip Ryan! We’ll definitely give it a go.
xo,
s
Karen says
I read your blog all the time and love it. I told my husband about the cool paint you used to keep your basement dry and that we should use it on our house. He told me that it is a very cool product and does a good job at keeping moisture out but that you have to be careful in the long. Because while the moisture isn’t getting inside it is getting in the foundation until the paint and over time can rot your foundation. Just wanted to pass on the knowledge. Hope this helps and good luck with everything.
YoungHouseLove says
Thanks Karen! The good news is that the foundation under our basement isn’t wood it’s all cinder block so it won’t rot! But thanks for the tip. We asked the experts at True Value if it was the right product for us and it was, but we definitely recommend that other people ask around to be sure it’s right for their space!
xo,
s
Jacci says
Yeh, man – that’s what I’m talkin’ about. Break out that graph paper!
This is exactly how we do it, too. Somehow the little pieces of paper take me back to my childhood dollhouse days. A whole room in miniature is just so fun somehow :) And, as you pointed out, a far less expensive way to change you minds a few times.
Looking good, guys!
Jacci
Jessica says
We LOVE the Gorm shelving line. We saw it in the catalog being used for garage shelving, complete with gardening tools, etc…but we love it for our pantry. It totally beats the white rubbermaid wire shelving. I love the wood because we can go to Lowe’s and buy whatever size custom-cut shelves we need to match perfectly to build off of it since Ikea only has select sizes available. We actually added a few on both sides of the corner unit and added wine glass racks underneath a few. We LOVE it! Wish I could post a pic!
Amanda O. says
The basement is going to be so great! An idea that my friend had for hiding the eyesore water heater is using really tall shutters, the kind that are 7′ or so. And you can bend/position them any way you want.
Just thought I’d share in case anyone needs a cheap fix…
YoungHouseLove says
Thanks Amanda,
Great tip! We have a little plan of our own but we’ll have to see how it all turns out. You know we learn as we go so… fingers crossed!
xo,
s
Erin says
OK, it’s official. You two are too darn organized! I say buy the stuff and worry about jamming it all in there later! Of course maybe this is why my basement looks the way it looks.
Denise says
You’re up to 300+ comments on how to hang toilet paper. At that rate, the design for your basement should merit 3,000 comments. What you’ve done so far with just paint looks awesome! Can’t wait to see how it all comes together.
Christin says
Your basement is going to looking amazing! My hubby and I are quite partial to the Billy bookcase line at Ikea. We’re both in grad school and soon found we needed lots of shelving for our growing library! The walls in our 2nd bedroom / office are lined with billy shelves full of books (and many many DVDs too!). Can’t wait to see your finished product!
Jessie (Vegan-minded) says
I cannot wait to see the final result! Looks like it is going be be great. :)
caitlin says
ha! i was hoping there would be a basement post today :) I have to admit that I’ve never watched a video on your site–and this one was really good!
Also I used anaboda to store camping gear in my old basement. Would do that again–they work really well for that sort of thing.
YoungHouseLove says
Hey Caitlin,
Just imagine what some of our videos featuring actual faces and bodies are like! So glad you liked this one though…
xo,
s
Amy says
My husband and I recently purchased the Leksvik coffe table and matching side table. I love all the little separated compartments as they hold tons of my little boy’s ever-present toys! We also have the Expedit shelving unit that we installed as a long, floor unit instead of having it upright. (We already have a large, very tall bookshelf nearby and wanted to balance it out. We are using the Expedit shelf for storage in the “office” area of the living room.) I believe the only other Ikea item we have right now is an open, wall-mounted shelf that was a gift several years ago. (I don’t think they carry it any longer, so I don’t know a name for it…) We still haven’t installed it in the new house yet, but it’s on the official List Of Things To Do. :) The next thing up is to pick out a few coordinating boxes for the coffee table and Expedit shelf to hide stuff!
Jessica G. says
Oooo nice floor plan! Makes me want a basement.
As for Ikea, I love love it! We have the hemnes bed in our room. My 1yr-old son and my 2yr-old daughter share a room, and they both have mammut children’s beds. Blue for Max and pink for Lily. How cute is that?
Le says
I love that you are able to do all of this in your basement.
One suggestion (or future holiday gift idea)-My husband and I are using this bike stand in our NYC apartment. It totally rocks and would open up your floor space.
http://www.rei.com/product/751324
YoungHouseLove says
Hey Le,
We love the idea of hanging the bikes from the ceiling or the wall on a rack but unfortunately our cinder walls are proving to be super difficult to anchor anything into (it seems sturdy but falls right out with a puff of dust hours later). Here’s hoping we can figure something out!
xo,
s
Lauryn says
this is the first time Ive been a reader since the beginning of a room and I couldnt be more excited!! :-)
Allison H says
What a coincidence! I just did a similar post on my blog last week! (see here: http://gimmeakisss.blogspot.com/2009/10/decorating-room-planning.html)
John and Sherry, you would have been so proud of me! My graph paper fun was to solve the problem of sizing my living room rug. I was all set to send you an e-mail saying “my room is A x B, so what size rug should I get?” then I realized I could figure it out myself and leave you two alone to tacke DIYs and play with Burger!
Keep the inspiration coming!
YoungHouseLove says
Wahoo so proud of you Allison! And Christie, that’s too funny that you did the exact same thing and went with Expedit workstations! Two desks sound super fun. Jealous.
xo,
s
Christie Stearns says
Wow you guys, i JUST did exactly the same thing LOL. My mom taught me a long time ago about this graph paper space planning. OUr new place has a small room as an office and I did exactly this, with lots of different IKEA options, and then we went to Utah to get everything from the IKEA there. AND, what did we get for our workstations? EXPEDIT! Ours looks just like your board except we got birch finish, and we put two desks coming off the bookcase, one on each side, for us to share. I hope to post some pics soon. :)
Hannah says
Hi guys, looks fabulous…the floor is stunning and has made the space, one question – why the graph paper, wouldn’t Excel have been easier, kind of a big piece of electronic graph paper. Just a thought for you IT guys;-)
YoungHouseLove says
So funny you say that Hannah. Before we dug up some graph paper I looked a Sherry and I said “should I just print out a grid using Excel?” We also considered the even higher tech route of using http://www.floorplanner.com. But for one reason or another ended up going the super low-tech route so we could enjoy moving things around in person rather than on screen.
-John
anna see says
looks great! i wish we had taken the time to waterproof our basement.
love the expedit!
Lauren Ashley says
I love the armoires you got! I have a dresser in the same series. The clear panels aren’t the best for hiding a mess though. I’d suggest lining them with a pretty wrapping paper! More hide-age factor-and it looks pretty!
YoungHouseLove says
Hey Lauren,
That’s the plan! Either decorative paper or fabric to hide the clutter…
xo,
s
Erin says
Hi Sherry!
This is completely unrelated to the basement project, but your sketch made me think of a question :) We are redoing our guest bedroom and found a large 15pc set of art tiles. They each have to be hung individualy (nightmare!). A friend suggested we use graphing paper to pinpoint where we need to make the holes. Only problem is, where do you find lined paper that big???
Do you have any suggestion??
YoungHouseLove says
Hey Erin,
We would definitely suggest using any sort of paper (even paper bags from the grocery store) to trace the 15 art tiles. Then just tape them up on the wall to figure out spacing. Here’s a video we did all abut hanging photo arrangements and it delves more into that tip. Hope it helps!
xo,
s
Kyley says
I love that in the beginning of your video John keeps laying his hands on the table and it makes a little heart shape. How cute! :)
I’ve got a question for you though. I know you love white – and I can see you plan to get all white furniture for your basement. Now being a picture framer…I know that when I frame things with white picture frames we have to be extra careful not to get scuffs on the white frames. The white frames show all the little scratches and scuffs so much easier. So owning so much white furniture..don’t you worry about scuff marks…or perhaps you get them? Do you have some sort of touch up secret you use? I mean I imagine even just nicking a sneaker on a while table leg is going to make a scuff. Or maybe burger nicks a table with his claws?
As a framer we have wood puddy and touch up pens – but it never completely eliminates scuff marks. Anyway I have been wondering about this…as I’m about to buy furniture for my new home, and we don’t currently own anything white – but if we went that direction I was worried about this issue.
YoungHouseLove says
Hey Kyley,
Good question! In 3+ years of living with white frames and white furnishings we have no real issues with scuffing. We just wipe things down to keep them dust free (and take a sponge to white tables whenever we spill something sticky like grape juice) but things are generally sealed with poly or other sealants that keep them from getting super scuffed- at least the Ikea and Target frames that we grab (and the furniture that we paint is coated in poly to be super wipe-able). Hope it helps!
xo,
s
laura says
i love my ingolf dining room chairs (and the child sized one for my grandson is adorable at the table too!). they went together easily and after 7 chairs i was ready to hand over the allen wrench to another!! the bekvam kitchen island is great too.
Lauren says
We had virtually no furniture when we moved to Seattle five years ago, so we bought a majority of what we needed at IKEA. Now we’re more into “hacking” or modifying IKEA pieces. We used the Pax wardrobes and IKEA curtains to make a sorta built in look in our bedroom and used the Lillangen bathroom vanity but covered the top and exposed side with teak plywood and used non-IKEA hardware. I’ve also heard of people adding trim or moldings around the Billy bookcases to get a more “built-in” look.
Sara B says
Nice floorplan!
I wanted to share an ikea assemblage trick. If you have the tools for it you can snip off one end of an allen key and use the piece as a bit in an electric drill. Then you don’t have to wind that stupid key around and around and around…. you can just buzz it in. :)
YoungHouseLove says
Hey Sara,
Thanks so much for the tip. We’ll definitely give it a try!
xo,
s