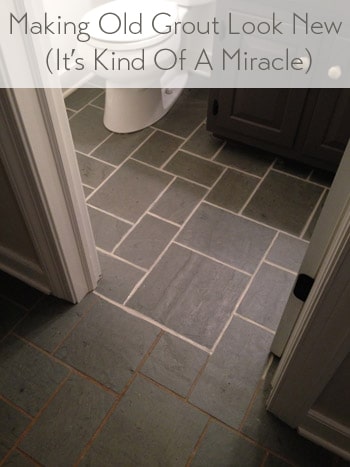
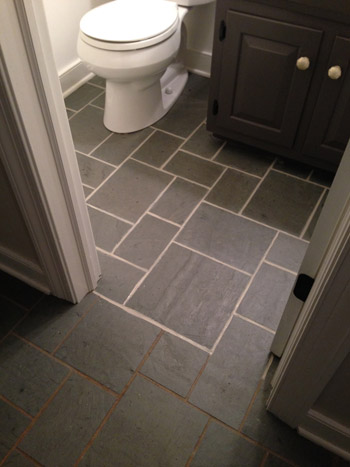
The discolored and dirt-stained grout in the tile floor of our foyer looked super old and gross, but after trying nearly a dozen cleaners and cleaning tricks we nearly gave up. Then we finally find THE SOLUTION to making the grout look white and clean again!
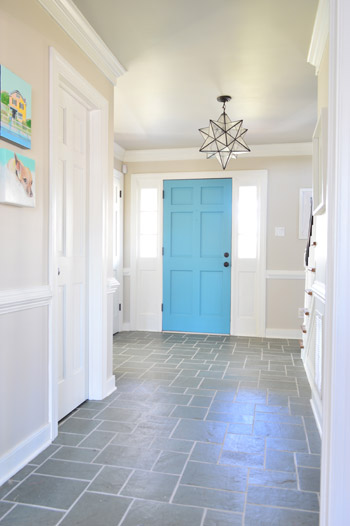
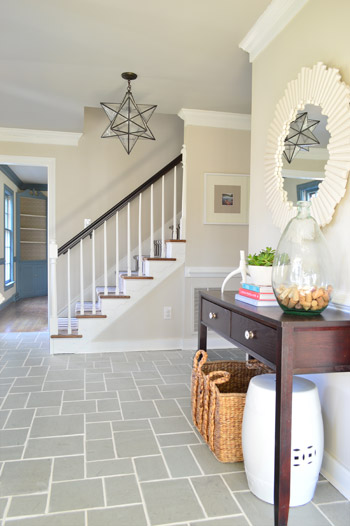
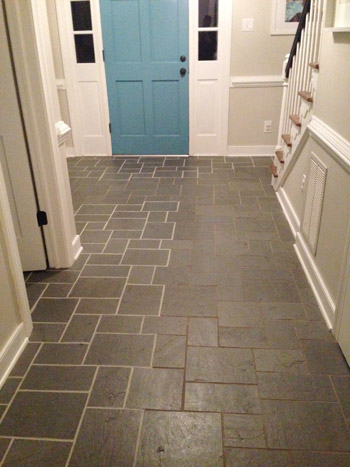
Now that we’re done, you can see how the view just got a heckova lot better around here. The crisp white grout lines play off the white trim and make the whole space feel newer and cleaner.
The funny thing is, it wasn’t actually cleaning that did the trick. So if you’ve got a similar issue with discolored or stain grout, here’s our official intervention: stop scrubbing! Well, maybe give scrubbing a fair shot, but don’t be discouraged if it gets you nowhere. There’s another way!
Cleaning Tricks That DIDN’T Work
As you might recall, for the past six months that we’ve lived here, it has looked like this.
I gave nearly every method under the sun a shot to make that grout look clean. After repeatedly scrubbing the heck out of it, I knew that it was actually very (very, very) clean… it just was so discolored and stained in certain areas, that no amount of blood, sweat, tears, or elbow grease could make it look that way.
Some of my attempts to clean grout included (but weren’t limited to):
- various baking soda paste mixtures
- various white vinegar solutions
- copious magic erasers
- specialty grout cleaning floor sprays/potions/scrubs
- bleach pens
- oxygenating cleaners like Oxiclean
- Mrs. Meyers powdered cleanser + a wire brush
- Barkeeper’s Friend + a wire brush
- a borrowed steam mop
- scrubbing with a stiff bristle brush
- lots and lots of muttered cursing
The Solution To Getting White Grout Again
By this point I did what most people would do. I gave up and ignored it for another few days (what’s a few days after six months of no-dice results?). And then I finally faced facts. The grout either needed to be scraped out and regrouted entirely (which makes for a pretty messy job, especially in the main hallway of our house which connects the entire upstairs to each room downstairs) or it needed to be refinished.
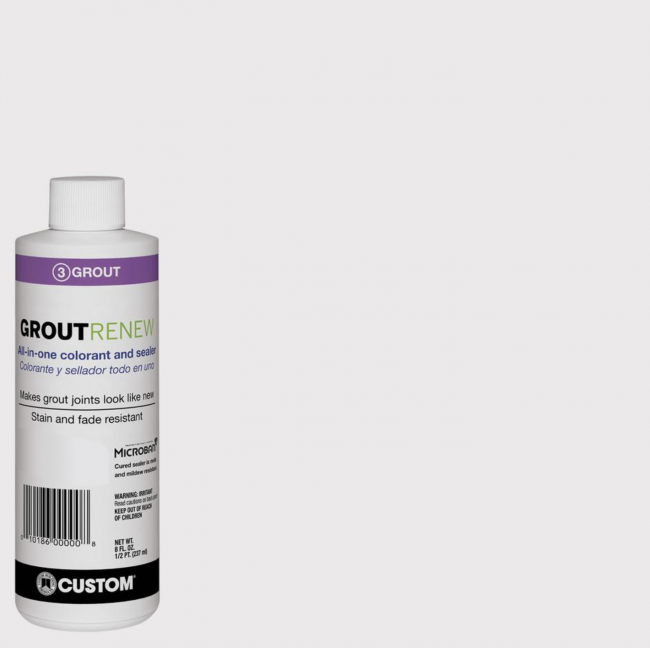
Thankfully a few of you tipped me off to a product you’ve used with success called Polyblend Grout Renew. Let me just skip to the punchline: it worked, and I wish I had tried it before spending six months scrubbing my mind out.
The cost? A cool $12 from Home Depot. (Update: it’s closer to $20 now, but there are more affordable grout pen alternatives available.) Can I get a what what? Note: this might sound like an ad for the stuff, but Grout Renew doesn’t know us from Adam – I’m just beyond grateful that it worked.
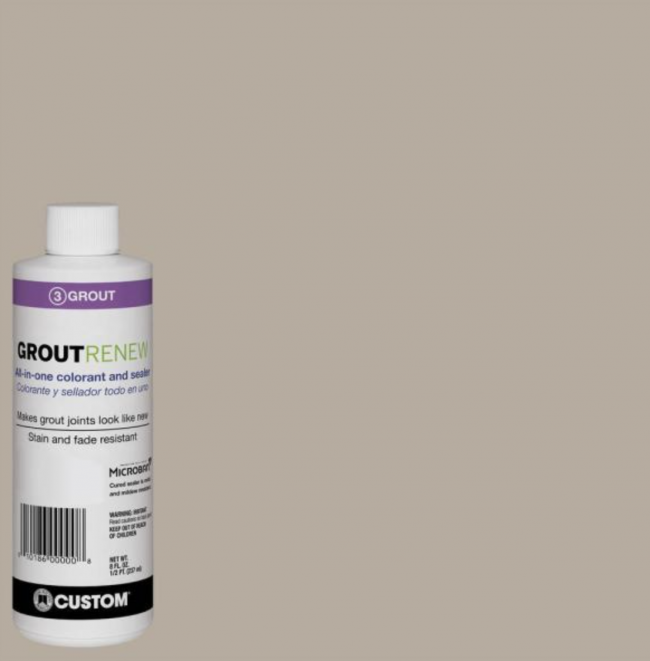
Choose Your Grout Paint Color
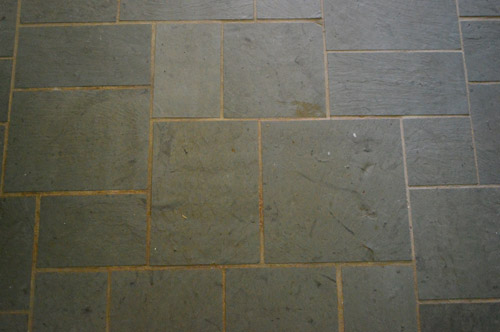
GroutRenew comes in several colors now – over 3 dozen, in fact, including several shades of white and off-white. So you may be tempted to go for the brightest white to get the cleanest, freshest look (that’s “Artic White” pictured below). However, just like paint colors, the brightest, whitest version may not be best for you.
Be sure to take some time to look at your room, your tile, and your lighting to make sure you’re choosing something that blends well with your space. You can always test out a few colors too before committing to one. John and I actually considered two colors – Natural Gray and Oyster Gray, which both look pretty dark compared to the brighter whites. We had seen a neighbor with darker grout in her slate floor, so we thought it was worth considering.

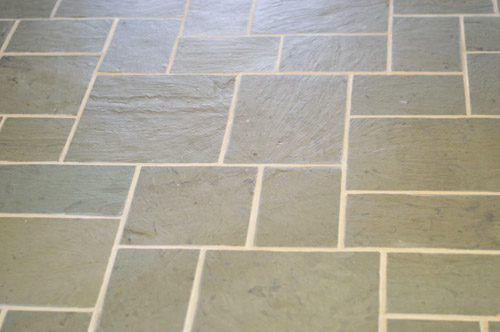
In the end we chose Oyster Gray (shown below) which is still a mid-tone Ivory color – definitely not a bright white. But it looked the most natural and still seemed very bright in contrast to the dark slate tile, without looking artificiall white. Any brighter and we worried it would look like someone in a Crest Whitstrips ad! You know, almost too blinding.
Oh and the Grout Renew was low odor and low-VOC, so this pregnant lady could get down with it. I did wear a respirator, along with opening windows, just because I’m into added ventilation and bad Bane impersonations.
GroutRenew Alternatives
This is the only product we’ve used, but there are some others on the market if this particular one is not available. Lowe’s sells a similar product by MAPEI that comes in a squeeze bottle. Amazon also has a well-reviewed Grout Pen product that comes in a white or beige option. Again, we haven’t personally tried those, but they may be some alternatives to consider if the PolyBlend is not available to you.
How To Apply Grout Paint
The downside to this solution is that it can be time intensive (and patience testing) depending on the size of your surface. For this floor, it took nearly eight hours to apply. But since I had easily spent 25 hours trying various stain lifting methods before resorting to this, well, eight hours with a bottle of Grout Renew was a small price to pay for VICTORY.
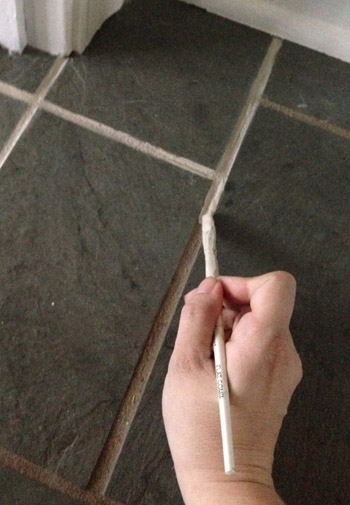
Step 1: Clean Your Tile & Grout
I know I said scrubbing wasn’t the solution, but it part of the process. I’ll pause while you laugh since I had already done that TEN MILLION TIMES. But like any surface you’ll be painting, you want to make sure it’s clean of dust and debris. So at least we’re not talking a heavy-duty scrubbing, just your regular washing to remove surface dirt should do.
Step 2: Pick Your Brush Or Application Tool
The instructions suggested using an old toothbrush to apply the GroutRenew it into the grout lines and then let it dry for 24 hours. I went with a thin craft brush instead because I had way more control (read: way less mess on the tile surface). The thin paint brush was also easy to dip directly into the bottle when I needed to load up with paint.
Step 3: Plan Your Starting Point & Exit Route
If you’re painting a floor, like we were, you’ll want to sure you don’t paint yourself into a corner (or at least if you do, you can carefully tiptoe across your tile without stepping on the cracks). I started in the half-bathroom because I figured I could work my way out of the room and close the door behind me so it could dry.
It was the opposite of fast. But it worked. Slowly I eked my way out from around the toilet and right out the door, which took about an hour and forty five minutes.
Step 4: Be Ready For Mistakes
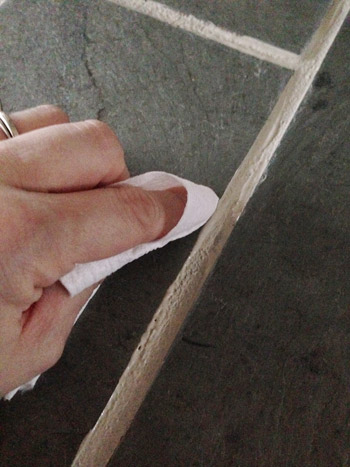
Even with a small craft brush there were still times when it got on the surface of the tile, and there was a very short window for wiping it off before it set (and then had to be scrubbed with a fingernail, which was a huge pain) so I literally would do one or two cracks at a time and then quickly follow up to smooth both sides of the seam out with a small piece of toilet paper (this would remove any from the surface of the tile as well as make the sides of each seam nice and straight looking). A paper towel or clean cloth would work as well. That is, if toilet paper isn’t fancy enough for yo?u.
Step 5: Be Patient & Pace Yourself
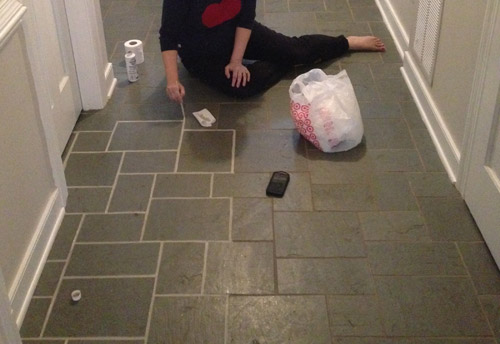
Being pregnant, the bathroom was all I had energy for on Day 1. Day 2 involved three more hours of line painting and wiping, and I opted to do 50% of the foyer in a strategic way so we could all still walk on the other half of it. Here’s a shot to show you how hilarious John is. I said: ok, get creative with this picture so my giant respirator doesn’t look weird. I like his version of getting creative – just lop off the whole head area.
The second day was the hardest day by far, just because I was still kind of sore from contorting my pregnant body around in the small half bathroom the day before, and the little knobby parts of each of my ankles were dragging on the tile as I scooted around like a dog with fleas, but it was all worth it. Worth it and then some!
Day 3 was another three hour process, but it was the most exciting day because I could see the light at the end of the tunnel. The end of the longest-running house battle that I had ever waged was near. I just worked my way around the foyer doing the other half of those pathways that I had done the day before, and I ducked into that last closet while pausing occasionally to fist pump and work on my clean grout acceptance speech (“I’d like to thank the academy, and the grout gods who invented this cheap bottle of miracles and unicorns”).
Step 6: Let It Dry
After each application process, we gave that section a full 24 hour drying period and made sure nothing got wet for 72 hours (since that was another warning on the bottle). It’s a good deal lighter than the old grout was, which still makes us say “whoa now” when we walk through the hallway, but we think it’s just our eyes adjusting. Maybe after 6 months our brains just can’t get over the fact that it finally looks clean!
We also had about 1/4 of a bottle left all of this, which was great in case we need some touch-ups down the line. I’ll definitely update you guys if anything funky happens, but so far it has been great. I mean, just look at how far it’s come from the before:

Update: After nearly two years of use, even with semi-frequent moppings, muddy shoes/paws, and a whole lot of foot traffic, our grout still looks identical to when I applied this stuff (you can see an updated picture that we shared after six months of use here). For the folks who can’t find it in stores, here’s an affiliate link to it on Home Depot.com. There are also alternatives like grout pens on Amazon.
Originally Published in 2014
Psst- Wanna know where we got something in our house or what paint color we used? Just click on this button:

*This post contains affiliate links to things we have actually purchased and love*

Anele @ Success Along the Weighn says
That is insane the difference it makes!! It looks like a whole new floor. I know it took a looong time but well worth the effort! Kudos!
Starr @ The Kiefer Cottage says
I thank my lucky stars that I’ve always enjoyed a good patina on just about every surface in my house (except the kitchen counters). Our grout shall continue having an aged, lived-in look. Of course, we don’t have as much as you do.
Anyway, yours looks great! Sparkling clean.
YoungHouseLove says
Aw, thanks Starr!
xo
s
Mary | Lemon Grove Blog says
Much, much better! It’s like an art project for your floor :) Bet y’all got a big old smile on your face when you walk into your house now!
Julia [Chris Loves Julia] says
Yes!!! We used this stuff in our last home’s laundry room (http://www.chrislovesjulia.com/2012/10/taking-grout-from-dark-and-dingy-to.html) and wow, what a difference. Glad you went for it!
I definitely marathoned a series on Netflix streaming on my laptop while doing it. But is it weird I love meticulous projects like this? The drastic results are just so motivating.
YoungHouseLove says
Oh man, you’re smarter than me. Netflix sounds fun! I just listened to Nicki Minaj and Eminem on repeat and sort of raged at the grout in my head. Haha!
xo
s
Leah says
I’m impressed at all the folks who can multitask while watching TV. As soon as that screen goes on, I lose all focus.
I’d have mainlined podcasts interspersed with music. Occupies the brain, but my eyes are still on task.
Needless to see, that looks amazing. You almost make me wish I had dirty grout so I could see such a transformation. We do have dingy linoleum, so maybe someone out there will suggest an awesome way to fix both your kitchen and mine.
Lindsay says
It looks great! Glad you found something that worked! If it holds up, will this be a permanent solution? Or is this a Phase 1 until you really do the kitchen and can have the same floors throughout?
YoungHouseLove says
We’d like the same flooring to run from the kitchen out into this hallway and half bathroom someday, so way later when we do the big kitchen reno we’ll most likely redo this area as well, just because there are currently three different floors that meet in the corner of the kitchen (slate, faux brick, and hardwood) and it just looks really weird. I’d love to do a heated floor or something cozy like that.
xo
s
Kate says
Yes! Awesome! I used this product in our kitchen and second bath and it made a huuuuuuge difference! Glad you decided to give it a try! I went fron wanting to rip out all the tile in my house to being very, very okay with what we had.
Kyra says
My question is this: Does it get dirty again, say if you go with another white or light color, or does the polyblend resist staining?
YoungHouseLove says
It says it’s “stain and fade resistant” right on the front, and it sounds like from others chiming in who have used it (some boasting 6 or even 9 years of luck with it) that it can hold up really well without needing to be redone or looking grungy.
xo
s
Stephanie, Sandpaper & Glue says
I just used that product in my bathroom last month and it was a LIFESAVER… and good to note it even holds up well as we get in and out of the wet shower (so you don’t have to worry about rainy days messing it up when you come into the house). Although a month in and I am still scratching at the tile with my fingernails because I didn’t wipe it up fast enough, lol.
YoungHouseLove says
That’s so good to hear about it holding up to wetness, Stephanie!
xo
s
MB says
I’m so sad that I didn’t know about this product before I sold our last house! I spent 3 years tackling the stained grout like Sherry with 90 different cures, all complete failures. Filing that away in my brain in case that problem ever crosses my path again. 8 hours is nothing compared to the wasted time of scrubbing! Looks great, guys!
Jessie says
I am impressed! Well done! We have the same tile, so I will keep this bottle of magic in mind if ours ever becomes discolored!
Laura @ Rather Square says
I’m curious to see how the Grout Renew holds up over time (like would it chip off eventually?). But for $12, I would be doing a happy dance too! The new grout color has a nice contrast against the tile and ties in well to the wall color in the foyer. And you’re planning to keep this tile in place for a while anyway (if not permanently), right?
We’re locking down our plan of attack for house projects this year, and trying to do things that are budget-friendly while we save up for a kitchen renovation that we think we’ll start next year. We’re definitely inspired by what you’re doing in your kitchen, even though it’s bigger than ours (ours is galley-style, so we have to be very conscious of space-saving layout and storage).
http://www.rathersquare.com/2014/01/ideas-plans-2014/
YoungHouseLove says
Ooh, kitchen plans are fun! And yes, we’d like the same flooring to run from the kitchen out into this hallway and half bathroom someday, so way later when we do the big kitchen reno we’ll most likely redo this area as well, just because there are currently three different floors that meet in the corner of the kitchen (slate, faux brick, and hardwood) and it just looks really weird. I’d love to do a heated floor or something cozy like that – but this will be around for a while. And I no longer scowl at the floor! Wahoo!
xo
s
Kelly {the Centsible Life} says
We did the same process to our kitchen floor about 6 months ago (you can see the results here: http://www.thecentsiblelife.com/2013/08/grout-makeover-with-grout-renew/) and it’s held up great! My kids drop messy food (like once someone spilled ketchup) on it and it wiped right off with minimal scrubbing.
I don’t plan to keep our kitchen floor forever (we’re planning to gut it-hopefully in the next year) but it’s a great solution even if you end up having to reapply in a year or so. I still have a nearly full bottle even after applying it to our entire kitchen.
YoungHouseLove says
I love hearing that it has held up so well for ya!
xo
s
April P says
Wow… what a huge difference! It looks amazing!
Somer says
So, the color on the bottle is pretty close to what shows on the grout? It looks awesome and I’ve been wanting to do this for a while to all three of our bathrooms!
YoungHouseLove says
I would say it looks a tad peachy on the bottle label (just a smidge, like a slight undertone) but there’s none of that in person, it’s just sort of a soft gray color.
xo
s
Kelly {the Centsible Life} says
I found the product to be a bit lighter than the color on the bottle so you might go a shade darker.
YoungHouseLove says
Great tip!
xo
s
Jess says
It looks awesome!! I thought the tile looked cool even w the dingy grout so it’s even cooler to me now! Hopefully this will make you want to keep it for the long haul.
Jen H says
Amazing results! This 7 month preggo lady wouldn’t have been able to walk after spending so many hours seated on the hard floor! Way to go Sher-dog!
Manda Wolf says
Looks great! I had a feeling doing something like painting was going to be the best option for that. I love the way the tile looks now!
My hubby and I have been fighting with wallpapering the ceiling since New Year’s. I think we are going to try it again this weekend. Hopefully with better luck!
Amanda K says
Oh, this is so exciting. I have waged a similar war on our bathroom floor tile with little success. I can’t wait to try this product. Thanks for the tip!
Robin @ our semi organic life says
How clean! Dirty grout always seems to me like something you don’t realize is so dirty until you clean it. And it makes a huge difference. I need to get on this at our house.
Renee Webber says
Fantastic! One of your best DIY improvements to date!
YoungHouseLove says
Thanks Renee!
xo
s
Megan @ Rappsody in Rooms says
Wow. That is an amazing transformation! I am so impressed by that product. It looks like a whole new floor! I’m so glad you saved that slate. I think it looks beautiful!
Lil says
Looks fantastic! I love your foyer.
Sassafras says
WONDERBAR!!!!!! wOOhoooooo, this looks marvelous!!!!! Congrats on finally finding something that works! I did a similar task once in our basement on an old rock wall that was formerly on the outside but then was on the inside when an addition was added. I finally just painted the concrete out white and sealed the whole wall, rocks and all. Looked S.O. much betta!!! Your foyer now looks super fantastic!!! I bet the old owners would be gobsmacked at the transformation the whole house has taken since ya’ll recent arrival!
Molly says
This looks amazing!! What a difference!
True commitment on your part too.
Question:Do you have to seal this like you do grout to protect it and prevent dirt from setting in it?
I can’t wait to try this in our entry way!
Thanks for sharing.
YoungHouseLove says
It’s an all in one product, so there’s no sealing that has to be done afterwards (it just says to let it dry for 24 hours, and not get it wet for 72).
xo
s
Lauren says
Wow, what a difference! it looks amazing. I love the contrast between the dark tile and the light grout – it makes it look so fresh and airy. Seems like a tedious process but like you said, well worth it.
Tyra says
Looks ah-mazing!! Does this mean the slate can stay? I remember you said you were not sure it was salvageable…. Or are there still
Bad areas we cant see?
YoungHouseLove says
There are a few bad spots (one sharp spot, one shattered spot, etc) so we’re still thinking that down the line we’d love the same flooring to run from the kitchen out into this hallway and half bathroom for a more seamless look without any step-ups or downs (there are currently three different floors that meet in the corner of the kitchen – slate, faux brick, and hardwood – and it just looks really weird). I’d love to do a heated floor or something cozy like that, but for now it’s definitely a lot more livable. I no longer look down and scowl, haha!
xo
s
heather says
I am picturing gorgeous warm wood floors throughout, though, let’s be honest Sherry – take a look at my house, we might be obsessed with wood floors.
YoungHouseLove says
Haha! Love me some wood floors…
xo
s
Jill says
My parents had a tile floor in just the hallway from the front door all the way to the back of the house. All the rooms that opened up off the hallway (kitchen, dining, fancy sitting room, and family room) had hardwood flooring that ran into the tile floor in the hallway.
The tile was never that pretty, so my mom recently when she was refinishing the hardwood everywhere, had them rip out the tile and just put down matching hardwood in the hallway too.
The point of this to say is that we have discovered that this, while looking perfectly nice, was a COMPLETE downgrade in function.
We really didn’t think it through, sadly, but it was really, really, really nice to have some flooring somewhere in your living spaces that is waterproof, and we are frequently a loss now that we don’t have that. It’s great for leaving muddy/wet things there when you first walk in the door — now we have no where to drop those things without ruining the floor.
When we are cooking, we used to drop spent kitchen towels that needed washing at the bottom of the stairs (to be taken up to the laundry room upstairs the next time someone went up), but now the damp towels can’t be left at the bottom anymore because the floor at the base of the stairs isn’t tile anymore. The system is ruined!
As kids, I did a number of messy, wet projects on the tile (on newspapers, but still) and left them there to dry — papier mache, water colors, etc. We carved our Halloween pumpkins and got the goopy innards everywhere sitting on the hallway tile. My mom used to spread out newspapers that had been rained on on the tile to dry out.
As pretty as it can be, I’d never recommend have hardwood in your entryway hall anymore. It’s just not as practical.
YoungHouseLove says
Smart tips Jill!
xo
s
Claire says
Talk about RESULTS! That’s amazing! I can’t even believe the transformation! And I would be super excited that *only* took 8 hours too! It looks like a brand new floor. Awesome.
beth says
I am THRILLED to see this. Seriously. We moved in a house 3 years ago with the same exact slate floor, dirty grout, despite the fact that the previous owner was a total cleaning fanatic. We have tried everything under the sun (like you did!) to get it clean, to no avail. Ours is sort of like wet concrete looking, but the grout color varies throughout the foyer, so it is obvious that it is dirty. I have left comments in your other posts on the floor, because I’ve been waiting anxiously to see what you guys would do with the floor. I’m definitely going to try this method. Seems like a good winter project. I am not looking forward to crawling around for hrs, but like you, I’ve done that in my attempts to clean the grout before, so eh, one more time won’t kill me. I wish this product didn’t have microban, but oh well. I hope it will be easy to maintain if we do end up doing it.
YoungHouseLove says
Wahoo! Good luck Beth! Happy floor-crawling!
xo
s
amy says
Holy Moly!! I really thought you guys were going to have to rip that tile out eventually, but this is a game changer.
Can’t wait to see how it holds up. Our kids bathroom needs it – bad. Have you cleaned it yet? Curious as to what you normally use to clean your tile?
YoungHouseLove says
We haven’t cleaned it yet, but I just use Mrs Meyers or Dr Bronners (watered down, on a damp cloth or fabric mop) so I think as long as you don’t use crazy abrasives it says it should last a long time (the reviews for it are amazing, I was really surprised).
xo
s
Kelly {the Centsible Life} says
When we cleaned ours post-Grout Renew I used our regular floor cleaner (a mild eco-friendly soap) our our steam mop-neither have caused any issues. I also occasionally use a spray bottle with vinegar/water or even Method spray cleaner to wipe up spills with no issues at all.
YoungHouseLove says
Great tips!
xo
s
Sayward says
Yes!!! I think we can all appreciate the long overdue relief of FINALLY finding a solution to something you’ve worked on so exhaustively. I’m literally fist pumping with you. And it looks gorgeous. $12 game changer!
Total sidenote: I just frosted my mom’s bathroom windows using the same film you guys used. I was extra meticulous and thorough, read your tutorials, read the box, etc., but none of my corners are crisp. I was so bummed. Did you guys get clean cut corners or are they kind of notch-ey and raggedy? Any insider tips? I feel like I HAVE to get one right now to redeem myself.
YoungHouseLove says
Oh no! Did you use a credit card to sort of jam them in there and try to get it smooth? That sounds strange- maybe there was some film around the edges of those windows that kept it from sticking? Like some residue from paint or cleaning product?
xo
s
Ashley Bee says
Wow! The tile looks so much less blue with this new grout color (in a GOOD way)! I actually never liked this tile until these pictures, but now it actually looks like a neutral. :) Hooray for cheap fixes!
YoungHouseLove says
Yes! In person it looks more “neutralized” too! I think the brown stains were so brown that they were giving the cooler gray tile a blue cast (and the old blue trim and wallpaper were probably contributing to that tint as well).
xo
s
Kaycee says
I did this to my shower, but used a different product. It was an uneven result, I need to go over it again, but it’s held up really well. I can’t believe you did this yourself, Sherry. Looks great!
YoungHouseLove says
Aw thanks Kaycee!
xo
s
Emma B. says
I LOVE this. It is so sad how my Type A, clean-freak side loves a clean grout post, but this makes a huge difference. I love the contrast of the grout to the tile.
Kate says
Wow!!! It looks fantastic!! So would you say the foyer is 100% done? I can’t imagine what else you guys have planned for it. The whole foyer looks amazing!
YoungHouseLove says
I’d say for now it’s about done, although I’d love an accent rug when you step inside I think…
xo
s
Selena Blake says
That looks amazeballs. Brighter and higher contrast, yes, but it goes with the new tuxedo look in the kitchen. I would have a hard time giving that floor up. Could you find the same tile and take it into the kitchen like your neighbor?
YoungHouseLove says
That’s definitely an option, if we could find something we love and make the height match up (that might be another issue, even if we find the same slate, we don’t want it to step up or anything).
xo
s
Kristen says
We used this on almost the exact same tile you all have over a year ago and it still looks the same as the day we applied it!
YoungHouseLove says
SO GLAD to hear that Kristen!
xo
s
CandiceMcC says
I’ve been wanting to try this! Our situation is super light tile with grungy grout so the color you used is actually what I’m wanting to go with as well. Add to that, I bought a little shadow box that I’m going to customize for my (hopefully) soon-to-be painted princess peg dolls for my daughter’s 3rd birthday. Doing my best not to turn into a creepy stalker. We are geographically separated if that makes you feel any better. :)
YoungHouseLove says
Aw, I love it Candice!
xo
s
Krista says
AMAZING! Makes me wish I had old dingy grout to re do! Sadly my house is tile free.
Molly says
I’ve been looking at this product for months and I’m thrilled it worked so well for you! It really looks amazing. We need to re-do the grout in our bathrooms and I just might try tackling that project this weekend!
Sara says
This looks AMAZING. Could you use it on shower tile? The grout in my shower is in dire need of a renewal.
YoungHouseLove says
I believe you can- just give it the recommended drying time and clean it well beforehand (I imagine soap residue and stuff could mess with how it holds).
xo
s
Sarah says
It does hold up well in the shower. My husband and I did this to our master shower over Labor Day weekend so it could dry while we were out of town. It went faster with me brushing it on and him wiping it off, although since our grout wasn’t that bad, I can now see that we missed a few places.
YoungHouseLove says
Great tips!
xo
s
Sara says
Awesome! Now I’ll just need to find a weekend where we don’t need to show for 72 hours…. :)
Lelia says
Oh wow, that’s such an improvement. It actually looks really nice!
Hannah H says
I waged that very slow battle with grout renew about a year ago in several parts of our house. It definitely has a learning curve to it (especially with thinner grout where it inevitably gets on the tile).
But – I can say that just about exactly one year later, it looks the same as when I first applied it. I still have the bottle as just-in-case, but I haven’t needed it yet (hopefully no jinxing action just happened there).
And also – aaaaah. That looks so much better.
YoungHouseLove says
I love hearing that! Wahoo!
xo
s
Leslie says
Great job! Especially for acting as a pregnant contortionist. We moved into a house with 1/2 inch white (well, stained and discolored) grout lines. So, I’ve used Grout Renew before. And I know how that knobby ankle pain works. The product is so great–especially when you just can’t get the grout any cleaner. I will say it only lasts a few years before it starts to get dingy and you have to do it again. It is also pretty difficult to apply in that you have to get it fairly perfect. The last room I refreshed, I used Grout Refresh (bought at Home Depot. Also, I am not selling either of these products). It is so much easier to apply and doesn’t look painted on. It seems to be holding up about as well as the Renew. Also, I will NEVER put white grout in a house if I can help it.
YoungHouseLove says
Great tip! Thanks Leslie!
xo
s
christy says
I used Grout Renew in one of our bathrooms that gets a ton of traffic from our six girls. It still looks great! It wasn’t a fun process (as you discovered) so I have yet to tackle the kitchen or other two bathrooms, but your pic has inspired me. It really does make a HUGE difference.
Jess says
The before and after photos are incredible. Love the high contrast and am so impressed with the end result. Looks so clean and crisp. Just beautiful!
Trinity says
I’m going to buy some TODAY! That looks so awesome! Great job :)
Karen Pasacreta says
Thank you for this post, because my bathroom tile is in dire need of this! I also LOVE that foyer mirror. Would you mind providing the source? I have this thing for round mirrors. And would love to find out more about that one!:) Thanks!
YoungHouseLove says
Thanks Karen! That was Joss & Main a while back!
xo
s
Sarah @ An Inviting Home says
Oh my gosh! We recently had a total mishap with our newly renovated bathroom where we accidentally turned our gray grout GREEN! There were literally tears shed as the new floor was my favorite part and now the grout was totally green. Someone tipped us off to a similar product to this and I got to work turning the green grout gray again. It worked like a charm and was WAY better than the thought of re-doing the entire floor because of the mistake. Your floors look great…like night & day!
~Sarah
YoungHouseLove says
So glad!
xo
s
Christina says
Great post from a fellow slate foyer owner. I attacked our grout with the help of my poor mother and a solution that warned could burn your skin off. Didnt really work, so this will be a must try.
Another issue I’ve been battling with our slate, is that is seems to have an old waxy coating on many tiles. As if a wax/shiny coating was once on and has worn off in some areas more than others. So no matter how clean, it looks dirty. People have said to reseal it? But I prefer the matte slate look rather than a sheen. Have you encountered this? Or know of a way to fix it?
YoungHouseLove says
Oh man, we haven’t encountered this. Anyone have tips for Christina?
xo
s
Gabs says
I used this product about 7 or 8 years ago and it started to look dirty in a few places. I also had build up of a previous sealer that I decided to remove while I was refreshing the floor. The sealer remover hardly marred the previously painted grout. I put a new coat of sealer down (your choice either matte or glossy) before I touched up the grout. It makes it easier to tidy up the slate when you go “out of the lines.” I did add a second layer of sealer after I touched up the grout just to be sure that the slate was sealed.
I have a cat who tends to have a sensitive stomach and sometimes vomits up food or hairballs. I wanted to be sure that this would not penetrate through to the slate or grout. Yes, it is time consuming, but the results are definitely worth it.
When I did this originally, I didn’t like any of the three choices I had so I mixed all three together and got a great result. I did save the left overs from several years ago. It was still in usable condition and made being able to touch it up very easy. It was mainly in the high traffic areas that I did the retouching.
candice says
It looks awesome! We have light tile and light grout (who are the idiots that did that…us) in our kitchen, hall, and downstairs bath. I HATE it. It looks horrible. I’ve scrubbed at it for hours, with all the stuff you’ve tried -plus soft scrub and it hardly makes a difference. I was ready to call for a steamer and then reseal the grout hoping that it would last. But $12!!! Awesome. Is there a need to seal the grout after applying this magic (genie)in a bottle?
YoungHouseLove says
It doesn’t call for it on the bottle, but someone used it and then seals it occasionally and said she has good results so it can’t hurt!
xo
s
Kristen H says
Does this need to be sealed afterwards, or is the sealer built in? My grout is awful – and runs through my entry, half bath, closet, laundry, kitchen and dining area.
YoungHouseLove says
It doesn’t say it needs to on the bottle, although others who have used it said they did a sealer occasionally afterwards and it has held up awesomely, so I’m tempted to give that a try!
xo
s
s leigh says
wow! that looks incredible!
Nancy W says
Yes! I have a bottle of this stuff sitting in my kitchen right now waiting for me to take the time to apply it. Our light beige tile and dirty looking dark grout make the floor look like a giant checkerboard. I can’t wait to lighten that grout and brighten the whole room. Maybe I’ll tackle that this weekend…
Adrienne says
I think I have the same light beige/off white tile with dirty looking grout! I picked up a bottle in the snow white color yesterday and am planning on doing it this weekend too. Fingers crossed for us both! :)