It’s about to get exciting…
But first, I have to start off this post with a brief side story. I love Jones Soda, partially because there are random little fortunes under the cap. I got this one the other day:

Tasks where skill is essential (sounds like a bathroom remodel to me) may be accomplished. MAY? Only may?!? That’s not a very confidence-inspiring fortune. Good thing we seem to be doing more than “maybe” accomplishing our latest bathroom projects.
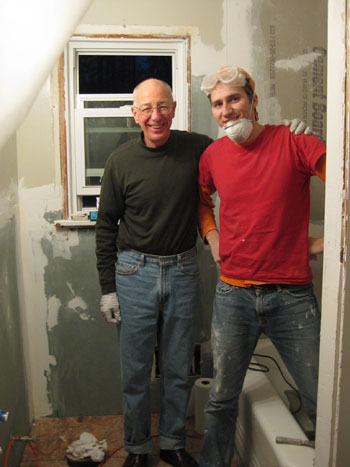
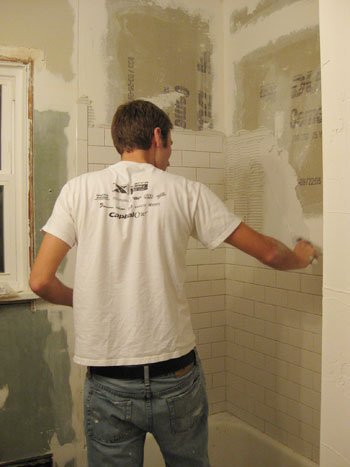
Take tiling for instance. Even though Sherry gave you a peek at the tile job last week, I’m back for the official tiling post as promised. You may recall from Chapter Three of our bathroom redo project that my dad and I spent a four day weekend-on-steroids putting up drywall and cement backerboard in preparation for re-tiling our shower surround and our floor. Thanks to a few “challenges” during the weekend, I barely got to start tiling the shower by the time my dad left that Monday evening. In fact, I was in the midst of it when this goodbye photo was snapped.
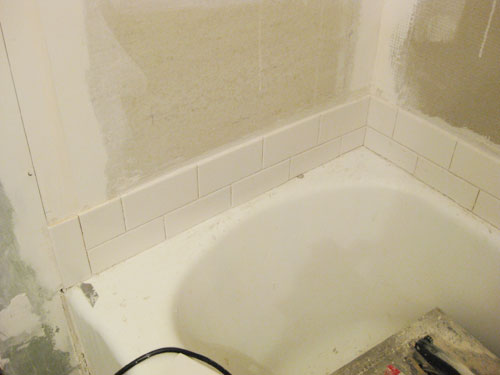
I worked for another couple of hours after he left, but by the end of the day I had only managed to tile a mere two rows. Sigh. Yes, it looked like another part of this project that wouldn’t be as fast or as easy as I had hoped. But why?
Well, our tub wasn’t level. So my original plan of using the edge of the tub as my guide went out the window (once we admitted to ourselves that having slightly unlevel lines would look “off” enough to bug us – and realized that we’d risk the tiles not lining up correctly at the corners). And while I’ve seen some people recommend finding the center point of your wall and starting there, with such small tiles it was more important to us that we didn’t end up with a sliver of tiles running along the edge of the tub or the ceiling (we wanted tiles to look as full as possible in those places for a more planned and balanced look). So I spent most of that first evening using a wet saw to shave off varying slivers of ceramic from the bottom side of each subway tile that sat against the tub to create one level line that I could build off of from then on. It was a good three or four hours of tedious trial and error-ish fun, but I got ‘er done.
I’m not being sarcastic when I say “fun” though. It was just the kind of home improvement project I love – it involved more mental concentration than physical strength (after all, I’ve already had my fill of that for this renovation) and it resulted in a big change that I could immediately appreciate. Plus I got to try out some new tools and learn some new skills. But since it was my first time tiling, I’ll give you the brief play-by-play about how I did, rather than an official “how-to” since there are definitely varying methods (all of which would work depending on your preferences) and because this was my first tiling fling. For true expert tutorials, I suggest checking out some of the sites that I referred quite a bit during my stint as Mr. Tile (I included the links at the bottom of this post for ya).
But on to the nitty gritty tiling details. First, let’s look at my weapons of choice:
- Wet saw (borrowed from my dad)
- Tile cutter (purchased halfsies with my dad)
- A couple of big buckets of thinset mortar adhesive
- Margin trowel (again, borrowed)
- Notched trowel (ditto)
- 1/16th” spacers (for the floor, the subway tile conveniently had built-in spacers that achieved a 1/16th” space naturally)
- Tape measure (already owned)
- Level (already owned)
- Pencil and sharpie to mark cuts on tile (since pencil didn’t show up on dark marble)
- Paper towels and a bucket of water (to help manage the mess)

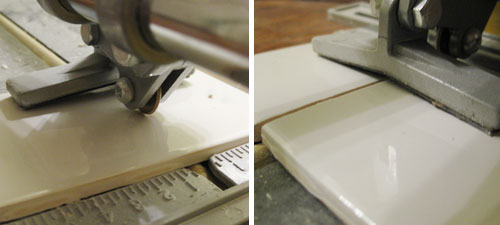
The wet saw and tile cutter were my tag-team tools for trimming tiles to the perfect sizes. The wet saw is like a circular table saw with a thick masonry bit, but the blade runs through a tray of water to keep it from overheating, wearing down too quickly or spraying too much dust (it does, however, create a pleasant “mud” that needs to be cleaned up every so often). The wet saw was great for making small cuts (like when I needed to trim just a little bit of tile) and non-straight cuts (like notching semi-circles to go around pipes – though I did have to break out my dad’s hole saw drill bit once to go through the middle of one tile). You can make straight cuts with it – it even comes with an adjustable guide – but I found I couldn’t be as precise with it as I’d like. And as much fun as I had using it, it was a bit on the messy side. I kept it in the bathtub while working on the shower (it was conveniently at my feet) and in a heavily drop-clothed area in the hallway when working on the floor. Had it not been the middle of winter, I probably would’ve worked outside.
The tile cutter, on the other hand, was mess free – and pretty simple to use. It’s only for straight cuts (like when I had to cut half tiles to create the staggered, running brick pattern in the shower). Once I marked where to cut my line using a pencil, I lined up the tile against the flat guide surface then ran the tiny scoring wheel a few times across the surface of the tile. I always waited for the nails-on-chalkboard style scraping noise to know I was doing it right. Then with just a little bit of pressure, the angled pad helped me snap the tile cleanly. The only bummer was that this tool wasn’t powerful enough to cut our thick marble floor tiles, so I had to rely solely on the wet saw when it came to the floor (but at least by that point I was more of an expert with it since I did the tub/shower surround first to “warm up”).
Cutting was the slow, tedious and mathy part of the whole process. Setting the tiles was pretty speedy and painless by comparison – the only challenge was using the right amount (and a consistent amount) of thinset mortar to make sure there was enough to hold the tile, but not too much so that tiles would lay unevenly or cause excess thinset to squish out between the grout lines (spoiler alert: I wasn’t so hot at this).
So after slapping on a hunk of thinset to the wall and spreading it around a bit using the back of the margin trowel, I switched over to the notched trowel. This trickly little fella has two straight edges and two notched edges. First, I used the straight edge to even my thinset (by running it across the wall at a 45 degree angle with enough pressure to leave a thin-ish coat on the wall). Then I’d go back over the area with the notched edge (again at a 45 degree angle and a bit more pressure this time) to leave long grooves in the thinset. Then I was ready to press the tile into place using enough pressure to set it firmly into the thinset so that it laid evenly with its neighbors (which you can conveniently check with a level).
I picked up a tip along the way about how to tell if you’re using enough thinset by prying up a tile right after setting it and making sure the entire tile has thinset on the back of it. If it doesn’t you need to use more. Though this is where I made my life harder. I probably overcompensated and used too much in some places, which created a lot of extra thinset squeezing up between my tile grout lines. Not a huge deal… if you’re diligent about cleaning it all out before it dries (I suggest a combo of your finger, a paper towel or even an old toothbrush). I learned my lesson the hard way and spent a good chunk of a Saturday knocking dried thinset out of the cracks with a razor blade (which is a lot harder than removing it when it’s wet). Gotta leave room for that grout after all, right?

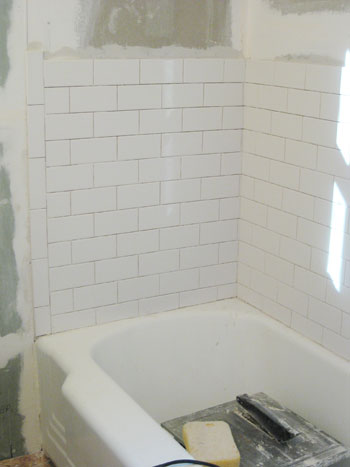
After that first evening of tediously tiling the bottom row, things moved pretty quickly since most of the tiles were whole (except for the edges and corners). I was able to accomplish the rest of it in two 5-hour sessions after work on Tuesday and Wednesday of that week. Victory was mine! In fact, we would’ve had the whole thing grouted that next weekend had it not been for two errors on my part: the aforementioned messy grout line cleaning that had to be factored in at the end, and a simple label-misreading that caused me to ruin a batch of grout by mixing in twice as much water as it required. More on that later in the week, but just know that the snowstorm that hit that same weekend prevented us from driving out to get more so we were on tiling “pause” for a bit. Not to be deterred, we turned our attention to the walls.

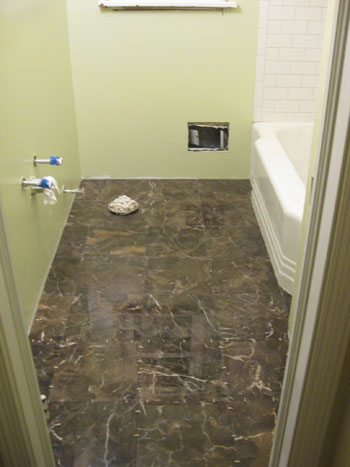
We primed them with a special Valspar drywall primer and landed on Benjamin Moore’s Dune Grass as our subtle muddy greeny-taupe hue of choice. We actually didn’t use Benjamim Moore paint though, we just brought a BM swatch to Lowe’s and had it color matched to their no-VOC Olympic Premium semi-gloss bathroom paint (the base is no-VOC but we did learn that adding color to it makes it low-VOC, which was still extremely mild and low odor). We figured it was actually a nice plan to get as much painting out of the way before laying our marble floor so we didn’t have to worry about paint drippage quite as much. Hooray for happy accidents that cause grouting & floor tiling to be put on hold and painting to commence! It all worked out pretty nicely (and painting feels like 1st grade arithmetic compared to the advanced algebra-ish challenges of tiling).
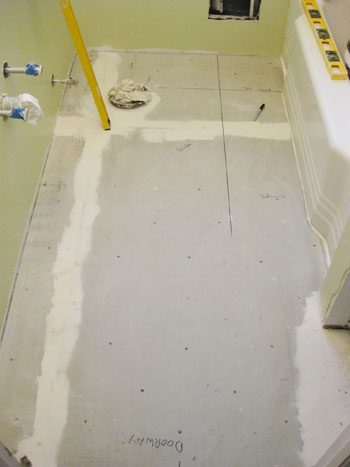
But then it was back to the floors. I first finished the prep job my dad and I had started by installing the cement backerboard (that he kindly cut and set aside before he left the previous weekend) over the plywood subfloor (tip: we used extra long screws to ensure that they went all the way through the backerboard, through the 3/4″ plywood underneath, and deep into the diagonal subfloor for a super strong and uncompromising hold). Once the four puzzle pieces were securely set and generously screwed into place we used mesh tape and mud to fill the seams and any remaining gaps. After giving that a day to dry, we sanded off the extra and did a thorough sweeping so the backerboard was 100% free of any dust or cement crumbs that could spell disaster for our tile.
As eager as I was to break out my wet-sawing skills again, we first had to plan our placement strategy to ensure that the layout looked good and that it was the smartest plan when it came to tile cutting (we wanted as many full tiles as possible in the most visibly spots and since we had to work around the curved tub and linen closet entrance we didn’t want to end up with awkward slivers). Again, some recommend finding the center of the room and working out from there, but with such a small room we thought our criteria (having large tiles where the floor was most visible and avoiding dreaded tile slivers in corners) was more important in our case. So we did a dry run of a few arrangements with our actual 12″ x 12″ tiles (including spacers!) and settled on a layout that called for pretty simple cuts and allowed us to lay full tiles nearly the entire length of the bathroom. Here’s a shot of the guidelines that I drew to start everything off:
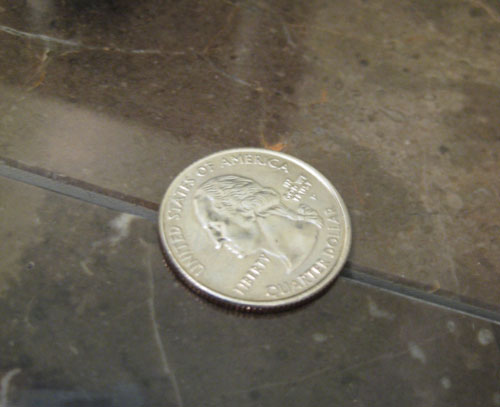
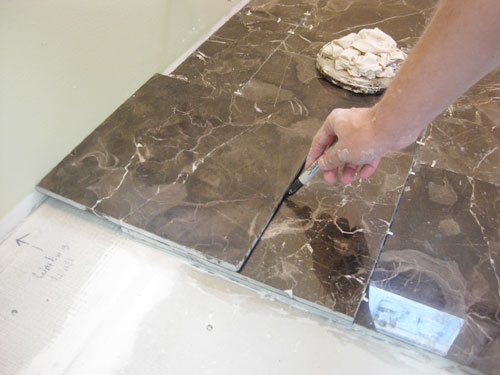
I won’t bore you by repeating the process of laying the floor tiles, since it was largely the same as laying the wall tiles. The only added challenge was that, as hard as we tried, our floor still had a teeny bit of a slope to it. So we opted to “back butter” our tiles to help compensate for this (we also heard that with marble many experts recommend this technique to keep things extremely firm and wiggle-proof for less cracking and long-tern wear and tear). This meant spreading a thin layer of mortar on the back of the tile in addition to the floor (using the same notched trowel technique) so that we could be more precise about making sure each tile was set level to its surrounding tile friends. And while we relied on a level as our main guide for levelness (is that a word?) we broke out a little quarter trick recommend by a friend to double-check ourselves. We gently ran a quarter across two neighboring tiles to see if it went smoothly or if it caught on one (meaning one was set too high).
The other trick someone taught us, which came in handy big time with the floor, was an easy way to measure any cuts that you needed to make against a wall. Once you’ve set the closest full tile, place the next tile that you want to use carefully on top of it (I found the rubber spacers helpful in creating a small buffer between my tiles so nothing got scratched). Then take a third, spare tile and place it on top of the stack, but this time slide it gently until it touches the wall. Just like that I’d exposed the portion of the middle tile that would be needed to fill the empty space. Then I simply used my Sharpie to mark a cut line on the middle tile and headed off to the wet saw for a little trim. Lo and behold, this worked like a charm every time.
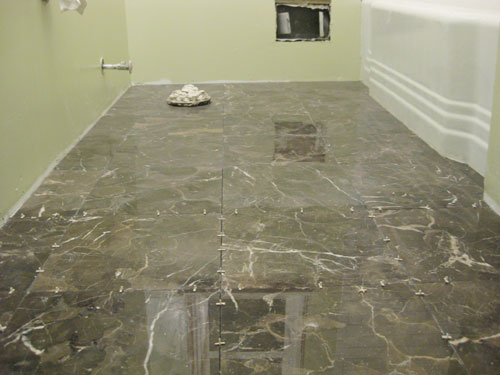
Tiling the floor, since more than half of the 37 tiles required wet-sawing, took me most of Christmas Eve (as much as I could do before we had to hop into the car to spill the beans about our baby girl bean to the fam) and another few hours of the evening when we returned home on the 27th. So all in all it was a lot of work, but dang it felt good to be a gangster to be done with all that tiling. Though I was sort of gonna miss the wet saw. We had some good times together.
Laying the floor isn’t the end of this tiling adventure though, since we still have the grouting and sealing process to share. But once again, that’s enough for now. I’ll post later in the week about the rest of our holiday bathroom adventures so stick around (is that a Thinset pun? it wasn’t intentional).
As I mentioned above, we referenced quite a few experts for our first foray into tiling. We found that instructions can vary and are rarely exact to your specific situation, so be sure to keep in mind what will work best for you and your home. Here are some links that we used that will hopefully come in handy for you guys as well: All Bower Power, AskTheBuilder, eHow, Home Depot, and Lowe’s.
Psst- Wanna read about the first few chapters of the big bathroom makeover? Check out Chapter One, Chapter Two, Chapter Three and a little teaser post that we recently shared.

Robynne says
Nice work! That is one sexy tile job!
(BTW, I totally LOVE Office Space…lol)
Pamela says
How did you cut the curve around the bathtub with the tile saw? It works like a table saw right? I my mind I just can’t picture how you cut curves with it (one of my biggest fears in DIYing our bathroom ourselves.
YoungHouseLove says
Hey Pamela,
Fortunately the tub’s curves aren’t actually that curvaceous – they’re more like straight lines that are just rounded slightly on the corners. So I was able to use the wet saw (which does work like a table saw) to cut straight edges that matched the tub’s angles pretty closely. It’s not 100% exact at the rounded part, but once we put a caulk seal down it will hide the tiny imperfections.
But I did have to cut curves around the toilet flange in the floor. Again, it didn’t have to be exact because the cut side of the tile was going to be hidden under the flange (and eventually the toilet itself). Since I found the wet saw allowed me to cut at just about any angle, I made a bunch of little cuts at slightly different angles that created the effect of a mostly round side. Plus the wet saw is great a shaving off little bits which allowed me to sort of buff the edges to be more rounded. The only issue I found was that the marble, unlike the ceramic subway tile, was more prone to chipping and breaking – so I tried to keep the “buffing” to a minimum when I could.
Hope that makes sense and helps calm some of your fears a bit.
-John
Jessica @ How SWeet says
I LOVE the tile!!
LizzieBeth says
It looks great so far John!! I am really interested to see the shower curtian. I feel like they are the throw pillows of a bathroom- brings the whole look together!
katie says
SA-weet tiling job there friends! I am so proud of you…now that you have officially tiled, basically the only thing left for you to learn is to how to move to GA :)
XO -kb
Sandra says
Great job with the bathroom renovation and the tile tips. It is so important to make sure the layout is planned early in the process for the flooring so you don’t end up with small tile slices at the borders. Again, great post on the bathroom remodeling process.
Chelsea says
You guys have so much patience! I dont know if that is a job I am willing to DIY.
Janis from Scotland says
Firstly – Happy New Year. The bathroom is starting to really shape up and the tiling is looking really, really good – I especially love the flooring. Can’t wait to see the finished product.
I so admire your guts and tenacity in doing this work – I would just have begged family/friends/saved up for someone to do it for us!!
Lesley H says
Wow, what an incredible amount of work but well worth the amazing results. Your tiling looks awesome John and you’ll rest easier for years to come knowing it’s all straight! Thanks for sharing the gory details (and the bum shot, ha ha!).
Betty in Munich says
Wow! That is an awesome job on the tiling. Not being a DIY person at all, can only say what they say here in Germany, “RESPEKT!”…Usually said with a slight bow…I think no translation is necessary…
Jenny @ Words On Wendhurst says
Our basement bathroom currently looks like yours did a few weeks ago – a blank slate, ready for the re-do. We’re only tiling the floor, and I am excited about it and not looking forward to it at the same time.
Your walls and floor look great, and I appreciate all of the great info and advice!
Chelsea says
It’s looking wonderful! I can’t wait to see it with the grout – which always really finishes tiles off and makes it look complete. Awesome job!
Amy says
Hey! The bathroom is looking awesome! One question: what did yall do to prep the walls for painting (other than prime)? I know there was alot of patching and sheetrock work and I cannot imagine the walls being smooth and ready to paint- I am wondering because wall work (patching, texture, etc etc is a big problem for us). I can see in the pics that yall mudded where pieces of sheetrock were joined- but how did you achieve a seamless, smooth, “finished”, paint-ready wall?
thanks :)
YoungHouseLove says
Hey Amy,
You’re right, we did do a few rounds of mudding and sanding to get the greenboard/drywall ready for paint. I’ll admit it’s not as perfect as I’d like, but I’m pretty satisfied for my first time every doing it. We mudded and taped where the drywall joined, as well as over the exposed drywall screws. Plus we had to install a metal corner piece on the outer edge of the linen closet to create a crisp edge. Some places were easy (like some screws only took one coat of mud) whereas others I had to do 3 or 4 times (corners, mostly).
I’m not an expert yet, but a couple of lessons learned were: (1) opt for larger spackling/putty knives, even if you’re filling small areas. It really helped the edges feather out more smoothly than when I was using a tiny putty knife. (2) We sprung for a special corner tool to help get the corner smooth. It was a huge help. (3) Sand. Sand. Sand. It won’t fix everything, but when in doubt, sand it a bit more. The places where I said “that looks good enough” don’t look as great as the parts where I said “I’ll sand it once more just to be safe.”
Here’s another good article, from an actual expert, about tips for getting a clean, smooth finish: http://www.askthebuilder.com/B387_Ten_Secret_Drywall_Finishing_Tips.shtml
Good luck!
-John
Sarah says
That floor tile is simply beautiful!!
Eric says
Looks incredible – I’ve got a big Guest Bath Demo/Re-mo job scheduled for later this summer (after our spring kitchen redo).
One thing I’ve heard from lots of my contractor friends in Europe is that the tiniest bit of unevenness is OK, is shows that the job was done by hand, and not by a machine. And people really value things that are done by hand, as you know.
Trista says
I’m so glad my dad is an “almost” tiling expert, because I don’t think I have the patience to ever do something like this.
Love the Jones Soda Reference. Green Apple is my favorite
robyn ross says
Getting a grout bag will save you some mess when you’re at that step. We did one floor without it, which caused me to go to Lowe’s and ask someone if they had “some sort of nozzle bag that I could squeeze grout through, you know, like something a baker would use to put icing letters on a cake?”
And they looked at me like, “Yes, lady, that product actually exists and is right behind you.”
YoungHouseLove says
Eric – I LOVE that European sentiment. It goes well with my thought that imperfections are just part of the charm of an old house’s charm.
Trista – we’re downing Jones Soda’s special holiday flavor Pomegranate Cream like it’s our job. Love it. Love it more because it was half off at Kroger thanks to the holidays being over.
Robyn – Hilarious quote from the Lowe’s guy. We hadn’t heard of a grout bag, but sounds smart. You’ll see later in the week how we worked it the old school way.
-John
Janet says
We’re gearing up for a kitchen/bath reno and needless to say I’ve been following your reports very closely!
I was wondering how many of your “overage” tiles did you end up having to use, if any at all? Did you estimate enough/too much/too little?
YoungHouseLove says
Hey Janet,
Good question! We actually broke a few tiles as we learned, but the best thing about tile is that you can usually use the broken ones in another place (for example, if you chip a corner off you can use the other half of the tile on a border somewhere so all isn’t lost). As a whole we probably used abut 5% more tiles than the room’s square footage due to breakage or other unforeseen issues, and we opted to keep about ten extra floor tiles and twenty extra wall tiles on hand in case something crazy happens down the line and we need perfectly matching tiles to fill anything in (say a pipe bursts and we have to tear up part of the shower or the floor). Experts recommend buying around 10-15% more tiles than you think you’ll need just to be safe and we think that’s about right (especially if you plan to save some for emergencies down the line). Happily we still got to return some surplus floor and shower tile and get some money back, which is always nice after all that work. Hope it helps!
xo,
s
Chrissy says
Really nice work John. I have been curious, however, as to why you guys are keeping your tub? I would have thought you would put in a shower stall or the newer oval tubs rather than the older square-style, which is usually a little small for adults to take a bath. I also find that those type of tubs are harder to keep clean for some reason (we also have stain-prone water here though; Richmond may not have that issue.)
YoungHouseLove says
Hey Chrissy,
We actually get this question quite often. We love our original tub and will be having it professionally reglazed which will give it a shiny like-new look that lasts at least a decade or more. We’re always big fans of working with what we have, and since we couldn’t save our vintage tile we were determined to save our original tub, which is nice and spacious- and made from durable cast iron. We knew it would be a bear to remove and replace it and we actually think it’ll look sparkly new and perfect once it’s refinished (which is also a lot more budget conscious than ripping out the old one- plus we’re saving a perfectly good tub from a landfill). Hope it helps!
xo,
s
Jenny @ DIY Newlyweds says
Bathroom is looking great! We recently did a little tiling of our own for the first time and I was excited that it was fun and simple (in our case) to do.
I love Jones Soda as well, but mainly because of their awesome photo labels.
Steph says
Great job, John. Seems like a tremendous amount of planning and work.
On a totally unrelated note, please write a post encouraging your readers to vote for you on Apartment Therapy’s Homies home design awards (voting ends tomorrow and the race is tight). And good luck!
YoungHouseLove says
Hey Steph,
That’s on the agenda for this afternoon! Thanks for the reminder and stay tuned (for anyone who would like to preemptively vote, here’s the link: http://homies.apartmenttherapy.com/2009/category/home-design )
xo,
s (& j)
Nicole says
Guys – I’m really concerned about the paint color. In the pictures you’ve posted the color feels really sharp and lime-y as opposed to zen-like and grassy.
Especially with the contrast against the brown marble tile, I’m not getting the harmonious vibe that we see in the rest of your house color choices.
I know that you have had to re-think paint choices in the past – like your once lime green living room. I think we’ll need to see the whole bathroom put together for any final decisions to be made, but my bet is that you’ll end up repainting.
YoungHouseLove says
Hey Nicole,
To each his own, right? We definitely believe that decorating and especially paint color choice is subjective and we personally are IN LOVE with the bathroom color. In fact on more than one occasion we’ve wished we “saved it” for a bigger room like the nursery. And our bedroom (Gentle Tide by Glidden) was always far and away our favorite paint color in the house but now the bathroom is actually giving it a run for its money! In short: we have never loved a paint choice more in the last two years. It’s totally possible that it’s not coming across accurately in pics (we’ll adjust the color in the final after pics) and it’s also possible that your computer monitor is showing you something different than ours is (all monitors vary in the color department) but we can assure you that the color is super subtle and taupey with a dash of soft green. There’s nothing lime-y about it and it totally fits in with the soft blues and tans of the house (it’s sort of like greeny-tan sea glass that works perfectly with our gray-blue rooms and all the other neutrals that abound). Oh and now that we have the trim, baseboards and toilet in the room (crisp clean white) it looks even more amazing. We can’t wait to share how it’s all coming together!
xo,
s
Autumn says
That looks intense! But I’m really excited to show your work and pictures to my parents, who are thinking of renovating two bathrooms in their house. Hopefully this will let them see that it can be done DIY style, or at least partial DIY style–they were getting outRAGeous quotes for each bathroom. Looking forward to the final product!
Amanda says
Aahhh so many memories. Those subway tiles are great, but small tiles take forever! I did most of my shower myself (including a glass block window which is basically 3-d tile- yikes) and it took a lot longer than I’d planned. A LOT. I ended up taking a day off work and just feverishly finishing because I wanted to take a shower so bad.
You have me a little worried though- I didn’t know to check behind the tiles to make sure you had enough mortar- I just kinda slapped on a bunch till I thought looked good and went with it. I guess I’ll find out in a couple years if it wasn’t enough! At least I saved some extra tiles in case any decide to pop off.
I really love the floor and how well it goes with your wood floors. Looking great guys!
Amy says
It looks so great so far! My husband and I are gearing up for our bathroom reno (which we are hopefully starting by the end of this week). We were having a hard time deciding on a floor tile, so I told him to pick it out, and he chose the exact same dark brown marble! I guess I married a man with good taste :) And great budgeting skills…the tile is now on sale for $1.48/sq ft!. Makes a total of $45 of tile for our bathroom floor….score! It’s great to read these tutorials. This will be our first tiling project as well, but we are planning to tile another 800 sq ft of the house come spring, so I’m sure we will be experts by the end. Can’t wait to see the full bathroom reveal!
Danielle@Newlyweds Paradise says
Great choices in tile might I add!
Erin DesRoches says
I stumbled upon your blog and all I can say is what a fantastic bathroom. The layout is almost just like ours and I was worried a dark tile would be too much but it just looks fantastic! I’ll be following you
jbhat says
Such great tips! The layering of tiles to get the cut right! The quarter! We could have used those years ago, in our old bathroom. Alas.
It’s looking SO GOOD in there! OMG.
jbhat
candace says
I can just imagine that these How To posts are lengthy and time consuming for you two. But they are so valuable for someone like me – so thank you for taking the time to do that for us! I want to tile my bathroom and am petrified by the whole idea…but, this post makes me leave feeling at least encouraged!
Caitlin @ That House on The Corner says
Great job once again! I cannot wait to see the final results! I’m ITCHING to remodel one of our two bathrooms –likely downstairs first during Winter break so our roomie wont have to borrow our master bathroom– but it just akes me want it more seeing your bathroom! I totally ADORE the floor tiles and had seen similar ones at Lowes that I want for our master reno(which currently has ALL industrial grade carpet–ew.), but as I said, that project might have to wait… I’m curious though where you found them after Amy mentioned that great price $1.48sq/ft :-)
Great colors by the way too! Orginally from the moodboard I thought it was gray, brown, blue, and white (the EXACT colors I want), but I love the green and can’t wait to see the end result!
YoungHouseLove says
Hey Caitlin,
You can learn more details about the discounted marble floor tiles we scored right here: https://www.younghouselove.com/tackling-the-bathroom-chapter-one-2/
But in short, they were from Lowe’s and they were $2.50 a tile down from over $10 a square foot. Amy also got a heckova deal. Wahoo!
xo,
s
Jessie (Vegan-minded) says
Love the marble floor tiles! Your bathroom is really coming together nicely. I have been doing some painting projects around the house and I am using Olympic’s low VOC paint too. It’s pretty great stuff, and no icky paint fumes to deal with. I can’t wait to see the finished product!
Katie (Re:fresh Design Studio) says
Wow, looks great John! I can’t wait to see the finished product! Props to you for all the hard work you are putting into this. It’s going to feel so great to have the new bathroom all finished for when baby arrives!!
Melissa says
Just wanted to share a wet-saw tip I observed during our recent kitchen remodel: Put the wet-saw into a large heavy-duty garbage bag! The bag kept all the mess contained, even on the newly-finished hardwood. Hope it helps some future DIY tilers!
vanessa says
Looks great! We had the same problem with our tub not being level. It looks just like yours except the concrete blocks were laid around it so there was no way it was going to be leveled or coming out without major ripping out and rebuilding of walls. We used a wet saw on all of our cuts and some of the glazing chipped on the tiles. Was that the case with the hand cutter or did you get an extra clean cut? Did you sand the edges of the tiles before putting them in?
YoungHouseLove says
Hey Vanessa,
We didn’t need to sand our tiles because we got pretty clean cuts from our wet saw and even cleaner ones from the tile cutter. We have heard that some cheaper tiles can chip more easily in the glazing department when using a wet saw (we were surprised that our super affordable subway tiles didn’t- they were very sturdy and chip-free) so a manual tile cutter might be the answer for you! Hope it helps.
xo,
s
Kevin M says
What did you guys think of the Olympic low VOC paint? I used it this past weekend for the 2nd time and was a little disappointed with the coverage. Granted I was using a dark color, but I had to do 2 coats everywhere and there are still some spots to touch up.
YoungHouseLove says
Hey Kevin,
We loved it! We’re usually Glidden, Behr and Valspar people (we’re not used to high-end Benjamin Moore-ish coverage) so to us it was extremely competitive in the coverage department with other paints in that price range. Of course we have plaster walls so we’re used to applying at least two coats of paint everywhere so that’s a given and we’re usually working with light colors so we can see how darker tones might be a bit more tricky. Hope it helps!
xo,
s
Ursula G says
Woohoo! It’s starting to come together and is looking fantastic so far! You’ll never notice that the tile is a little shorter to the bottom, it’ll become an optical illusion that would be hard to point out. Can’t wait to see it all finished!
Val says
I have almost the same bathroom–must have been the 1950s standard model in Virginia! These posts have been invaluable, even though I am only planning a regrouting. I can’t wait to see the tub reglazing.
Jennifer F says
Did you paint the ceiling? Wondering if that would give it a smaller or larger look?
I’m so impressed with you guys! My hubby and I looked at a fixer-upper last night with a contractor. Here’s hoping that my other half doesn’t freak out – cause I am ready to get it started.
YoungHouseLove says
Hey Jennifer F,
Why yes we did paint the ceiling the same soft greeny-tan color. It actually makes the room feel bigger and more seamless (it blurs the boundaries of where the wall meets the ceiling so it feels open and sort of ambiguously airy). We actually love the look of painting the ceiling the same tone as the wall as long as it’s a light-ish color that won’t close in the space. Hope it helps!
xo,
s
Meredith says
Looks awesome!!! You guys have been working hard!!!!
Pamela says
Question about paint brands: Did you opt out of BM just because it is expensive? We have plaster walls and BM Aura really does cover in one coat (unless you’re using red–that took 2 coats plus primer). It is also low VOC and even the matte finish (which hides wall imperfections) is scrubbable. Also, it dries in 2 hours. Admittedly, it costs $60 a gallon (comparable to $30 if you consider only having to do one coat instead of two), but the advantages are worth it!
YoungHouseLove says
Hey Pamela,
We’ve actually been meaning to try out BM’s Aura line, but we heard for a bathroom that it can have some water issues (someone mentioned that their experience was that it peeled due to moisture in a full bath) and because we also wanted to try out Olympics new no-VOC line (which has semi-gloss paint made specifically made for bathrooms and is just $24 a gallon) we went for it. So far it’s been great with water (we had a little incident with h20 shooting all over the bathroom after we painted and it held up beautifully). More details to come…
xo,
s
Sherrie says
Nice subway tile. We have a similar bathroom that started out as just a tub (it’s now a shower, also) and with white tiles halfway up the wall. Our white tile is in great shape, so we left it. But our bathroom was actually carpeted–thick carpet no less–so we laid the peel and stick tiles. We also replaced the vintage toilet with a higher efficiency Jacuzzi model.
FullertonRegan says
SO PRETTY!!! Way to go guys! This looks simply spectacular.
caitlin says
i havent read this yet… i just wanted to say that i am so excited to go home and read it!! how nerdy :)
Amy says
Looking good! Cant wait to see the final product!
Denise says
Great job, John. Your tile work looks professional. Love the new wall color, too.
Lauren says
Wow! The bathroom is really coming together! Thanks for all the tips….I plan to use them when the hubby and I tackle our first tiling project soon!
Erica says
Reading all about your tiling adventure reminded me of my recent tiling adventure! I had some of the same problems you had when I tiled my kitchen- I have a slightly uneven floor too, and I had to “back butter” my tiles to make them even as well. Wish I had known about the quarter trick when I did my tiling! My next tiling project will probably be the bathroom as well. The floor and wall tiles all need replaced badly. Would you say the floor or wall tiles were more difficult?
Also, about reglazing your tub- will this be something you will undertake on your own, or will you pay someone else to do it? My tub is definitely looking old and worn out, and reglazing might be one way to make it look much nicer! I can’t wait to read about reglazing your tub.
Abby says
Hi, your bathroom is looking fantastic! I have a question about your walls. Did you texture them and if so how did you do it? I have done some texture (after tearing off tons of floral wallpaper) and am not in love with the outcome. I used joint compound and a paint roller. I don’t like thick texture but I think the technique I used didn’t create enough. Any advice on texturing walls?
YoungHouseLove says
Abby- We actually didn’t texturize the walls, we mudded and sanded them to keep them nice and smooth. We have untextured walls throughout the house so we’re all about keeping things consistent. We actually don’t have wall texturizing tips to share but perhaps you can google around for tips and ask someone for help at the home improvement store? Good luck!
Erica- Tiling the shower surround was more difficult just because it was three different planes as opposed to one on the floor so there were more border cuts. The tiles were also a lot smaller around the shower so it took longer to get them up. Hope it helps! Oh and as for the tub, we’re definitely leaving it up to a pro. We have heard nightmare stories about DIY reglazing gone wrong so we don’t mind hiring an expert for something that will last us for the long haul.
xo,
s
Dana says
Once again, I am completely exhausted just reading your “Tackling the Bathroom” post. Whew. Thanks for all the detailed tricks! We want to tackle our kitchen backsplash this year and I think we can use some of your tiling tips.